Hello, Workshop attendees!
We're delighted you're joining us. Below is our recommended gear list. Please read and consider, as some things are vital to having a great workshop experience.
Gear List & Recommendations
Choosing the right tools for night photography can be overwhelming. If you already have a preferred kit that serves you well, then most likely you can just skim the below info. If you are not a seasoned night photographer, you will find the below resource helpful in identifying essential gear for a successful workshop. Again, always feel free to reach out to either of your workshop's instructors for guidance and personal advice. This is a general guideline.

Digital Camera
Most modern full-frame DSLRs and mirrorless cameras from the last 2 to 3 years are well-equipped to handle the longer exposures (6 to 8 minutes) as well as the higher ISOs (3200 and beyond) that night photography demands.
We do not recommend point-and-shoot cameras, no matter how advanced they might be, as they typically can’t get beyond 30-second exposures without losing significant image quality. APS-C and Micro Four Thirds cameras will struggle at ISO 6400 and beyond. This might require that you have a faster lens or stack your images in post to get better image quality.
Suggested Cameras
Canon: R6, 5D Mark IV, 6D Mark II
Olympus: OM-D E-M1 Mark III
Pentax: K-1 Mark II

If you do not have one of these cameras, please reach out to the workshop lead and go over your gear to make sure it will be appropriate for the workshop.
Whatever camera you have, bring extra batteries!
Suggested Online Rental Agencies
If you do not own an appropriate camera, consider renting one. But if you do rent, we advise getting the gear a couple of days before the workshop begins so you can get accustomed to it before trying to operate it in the dark.
Lenses
We recommend using your widest and fastest lenses. A wide lens is usually best for shooting at night, as it will allow you to include more sky in your compositions. Using a lens with an aperture of f/2.8 or wider will not only increase viewfinder brightness, but will also allow you to rely less on the higher ISOs of 6400-plus.
Focusing at night is often done manually, so your autofocus lenses must have a manual focus setting. Also make sure your lens has distance markings on the barrel—these markings allow you to use hyperfocal and zone focusing at night.
Fixed focal length lenses can be lighter, sharper and less susceptible to lens flare. Zoom lenses offer more flexibility by allowing you to work all night without changing lenses, which can help keep your camera’s sensor dust-free in dirty conditions.
Whatever lenses you bring, don’t forget you lens hood. The moon and light painting can cause lens flare.
If you were to only bring one lens, our recommendation for full-frame cameras is either the Nikon 14-24 f/2.8 zoom for Nikon cameras or the Tamron 15-30mm f/2.8 for other camera brands. A second lens could be a 24-70mm f/2.8 suitable for your camera. If you are using an APS-C camera, the Tokina ATX-i 11-20mm f/2.8 CF lens is an excellent choice. It’s rare to use telephoto lenses at night.

Suggested Lenses
Other favorite lenses we recommend:
Canon: 16-35mm f/2.8L III, 24-70mm f/2.8L II, RF 15-35mm f/2.8L IS, RF 24-70mm f/2.8L IS
Irix: 15mm f/2.4
Nikon: 14-24mm f/2.8, Z 14-24mm f/2.8
Sigma: 14mm f/1.8, 14-24mm f/2.8, 24mm f/1.4
Sony: 12-24mm f/2.8, 16-35mm f/2.8, 20mm f/1.8
Tamron: 15-30mm f/2.8
Tokina (for APS-C): atx-i 11-20mm f/2.8 CF
Venus Optics: 9mm f/2.8, 12mm f/ 2.8, 15mm f/2.0
Zeiss Batis (Sony E): 18mm f/ 2.8, 25mm f/2.0
We are not fans of the Rokinon, Bower and Samyang manual focus lenses, as we find they are softer than other lenses, which is critical when photographing stars.
If you do not own an appropriate lens, consider renting one (see above for the rental companies we recommend). But if you do rent, we advise getting the lens a couple of days before the workshop begins so you can get accustomed to it before trying to operate it in the dark.
Tripod

Everything you ever wanted to know about tripods can be found in our 70-plus-page e-book Three Legs to Stand On: A Guide to Tripods. Below is a brief summary of what you should consider for tripods.
For night photographers, a good, sturdy tripod is just as important as what camera you choose. So investing in quality is a must. When choosing a tripod, consider several factors:
How much does the tripod weigh?
How much weight it can support?
What is the maximum/minimum height?
A good aluminum tripod will typically cost between $150 and $300, including a head. They weigh 5 to 7 pounds and can extend up to 57 inches. We want to look at maximum height without extending your center column, as that is the most stable stance. Aluminum tripods are 2 to 3 pounds heavier and at least $200 to $300 less expensive than carbon fiber (you tend to pay $100 per pound you save!). Aluminum also gets much colder than carbon fiber at night.
Carbon fiber tripods weight 2 to 4 pounds. If you’re doing a lot of walking around in the dark, that can make a big difference. They also don’t get as cold to hold when the ambient temperature drops.
Manfrotto, Induro, Feisol and Robus all have a good selection of aluminum and carbon fiber tripods. Gitzo and Really Right Stuff (RRS) are on the higher end and will last a lifetime.
Pan-tilt heads are very precise, but can be more cumbersome and take longer to set then ball heads. We love the quality and lightweight Acratech and RRS ball heads.
Gabe, Lance and Matt uses a Gitzo Traveler Series 2 tripod. Tim and Chris use a Gitzo Series 3 tripod and a ball head.
Whatever you choose, make sure both the legs and head are rated to hold the weight of your camera and lens. For the utmost security and stability, the tripod/head combination should be capable of supporting double the weight that you customarily put on it.
Also, if you have two cameras, consider bringing two tripods. This will allow you to do one setup for a long exposure and simultaneously do a second setup somewhere else.
Remote shutter release
There are two categories here you'll want to choose from: a standard cable release or an intervalometer.
A cable release is simply an open/close button, perhaps with a few other features thrown in. You’ll likely need a digital stopwatch or phone to accurately time your exposures.
An intervalometer, on the other hand, offers more functionality that can make it easier to set up scenes for light painting, star stacking, etc.
Nikon and Canon make shutter releases and intervalometers that are excellent, but also pricey. There are also third-party remotes made by Vello and others that offer these same features for a significantly cheaper price and work just as well. The Vello Shutterboss II is one intervalometer that we’ve liked for a while.
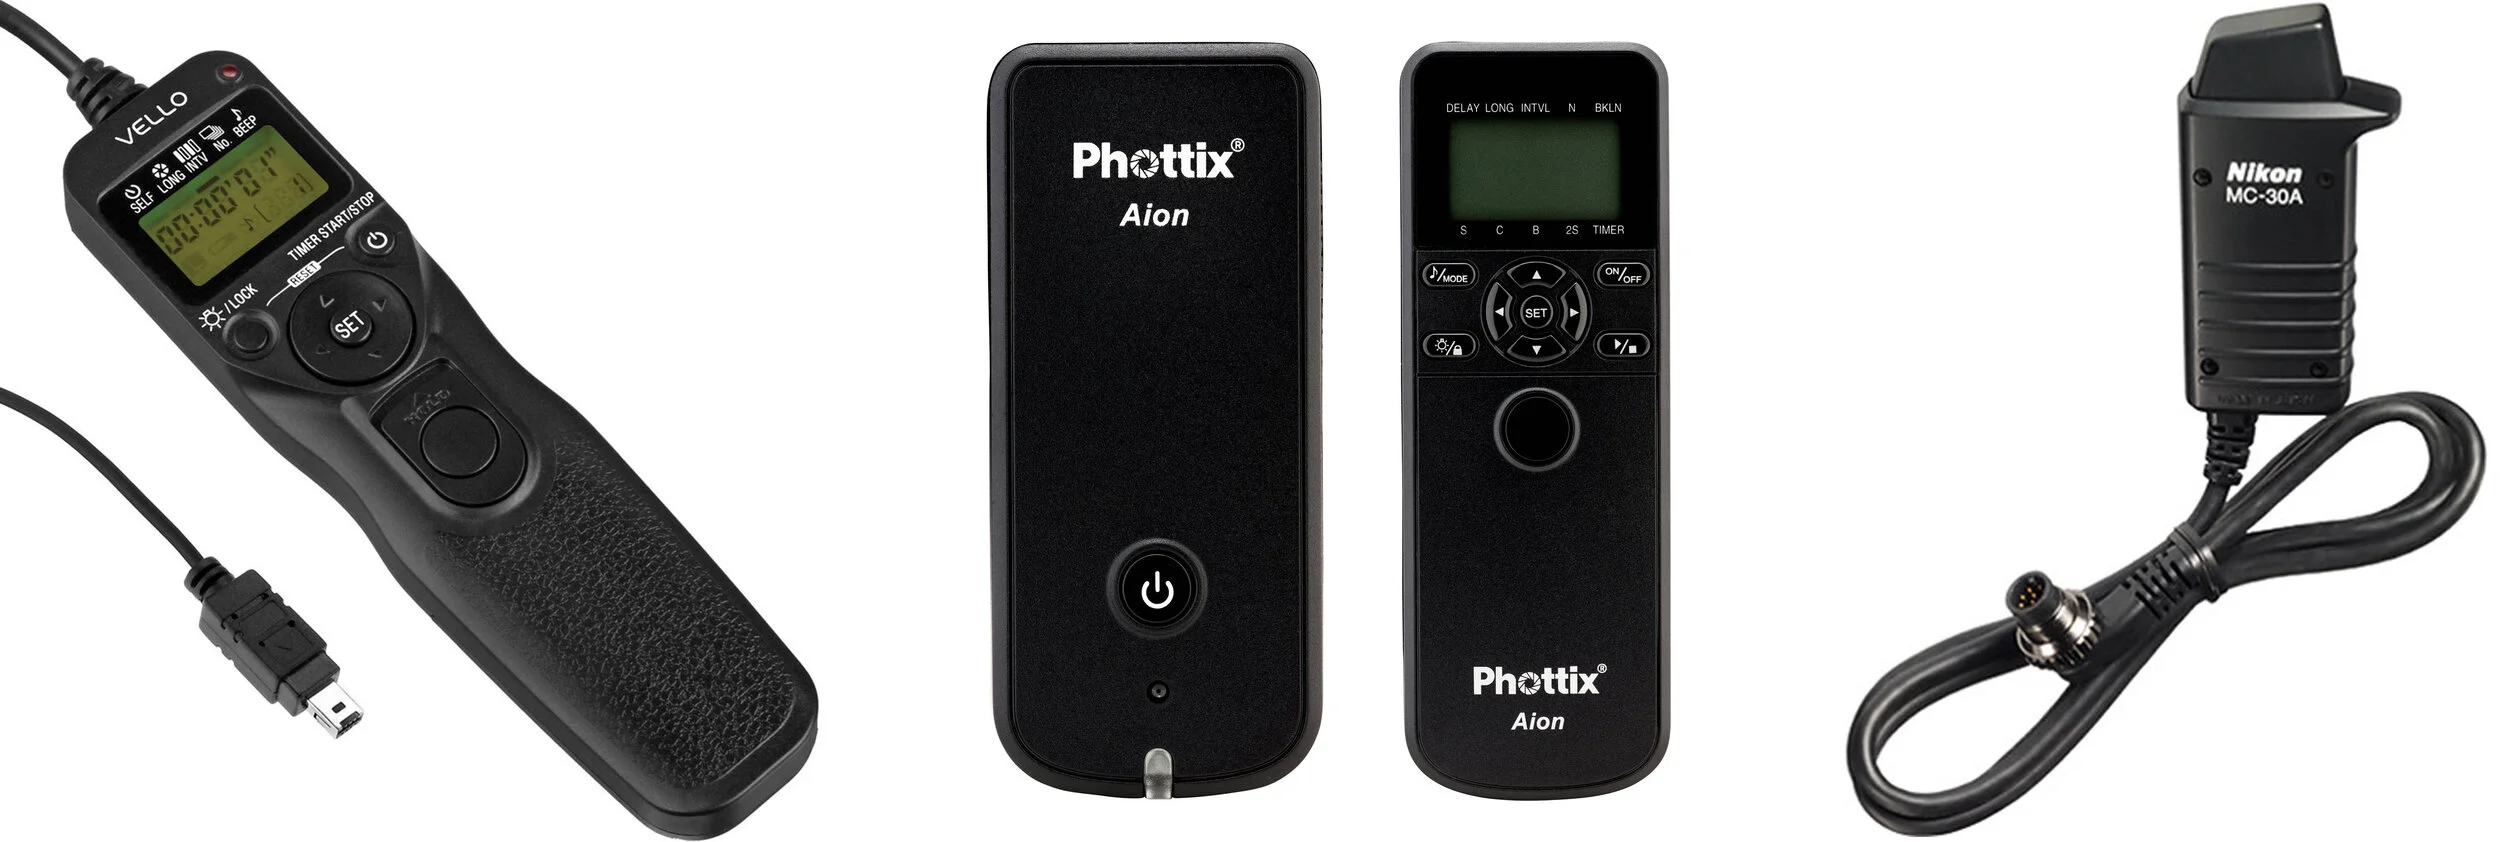
For a wireless intervalometer we like the Phottix Aion, which is a universal remote that comes with cables for Canon, Nikon and Sony. There are pros and cons to using a wireless remote, so check out our blog post “Wireless or wired intervalometers for camera triggering?” Also see our post on the Aion, as we like it enough to recommend it despite some of the drawbacks to the wireless approach.
Another exciting option in this category is a smartphone- or tablet-controlled wireless release app—some of these apps can actually display your image on-screen. We have not tested these as of yet, but we can give you one word of warning: They will wear down your phone battery faster, so be prepared to deal with that shortcoming.
If your remote release requires a battery, make sure to bring a spare. This is a critical piece of gear with night photography, so we often bring two remote release shutters just in case anything happens.
If you’re using a wired release, you don’t want it dangling from the camera, as that can increase wear on the connector, and it can also cause camera shake if the wind is blowing. To mitigate these issues, we highly recommend the Ruggard RTC Case that wraps around your tripod leg and keeps your wired remote release secure. An alternative DIY solution is include attaching a Velcro wire tie to your tripod leg.
LIGHT PAINTING & Writing EQUIPMENT
Besides the typical light sources we are recommending below, think of anything that emits light and bring it! The workshop will be full of chances to experiment with different types of light sources.
Flashlights
The two most important considerations when purchasing a flashlight are the lumens (brightness) and what type of bulb it uses (i.e., the color of the light). We’re big fans of incandescent flashlights that have a yellow/warm light to them that complements deep blue night skies in a very pleasing way.
But we’re mostly using white LED lights, because that’s mostly what’s available these days. You just have to watch out for ones that cast a bluish tint. For more on this, see our blog post “Leveling up with Light Painting: Getting the Right Color out of Your Flashlight.”
One of our favorite flashlights is the Coast HP7R. It can be powered by a rechargeable lithium-ion battery (included) or four AA batteries, so you’ll never be without light. It has a very even and focusable beam that aids nicely for even light painting. It is a white LED light, so bring a couple of CTO gels to warm things up from time to time. (Again, see the blog post mentioned above.)
We recommend bringing two to three (or more!) flashlights of various lumens so that you can have a nice overlap of brightness and intensity that you can choose from to paint the scene.
Here is a breakdown:
Very low power: The Coast G9 is a small, low-powered light that we like to modify with a layer or two of tissue paper under the bezel. This light is useful for light painting foregrounds at high ISOs, and for navigating in dark environments while preserving your night-adapted vision. This is a better alternative to a red light in group situations.
Low power: The Coast HP5R is a small, focusable rechargeable light. Its 185 lumens are good for low-power work near your camera or when walking through the scene. You may also want to consider the Coast PX20 multicolor 155-lumen flashlight.
Medium power: The Coast HP7R is our medium flashlight of choice that packs a 300-lumen punch. Our favorite aspects are the smooth zoom focusing, even beam and included rechargeable battery. It also can illuminate up 1,154 feet away! Accessory gel filter set here.
High power: The Coast HP18R is large, but powerful. Its 3,650 lumens and will aid focusing in almost any situation, with an effective range of almost 1,100 feet.
Incandescent: If you wanna go old-school, look for incandescent flashlights such as AA- and C-cell Maglites. They tend to be 25 to 80 lumens with an effective range of 2 to 30 feet. This can be your main, general-purpose flashlight for light painting in Tungsten white balance scenarios.
Workshop attendee special discount: If you order a flashlight from coastportland.com, use our discount the code “NPAN35CP” to get 35 percent off of the entire order.
Note: Avoid the million-plus-candlepower lights found in box stores. They are typically too bright for most applications and can be very bulky and heavy to carry around all night.
Gels: Use CTO gels over your flashes or flashlights to get specific about accurate color, as mentioned in the blog post referenced above and in our Flashlight Filtration Guide e-book. If you want to cover bigger flashes or lights, we recommend the larger Rosco CTO gels.
Be advised that there’s a difference between gels that affect color temperature and those that change color itself. CTO gels warm the color temperature of the entire spectrum of light coming from your flash and LED flashlights, while colored gels eliminate all the light except for one color. The former are more subtle, in a good way. We generally do not use the latter unless for a very specific, strong, almost over-the-top effect.
LED Panels
It’s a more expensive option than many flashlights, but we’re more and more loving the advantages of light painting with an LED panel. Our favorites are the Luxli Viola and the Luxli Fiddle, which allow for precise control over the intensity of the light, as well as the color temperature and, if desired, the hue.

In addition to the critical color control afforded by the Luxlis, the low-power option allows for the technique of Low-level Landscape Lighting, which is when the light is barely perceptible to the naked eye but is bright enough to illuminate your subject over the course of a long exposure.
One additional accessory that we might suggest with your Luxli is a light stand or tripod. This will allow precise positioning of your LED light. The Manfrotto Nano light stand is the most compact one on the market and the Nanopole gives you the additional feature of being able to remove the column and use it as a 6-foot boom arm. The caveat is that using light stands is not allowed in national parks unless you have a Special Use Permit. So bring a light stand only if we won’t be in a national park.
Strobe flash
Flash is useful for portraits at night or any time you need to freeze motion. Make sure it has a manual trigger and adjustable power settings. Don’t forget extra batteries.
Light writing
You can also write with light, and we encourage you to bring anything you might like to experiment with in that regard. If you want to get some good tools for this genre of night photography, take a look at our blog post “A Guide to Light Writing Tools.”
Computer
We will be doing some post-production work during the day, and you will probably want to be doing some editing at night or in the morning, so you should definitely bring along your laptop and the image editor of your choice (we use Lightroom Classic and Photoshop). And don't forget your power cord!
miscellaneous Handy Items
A small piece of gaffer tape: to hold stuff down. You never know what might happen. We know someone whose remote release broke, so he used gaffer tape and a small rock to trip his shutter. (Tenacity wins!) Wrap some gaffer tape around one of the legs of your tripod about 10-15 times and you will always have it with you (minus the bulk of the tape roll).
Lens tissues or a soft cloth: because lenses can get dirty in a hurry outside.
A hot-shoe bubble level: to make sure you have your camera horizon perfectly level. Plenty are available at B&H. Some tripods/heads/cameras have built-in levels.
