Night Photography Blog — National Parks at Night

Gabriel Biderman

Out of and Into the Dark: Wrapping Up Nightscaper 2023

What happens when 200 night-minded people converge in Kanab, Utah, for the Nightscaper Photo Conference

Well, stellar things of course! And just like when we prepare for an epic night of photographing under the stars, unexpected happenings occurred that provided even more opportunities for us to “seize the night” with old friends and new.

Gratitude

Before we recap the 4 days and nights of Nightscaper 2023, we want to thank the 22 speakers who provided so much inspiration and education on a variety of topics, from deep space tools and techniques to more down-to-earth topics such as planning successful night shoots, tracking and processing panos, sculpting light, saving our stars, and the business side to kickstarting your night photography career. 

Another thank you to our 20 sponsors that provided over 35 prizes and incredible hands-on opportunities to try out the latest products to help us reach for the stars:

Shawn from Canon printed attendees’ amazing night photographs.

  • Canon ImagePrograf was probably the busiest vendor, as Shawn was constantly printing free 18x24-inch prints on our new favorite paper, the Red River Polar Gloss Metallic, which made everyone’s stars really shine.

  • Peter from Shimoda showed the brand new Action X V2 bag for the first time in public, and everyone was eager to figure out which size fit their night kit the best.

  • Brenda from Calibrite offered free display calibrations.

  • Fotopro and Novoflex showcased a veritable forest of tripods for people to try.

  • Michael from Benro co-presented an engaging discussion about noise, including the influence of AI in cleaning up night images.

  • Erik from KelbyOne shared his epic rocket photography images and gave us even better insight about the best apps for predicting clear dark skies.

  • Clarence from Spencer’s Camera offered a course on how to get the most from astro-modified cameras.

  • David from Action Photo Tours walked attendees through a practical approach to creating time-lapses.

  • Bay Photo Lab came up huge by creating the most unique aluminum badge for all in-person attendees, while Patrick showcased a variety of surfaces for us to print our best night photos on.

  • Our friends at B&H Photo, Max and Michael, showcased the latest night-centric gear and of course offered those amazing B&H deals.

4 Days of Conferring

The 4-day conference schedule (May 18-21) included two tracks and over 30 classes for nightscapers to choose from. Determining which class to sit in on was a challenge at times, but knowing that all the sessions were being recorded for streaming replays allowed us not to suffer too much from the fear of missing out.

Beyond the education, the common through-line during the event was community. People from all over the world converged to “collab in Kanab” (thanks to Max for that turn of phrase!)—whether that was in between sessions, over the many meals we shared, or during the multiple night shoots that were organized by speakers and attendees. The weather was mostly cooperative for people to meet up and photograph the many sites around Kanab and the Grand Staircase-Escalante region.

Dan Zafra teaching tracked Milky Way panoramas.

One of the highlights of opening day was when we broke the fourth wall between the speakers and audience and offered a “Tales of the Night” session, where in-person attendees could share an image on the big screen, then stand up and take the mic to reveal the vision behind their photo. The variety of work shown sparked conversations as we found even more common bonds with our newfound family. 

Another highlight was the Star Party we co-hosted with Amazing Earthfest and the International Dark-Sky Association (IDA) on the second night. Everyone enjoyed sharing the 10 telescopes locked in on key features in the sky, set up along a section of abandoned highway in the desert. Bettymaya Foote from IDA and Rich Csenge from Amazing Earthfest took us through twilight with demonstrations on what we can all do to limit light pollution in our hometowns and backyards. Starlink was “kind enough” to schedule their latest launch of satellites during the star party, which created many oohs and ahhs.

Gazing at the stars with Nightscaper Photo Conference, Amazing Earthfest and the International Dark-Sky Association.

However, we couldn’t have planned for one of the most unique night experiences ever. On the third night of the conference, the local power company scheduled a planned outage from midnight to morning so they could work on upgrades to the grid of several local counties. This included Kane County and Kanab, which most likely inconvenienced the 5,000 locals. But for the 200 Nightscapers in town, it was a golden opportunity to capture the Milky Way rising over Main Street. 

This ended up being my favorite night, as I wandered the streets safely greeting Nightscapers and seeing what they were creating under such rare conditions. It made us dream of what a true IDA dark sky city would look like.

Milky Way and Main Street, Kanab 2023. Nikon Z 6II with a Nikon Z 24-70mm f/2.8 lens. 6 seconds, f/3.2, ISO 12800.

As it turned out, the updates to the grid still needed some fixing. The next morning, after about seven slides into my talk titled “Inspirations Beyond the Milky Way,” the power went out again. In the darkness with only a battery-powered spotlight shining on me and no images on the screen, I pivoted and told some of my own tales of the night. I tried to paint a picture of my favorite photos and adventures under the stars—stories that are of course similar to what many nightscapers have experienced. In the darkness of the room, I no longer felt like we were in a conference center, and I imagined what humans have been doing for many a millennia: telling stories under the stars. I could feel energy and love from our nocturnal family.

Night photography can be a solo sport, but at Nightscaper we discovered that we were not alone in the universe. We are united by a common passion and we have so much to learn from each other. We are still very young at exploring the night, but we are going to seize each and every moment.

Speaker Jess Santos working with an attendee in a portfolio review.

’Til Next Time

Whether or not you attended the Nightscaper Photo Conference, we are all connected. There is a comfort knowing we are not the only ones who have a passion for staying up to all hours of the night. We invite you to join the conversation either in the comments below or by tagging #nightscaperconference socially when you share your images and stories. 

If you are interested in watching any of the replays from Nightscaper, you can still purchase a ticket here. The replays should be ready in about a week, and they’ll be available for streaming for 1 year after the conference ended.

We are already making plans for the next Nightscaper Photo Conference family reunion. Stay tuned to this blog for more!

Gabriel Biderman is a partner and workshop leader with National Parks at Night. He is a Brooklyn-based fine art and travel photographer, and author of Night Photography: From Snapshots to Great Shots (Peachpit, 2014). During the daytime hours you'll often find Gabe at one of many photo events around the world working for B&H Photo’s road marketing team. See his portfolio and workshop lineup at www.ruinism.com.

UPCOMING WORKSHOPS FROM NATIONAL PARKS AT NIGHT

PhotoPills, National Parks at Night Partner for Two Masterclasses

As most of you know, we love the PhotoPills app. It is packed with tons of useful information for photographers. We use it to plan locations from home, scout the stars during the day, figure out exposures, calculate hyperfocal distances, visualize star trails and much, much more.

Earlier this year Chris Nicholson wrote a great article on “The Many Ways That PhotoPills Helps A Night Photographer,” which zeroes in on several key features that are essential to his workflow. Tim Cooper always says that PhotoPills is the best $10 investment he’s ever made in photography, and the rest of us definitely agree.

Yet PhotoPills is much more than an app. The team behind it also offers a lot of education to support their mantra of “Imagine. Plan. Shoot.” Why? Because their goal is to help people become better photographers.

National Parks at Night embraces that same philosophy, and we have partnered with PhotoPills often to collaborate. In 2018 we invited Rafael Pons, also known as The Bard of PhotoPills, to speak at our very first conference, the New York Night Photography Summit, and he also spoke at our Night Photo Summit online conference in 2021 and 2022. We’ve even run four PhotoPills Bootcamp workshops, with a fifth coming next year. 

This past May, Chris and I were instructors at PhotoPills Camp, a much-sought-after international gathering of PhotoPillers hosted on the Mediterranean island of Menorca, Spain. It was an amazing experience, and we finally met the entire PhotoPills family on their home turf!

Shortly thereafter, Rafael invited Chris and I to present as part of their Masterclass series on YouTube. Both of those masterclasses were livestreamed in the past two weeks.

I spoke about star trails and Chris taught about how to photograph lighthouses at night. We are very passionate about these subjects and have been honing classes about them for years. But given the chance to speak on the PhotoPills Masterclass platform, we knew we had to share every bit of information we knew, and then some. So we hit the books, pushed the stars and lighthouses beyond anything we had tested before, and voila!

Both classes are now posted on the PhotoPills YouTube channel for you to watch at your leisure.

It was a great thrill to see so many friends and workshop alums among the livestream visitors (thank you!), and we’ve been enjoying reading the positive comments in the chat.

Please leave any questions you might have in the comments for each video. Chris and I will be monitoring them for the next few weeks and want to make sure you are ready to Seize the Star Trails and Lighthouses in the near future.

What other night topics are you interested in learning more about? Drop them in our comments below and #staytunedformore.

Gabriel Biderman is a partner and workshop leader with National Parks at Night. He is a Brooklyn-based fine art and travel photographer, and author of Night Photography: From Snapshots to Great Shots (Peachpit, 2014). During the daytime hours you'll often find Gabe at one of many photo events around the world working for B&H Photo’s road marketing team. See his portfolio and workshop lineup at www.ruinism.com.

UPCOMING WORKSHOPS FROM NATIONAL PARKS AT NIGHT

How to Access and Photograph Abandoned Places

Do you have a fascination with abandoned places?

I do.

In fact, I coined a word for this 30-year obsession: “ruinism.” It means the beauty of decay, and it can apply to person, place or thing. It has been an overarching theme that I have tried to incorporate into my photography, both day and night.

Part of this has been exploring abandoned places—buildings, lots, junkyards—that have fallen by the wayside of the human race’s march across the landscape.

I’ve learned a thing or two over the years about getting into and out of these industrial skeletons, and I have been handcuffed only once due to trespassing. For this Halloween special, allow me to share the allure of abandoned places, how to do your research and get permission, and tips on how to best photograph and share your images with the world.

Sloss Furnaces, Alabama. Nikon D750 and Irix 15mm f/2.4 lens. Multiple stacked frames shot at 15 seconds, f/2.8, ISO 100.

Why Ruinism?

In this age of social sharing, the world has become much smaller than it was 10 to 20 years ago. There are very few whispers of secret abandoned places. Some locations have lasted for thousands of years while others are barely standing, helped by the vines and ivy that have replaced the walls.

My favorite class in school was ancient history, so when I had an opportunity to live in Greece for 6 months in the 1990s, it was a dream come true. In fact, that is where the term ruinism was born. I was visiting all the ancient cities: Rome, Delphi, Thebes, Mycenae, Troy, Constantinople. The modern world had grown around and incorporated the remnants of some of these age-old civilizations, while others had been completely forgotten by time.

When I walked through the streets of Pompeii, I imagined what it had looked like before Vesuvius erupted in A.D. 79—partly out of intellectual curiosity, and partly for creative purposes. When photographing these abandoned locations, I always try to tap into the history and capture the spirit. Long exposures, ghosts and light painting are wonderful tools to aid in this storytelling.

Getting Access

Besides the legal “pay for access” places, let me share a few examples of how to get in. The overriding theme is:

  • Do your research.

  • Understand the history and importance of this place.

  • Share your respect and passion for memorializing the location before it disappears.

  • Find the organization or person that owns/maintains it.

  • Never steal any artifacts—take only pictures!

Example 1: The Abandoned Village of Kayaköy, Turkey

While staying in the beautiful port city of Fethiye, I was told of the history and modern ruins of Kayaköy. I spent the day wandering around a town where the people had been forced to leave their homes, churches and shops due to protocols written up by the Treaty of Lausanne in 1923.

On the day I was there, no one else was present except for some sheep herders and their flock. The sheep wandered into roofless homes at will. Time had taken back this town. It felt like I had finally experienced ruinism to the highest degree.

Gateway to Kayaköy. Pentax K1000 with TriX film. Exposure unrecorded.

Church of Kayaköy. Pentax K1000 with TriX film. Exposure unrecorded.

The key to accessing Kayaköy: The village was in a remote area but open to all who were interested and had the money and a means to get there. If you were to visit today, there is an entrance fee of $1, and restoration limits some access to the church and many of the buildings.

Example 2: The Abandoned Apartment

Abandoned places can be huge like Kayaköy or they can be the apartment next door.

I was living in Pátras, Greece, in 1995 when this mystery revealed itself. A 5.1 earthquake in 1993 had seriously damaged the town and the neighbors just up and left. There were plenty of cracks in the walls for us to peep in and most doors weren’t locked in this small community. So I entered with my friend and we used long exposures on film to give voice to the ghosts that remained.

Abandoned Apartment, Pátras. Pentax K1000. Pentax K1000 with TriX film. Exposure unrecorded.

The key to accessing the abandoned apartment: We reached out to the neighbors to learn more, and we ended up being responsible for looking after the place and putting a lock on it. When something like this happens, be smart, safe and respectful. Anything we moved, we put back in place. Like most abandoned buildings, there is a time limit to its existence, unless it is deemed of historic importance.

Example 3: The Abandoned Casino

A real dream-come-true location is the Constanța Casino in Romania. Built in 1910 aside the crashing waves of the Black Sea in the art nouveau style, the casino closed its doors to the world in 1990. However, the symbol of this ancient grandeur was adopted by the city and they struggled for many years to find a way to preserve this masterpiece.

Constanța Casino. Nikon Z 6 with a Nikon 24-120 f/4 lens. 1/500, f/11, ISO 200.

Constanța Casino. Nikon Z 6 and Nikon 14-24mm f/2.8 lens. 1/30, f/10, ISO 400

The key to accessing the Constanța Casino: Fortunately I have a friend in Romania who loves ruins and history as much as I. We led an Opulence and Decay workshop with National Parks at Night and Atlas Obscura in 2019, which included access to this location. My contact worked very closely with the town that was restoring the casino. We had to prove our love for preserving this building and of course pay a fee that went to helping stabilize it for future generations. It was an amazing experience and epic workshop. (If you want us to revive this workshop, let us know in the comments!)

Winging It

I understand that access can be the biggest of all hurdles. Sometimes you just stumble upon an abandoned farmhouse in the middle of nowhere. There aren’t any “No Trespassing” signs or neighbours for miles away. What do you do?

If you enter this property, you will be seen as a trespasser by the law. So it’s best to think of this as the “initial scout” and take pictures safely from a legal and respectful distance.

Then, find any neighbors who may be nearby, or go into town and show these pictures and ask who might own the property. If you are seen as a photographer and documenter first, instead of urban explorer or vandal, good things will happen.

Silver City, California. Nikon D700 with a Zeiss Milvus 21mm f/2.8 ZF.2 lens, lit with a Coast flashlight. 4 minutes, f/5.6, ISO 400.

For example: I was on a road trip with Troy Paiva and Joe Reifer and we used Google Maps to identify what looked like an old, abandoned mine. We drove there only to find a gate and a “No Trespassing” sign. We debated what to do.

During that 5 to 10 minutes, a weathered Jeep with a Willie Nelson character came flying down the road with a barking dog not far behind. He asked us “what the hell” we were doing at the entrance to his property. We explained that we were photographers with a fascination for the past. Troy had a copy of his book and showed it to the man, and that was the key. Having a website, prints or a book that can show your passion for abandoned places can often help break down those barriers.

The end result was that within 5 minutes we were all best friends with Irish (which turned out to be his name), getting a private tour of his silver mine followed by 2 nights of access.

I understand there is a certain excitement in exploring the unknown that is greatly heightened when you don’t have permission. I also know that some places will never grant permission to any visitor because they are deemed too unsafe. If you decide to break into those places, you’d better understand the dangers involved and realize that no insurance will cover you when you trespass. We neither recommend nor condone this course of action.

Doing it the Right Way

A perfect example of doing it the right way has been my experience and relationship with the Bannerman Castle Trust.

I first saw the ruins of Bannerman while riding the Metro-North Railroad up to Rhinecliff, New York, in 2001. You always want to get a “water view” window seat on the train as the tracks hug the Hudson River all the way to Montreal. I was mesmerised by water and landscapes that rushed by—Storm King Mountain, the bridge walkway over the river, and many mansions.

But wait, what is that? A castle-island resting in the middle of the river?

Luckily the previous owner had used a side of the castle as a “billboard,” and I had my first clue: Bannerman Island Arsenal.

Bannerman Arsenal. Nikon D750 and Nikon 24-70mm f/2.8 lens. 1/250, f/11, ISO 200.

I had no reception on the train but wrote down the name and pinned the location on Google Maps. I later found a little information about the history, but being an island, the only access was via kayaks.

A few years later, the Bannerman Trust established a website and daytime tours of the castle from May to October. On the boat ride over, I shared my passion for ruinism and my excitement about Bannerman with a member of the trust. That laid the groundwork for later leading overnight photography workshops.

It took a few months to hash out the details, but we both wanted to see the idea succeed. The trust was interested in promoting the location, getting a unique interpretation and getting (of course) additional funding for the restoration.

Since then Matt Hill and I have led 14 Bannerman overnight workshops. I’m leading two more trips next August. (If you are interested, join the waitlist.)

Bannerman. Sony a7S with a Sony 10-18mm f/4 lens. 12 minutes, f/4, ISO 1000.

Bannerman. Nikon Z 6 with a Nikon 14-24mm f2.8 lens. 45 stacked frames shot at 100 seconds, f/5.6, ISO 400.

I’ve seen the once roofless residence become a completely intact museum that shares the history of Bannerman and Pollepel Island. Over time, walls have crumbled and braces have been installed to stabilize what is left.

This has obviously been a best-case scenario, where both Matt and I have become honorary members of the Bannerman Castle Trust. I have also established the same relationships with historic iron furnaces: Sloss in Birmingham and Carrie in Pittsburgh.

In Conclusion

The allure and proper access will hopefully lead you down a path of successfully photographing abandoned places. My main tip on how to best get into and photograph these special spots is to really understand them and try to tell their story.

A few more tips:

  • When sharing locations that are fragile, consider tagging them less (or not at all) on social media and keeping them sacred and preserved places that others can happily stumble upon. Don’t share GPS coordinates of spots that could end up getting overrun and trampled.

  • The world as a whole is trying to preserve its past. There are plenty of organizations you can join that will grant you safe and legal access to many forgotten places.

  • The U.S. National Park Service preserves many wonderful abandoned locations that offer legal and safe access. You can see a list of some of them here.

Night photography can aid your creativity by illuminating the spirit of these places with creative long exposures under the night sky. Light painting can also reveal the story you want to tell as seen by this eerie shot taken by Tim Cooper in Grafton Ghost Town right outside Zion National Park:

Grafton, Utah. Nikon D700 with a Nikon 24mm f/2.8 lens, lit with a Coast HP5R flashlight. 1 minute, f/9, ISO 200.

We’d love to see your favorite night photos of abandoned places, and to hear the stories behind them. Share in the comments below, or on our Facebook page, or on Instagram (tag us @nationalparksatnight #nationalparksatnight #seizethenight).

We hope your journey to abandoned places is a safe, smart and creative one!

Gabriel Biderman is a partner and workshop leader with National Parks at Night. He is a Brooklyn-based fine art and travel photographer, and author of Night Photography: From Snapshots to Great Shots (Peachpit, 2014). During the daytime hours you'll often find Gabe at one of many photo events around the world working for B&H Photo’s road marketing team. See his portfolio and workshop lineup at www.ruinism.com.

UPCOMING WORKSHOPS FROM NATIONAL PARKS AT NIGHT

How I Got the Shot: Puente Nuevo, Ronda at Night

Puente Nuevo, Ronda at Night. Nikon Z 6II with a Nikon Z 24-70mm f/2.8 S lens at 40mm. Foreground: shot with a 10-stop neutral-density filter at 20 seconds, f/11, ISO 100. Sky: 460 stacked frames shot at 3 seconds, f/8, ISO 800.

The Location

Dream location—conquered!

The rich history of Ronda, Spain, dates to the Neolithic Age. The Phoenicians, Romans, Muslims, Christians and the Spanish have claimed this remote outpost as their home. The Spanish Inquisition, Napoleon War and Spanish Civil War all had major impacts on the town. Ronda is proudly known as the birthplace of the modern style of bullfighting and has influenced and attracted such artists as Orson Wells and Ernest Hemingway to call it home.

Beyond this colorful past, what attracted me to Ronda were the images of this cliff-clinging town and the historic bridges that unite the old and new settlements over the 400-foot-deep gorge known as El Tajo. The most famous of the three bridges is the Puente Nuevo, or New Bridge, that was completed in 1793. (Imagine how old the older bridges are!) It could be one of the most dramatic bridges in the world and definitely one of the most photographed sites in Spain.

Figure 1. Puente Nuevo, or New Bridge, is in the mountaintop city of Ronda, Spain. (Satellite imagery courtesy of Google Earth.)

I had an image of this in my notes as a place to visit if I ever went to Spain again. Truth be told, that image has been in mind for a long, long time. I had been dreaming about Ronda and the New Bridge since I was a child.

One of my favorite children’s books growing up was Ferdinand the Bull, the story of a gentle bull who refused to fight. Ferdinand was from the Andalusia region of southern Spain, and there is a scene in the book where they send Ferdinand off to fight in Madrid. The illustration backdrop is Puente Nuevo!

Figure 2. The image I remember so well from Munro Leaf’s The Story of Ferdinand, illustrated by Robert Lawson.

The Shoot

In researching the town and looking at pictures of Puente Nuevo, I found very few pictures of the bridge at night, and none with stars. This is because the bridge is lit by sodium vapor floodlights that make it difficult to see anything in the pitch-black night sky.

The typical prime time to take photographs of Puente Nuevo is when the sun sets directly opposite the bridge, basking it with golden light, or during civil twilight when the sky is still a bright rich blue that perfectly complements the golden floodlights (Figure 3). But I’m always one for a challenge, so I set off to capture it at night.

Figure 3. Twilight at Puente Nuevo. Nikon Z 6II with a Nikon Z 24-70mm and a 10-stop neutral density filter. f/2.8 S lens at 40mm. 20 seconds, f/11, ISO 400.

My strategy was this: Combine a twilight blend with a star stack. This is a fairly common technique, but it would definitely prove to be difficult given the high contrast between the lit bridge and the surrounding darker rocks and sky.

So I hiked down the gorge to a vantage point I liked and shot the bridge during twilight. This foreground shot perfectly balanced the bridge and its lights (which had just come on) with the rocks and waterfall that were lit by the ambient light of twilight. I shot a few more frames and chatted with rock climbers and other folks coming down the path as I waited more than an hour for the stars to come out.

An additional challenge was the inky black sky of the moonless night. Having even a little moonlight would have helped the visual transition from a bright bridge to a more illuminated sky.

Yet another challenge was the lack of stars in the frame. With my naked eye I could see one star in my composition. I could have shot wider to include a bigger part of the sky that was unaffected by light pollution, but then the waterfall would have been too small and lost in the image. I chose a tighter 40mm focal length to get the viewer into the landscape, and I left one-fifth of the composition for the sky.

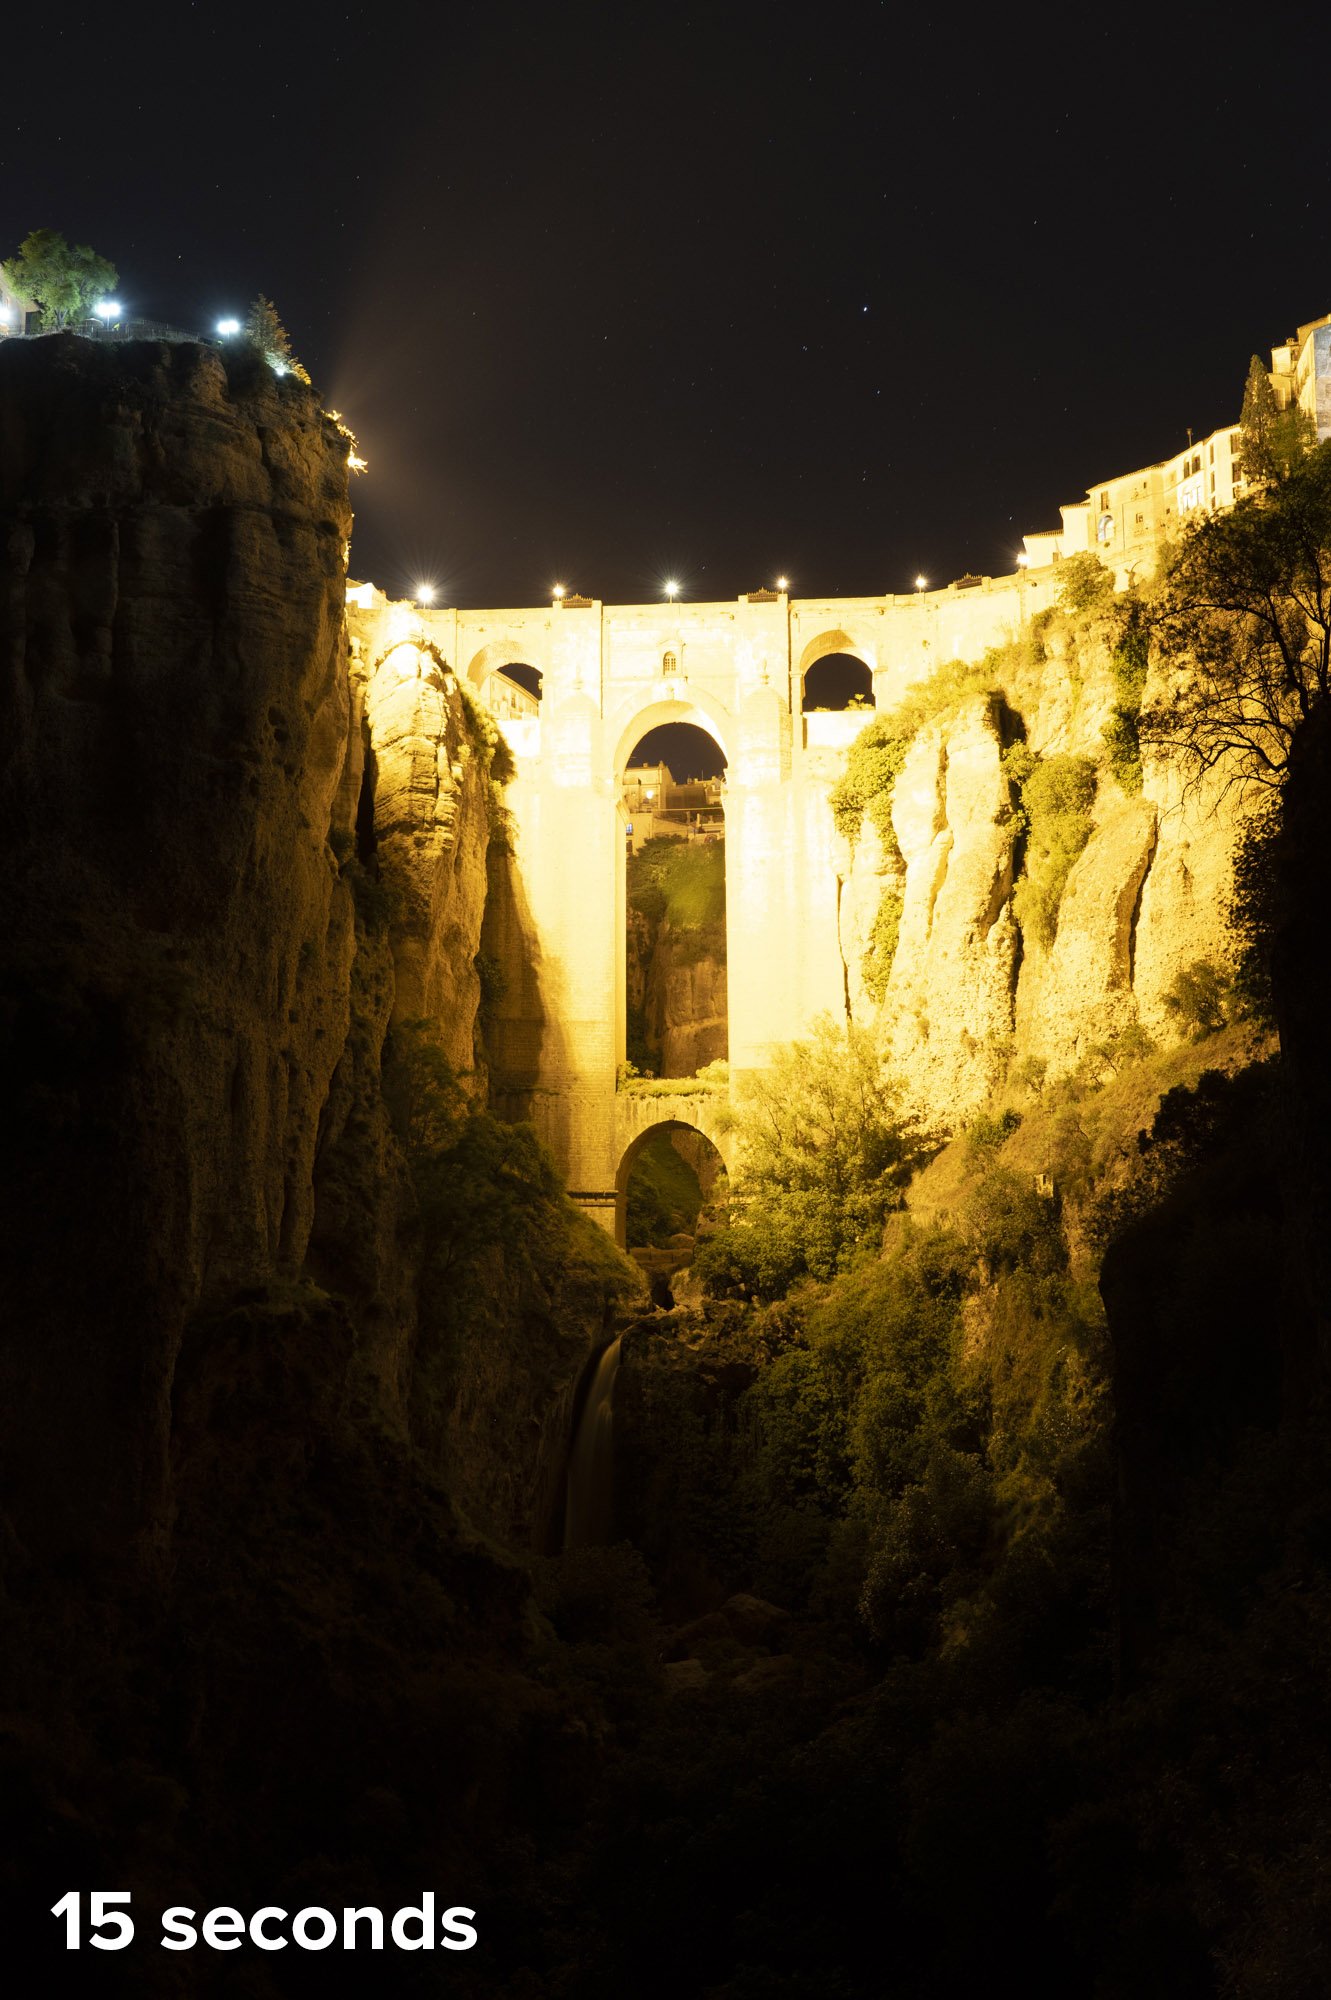
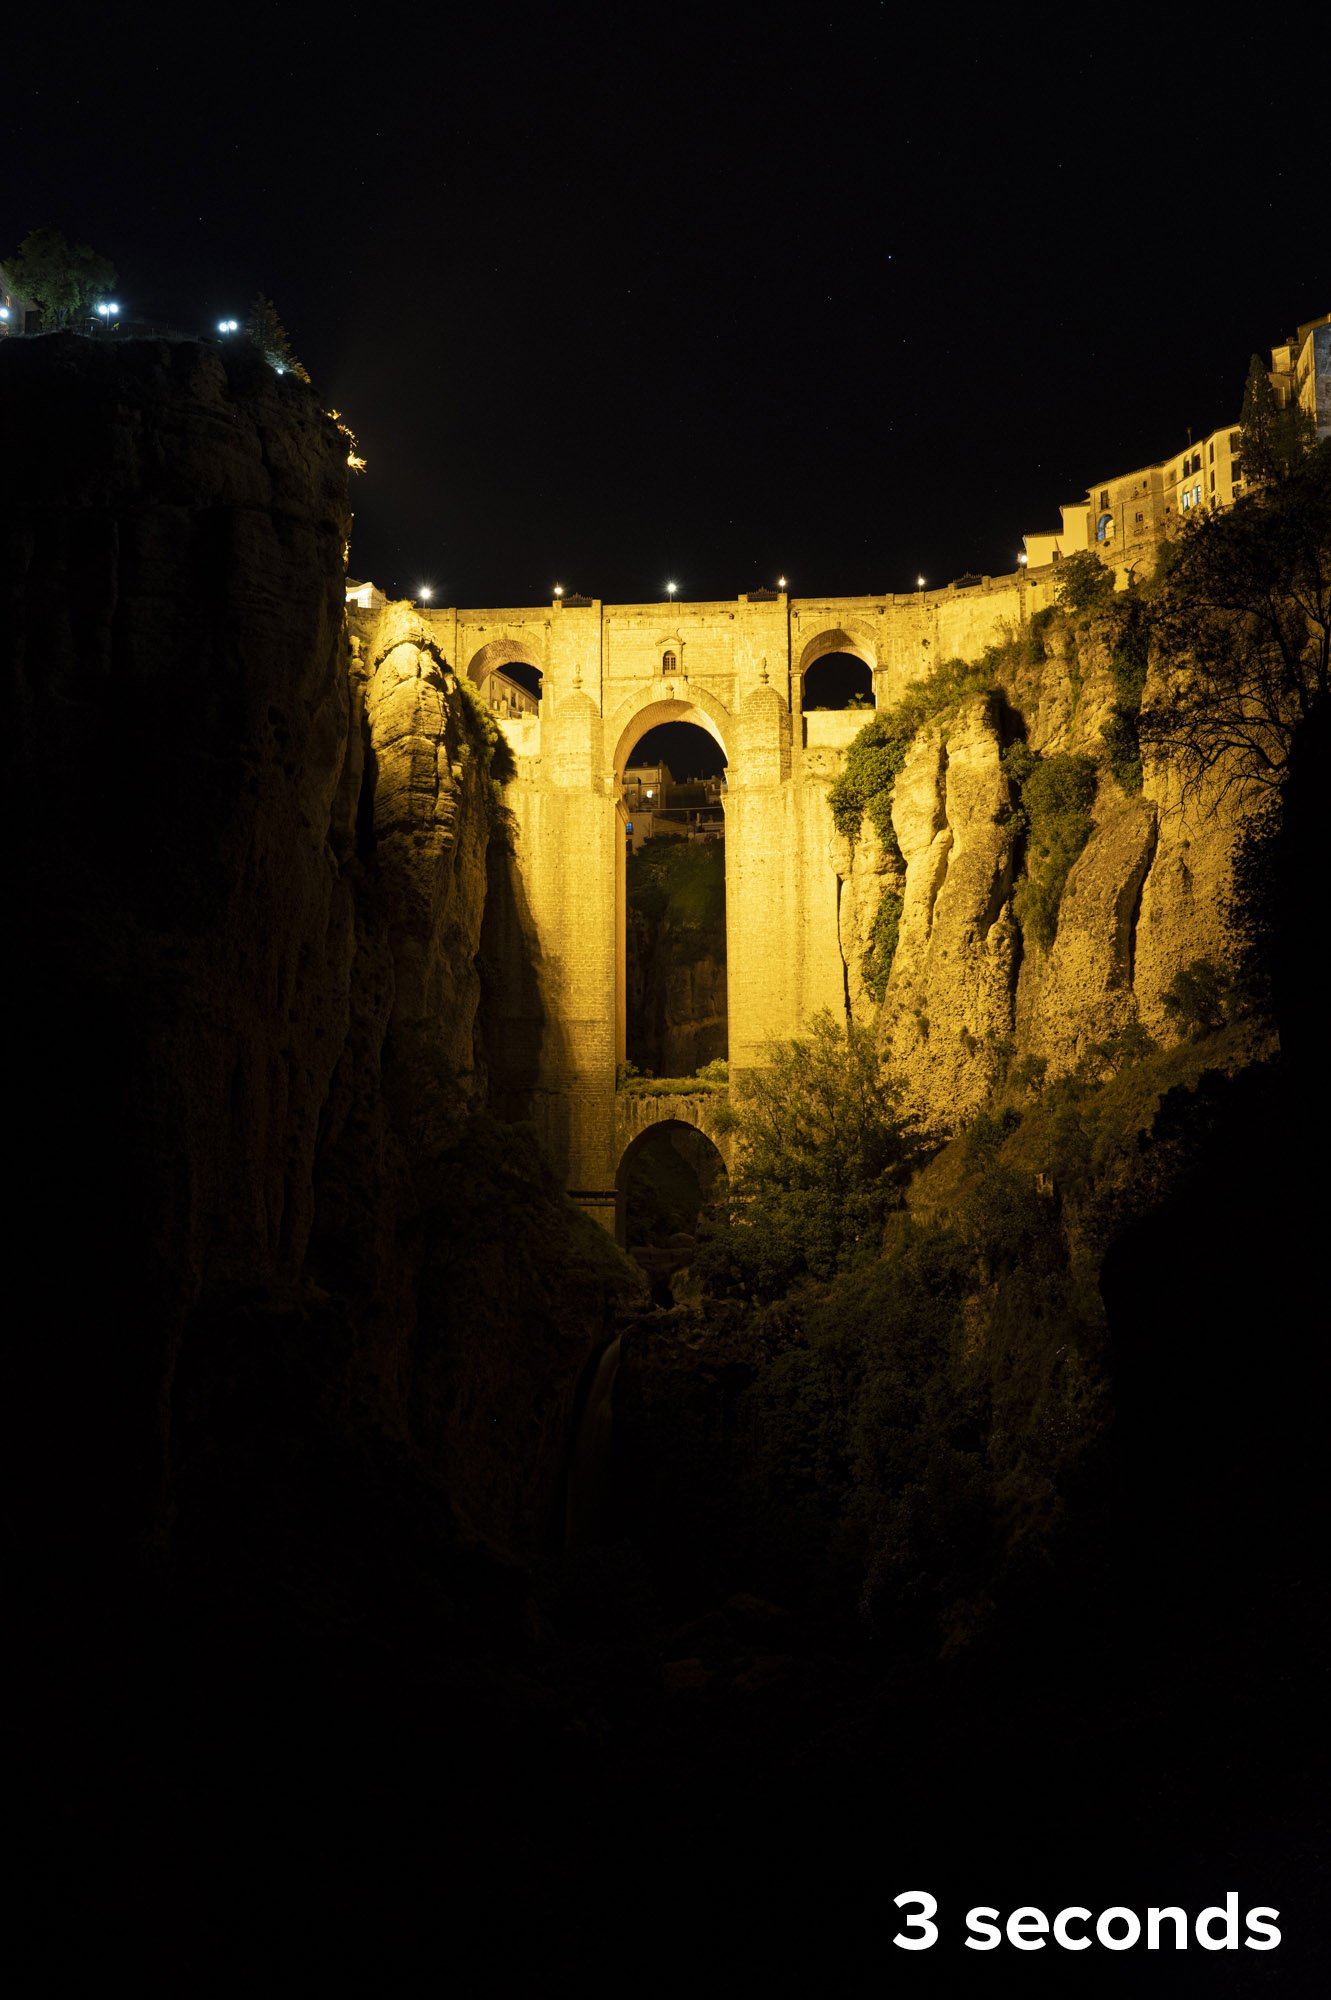
I could have opened my aperture to f/2.8 or gone to a high ISO to help my camera record more of the fainter stars, but that would have resulted in more of the streetlight spilling into the sky. Instead I chose an aperture of f/8 to control the direct light from the lamps and an ISO of 800 so the stars would retain some of their color and not blow out (Figure 4).

Figure 4. My first test shot was at 15 seconds, f/8, ISO 800. Note the spill of the streetlights into the night sky. I wanted to limit that so that blending in Photoshop would be easier. A 3-second shutter speed was the right balance, as it kept the bridge lights from not bleeding into the sky and still recorded more stars than my eyes could see.

It definitely felt weird to think of star-stacking a series of 3-second exposures. I would need a lot of frames to create a lengthy trail. But I felt this exposure gave me the best balance to blend everything together to create the final photograph that I was envisioning.

I was facing east, the only angle possible for this shot, so I knew the stars would trail downward toward the left. I planned for at least 1 hour of exposure, because I knew that would yield nice long star trails. I was shooting with my Nikon Z 6II, which is a 26-megapixel camera. With my shutter speed at 3 seconds, I used the built-in intervalometer to continually take successive shots.

As busy as this location is during the day, I bumped into only three people during my shoot. It is a bit of a hike down to the lookout, and people just don’t explore at night. So I dangled my feet over the fence and thought of Ferdinand the bull and all the historic places I had visited in Ronda that day.

After half an hour my eyes were adjusted enough and I could see that the brightest star had most likely moved out of the composition. That star had started in the middle of the frame, and because I was zoomed in with a 40mm focal length it had traveled a considerable distance to yield a long star trail. So even though I really didn’t see many other stars, I felt confident I had what I needed to put it all together in post.

The Post-Production

After loading the frames into Lightroom, I made only one adjustment: I turned off the automatic lens corrections. I always advise turning this off for stacking stars, otherwise you run the risk of creating moiré in the final stacked image. I was using 460 frames, which would result in about a 30-minute total exposure for the star trails.

Even though I have a fairly new souped up MacBook Pro M1, to stack 460 30-megabyte files would have definitely caused it to choke. So I stacked the images in sets of about 100 to create a series of five star trail images. Each stack followed this process:

  1. Select the frames in Lightroom.

  2. Choose Photo > Edit In > Open as Layers in Photoshop.

  3. In the resulting Photoshop file, select all the layers by clicking on the first, scrolling down, then shift-clicking on the last.

  4. Change the blend mode to Lighten.

  5. If desired, review the individual layers to edit out plane trails, stray light, etc.

  6. If desired to save hard drive space, flatten the layers.

  7. Save and return to Lightroom.

I then brought each of the five flattened stacks into Photoshop as layers, and used the Lighten mode on them to connect all the trails (Figure 5).

Figure 5. My five sequential star-stack images combined into one long stack.

Finally, I added the twilight shot as the top layer, and I and used a variety of masks and adjustment layers to match the exposures and blend them together as one cohesive image.

In the final photograph (Figure 6), look at the foreground areas outside what’s being illuminated by the streetlights. They are very dark, and that’s why I needed the twilight shot—just to bring out a little bit of detail in the rocks, waterfall and the rest of the foreground to make the overall image more pleasing, and to complete the visual story.

Figure 6. Nikon Z 6II with a Nikon Z 24-70mm f/2.8 S lens at 40mm. Foreground: shot with a 10-stop neutral-density filter at 20 seconds, f/11, ISO 100. Sky: 460 stacked frames shot at 3 seconds, f/8, ISO 800.

All in all this photograph took me about 1.5 hours of post-production work—the same amount of time I committed to shooting the image in the field!

Wrapping Up

Ferdinand didn’t want to fight, but I didn’t mind fighting all of those obstacles to get the shot that reminded me of one of my favorite stories from boyhood.

I’m pretty happy with it. I set out to create a complex photograph of a dream location under conditions I couldn’t control. I put my stamp on it, and hopefully inspired you to seize the night no matter what the scenario!

Gabriel Biderman is a partner and workshop leader with National Parks at Night. He is a Brooklyn-based fine art and travel photographer, and author of Night Photography: From Snapshots to Great Shots (Peachpit, 2014). During the daytime hours you'll often find Gabe at one of many photo events around the world working for B&H Photo’s road marketing team. See his portfolio and workshop lineup at www.ruinism.com.

UPCOMING WORKSHOPS FROM NATIONAL PARKS AT NIGHT

10 Pictures, 10 Tales: Our Favorite Night Photos of 2021

2021 was a challenging year for all. But the overall themes that prevailed were hope and celebration, as many of us could finally rejoin the great outdoors with friends and family. At National Parks at Night, we were so thrilled to see our community in-person and to share sacred spaces under the stars.

Now, at the end of 2021, as in the past we look back on our year’s worth of images and note the ones that are most precious to us. Choosing your favorite photos can be a daunting project. What makes a 5-star image? Is it the technical work that went into creating it? Or the reminder of a very special night? Which photographs still continue to shine and what new gems have been uncovered?

As you read about each National Parks at Night instructor’s favorite two photographs of the year, the underlining theme is that each had the power to transport us back to that precise moment in time. The feelings that come rushing back can be a combination of everything that aligned to create the image. It transports us back and hopefully takes you on a similar journey.


Chris Nicholson

Stars Over Zumwalt Meadows, Kings Canyon National Park

Nikon D5 with a Nikon 14-24mm f/2.8 lens. Two blended exposures shot at 30 seconds, f/5.6, ISO 400 (foreground) and 20 seconds, f/2.8, ISO 8000 (sky).

When I was writing my book Photographing National Parks a few years back, I spent a lot of time in coffee shops in Queens, New York, where I lived at the time—as well as in coffee shops in my hometown in Connecticut and in other places I traveled—researching and writing about various places, including some I’d never been to. I recall writing about fantastical-sounding spots such as Cinder Cone in Lassen Volcanic National Park, and Grand View Point in Canyonlands, and Artist Point in North Cascades, and hoping that someday I’d get to visit them.

In the following years I was fortunate that my book carried me to these places and more. On multiple occasions I’ve stood gazing at grand vistas, thinking back to my days leaning over my laptop in some random Starbucks learning and writing about these places, and marveling at the journey that brought me to be there in person.

Another such place was Zumwalt Meadow in Kings Canyon National Park, which I wrote about sometime around 2013 and finally was able to visit in 2021. From my book: “Zumwalt Meadow is easy to hike to and around, and is pleasant to photograph, as well. The meadow sits on the valley floor, with lush greenery providing a softer aesthetic than found in most other areas of the park. The Kings River flows through the grasses, framed by the distinctive granite walls of Grand Sentinel and North Dome.”

Zumwalt sits near the end of the furthest mile of paved road in Kings Canyon. Lance and I ventured out there, scrambled about 30 feet up some talus, set up our tripods for a dusk foreground exposure, then waited under a peaceful, spectacular night sky for a starry background exposure.

For a long time I sat on a boulder, just watching this beautiful space on Earth roll into darkness, once again remembering where I’d been and feeling grateful for where I’d come.

Tuolumne River and Meadows, Yosemite National Park

Nikon D5 with an Irix 11mm f/4 lens. Two blended exposures shot at 4 minutes, f/4, ISO 2000 (foreground) and 25 seconds, f/4, ISO 8000 (sky).

My next favorite photo from 2021 is also a blue hour blend, which isn’t much of a coincidence because it’s a technique I deliberately tried to employ more during the year.

This time I was in Tuolumne Meadows in Yosemite National Park. It’s a beautiful location in the High Sierra region of the park—an area that for many visitors is practically ignored in favor of the oft-visited valley.

At 8,600 feet, Tuolumne is one of the highest-elevation meadows in the Sierra Nevada. The Tuolumne River quietly bisects the glacier-carved meadow, meandering among erratics and past scattered lodgepole and Jeffrey pines, supporting a teeming riparian ecosystem that’s practically an oasis in the beautiful yet rugged and vast sub-alpine landscape.

I was again with Lance, and we hiked into the meadow to a beautiful view of the Tuolumne River flowing toward the distant mountains. The moon was new, so I knew the landscape would be completely dark once twilight was over. Phrased another way, it was a perfect situation for a blue hour blend.

I set up my tripod and used the ultrawide Irix 11mm f/4 lens to fill the foreground with the river. I made a few exposures during dusk, then left the setup while heading off to shoot with a second camera for awhile. I came back once the stars were shining, and made several exposures over the course of an hour or so, capturing the Milky Way in different spots as it drifted along the horizon. I later composited two of the frames in Photoshop to create the final image.

Gabriel Biderman

Officer’s Row, Sandy Hook

Nikon Z 6 with a Nikon Z 24-70mm f/4 lens at 24mm. 30 seconds, f/11, ISO 1600.

My new year’s resolution for 2021 was a simple one: to get out more at night and photograph! I live in Brooklyn, New York, and spent most of 2020 indoors; I didn’t travel farther than my Vepsa could take me.

So in early January my wife and I decided to spend a weekend with a good friend of ours in New Jersey, right outside Sandy Hook. Part of Gateway National Recreation Area, Sandy Hook is a very popular spot in the warmer months, but in the winter when the temperature is below 20 F, not so much.

For the two nights I poked around with my camera, I was bundled up like an Arctic explorer. Everyone thought I was crazy for going out, but I would not be daunted. This was the first national park I had stepped into in over a year, and I was energized!

Officer’s Row is one of the most scenic spots at Sandy Hook, especially for the brilliant sunsets that light up the sky. I tried a variety of focal lengths, cropping in tight to one, three or five houses. It was nice, but almost too simple. I continued to move back to include more buildings and then I realized that the trees at the other end of the field stood in a row similar to the homes. By adding the trees, it created the perfect foreground to give a better sense of place. Officer’s Row is not just the homes they lived in, but the field where military folk played with their families.

It was a cold and lonely experience, but one that jump-started my 2021 relationship with national parks at night.

Reacquainted with the Night, Joshua Tree National Park

Sony a7S III with a Sony FE 12-24mm f/2.8 lens at 18mm. 13 seconds, f/2.8, ISO 6400.

I was thrilled to have my first road trip of the year be to a familiar and always inspirational place, Joshua Tree National Park. I was also excited to be sharing the experience with my good friend and co-teacher, Matt Hill. We both packed our kitchen sinks for what would end up being a 3-week road trip. Not only did I bring trackers, tripods and time-lapse devices, but I also borrowed every Sony A7 and A9 camera and most of their wide and fast glass.

Matt and I had 3 days to scout and enjoy the night skies as we prepared for an upcoming workshop. But with so much gear, I got stuck in “testing” mode and created very few images for myself.

After the workshop we stayed an extra night to team with Chris and Tim to record our OPTIC Imaging Conference presentation for B&H Photo. That was a long, focused night that required the four of us to play multiple roles from creative to producer and grip!

During a break in the filming Matt went to lay on one of Joshua Tree’s many boulders. He was exhausted and needed to re-energize by taking a few moments to be one with the stars.

I immediately took one of our Luxli Fiddle LED panels and boomed it up and over him. I love the spotlight effect that made it seem like Matt was bathing in the moonlight. For the camera, I chose a low angle to create a new horizon line that makes it seem like Matt is floating on a wave of rocks.

This could be one of my favorite night portraits I have ever made, because to me Matt is experiencing something I have done and that we all need to remember: Take a break under the stars and get reacquainted with the night.

Lance Keimig

Julie at Bass Harbor

Nikon D780 with a Tamron 15-30mm f/2.8 lens at 29mm. Six composited frames exposed at a range of 2 to 30 seconds, f/5.6, ISO 100.

This image was made more or less as a grab shot as the last twilight was fading at Bass Harbor, Maine, during our PhotoPills workshop in Acadia National Park.

We had arrived just as the light was fading, and by the time the group dispersed and got to work, it was too late to get it all in one exposure. Not to be deterred, I did a six-frame bracket at 1-stop intervals. I was struck by the scene, and even in the fading twilight the light was gorgeous. Our workshop participant Julie had set up on the pier, and at first I was bummed that she was in my frame, but in the end I think that she adds to the image.

I’m attracted to the cool blue colors punctuated with one sodium vapor streetlight and a few warm lights in the houses, plus the stillness and the simple architectural shape of the shack on the pier. Julie adds another element, and marks the context for my memory.

To me, it’s a great example of how a photograph has the power to transport me to a different place and time. As I sit here typing on a cold December evening in Vermont, I’m taken back to coastal Maine in the height of summer, and all of the places spent over the course of a week with a fine group of people making images. It’s personal, and I like that. The viewer will make whatever they want or nothing at all of the image, but for me it is a place-keeper for a boatload of memories.

Tanguy Key

Nikon D750 with a Nikon 28mm PC f/3.5 lens. 15 seconds, f/5.6, ISO 6400.

After completing our Everglades National Park workshop in April, Chris and I took a couple of days to explore the Florida Keys. I am so out of my element in Florida. Culturally, geographically, meteorologically, Florida is just not in my wheelhouse. I admit, after a long New England winter it was nice to be wearing shorts and a Hawaiian shirt while those at home were still wearing down jackets, but still …

The drive from the Everglades into the Middle Keys took longer than we had anticipated, and longer than Google had promised, and the night-photo opps visible from the main drag were few and far between. I didn’t mind; I was just along for the ride and happy to experience this strange new environment.

This image was made at the foot of one of the causeways that connects the keys, where the setting comprised a vast expanse of sea and sky punctuated with sticks and stones and various synthetic detritus. The tropical colors and minimalist landscape reminded me of the French surrealist painter Yves Tanguy, and I made several compositions that night in his honor that had a similar feel.

I’m smitten with this composition—the repeating shapes of the stones, the sticks, the horizon and the wires, and the graduated turquoise hues of water fading into sky all work together to make this one of my surprise greatest hits of 2021.

Matt Hill

White Pocket

Nikon Z 6 with an Irix Cine 11mm T4.3 lens, lit with a Luxli Fiddle. Eleven frames shot at 20 seconds, T4.3, ISO 12800, stitched in PTGui and post-processed in Lightroom.

Until this year, one of my bucket list experiences was an overnight at White Pocket in the Vermillion Cliffs National Monument of northern Arizona. Boy am I lucky to have scratched this one off the list!

This location is on BLM land, and you can camp there overnight without a permit. If planning a visit, always check ahead of time, as it’s a major commitment to drive out there (in deep, deep sand). You might also consider hiring a local guide, like we did. They provided camp gear and food, and we drove ourselves in a high-clearance vehicle.

All disclaimers aside, this area is precious, wild, remote and located in dark, dark skies. Being there seems like being on the surface of another planet. The various colors and textures of rock are mesmerizing, and a joy to light paint.

I had been imagining this pano for years. Ever since my first daytime-only visit I’d been wanting to photograph the Vortex and Castle Rock paired with a low Milky Way.

When the chance finally came, I was with Gabe and we interpreted this scene in different ways. But we both had our tripod legs on the precipice of the Vortex, which dips down much more precariously than this image suggests.

The final pano is a PTGui blend of 11 images made from an ultrawide 11mm Irix Cine lens, in vertical orientation. As usual, I aggressively overlapped the images for a seamless stitch. I shot at ISO 12,800 to balance out the native T4.3 maximum aperture. And each 20-second exposure was halfway between Accurate and Default NPF exposure durations for crispy star points.

Lighting the monumental landform was tricky. I used a Luxli Fiddle to bounce light off the stone wall behind us—literally the only option as my angle of view exceeded 200 degrees.

This now hangs on my wall as a 72-inch Xposer print.

Bethesda Fountain, Central Park

Nikon Z 6II with a Nikon Z 24-70mm f/2.8 S lens at 34mm, lit with two Coast HP7R flashlights. 60 seconds, f/6.3, ISO 100.

During our New York City workshop with Gabe, it felt great to get back to my roots. Gabe and I had met and fostered our friendship over night photography in NYC, so returning to the noise and a cacophony of light sources was quite satisfying.

Bethesda Fountain is an icon within the world-famous Central Park. This was not my first time shooting here, but it was certainly the best lighting I’ve ever had. And that was due to teamwork!

Gabe and I placed our flashlights on the fountain’s edge to add sparkle to the gilded statuary. The light also filled in the dark areas in the water and under the body of the fountain. We placed the first light slightly left of camera, the second perpendicular and to the right. The result is, for me, a strong example of well-defined portrait lighting.

Of particular challenge was defining the falling water. The camera did capture all the info I needed, but some post-processing magic in Lightroom was required to render this version. Applying a Select Subject mask allowed me to control the highlights and contrast in the water. I added a Select Sky mask to darken the sky, and increased contrast. Finally, I darkened the bright clouds low to the horizon with a brush mask and emphasized the paths of the water cascading down to the final raised pool.

What you don’t see was the most “New York Moment” of all: the half-naked man collecting change from the bottom of the fountain during this exposure. Ah, New York, how I love you.

Tim Cooper

Desert Light, Joshua Tree National Park

Nikon Z 6II with a Nikon Z 12-24mm f/2.8 lens at 24mm. Multiple blended exposures of 30 seconds, f/8, ISO 1600 (foreground) and 15 minutes, f/8, ISO 100 (sky).

With its amazing array of rock formations, desert flora and pure night skies, Joshua Tree National Park is a night photographer's paradise. I was fortunate enough to be there for the near simultaneous events of our PhotoPills workshop and our video production for B&H’s OPTIC Imaging conference.

While scouting, Chris showed me this narrow defile near Skull Rock and I knew it was not only a great spot for our PhotoPills workshop but also a perfect spot for me to do a light painting demo for the conference. The shoot was, however, going to be a challenge.

When first entering the narrow gorge I saw the desert scrub plant wedged between the rounded rocks and knew I wanted to backlight the plant so it would anchor the foreground and highlight the texture in the rock formations.

The first problem was that there was no way one exposure would give me enough time to light paint the foreground and the background. The second problem was that I was so close to foreground rocks that even an aperture of f/16 would not provide perfect sharpness throughout the scene. So I decided to break up the scene into several exposures.

On the first exposure I focused on the foreground rocks and painted from behind to bring out the texture and to backlight the scrub plant. On the second exposure I refocused on the middle ground and walked through the scene while illuminating the walls of the gorge. The light on the far peak was supplied by passing cars.

After many practice runs and several failed attempts I was finally able to light the entire scene as I’d imagined it. For the final exposure I focused on the sky to create the trailing stars.

While the bulk of time creating this image occurred in the field, I also spent a significant amount of time post-processing. The same scene taken with different focus points results in small changes to the size of the subjects within the scene. This means that I had to resize each frame in Photoshop so that all of the rocks were the same size in the final image. Then each frame had to be blended together to create the illusion of continuous lighting. The easiest part was blending the star trails with the foreground.

While many night images can be made with a single exposure, sometimes it's easy to envision a shot that requires a lot more work. I’m glad I took on this particular challenge as it turned out to be one of my favorite images of 2021.

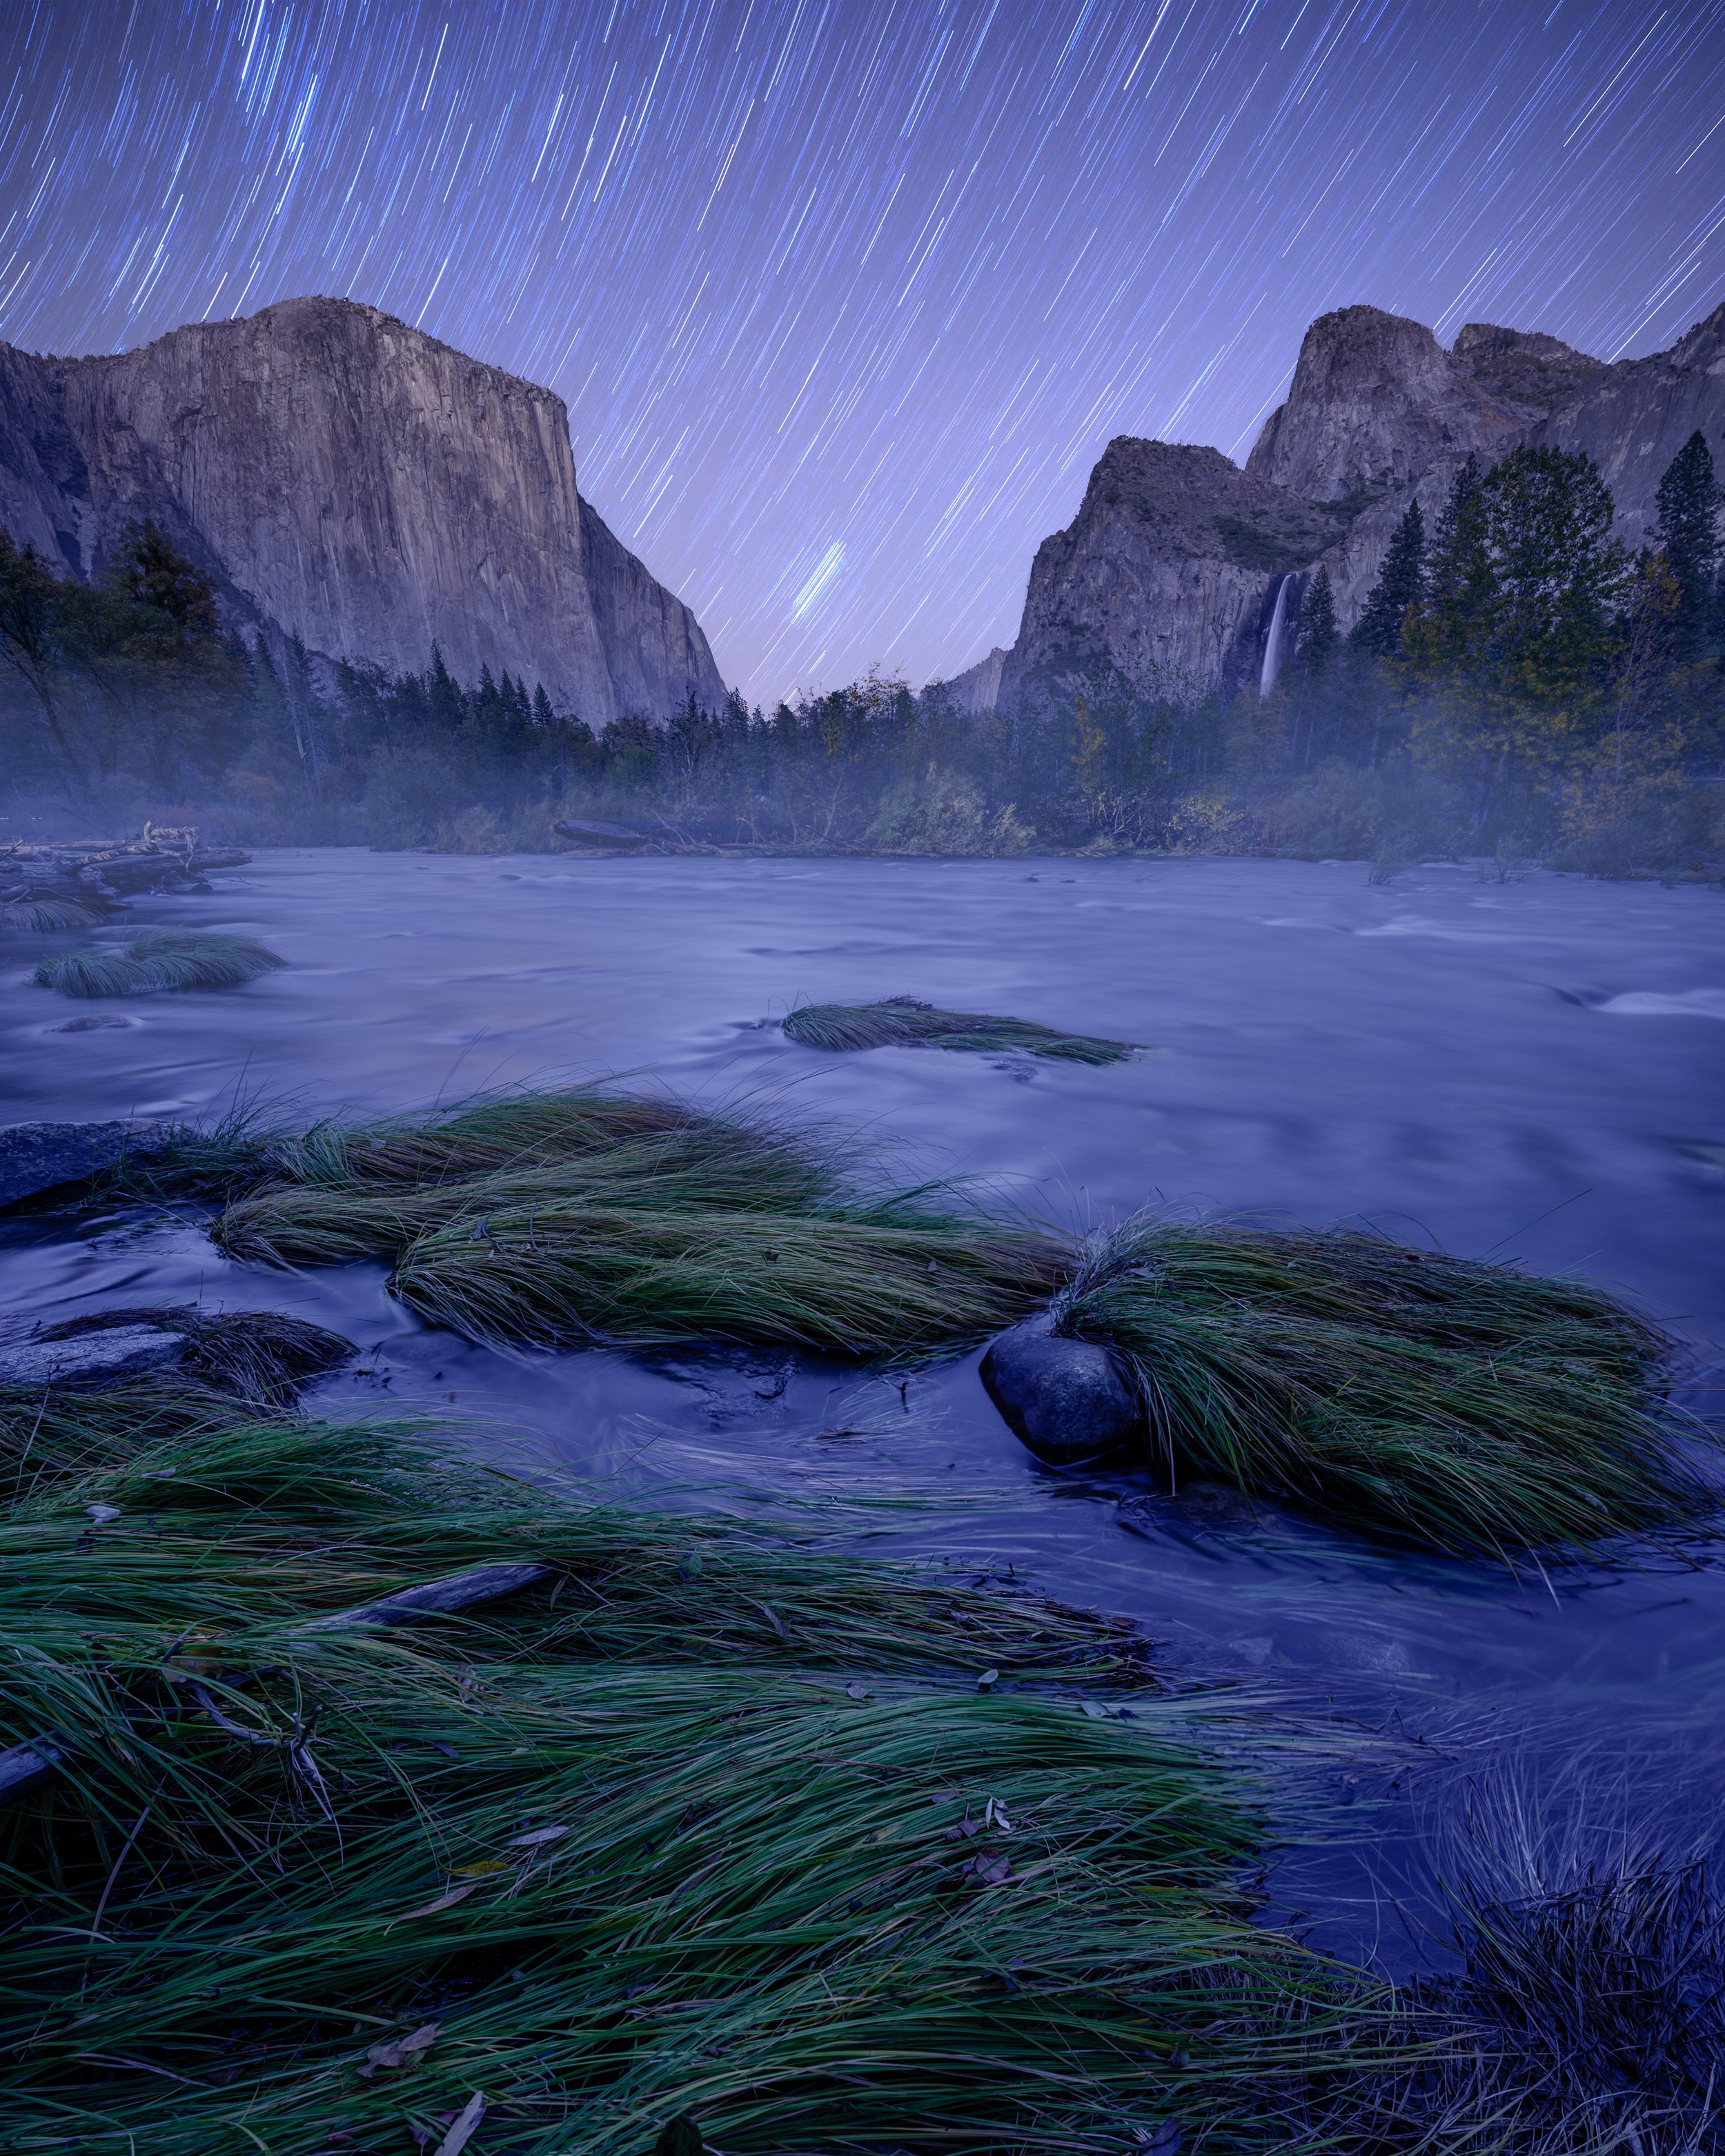
Star Trails, Valley View, Yosemite National Park

Nikon Z 6II with a Nikon Z 12-24mm f/2.8 lens at 14mm. Foreground: three focus-stacked blue-hour images shot at 15 seconds, f/5, ISO 100. Sky: three exposures shot at 5 minutes, f/3.5, ISO 500.

Of the millions of photographs made in Yosemite National Park, some of my favorites are from the Valley View pull-off. The ever-changing volume of the Merced River revealing, hiding and reshaping the river's edge directly below the parking area has been fodder for an abundance of magical photographs. I was determined to add to that collection, hoping for an image that captured this view with the stars of the night sky.

My chance finally came in October when Matt and I led a group of night photographers for a workshop in Yosemite Valley. During our initial scout I was disappointed to find that the river had become so low from California's ongoing drought that this particular vantage point left much to be desired.

As luck would have it, our group experienced the break in California’s dry spell to a tune of over 6 inches of rain in less than 2 days. The aftermath of the rainfall was truly magical as all of the waterfalls were rejuvenated and the rivers sprung back to life.

After shuffling the schedule around a bit due to the rain, we were able to venture to the Valley View pull-off to begin a night of shooting. The swollen river produced a far more interesting foreground as it created new channels and connected the recently dried grass tussocks with the flow of the water.

Setting up near several of the workshop participants, we worked through the blue hour exposures (with focus stacking to accommodate the extreme depth of the scene) and waited for astronomical twilight to end.

Simply waiting and watching as the glow faded from the mountains was worth the whole excursion. After the show of color ended and we counted the lights of the climbers making camp on the vertical cliffs, darkness finally fell and we began our sky exposures. I chose to create star trails via a stack of three 5-minute exposures in the hopes of creating motion in the sky that would echo that of the river and that implied a mirror of the motion of the foreground grasses.


Your Turn

What was your favorite night photograph of 2021? We’d love to see it! Share in the comments below, or on our Facebook page, or on Instagram (tag us @nationalparksatnight #nationalparksatnight #seizethenight). Be sure to tell a story too—the technical aspects, the challenge overcome, or a tale of the experience.

Then … have a Happy New Year!

Gabriel Biderman is a partner and workshop leader with National Parks at Night. He is a Brooklyn-based fine art and travel photographer, and author of Night Photography: From Snapshots to Great Shots (Peachpit, 2014). During the daytime hours you'll often find Gabe at one of many photo events around the world working for B&H Photo’s road marketing team. See his portfolio and workshop lineup at www.ruinism.com.

UPCOMING WORKSHOPS FROM NATIONAL PARKS AT NIGHT