
In the whole history of photography, at least half the magic of creating images happened after the shoot, in that period of prestidigitation known as “post-production.”
In the film days, post happened in the darkroom, where many of us got stinky hands and forgot how to socialize with people who lived on the other side of the door in light. These days, post happens mostly on a computer, in which the millions of data points that make up our image are rearranged and altered in a way that produces the final photograph as our minds saw it in the field.
And when it comes to night photography, post-production tools can be used in all sorts of unique ways to help us seize the night exactly as we see fit. Below are a few of the techniques a few of us here at NPAN use to bring the image down the homestretch.

Working through post-production on a 27-inch BenQ SW2700PT monitor at our workshop in Cuyahoga Valley National Park.
Chris Nicholson
Making Planes Disappear
Remember when David Copperfield made a Learjet disappear on national TV? I do that trick too.
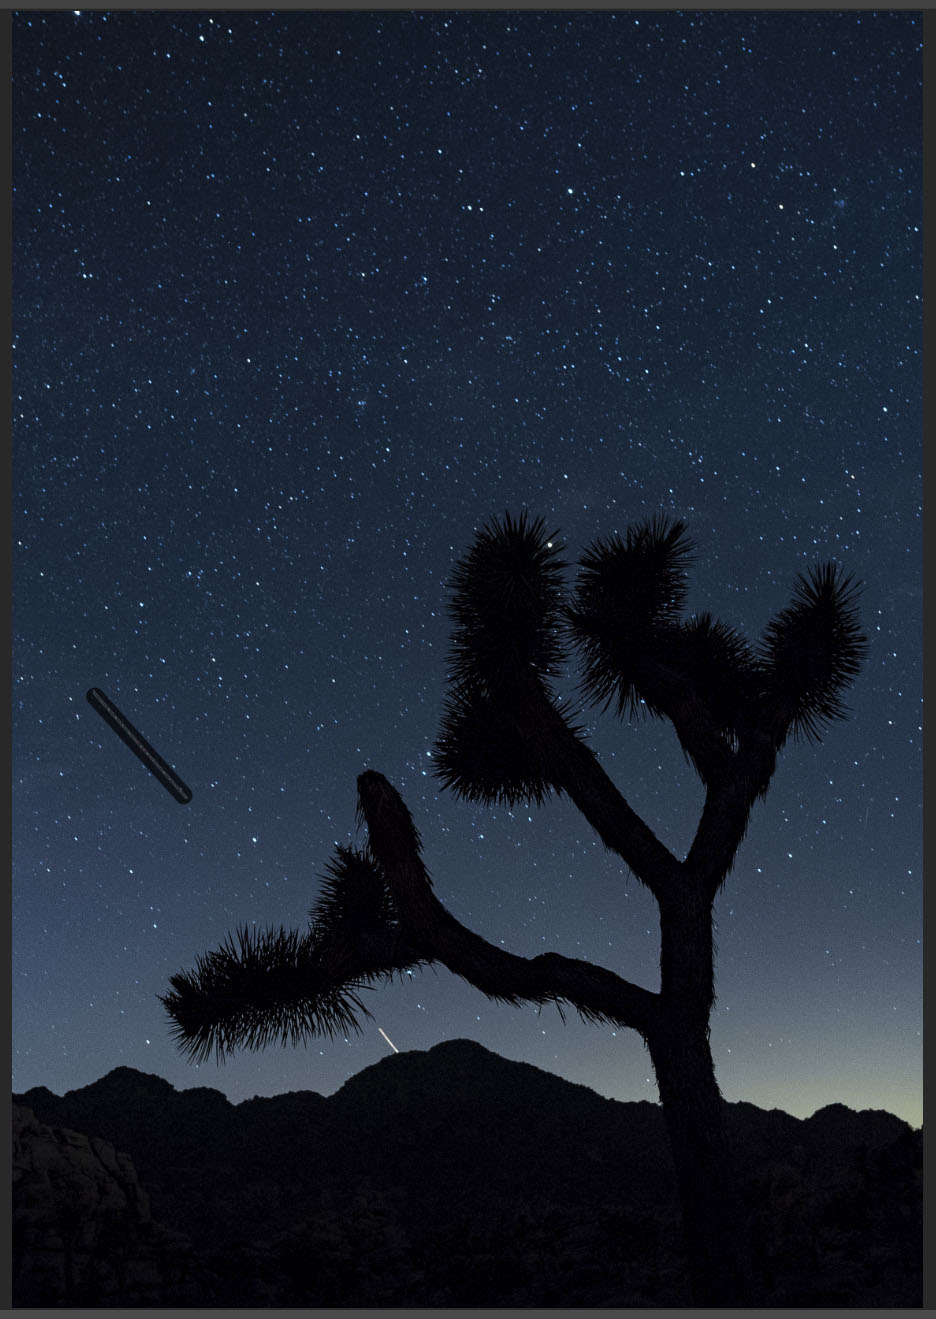
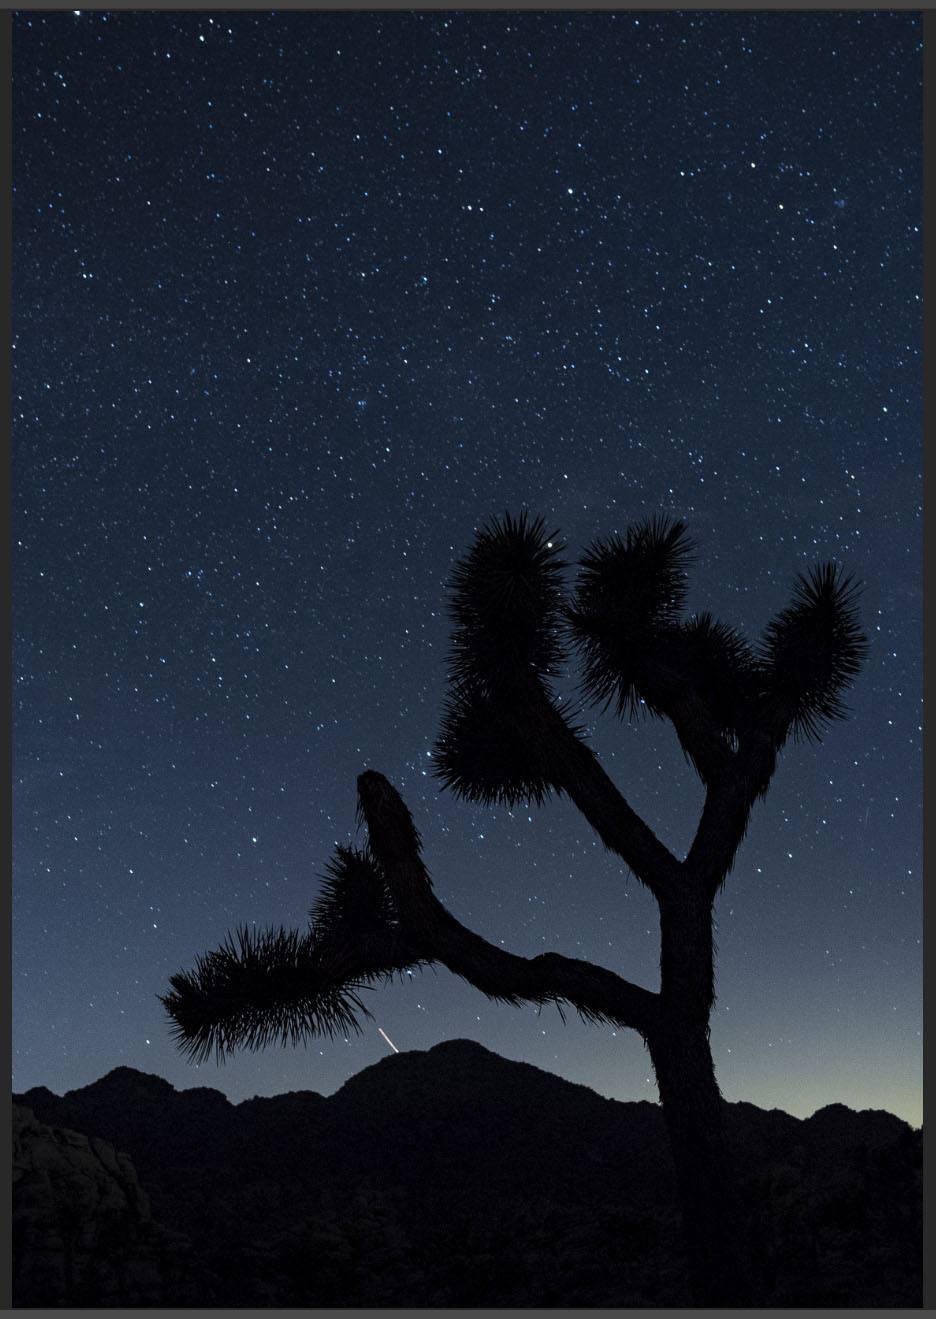
If you have photographed anywhere within the region of a major airport at night, or even just along major flight paths, then you know how conspicuous planes can be in an otherwise pristine dark sky. Many star trail photos have been bisected by plane trails.
Some photographers don’t mind that, and some do. Even among us five NPAN instructors you’ll find varying opinions. I, for one, don’t want planes in my sky shots, so I usually remove them in post-production.
Fortunately, Adobe has made this really easy to do, in both Lightroom and Photoshop. In the old days of digital darkrooms (as in, like, five years ago), to clone out a plane trail could take a fair amount of effort—it generally involved stamping over the offending pixels with the Clone tool while sourcing various other spots in the sky to avoid telltale digital artifacts, and then doing some cleanup work to make things look normal. But these days you can use the Spot Removal tool in Lightroom or the Spot Healing Brush (in Content Aware mode) in Photoshop to do most of that work for you.
But that’s not the tip, as many people reading this already know what a great job those tools can do to quickly and effectively remove unwanted elements of a photo. The tip is something that many photographers don’t know: You can draw a perfectly straight line with either the Spot Removal or Spot Healing Brush tools by shift-clicking on two points. This is enormously useful for quickly wiping out a straight unwanted element—such as an airplane trail in a night sky!
Simply zoom in on the airplane trail you want to remove, hold down the shift key, click once at one end of the trail, then once more on the other end. The trail will disappear from your composition, almost always without any artifacts to clean up afterward. It’s like magic. Like David Copperfield.


Matt Hill
Blending a dusk shot with star points
When you shoot on new moon nights, shadow detail is pretty hard to come by. One way to fix this—to add detail in the shadows, to mask high ISO noise and to add a “fantastic” sparkle to your image—is to blend in a photo that was shot during the tail end of dusk.
Of course, this requires patience. But trust me, it’s worth it.

Owachomo Bridge in Natural Bridges National Monument, as photographed during our workshop there this summer.
When I see the light turn that special indigo color, I set the camera on its tripod and go through all the motions of composing and getting ready for my night photo. Then, with twilight light still in the air, I shoot (in RAW, of course) one to three photos at a low ISO, with a white balance of Daylight, to faithfully render that delicate color.
Then I wait patiently until all twilight has left the sky (which happens faster if you face east) and then take a high ISO photo for star points, preferably with the Milky Way in plain view, and even better if the galactic core is in your frame.
During post-production, I cook the two images to taste, being careful to not accentuate the shadow details on the star points photo. Then I select the two images in Grid view, right-click one of the chosen thumbnails, and choose Edit In–Open as Layers in Photoshop. I put the dusk photo on the top layer, add a layer mask, and then mask out the sky (Figures 1 and 2).
Figure 1.
Figure 2.
Finally, I reduce the layer opacity to taste (Figure 3). I usually use anywhere tom 10 to 20 percent. The more you show, the more the final image looks more like fantasy. My ideal effect is to simply add a little sparkle to those dull shadows with color and quality.
Figure 3.
Gabriel Biderman
Creating and Saving a Milky Way Brush in LR
The great thing about our latest batch of digital cameras is how sensitive they are to light and how much better they can see than our own eyes. Take a look at the multitude of Milky Way photos populating the World Wide Web. Unfortunately most of them are a bit too over-processed for my taste. In their understandable enthusiasm, many photographers push the Clarity and Dehaze sliders too far to the right so that every pixel is sharpened and we are seeing a very unnatural shift in the colors of the night.
A more subtle way to “treat” the Milky Way is by locally applying a gentle brush adjustment. I do my global adjustments and general processing first, but I do like the Milky Way to stand out a bit from the background of all the other stars, which is when the brush comes into play (Figure 4).
Figure 4.
To achieve this, start by clicking on the Brush tool and selecting a default Effect, such as Highlights. To aid me in seeing where I am brushing, I will generally adjust the brush to the extreme—like +100 highlights (Figure 5). Once I have brushed in the appropriate places, I start bringing back the effect and finessing the look.
Figure 5.
In Figure 6, you can see the adjustments I made to make the Milky Way, which make it pop a little bit more.
Figure 6.
That general separation between Milky Way and sky is created by adding contrast and clarity. I like to adjust contrast by not only using the Contrast slider, but also by raising highlights and lowering shadows. Clarity is a slider you need to respect though, as too much clarity creates noise and a halo effect along the edges of the contrasty regions of the image. That’s why it is so important to first apply any clarity and sharpening globally. Then you can really see how much, if any, is needed for the Milky Way.
Here’s the fun part—the real core of this tip. Those adjustments probably took a solid 5 minutes to make. But you don’t need to take 5 minutes to make them next time, or any time after that. Why? Because you can save those adjustments as a permanent brush that you can use at any time.
If you look at the top of the Brush panel, in the Effect drop-down menu, you’ll see an option called Custom. Click on Custom and a scroll-down menu of brush options will appear. Go to the second to last option and select Save Current Settings as New Preset (Figure 7).
Figure 7.
You’ll need to enter a title for your preset (Figure 8)—“Milky Way” makes sense, but you can call it whatever you want. Once you’ve entered your title, click the Create button.
Figure 8.
Now you have a Milky Way brush that you can paint onto all your dark sky shots! Any time you edit a Milky Way photo, make all your global adjustments first. Then select the Brush tool, choose “Milky Way” (or whatever you named it) from the Effects drop-down, and paint in your home-cooked adjustments.

