Night Photography Blog — National Parks at Night

Matt Hill

In the Bag: Packing for a 3-Week Night Photography Trip

Note: As mentioned in the post below, Matt is about to embark on a 3-week night photography trip with Gabe. Follow their adventures via our next three installments of “NPAN Conversations” on the National Parks at Night Instagram account.


This is gonna be some trip! I’m about to leave for 3 weeks in the American southwest, where I’m co-leading a night photography workshop, attending a night photography conference, scouting some new locations, and creating some photo and video content in the field. And I need to pack for all of that in one bag.

What goes into one bag to cover all of that for one trip? Today I’m going to share that with you!

With all the uncertainties of the past year and of the next few weeks, it’s still exciting to curate and cull my gear for a trip. To be more specific about my needs, the following are my goals for the trip and the events I’m packing out for:

With all that on the plate, how do I pack smart, and how do I pack so that my bag is light enough to walk with for a few miles?

The first step: the bag. Introducing my new backpack, the Shimoda Action X50—aka “the Kitchen Sink 2.0.”

There’s a ton of surprises inside. So I made a video walk-through/breakdown of my gear and why it made the cut:

(a few hours later…)

Whew! Thanks for watching. On YouTube, there is a complete gear list with links, or you can download it here:

How are you gearing up for your next trip? What is essential? What did you leave by the wayside and why didn’t it make the cut? Let us know in the comments or on our Facebook page.

Matt Hill is a partner and workshop leader with National Parks at Night. See more about his photography, art, workshops and writing at MattHillArt.com. Follow Matt on Twitter Instagram Facebook.

UPCOMING WORKSHOPS FROM NATIONAL PARKS AT NIGHT

Resharp Your Lens: How to Calibrate Infinity Focus on the Irix 15mm and 11mm

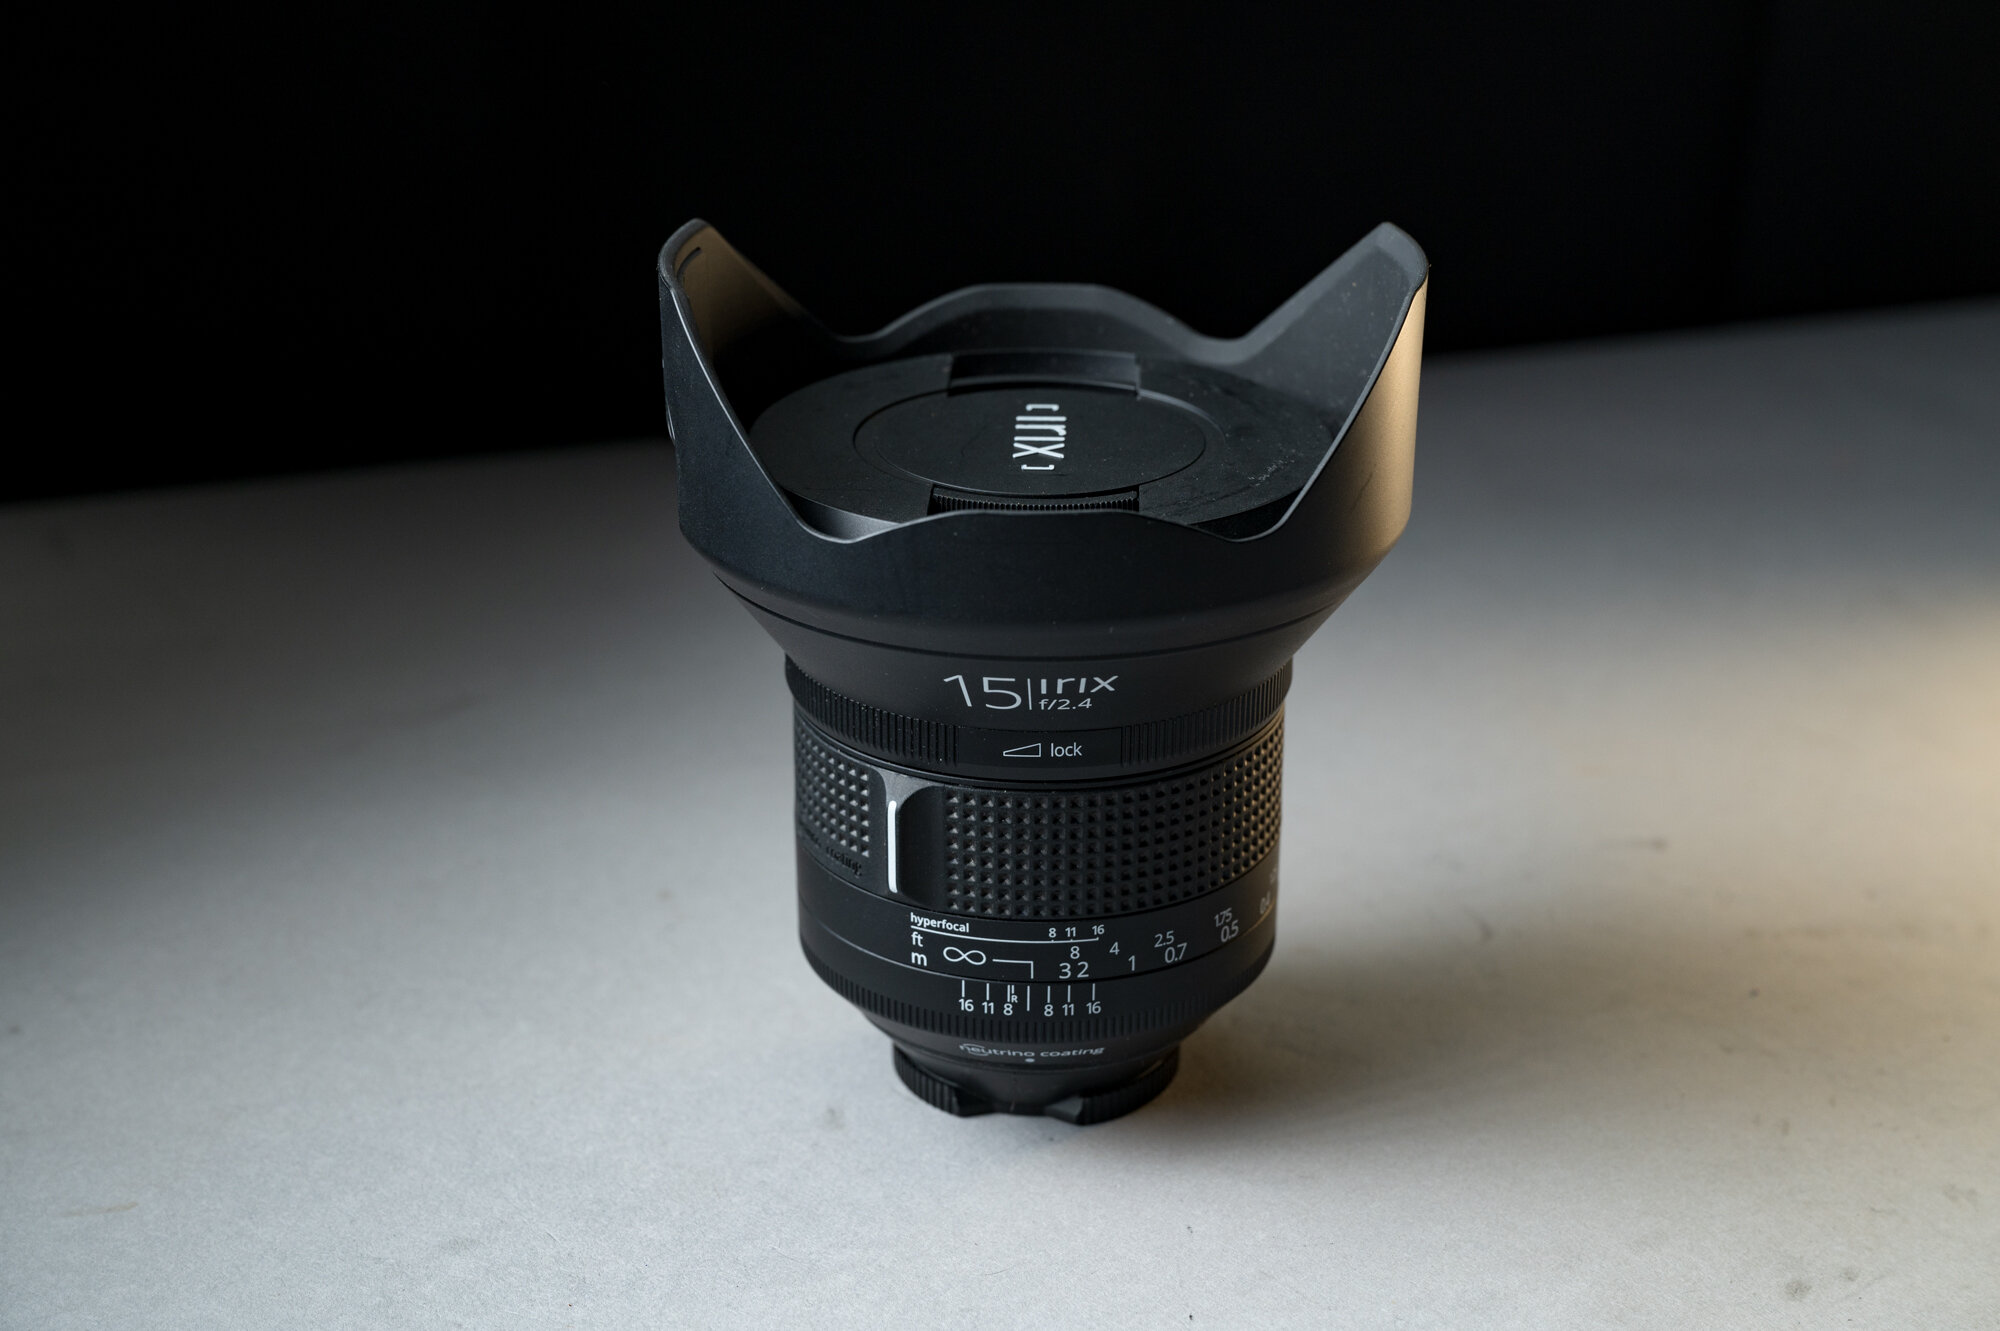
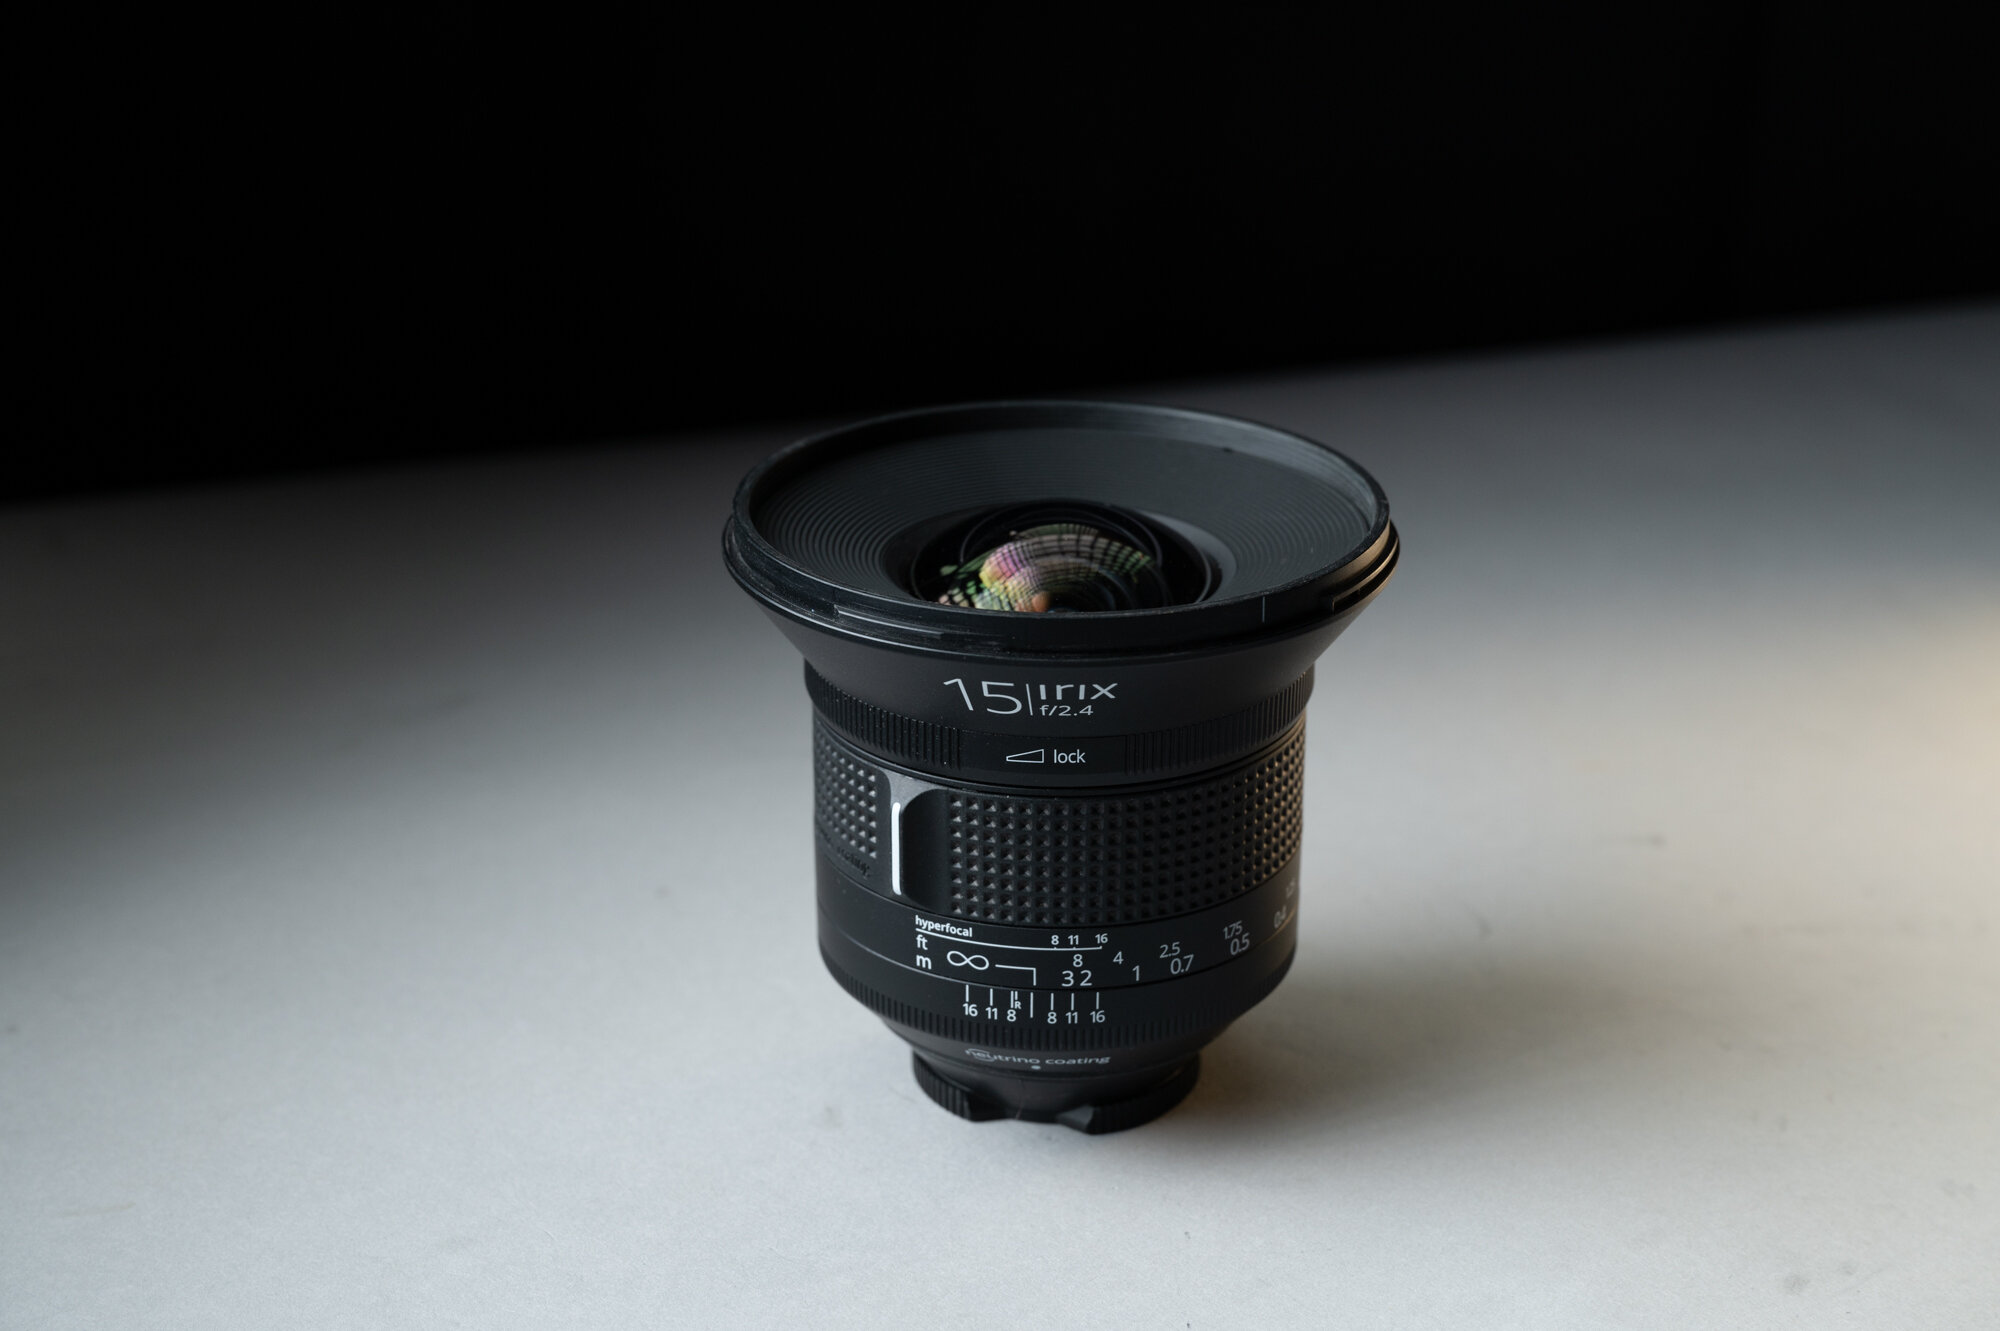
Irix 15mm and 11mm lenses are very popular among the National Parks at Night instructors and our workshop attendees. There are multiple good reasons for that, all of which have to do with sharpness, including:

  • The lenses have very little coma.

  • They’re sharp as heck.

  • The focus ring clicks into place at infinity, giving you tactile feedback for focus, which is so helpful in the dark.

Put all those together, and you pretty much have a guarantee that your stars will be sharp.

Irix has another feature that will allow you to stay sharp too: If you find that the infinity mark is off, you can calibrate it at home.

Why would you need to do this? Our experience is that the focus is perfect as received from the factory. But, as time passes and your lens gets jostled around during travels, it’s possible the focus can drift. It happens to the best of lenses. But with most brands you need to send such lenses to a repair technician, while Irix superwides enable you to self-fix this relatively quickly.

If you own an Irix 15mm f/2.4 wide angle lens or 11mm f/4.0 rectilinear wide angle lens, you can follow the instructions below to calibrate your own infinity focus.

Note: If you have really poor eyesight or your fingers aren’t nimble, you may consider sending it in to Irix instead.

The Irix Calibration Process

What you will need:

  • camera

  • tripod

  • torx T6 screwdriver with a magnetic tip

  • standard slotted 1/16-inch or 1.5mm screwdriver with a magnetic tip

  • a clean, dust-free, well-lit space with a white or very light surface

  • daylight

I used a computer repair kit I bought at a local home improvement store. If you don’t have a set like this, you can find one at B&H Photo or Amazon.

Step 1: Remove the lens hood.

You use the lens hood, right? You should, for protecting that slightly bulbous front element from bumps and scratches, if nothing else. Anyway, time to remove it, for just a few minutes.

Step 2: Lock to infinity.

As mentioned before, infinity focus is easy with an Irix. Just turn the focus ring until you feel it click into the infinity detent.

lock Itrix 15mm.jpg

Then turn the focus lock ring all the way to “lock.” I use two hands for this and I move slowly so that the focus ring doesn’t move while locking it down.

Step 3: Open the calibration window.

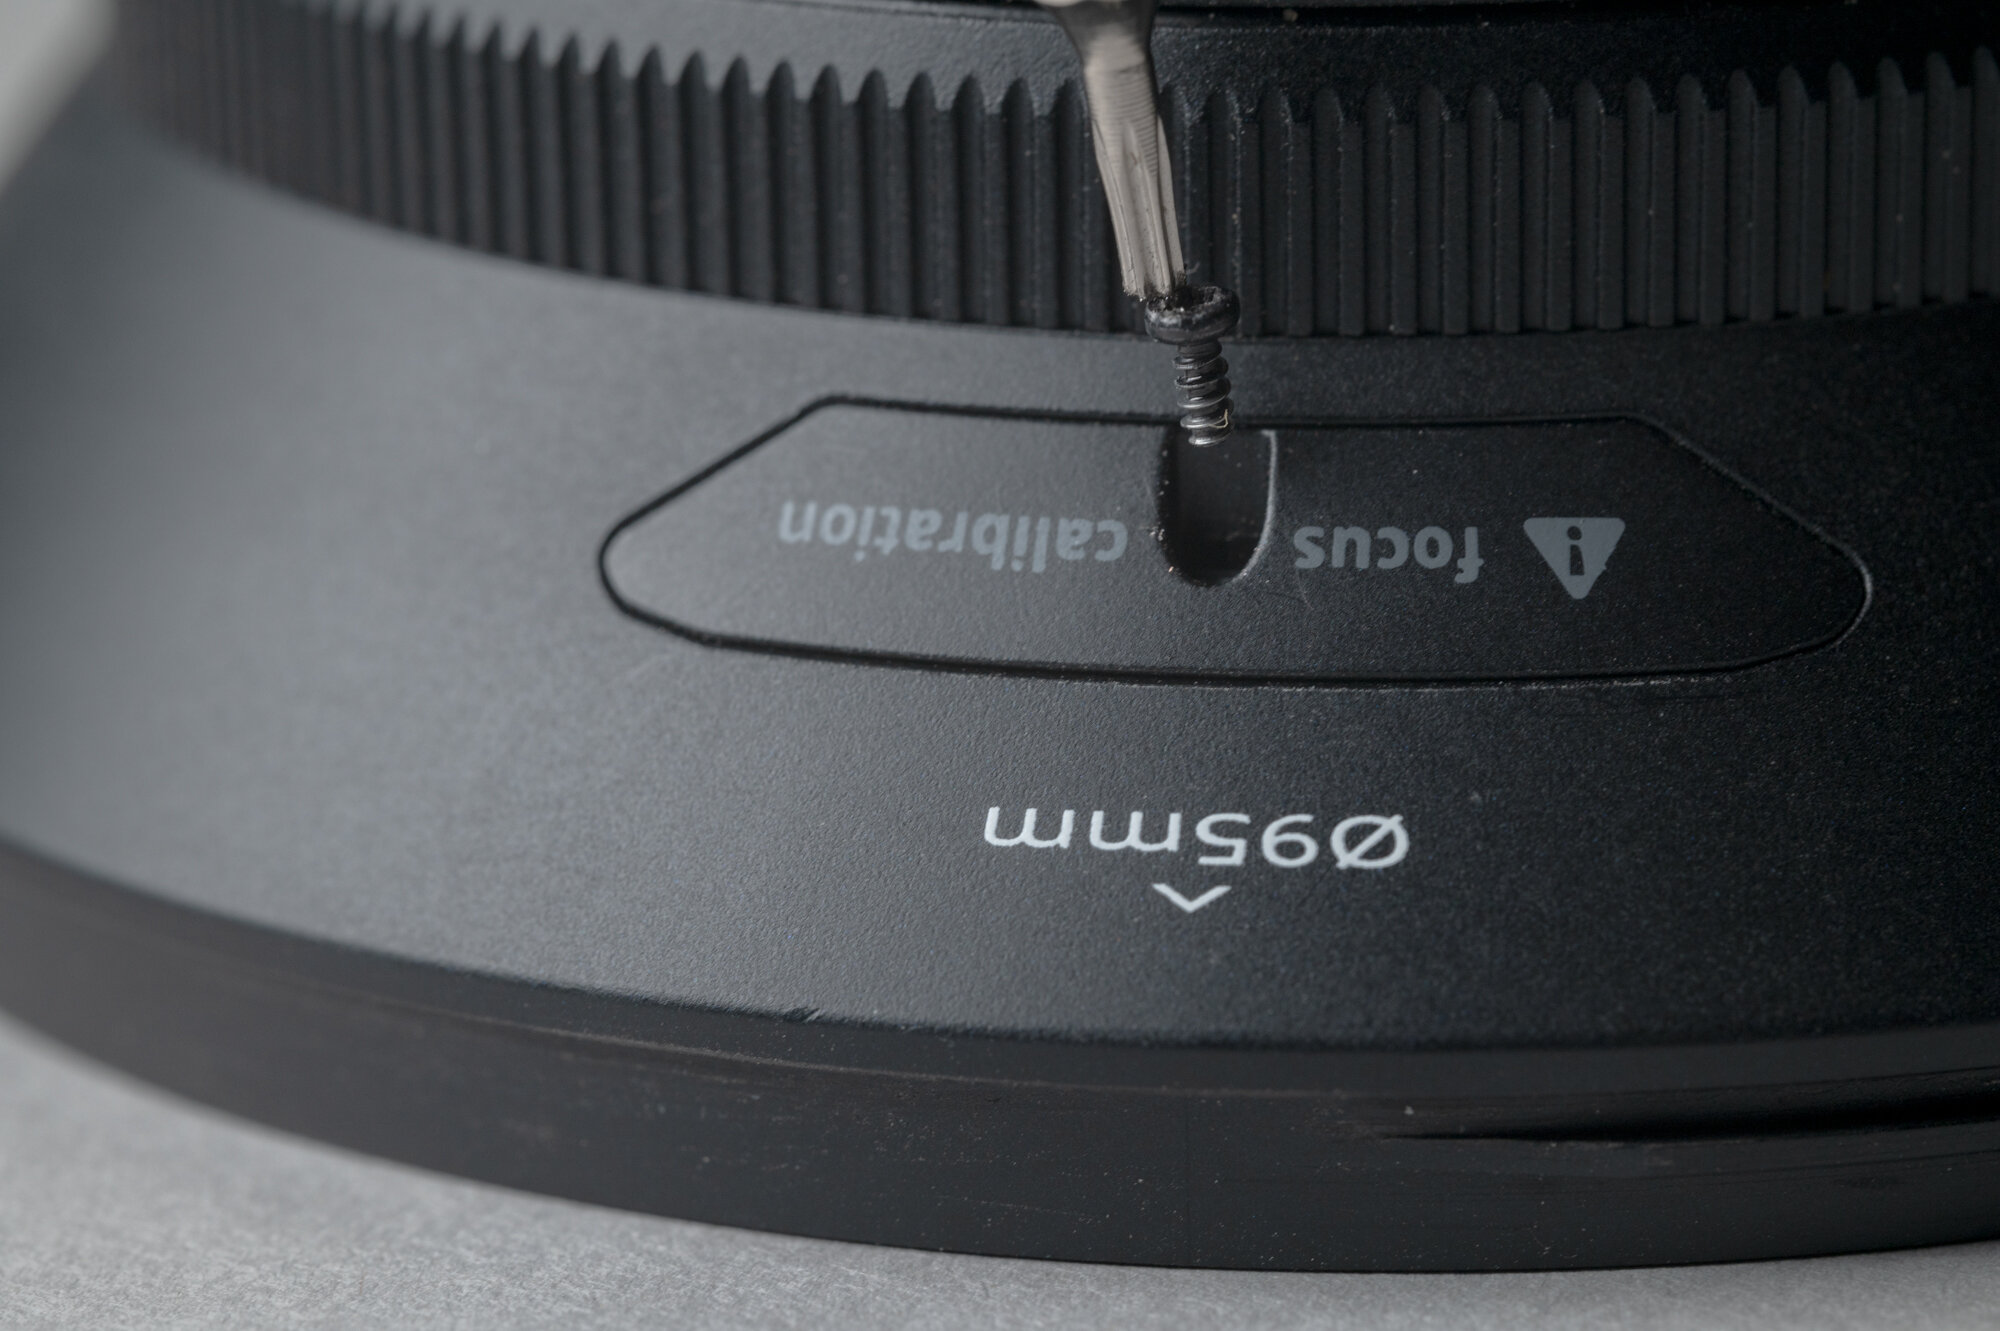
Use a Torx T6 screwdriver to open the calibration window by removing the screw entirely. Set the screw and cover aside in a safe place, such as a small plastic bin.

Carefully slide out the plastic cover labeled “focus calibration” (the head of the Torx screwdriver is convenient for lifting the cover away).

Step 4: Find the interior locking screw.

Look inside at the calibration ring, and find a slot screw. If you don’t see one, slightly turn the focus lock ring until you see the screw.

Note: You’re looking for the small slot screw, as opposed to the larger screws that keep the calibration ring in place. You absolutely do not want to unscrew the latter.

Step 5: Unlock the focus

Using a 1.5mm slotted screwdriver, fully remove the small locking screw from the calibration ring and set it aside in a safe place.

Note: This is where it’s vital you have a magnetic head on your screwdriver. You do not want to lose that screw inside the lens barrel.

Step 6: Set the lens.

Mount the lens on a camera and mount the camera vertically on a tripod. Make sure you have easy access to the calibration window.

Go outside in daylight and point the camera at a distant object (at least 36 feet away) with good contrast. Orient this object in the center of the frame and set your focus point to the exact center.

Set the aperture to the widest setting—i.e., f/2.4 for the 15mm or f/4 for the 11mm.

Step 7: Zoom in.

Activate your camera’s live view and zoom in to maximum magnification.

Step 8: Adjust the focus.

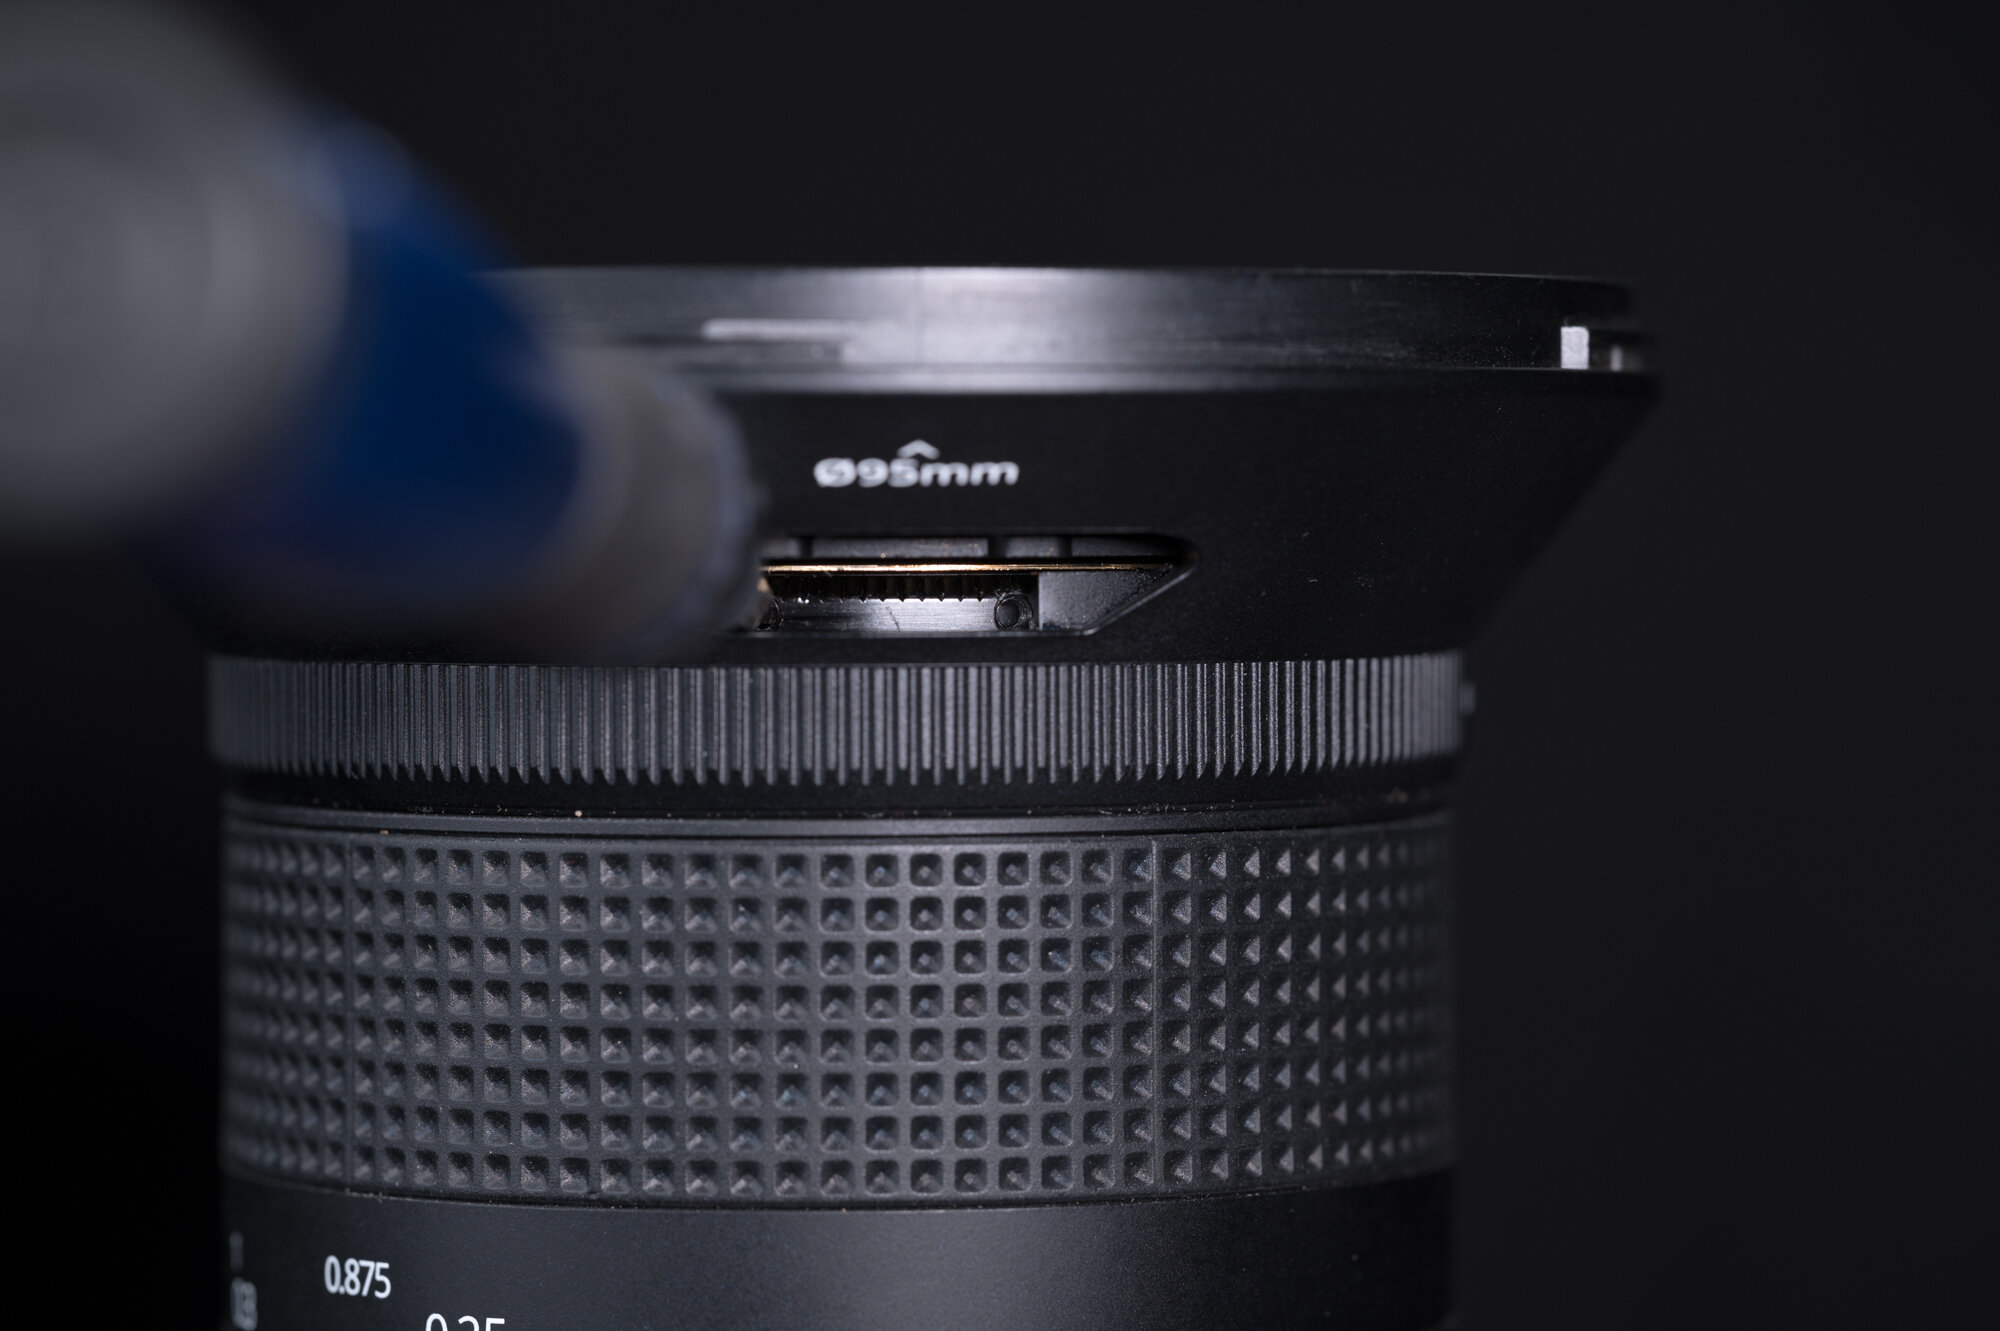
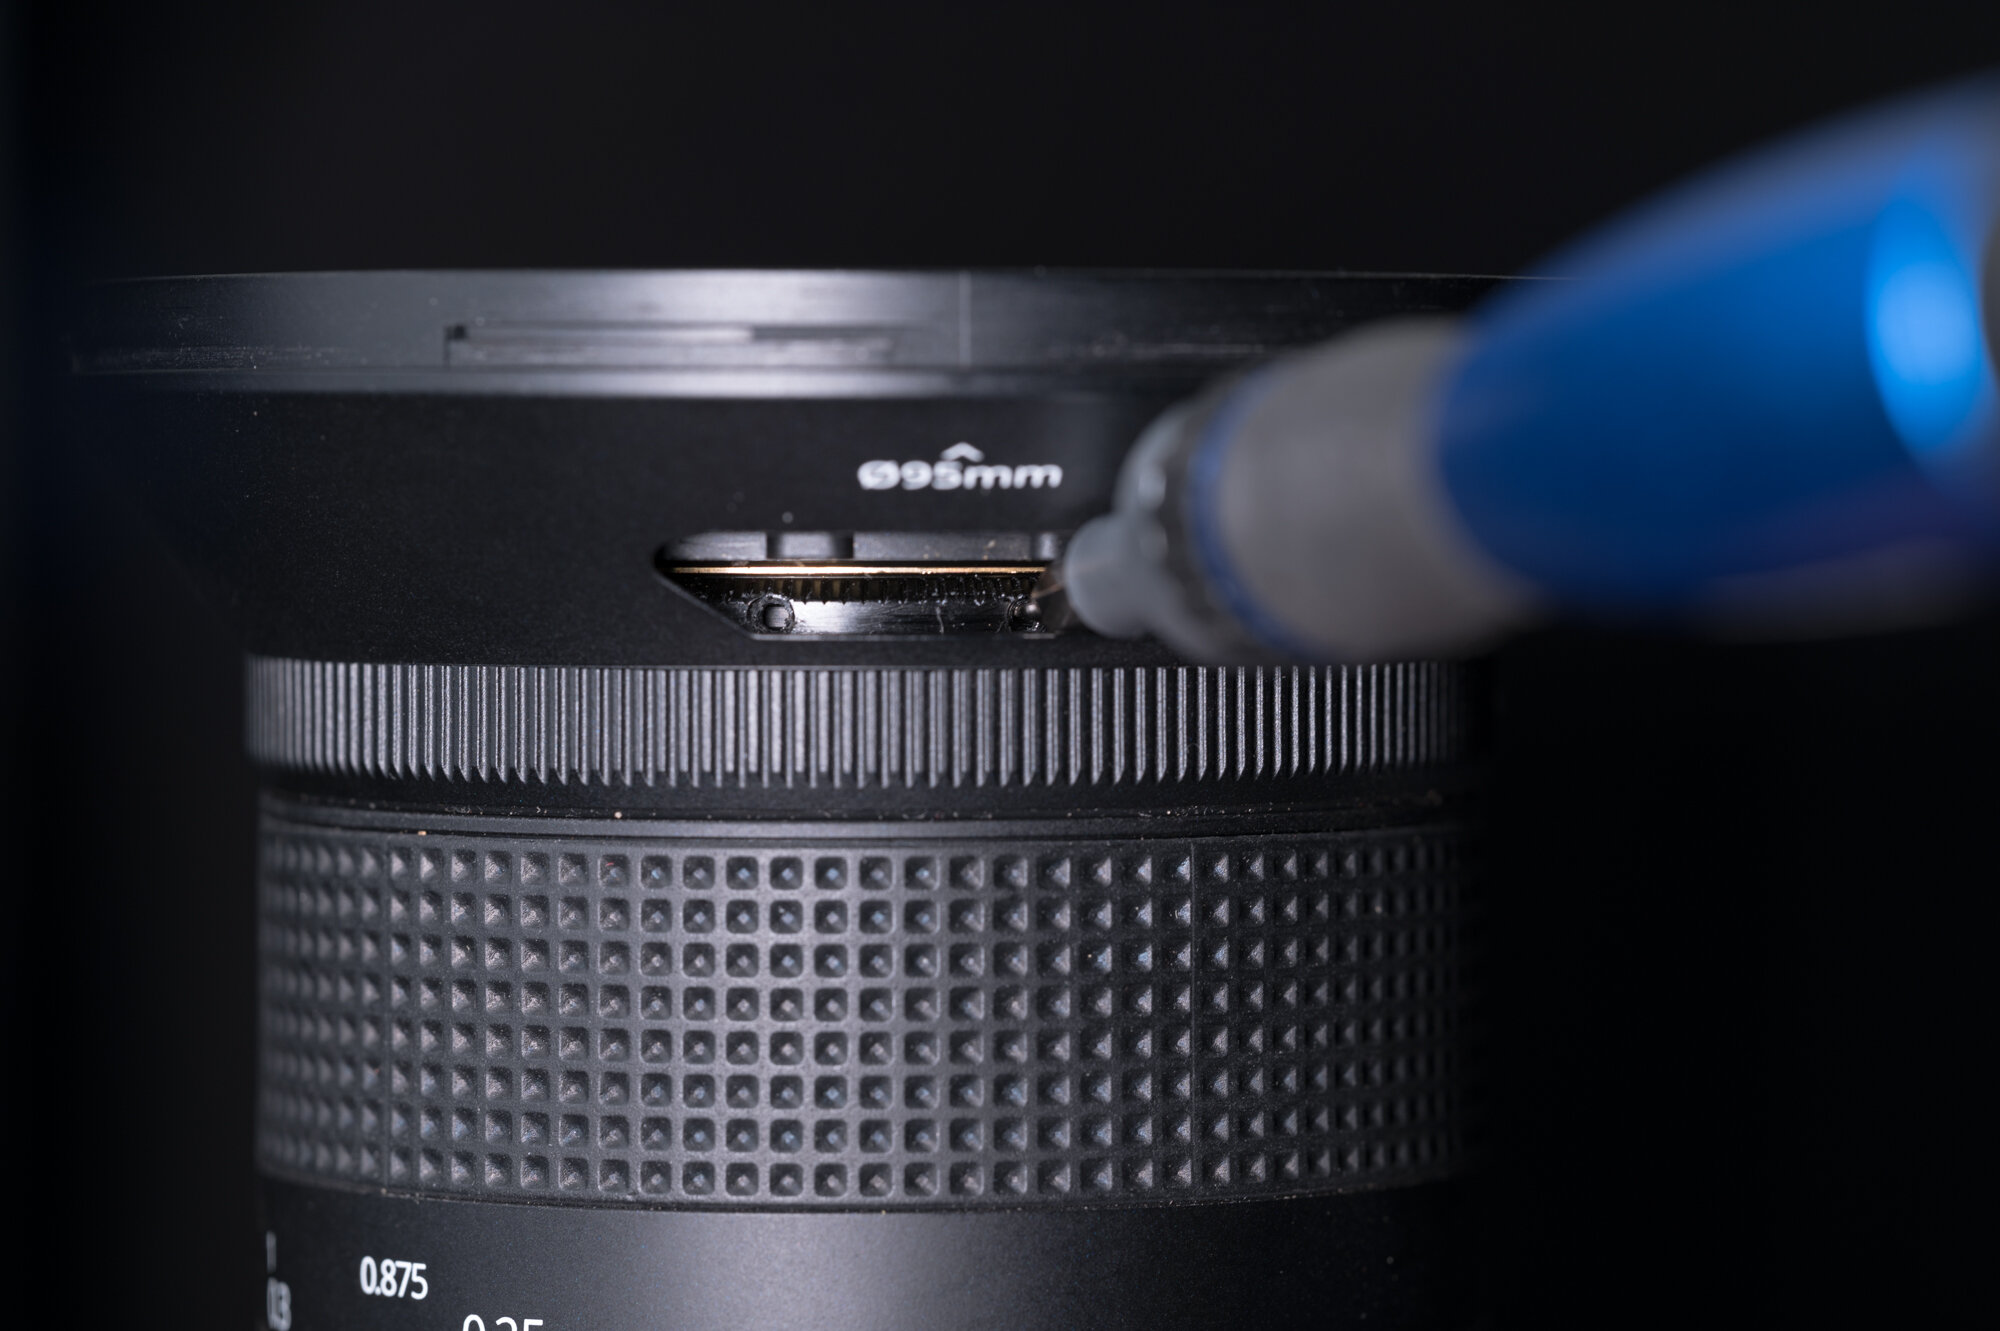
Insert the slotted screwdriver into one of the holes in the calibration ring, and then rotate the ring slowly back and forth. (As you adjust, you may need to choose a new hole.)

Keep rotating until the objects at infinity (36 feet away or further) become as sharp as possible on your rear LCD screen or when viewed in your EVF. It’s a very slow process. Take your time. If you have one, use a focusable loupe (such as the Hoodman HoodLoupe) to help you see the changing sharpness even better.

Step 9: Lock it Down.

Once focus is achieved, go back to your work area inside. Remove the lens from your camera.

Look for an open spot to thread the small locking screw back into the calibration ring. Depending on how much you adjusted the focus, that may not be the same hole you removed the screw from earlier.

Using the slotted screwdriver, carefully insert the screw and turn until firmly finger-tight. Do not over-tighten.

Step 10: Close things up.

Slide the plastic “focus calibration” cover back in, then secure it using the Torx screw and the T6 screwdriver.

Unlock the focus lock ring.

That’s it—you’re done! You now have a perfectly calibrated Irix lens for photographing amazing star images. I recommend heading out that night and shooting a few test images of the stars just to be sure.

For those who like to watch, here is Irix’s video version of this tutorial:

Matt Hill is a partner and workshop leader with National Parks at Night. See more about his photography, art, workshops and writing at MattHillArt.com. Follow Matt on Twitter Instagram Facebook.

UPCOMING WORKSHOPS FROM NATIONAL PARKS AT NIGHT

Controlling Highlights in Urban and Suburban Night Photography

I love shooting suburban night scenes. Which is a good thing, because I live in an awesome place for it: the historic, charming, picture-perfect village of Catskill, New York.

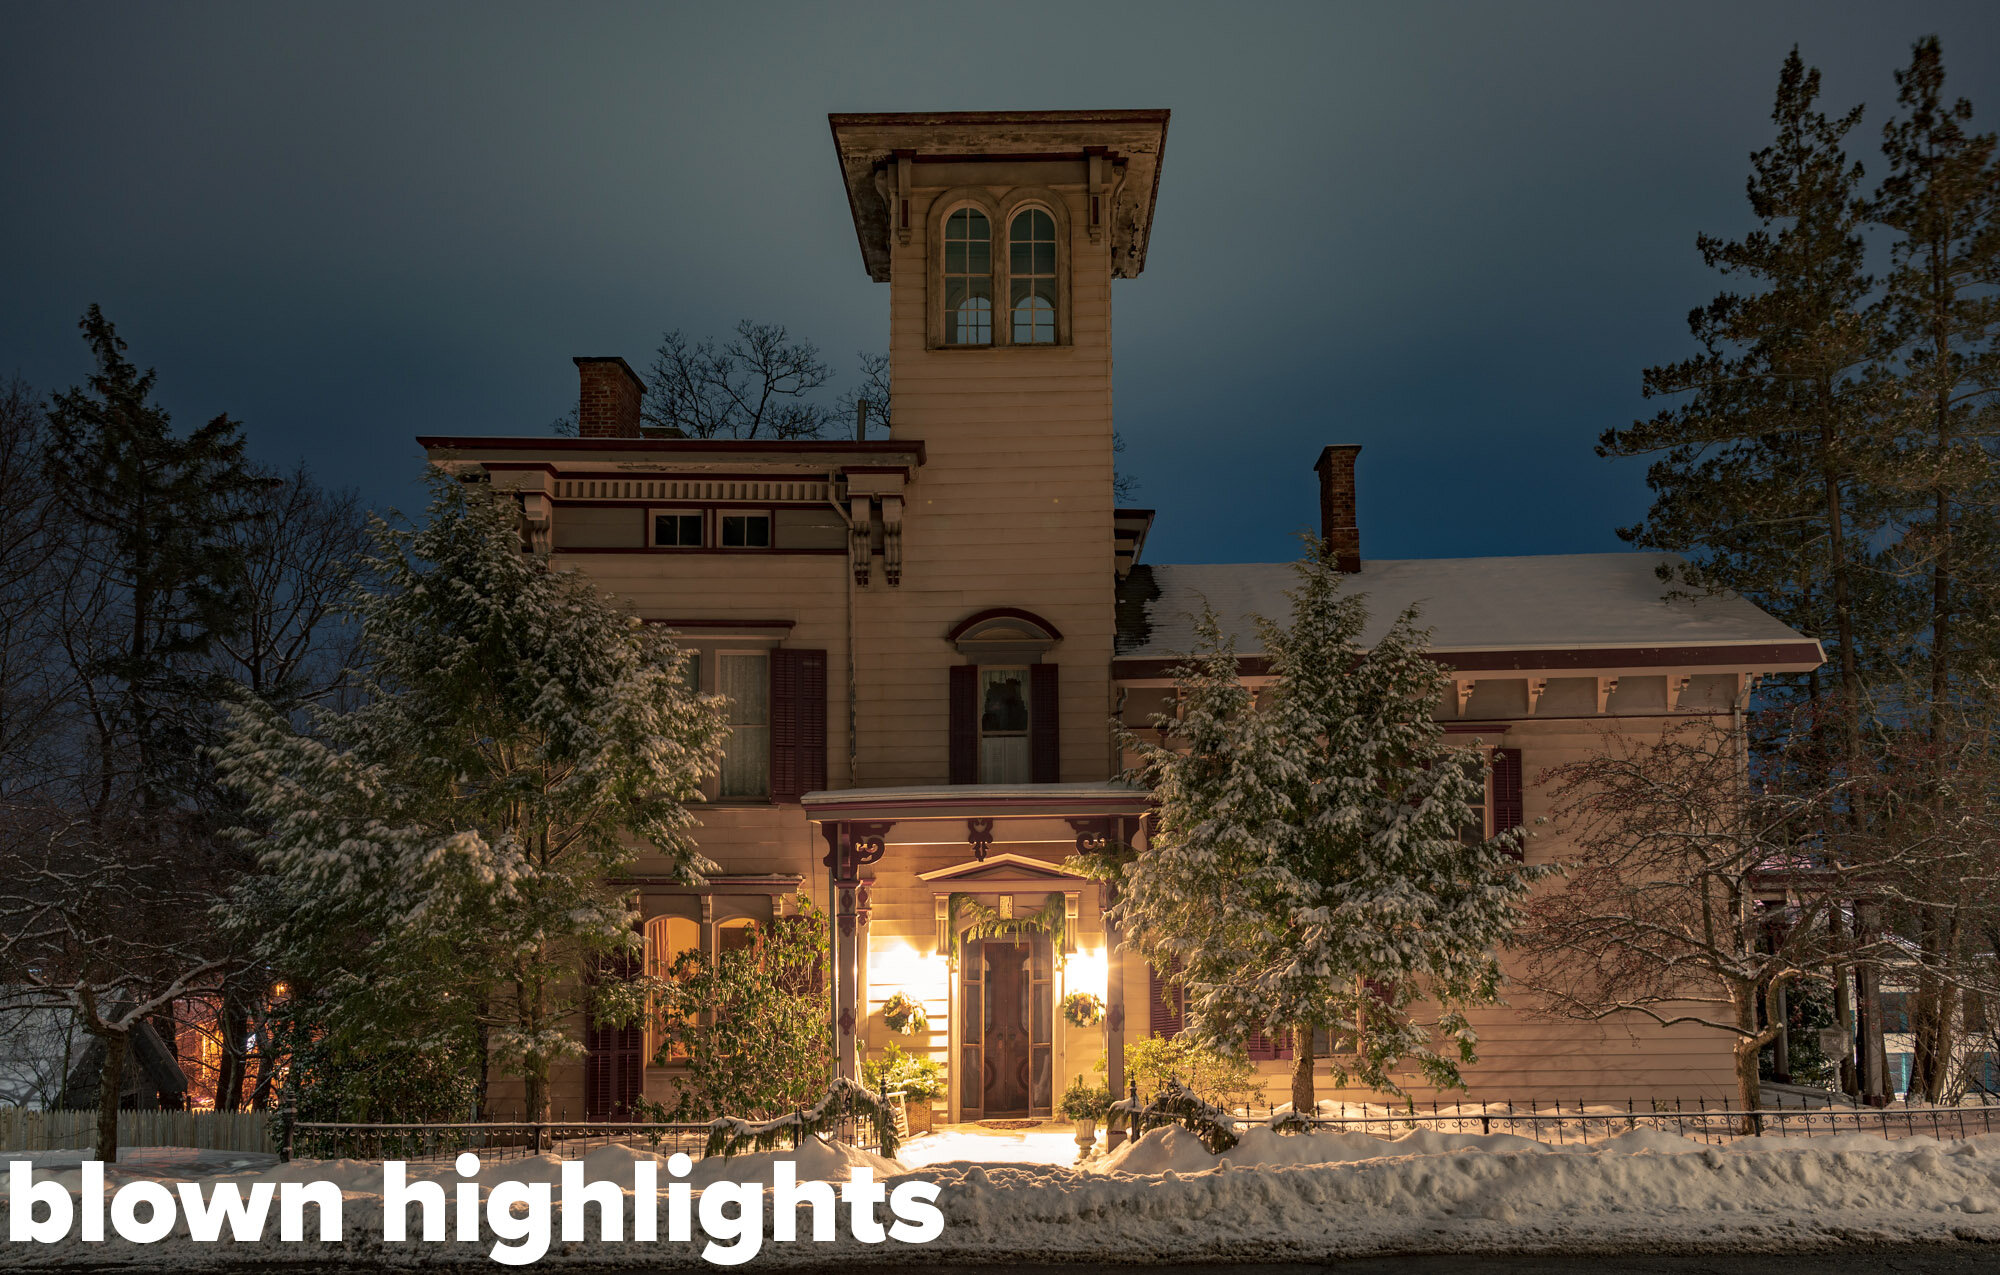
But working a suburban environment (and especially an urban environment) at night comes with a major challenge: artificial lights. Wherever we find artificial lights at night, we also find blown-out highlights in photos.

While working on my #CatskillNights project, it’s common for me to see a cool home that looks great to the naked eye but that doesn’t look so great in a single exposure. The dynamic range between the brightest brights and the shadow details are just too far apart.

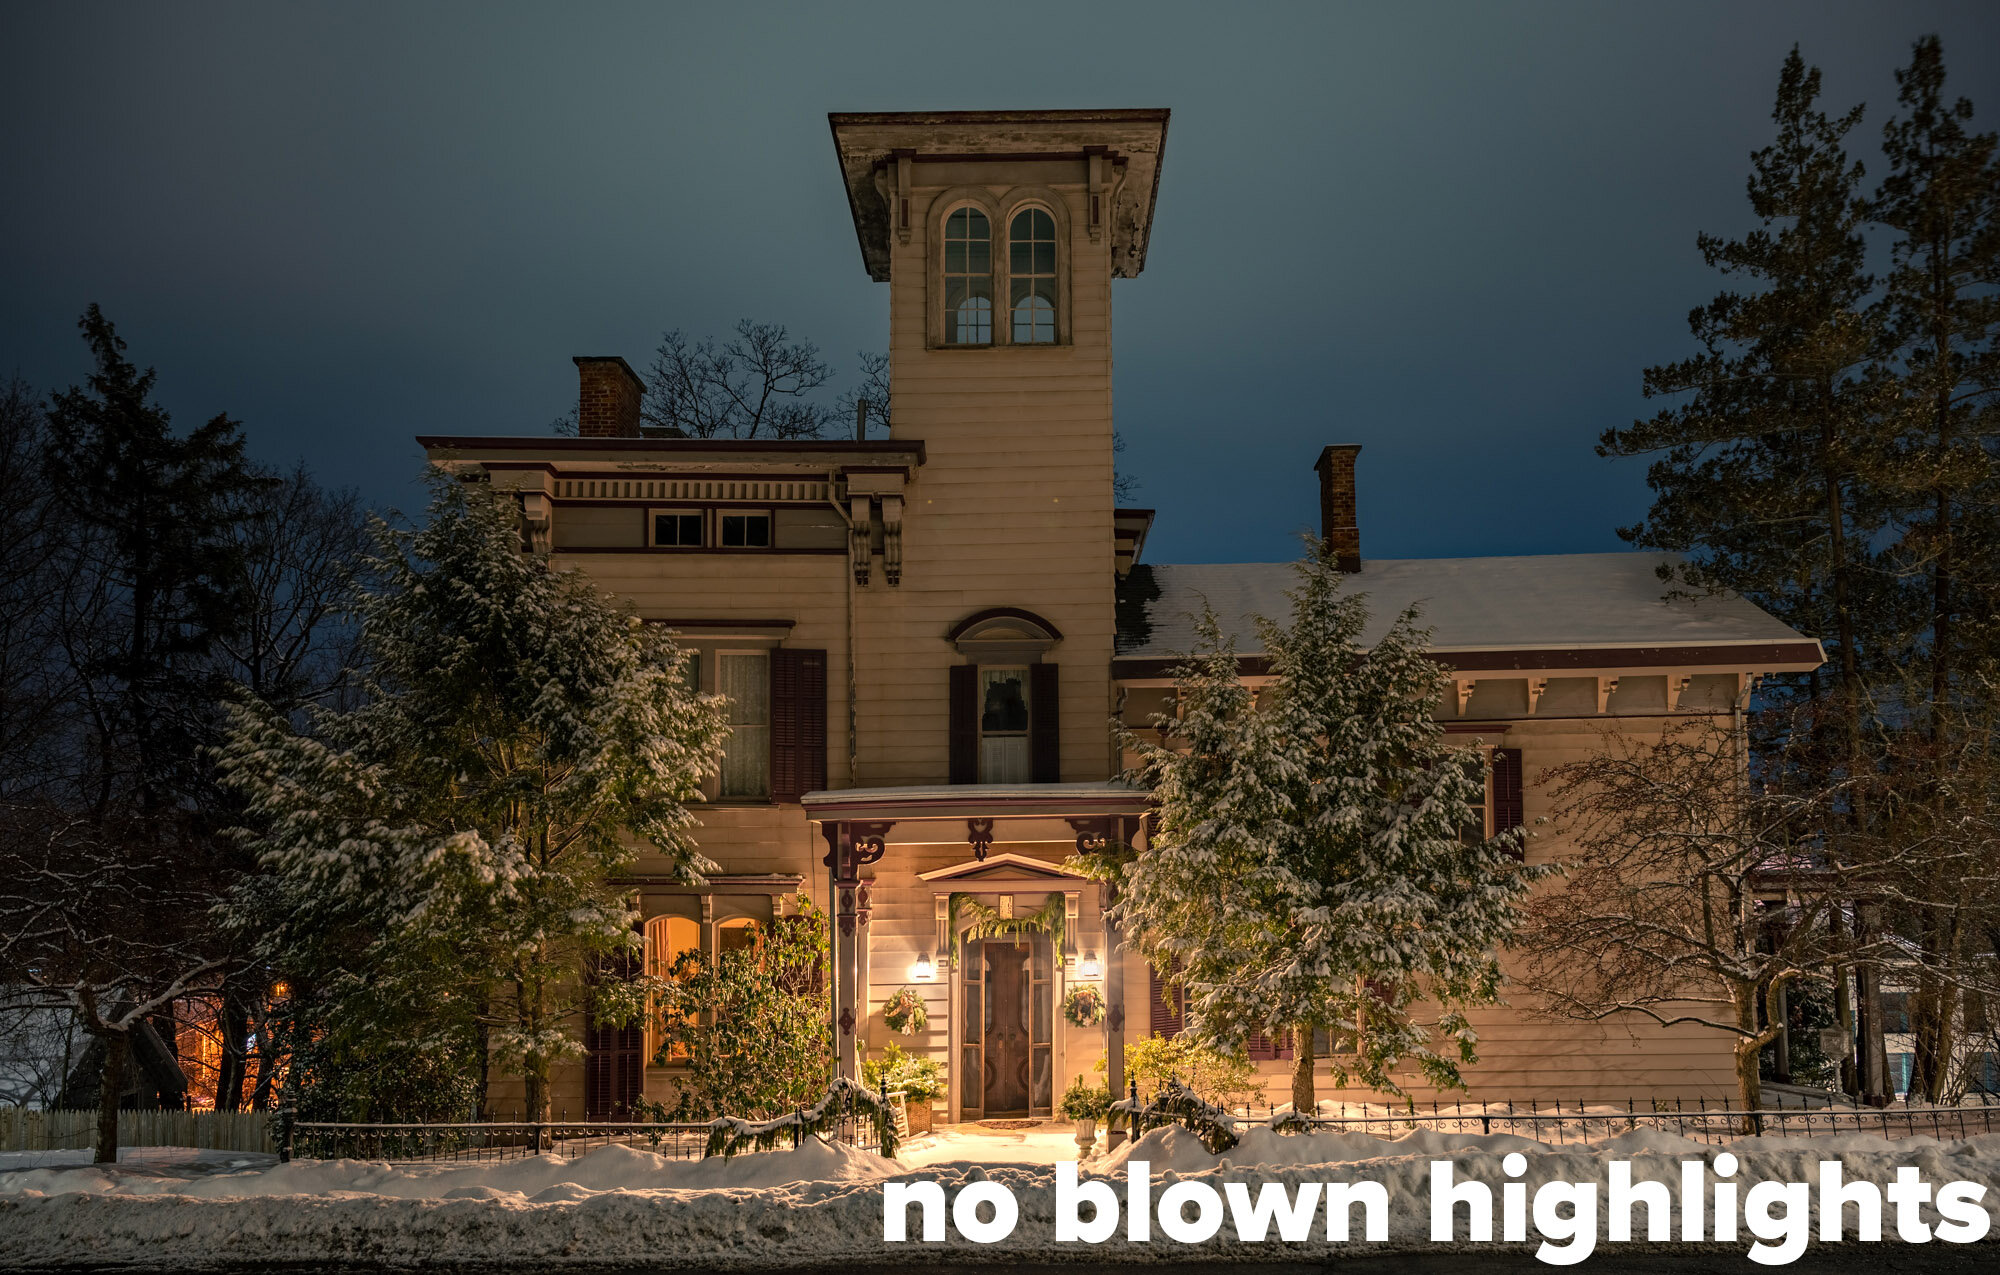
Castle in the Snow, Catskill, New York. Nikon Z 6II with a Nikon 24-70mm f/2.8 S lens at 24mm. Four merged frames shot at 30, 10, 3 and 0.6 seconds; f/5.6; ISO 100.

How do we control this? By shooting multiple images at different exposures and combining them during post-processing into an HDR image.

But you must shoot it right on scene to have a chance of processing it right in post. So let’s begin with:

Getting it Right in Camera

First up, try to strategically hide visible light sources behind columns or trees. That will save you lots of highlight headaches. Why? Because it’s not the light that’s causing the problem—it’s the light source. It’s the bulb, the lamp, the streetlight itself. If you can hide those things behind objects in the composition, they go from being a problem to being magic.

If you can’t do that, no worries. Read on.

For my first frame, I shoot for an ideal overall exposure that has clear shadow detail. The highlights will blow out. That’s fine. For now, essentially you just want your camera’s histogram not to collide with the left side (Figure 1). Don’t worry about the right.

Figure 1.

For my second frame, I stop down 1 to 2 stops to rein in some highlight data, and then I inspect the image. And the histogram. Then I shoot more frames. I keep reducing the shutter speed by 1 to 2 stops until the highlights retain color and tonality.
Nikon Z 6II with a Nikon 24-70mm f/2.8 S lens at 24mm. 30 seconds, f/5.6, ISO 100.

10 seconds, f/5.6, ISO 100.

3 seconds, f/5.6, ISO 100.

.6 seconds, f/5.6, ISO 100.

To be extra sure, I zoom to 100 percent to ensure there is detail. If I don’t see highlight detail, I stop down further and make another exposure.

Below is an example of how a single shot can have terrible highlight transitions, versus a processed HDR composite. Look at the first image around the lantern and note the missing details on the wall, then look at the second image and note the complete details on the wall. It’s subtle when it’s right, but blatantly obvious when it’s wrong.

That’s it, really.

Make a great overall exposure and keep reducing your shutter speed until you get beautiful light sources with no highlights blowing out.

Also, you may notice that I shot every image in this post at ISO 100—because that’s the native ISO of the Z 6II. Do the same. Find your camera’s native ISO and shoot there. Cameras produce images with the widest possible dynamic range at native ISO, which is essential for this type of work.

You might consider getting fancy with your skies in a final, longer exposure (knowing you can mask the bottom half out in post—see Tim’s blog post on this in the near future). You could also create star trails, or points, or make really interesting cloud streaks. The sky is the limit (hee-hee).

Below are three more straight-out-of-camera image sets that show how I bracketed exposures to set myself up for a good night HDR final image. Each starts with the good overall exposure and ends with the frame that has decent highlight detail.

Processing the HDR Raw Materials

Thanks to constant improvements in software, making natural-looking HDR images is easier than ever. Many software vendors offer HDR options. I will be limiting this demo to how I use Adobe Lightroom Classic.

(Note: I find that using Adobe Photoshop for HDR is less intuitive and flexible—for me, anyway. I prefer the DNG workflow of Lightroom, and having only rasterized images coming back from Photoshop is too limiting.)

In the Lightroom grid mode, I select all the images in the sequence, right-click (Control-click on a Mac) and choose Photo Merge > HDR (Figure 2).

Figure 2.

In the HDR dialog (Figure 3):

  1. I toggle Auto Settings on and off to see which gets me closer to my goal. More often than not, Auto settings “on” is better for me.

  2. As for Auto Align, I always leave it on—no harm in doing so.

  3. For most nights, setting Deghost to “none” works fine for me. Unless there is a stiff wind or other movement in critical areas.

Figure 3.

Once I click “Merge,” a task is created inside Lightroom, the job will be processed, and the merged image will appear in the catalog alongside the other images (Figure 4).

Figure 4.

Now for the magic of editing.

For urban/suburban images, I first neutralize the color temperature and then warm it up a tad. (Tap the W key to activate the White Balance Selector, click on something white, then use the Temp and/or Tint sliders to warm to taste.)

Figure 5.

That gives me a good starting point for marching through the rest of my processing process:

  1. I go straight to Profile and change it to “Adobe Landscape.”

  2. I start sliding the Dehaze slider to the right. Pushing Dehaze also adds saturation, so …

  3. I usually pull back the Saturation slider a tad.

  4. I try lightly lowering Contrast.

  5. I usually drop Highlights down and push Shadows up.

  6. I make sure the black point is at the dead left of the histogram to get rid of any muddy shadows.

After doing those top-level edits, I use Transform (Figure 6) to straighten any vertical keystone effects from having used a wide angle lens tipped upward.

Figure 6.

Finally I do highlight control. Using a local brush, I make sure the visible light sources are believably detailed. I may lower the exposure, highlights or whites a little bit to taste. Or not at all. I am just looking for some details and hue in the light sources (Figure 7).

Figure 7.

I aim to shoot every light bulb to render it perfectly, yet to also make it look like a light source participating in the illumination of the scene. It’s a delicate balance to pull off naturally. Too much detail equals too much fake.

Less Has Been More

I have noticed that I’ve had a lot of success with HDR composites that are made from only two images. One that’s a solid general exposure and one that’s for extreme highlight control.

Why is that? I’m convinced the dynamic range of my Nikon Z 6II is so expansive that I have enough information to make a decent exposure of everything except for the light-source highlights. So I’ve found myself shooting fewer frames for sequences—and if I shoot more frames, they’re strictly for highlight control and not for revealing shadow details.

Here are some examples, each showing the good overall exposure followed by the highlight-control exposure followed by the final HDR:

I tested that theory by processing only one of the best single exposures to the best of my ability, then processing an HDR, and comparing. Noticing the areas of the image that actually needed to be improved really locked in for me how I need to shoot to make a “meh” urban photo into a banger.

Do the same. Test your particular camera to learn how you need to expose to make this all happen. Note that the older your camera is, the less dynamic range it probably has, so the more frames you’ll probably have to shoot to get good detail throughout the exposure.

Summary

It’s pretty simple to make gorgeous HDR images in urban and suburban areas:

  1. Get a good overall exposure, ignoring blown-out highlights.

  2. Get the highlights right in camera—shoot as many images as you need to get detail in them.

  3. Combine the images in Lightroom.

  4. Cook to taste (tastefully).

Have fun out there and be safe!

Matt Hill is a partner and workshop leader with National Parks at Night. See more about his photography, art, workshops and writing at MattHillArt.com. Follow Matt on Twitter Instagram Facebook.

The Conversation Continues …

See Matt and Lance talk more about “Controlling Highlights in Urban and Suburban Night Photography” in our #BlogChat YouTube program:


UPCOMING WORKSHOPS FROM NATIONAL PARKS AT NIGHT

10 Silver Linings: Our Favorite Night Photographs of 2020

If you were to wrap up everything that was 2020 into a single long-exposure frame, I’m confident it would be overexposed. (Too soon?)

But that’s not how we do it around here. We take our time. We are choosy. We are deliberate. We expose for the shadows, yet retain critical details in the highlights. We exercise the right to turn our tripod around 180 degrees and shoot the other way. Why? Because the next best shot is somewhere near the infinite focal point of our lives: night photography. 

Now we embark on the hardest quest of the year: to each choose only two frames to represent our favorite creative photographs from of 2020. Please enjoy the highlights from each of our agonizing selection processes. Keep in mind, we (mostly) love all of our photos. But these rose to the top.


Chris Nicholson

Comet Neowise, Monhegan Island

Comet Neowise, Monhegan Island, Maine. Nikon D5 with a Nikon 24-70mm f/2.8 lens. 5 seconds, f/2.8, ISO 25,600; 16 images stacked in Sequator.

One of the nice surprises of 2020 was Comet Neowise. It was a gift to anyone who had been longing to be outside under night skies again, especially photographers. It first appeared at night at the beginning of our July workshop in the Mid-Coast region of Maine, and it really started to shine during our subsequent workshop on Monhegan Island and in Acadia National Park.

It was on Monhegan that I made this image. Lance and I had been shooting on the island for two nights alone, then two nights with the group. On the last of those evenings, in the extra-late hours, I found myself alone on an extra-quiet trail along the rocky shore. I came upon this house and cottage, with the comet nestled quietly in between.

What I didn’t see through the dimly lit window was the perfectly framed head of someone sleeping on a pillow. That detail became apparent only when viewing the long exposure on my laptop display the next morning. Sometimes surprises make the image, and for me that was certainly the case here. Aesthetically I had liked the photograph before, but once I saw the sleeper, I loved it.

The open window and the sleeping would-be stargazer under the comet-adorned night sky all combine to tell the tale of what it felt like to be outside and at peace again.

Moon Over Mobius

Moon over Mobius Arch, Alabama Hills National Scenic Area, California. Nikon D5 with an Irix 11mm f/4 lens, light painted with a Luxli Viola. 20 seconds, f/8, ISO 3200.

In October I was finally able to visit and photograph Alabama Hills—a place I’d seen many photographs of, as Lance, Tim and Gabe have shot there plenty.

Night photographers are of course drawn to rock formations, and Alabama Hills offers a nearly infinite supply of them. Perhaps the most famous, especially for photographers, is Mobius Arch. The day I photographed it was (and still is) the only day I’ve been there, but I was able to shoot it in amazing late-afternoon light, and later in serene moonlight. Yet those two opportunities were hours and hours apart.

I’d spent most of the evening helping workshop participants in other spots, ranging from right next to the cars in the parking lot (where folks were shooting star-panos of the mountain range that flanks the boulder-strewn landscape) to locations far and off the trail (where others were shooting star circles over that same landscape). Only at the end of the night did I return to Mobius, with the last two participants alongside. The three of us worked quietly together, each honed on our own ideas of how to interpret the scene.

I worked on this particular take for about 20 minutes. I already knew the exposure and the light painting approach from previous takes. The trick, though, was following the moon as it set behind Mobius, inching the tripod along the ground, keeping la luna framed right at the edge of the arch from one exposure to the next, until I finally captured what I was hoping for.

Gabriel Biderman

Utakleiv Beach, Lofoten

Utakleiv Beach, Lofoten. Nikon Z 6 with a Nikon Z 14-30mm f/4 lens at 17mm. 8 seconds, f/4, ISO 12,800.

I feel very blessed to have gone to such a special place as Norway prior to the world turning upside down.

Lofoten was an epic experience, but our nights were tricky. Clouds and snow were our constant companions. We kept an eye on the weather and the Kp index to try to predict our best chance at capturing the northern lights.

Finally we saw a good report. The forecast for the elusive aurora opening was going to be from 8 to 9 p.m.—a narrow window before the clouds would roll back in.

We knew the perfect place to go: Uttakleiv Beach. We had spent a day at Uttakleiv earlier in the trip, so we were familiar with the terrain. It has seaside mountains to give scale and water to reflect the night sky.

I’ve never seen a weather forecast be so on point. When we arrived, the overcast skies made the situation seem like a bust. But at 8:00 on the dot, the skies cleared and the magical green lights started their dance. For most of our group, this was the first time witnessing auroras, but to be honest, even for the experienced, this night was pretty special.

For one hour we danced with the northern lights, aiming our cameras as the auroras moved along the purple skies. It was truly magical. And it lasted, as predicted, for one hour. For all of us who shared a night under the northern lights, we’ll carry the experience forever.

Summit Bridge, Red Hook

Summit Bridge, Red Hook. Mamiya 7 with a Mamiya 65mm f/4 lens. 30 seconds, f/8, ISO 100 (Fujifilm Acros II).

Upon returning from Norway, my “adventures” consisted of my apartment in Brooklyn and the surrounding areas. As frustrating as it was not to be under the stars of our national parks, I fell back in love with my “backyard” and film.

I live in Carroll Gardens in Brooklyn. It is a quaint neighborhood where everyone is proud of their front garden. I battled my stir craziness during the pandemic by taking night walks in the neighborhood. I dusted off one of my favorite film cameras—my medium format Mamiya 7—and got back to the basics of shooting film. Brighter urban lights make film exposures fairly easy to determine. 2020 also welcomed the return of Fujifilm’s Acros 100 (now II), which has the least reciprocity of any film on the market and makes long exposure film shots relatively easy.

My walks would often lead me to neighboring Red Hook, which features a mixture of industrial buildings, wharfs, cobblestone streets and old-school residential homes.

Summit Bridge, a small bridge that takes pedestrians up and over the Brooklyn Queens Expressway, unites our two neighborhoods. I’ve walked over it a thousand times, but this time all the elements of the scene clicked for me. I saw lines leading up to the beacon of light. Heck, there were lines galore! The lines of the steps connected with the lines of the rails, which intersected with the lines of the spear-headed fence, and the light reflecting on the brick building also leads the eye to the fence, which all leads back to the focal-point light.

I shot this just two weeks ago. The image is a perfect bookend for a year that started in a distant archipelago and ended very close to home.

Lance Keimig

Portland, Oregon

Portland, Oregon. Nikon D780 with a PC-E Nikkor 28mm f/3.5 lens. 8 seconds, f/8, ISO 100.

Probably like most people, 2020 was not my most productive year, photographically or otherwise. All in all, I count myself lucky though. We managed to hold a few workshops, stay healthy, and fill most of our 2021 workshops and tours. The at-home stress test with my partner Katherine only brought us closer together, despite both of us dealing with ongoing family crises. I’m coming out of this horrible year in better shape than a lot of people, and am grateful for it. Creatively, the year is a write-off, and that’s OK, all things considered.

Katherine and I went to Portland, Oregan, to help celebrate a friend’s birthday in late February, just as the COVID-19 scare was beginning. While there we got together with another old friend who took us out night-shooting in an industrial area that just happened to be near a brewery that Gabe said Katherine and I had to visit. (We did.)

One of the things I came to realize in this truncated year was that I really miss urban night photography. It’s where I started, and I plan to get back to it in a big way when COVID subsides.

This image might not have a lot of appeal to most people, but I love the simplicity of it. The repeating shapes, the backlighting, the shadows, the minimal colors. It’s the kind of image I used to make all of the time, and want to make again. I guess that I also like it because it represents the last moments of freedom before we were all overwhelmed by the pandemic.

Acadia National Park

Eagle Lake panorama, Acadia National Park, Maine. Nikon D750 with a Sigma 24mm f/1.4 Art lens. Five stitched images shot at 15 seconds, f/2, ISO 6400.

Chris and I were joking that I’d be submitting Comet Neowise images as obvious favorites, because that’s pretty much the last time I took a night photograph. I do have a couple of decent comet photos, but it was this pano of Eagle Lake in Acadia National Park (made during the comet’s peak) that I chose to share here. Many of you know that Acadia is one of Chris’ favorite parks, and I was very happy to have been able to spend some time with him there this summer as part of the two back-to-back workshops we somehow managed to pull off in Maine in July.

I’m generally not a landscape photographer, nor a big Milky Way shooter, but this was such a gorgeous scene, and such a peaceful place to be in such a calamitous time, that the memories of being there that this image brings back make it my second pick for my favorite images of the year.

I’m thinking now how snapshots to the non-photographer serve mainly as memory triggers to take one back to a time and place from the past. I guess the same can be true for professional photographers too, as that’s what this image does for me. It’s a bookmark in time, in this case for a brief reprieve from the nonstop barrage of bad news that was 2020. But—this year is coming to an end, and if we are diligent, and a bit lucky, as we round the corner into 2021, things will start to brighten, and new opportunities will await. I’m ready for them.

Matt Hill

Lance on the Racetrack

Lance Keimig on Racetrack Playa, Death Valley National Park. Nikon Z 6 with a Venus Optics Laowa 15mm f/2 FE Zero-D lens. 20 seconds, f/5.6, ISO 1600.

If I could sum up 2020 with one image, it would be this pensive portrait of Lance on Racetrack Playa in Death Valley National Park.

That workshop seemed to be foreshadowing the year ahead of us. We were plagued with adversities. From sand storms to power outages to a scarcity of fresh food, only tenacity on everyone’s part brought us to a successful end. This included our alumni, the workshop leaders and the surprise guests (Gabe and Tim).

My consideration of this image includes the crisp starry sky, the crusty playa and the soft memory of where Lance lingered, considering what occupied his attention at that moment. In the distance you can see other people forming their own relationship with the night sky. Plus, the sign of perhaps other strangers arriving or departing in the car trail on the far side.

2020 will hopefully fade into insubstantiality as this instance of Lance’s pondering did. But hopefully the tenacity and lessons we bring with us will have a more permanent home in our decision-making process.

It’s my wish that we will employ more empathy. Take a little more time to consider the perspective that distance from “normal” offers. And to take the hope one can find in this and apply it to making the things we find important thrive.

Molly Diptych

Diptych of Molly on the Hudson River. Nikon Z 6 with a Venus Optics Laowa 15mm f/2 FE Zero-D lens, lit with a LumoPro LP180 speedlight and a Nanlite Pavotube II 6C. Left: 10 seconds, f/4, ISO 3200; right: 6 seconds, f/3.5, ISO 100.

If you could truly render your perception of another being into a descriptive portrait, how would you approach executing it? I ask myself this before many portrait shoots.

This particular diptych of night portraits was the culmination of something I hold very dear: the opportunity to collaborate with other creative people. Such as the subject of these portraits and the team around this shoot.

Molly, who posed for these, has layers upon layers of truths she finds crucial and things about the world she works tirelessly to improve. From social justice to art, her strength of character and determination were elements I wanted to preserve and to enhance.

Being a fellow artist and photographer, Molly was able to offer contributions that went beyond posing in front of the camera. Her willingness to collaborate, with clear ideas on how she wanted to pose, and her willingness to stand in the murky Hudson River on a warm July night all yielded a rich session with many images I love.

For a few years we were promising to make some art together. And this was really one of the first few chances. I’m happy. And I believe the diptych of Night Paper on the left and a light painting night portrait on the right speak to each other.

The best ideas really require getting other people involved to render the vision. The other people I want to thank are Kelly Mena for producing the video shoot preceding the Night Paper shoot, and my wife Mabel for being my stalwart creative support on the video and portrait shoots. And for that matter, practically everything else.

For me, 2020 will always be a time of exploring the realities and concepts behind isolation, safety and security. This portrait pair is one glimpse into a topic I want to explore even more.

Tim Cooper

Steam at Excelsior Geyser

Steam at Excelsior Geyser, Yellowstone National Park. Nikon Z 6 with a Nikon 14-24mm f/2.8 lens at 20mm. Two blended images shot at 6 seconds, f/2.8, ISO 1600 (foreground) and 15 seconds, f/2.8, ISO 6400 (background).

During our Yellowstone National Park workshop in September, Chris and I brought the group to one of the largest and best-known thermal features in the park: Grand Prismatic Springs. It’s known almost exclusively for the glowing oranges and yellows of the algae and bacteria mats that surround the deeper blues of the spring. But even there, there’s much more than just one shot. And sometimes that other take can be the hero image.

While walking the location, I noticed a car coming down the road backlighting the profuse steam generated by nearby Excelsior Geyser. The play of light and shadow through the steam was simply fantastic. I knew I had to somehow capture it by the end of the night.

By the time the group left, the shot was much more challenging to make. When I exposed for the steam and car lights, the sky rendered pitch black. On the other hand, exposing for the sky overexposed the steam. This situation called for two different exposures at different times.

For the image of the sky, I waited for a break in the steam and exposed to capture Jupiter and the stars. For the next image I had to wait for an oncoming car to backlight the steam—which by that time of night took awhile. After several attempts I finally made the images I would use to create the final composite.

The backlit moving steam and the tree and mountain silhouette came together to create an ethereal image that, for me, perfectly captured the mood of the scene.

Colorado Silky Way

Silky Way over Last Dollar Road, Colorado. Nikon Z 6 with a Nikon 50mm f/1.8 lens. Two blended images shot at 2 minutes, f/2.8, ISO 320 (foreground) and 8 minutes, f/2.8 ISO 160 (background).

The San Juan Mountains of western Colorado is one of my favorite places in the world. I’ve been running workshops there every year since 1995, and I never tire of the area or the scenery. When I am there, I am inspired.

I made this image during our workshop in October, at the end of our traverse over Last Dollar Road, one of the lower mountain passes in the area. Chris and I had chosen this location as a spot where we could photograph both the sunset and, later, the Milky Way. After an awe-inspiring drive, we arrived just in time to time to frame up some shots of the sunset and then plan our blue hour compositions. Once these were made, we left our cameras set up and waited for the end of astronomical twilight. The skies were perfectly clear and every participant made great images of the galactic core.

Upon arrival, I had envisioned my final shot as a tack-sharp image of the core, but after experimenting with shutter speeds, I decided on an 8-minute exposure instead. Eight minutes of exposure is generally too short to create desirable trails when using a wide angle lens, but with the longer focal length of 50mm the trails are perfect. The narrow view of this lens also compressed the foreground and magnified the core to create the look that some call the “Silky Way.”

Your Turn

So there you go—from Maine to California, and even to Norway, and from a plethora of places in between—our favorite photographs from 2020.

Now we’d like to see yours! Please share your favorite night image from the past year, either in the comments below, on our Facebook page, or on Instagram (tag @nationalparksatnight). And then let’s all march forward together into 2021, when we’ll find new nights and new inspiration.

Matt Hill is a partner and workshop leader with National Parks at Night. See more about his photography, art, workshops and writing at MattHillArt.com. Follow Matt on Twitter Instagram Facebook.

UPCOMING WORKSHOPS FROM NATIONAL PARKS AT NIGHT

How to Deal With Light Pollution, Part I: Filters

Note: This is the first in a three-part series about one of the most common questions we get: How do you deal with light pollution? We have three answers: with filters, with post-processing, with creativity. In this week’s blog post, Matt Hill discusses the first of those solutions: light pollution filters.


Light pollution is a reality. It affects humans’ quality of life. And it’s not addressed in a serious manner by most local governments.

When it comes to night photography, it’s purely up to individual aesthetic if light pollution is positive, negative or neutral.

I like to think of the problem as a coffee metaphor. Would you make coffee without a filter? No. That would be sacrilege (and like drinking mud). The same principle applies to photography. There are certain situations wherein a filter does exactly the right job and is therefore necessary. Neutral density and polarizers are perfect examples.

But as light pollution filters are relatively new to the photography world, the question stands about whether they fall into the same category. So I set out to understand if and when light pollution filters are useful. After some deep testing experimenting in post-processing and hours thinking about the issues, I have some observations and suggestions for you.

The bottom line is this: Yes, light pollution filters are very helpful in certain situations. Read on to find out when I’d suggest using them.

Note: This will not address deep-sky light pollution filters used typically for strict astrophotography. I focused on what we do best: astro-landscape and suburban/urban night photography.

The Problem(s)

1.  exactly what light pollution filters do is not clearly described.

The manufacturers of light pollution filters claim they remove unwanted color casts from night photography. But very few, if any, provide graphs or data showing which wavelengths of light are blocked. On top of that, very few laypeople know what the heck those mean anyway—so maybe that’s why they aren’t just readily available on the manufacturers’ websites.

In short, the makers say that the filters block a yellow glow. And most often they claim the glow comes from sodium lights. But there are distinctions in this range. As we see in Figure 1, low-pressure sodium vapor lamps typically emit at 589 nm (nanometers).

Figure 1. Source: Wikipedia

The Irix website provides the chart in Figure 2, which clearly shows 589.3 nm as the wavelength being narrowly blocked with only 15 percent transmittance. This means only 15 percent of the light at that wavelength passes through the filter. And it slopes up on either side, so some other nearby wavelengths (colors) are also affected.

Figure 2. Source: Irix.

By comparing the two charts—the emitted light spectrum and the filter’s blocking profile—we see that this is a very specific filter. In fact, it has only one job: to block light at a very narrow wavelength.

Mercury vapor lamps are trickier to filter for, since there are many wavelengths and uses for them. But when used as overhead street lighting, they typically show as blue (435.8 nm) and green (546.1 nm) to our eyes. There is a yellow-orange variant too, which emits at 578.2 nm. This latter one is likely also blocked using (what I can discern as being) typical light pollution filters.

Figure 3. Source: Wikipedia.

We also need to consider the LED revolution. Many cities and townships are in the process of (or have completed) converting all street lamps from the often-beautiful mixed-color lighting to very consistent and “clean” LED lighting. The color temperatures from LEDs may vary widely from warm to slightly cooler than daylight. They also emit more of the color spectrum and will thus render colors better (though not as well as a true tungsten light source). Keep reading to see examples.

So it feels like this wave of light pollution filters is about 10 years too late. But is it?

2. how to best use light pollution filters is not clearly described.

Not one manufacturer source that I researched suggests a white balance setting, nor any post-processing settings. None even mention the filter factor (i.e., how much light the filter eats and how much to compensate for it).

It seems to me that photographic lens filters are a sunset product. Meaning, they are mostly outdated and unnecessary except for the aforementioned specialty filters that have very narrow, specific jobs that cannot be reproduced by post-processing. Their effect must be in-camera. Because this category of products is basically fading away, there are very few passionate manufacturer advocates who put energy into clearly explaining what the filters are for and how to use them. This is a personal gripe I have and my own observation. But it makes sense, right? I wish more technical and instructional information existed in the filter market in general, and definitely for such a new type of filter that’s been generating such buzz.

3. Using filters is inconvenient.

Screw-on filters are a PITA to mount and unmount. I get so anxious doing it. Especially since I often have my camera over a precipice, railing or bridge. I dread that the filter will fall out of my hand or not thread properly and splash/crash.

Some forward-thinking manufacturers now use a magnetic mount system. I have not tested this, but the premise of it addresses my pain directly. My concern (again, having not used it) whether the filter remains in place if I forget it’s on and move my tripod around with the camera mounted. I am not sure how strong those magnets are.

Drop-in filters are also painful to use. Resin filters damage the optical quality of your images too much to even consider. And glass drop-in filters, even though they are chemically hardened, are still glass and therefore fragile. So transporting them to the shoot location and them keeping them safe as you move around is another concern.

Bottom line: You have to care about the problem to use the solution.

The Gear

For these tests I used the following camera gear:

Testing Methods

I shot one control and two tests with the following process:

  1. Photograph without a filter at Tungsten white balance.

  2. Photograph with an Irix screw-in filter.

  3. Photograph with a Benro drop-in filter.

To avoid bumping the camera, I gently screwed in the Irix filter, shot, unscrewed it, and then used the quick-mount Irix filter holder with the Benro glass filter in it. Minor camera movements happened—despite my process.

Locations

I chose a few locations with varying light pollution. I did not go to a place without light pollution, as that would negate the need for the filters.

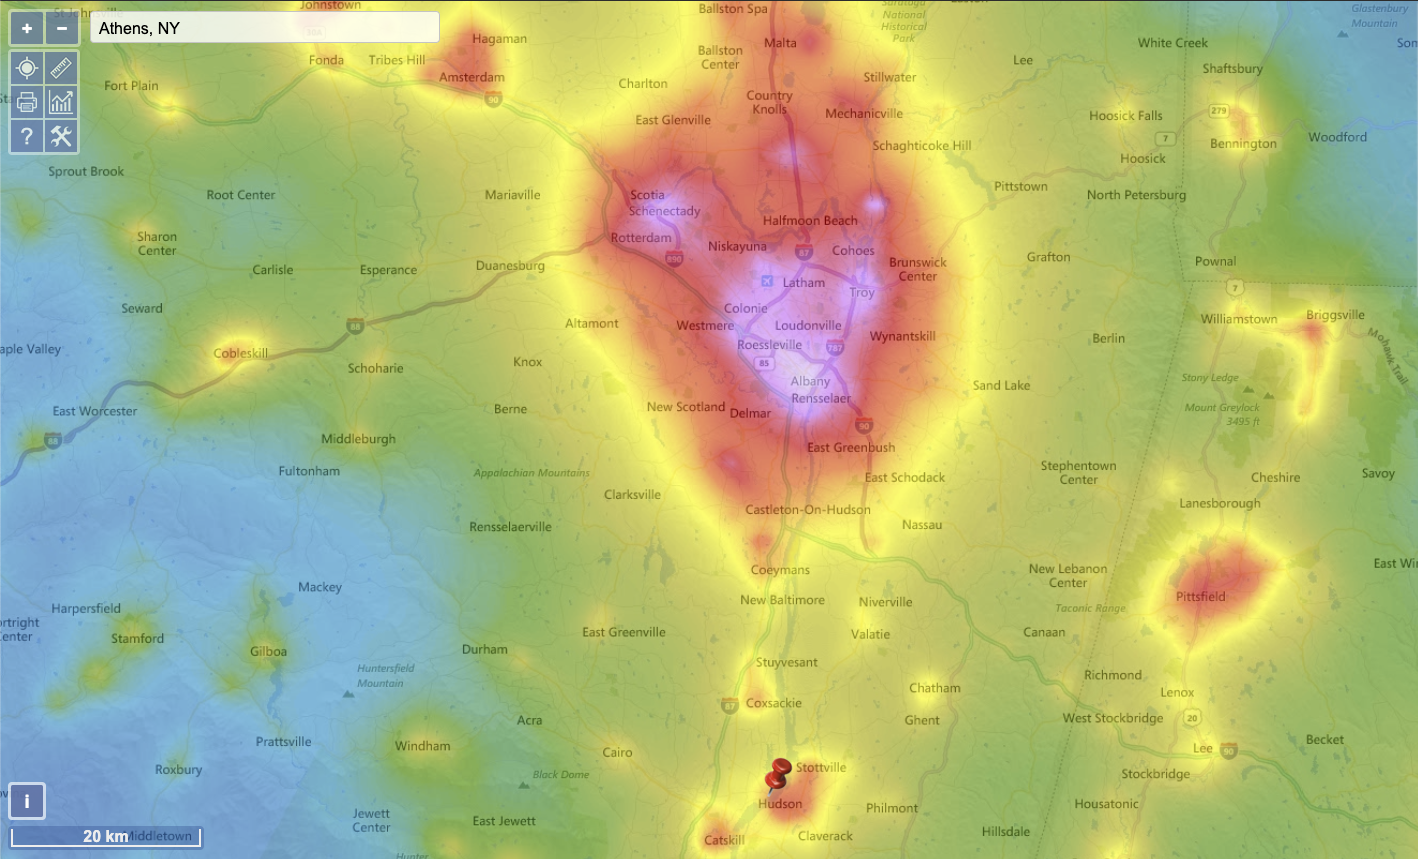
  1. Athens, New York—Bortle 4 (rural/suburban transition)

  2. Catskill, New York—Bortle 5 (suburban)

  3. Astoria, New York—Bortle 8-9 (city sky / inner city sky)

Let’s Talk About Color

Visible light occurs between 400 and 750 nm. Some light sources emit full-spectrum light (such as tungsten lighting) and some emit less of the color spectrum (such as sodium vapor).

So I brought along my favorite tool for getting a) the most accurate color in-camera, b) a reliable color reference for comparison and c) a reliable neutral for color balancing. That tool? The X-Rite ColorChecker Passport Photo 2.

Color management is not voodoo. And color science is not as daunting as it seems.

Here is how I use it:

Building a camera profile

When I want to make sure I have the colors represented as closely as possible to correct, I photograph the object in Figure 4:

From Lightroom, using the ColorChecker plugin, I export that image to build a profile (Figure 5).

Figure 5.

Then after restarting Lightroom, under “Profile” in the Basic panel of the Develop Module, I choose the new camera profile.

Figure 6.

The process of building a camera profile is simply one of asking science to place all the color values where they should be (Figure 7). Know this: You may want to build camera profiles for different light sources, such as midday sun, moon, flash, flashlight, sodium vapor, etc. Even if you don’t use a white balance adjustment, the colors will render more true to life.

Figure 7. It’s science. Color science. And don’t the colors look more “right” as you both profile and apply a white balance?

Let’s compare them side by side without a profile and without color balance adjustments, as seen in Figure 8:

Figure 8. Nikon Z 6 with an Irix 15mm f/2.4 lens. Tungsten white balance; 30, 50 & 50 seconds (left to right), f/2.5, ISO 125.

It’s easy to see what a sodium vapor light source does to color when you have a series of calibrated color patches. None of them look right without correction. That’s because that light source is not full spectrum, so different-colored objects reflect it differently.

And when you put a filter on the lens to filter out that light source, you are compounding a problem again. First, the light source didn’t emit at full spectrum, so expecting it to render anything “naturally” is not just unreasonable, it’s impossible. The color patches above demonstrate this. You can come closer via profiling and white balancing, but never true to a full-spectrum light source.

Figure 9. Note the dramatic change in contrast on the stone bench arm beneath the ColorChecker Passport, as well as the neutralization and color change in the streetlamps in the background.

But when you apply a light pollution filter to block that spectrum, you can prevent it from affecting (or, polluting) your image.

That’s when these light pollution filters become viable. Even necessary.

I provide all the above to help you understand the side-effects of filtering out that spectrum and the ideal ways to approach correcting this. I will explain what I have learned.

OK, let’s get out of the science weeds and into the practical application.

One more note before we continue: I love my ColorChecker Passport Photo 2 for daylight and flash camera profiling. It’s invaluable. But for night photography it falls short; often due to the partial spectrum light sources we use. I highly recommend owning one but its applications for night photography are limited to primarily white balancing. It was, however, an excellent tool to demonstrate the color shifts and missing color spectrum.

Light Pollution Filters in the Field

The first time I saw a practical benefit for a light pollution filter was when facing … well, light pollution. (Amazing, right?)

When photographing the Perseids this year, I set up my Nikon D750 as a second camera facing due north from Athens, New York, toward Albany, New York. That city is 45 miles north and yes, it brightened the sky.

Figure 10. Nikon D750 with an Irix 15mm f/2.4 lens, no filter. White balance 3200 K, 260 seconds, f/2.8, ISO 100. Note the warm clouds and cool sky.

Figure 11. Nikon D750 with an Irix 15mm f/2.4 lens, with an Irix Edge Light Pollution Filter. White balance 3200 K, 257 seconds, f/2.8, ISO 100.

Figure 12. Nikon D750 with an Irix 15mm f/2.4 lens, with a Benro TrueNight filter. White balance 3200 K, 252 seconds, f/2.8, ISO 100.

All of the images in Figures 10 to 12 were “cooked to taste” in Lightroom.

With the Irix and Benro filters, a few things happened:

  • The clouds became neutral.

  • The haze in the sky decreased dramatically.

  • The Benro filter seemed to be even more aggressive in neutralizing the yellows.

  • I noticed about one-half to two-thirds of a stop of light loss, and I often increased exposure time to compensate.

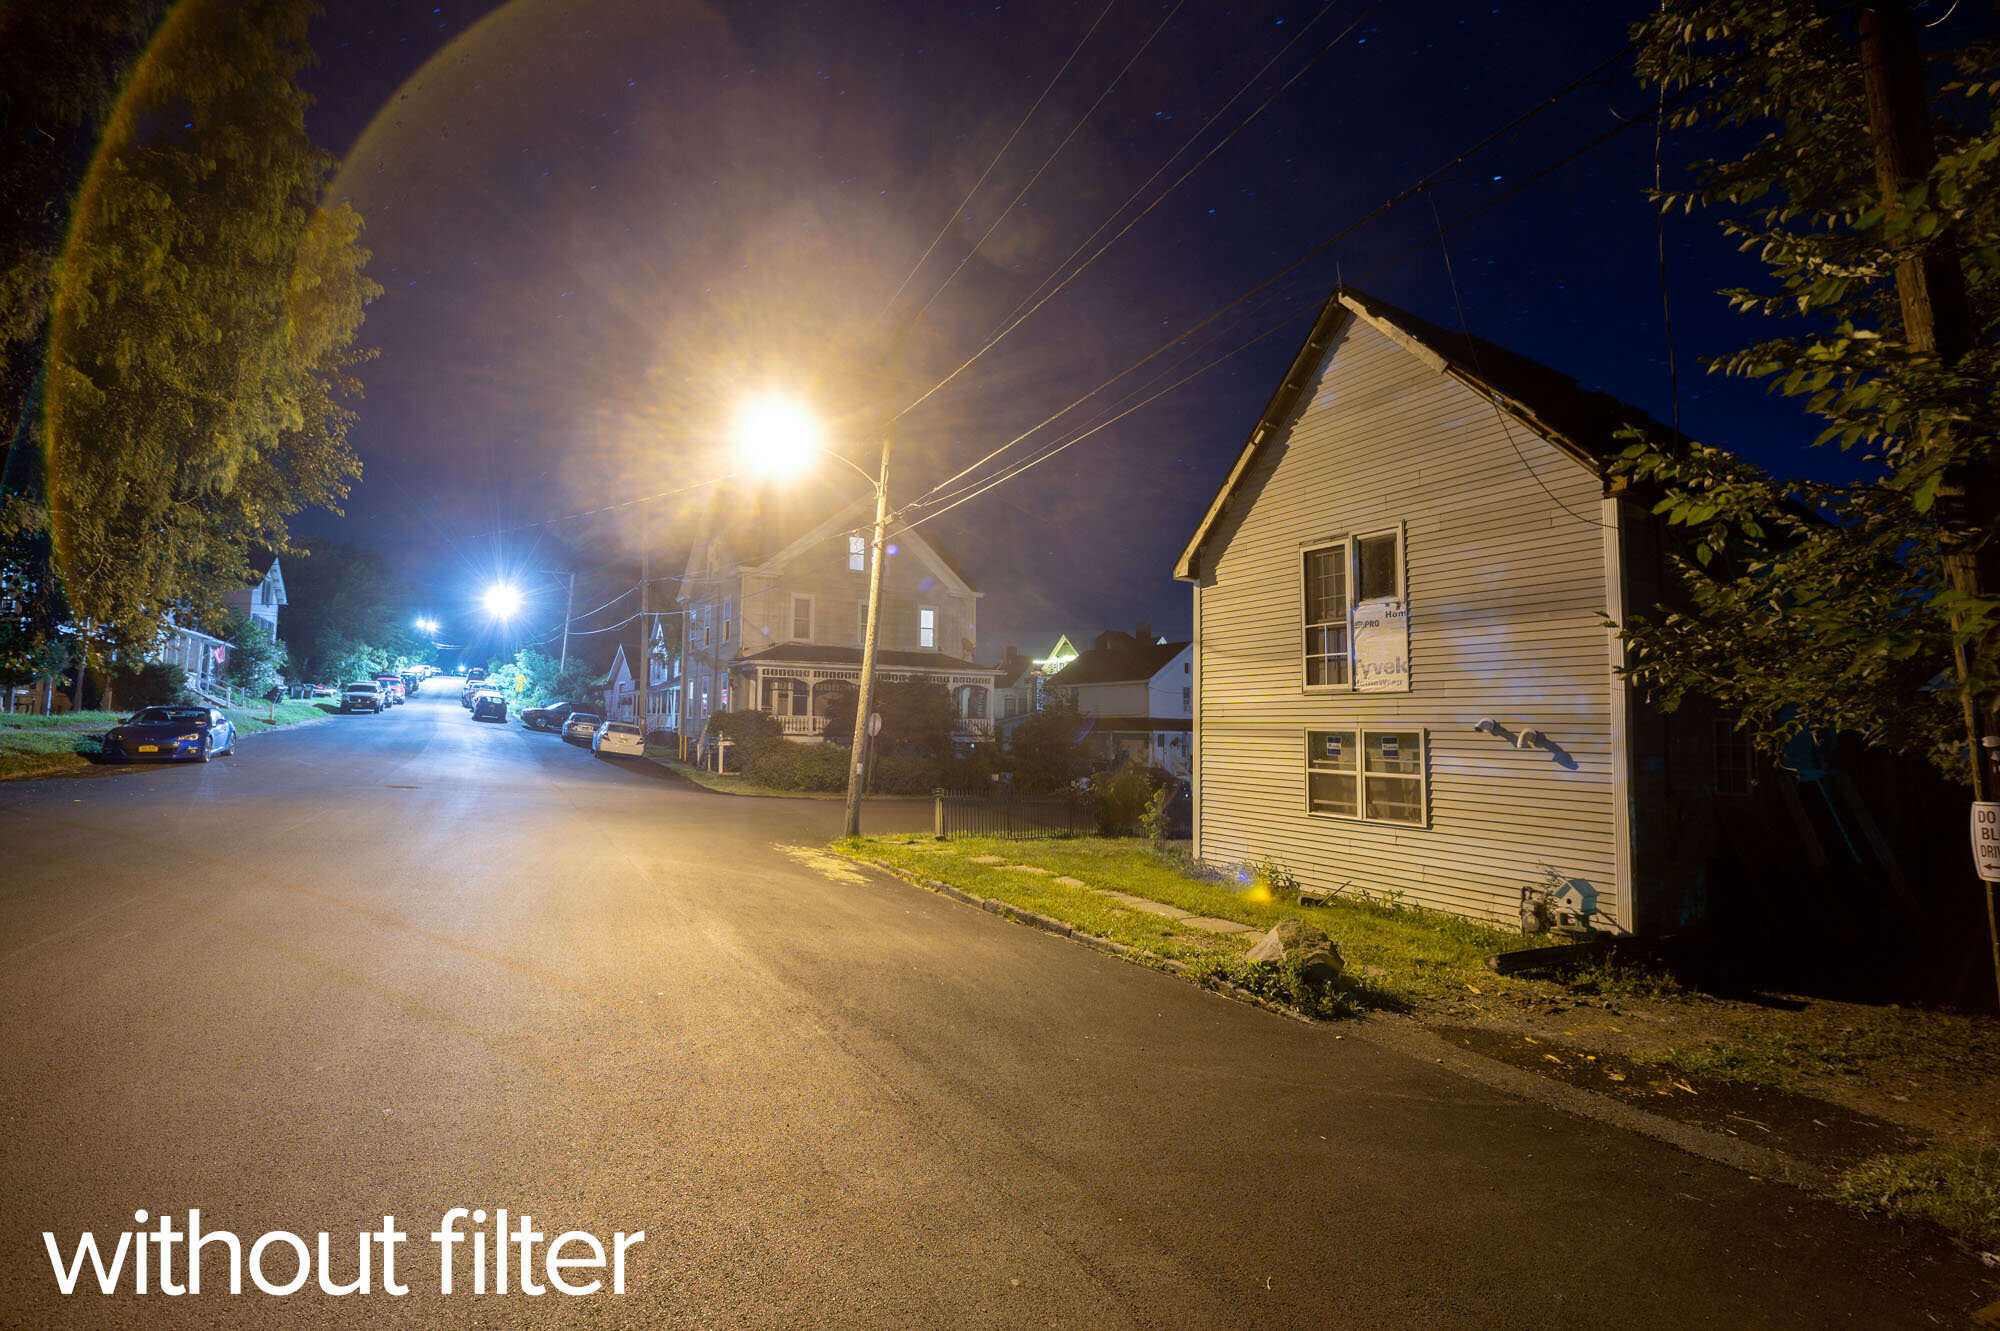
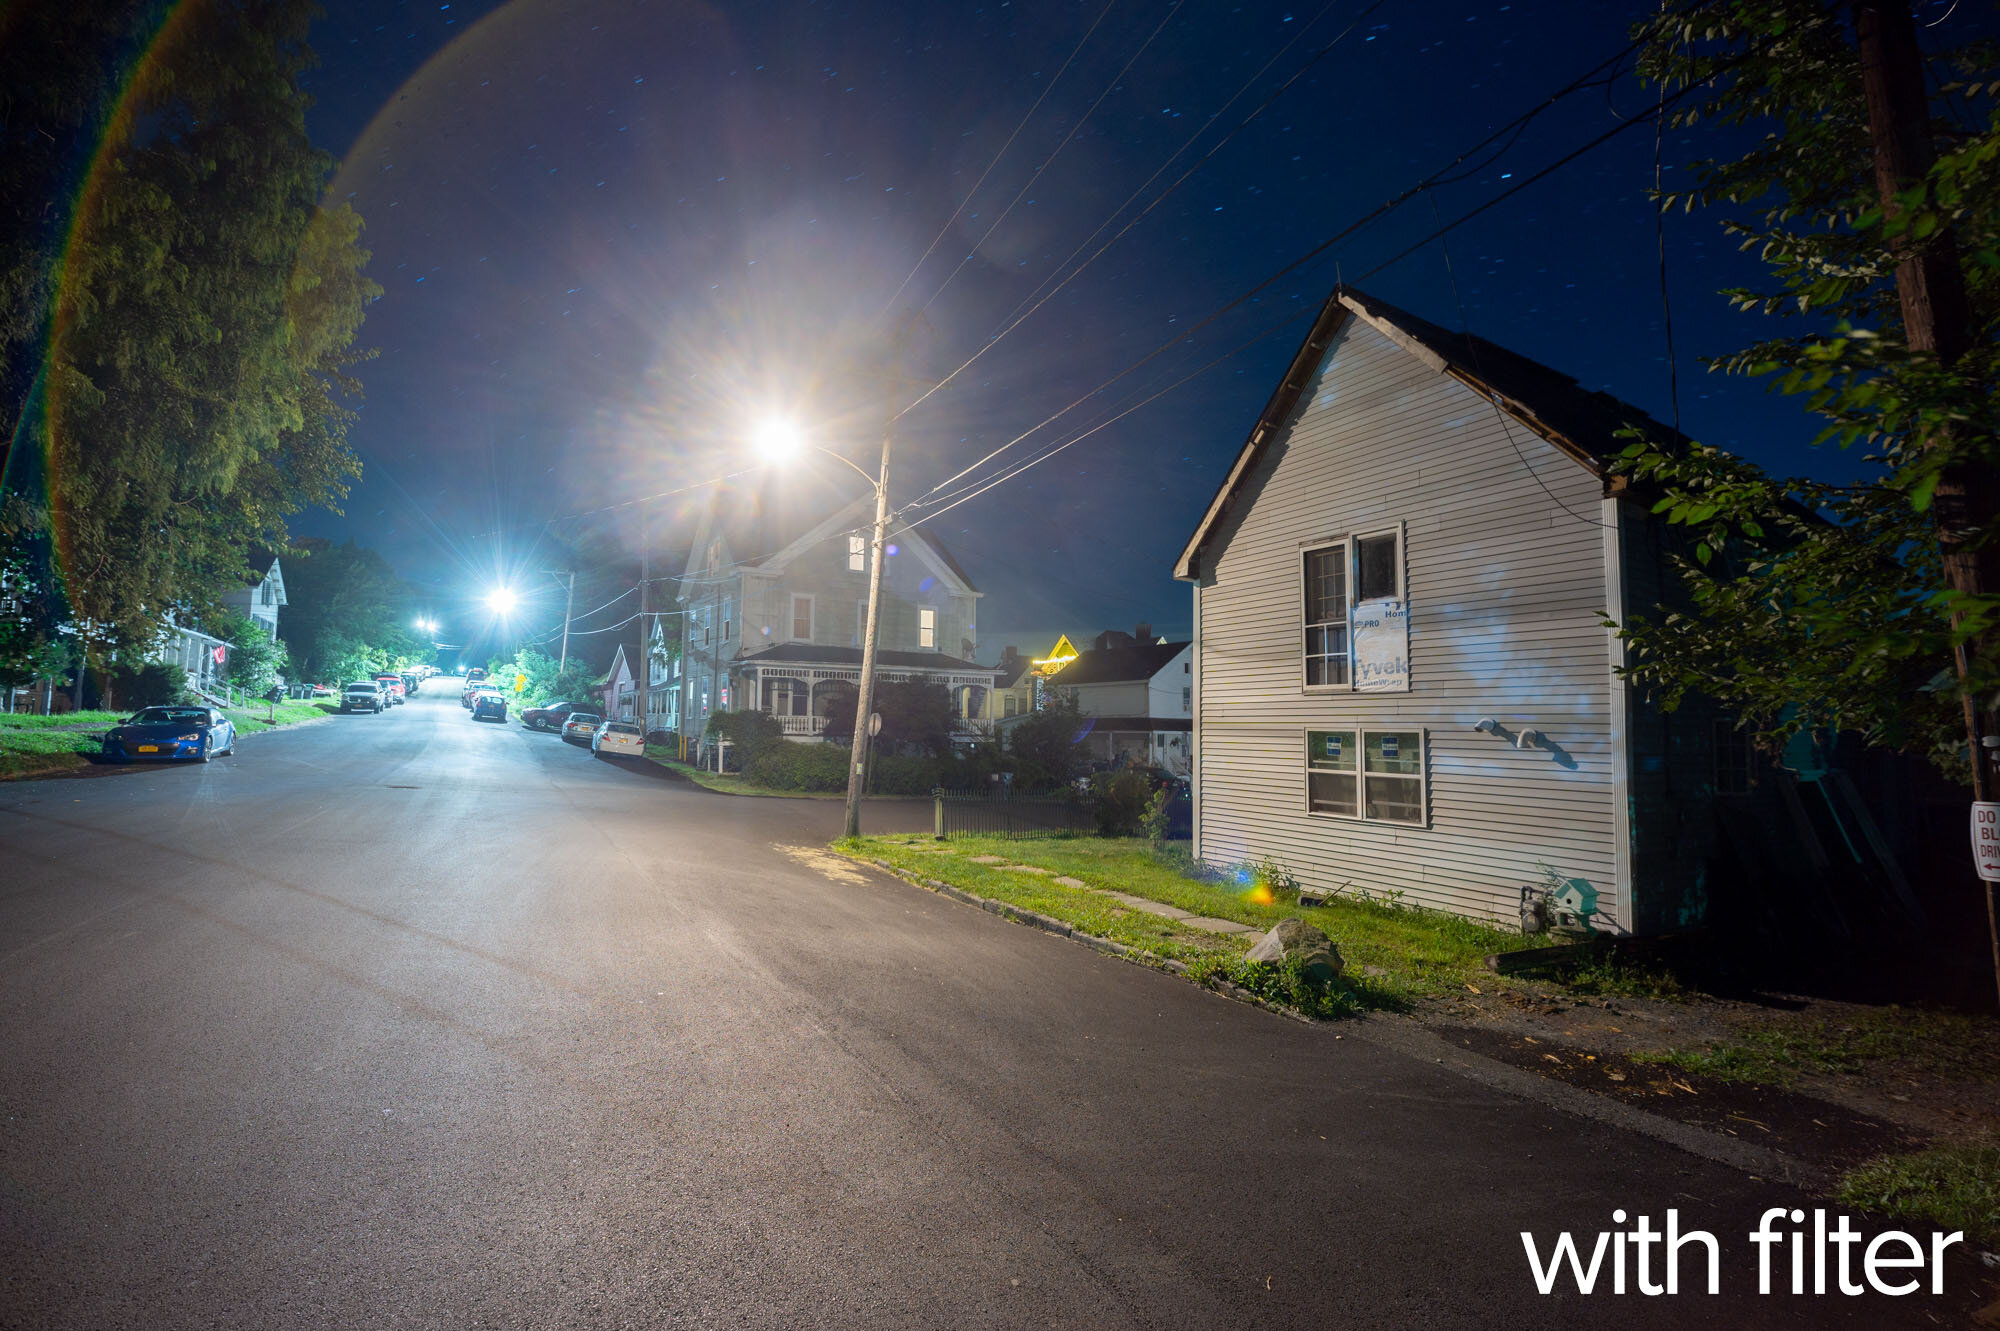
The second point above piqued my curiosity. So as I tested more, I looked for evidence of haze being removed from the sky, but found instead that the strong yellow cast from a sodium vapor streetlight was completely removed from the light on the side of the house (Figure 13). This has major implications for urban night photographers because white balance and post-processing do not offer great solutions for color correcting sodium vapor lights, due to their limited spectral emissions as noted earlier.

Figure 13. Nikon Z 6 with an Irix 15mm f/2.4 lens, with no filter (left) and an Irix Edge Light Pollution Filter (right). 61 seconds, f/4, ISO 800.

Here is a Lightroom screen capture zoomed in:

Figure 14.

Note I did not go turn off that light source. I put on the Irix filter. That’s it.

So now I am thinking to myself: All those times I sighed heavily when trying to color correct an image that had heavy orange/yellow streetlights in it—this filter could have prevented a headache.

Figure 15 shows the light source that was hitting the side of that house, without and with a filter (for effect!). It’s not an artful shot, but check out the contrast on the blacktop, as well as the contrast in the sky and on the side of the house:

Figure 15. Nikon Z 6 with an Irix 15mm f/2.4 lens. 61 seconds (left) and 86 seconds, f/4, ISO 100.

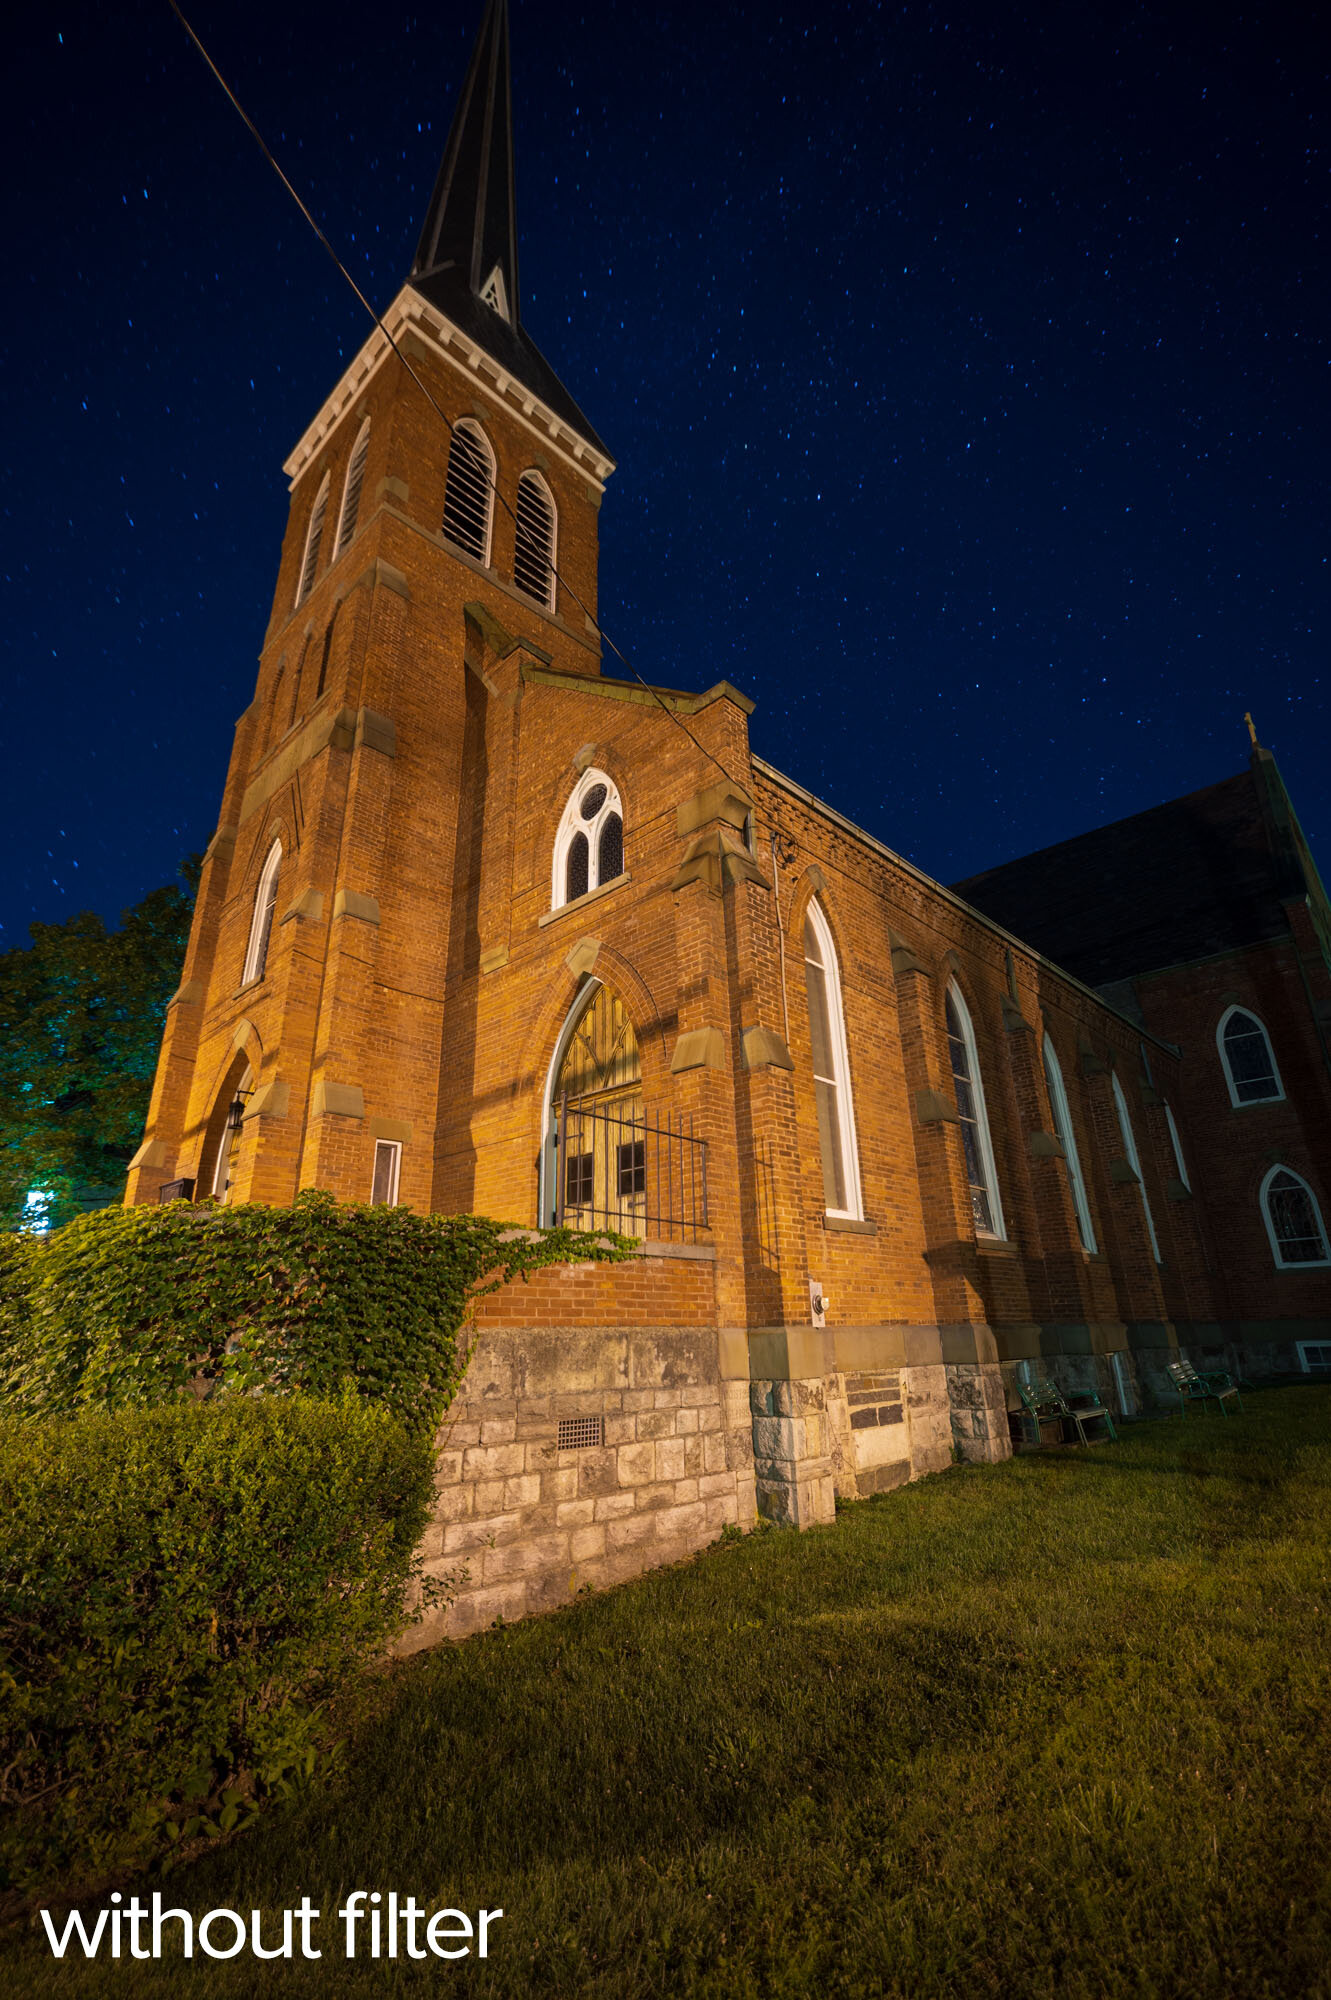
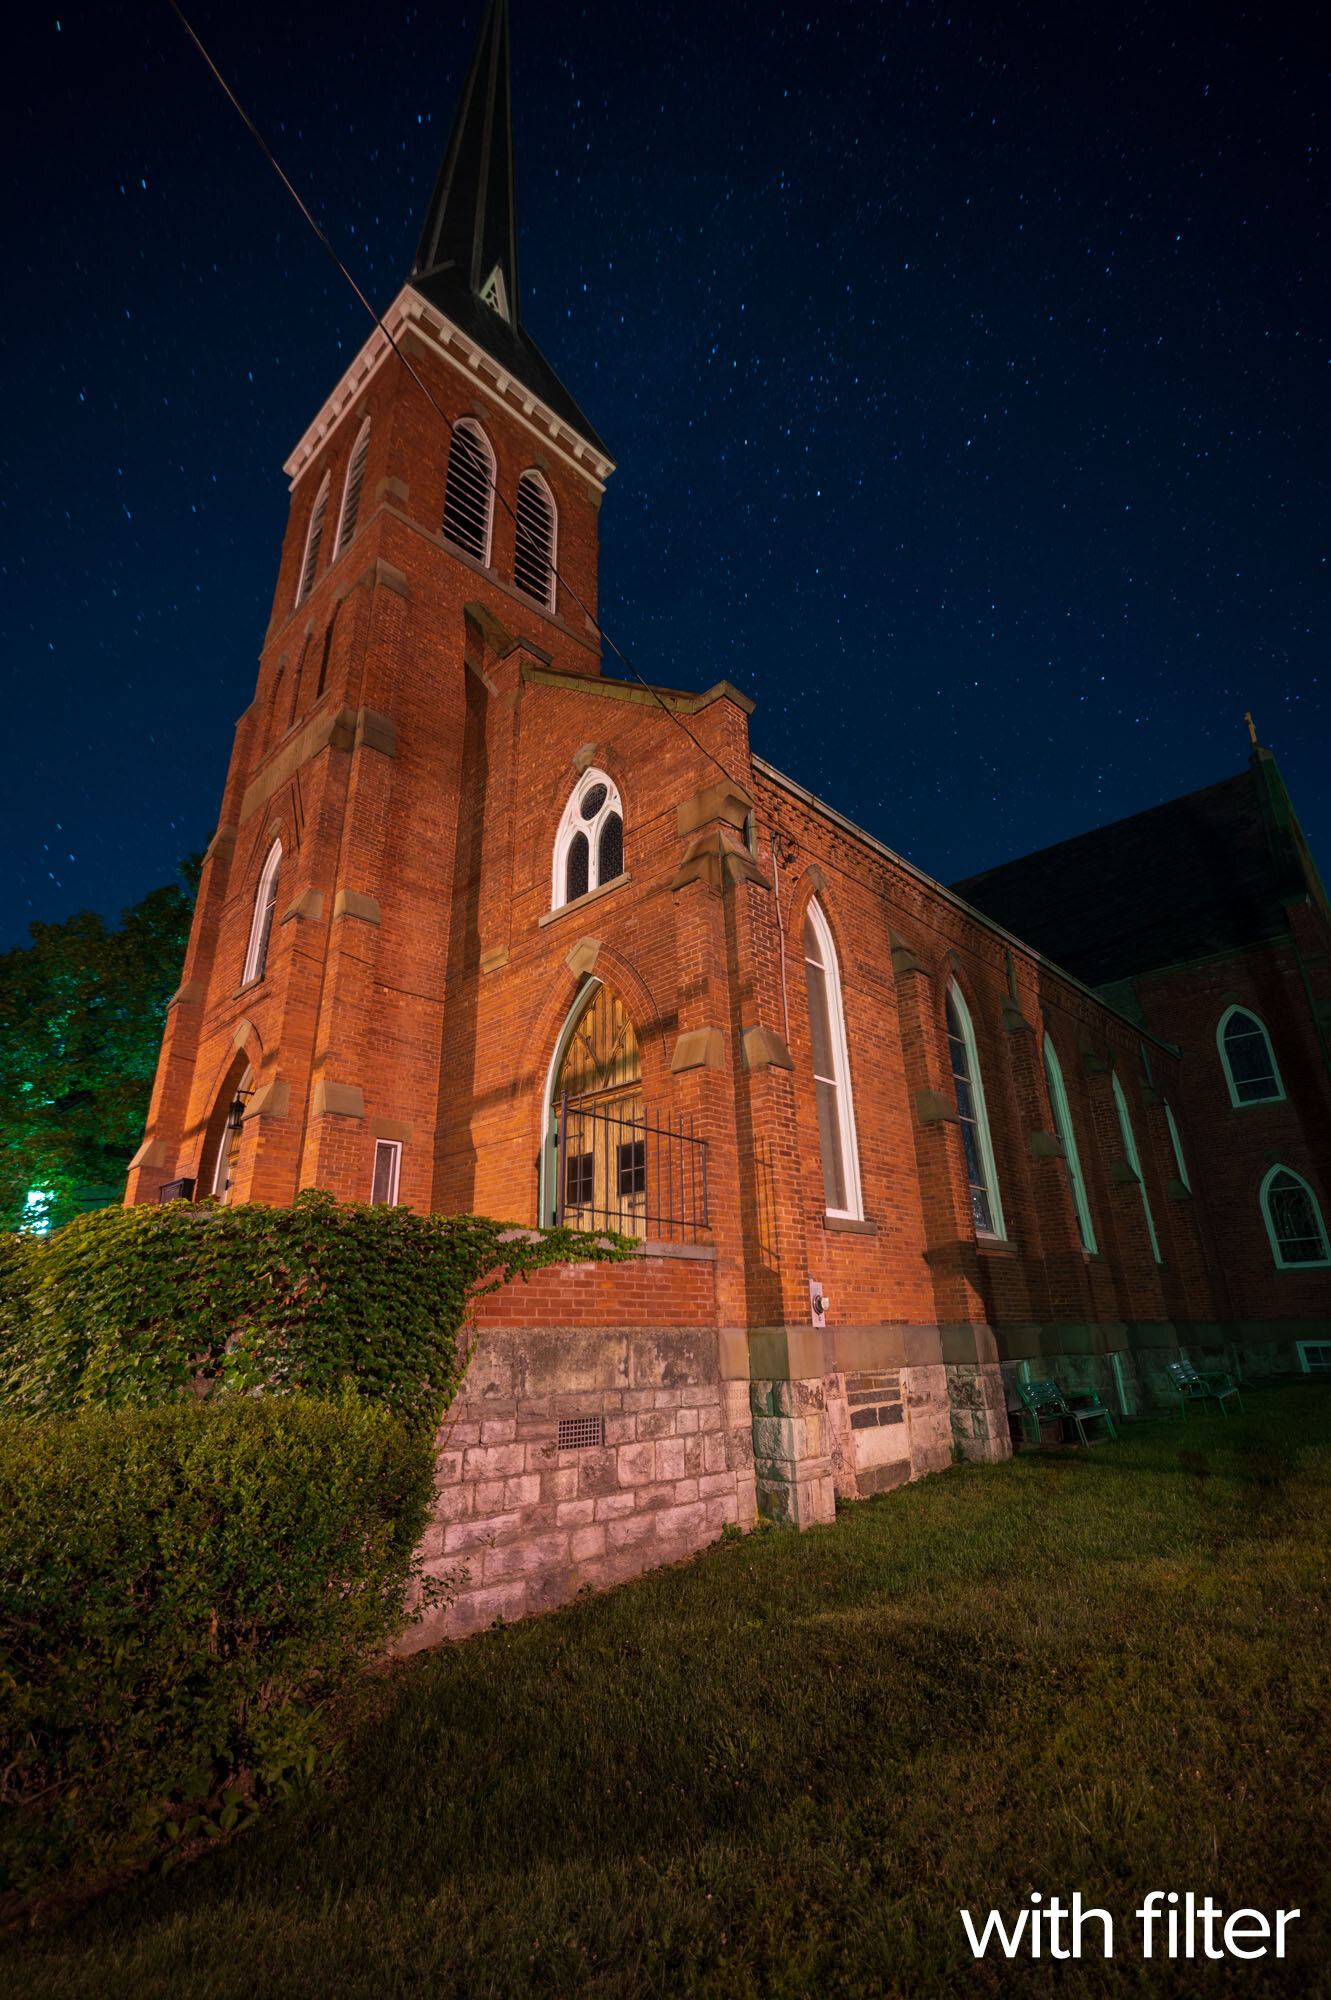
Figure 16 shows how you can make a brick church look a little more like a church:

Figure 16. Nikon Z 6 with an Irix 15mm f/2.4 lens. 60 seconds, f/2.8, ISO 100.

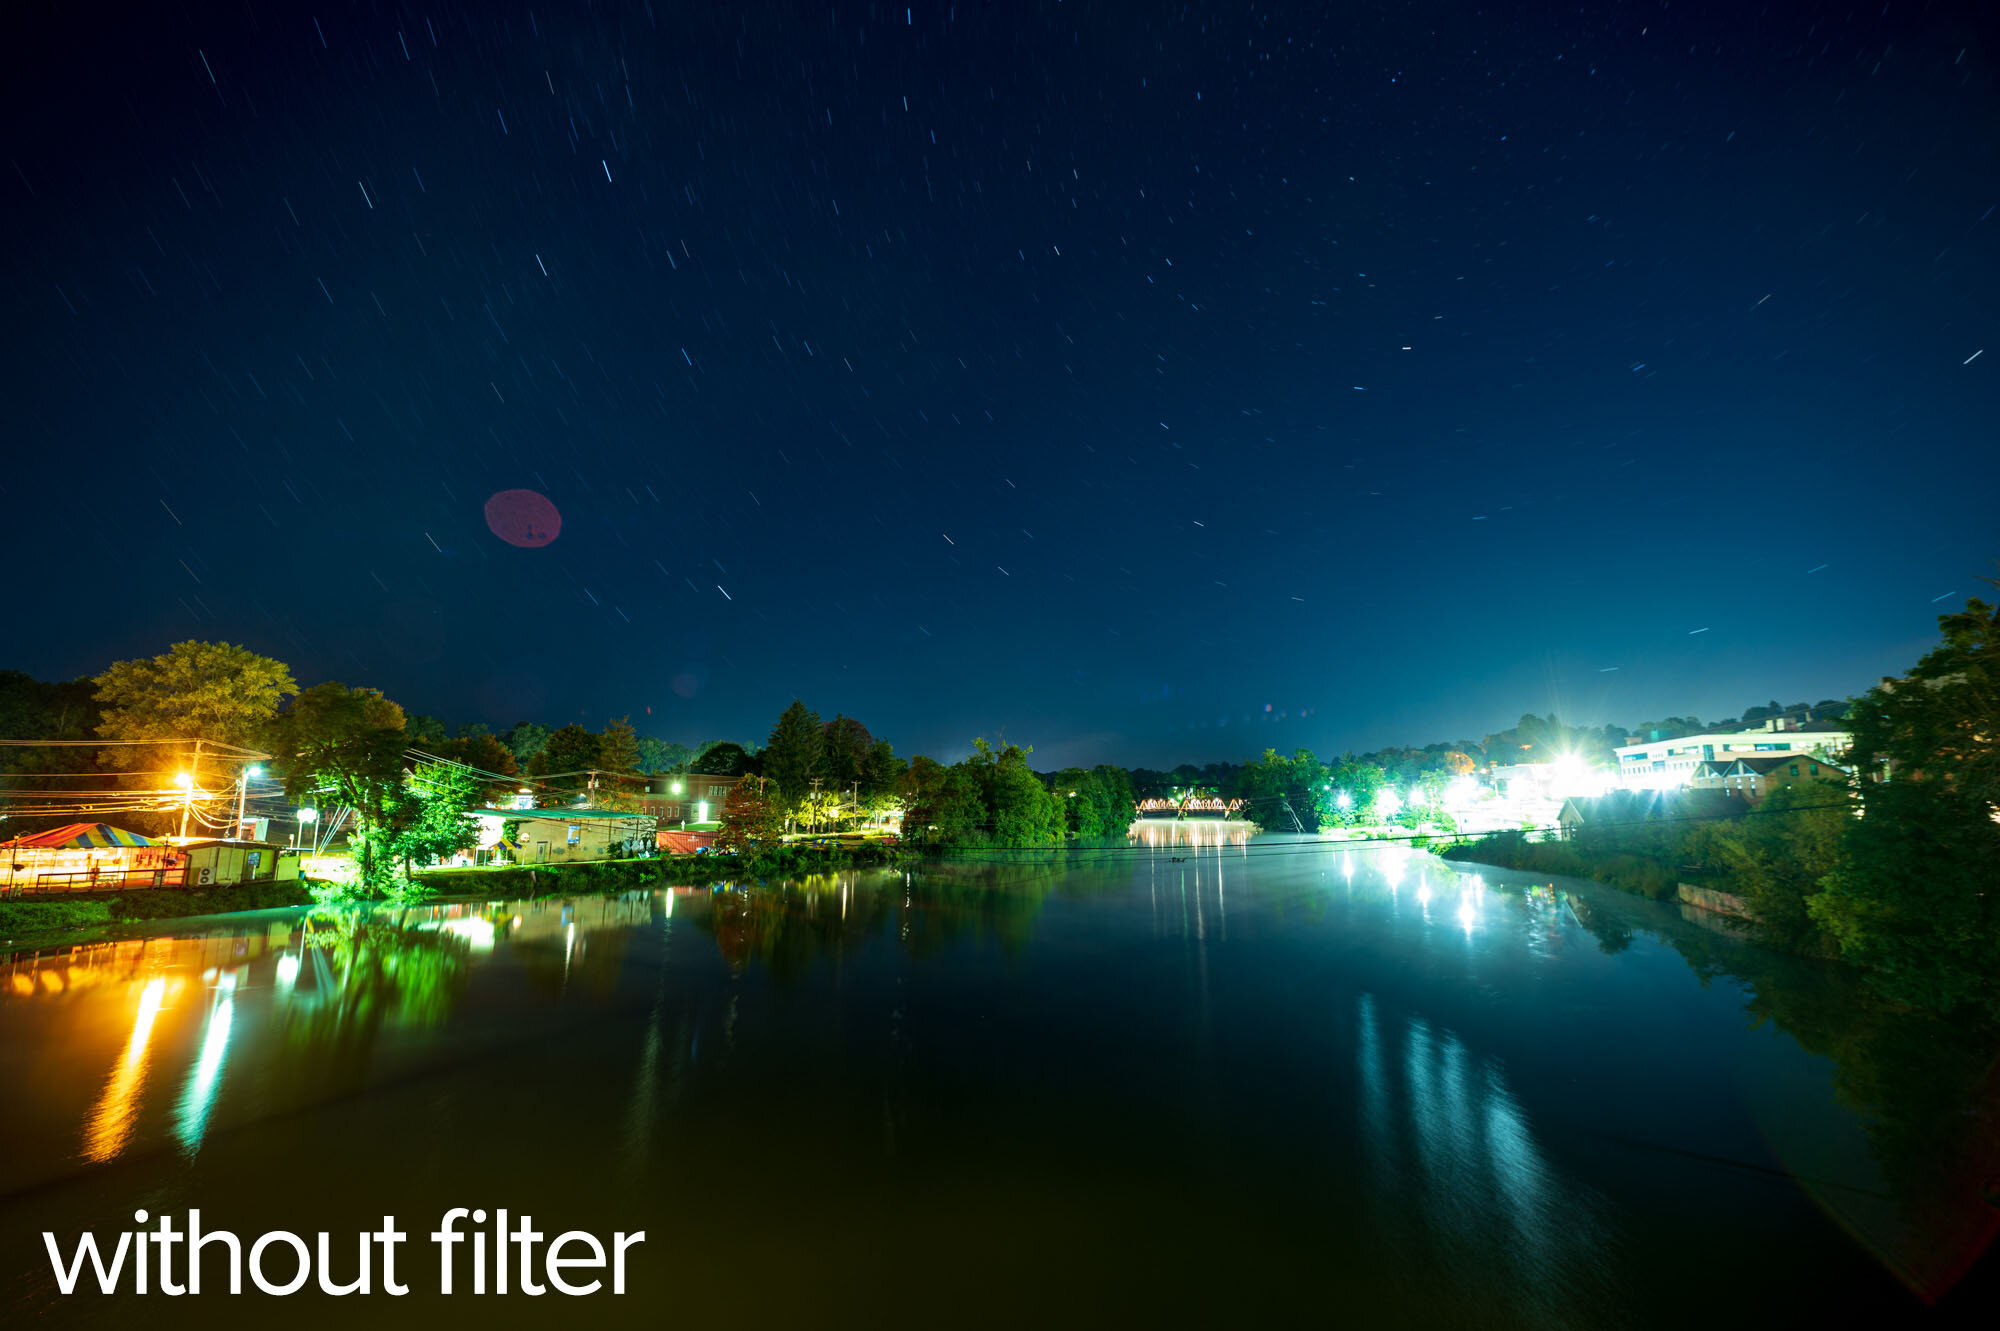
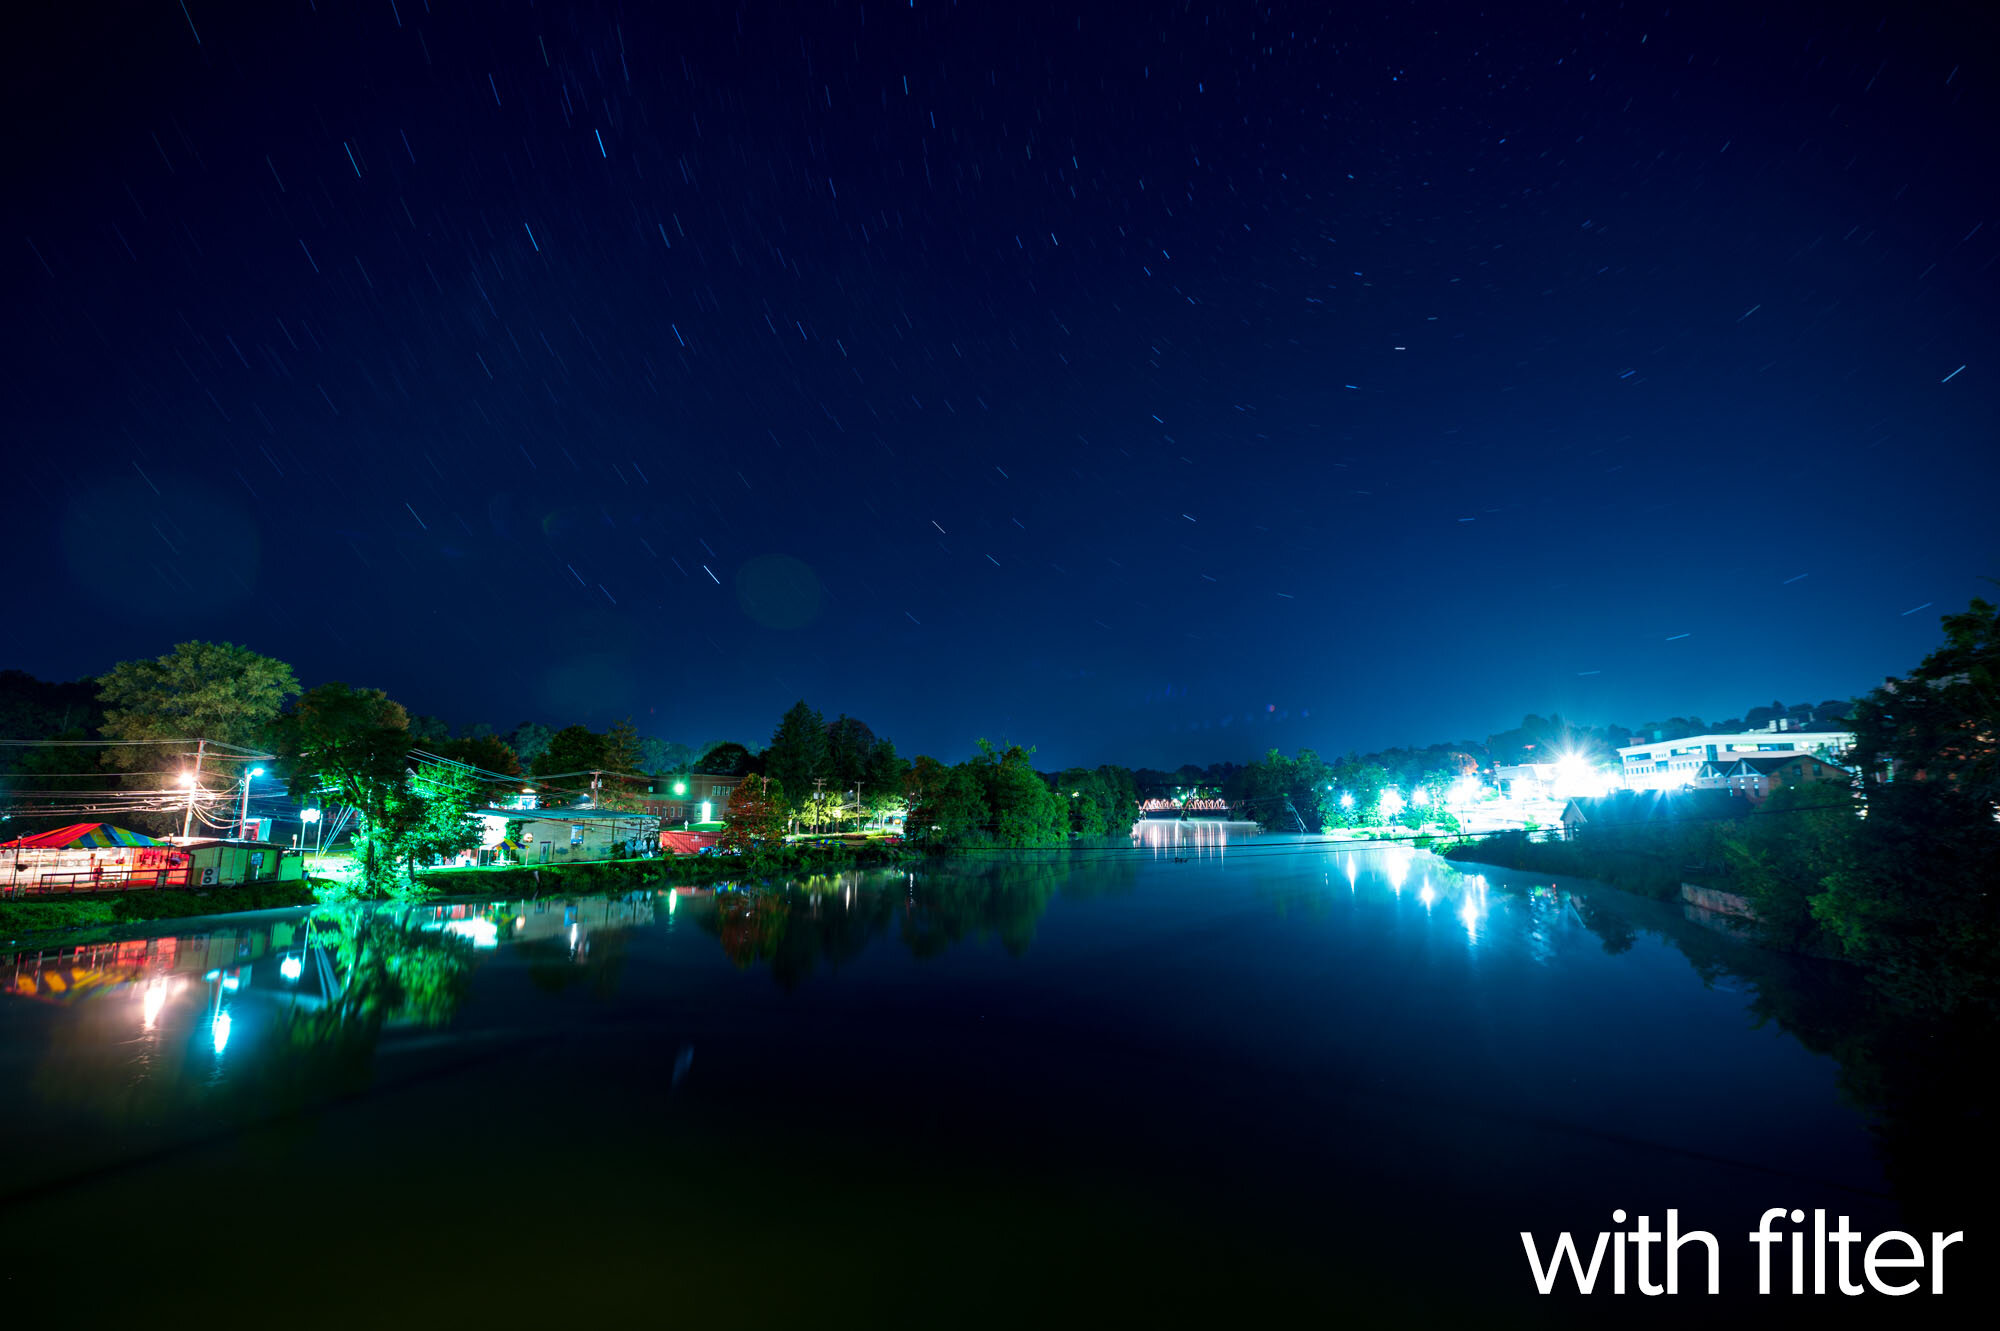
The pair in Figure 17 is especially dramatic. Notice how the yellow glow in the water foreground disappears, along with many reflections. But the sky gets more contrast as the yellow/orange is removed:

Figure 17. Nikon Z 6 with an Irix 15mm f/2.4 lens. 441 seconds, f/4, ISO 100.

Now, in Figure 18, an example that addresses the burning question in our night photographer hearts: “Will it help my Milky Way images?” I processed each of these individually to taste. Applying the ColorChecker camera profile to the no-filter image helped. It did not help the others, so I applied the Adobe Landscape profile and processed to them look similar. They probably look the best they can:

Figure 18. Nikon Z 6 with an Irix 15mm f/2.4 lens. 10 seconds, f/2.8, ISO 6400.

The examples in Figure 19 have mixed light sources. The lamp on the side of this building is a CFL (compact fluorescent) bulb. The light hitting the side of the building is from multiple sodium vapor streetlamps. Note that the fill light almost disappears, yet the CFL lamp remains unaffected. Wavelength filtration at its finest.

Figure 19. Nikon Z 6 with an Irix 15mm f/2.4 lens. 15, 25 and 25 seconds (from left to right), f/11, ISO 400.

Finally, I decided to pay a visit to the mecca of light pollution, New York City. I visited Astoria Park’s waterfront and shot downstream toward the Hellgate and RFK bridges. I think I got just about every kind of light source one can get in a single frame.

Figure 20. Nikon Z 6 with an Irix 15mm f/2.4 lens. 8, 13 and 13 seconds (from left to right), f/5.6, ISO 800.

I processed those (Figure 20) to be similar to each other. I found that the skies in the images shot with filters were a bit duller, so I had to boost the luminance and sometimes tweak the hue. Otherwise, global adjustments were all that were necessary.

To me, the shot without the filter seems better. But this was just this night at that location with those skies.

In Conclusion

Using and testing light pollution filters, I learned:

  • If you have some particular man-made lights that are vexing, and you have a filter that can block them, light pollution filters are useful.

  • If you like your clouds to be a neutral cast, light pollution filters are useful.

  • Your image ends up being more blue, which will require additional post-processing.

  • I can imagine that this helps immensely in situations where the horrid orange yellow light makes skin tones look terrible or prevents you from editing a color image properly.

  • It’s surprising to just be able to subtract that light source without affecting much else.

If you absolutely hate carrying filters and using them, none of this matters. 🙂 But if you find any of the above effects attractive, perhaps you will make room in your bag.

Big thanks to Irix for their support. We use their lenses all the time and love them. Getting to know their other products has been a privilege.

Also thanks to Benro for loaning us the TrueNight glass filter.

If you want to learn more about light pollution, please visit or join the International Dark-Sky Association. They provide a wealth of educational materials, conversation starters and resources for those who want to help address the light pollution issues that affect nearly everyone on the planet. Please consider becoming a member or donating money to support the pursuit of dark skies.

Questions?

I hope so! Lay ’em on in the comments below, on our Facebook page, or via email to adventure@nationalparksatnight.com. In the future I plan on doing a big shootout of all the light pollution filters I can get my hands on. So what you ask now will help me develop a better testing schema.

Thanks! Seize the night.

Ready for another solution to light pollution? Read “How to Deal With Light Pollution, Part II: Post-Production.”

Matt Hill is a partner and workshop leader with National Parks at Night. See more about his photography, art, workshops and writing at MattHillArt.com. Follow Matt on Twitter Instagram Facebook.

UPCOMING WORKSHOPS FROM NATIONAL PARKS AT NIGHT