Night Photography Blog — National Parks at Night

Lance Keimig

Muses From The Past: Train Photographers

Analyzing classic photographs can be an effective way to progress in one’s own work. The key is not to simply mimic someone else’s great ideas, but to use the knowledge that comes with reproducing the work of masters and move on to create something new. With this in mind, National Parks at Night's Lance Keimig offers this ongoing series highlighting some of the early masters of night photography. We'd love to see any photographs you create after learning more about the pioneers of this niche—please share in the comments section!


I photographed these three rail cars on a productive evening with Tom Paiva at the Southern Pacific rail yard in Oakland, California, in 1995. Pentax 6x7 with a 55mm lens, shot on Fuji color negative film.

Most anyone with more than a passing interest in night photography has seen images by O. Winston Link, the best known of a generation of train photographers who lovingly documented the last days of the steam locomotive in the U.S. The rise of the automobile and the construction of the interstate highway system led to the demise of passenger rail travel in the years between World War II and the mid-1960s. Concurrently, that and the development of more powerful and efficient diesel engines were responsible for the end of steam railroading.

Nostalgia for a dying way of life led to a renewed interest in trains. Photographers––a notoriously romantic lot—were inspired to document the end of this quintessentially American way of life.

Call it our myth of mobility. We believe that going somewhere else, down a distant track, away from present situations, can only mean broader fulfillment: a remedy for what ails us. It’s our restlessness that best understands and appreciates the symbolism trains and railroads play in our lives.
— Richard Steinheimer

It was the rise of the railroads in the 19th century that led to American expansion across the continent and the fulfillment of Manifest Destiny. Small towns had sprung up along the railroad, which was a lifeline to their prosperity, and in some cases, their very survival.

Later, interstate highways were built without regard for these towns, and designed to allow people to quickly and efficiently move between major cities or to go from state to state rather than from one town to the next. As the trains faded toward history, they became a popular theme for nostalgic photographers.

Richard Steinheimer, “Southern Pacific #4194 ‘Tehachapi’ Night Train 55 at Glendale Station,” Glendale, California, 1950. Steinheimer was one of a number of highly dedicated train photographers who often shot at night from the 1950s through the 1980s, but who were all generally less well known than O. Winston Link.

The most challenging images these train photographers made were the night photographs, which were technically complex, and often required considerable equipment and planning. Link’s heroic work is well documented; there is even a museum dedicated to his train photographs in Roanoke, Virginia (which we will visit during our Blue Ridge Parkway workshop this coming July).

Sadly, Link did not receive much recognition until very late in his life and his last years were truly tragic. Today, his original prints are highly sought after and command thousands of dollars. Many of Link’s contemporaries also never received the recognition they deserved. Many of those photographers saw and were inspired by Link’s images in early issues of Trains magazine. This post, in keeping with the theme of the “Muses From The Past” series, concentrates on some of those lesser-known but equally talented train photographers.

Rails After Dark was a group of photographers—Howard Pincus, Bob Hart and Al Papp—who collaborated to make ambitious O. Winston Link homages from 1983 to ’87. The symbolism is obvious as this Delaware, Lackawanna and Western commuter train coasts past a cemetery in Basking Ridge on its way to Summit, New Jersey, in 1984, a month before the elderly fleet shut down for good.

Another Rails After Dark image from the 1980s that’s reminiscent of Link’s style. A 1930 Ford Model A awaits the passage of the Valley railroad 2-8-2 #40 in Centerbrook, Connecticut. Rails After Dark used the same type of lighting as O. Winston Link used––4x5 view cameras, a large battery-capacitor sync flash system with hundreds of feet of wire, and hours of setup time.

Nighttime train photography is not a walk in the park. Massive black objects against a black sky, often moving at 50 miles per hour, make for intimidating subject matter. Safety and access were major concerns, and these photographers had to coordinate with the railroads to gain both permission and access, and hopefully cooperation. It’s likely that the engineers might not have appreciated being blasted unexpectedly by thousands of lumens from a string of 30 or so flashbulbs.

Most of these photographers worked with large format cameras and significant amounts of supplemental lighting, which were in the form of either flashbulbs or strobes. Flashbulbs were more powerful, making it easier to light a large scene, but were more difficult to work with. They became increasingly scarce and expensive as the strobe became more popular due to its shorter flash duration and reusability.

Jack Delano made some of the earliest color night photographs while shooting for the Farm Security Administration in 1942 to ’43. Here, the night is lit by a giant Pabst Blue Ribbon sign above Chicago's South Water Street freight terminal in April 1943.

Even if a photographer managed to coordinate for a train to stop in a photogenic location, most times there was only a single opportunity to make an image. Swapping out dozens of white hot flashbulbs strung along the tracks or under a trestle was time-consuming, and time was money for the struggling railroads. One solution was for a photographer to set up multiple cameras. One of Link’s great behind-the-scenes shots (below) illustrates the technique.

O. Winston Link using multiple cameras for a night-train photograph.

Exposures and development had to be precisely orchestrated, for with only one or two sheets of film, everything had to be perfect. Many of these scenes were extremely high in contrast, and if the train was moving, exposure times had to be quick. There were many uncontrollable variables and usually a short window of opportunity to get the shot.

Link may be the most famous, but he wasn’t the first night-train photographer. The first night-train photograph was probably the one made by H.L. Arey in Tillamook, Oregon, in 1914. (You can see it in Lucius Beebe’s book Great Railroad Photographs). Philip Hastings began photographing trains at night beginning in the early 1940s, and Jack Delano was commissioned by the Farm Security Administration/Office of War Information to document the nation’s railroads in 1942 and ’43. He made some of the first color night photographs for this project.

Many of the photographers inspired by Link’s work would continue to photograph trains well into the diesel age. For an excellent overview of the best of train night photography, check out the book Starlight on the Rails by Jeff Brouws. Of the books on Link’s work, A Life Along the Line and Steam, Steel, and Stars are the best.

Jack Delano’s stated mission was “introducing America to Americans.” In 1942 and ’43, Delano spent time in the rail yards of Chicago documenting the busy freight hub and the workers who kept the trains running 24 hours per day. He made most of these images on 4x5 Kodachrome transparency film, and many of them showed light trails from the yardmen’s lanterns.

These days, passenger train travel is an afterthought for most people, except for those in the suburbs who have access to commuter lines. Millions of tons of freight is shipped across the country on trains every day, but unless you live within earshot of the tracks you could be forgiven for being oblivious.

Regardless, there is an undeniable romanticism associated with trains in America, making them ripe subject matter for night photographers even today. If you find yourself in need of inspiration, make your way down to the train tracks, set up your tripod and listen for that lonesome whistle.

I was riding number nine

Heading south from Caroline

I heard that lonesome whistle blow

Got in trouble had to roam

Left my gal and left my home

I heard that lonesome whistle blow
— Hank Williams

Lance Keimig will be presenting a talk on “An Abbreviated History of Night Photography” during National Parks at Night’s Night Photo Summit, February 12-14. He might just sneak a few train images into the presentation.

Lance Keimig is a partner and workshop leader with National Parks at Night. He has been photographing at night for 30 years, and is the author of Night Photography and Light Painting: Finding Your Way in the Dark (Focal Press, 2015). Learn more about his images and workshops at www.thenightskye.com.

UPCOMING WORKSHOPS FROM NATIONAL PARKS AT NIGHT

Banding Together: The Tradition of Community Spirit in Night Photography

The Oxford English Dictionary defines community as: “a feeling of fellowship with others, as a result of sharing common attitudes, interests and goals.

“Tribe,” “family,” “cohort,” “sisterhood,” “brotherhood,” “collective,” “fellowship” and even “gang” are all words that describe community in one sense or another. A group of people who collectively support each other for a common purpose.

There are communities dedicated to protecting the climate or endangered species, to fighting diseases, or to rallying around a politician or other public figure. There are communities of flat-earthers, bubble tea drinkers, those who like to explore abandoned mental hospitals, and even for people obsessed with identifying animal scat. If you can imagine it, there probably is a community for it.

Never has there been more need for community than in the last year. Our physical isolation—and the limited circles of people we spend time with face to face—has increased the need to connect with our communities. It’s something I’ve been thinking about quite a bit recently: the different communities I belong to, have connected with, and have drifted away from.

Anyone who is even an occasional reader of this blog, or who has attended a National Parks at Night event, will know that we place a lot of emphasis on community. Heck, unless you randomly stumbled upon this article, you are probably already a part of our community. (And to you random stumbler, come join the party!)

That said, National Parks at Night is certainly not the first community of night photographers. We’re only 6 years old, but there have been communities of night photographers dating as far back as the beginning of the 20th century.

Some years ago while researching the early history of night photography, I came across an article in the February 1910 issue of American Photographer by Alfred H. Blake, who identified himself as the founder of the Society of Night Photographers of England. In the article, Blake was sharing the findings of his organization’s members on how to deal with some of the many technical challenges faced by early night photographers. He wrote that a key tenant of the society was to “pursue the subject as far as possible apart from all faking and double-exposing.”

It seems that because night photographs were so difficult to create successfully, there were all manner of techniques––day for night, double exposing, hand retouching—that were commonly employed to achieve the look of night photographs without actually doing the work at night. The society was formed in part to promote true night images above the fakes, but more importantly to share information and discoveries that led to better night photographs for anyone interested in the pursuit.

Despite the reputation of night photographers being solitary, introverted loners, we’ve always shared a communal camaraderie that has offered support, encouragement and appreciation of one another’s craft. My own first forays were solo ventures, but at that time, night photography was far more obscure, and there was no internet to exchange images and information. I thought that I was the only one photographing after dark, and that notion was regularly reinforced by the late night security guards and dog walkers who would question my intentions whenever I was discovered in the field.

When I found a class offered on night photography in San Francisco in 1988, I enrolled in the school and moved across the country, as it appeared to be the only class of its kind at that time. It was a fortuitous decision as it set the course of my career, and became the model for my own classes and workshops when I began teaching night photography a decade later.

The course was taught by Steve Harper, who became my mentor––as he was also to a generation of Bay Area photographers in the 1980s and 90s. In all of my other classes we were given assignments, and we went off to complete them independently. Steve’s night photography courses were different. The students went out together to shoot on location, and in between classes smaller groups would connect and go out shooting together.

Steve Harper’s students shooting together in Yosemite National Park in 1984.

Many of us became obsessed with shooting at night, some to the point of not wanting to do anything but night work. Students would enroll in Steve’s class repeatedly, even though credit could be earned only once, until Steve eventually developed an advanced course.

The critiques were different from other classes as well. Students quickly overcame any shyness or concerns that their images might not be good enough, and we worked together to improve our techniques, watched each other’s backs in dodgy areas of South San Francisco, and celebrated one another’s images when they magically appeared in the darkroom tray.

Steve soon introduced me to Tim Baskerville, who had studied with him some years earlier, and who had caught the night photography bug himself. Tim was curating an exhibit of night photographs, and he generously included my images and those of my classmate Tom Paiva. The show was held at The Gallery Sanchez in San Francisco’s Noe Valley neighborhood, and was titled “The Nocturnes.”

A few years later that exhibit morphed into a website and became what we believe to be the world’s first online night photography community. Tim began to get emails from around the world from excited people who had previously believed that they were the only ones crazy enough to stand out in the cold and darkness with their cameras night after night. That was 30 years ago, and Tim still hosts semi-annual gatherings of honorary Nocturnes for image-sharing and -making at his studio in Mare Island, California.

Our group from the Night Photography Conference, presented by the Nocturnes and Mono Lake Workshops in August 2006.

Today, with the proliferation of the internet and social media, there are so many opportunities for sharing images and ideas that were completely unfathomable just a few short years ago. Sites like Flickr and 500px have long since yielded in popularity to Instagram and Facebook, and the next generation has moved on to TikTok and Twitch, but all are ways to connect and share. I for one long for a time when we can reconnect with our communities face to face, to hug and to shake hands, and to look over a friend’s shoulder at her or his laptop without a care other than whether or not I have garlic breath.

Still, we are truly fortunate to live in a time with so many ways to connect and to relate to our fellow humans, whichever tribe or tribes we belong to––be it bubble tea aficionados or night photographers. It’s easy to hibernate in our home-cocoons, and to attempt to ride out the storm alone, but even in quarantine, or semi-quarantine, remember that there is a thriving community of night photographers at the ready to encourage, inspire or nudge you along, and others who may need the same from you.

Just a few of the National Parks at Night workshop groups—a great community of night photographers 6 years and 500-plus members strong. Many stay in touch (and share photos, arrange night photography shoots, etc.) via a private group on Facebook.

It seems fitting that National Parks at Night is holding our first Night Photography Summit in the year that marks the 30th anniversary of the Nocturnes. That show was a seminal moment for me, and I know that it was for Tom and especially Tim as well.

For me personally it is a confirmation, a justification, an assertion that what we do is important, has meaning, and brings people together to share a common love of the magic that happens when a shutter clicks in the dark.

Lance Keimig is a partner and workshop leader with National Parks at Night. He has been photographing at night for 30 years, and is the author of Night Photography and Light Painting: Finding Your Way in the Dark (Focal Press, 2015). Learn more about his images and workshops at www.thenightskye.com.

UPCOMING WORKSHOPS FROM NATIONAL PARKS AT NIGHT

Announcing the First-Ever Online Night Photo Summit

We are so pleased to announce the first-of-its-kind dedicated Night Photo Summit, to be held February 12-14, 2021.


One of the things we love best about National Parks at Night is the amazing community that’s grown around our mutual love of night photography since we began this project back in 2015. We’ve been talking about a way to celebrate that for a long time.

Last year, we held our first all-alumni workshop in Death Valley, and the energy and camaraderie we all experienced was cathartic. (It seems like a decade ago now!) We’ve long wanted to do a larger-scale event to bring the entire community together, and to introduce more people to the magic we experience under the stars in our amazing national parks.

Rather than wait until we can all gather together in one of those parks, we decided to produce a virtual event now that will enable even more people to gather to share and learn from an extraordinary group of speakers and educators.

We are over the moon to present the first Night Photo Summit

NPS_brought_horiz.png

Join us this February for three days of presentations from 28 dynamic speakers discussing a wide range of topics on all things nocturnal, and all things national parks, and a little more.

You’ll learn from photographers, astrophysicists, writers, artists and rangers about astronomy, dark skies, creativity, and of course photo techniques––both in the field and post-processing. 

There will be panel discussions (including one on “Women in Night Photography”), image reviews with the National Parks at Night instructors, a screening of the amazing aurora film Light Side Up, and opportunities to connect with the wider community of creative professionals who share a love of night photography.

Our incredible lineup of speakers and talks includes:

  • Kevin Adams: “Photographing Waterfalls between Sunset and Sunrise”

  • Gabriel Biderman: “Urban Nightscapes: Creating Magical Long Exposures Under Streetlight”

  • Paul Bogard: “Is This the End of Night?”

  • Gary Bremen and Grant Livingston: “Songs and Stories of our National Parks”

  • Russell Preston Brown: “Creative Night Photography with a Mobile Phone”

  • Forest Chaput de Saintonge: “Getting Started With Deep Sky Astrophotography”

  • Michael Frye: “Noise Reduction Strategies for Night Photography”

  • Matt Hill: “Don’t Be Afraid of the Dark: Fostering a Creative Night Photography Habit”

  • Rachel Jones Ross: “Winter Nights: Capturing Night Sky Magic Without Freezing Your Bits”

  • Lance Keimig: “Abbreviated History of Night Photography”

  • Jennifer Khordi: “Shooting the Moon and New York City”

  • Erik Kuna: “Ignite Your Nighttime Rocket Photography”

  • Nate Luebbe and Autumn Schrock: “Chasing the Aurora Borealis”

  • Susan Magnano: “Chasing Moonlight”

  • David Marx: “Creating a Basic Time-Lapse Video Clip”

  • Harun Mehmedinovic: “Skyglow”

  • Dr. Tyler Nordgren: “Astrophysics for Better Astro-Landscape Photography”

  • Troy Paiva: “Night Photography and Light Painting: the Lost America Style”

  • Eric Paré: “Getting Started With Outdoors Tube Light Painting”

  • Sherry Pincus: “Backpacking: the Key to Amazing Dark Skies and Unique Photo Opportunities”

  • Rafael Pons: “How to Plan any Sun, Moon and Milky Way Photo You Imagine with PhotoPills”

  • Sandra Ramos: “Planning the Perfect National Park Adventure”

  • Jess Santos: “Blending Magic: Blue Hour Blends and Composites”

  • Adam Woodworth: “Milky Way Panoramas”

  • … and more to be announced!

The Basics

There will also be something very special to this summit: a Night Photography Fundamentals track that will allow a newcomer to this genre to learn the necessary skills, or the photographer with know-how to brush up their skills.

Sponsors & Giveaways

Every attendee will be automatically entered into drawings for a large number of giveaways from our generous sponsors, as well as amazing session-specific giveaways from some speakers. Prizes include a one-year Adobe Creative Cloud subscription, a night photo walk in New York City, B&H Photo gift cards, an Irix lens, books and video classes by our speakers, and more.

The Night Photo Summit is sponsored by B&H Photo, Adobe, Tether Tools, X-Rite, Coast Portland, Acratech, PhotoPills, Vallerret, Bay Photo and Irix, with additional sponsors to be named soon.

How to Join Us

If you’re into night photography, or if you want to get into in it, this is an event you absolutely do not want to miss.

Tickets are $399, and include:

  • three days, 28 instructors, nearly 40 hours of inspirations and instruction

  • 1 year access to re-watch any of the courses

  • three live image review sessions

  • three panel discussions

  • Friday-night film screening with filmmaker Q&A

  • exclusive summit T-shirt (mailed to attendees with U.S. addresses, and we may be able to help those from other countries too!)

  • personal access to product experts from brand sponsors

  • lots of giveaways throughout the duration of the summit

  • an unprecedented opportunity to connect with like-minded photographers passionate about the night

Registration is available now, so sign up today and mark your calendars to join National Parks at Night for the world’s first online Night Photo Summit!

Join Us on Social Media

As if that isn’t all enough, we’ll be releasing plenty more information over the next few weeks. To stay tuned in to it all, we invite you to follow the Summit social media accounts on:

We are very much looking forward to seeing you online next month. In the meantime, feel free to ask us any questions via the social media accounts above, in the comments below, or through the Summit webpage.

Seize the night … online!

Lance Keimig is a partner and workshop leader with National Parks at Night. He has been photographing at night for 35 years, and is the author of Night Photography and Light Painting: Finding Your Way in the Dark (Focal Press, 2015). Learn more about his images and workshops at www.thenightskye.com.

UPCOMING WORKSHOPS FROM NATIONAL PARKS AT NIGHT

Going Gradual: A Guide to Low-level Landscape Lighting

Pemaquid Point Lighthouse. One Luxli Viola light, mounted on a stand out of the frame, camera-left. This image could have been made with traditional light painting, but walking on the wildly uneven rock below Pemaquid Point Lighthouse with only a sliver of moonlight wasn’t fun. Taking the easy way out by working with a stationary light seemed the prudent thing to do. I wanted to show the texture of the rock without distracting from the reflection in the foreground. · Nikon D750 with a Sigma 24mm f/1.4 Art lens. 386 seconds, f/4, ISO 1600.

Any regular reader of our blog will know that all five of us use the Luxli Viola as an added light source in many of our images. In this week’s post, I’ll be discussing using a Luxli or similar light source versus a flashlight, and more specifically explaining the difference between light painting and the newer technique called Low-level Landscape Lighting, or LLL.

“Light painting” has become an umbrella term that many people use to describe any addition of light to a night photograph. In practice, light painting is simply using a hand-held light source that is usually moving to illuminate part or all of a scene during a long exposure. It’s a time-tested technique that has been employed by photographers for decades. It’s fun, it’s versatile and it’s effective. I still use it more often than any other technique in my own work.

Alabama Hills. In order to get the depth of field required for this image at 22mm, I needed to stop down to f/7.1. I also wanted to keep the shutter speed as short as possible to make sure that the stars would not trail. Moonlight and ISO 6400 allowed for an exposure time of just 4 seconds, which isn’t much time to run around with a flashlght, so LLL was my best option for lighting. · Nikon Z 6 with a Tamron 15-30mm f/2.8 lens. 4 seconds, f/7.1, ISO 6400.

LLL is a technique that was developed and evolved concurrently with astro-landscape photography over the past eight years. As opposed to traditional light painting, LLL utilizes very dim constant light sources that are usually maintained in a fixed position during the entire exposure, or possibly even for an entire night. LED panels that feature adjustable brightness and color temperature—such as the Luxli Viola—mounted on a tripod or light stand are the most common light source used for LLL, but any dim light can be used.

The goal of LLL is generally to leave the light on during an entire exposure in order to match the brightness of the foreground in an astro-landscape scene with the brightness of the sky, thus creating a realistic-looking image that requires minimal post-processing.

Advantages of LLL

Why go through all that instead of wielding a flashlight for a few seconds? LLL presents a few advantages.

Again and Again

One big advantage is repeatability. Because the light is fixed, it will be the same from one image to the next, unlike light painting where it can be very difficult to repeat complex lighting from one frame to the next.

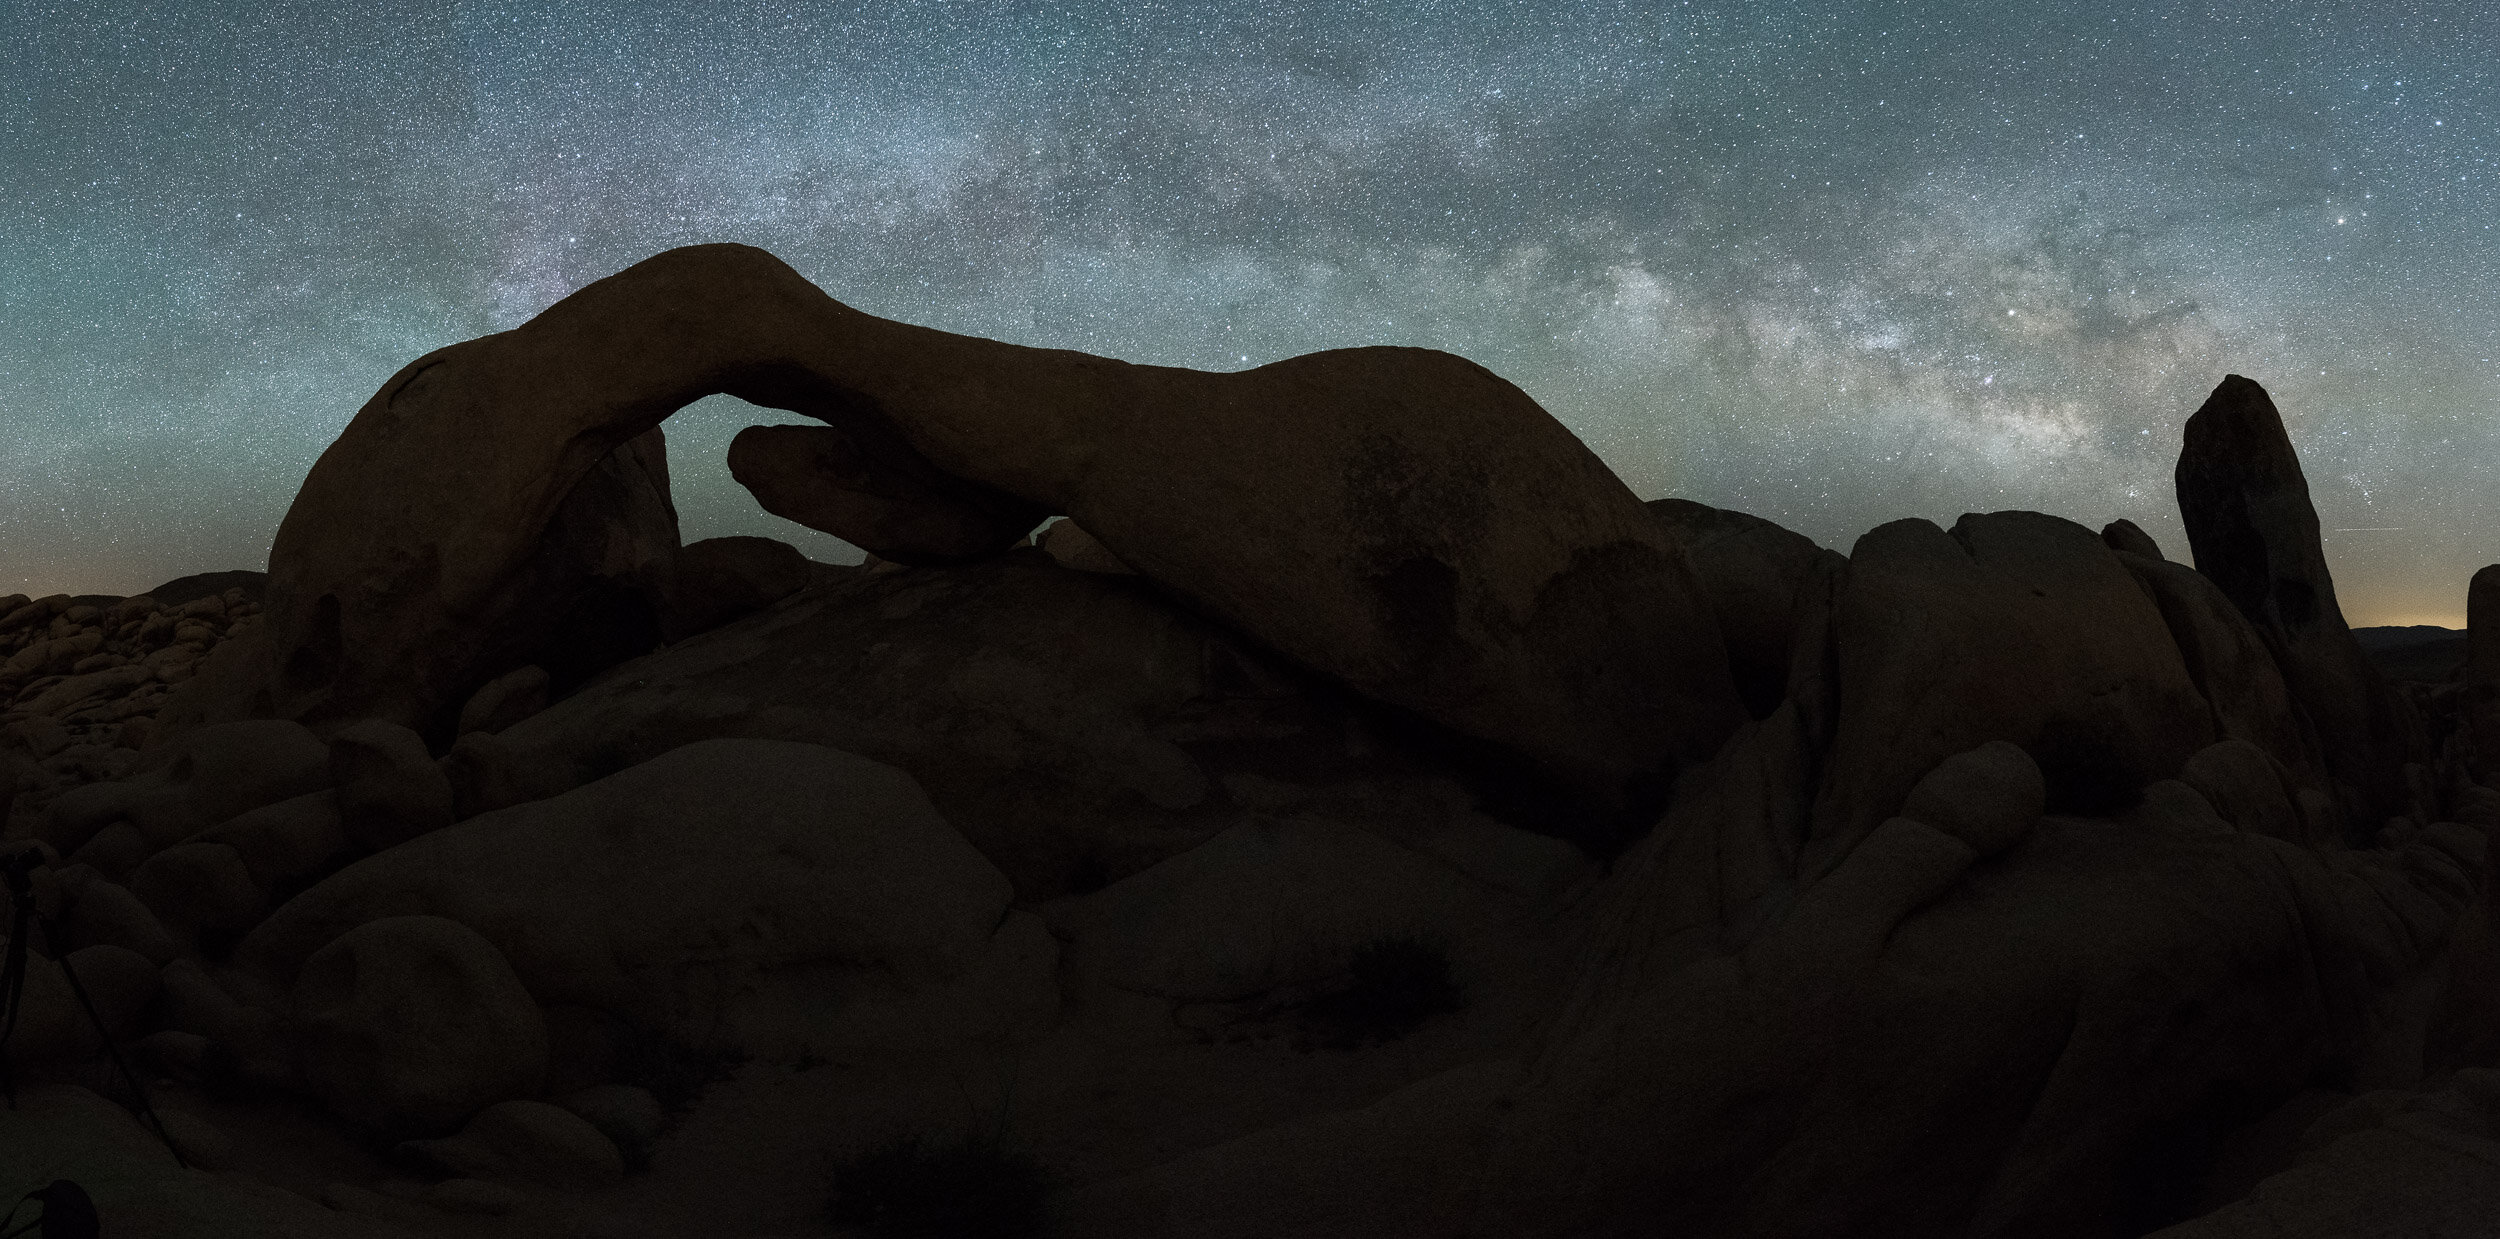
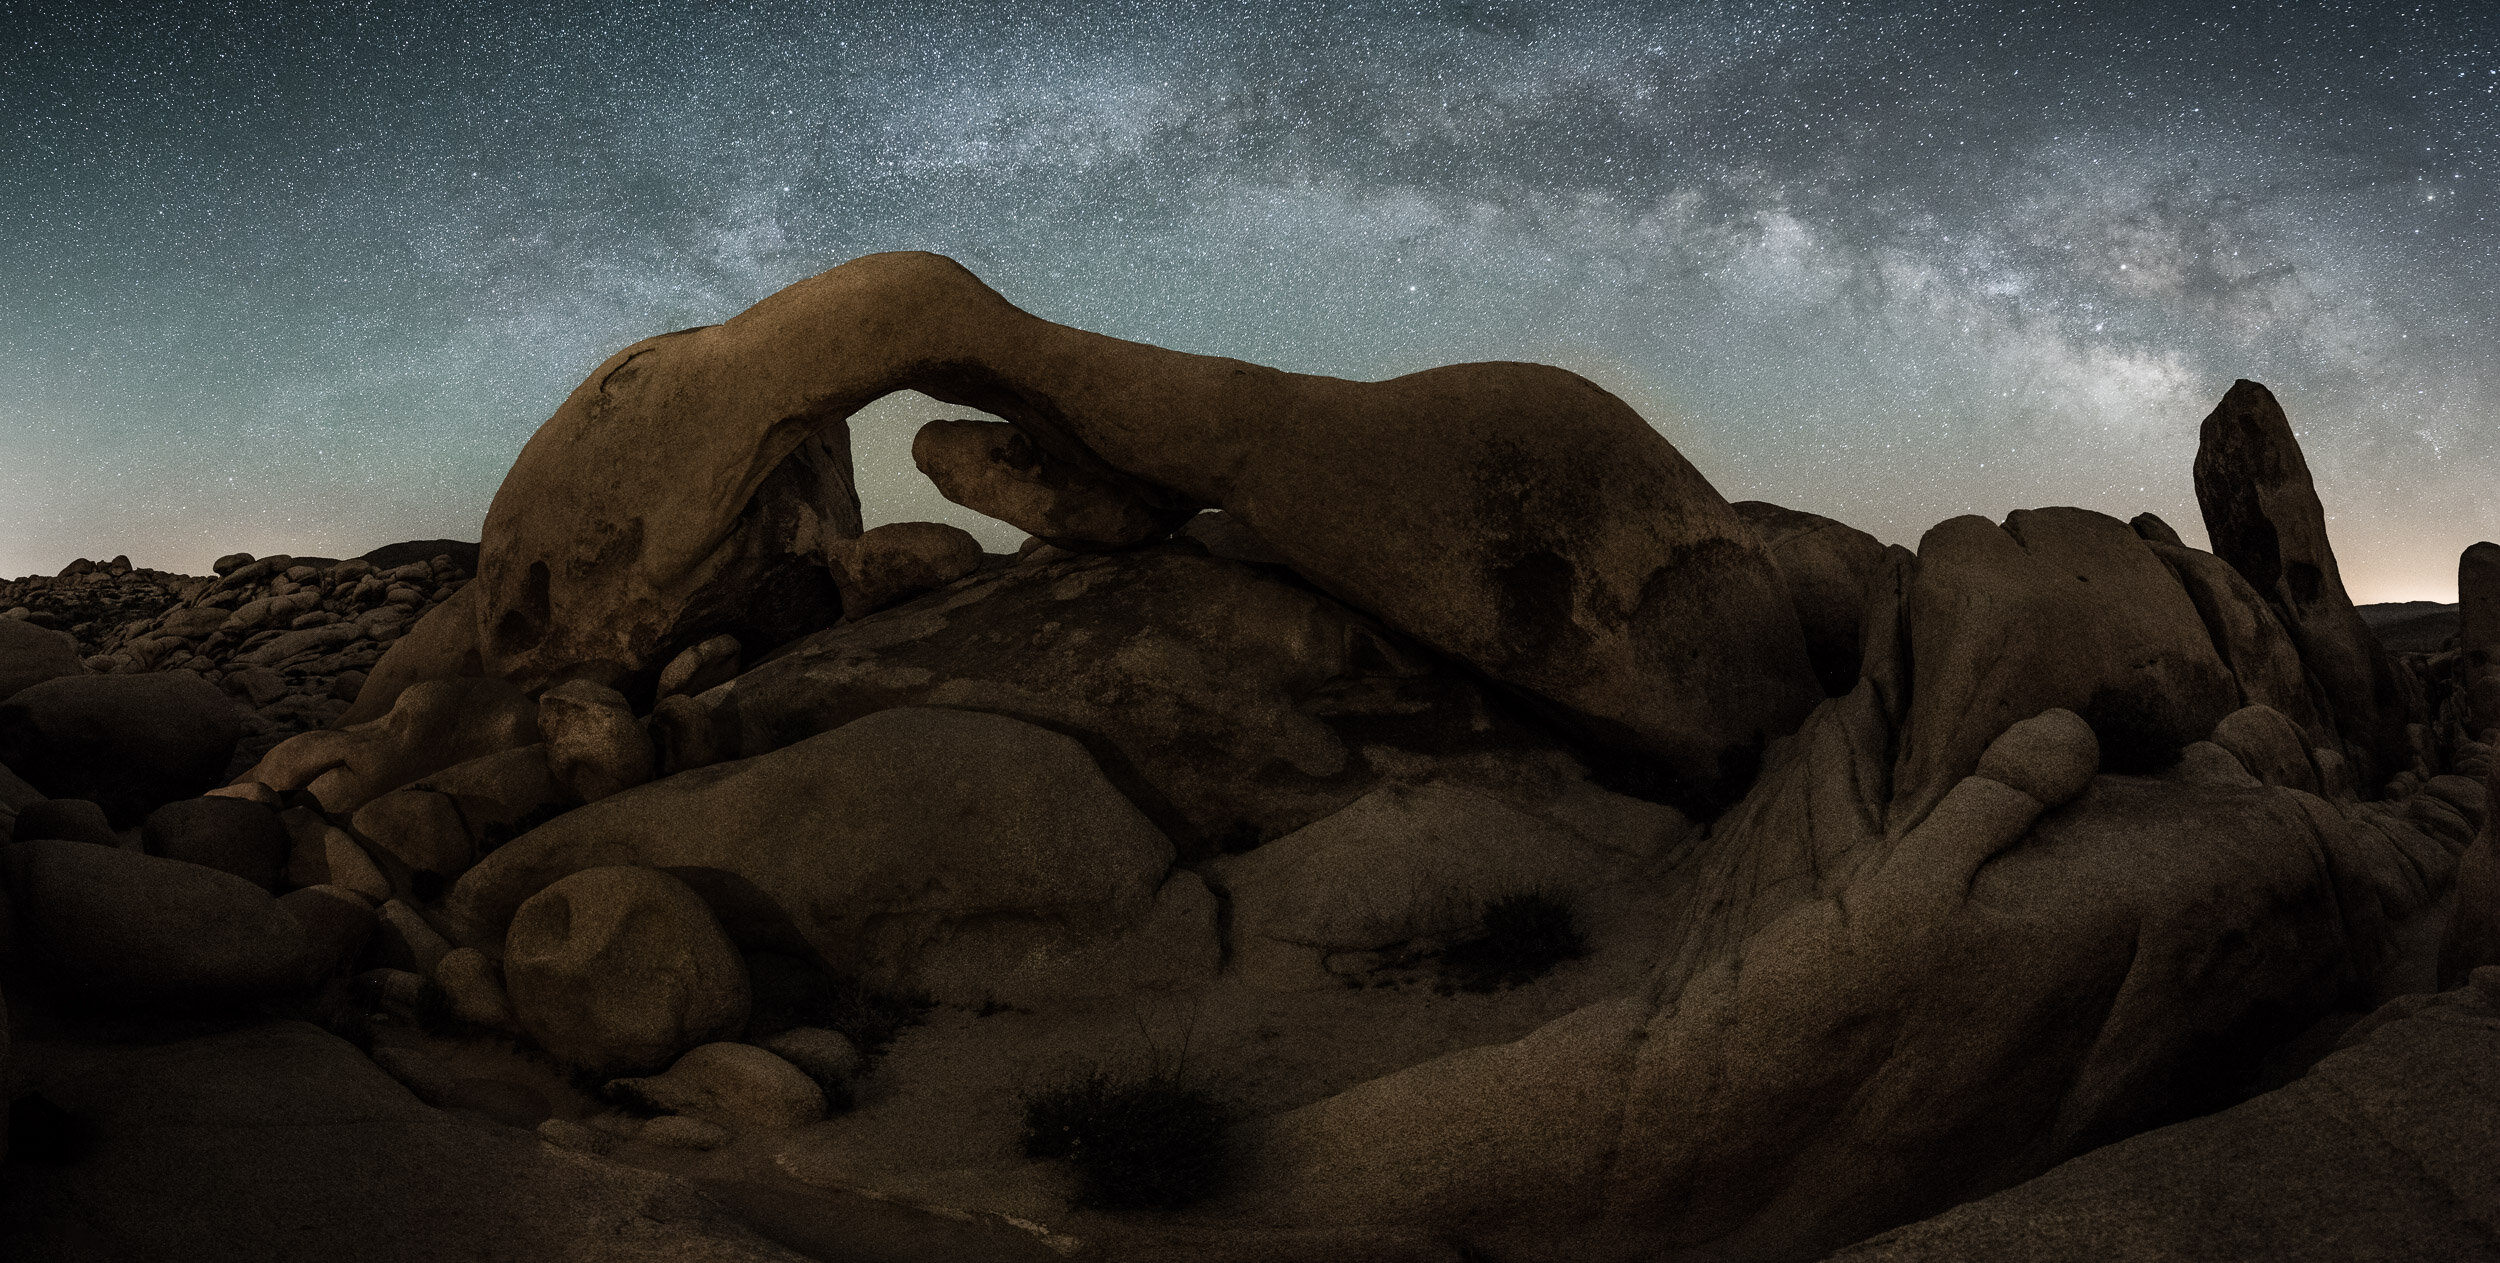
Arch Rock Panorama with Milky Way, Joshua Tree National Park. This before-and-after example shows how LLL can be used to create completely natural looking lighting in astro-landscape images. When making a panorama, having consistent lighting for each frame is critical. I made this image during a workshop collaborating with many of the participants. By using three Luxli Violas in fixed positions at the lowest brightness setting, everyone in the group was able to nail this difficult shot. · Nikon D750 with a Tamron 15-30mm f/2.8 lens. 20 seconds, f/3.2, ISO 6400.

Time Constraints

Night photographers are these days faced with two additional challenges when photographing by starlight, and the LLL technique helps with both of them.

The first problem is one of a technical nature. Astro-landscape exposures typically range from 15 to 30 seconds, which does not leave much time for light painting, especially if a scene is large, treacherous or complex. Imagine trying to light from three or four different positions during a 20-second exposure while navigating uneven rocky ground by starlight!

It’s possible to light various parts of a scene in different exposures and combine them in post-processing to form a final image, but that technique requires a substantial amount of time at the computer in Photoshop, and some people (such as myself) prefer to do the work in the field.

Space Constraints

The second problem has more to do with people than photography. With increased numbers of photographers and non-photographers alike out enjoying nature and our national parks at night, large numbers of bright flashlights being waved around willy-nilly has ruined numerous masterpieces. National Parks at Night has always stressed communication and collaboration during our workshops to enable groups of people to photograph together without getting in one another’s way, but not everyone is as considerate as our awesome workshop participants!

The Rattle Dragon, Borrego Springs. Nine stacked frames, each shot at 3 minutes, f/8, ISO 320. Ricardo Breceda‘s amazing 350-foot serpent in the Anza Borrego desert photographed with three Luxli Viola lights on stands to illuminate the sculpture. I could have used traditional light painting techniques for this image, but lighting such a large creature from different angles was more easily achieved with fixed-position LLL. · Nikon D780 with a Nikon 24-120mm f/4 lens.

Many people who use LLL are striving for images that don’t look like any light has been added to their images. Their goal is to add just enough light to balance the foreground exposure with the sky and call it done.

For me, old habits are hard to break. Although I use and love my Luxlis on almost every night shoot, my own technique is more of a hybrid of LLL and light painting. I’ve been known to mount a Luxli on a boom arm and hold it over my head while walking along a clifftop or under redwood trees. In other situations I might use a Luxli mounted on a stand, or propped against a rock to light part of a scene, and light the rest of the image with a flashlight. As much of my work is done where the human-made and natural environment intersect, I’m not necessarily trying to make my images look completely natural. I try to make them look more interesting with interesting light.

Regardless of the technique you use to light your night shots, the goal is the same––either to add emphasis and draw the viewer’s attention to a particular part of a photograph, or to fill in dark and underexposed areas to make for a better exposure.

LLL Gear

If you are ready to jump in and give LLL a try, you could rest your light source on a nearby rock or tree branch, or you could start with just one panel light on a second tripod—but more than likely you’ll soon end up with two or three lights and accompanying stands. The Impact LS-RL7 Reverse Legs Light Stand is a good option, as is the Manfrotto MS0490A Nanopole. And if you want the lightest of stands, the Nanopole comes in a Carbon Fiber version that weighs in in at a tidy 1.8 pounds.

I mentioned the Luxli Viola at the beginning of this article as NPAN’s LED panel of choice. It is one of the more expensive LED panel lights available, but the quality of the light, the variability of color temperature (as well as the ability to create almost any color you can imagine) and the useful app that allows for remote control of one or multiple Luxlis all make it more than worth the cost. The Viola also comes with a mini ball head that makes aiming the light right where you want it much easier.

The Luxli Viola, the LLL tool of choice for all the NPAN instructors in most situations.

A couple of budget options to get you started are tea lights from a dollar store or diffuse inflatable camping lights, but you probably won’t get good color from them.

LLL Tips

So, how do you light the landscape with low-level light? The basic concepts of LLL and traditional light painting are similar. The primary difference is that your light or lights are stationary, and usually much dimmer than light painting tools. Here are a few guidelines:

  • Light from 45 to 180 degrees from the camera, never from the camera position.

  • Compose, then focus, then determine your base exposure, then add light where needed.

  • Make test exposures, review the results, make adjustments.

  • Move the light, be mindful of shadows, adjust the intensity as needed.

  • If you are using a Luxli or other variable color tool, match or contrast the color of your light to the overall scene.

  • If using a Luxli, consider pairing it with their free Composer app, which allows you remotely change the intensity, color temperature and hue, rather than having to walk back and forth between the light and the camera to make changes.

  • Work with a partner, or even in a small group, sharing the lighting and the work.

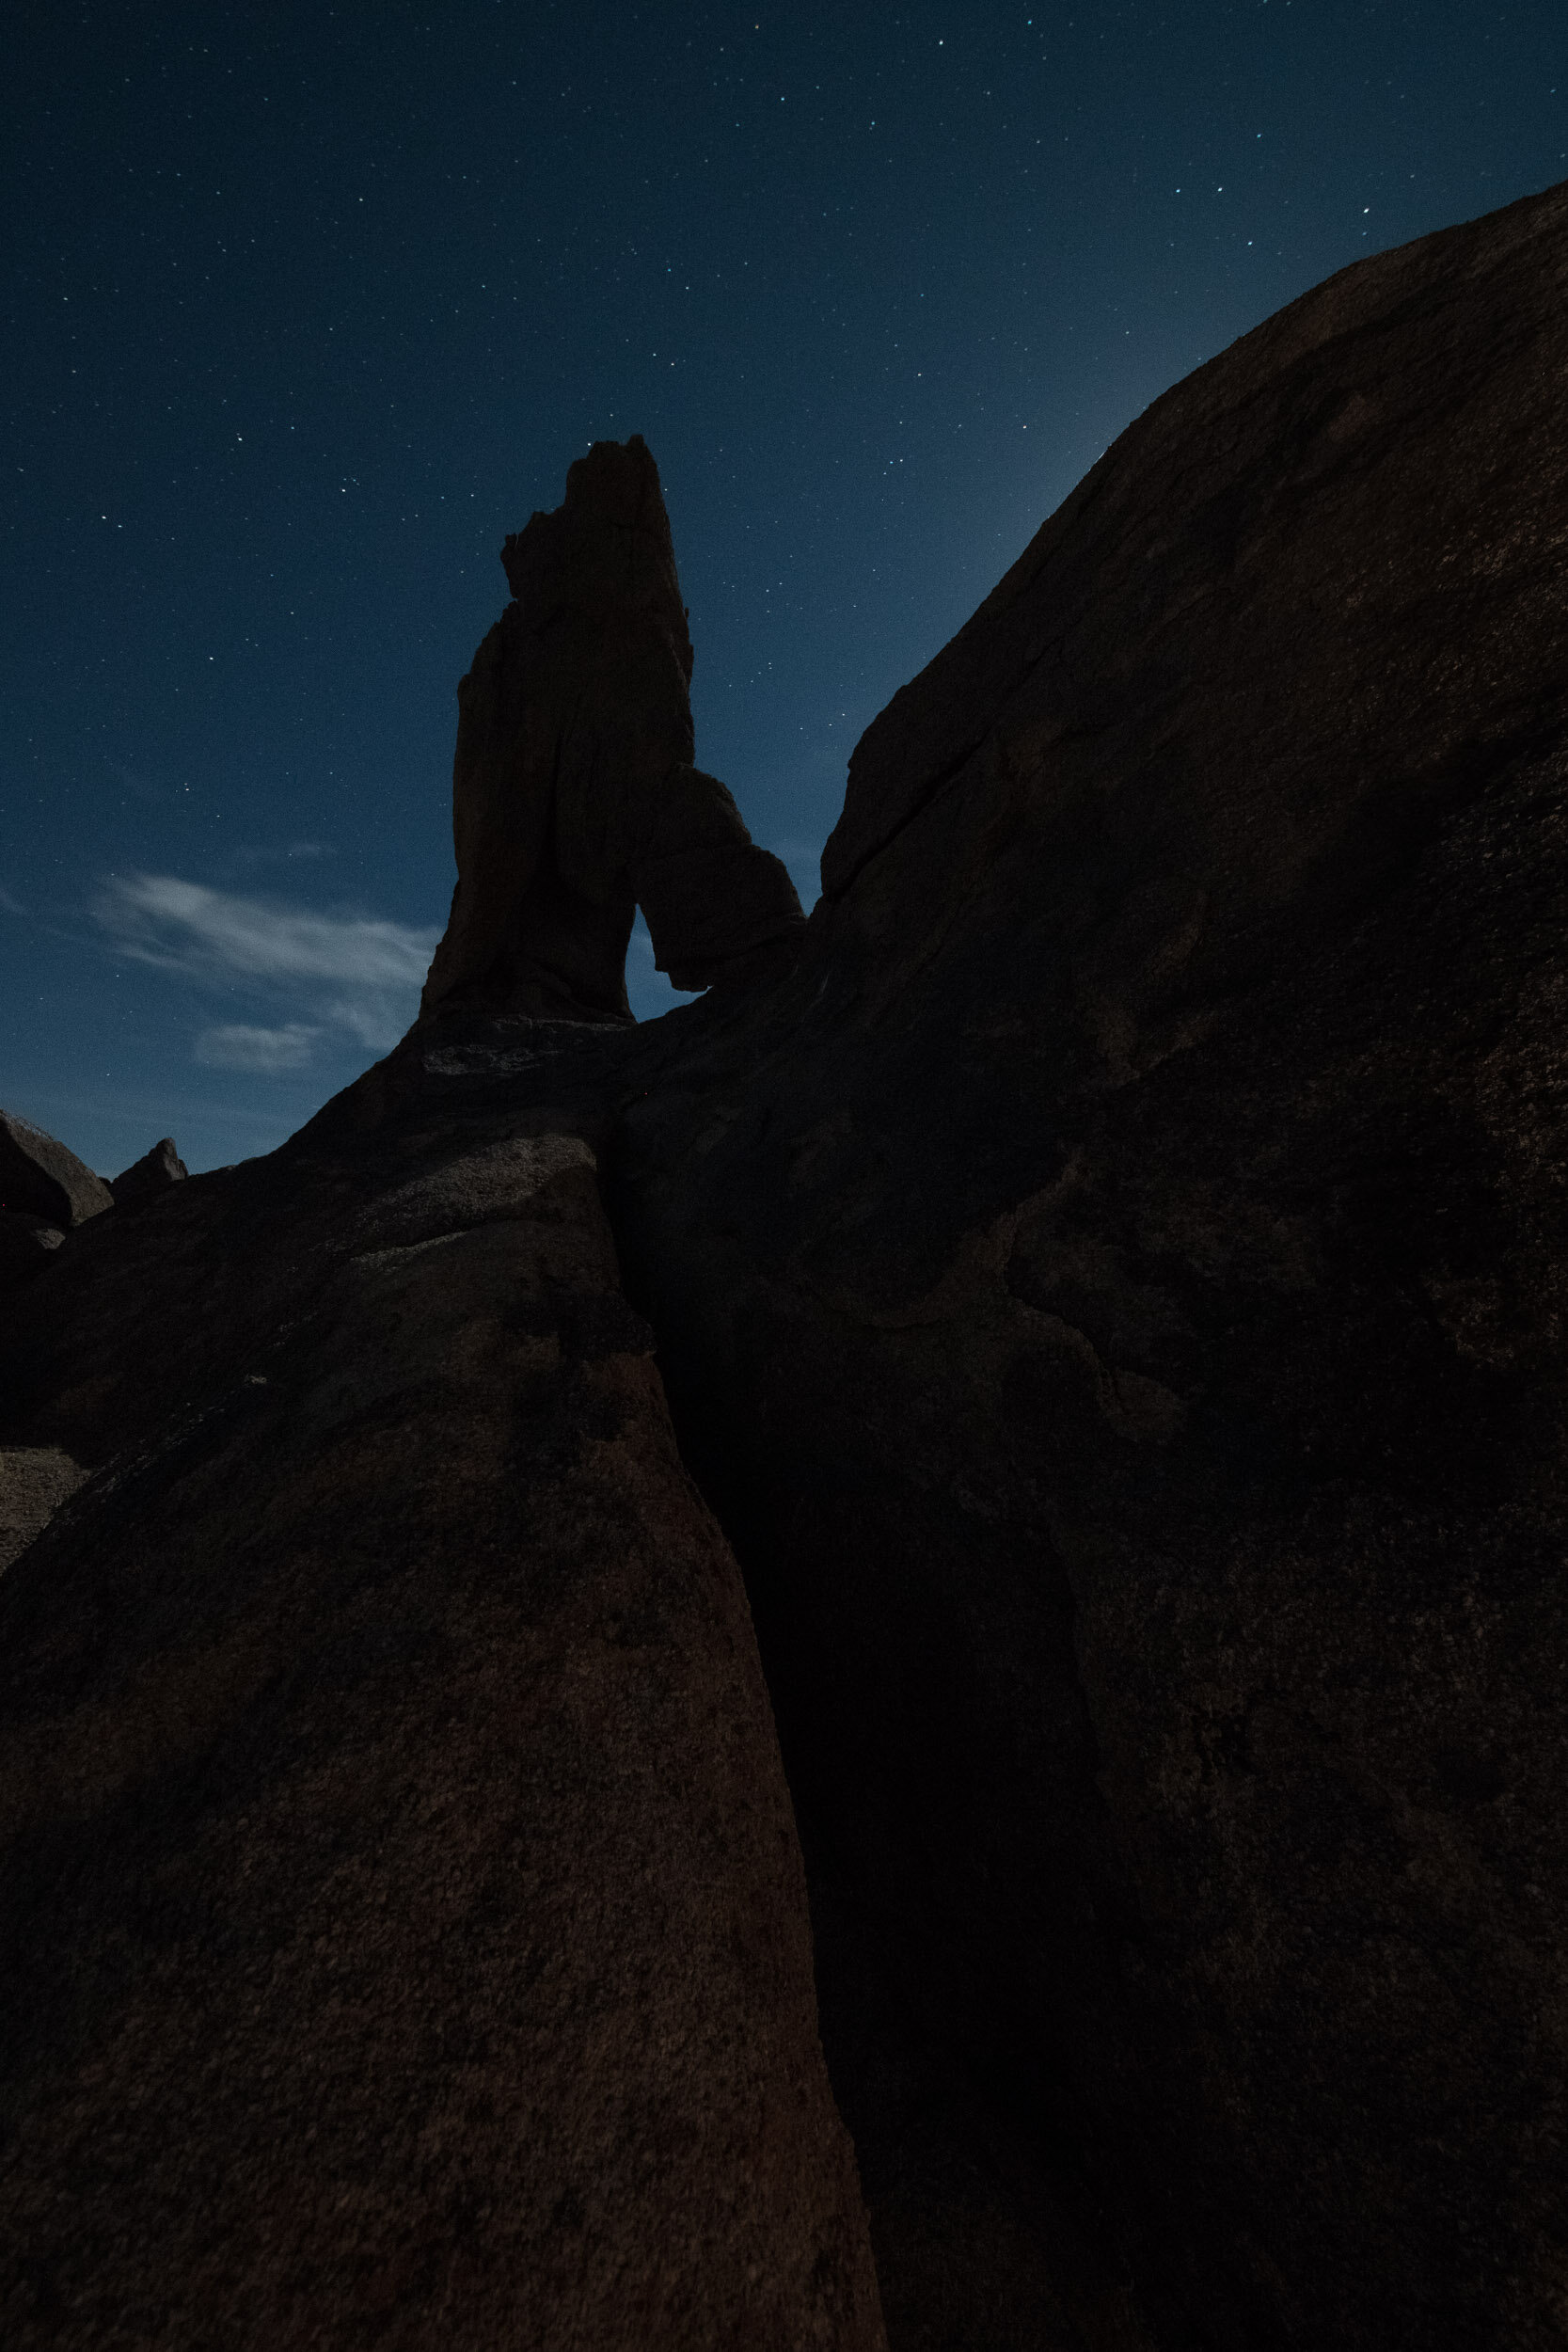
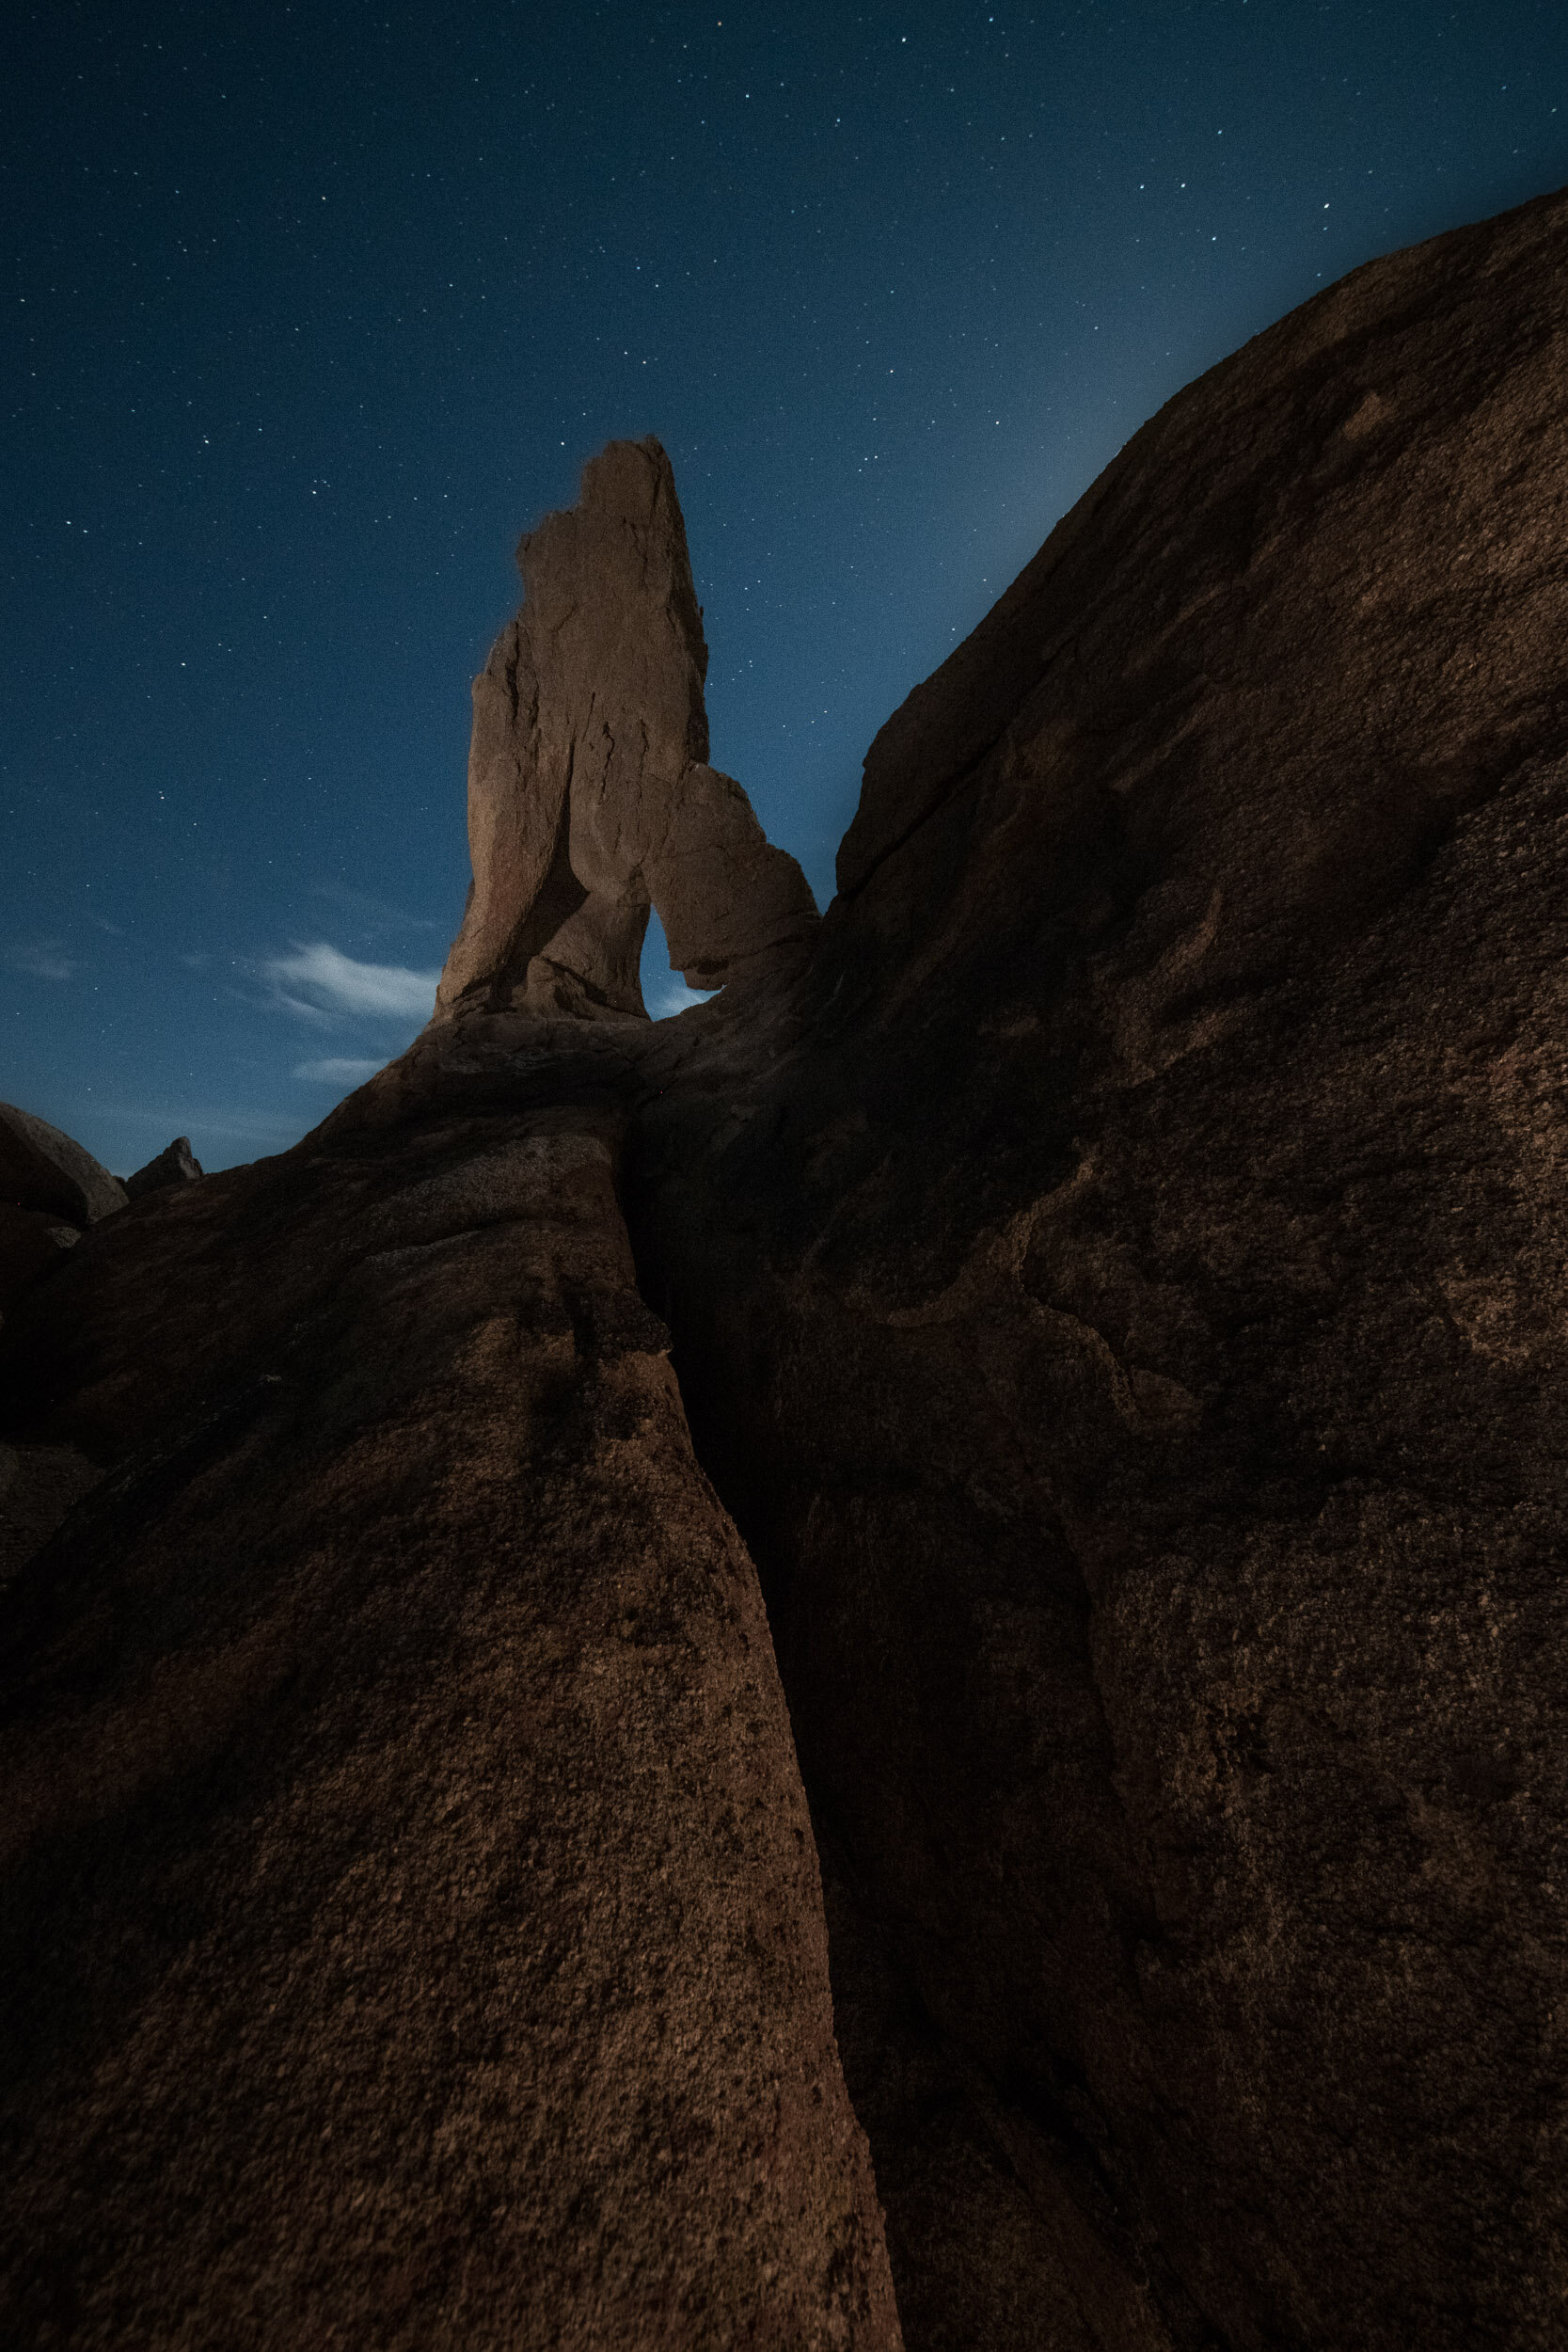
Lady Boot Arch, Alabama Hills. Here’s another before and after example. The full-ish moon was rising behind the rock on the right. I was more in the mood for star points than trails, so I needed to keep the exposure short. The landscape was full of narrow crevices that seemingly were designed for twisting ankles and banging knees. I used light painting on a different version of this image that night, running like a nutcase between the formations during the short exposure, but that wasn’t an option for this shot. One light was on a stand high to camera-right, and another was leaning against a rock to the left of the arch. · Nikon D780 with an Irix 11 mm f/4 lens. 25 seconds, f/8, ISO 3200.

Wrapping Up

Regardless of the tools you use, Low-level Landscape Lighting is an essential technique to have in your night photography toolbox.

If you’re inspired to get out and try this, or if you’ve done it before, we’d love to see your images. Share your images in the comments section or on our Facebook page, or post them on Instagram and tag us (@nationalparksatnight).

Lance Keimig is a partner and workshop leader with National Parks at Night. He has been photographing at night for 35 years, and is the author of Night Photography and Light Painting: Finding Your Way in the Dark (Focal Press, 2015). Learn more about his images and workshops at www.thenightskye.com.

UPCOMING WORKSHOPS FROM NATIONAL PARKS AT NIGHT

How to Deal With Light Pollution, Part II: Post-Production

Note: This is the second in a three-part series about one of the most common questions we get: How do you deal with light pollution? We have three answers: with filters, with post-processing, with creativity. In this week’s blog post, Lance Keimig discusses the second of those solutions: processing in Lightroom.


Last week, Matt wrote about his experiences testing a couple of light pollution filters, and he showed how they can be useful for neutralizing color casts in clouds from artificial lights, in reducing atmospheric haze, and especially for taming the beasts known as sodium vapor lights.

He showed that the two filters he tested work primarily by filtering out a narrow band of intensely orange light that is particular to sodium vapor lights. Before the widespread adoption of LED street lighting, high pressure sodium vapor was the most common form of street lighting used worldwide. These lights are still quite common, and until they are eliminated altogether, light pollution filters will probably be the first line of defense against the color shifts they cause in photographs.

The image above is a good example of the types of artificial light sources that cause light pollution. The intensely yellow lights are low pressure sodium vapor, and the others in the scene are high pressure sodium vapor. Canon EOS 6D with a Nikon 28 mm f/3.5 PC lens. 6 seconds, f/8, ISO 200.

When we consider the problem of light pollution in night photography, there are two conundrums:

  1. unwanted color casts in the clouds and in the sky

  2. stray light that obscures the stars in our images

Light pollution filters can address both of those issues, providing that the bulk of the light pollution is from sodium vapor lights.

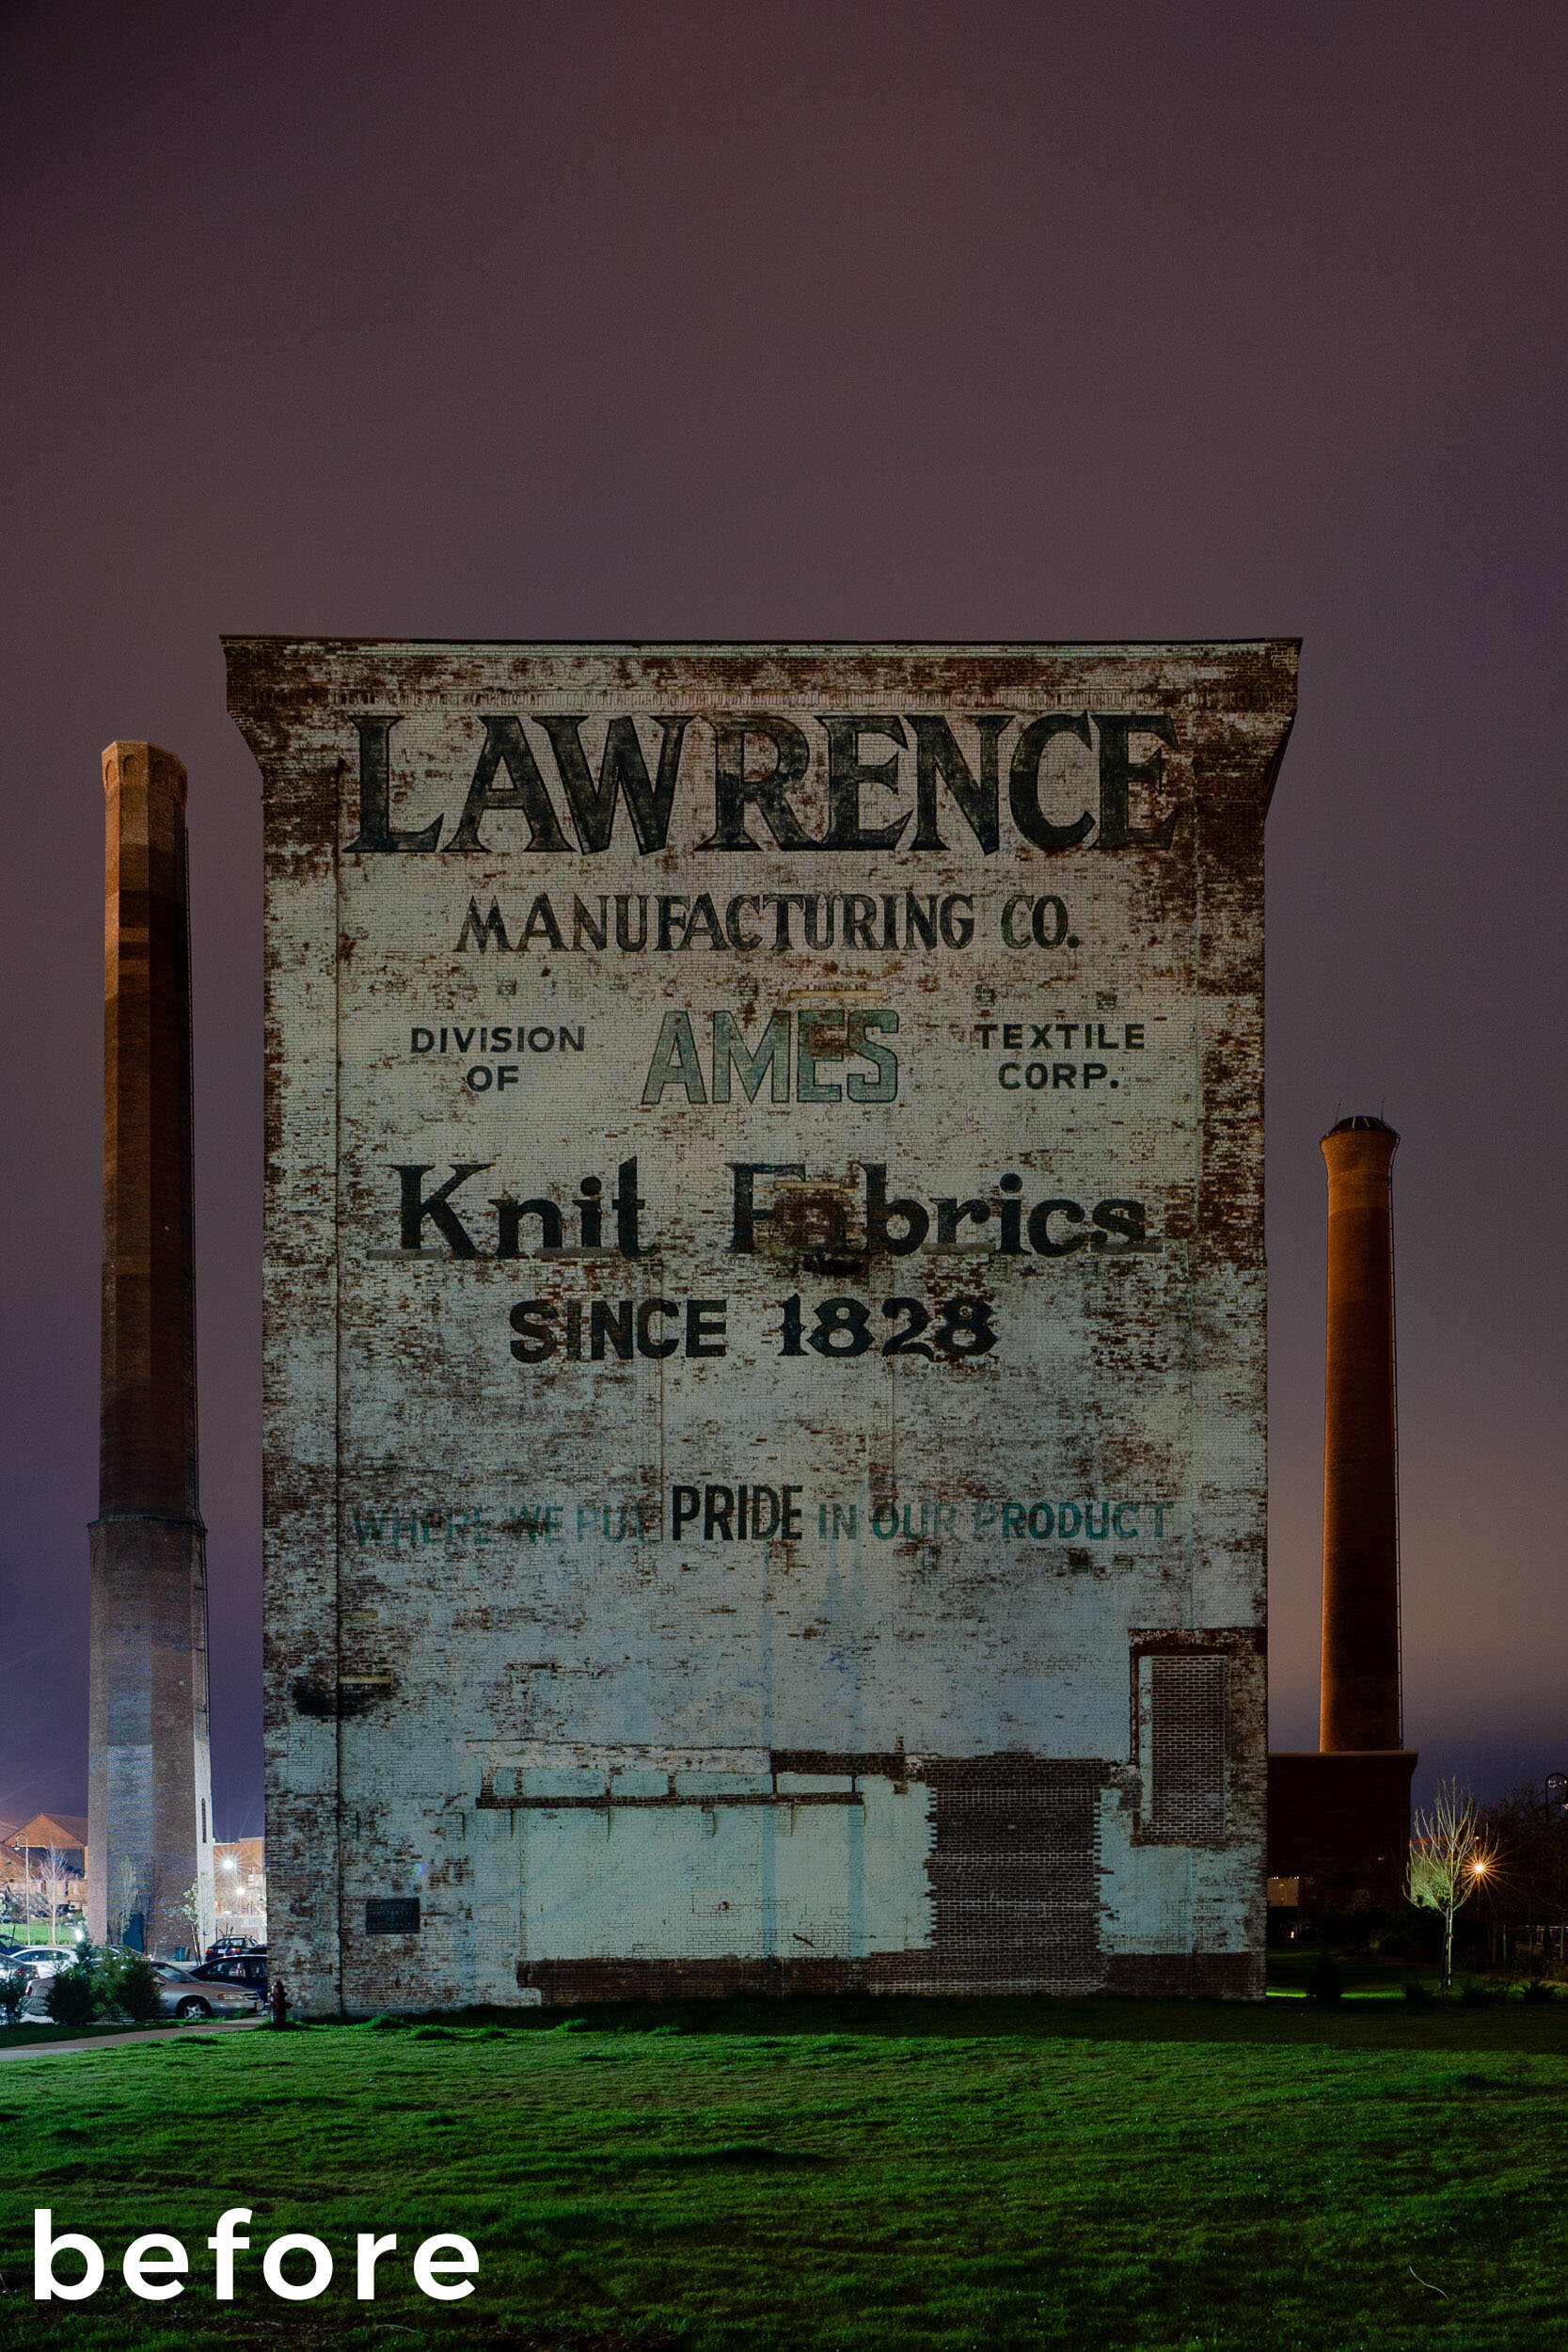
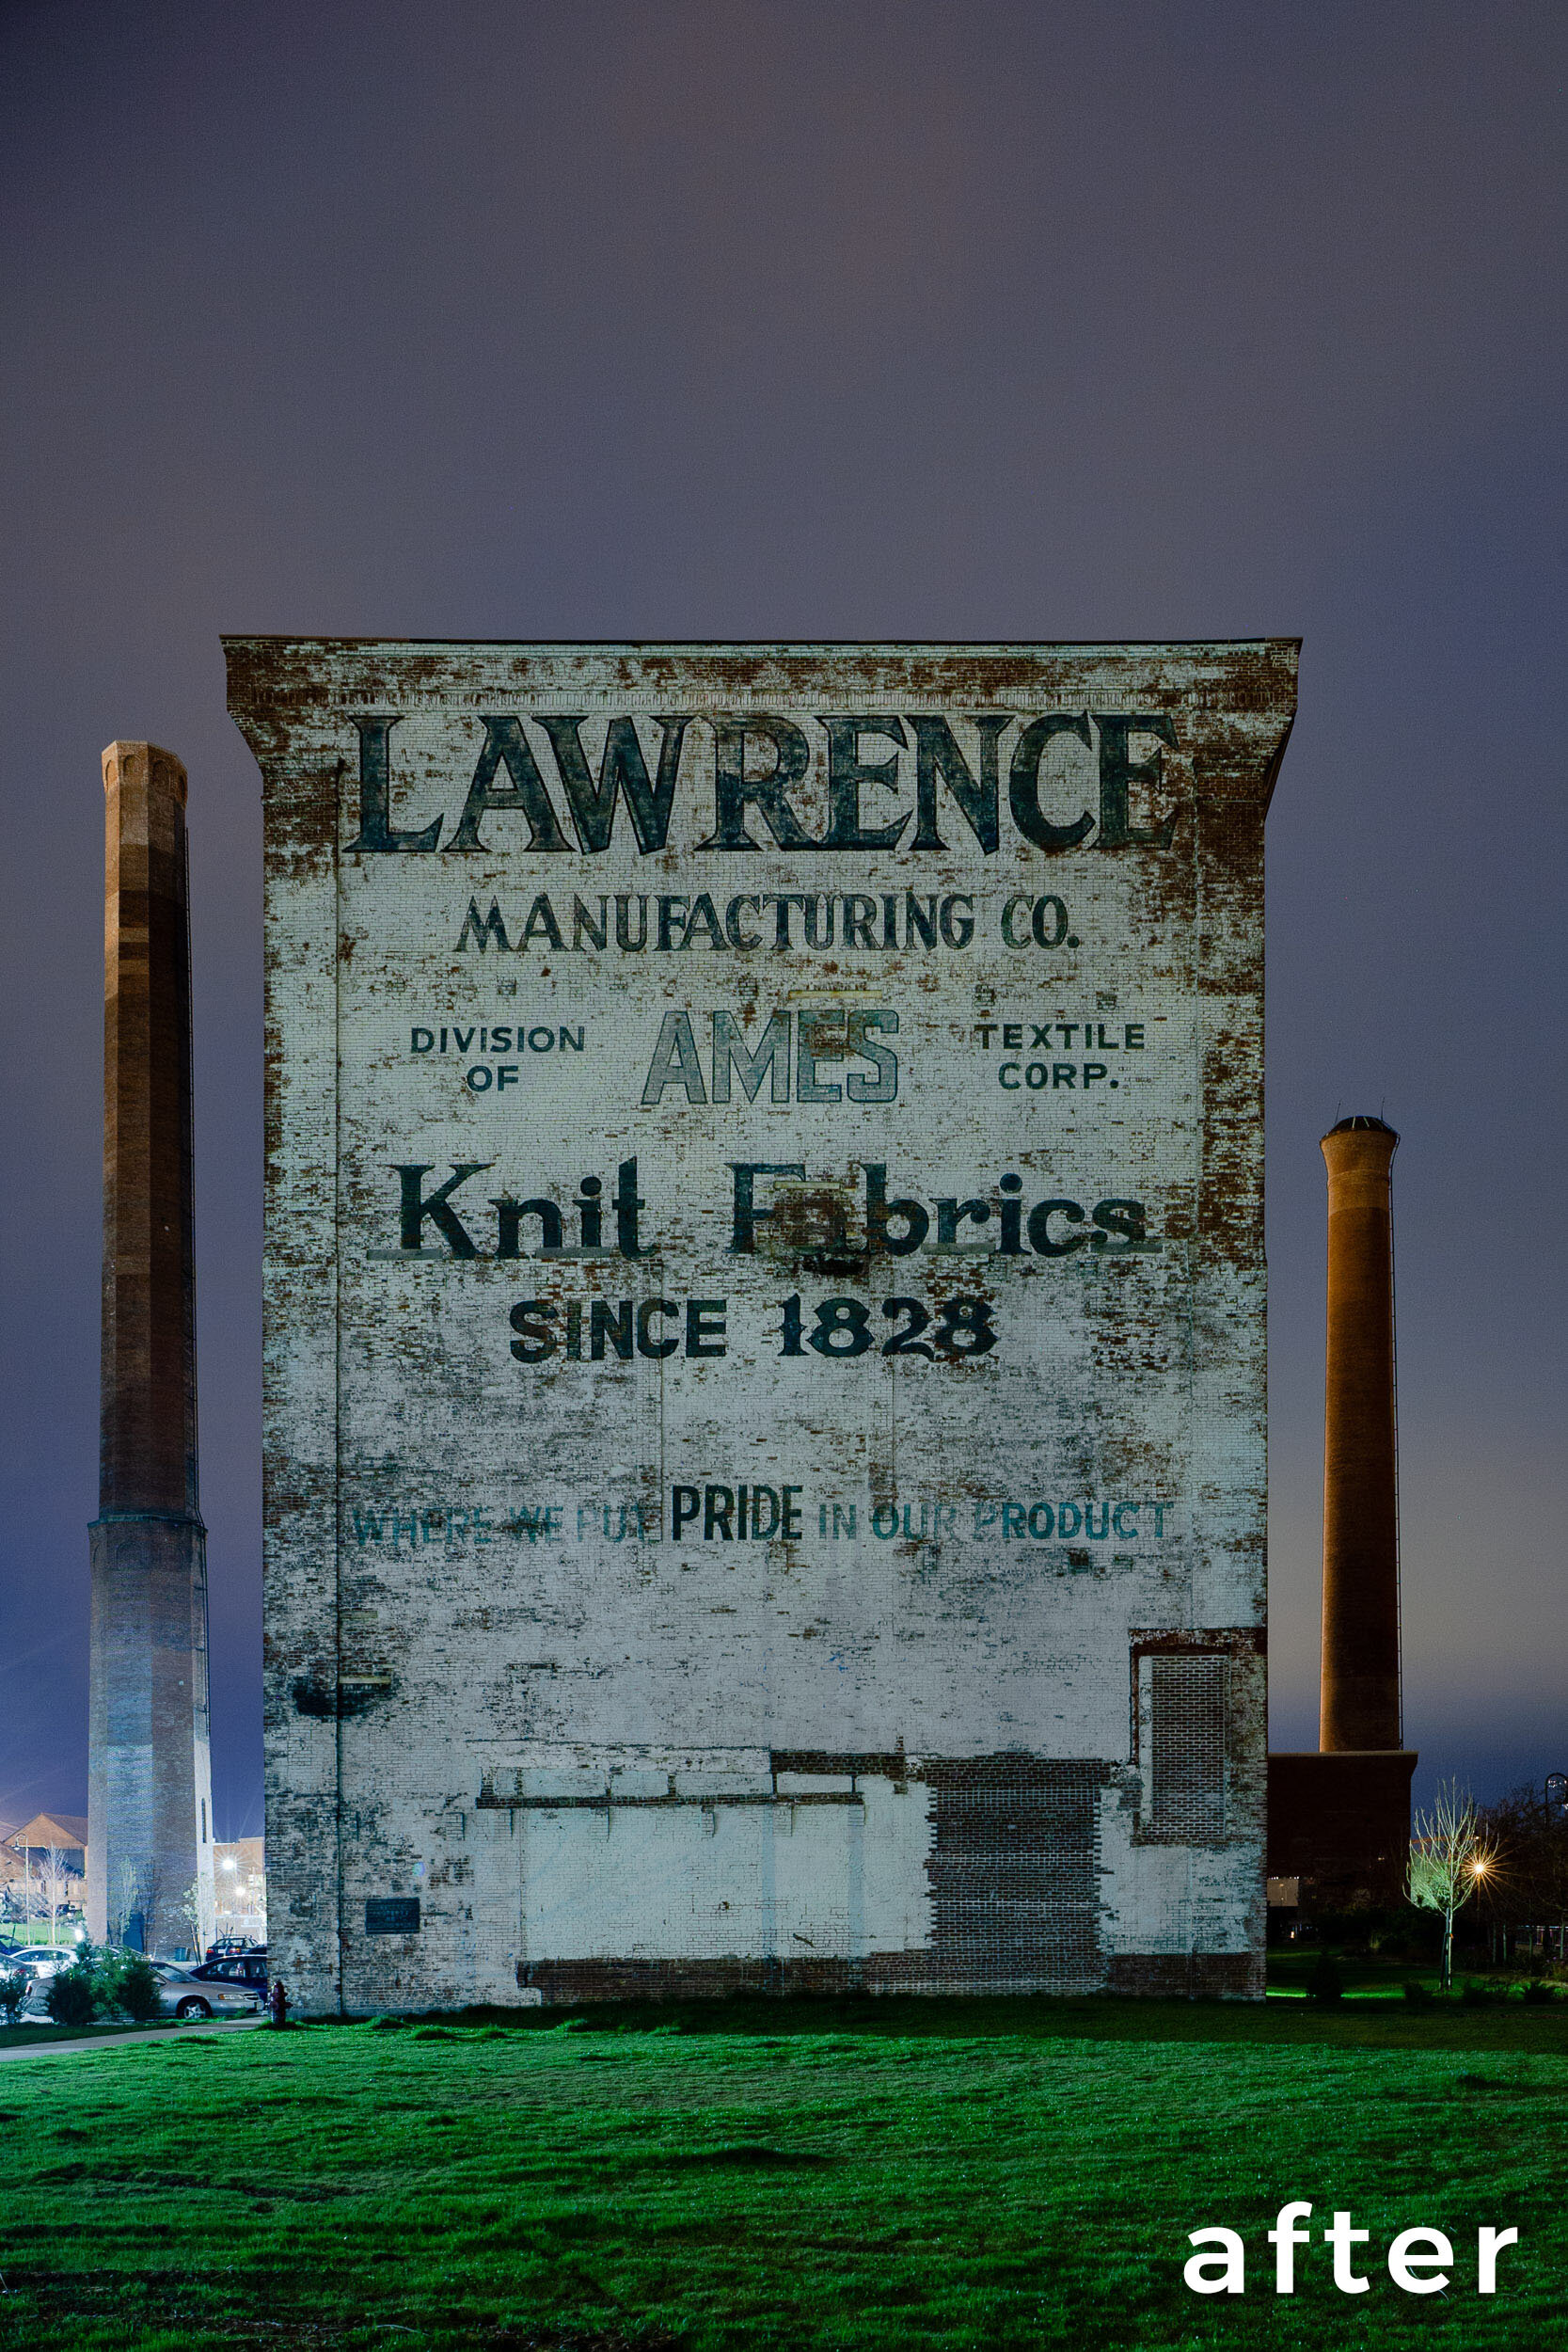
However, if you don’t use a light pollution filter, post-processing offers an alternative method to correcting unwanted color casts from light pollution in night photographs. In this post and the accompanying video (you can jump to it here), I’ll show you examples of how you can employ post-processing techniques to minimize unwanted color casts from light pollution. All of these examples utilize Lightroom Classic’s White Balance, Hue, Saturation and Luminance (HSL) and local adjustment tools to achieve the desired effects.

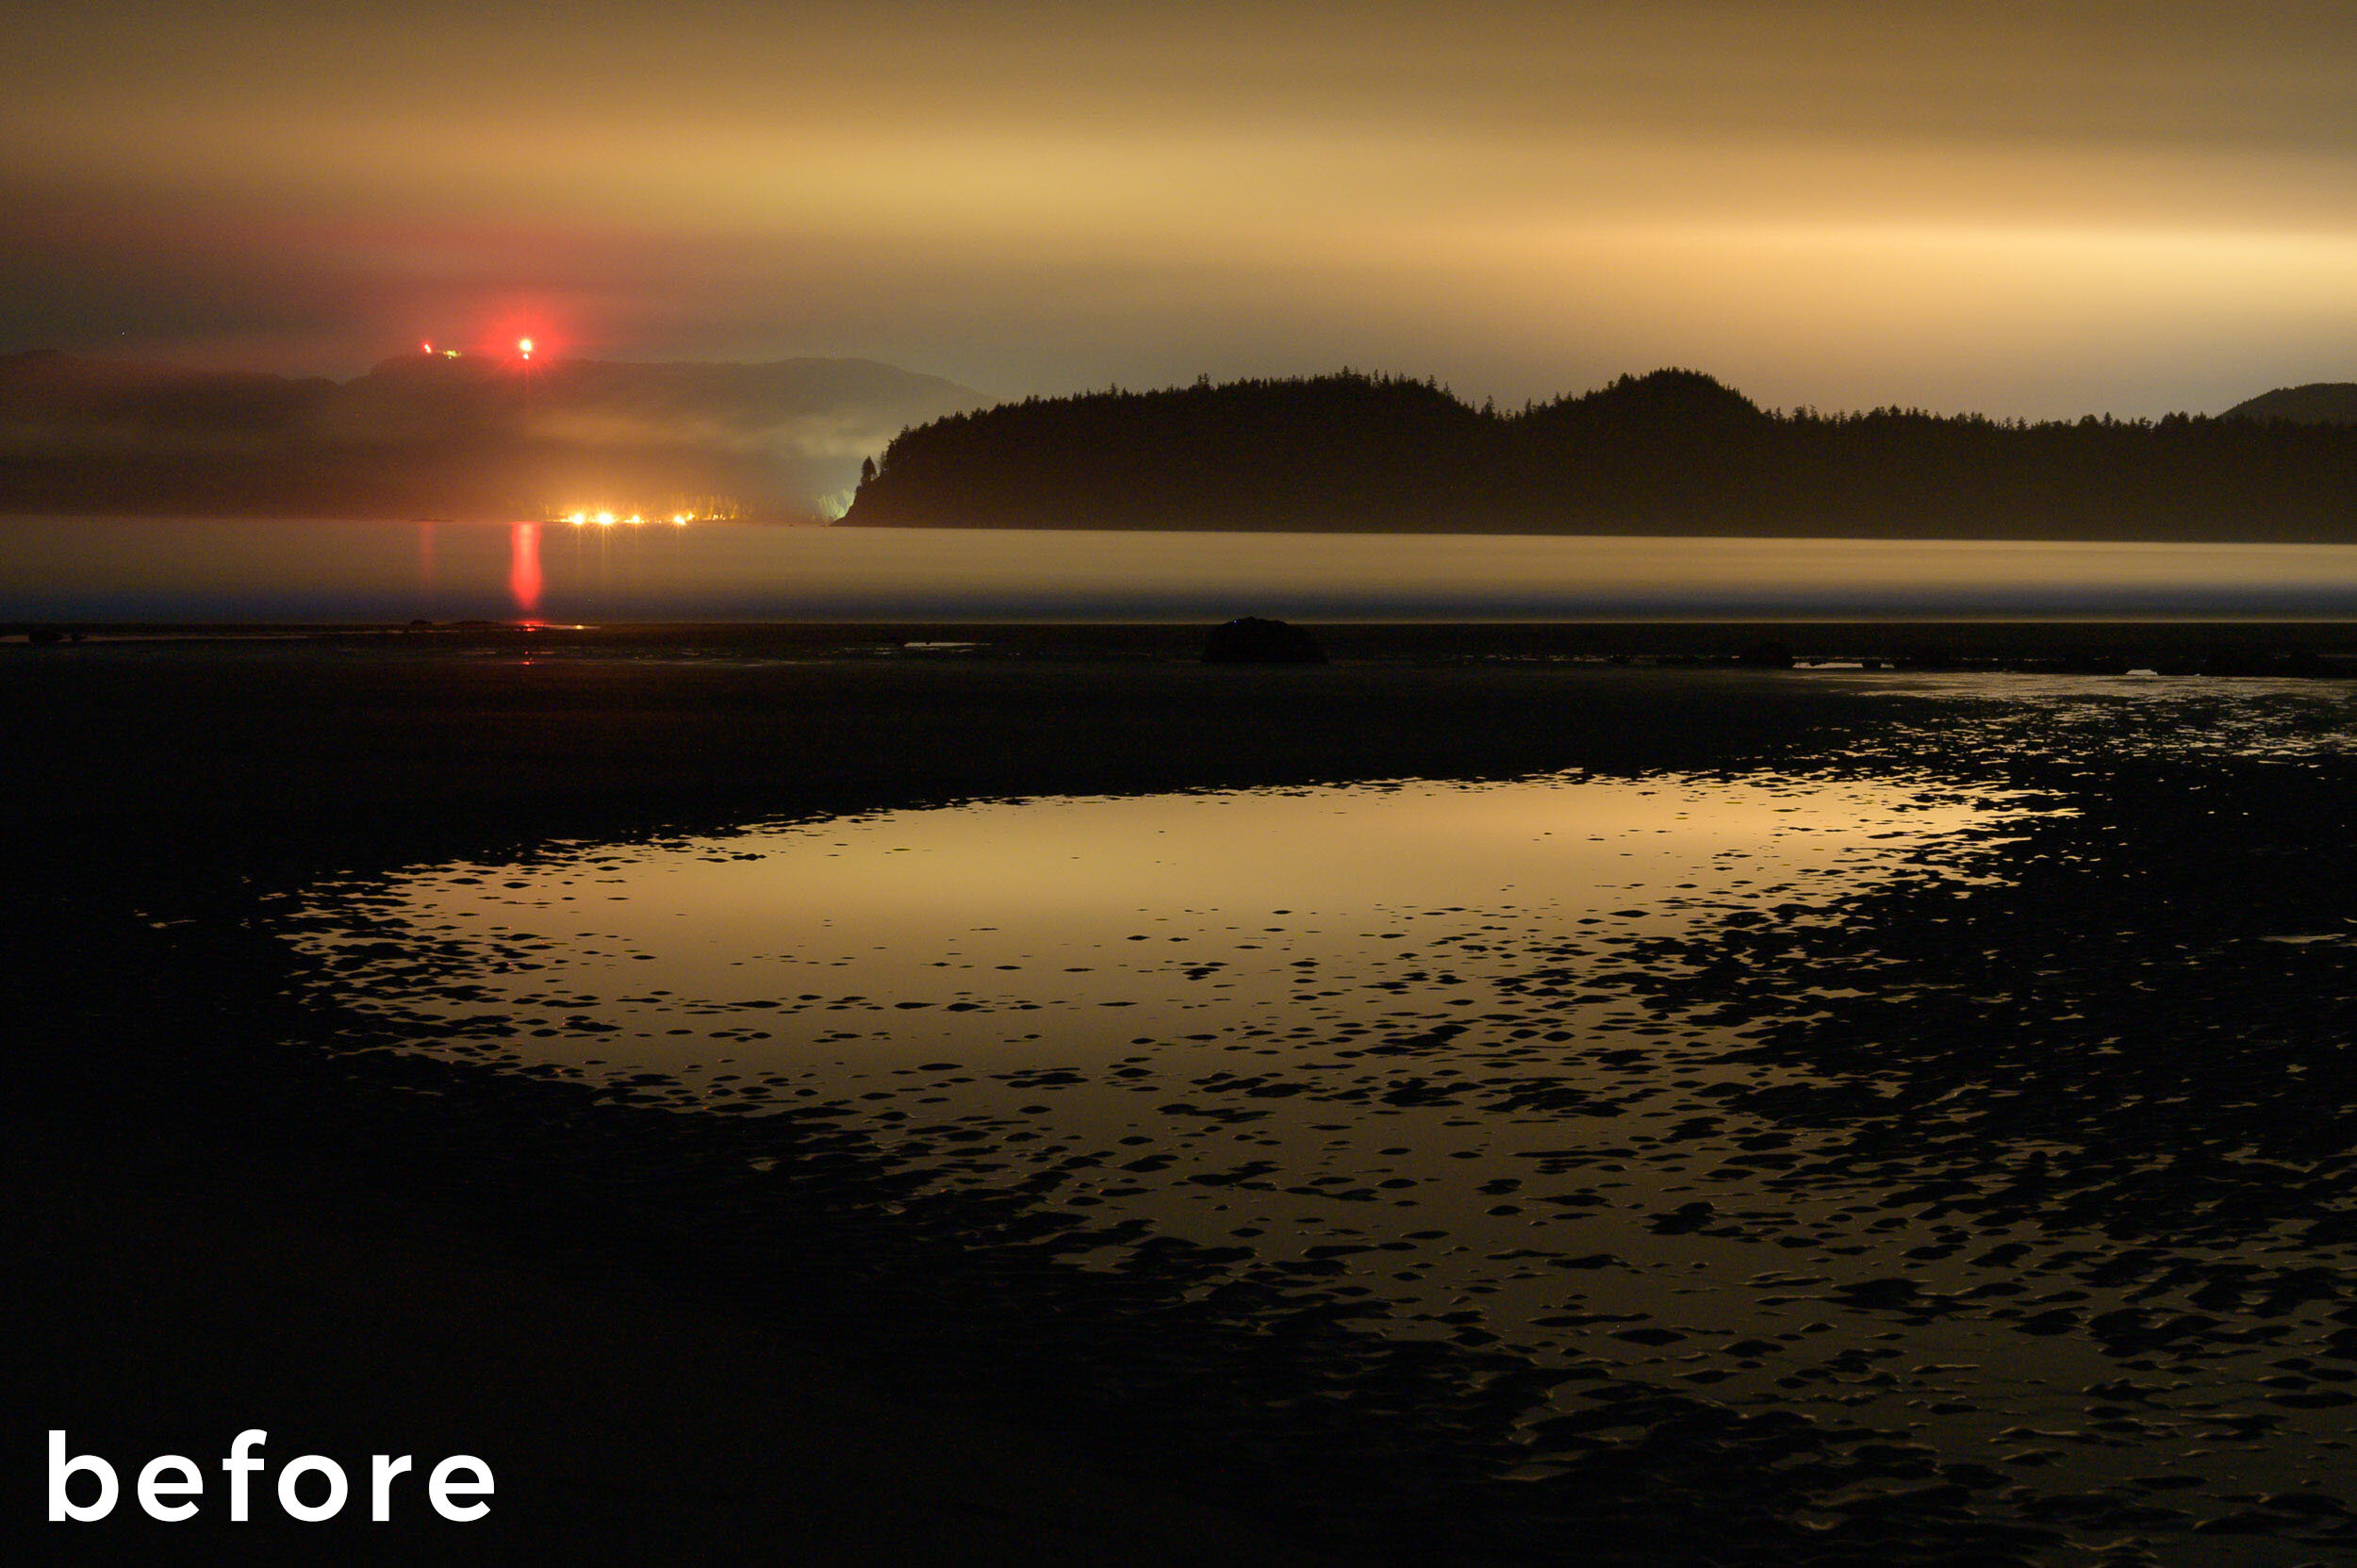
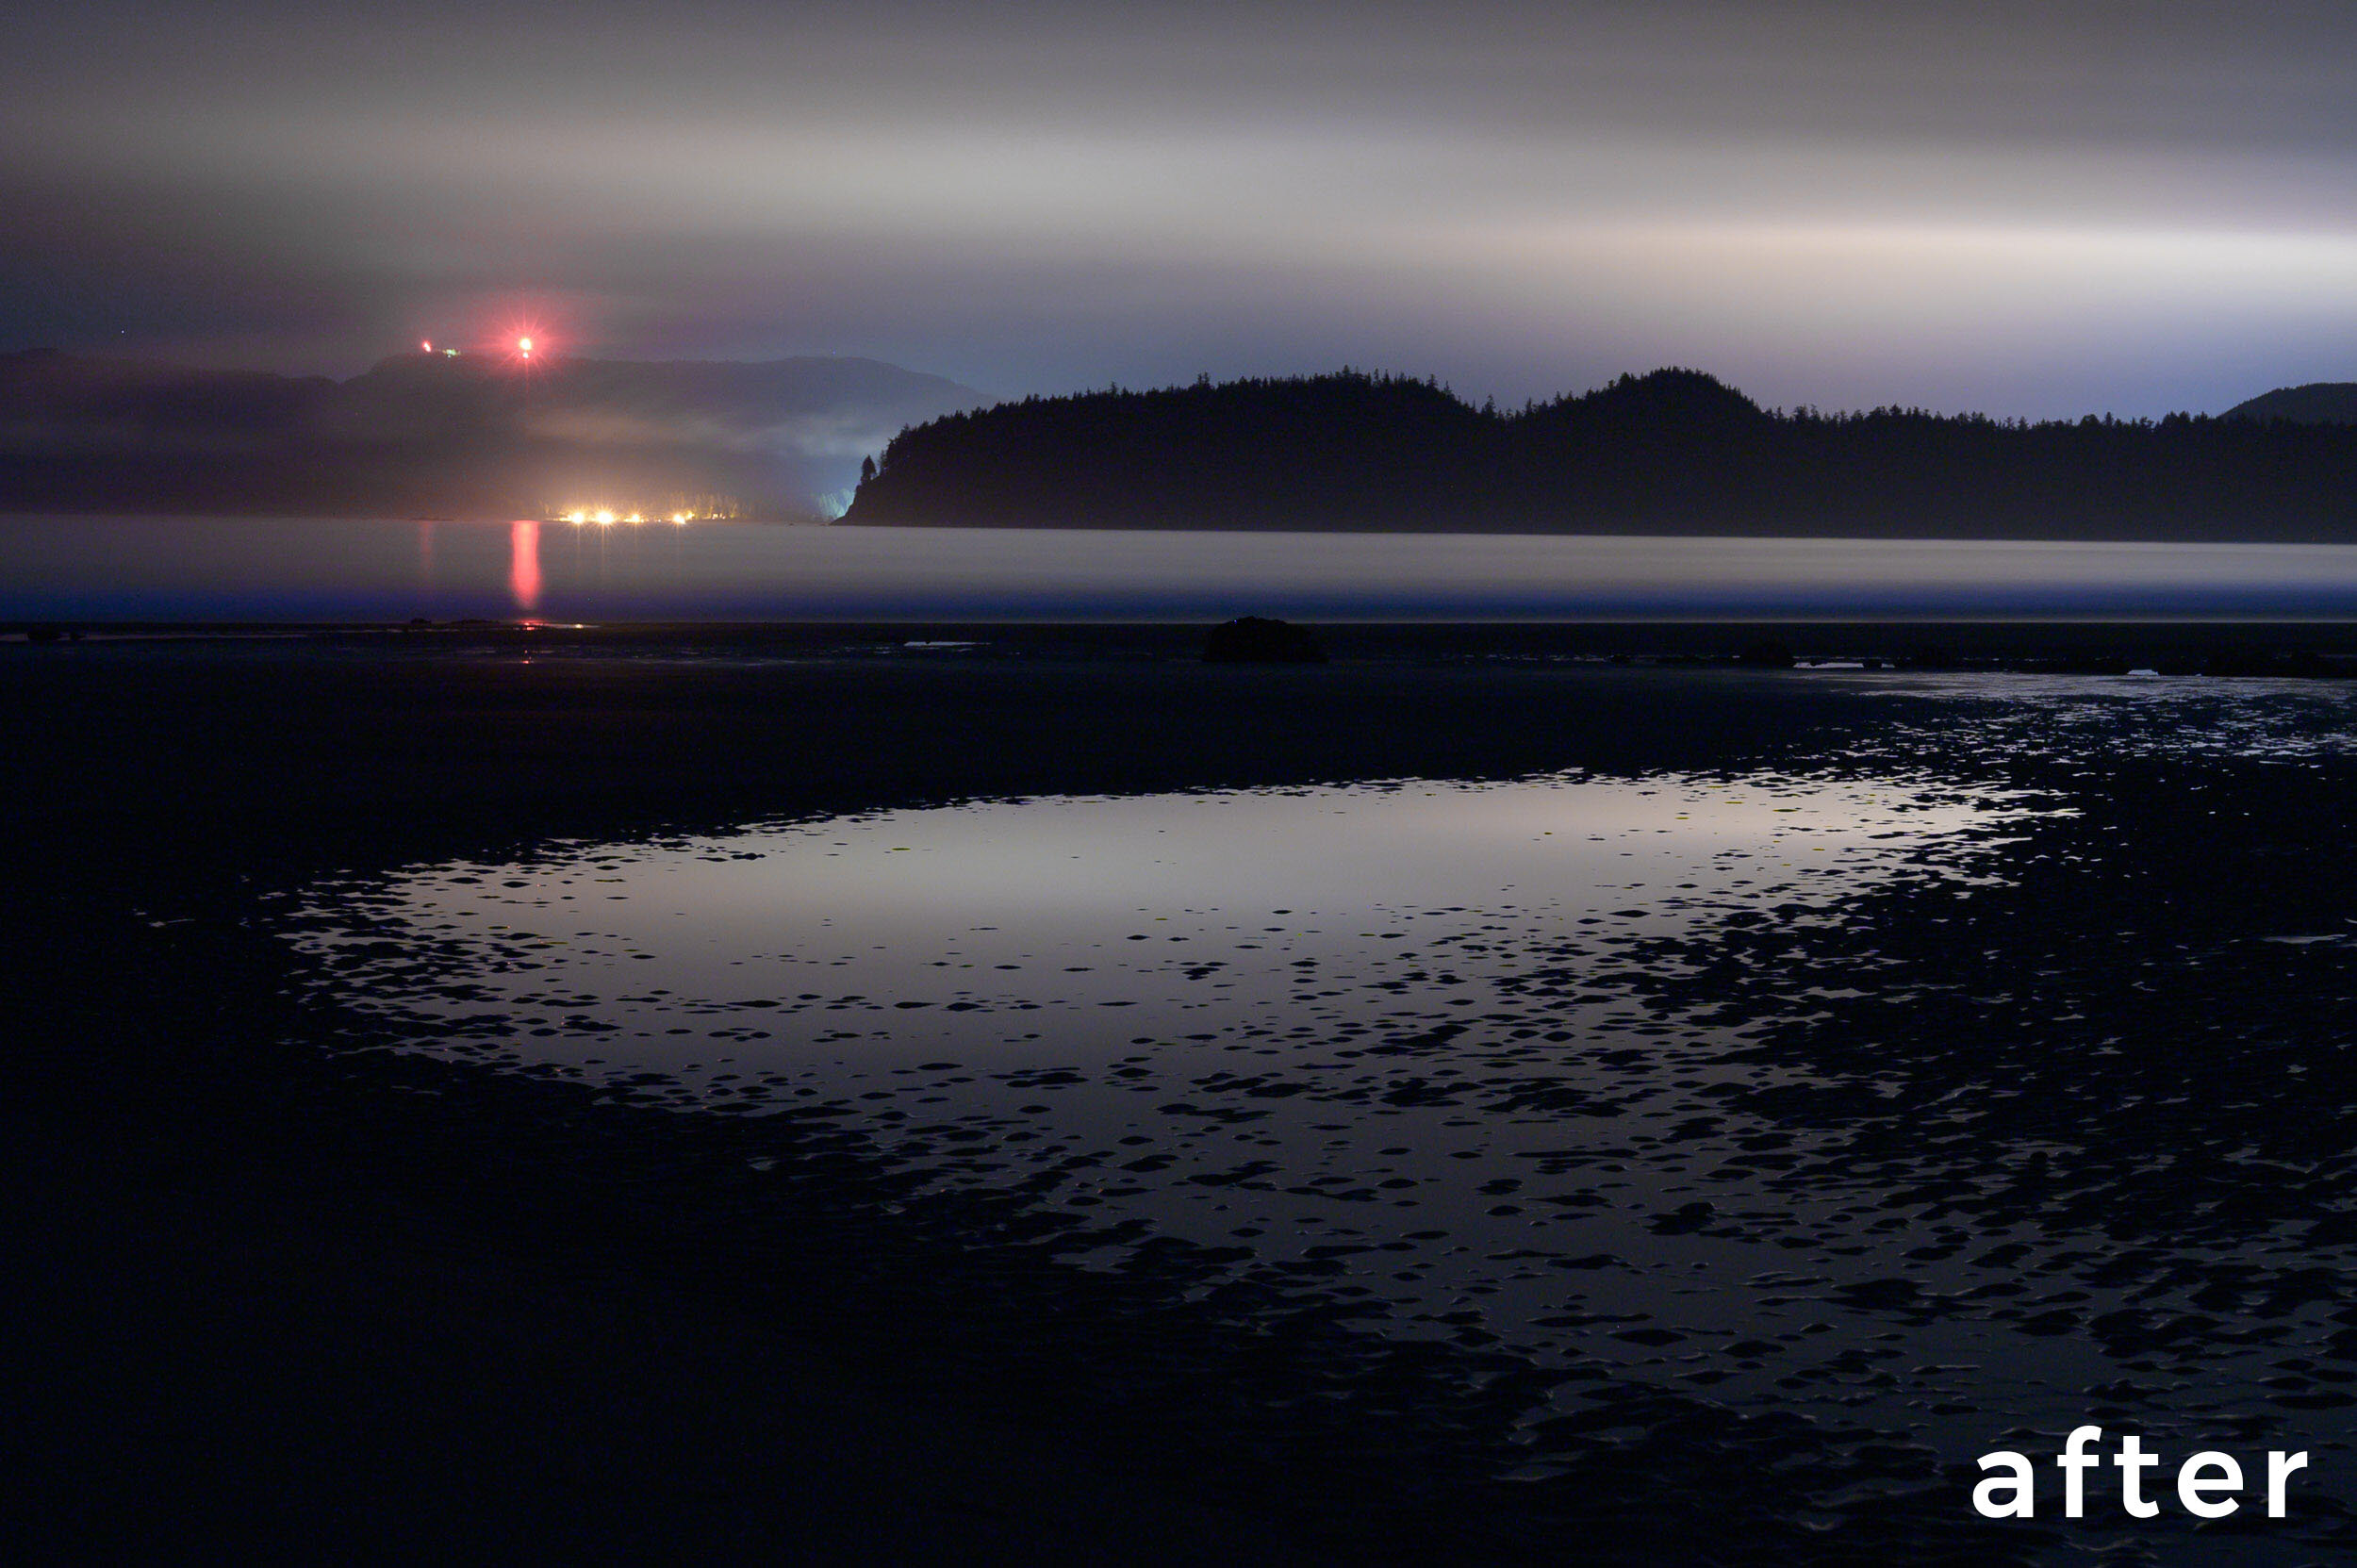
The first example (Figure 1) is one that I made last year during our Shi Shi Beach adventure in Olympic National Park. In this case, the lights from Victoria on Vancouver Island reflected off the low cloud cover and turned the sky yellow. A simple white balance adjustment took care of the yellow, and then a little HSL work with the targeted adjustment tool helped with the red and magenta from the beacon on the hill. I could not remove all of the red and still have the image look natural, so I just toned it down a bit.

Figure 1. Light Pollution over Vancouver Island. Nikon Z 6 with a Nikon Z 24-70mm f/4 lens. 693 seconds, f/5, ISO 800.

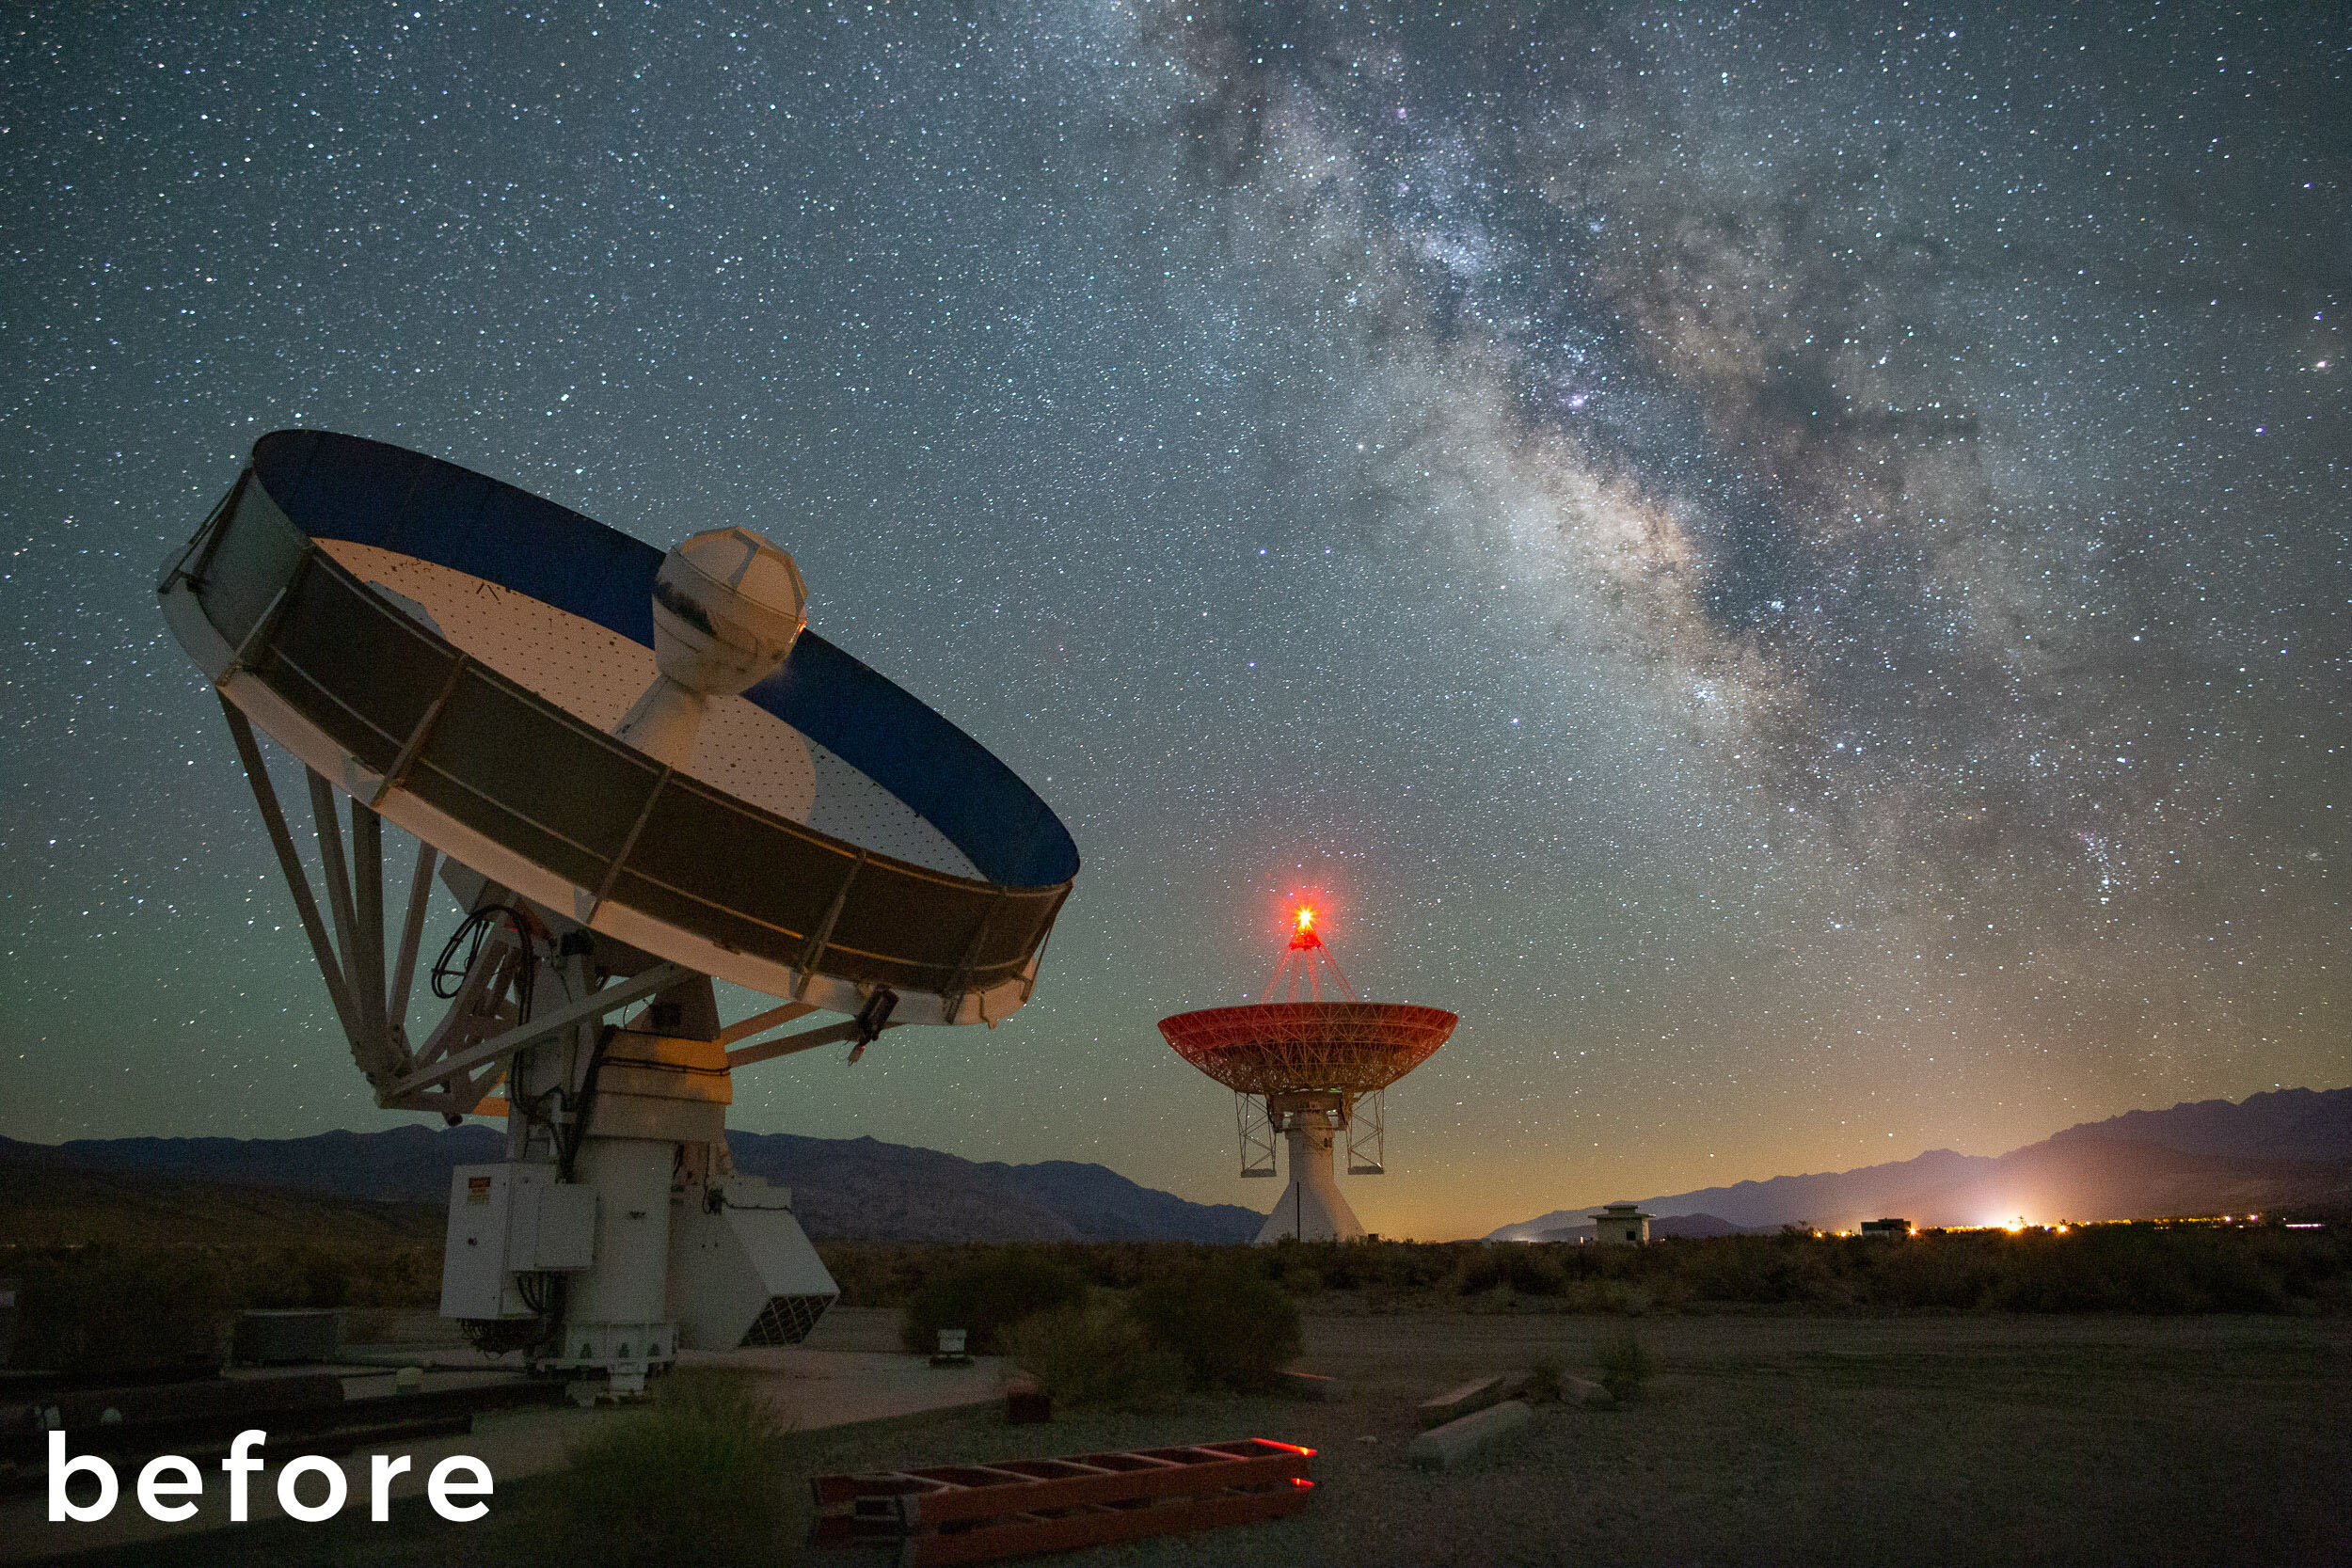
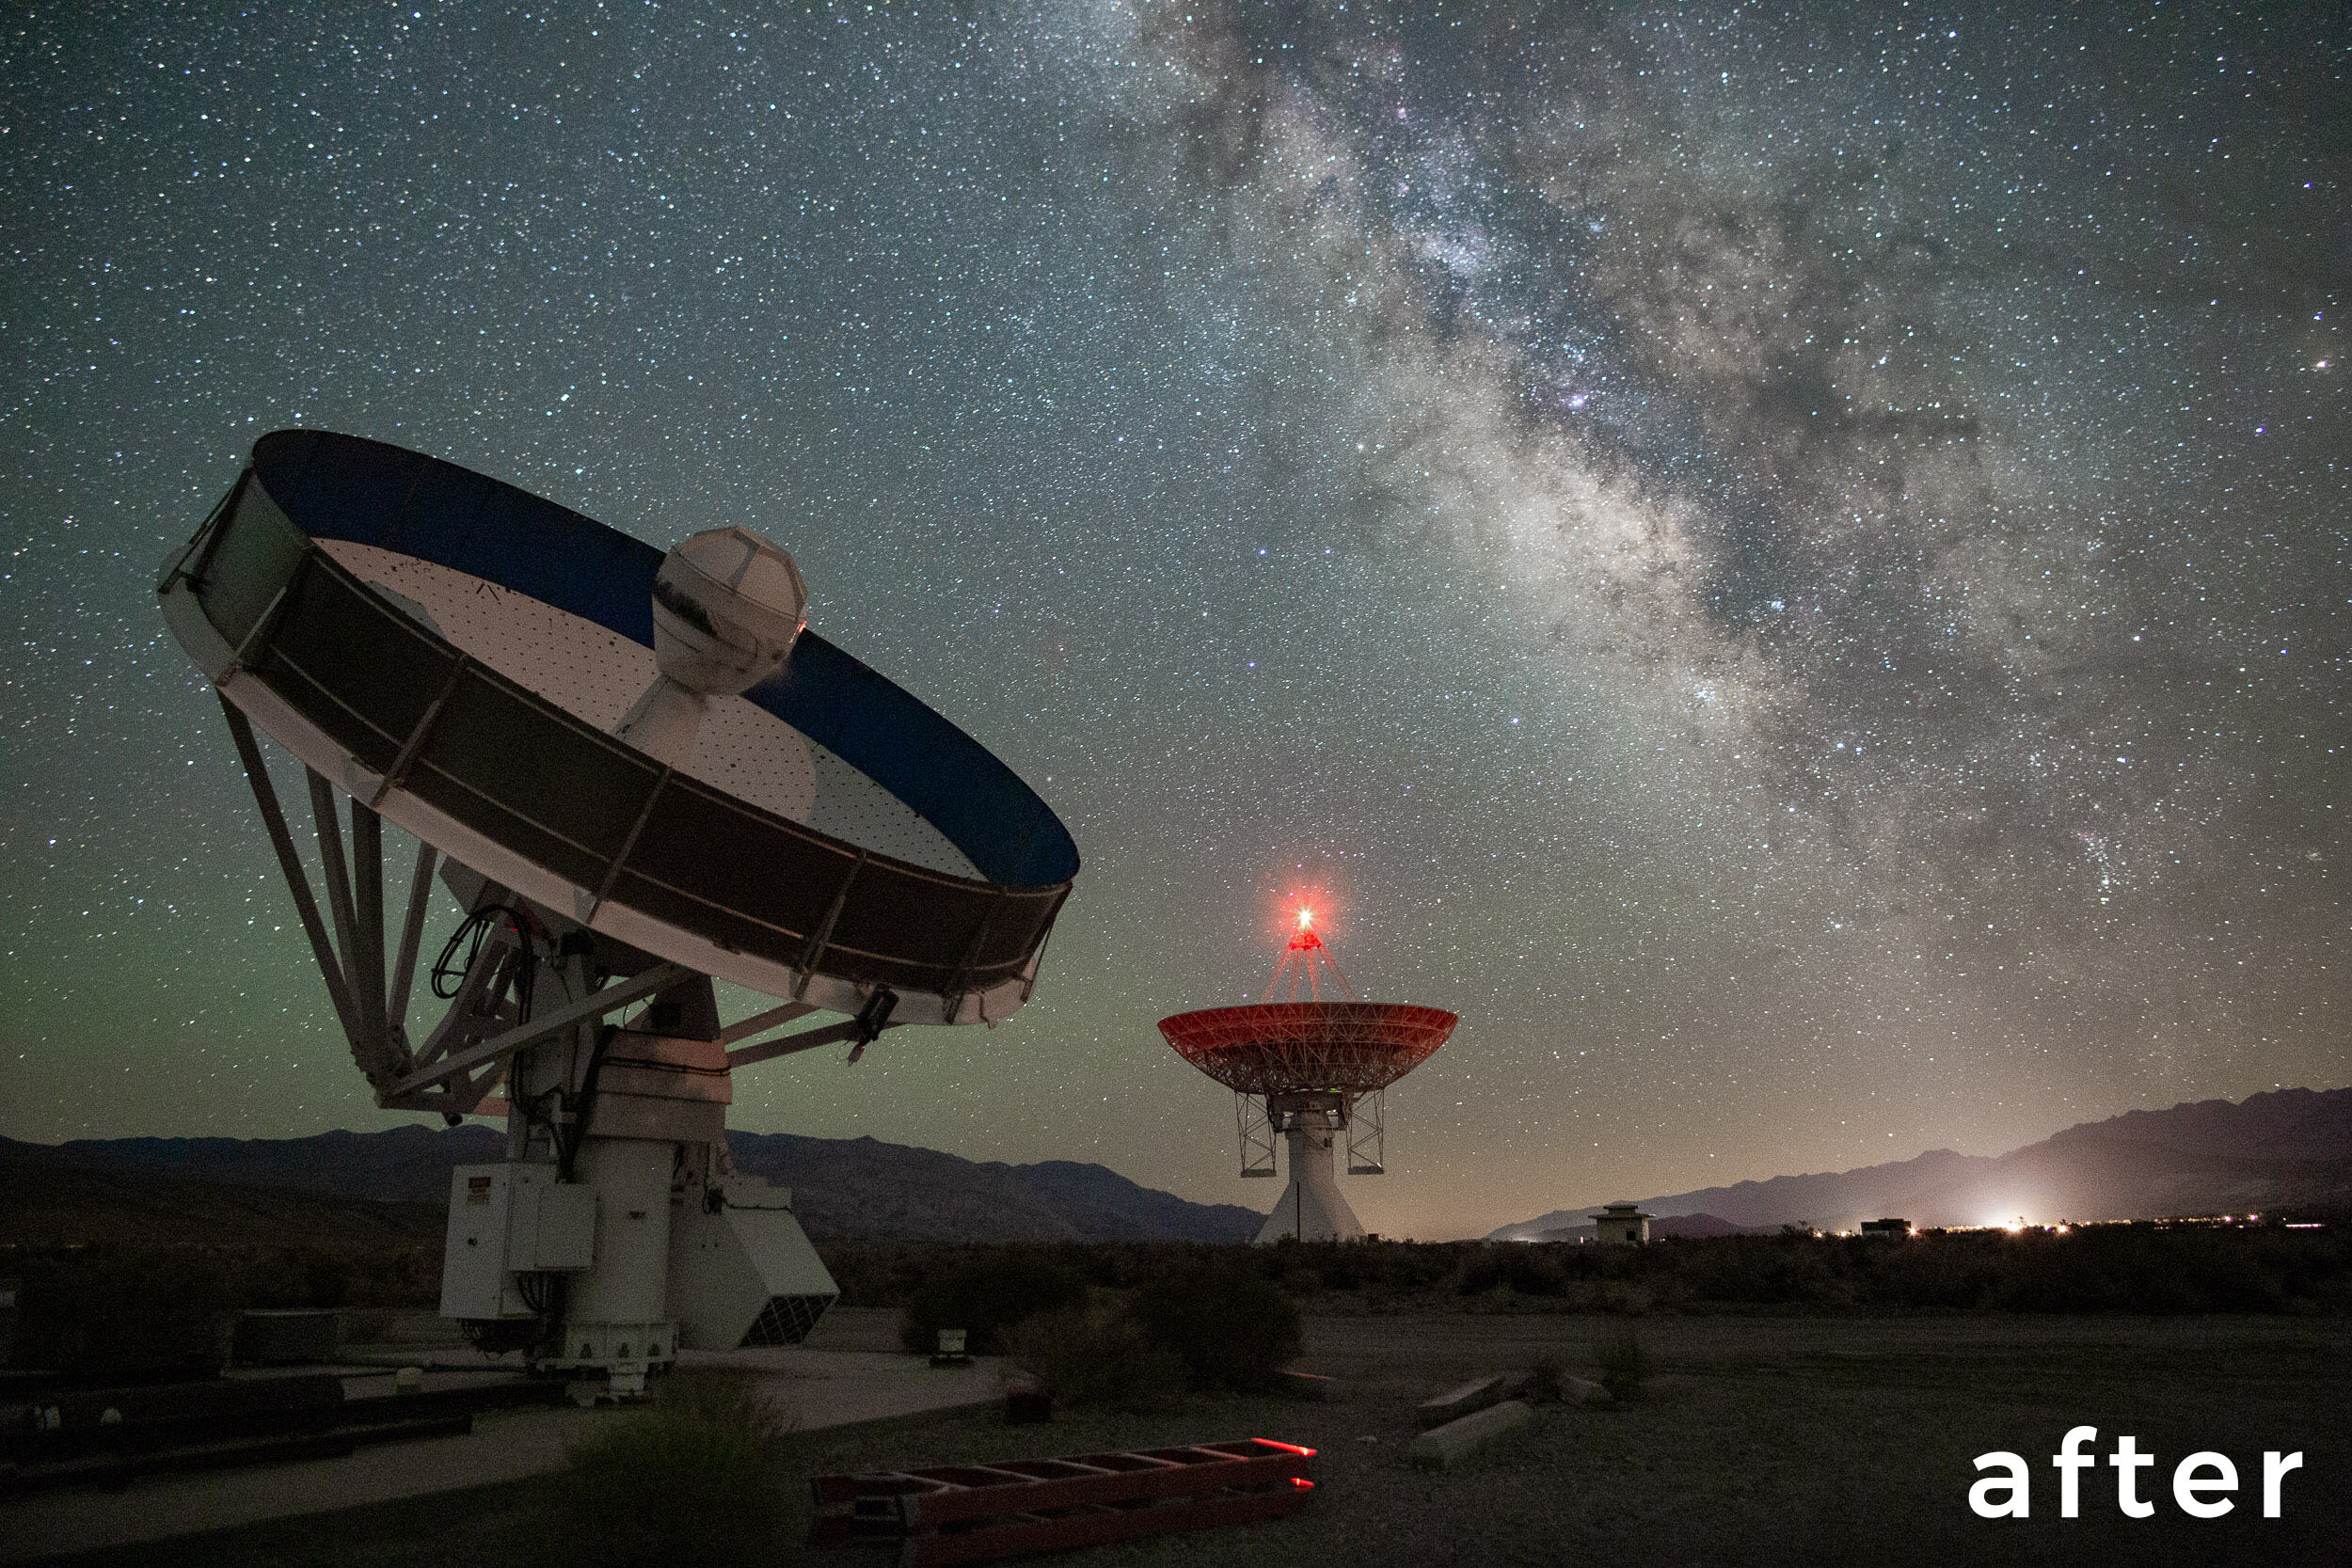
I made the next image (Figure 2) at the Owens Valley Radio Observatory in California. Light pollution on the horizon to the south shows a yellow glow from sodium vapor lights. HSL adjustments took care of removing the unwanted yellow from the image.

Figure 2. ORVO and Milky Way. Canon EOS 6D with a Nikon 20 mm f/3.5 AIS lens. 20 seconds, f/4, ISO 6400.

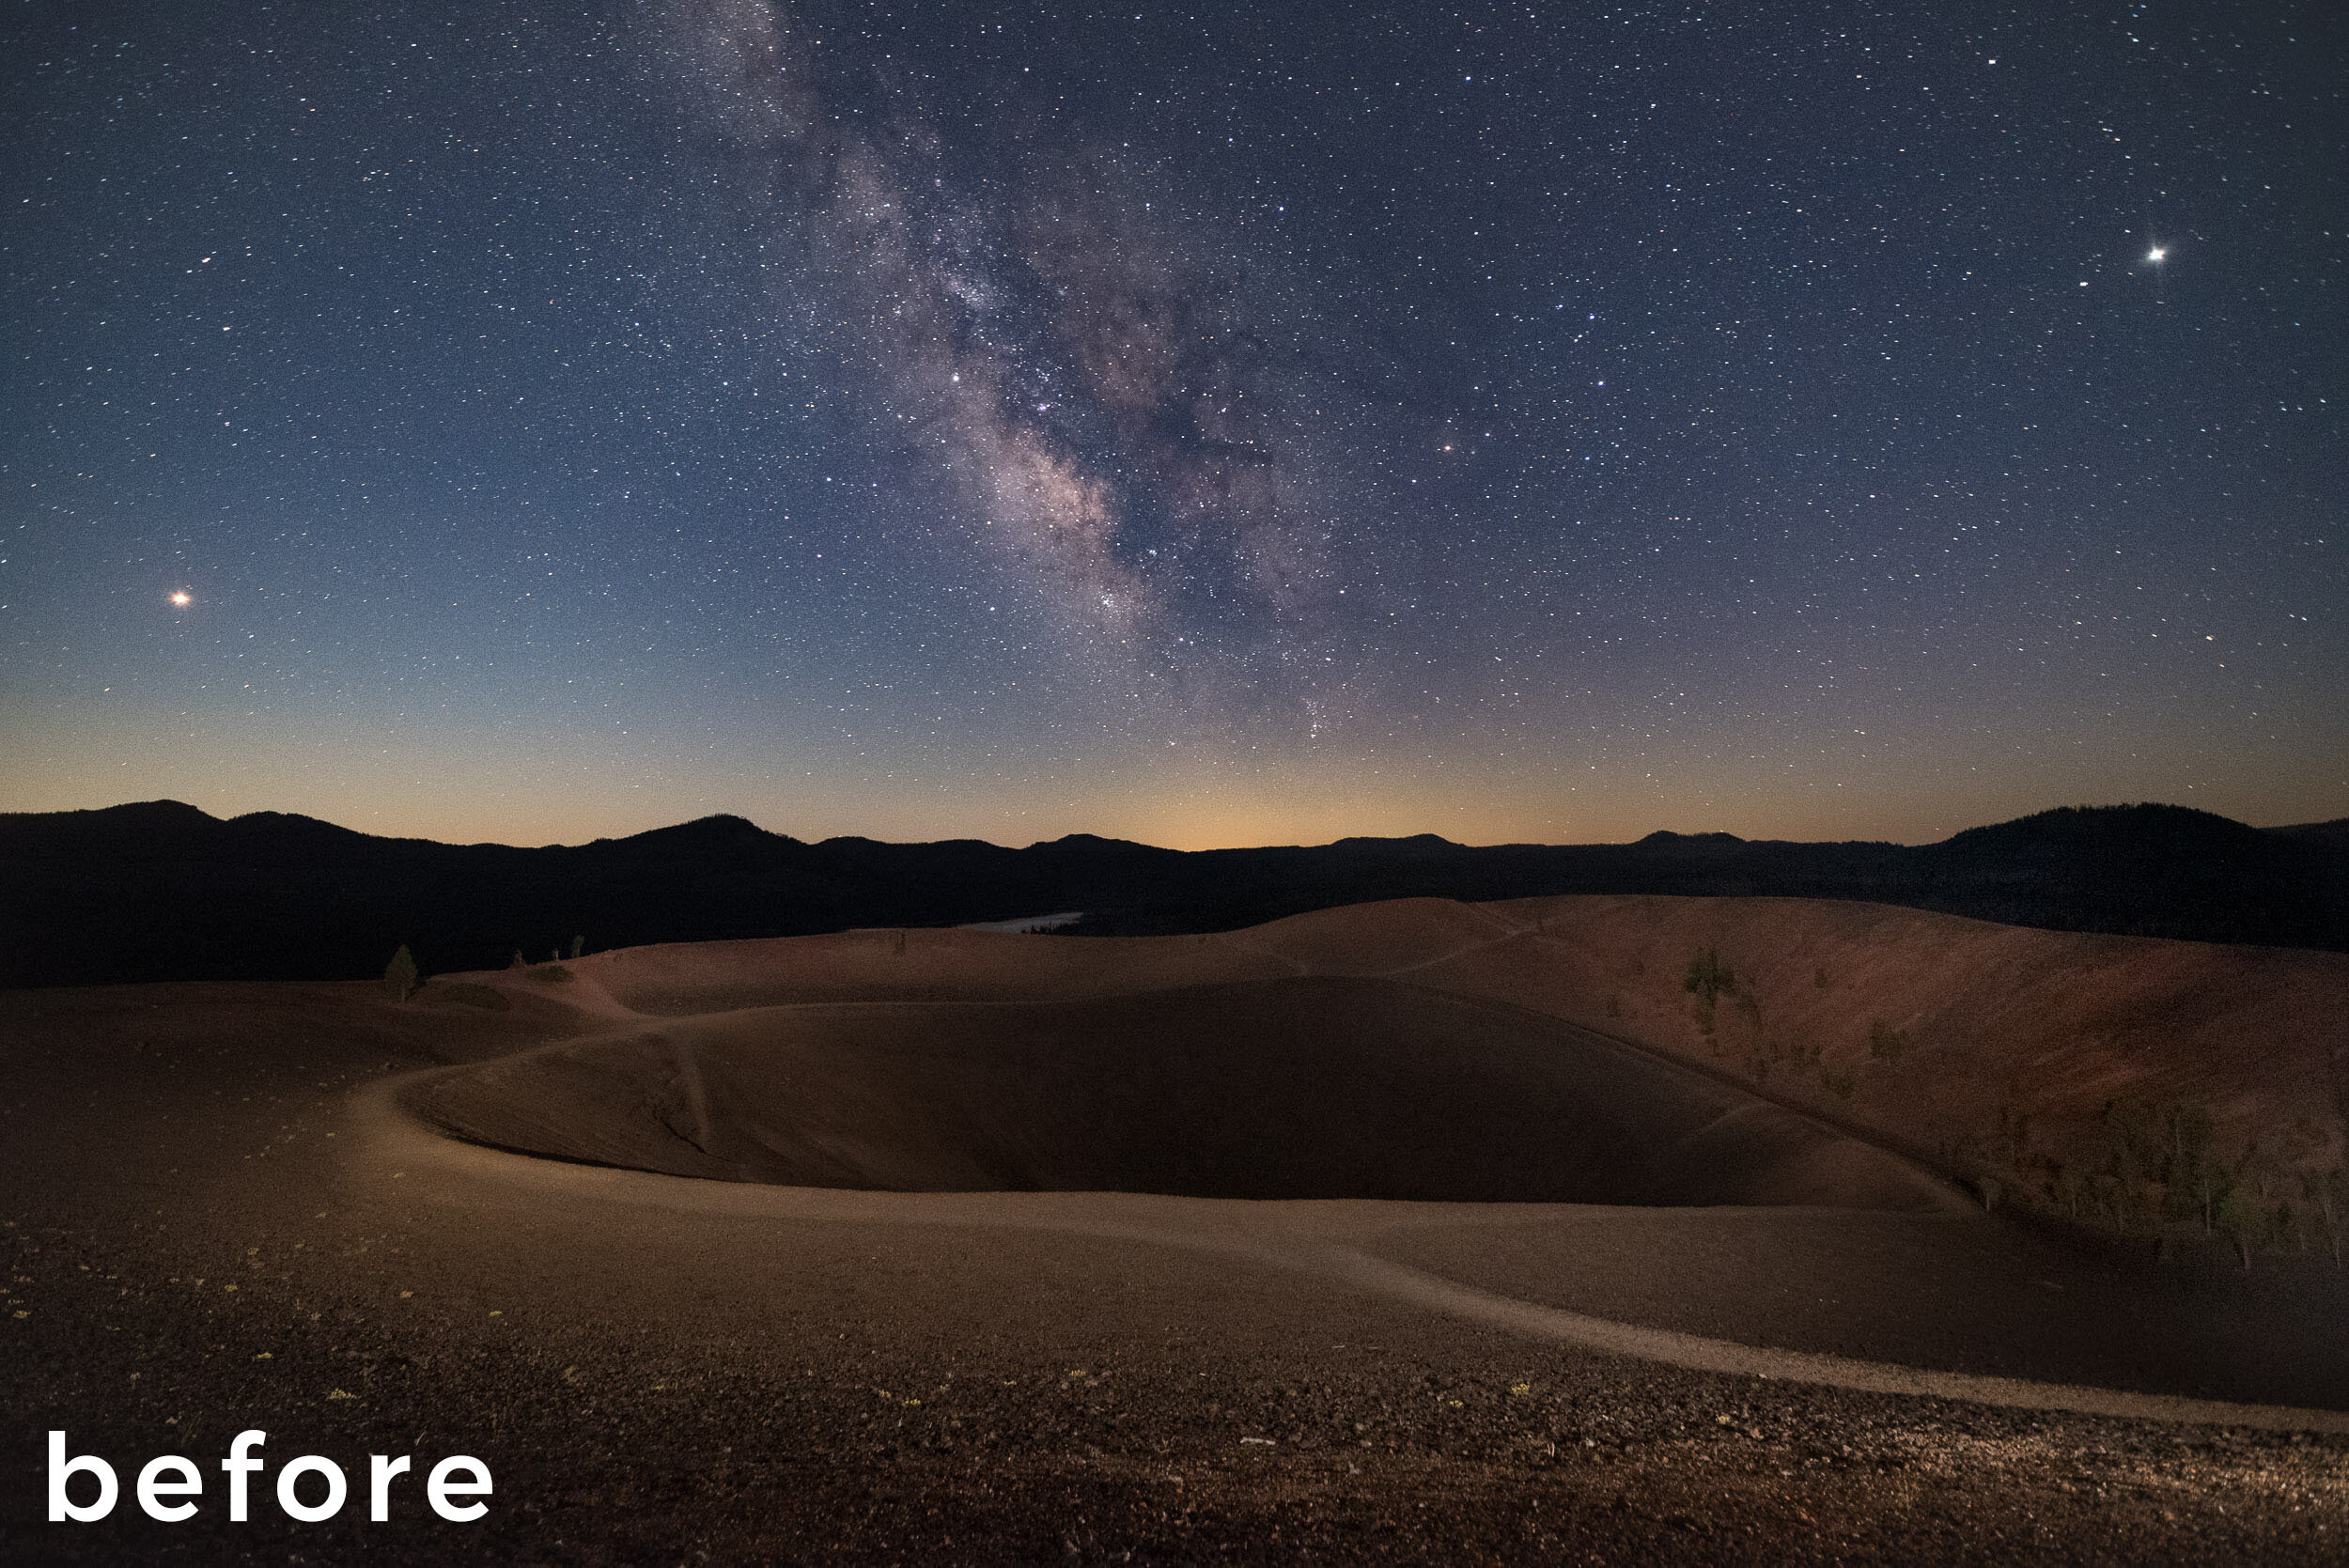
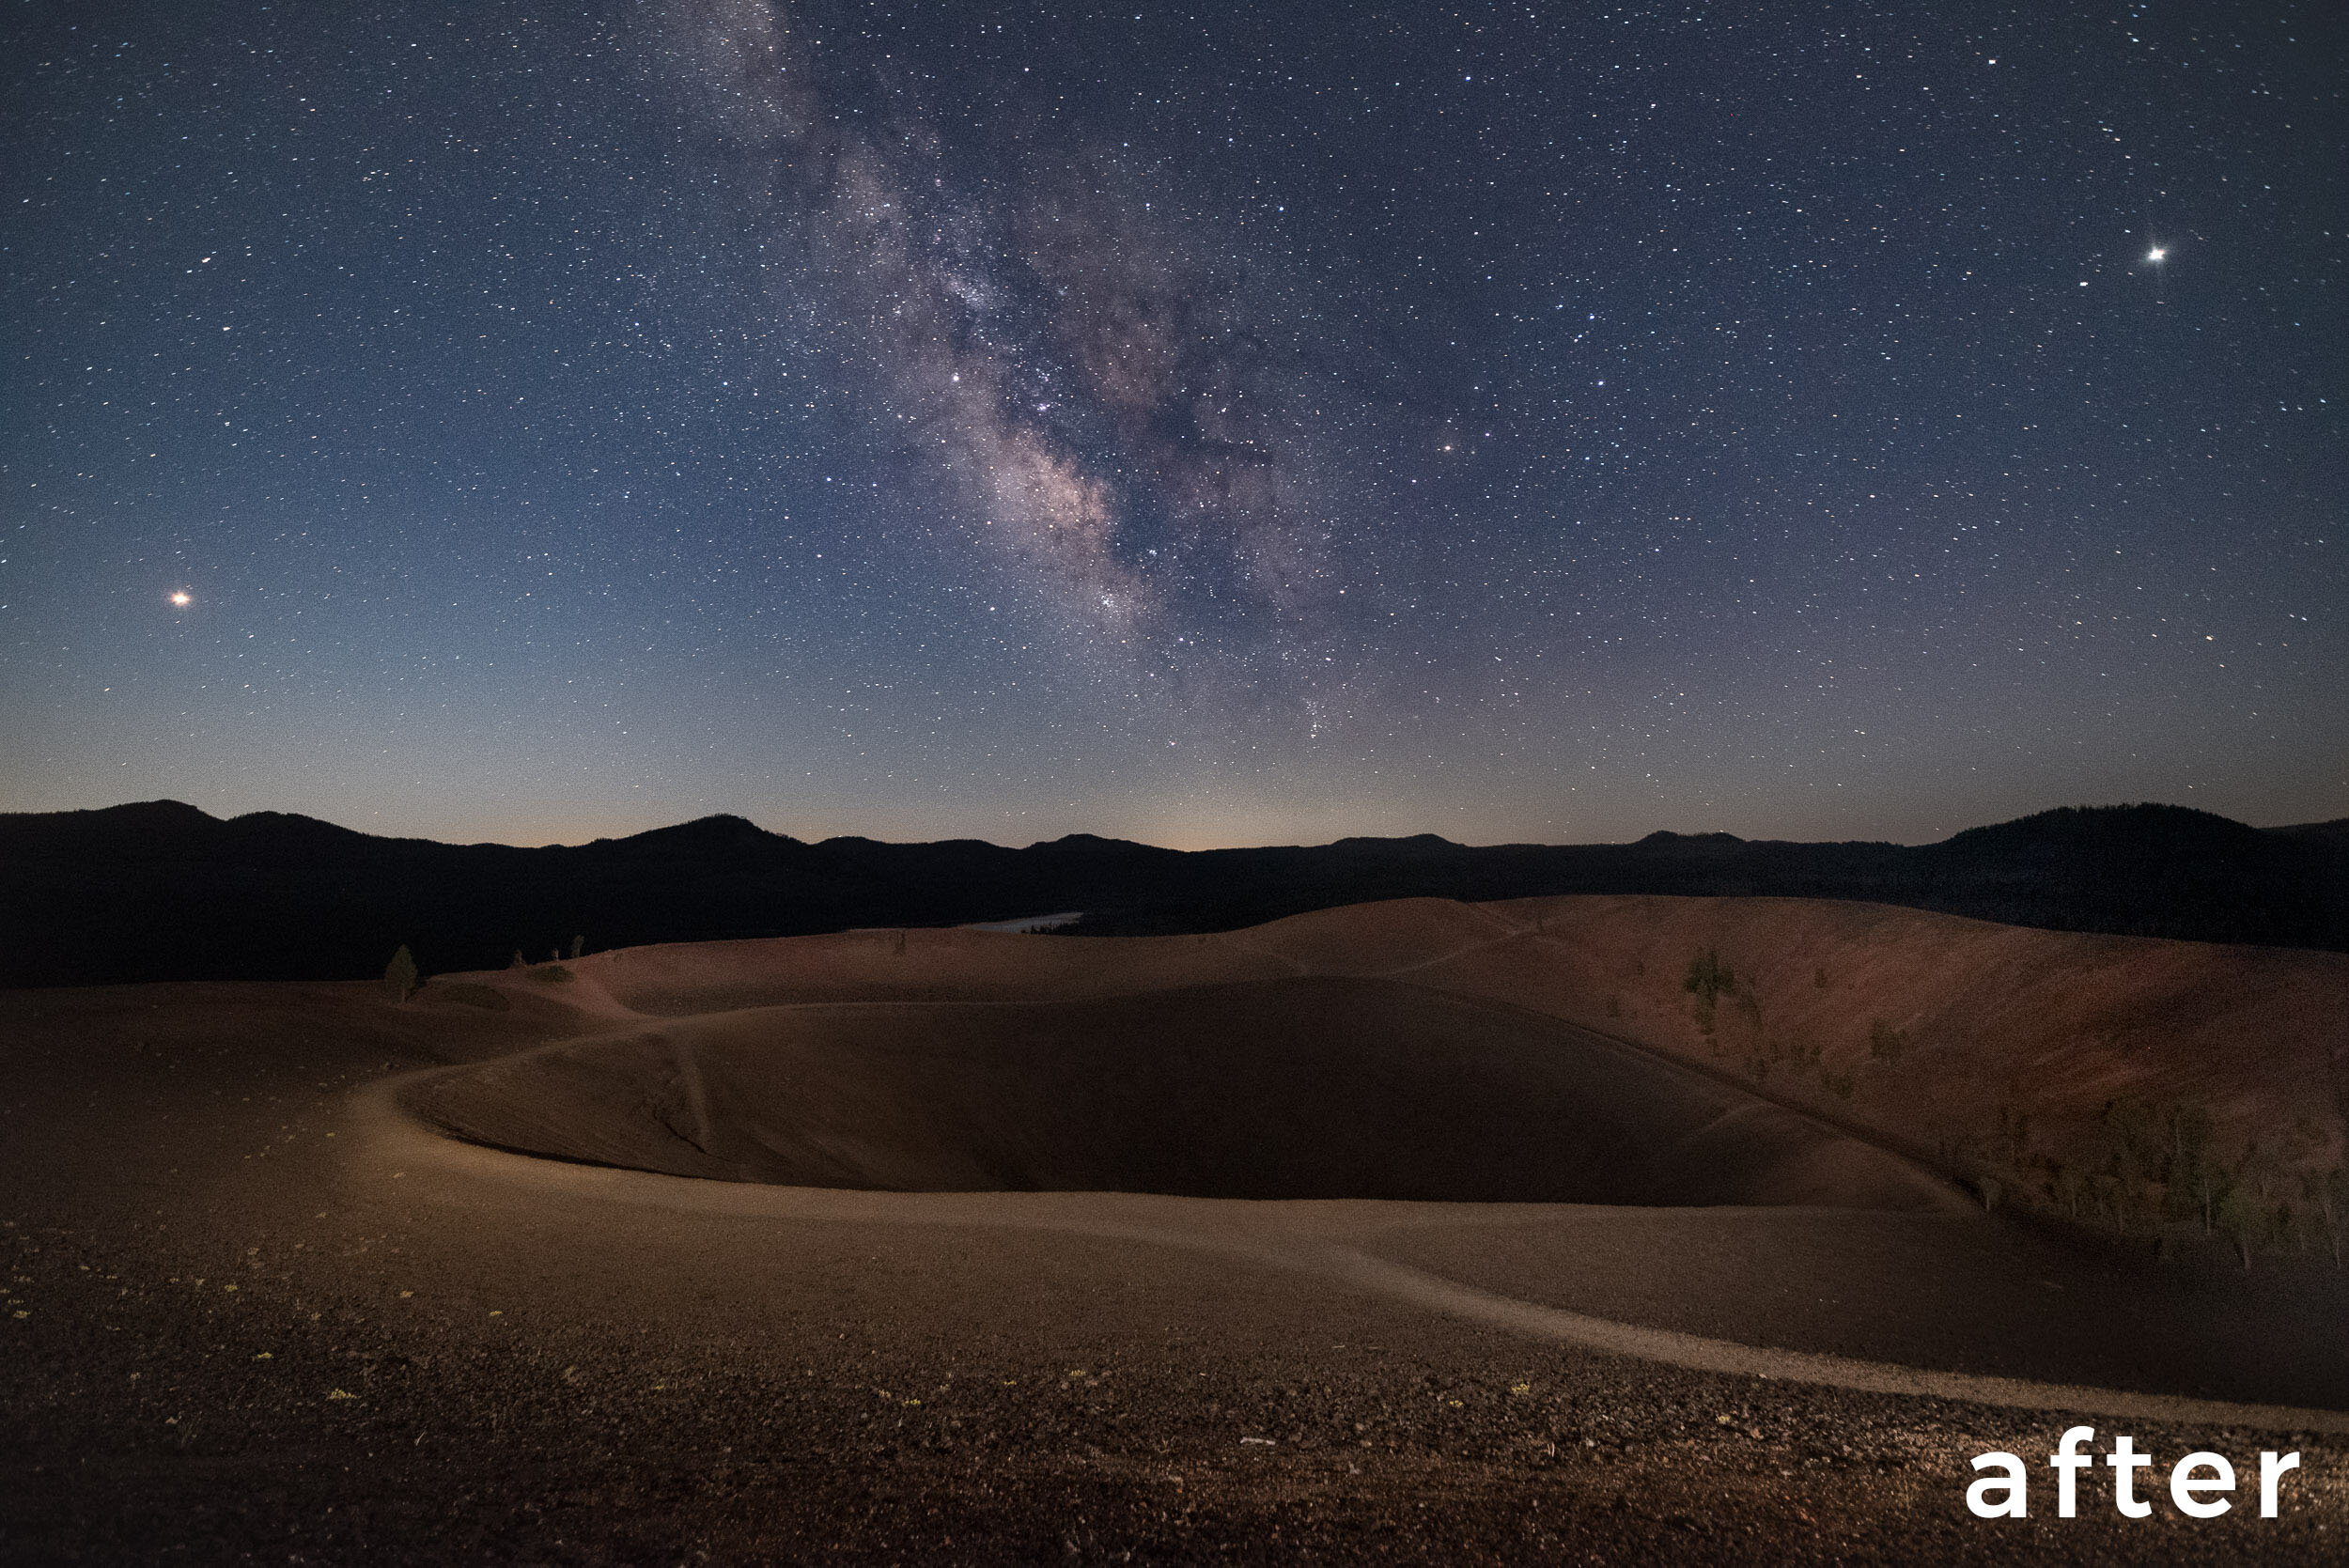
The image from Lassen Volcanic National Park (Figure 3) also had yellow light pollution at the horizon, but also a fair amount of yellow and orange in the soil at the foreground, so an HSL adjustment would have affected more of the image than needed. In this case, I used a local adjustment brush and desaturation to solve the problem.

Figure 3. Cinder Cone, Milky Way, Jupiter, Saturn and Mars. Nikon D750 with an Irix 15mm f/2.4 lens. 25 seconds, f/3.2, ISO 6400.

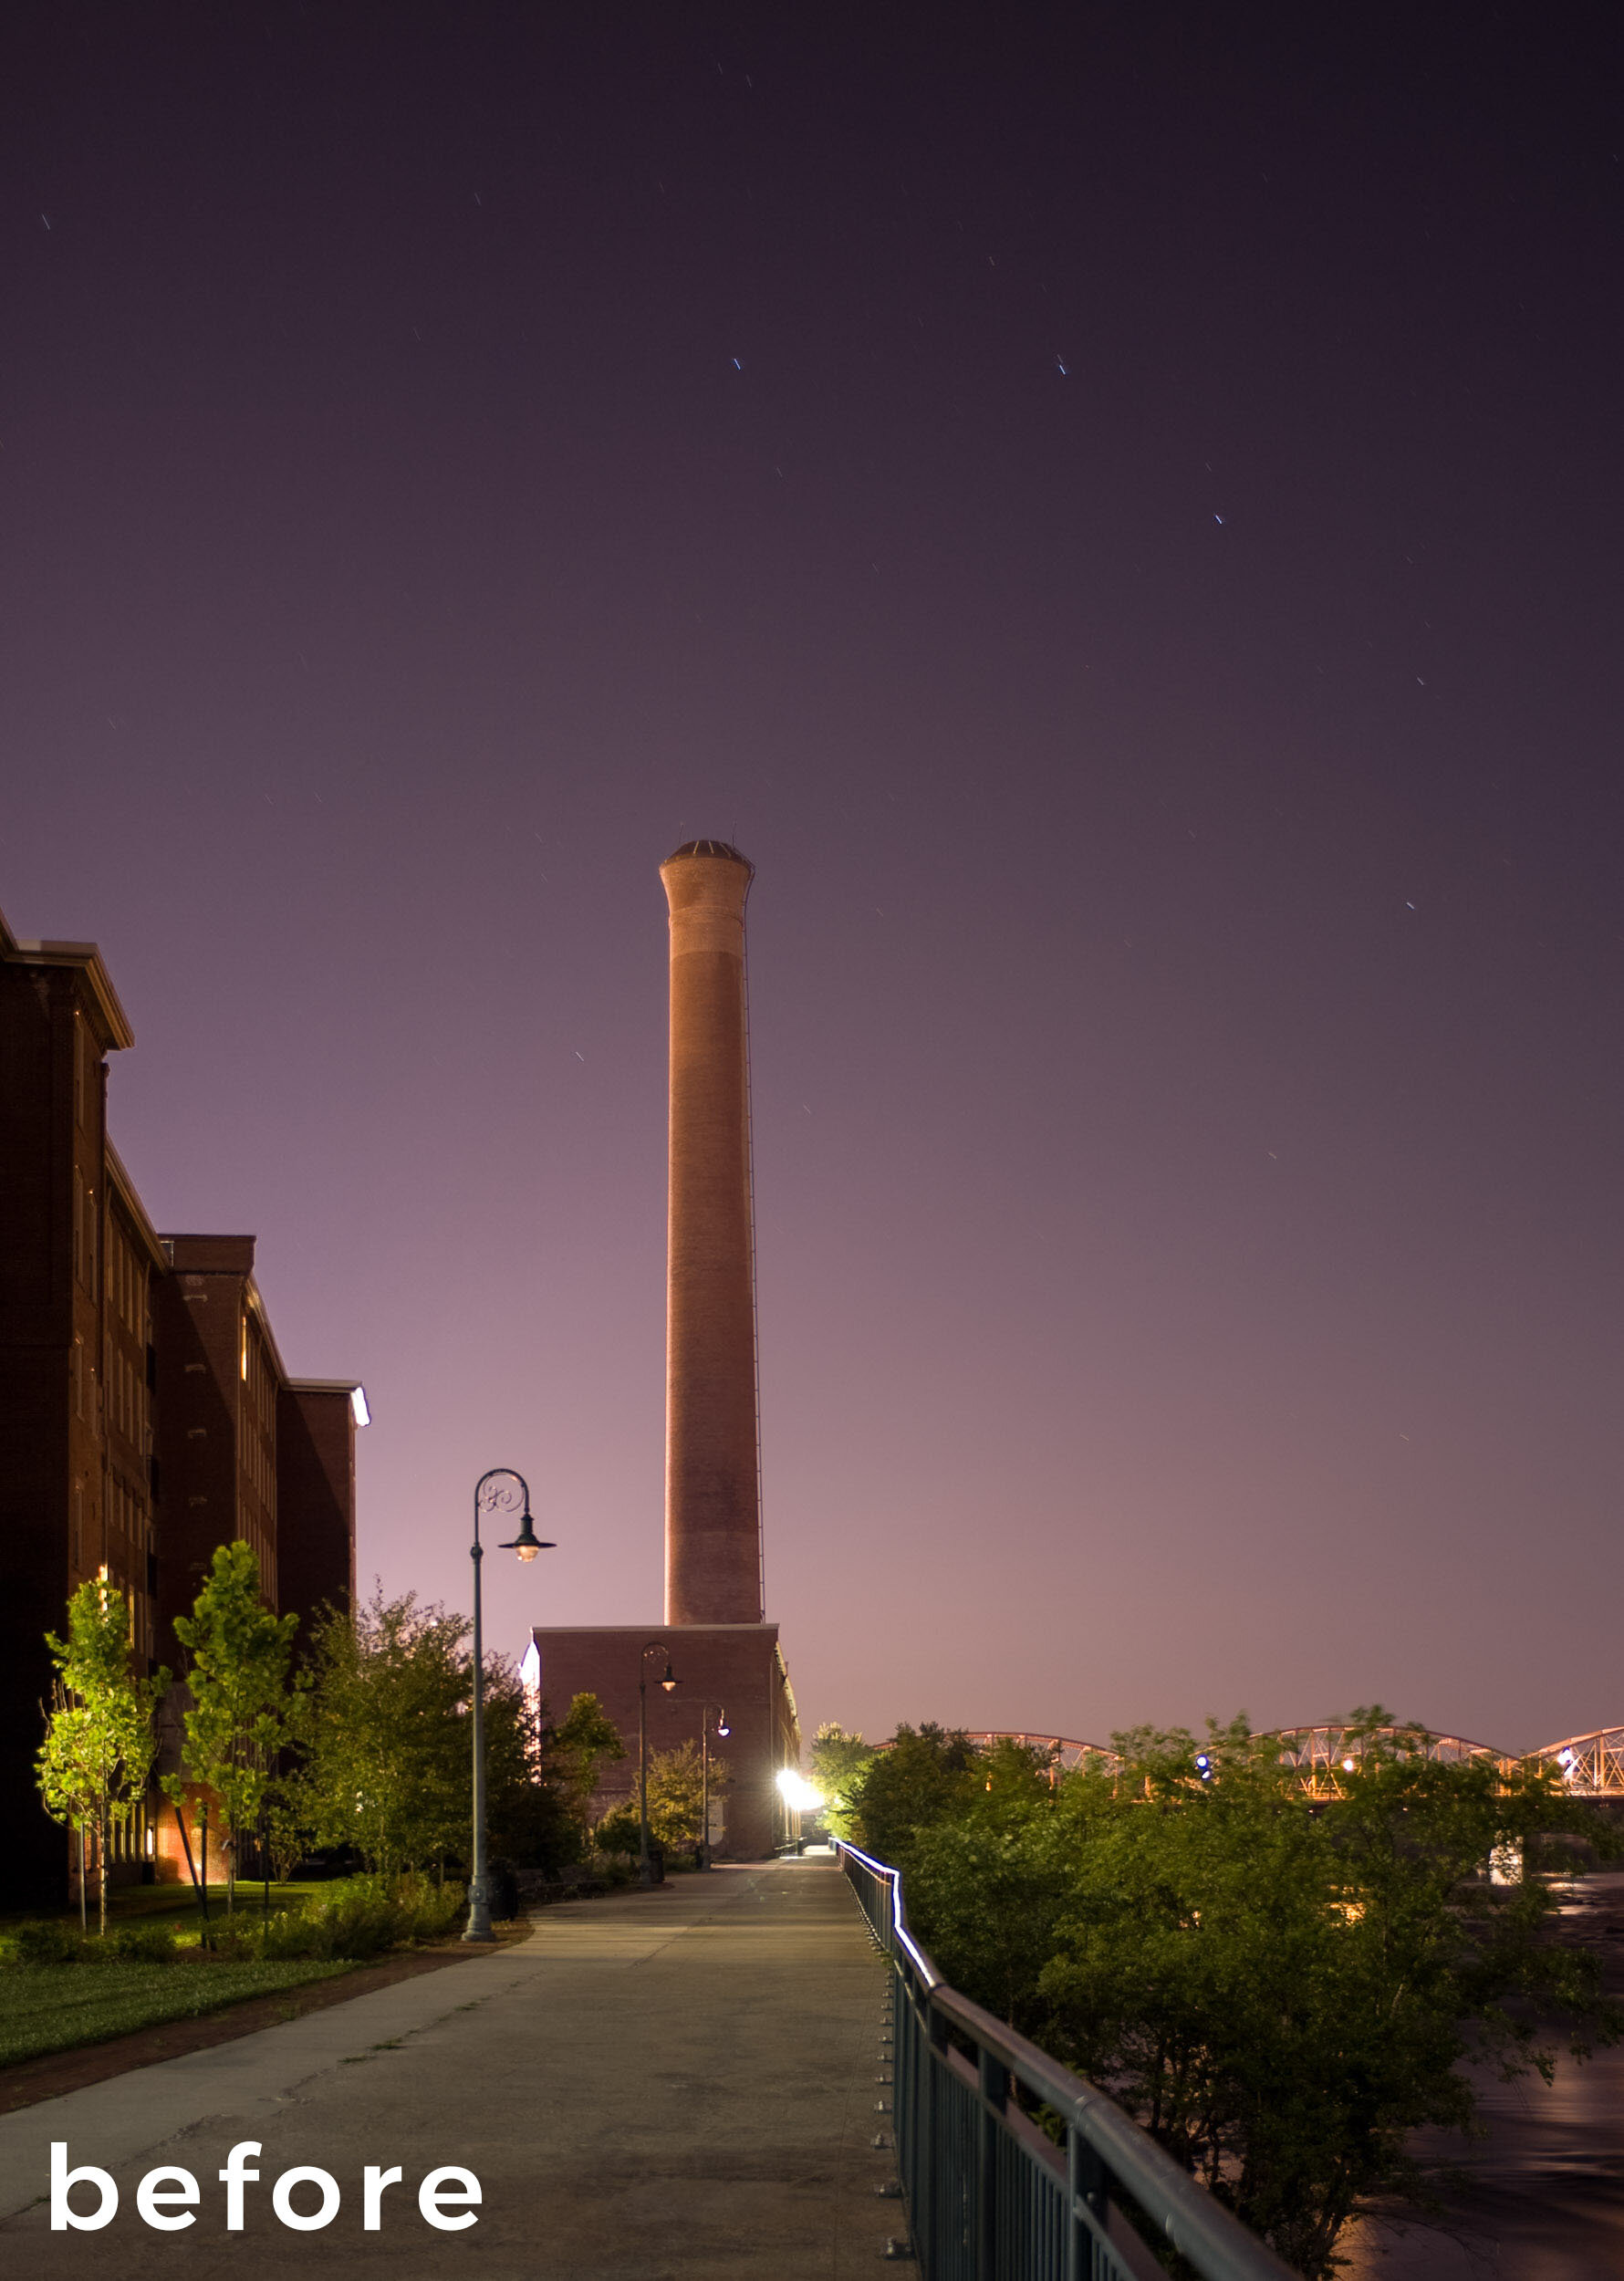
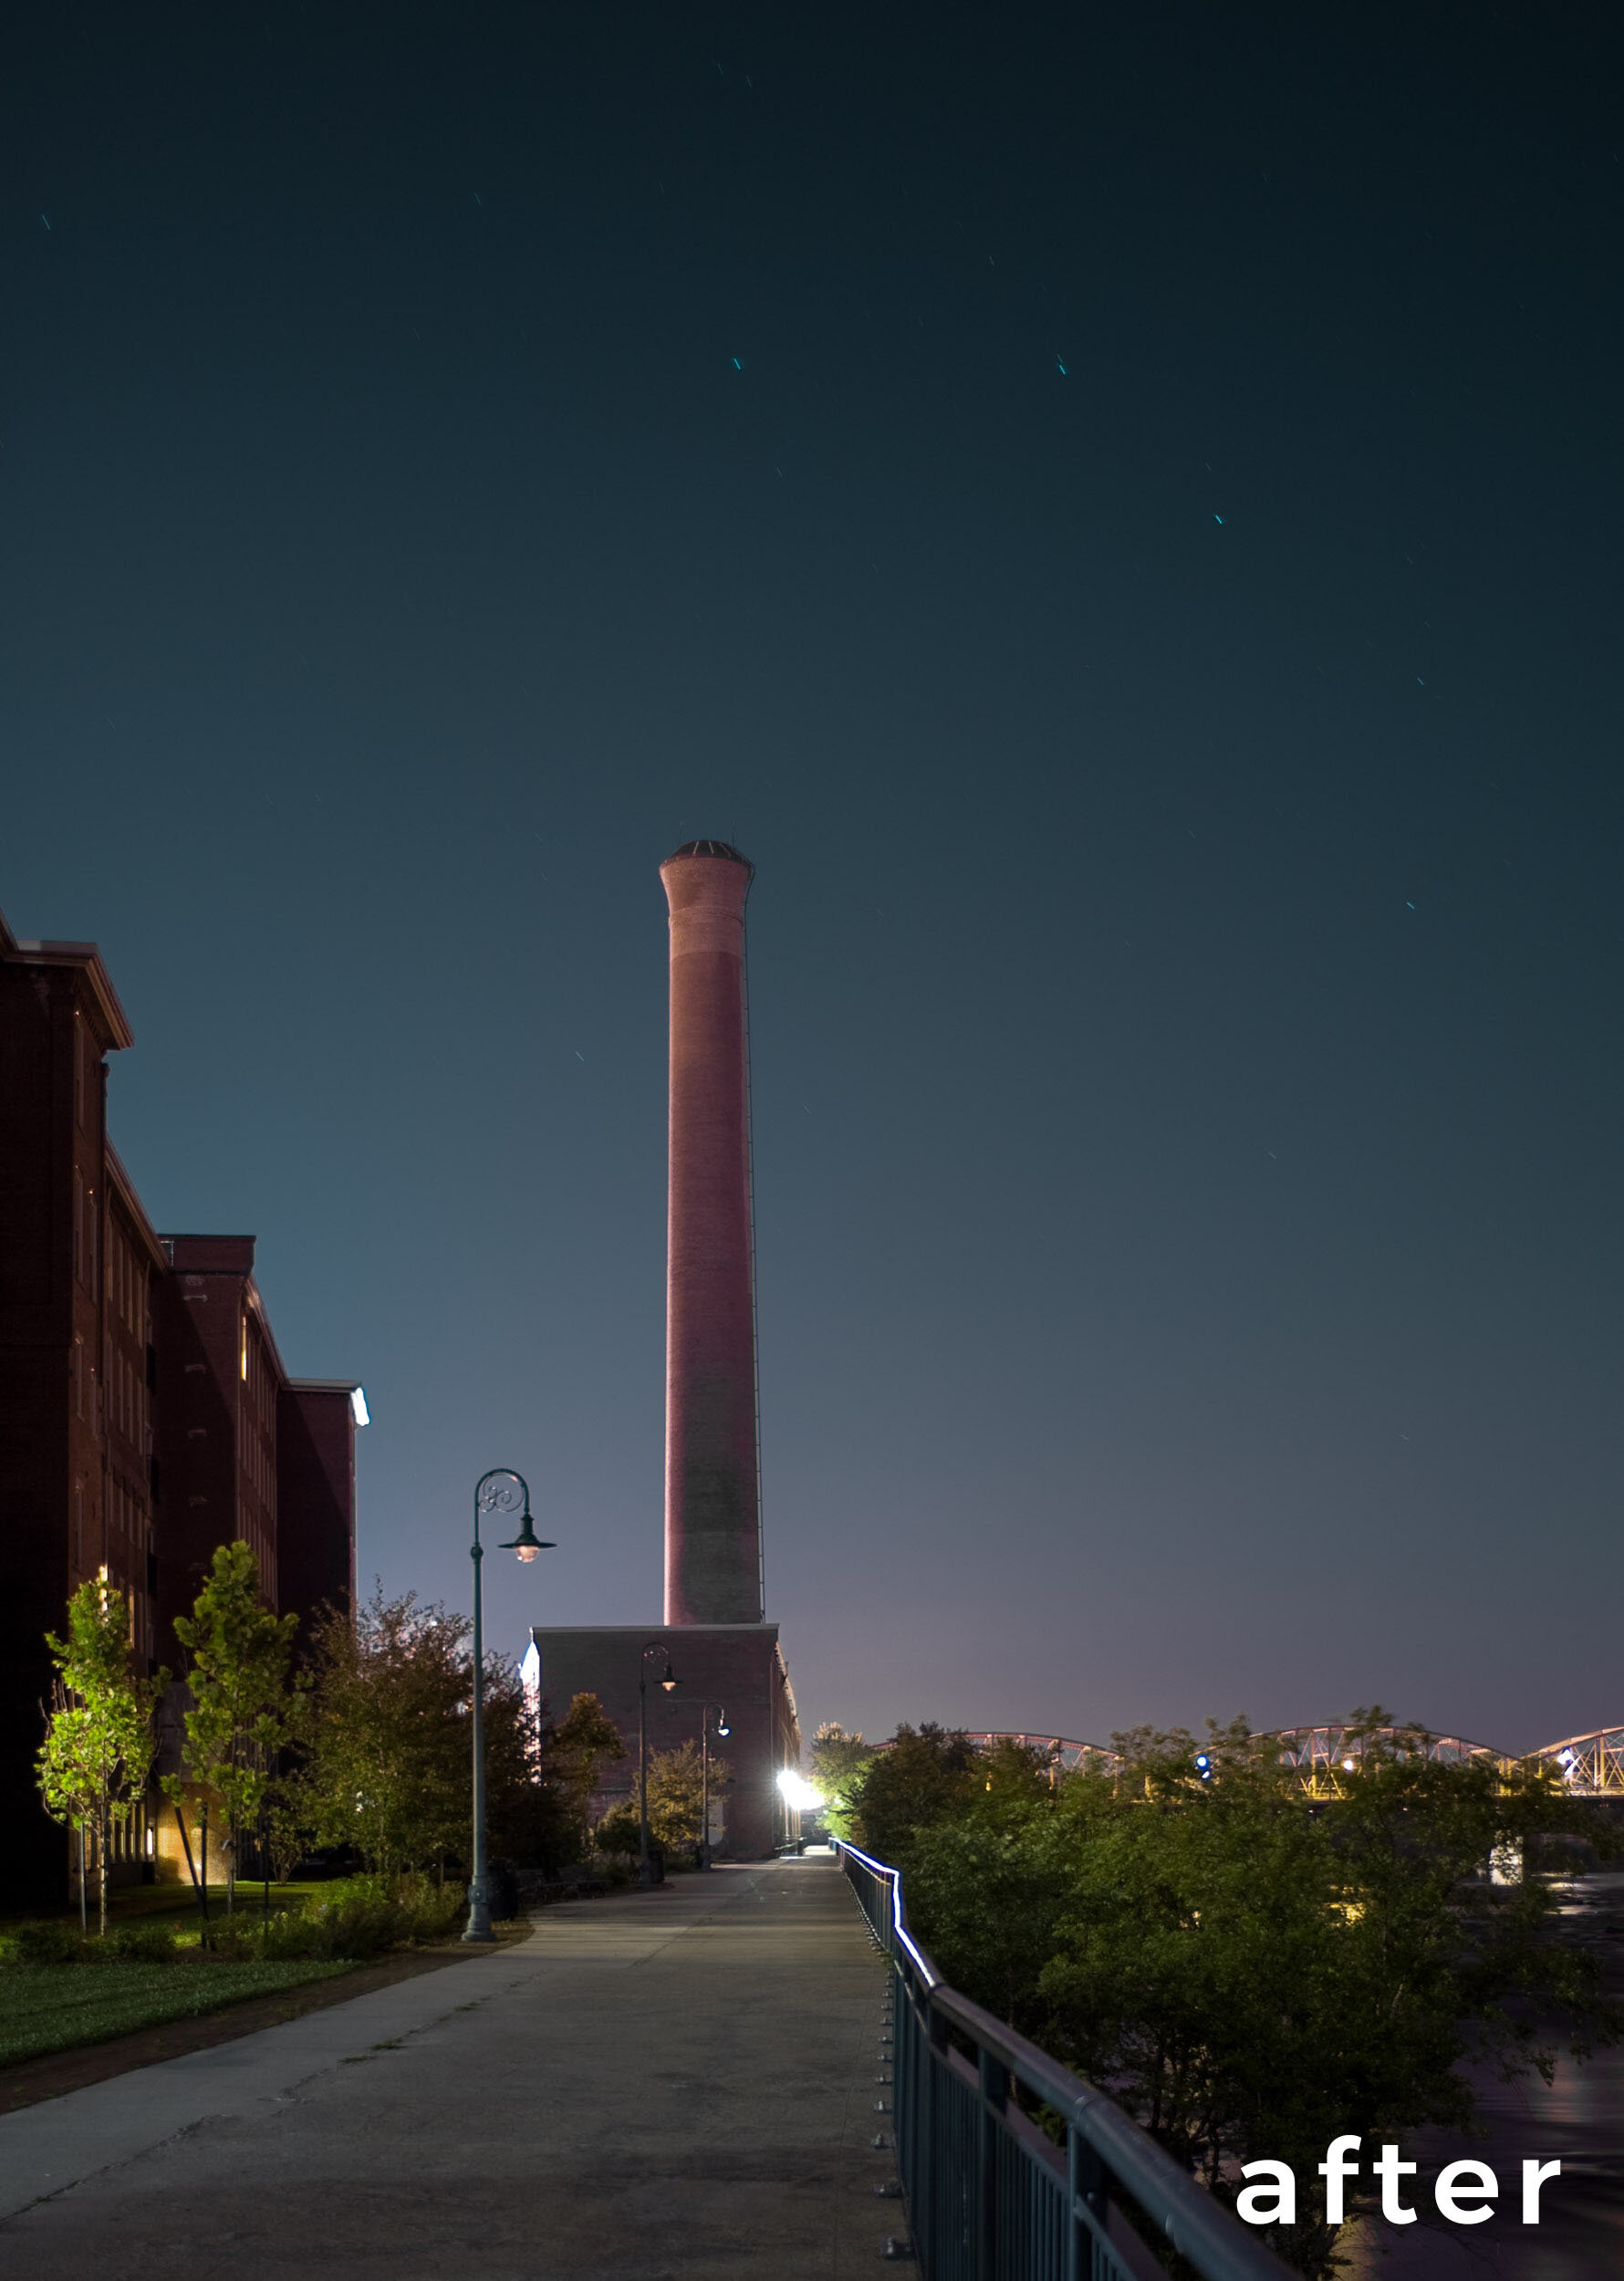
Dealing with light pollution in urban environments tends to be a bit more involved, and also subject to taste in how the image is presented. Below are two examples from Lowell, Massachusetts, an environment primarily lit by sodium vapor with a host of other light sources thrown in for good measure. For this first one (Figure 4), I used a gradient on the sky to remove the color cast without affecting the foreground.

Figure 4. Lawrence Mills, Lowell, Massachusetts. Canon EOS 5D with a Nikon 28mm f/3.5 PC lens. 74 seconds, f/8, ISO 100.

In this last example (Figure 5), setting the white balance by using the eyedropper on the clouds eliminated the color cast from the ambient sodium vapor lights, but exaggerated the cyan from the metal halide lights on the structure. A selection with the local adjustment brush enabled me to desaturate the cyan on the building without affecting the rest of the image.

Figure 5. Lawrence Mills, Lowell, Massachusetts. Canon EOS 5D with a Nikon 28mm f/3.5 PC lens. 73 seconds, f/8, ISO 100.

Video Tutorial

In the video below, I offer more detail on how I accomplished the edits I mentioned above, walking you through all the steps for achieving the same results in your own photos affected by light pollution.

Wrapping Up

As you can see, if you don’t have a light pollution filter, or even if you do, post-processing techniques offer another option for dealing with light pollution in nocturnal images. The techniques are most effective at minimizing color casts from gas discharge lights such as sodium or mercury vapor, or metal halide lights.

However, be aware: If the stars are obscured by scattered light in the atmosphere and are thus not recorded by the sensor, no amount of post-processing can bring them back. However, judicious use of the Dehaze slider will help bring out the stars that are present, and can also compensate for the loss of contrast from light reflected off of particulates in the low atmosphere that are the source of the problem.

In Part 3 next week, Chris will write about learning to live with light pollution in night images, and how to turn a hindrance into an unexpected bonus. Stay tuned, as the more tools you have at your disposal, the better your chances of a successful image regardless of the light conditions!

Lance Keimig is a partner and workshop leader with National Parks at Night. He has been photographing at night for 35 years, and is the author of Night Photography and Light Painting: Finding Your Way in the Dark (Focal Press, 2015). Learn more about his images and workshops at www.thenightskye.com.

UPCOMING WORKSHOPS FROM NATIONAL PARKS AT NIGHT