Post-Production

The Night Photographer's Guide to Star Stacking (Part III)

Note: This is the third in a three-part series about creating star trails with the stacking technique. Part I covered how to shoot the raw materials. Part II demonstrated how to edit the individual frames in Lightroom and Photoshop to create the star trail stack. In Part III, below, Tim explains how to clean up artifacts that can occur when combining these images in Photoshop.


This is the third and final installation of our three-part guide to star trail stacking. We hope you have enjoyed the series so far. For those of you who didn’t catch Part I and Part II, we recommend reading those blog posts before you jump in here, so that you are up to speed with the capture and initial processing steps.

This method of creating star trail images is versatile and comes with many advantages, but it can also result in artifacts that need to be corrected in order to create a polished final image—things such as plane trails and stray light, which can appear on individual frames during capture.

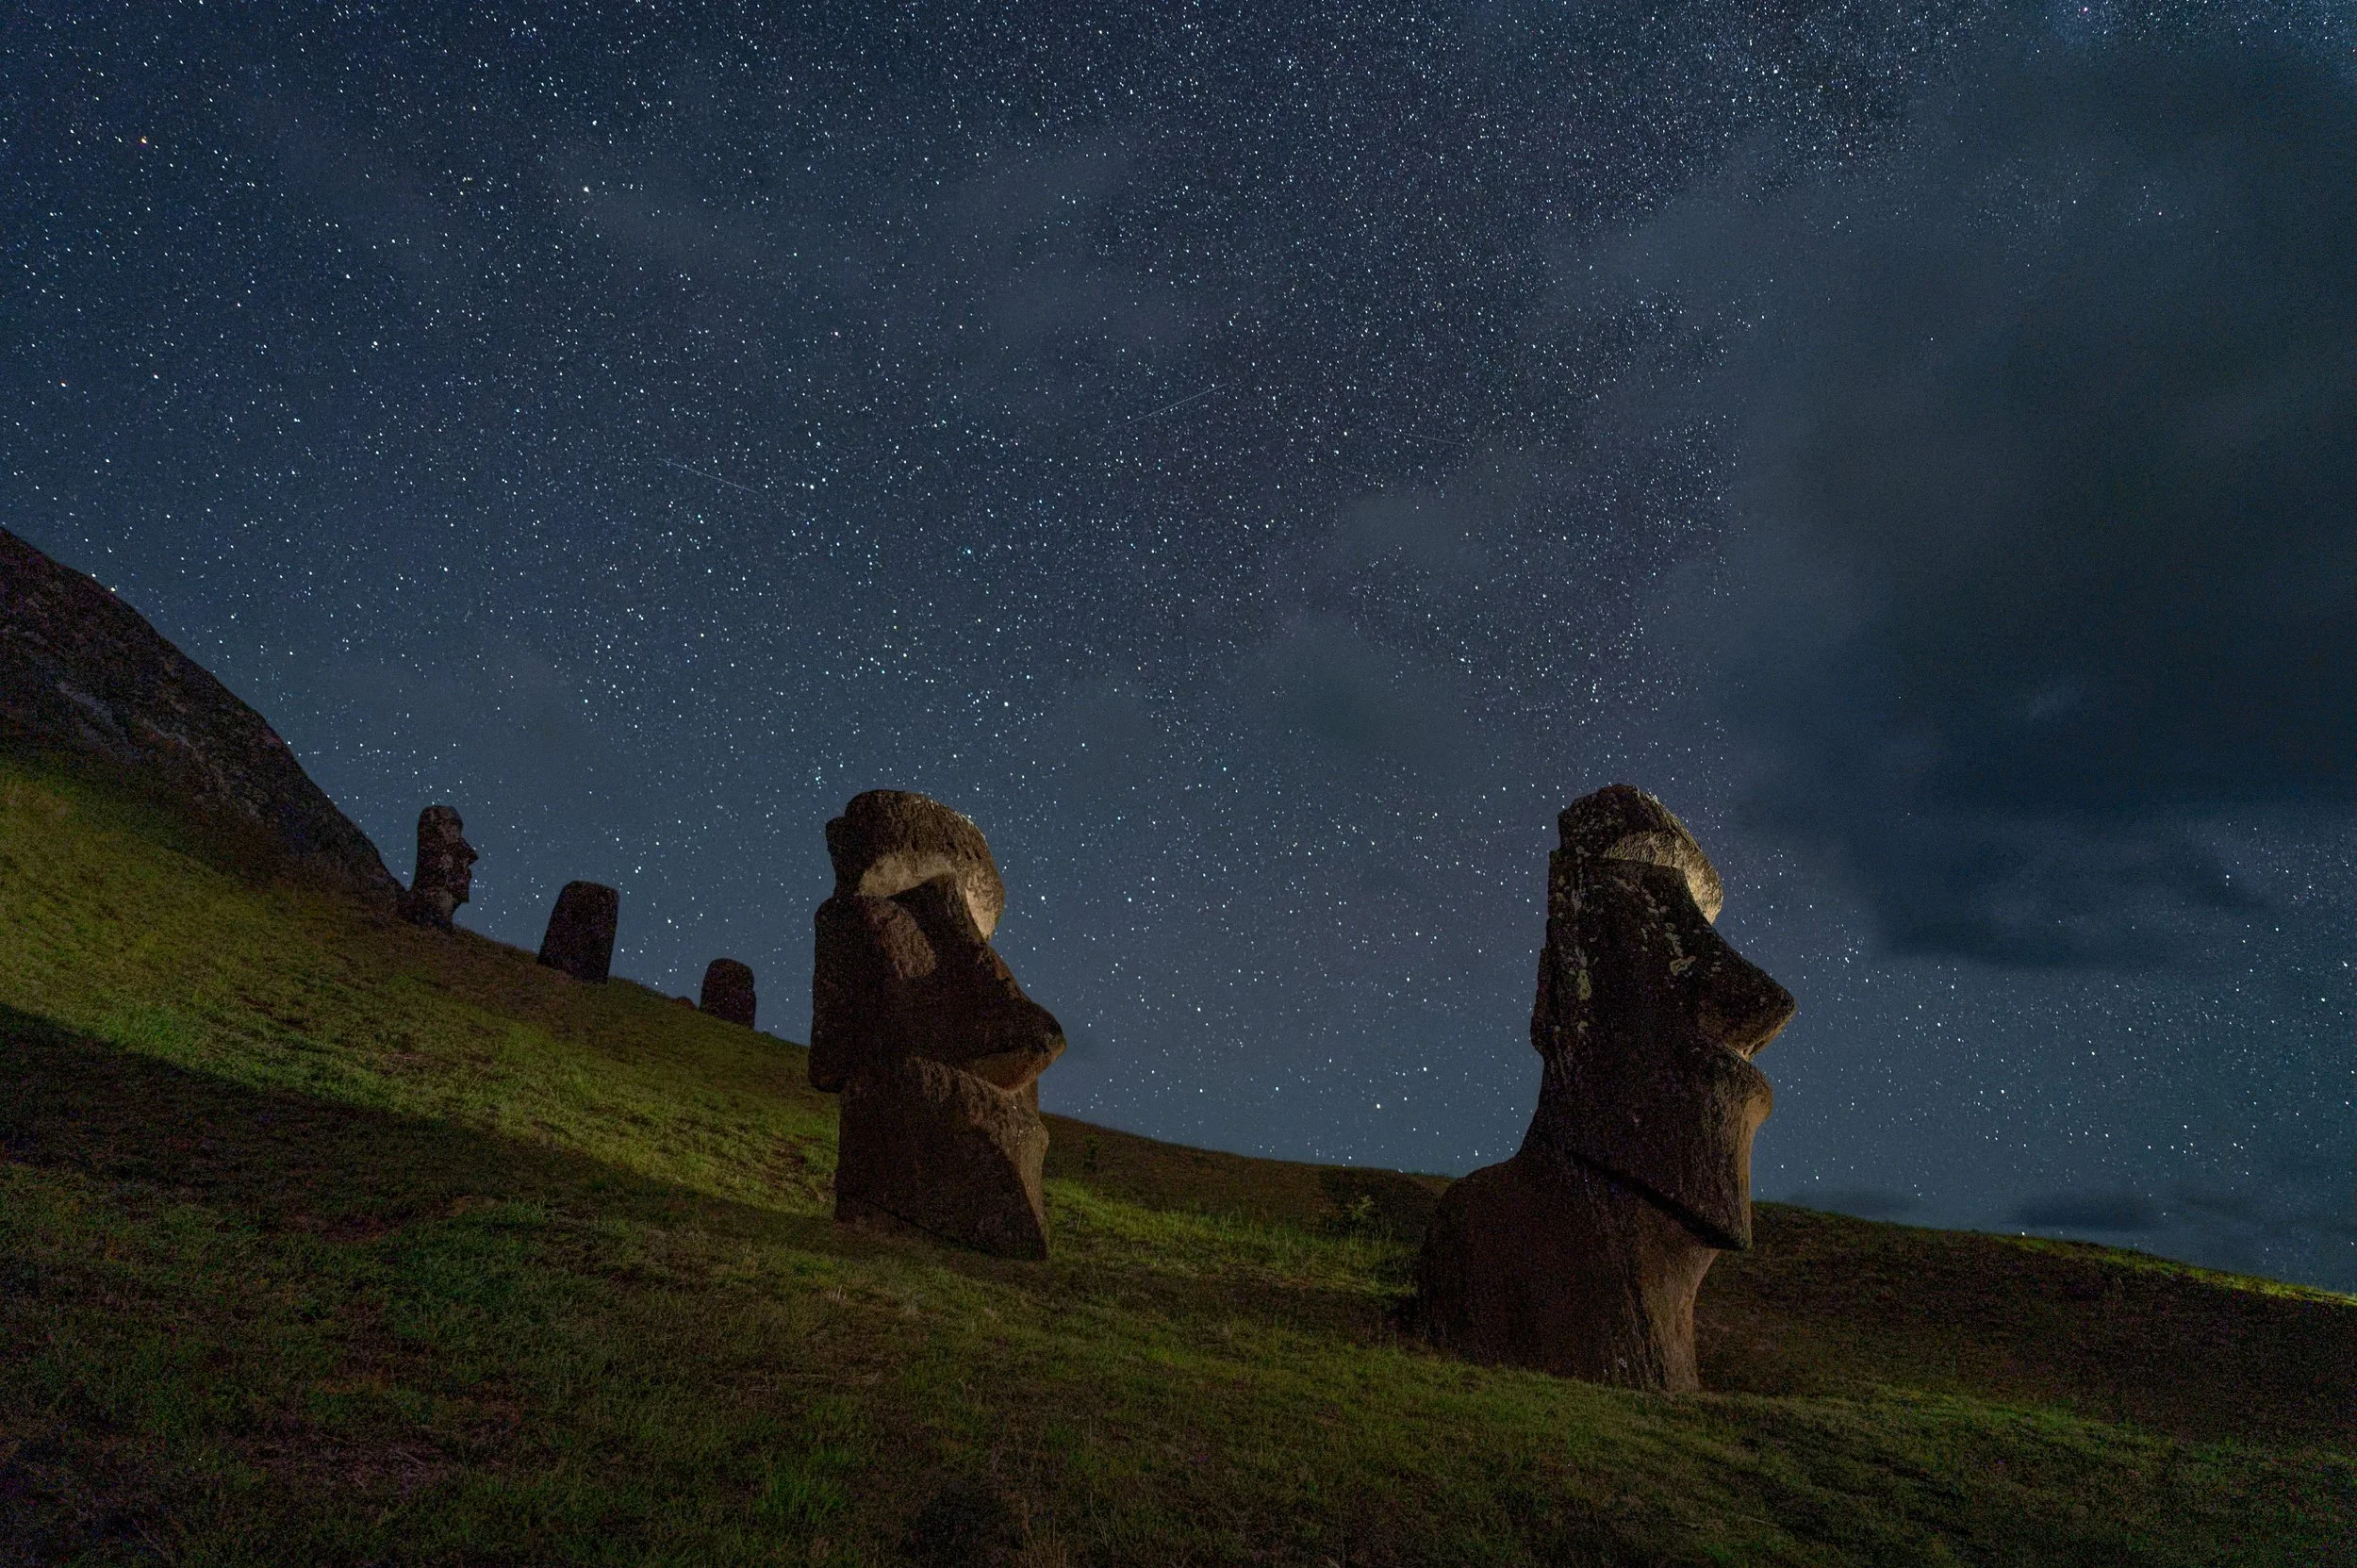
Star trails over Animas Forks, Colorado. Nikon Z 6II with a Nikon Z 14-24mm f/2.8 S lens at 15mm. 17 stacked frames shot at 4 minutes, f/2.8, ISO 640.

While the fact that these artifacts exist at all might make you question whether to use this technique to begin with, the opposite is true: These problems can appear in any long exposure of the night sky, and the stacking technique gives you more power to remove them in a way that doesn’t harm your final image.

Indeed, that we can remove common artifacts from individual layers is a great reason to choose the technique of shooting multiple shorter exposures and stacking them together in Photoshop rather than shooting one long exposure.

In This Video

In the following video I’ll cover:

  • exporting your images from Lightroom into Photoshop

  • changing blending modes to create the initial star trail composite

  • identifying and working on individual layers

  • removing plane trails from individual layers using the Spot Healing Brush

  • the difference between layers and masks

  • creating layer masks and using the paintbrush to remove unwanted items that appear on individual frames

  • using selections to remove unwanted items that appear on individual frames

  • streamlining the editing process by grouping layers

  • using color labels to mark important layers

  • when to flatten your image and when to retain the layers

  • creating a composite layer to enable edits that can’t be done to multiple layers

  • renaming your Lightroom files to reflect the file’s status

Your Turn

Have you been creating star trail images using the stacking technique? We’d love to see your photos! Share in the comments below, or on our Facebook page, or on Instagram (tag us @nationalparksatnight #nationalparksatnight #seizethenight).

Tim Cooper is a partner and workshop leader with National Parks at Night. Learn more techniques from his book The Magic of Light Painting, available from Peachpit.

UPCOMING WORKSHOPS FROM NATIONAL PARKS AT NIGHT

A Whole New Bag of Tricks: Check Out the Features in Adobe's Latest Update

Earlier this week Adobe released its latest updates to Lightroom and Photoshop. As happens sometimes, this particular release included some tweaks that are exciting for night photographers.

The biggest among those was the introduction of Lightroom’s new AI-based Denoise feature, which is simple to use and amazingly effective. On Tuesday we published a video post that explains the new Denoise feature (see “Cutting Through the Noise: Lightroom Just Made Night Photography Better”). You can see the power of this new tool in these before and after pictures:

But Denoise isn’t the only new thing to be excited about in Lightroom and Photoshop. Several other new features in this release will prove to be a real benefit for the night photography enthusiast. In today’s blog post, I’m sharing a video to show all the new tools and tweaks that you’ll want to look into, as well as some tips on how to use them, including:

  • the new ability to use Lightroom Curves adjustments on a masked selection

  • how to use the targeted adjustment tool to speed up manual changes to Curves

  • the new ability to open multiple images into the same Photoshop file as Smart Object layers (and why you’d want to do that)

  • two examples of using two Smart Object layers for better control when creating a blue hour blend

Check it out below.

Wrapping Up

All in all, it’s a great day to be a night photographer!

What are you most excited about in the latest Adobe updates? What photos are you making with them? Share in the comments below, or on our Facebook page, or on Instagram (tag us @nationalparksatnight #nationalparksatnight #seizethenight).

Tim Cooper is a partner and workshop leader with National Parks at Night. Learn more techniques from his book The Magic of Light Painting, available from Peachpit.

UPCOMING WORKSHOPS FROM NATIONAL PARKS AT NIGHT

Cutting Through the Noise: Lightroom Just Made Night Photography Better

While Adobe’s focus is on creating benefits for all photographers, every now and then they come up with a feature that is a huge benefit to us night owls, in particular.

This is the case with their latest Lightroom update (12.3). As of today, Lightroom users have AI noise reduction—and we’ve tested it, and it’s excellent. For those of us shooting high ISOs at night, this stands to be a game-changing addition to our processing workflow. Simply put: It makes night photos better.

Milky Way at White Pocket. Nikon Z 6II with a Nikon Z 14-24mm f/2.8 S lens at 24mm. 2 minutes, f/4, ISO 1600 (foreground); 8 seconds, f/2.8, ISO 6400 (sky); blended in Photoshop. Both images used Adobe Lightroom’s new Denoise slider at a setting of 23.

Adobe’s new Denoise tool works seamlessly within the Lightroom raw workflow. It can be applied to images just out of the camera or to images that you have already labored over in the Develop module—including those you have processed using complex masks.

The process of ridding your images of noise in Lightroom couldn’t be easier. Check out the following video for our tips and tricks on using Adobe’s fantastic new AI noise reduction feature.

Of course, this isn’t the only update Adobe made this week, but we wanted to immediately get you the news on this huge improvement for night photographers. Be sure to check out our blog post this coming Saturday, in which we’ll cover more about Denoise, plus other new features that will help out night photographers.

Tim Cooper is a partner and workshop leader with National Parks at Night. Learn more techniques from his book The Magic of Light Painting, available from Peachpit.

UPCOMING WORKSHOPS FROM NATIONAL PARKS AT NIGHT

Editing Auroras: How to Post-Process Your Northern Lights Photos

If you’ve read our previous blog post, or if you’ve been reading the news, or if you’ve been outside at night in the past two weeks, then you are already aware of the fantastic displays of auroras that have been dazzling observers even at latitudes that hardly ever see the phenomenon.

We were fortunate to have experienced these auroras on our recent photography tours to Iceland and Norway’s Lofoten Islands, which was the subject of last week’s post (“Spring Solar Storm Brings a Week of Amazing Auroras”), as well as the subject of our Instagram feed all this past week (and next).

Auroras over Gimsoystraumen, Lofoten Islands, Norway. Nikon Z6 II with a Nikon Z 14-24mm f/2.8 lens at 14mm. 6 seconds, f/2.8, ISO 3200.

If you’re outside shooting at night, such an amazing display of northern (or southern) lights tends to generate a lot of of frames to bring home. And that translates into a lot of post-processing on the to-do list.

We’d like to help. So we decided to create a tutorial on how to process your beautiful aurora images.

In This Video

In the following video I’ll show you how I use Lightroom to maximize the visual power of auroras in your night photos. I’ll cover:

  • techniques to control contrast and brightness

  • the Dehaze, Exposure, Shadows and Whites sliders, and how they can be used to better separate auroras from the surrounding sky

  • using profile corrections to even out the sky

  • local and global adjustments to target individual areas of the scene

Your Turn

Have you been out photographing the auroras? We’d love to see your photos! Share in the comments below, or on our Facebook page, or on Instagram (tag us @nationalparksatnight #nationalparksatnight #seizethenight).

Tim Cooper is a partner and workshop leader with National Parks at Night. Learn more techniques from his book The Magic of Light Painting, available from Peachpit.

UPCOMING WORKSHOPS FROM NATIONAL PARKS AT NIGHT

The Night Photographer's Guide to Star Stacking (Part II)

Note: This is the second in a three-part series about creating star trails with the stacking technique. Part I covered how to shoot the raw materials. In Part II, below, Tim goes over the required post-production. Later he’ll follow up with Part III, in which he’ll show how to clean up the artifacts of the technique (such as plane trails).


Previously I wrote about the in-field steps for creating star trails from multiple exposures. Now we’re ready for the next step, which is how to process those images into one final star trail photograph. And, as a bonus, I’ll include a light-painted foreground shot into the mix!

While there is a variety of software that can process raw files, Photoshop is still the industry standard for compositing images. In this post I’ll use Lightroom and Photoshop to complete our star stack.

The Lightroom Steps

Once your images are downloaded, all the frames for your stack should be together, because you shot them sequentially. For this example, my images are in a Lightroom folder called Inyo Mine (Figure 1).

Figure 1.

At this point you could bring the frames into Photoshop to stack them, but I recommend doing as much editing to the images as possible before sending them over. This could be as little as altering the exposure or as extensive as masking and removing plane trails from each image. I prefer to make adjustments beforehand to maximize the advantages of the raw workflow—once the frames are in Photoshop, they’ll be rasterized and any subsequent image adjustments could possibly hinder image quality in a way that wouldn’t happen earlier in the process.

However, you should note one caveat: We have seen that the more edits you make before stacking, the higher the chance that the final image will suffer from moiré. Now, you might never see moiré, but some photographers do, and some see it more often. The incidence of moiré can vary from one camera model to the next—for example, we tend to see it more with higher-resolution cameras.

The problem with moiré is that it can’t be edited out, so it needs to be avoided. As you’re getting into stacking for star trails, if you notice that you encounter moiré in your final images often, then it might just be more efficient to do your basic image edits after stacking rather than before. (More on this in a little bit.)

Either way, the edit we see that most often causes moiré in a stack is Lens Corrections—in fact, it’s common. So that’s the one adjustment you might want to make a habit of waiting until later to make.

However much editing you decide to do, you should ensure that global adjustments are the same on all of the images. Select all of the frames by clicking on the first, holding the Shift key, then clicking on the last (Figure 2).

Figure 2.

For this example I adjusted the White Balance, increased the Exposure and Whites, and added a touch of Dehaze on the first star trail image. We want these all of our global adjustments to be applied to all of the star trail frames, otherwise the stars will look different at various spots in the final trails. To apply the edits to all the frames, with all of the star trail images selected, click the Sync button (Figure 3), click Select All, then click Syncrhonize. (You’ll notice that I did not include the light-painted image with this sync, as I want to edit that separately.)

Figure 3.

Now that the global adjustments are synchronized across all of the star trail frames, you can make any edits that may be needed on individual files, such as removing plane trails, masking etc. At this point I made some adjustments to the light-painted foreground (Figure 4).

Figure 4.

Once all of your editing has been done, return to the Library module and again select all of the images you wish to stack (Figure 5). Notice that in this case I have selected all of the star-trail frames as well as the light painting frame.

Figure 5.

Choose Photo > Edit In > Open as Layers in Photoshop (Figure 6). This command does a lot of work for you in the background. It takes each of your raw files, make copies and converts them to TIFF, then sends them to Photoshop, each as an individual layer in one document. Depending on your Lightroom settings, this may produce a PSD or TIFF file. Either is fine.

Figure 6.

The Photoshop Steps

Once the frames begin opening in Photoshop you’ll see them appear as different layers in the Layers panel. The bottommost layer will show as “Load Layers” (Figure 7); this indicates that Photoshop is still opening and placing new files into the document. Be patient with this step. It could take a while depending on how many frames you are using.

Figure 7.

Once the images have been loaded you’ll see the Layers panel filled with your individual frames (Figure 8).

Figure 8.

Click on the top layer, hold the Shift key, then click on the bottom layer (you may have to scroll down a bit). This selects all of the layers so that our next step will apply to all layers in the file.

Now it’s time to change the blending mode, which is how we’ll combine the stars that appear in the different layers. The blending mode is set with a dropdown menu located near the top of the Layers panel (Figure 9).

Figure 9.

We want to change the blending mode to Lighten. With all of the layers still selected, click on the arrow for the blending mode dropdown menu, then from the options, select Lighten (Figure 10). Witness the magic. All of your stars have now combined to create trails.

Figure 10.

How did this work? Imagine the individual layers as individual photo prints stacked on a table. No matter how large the stack, you would see only the topmost print. It’s the same with layers.

However, changing the blending mode on all of the layers to Lighten tells Photoshop that the brightest part of each layer should show through all the way to the top. This means that wherever there is a star in the sky, it will show through.

Figure 11 shows an enlarged portion of the sky, and I have turned off the visibility of all the layers except one (circled in red). This was done by clicking the eyeball off for all the other layers, thus turning off their visibility.

Figure 11.

In just that one layer, you can see that the star trail is quite short. But when I activate another two layers, the trail lengthens (Figure 12).

Figure 12.

This is because the stars on these layers are brighter than the darker sky in the same spots on the other layers. Remember that with the Lighten blending mode, the brightest areas of each layer show through. So when all of the layers are visible (eyeballs turned on) and their blending mode is set to Lighten, you will see all of the star trails from each layer (Figure 13).

Figure 13.

Moiré

Note that this is the point where you might see moiré. It can be caused by the processing algorithm creating just slightly different pixels from one layer to the next. Zoom in to the sky and look for moiré, which will appear as a pattern of bands of somewhat lighter and darker pixels, such as in Figure 14. If you see that, you cannot edit it out. Your best bet is to close file (don’t bother saving), go back to Lightroom, undo some edits, and then re-create your layered Photoshop file.

Figure 14.

In that case, here’s how to troubleshoot:

  1. As mentioned earlier, the adjustment that we most often see causing moiré in a stack is Lens Corrections. If Enable Profile Corrections is on, turn it off, create the stack again, and see if that fixes the problem.

  2. If not, then it’s back to Lightroom. Zero out your most aggressive edits (Shadows at 100?!) and try again.

  3. If you’re still getting moiré, zero out all of your edits, create your stack, and then edit your final image in Lightroom.

We have seen only one case ever where these steps didn’t solve an issue with moiré.

If you are working with only star trail layers, with no light painting layers, then you could be finished at this point. Feel free to jump ahead to “Saving the File” at the end of this post.

Masking Around a Different Foreground

It’s been a while since I mentioned it, but remember the other image I opened as a layer, the one with the light painting? Because the lighting in that one layer is brighter than the dark foreground in all the other layers, all that light painting shows through—again because of the Lighten blending mode. More magic!

However, that light painting layer is causing one problem. That exposure was not made sequentially with the others. I shot the light painting frame before I started shooting the star trail frames. It has stars in it too, and because the blending mode for that layer is also set to Lighten, those stars are showing in the stack.

Figure 15 shows the image with the light painting layer turned on. You can see all of the stars (circled in red) from the exposure I made while light painting. This exposure was shorter, so the stars appear as dots rather than small trails.

Figure 15.

I do want the light-painted foreground from this layer, but I don’t want those star points to appear in the sky and break up my star trail pattern. The solution? Mask out the sky from that layer.

Masking

Selecting and masking in Photoshop is a deep subject and we could spend a summer of Sundays plumbing its depths. To keep this simple, we’ll use a powerful (and somewhat new) selection tool called Select Sky.

The goal is to keep the sky of the light-painted layer from showing in the stacked final image, while still letting the foreground show. This means we want a selection of the foreground for our mask. But in this case (and in many cases), it’s easier to select the sky and then invert that selection so that we have the foreground selected instead.

I begin by clicking on the light painting layer (Figure 16). Clicking on this layer tells Photoshop that when I start using selection tools, the selections will be based on the information from this layer. Then I choose Select > Sky.

Figure 16.

Then I choose Select > Inverse to change the selection to the foreground (Figure 17).

Figure 17.

The selection of the foreground is now active (shown by the marching ants in Figure 18).

Figure 18.

To turn this selection into a mask, all we have to do is click on the Add a Mask icon (Figure 19).

Figure 19.

The newly created mask on the light painting layer (circled in Figure 20) allows the foreground to show (as indicated by the white area of the mask thumbnail) but blocks the sky from showing (indicated by the black area).

Figure 20.

Saving the File

Once you’re done, you’ll want to save the file and send it back to the Lightroom catalog. To do so, select File > Save, then File > Close. Once back in Lightroom, you can continue fine-tuning the edits with a more familiar set of controls.

However, there’s a potential hitch when it comes to saving. Image files with lots of layers can be quite large. The more frames you stacked, the larger the final file will be. The problem is that PSD files cannot be larger than 2 GB, and TIFF files cannot be larger than 4 GB. If your layered image is larger than those limits, Photoshop will complain, and you’ll need to make a decision. You may:

  1. Flatten the layers (select Layer > Flatten Image), which will dramatically reduce the size of the file. This means Photoshop can save the file as a PSD or TIFF, which has the added benefit of taking up less space on your hard drive. However, your layers will be gone forever, so if you want to make layer-level changes in the future, then you’ll need to go through the whole process again.

  2. Save the file as a PSB, which is Photoshop’s large-document format. Simply select File > Save As, and choose “Large Document Format (*PSB)” as the file type. This will allow you to keep all your layers, but will of course use more room on your hard drive.

More Potential Steps

Creating star trails by stacking images has a lot of advantages, but it can also create some artifacts, such as plane trails, or stray light from flashlights or from cars driving by. Working with those artifacts is the next step in your process, and I’ll cover that in the next and final blog post in this series. Stay tuned for Part III, coming soon.

Tim Cooper is a partner and workshop leader with National Parks at Night. Learn more techniques from his book The Magic of Light Painting, available from Peachpit.

UPCOMING WORKSHOPS FROM NATIONAL PARKS AT NIGHT