Night Photography Blog — National Parks at Night

Gabriel Biderman

Yesterday's News, Today's Muse: Shooting Night Photography on Film

News flash!

There is a little bit of a film renaissance going on, right now!

I can tell you that I’ve been enjoying loading up my classic cameras again and taking them out for more day and night adventures.

I learned night photography on film in the 1990s, back when it was seen as a very difficult and archaic process that yielded more misses than hits. However, when you succeeded, it felt like a majestic home run! Without the instant feedback and resources on the internet, night photographers in the film days would write copious amounts of notes from all their trials and errors, and they would use specific films that played better to longer exposures.

Digital certainly made night photography easier and more accessible for people to master. On the other hand, there’s a series of benefits to photographing night with film: the exciting uncertainty of shooting on analog can push you to pre-visualize, challenge yourself and add a dash of nostalgia to your photographic experience.

Sutro Baths. Mamiya 7 with a 43mm lens, shot on Fujifilm Acros 100 under a full moon. 8 minutes, f/8.

Why Shoot Film for the Night?

Night photography is a fairly slow and laborious process. Digital technology has sped up that process and given us immediate feedback to adjust our decisions on exposure and light painting in the field. But have those advantages made you more complacent as well?

Film definitely pushes you to pre-visualize and to slow down even more. You’ll think about every decision before clicking the shutter, and that isn’t a bad thing.

With digital, there are relatively few limits to the night sky—either in the field or later in post-processing. You have the tools to switch from color to black and white, and to stack images so that everything from 6 inches to the infinite stars is in focus.

With film, your options are limited—but that can force you to be more creative. There is something to be said for heading into the field with a very specific vision, and film locks you into one palette for the night. (Or at least for 10 to 36 frames.)

Speaking of vision, I also love the variety of film cameras that are geared to let you to see in a different way, whether it is a true panorama camera, the square frames of a twin lens reflex, or even a pinhole camera.

You can embrace these limitations, and just “roll” with film!

Parroquia de San Miguel Arcangel. This is a rare night photograph taken with a zone plate (pinhole type). Shot on Polaroid Type 59 4x5 color film that has notoriously bad reciprocity failure. Note how the direct light sources from the church reflect the zone plate lens. 4x5 Zero Image Pinhole camera with an f/45 zone plate. Approximately 4 minutes, f/45, ISO 100.

Logistics of Shooting Film

There are some specific logistics to shooting film that we need to get an initial grasp of.

Reciprocity Failure

The main logistical obstacle is reciprocity failure. A digital sensor’s ISO can be adjusted from 50 to 51,200 and beyond. The ISO of film is less pliable. Film is optimized for the ISO it is rated for and can suffer from reciprocity failure during long exposures at very low light levels.

A film’s emulsion is made up of a layer of silver halide chemicals that “react” to light and etch the image onto the film. Common chemistry tells us that a chemical reaction is most potent at the beginning and loses its potency over the course of the reaction. Ergo, the longer an exposure, the less sensitive the film’s silver halide layer becomes to light. The breakdown can start in as soon as 1 second, and it accelerates as the exposure gets longer. Each type of film is made up of different chemistry and therefore reacts differently, so each has a reciprocity failure chart that is often printed inside the box or found on the manufacture’s website.

Developing Time

Another issue is controlling the highlights of night images on film. Because we are inherently overexposing most scenes to get more detail in the dark shadows, we need to be careful not to blow out our highlights. In digital we can take multiple shots and use HDR techniques and blend them together. That would be more laborious with film.

A better option to control the contrast of the scene is by altering the way we expose and develop the film. The old adage of exposing for the shadows and developing for the highlights is the key to success.

There are different strategies depending on how much contrast is in the scene. In moonlight, the best technique is to reduce the development time by about 10 percent. The extreme contrast found in artificially lit locations can be even more problematic. In these situations, an extended development time with reduced agitation in a diluted developer will yield the best results. Experimentation combined with accurate notes will allow you to develop a personalized system to both get consistent results and to customize your look.

(Of course, not everyone who shoots film also develops it. If someone else is doing the darkroom work, discuss all these options with them to achieve the best end results.)

I also recommend dedicating a roll of film to only night photography, as opposed to mixing night and day exposures. Brightly lit daytime frames and dimly lit nighttime frames require different development times for the best image quality, so if you were to shoot them both on the same roll, then one or the other would suffer from incorrect processing.

Film Choice

Two of my favorite films are Fujifilm Acros 100 and Kodak Tri-X 400. The reciprocity failure compensation for each is drastically different, and the slower speed of the Acros handles longer exposures much better than Tri-X. When I meter and add reciprocity compensation on a moonless night, I’m looking at a 4- to 6-hour exposure with Acros—but any decent exposure under those conditions is impossible with Kodak Tri-X!

Reciprocity Failure Chart. A comparison of reciprocity compensation for two of my favorite films, Fuji Acros 100 and Kodak Tri-X 400.

If you have a favorite film, research the technical data prior and do your own exposure tests to figure out how much you need to adjust your initial evaluation of a scene.

For example, most films start to suffer reciprocity failure between 1 and 10 seconds. But with Acros (as well as with most of Fuji’s color slide films), reciprocity failure doesn’t begin until after 2 or 3 minutes.

Another choice is whether to work with color. When working with film, I shoot pretty much exclusively with black and white. I love bringing the monochromatic look wherever I go. When we shoot digital, we often default to color and forget about the strong lines and compositions that black and white can emphasize even more—but with analog that’s a more conscious decision, because the whole process starts with choosing which film to use.

Metering

This leads up another important question: How do you meter for night exposures?

This was the biggest frustration pre-digital. Most internal meters in film cameras can’t accurately gauge dim scenes at 3 EV or lower. Handheld meters perform a little better, with the best ones working well at as low as -3 EV. (For reference, 0 EV would be the equivalent of a subject lit by dim ambient artificial light, and -3 EV would be a subject under full moonlight.)

Today’s digital meters are way more sensitive, especially considering that we can raise the sensitively of a camera to ISO 6400 and beyond and still get a very accurate reading. Because of this, when I’m shooting film at night, I often shoot with a second setup that’s digital. I meter with the digital and then apply those settings and add the required reciprocity factor for the film, and that gives me an excellent starting point. Even with this relatively accurate approach, I definitely advise bracketing your exposure to be sure you get an exposure you like and can work with.

My go-to full-moon exposure with Fujifilm Acros 100 is 8 minutes at f/8. One day after the full moon, I add one stop of light—i.e., 16 minutes at f/8 or 8 minutes at f/5.6. For me, a productive night is to finish a roll of film, but honestly I often have time for only 8 to 10 frames.

Cannon Beach. Wisner 4x5 Technical Field Camera, shot under a full moon on Fujifilm Acros 100. 30 minutes, f/11. Acros is a fine-grain film that allows short exposures in dimly lit scenes, and it lets you extend exposures in dark, moonlit scenes without much loss in reciprocity.

Which Film Camera is Best for You?

The Mamiya C220.

I like to recommend cameras that are not battery dependent, or ones for which the battery is solely for powering the meter. I also, for night work, highly recommend medium format cameras over 35mm. If you are averaging only 8 to 12 framers per night, it could take three nights to finish a roll of 35mm film, whereas you could finish one roll of medium format’s larger film in one night, and you’ll also get better image quality.

Both Matt Hill and I shot many nights with our beloved Mamiya 7, which yields a large negative and has a bright rangefinder that makes it easy to compose in dark environments. However, the battery in the Mamiya 7 is notorious for draining quickly with long exposures. And that battery also controls the shutter, so if it drains in the middle of your exposure, you’re not only done for the night, but you’ve also ruined your last shot. I always kept a spare battery in my bag for one-night shoots, and brought several extra on longer road trips.

The Mamiya 7 is still expensive even on the used market, so if you are new to this and don’t have an old film camera on hand, I recommend the Mamiya C220 twin lens camera. No batteries, no meter needed. It produces a nice square negative, and it’s one of the few twin lens cameras that had interchangeable lenses. These can often be found for under $400 in good condition and with a lens.

Thomaston, Maine. Mamiya C220 with an 80mm lens, shot on Fujifilm Acros film. 8 minutes, f/5.6.

The Urban Night on Film

So far this film thing probably seems like it’s loaded with a lot of factors that need to be juggled. But most of the considerations I’ve mentioned so far have been for dimly lit scenes, or moonlight—and those are the most challenging night conditions for film. On the flip side, you can shoot film with fewer concerns in brighter lit urban scenes:

  • Color shifts and reciprocity failure don’t come into play much under streetlights.

  • The shorter exposures are easier to meter.

  • The brighter scenery is easier to see through your viewfinder.

All of this means you can be more productive, because you can shoot more frames!

In the urban environment, color film can be fun to experiment with, or you can see your city in a black and white noir look.

Red Hook. Rollei Rolleiflex 2.8E TLR, shot on Fujifilm Acros 100. This was shot at probably 1/2 second or less. The well-illuminated crooked street light provided ample light for even a slow 100-speed film.

Red Hook. Rollei Rolleiflex 2.8E TLR, shot on Fujifilm Acros 100. This was shot at probably 1/2 second or less. The well-illuminated crooked street light provided ample light for even a slow 100-speed film.

Olympic Stadium, Montreal. Voigtlander Bessa R, shot on slide film that was then cross-processed to get even more grain and some trippy colors.

Final Thoughts

Film can be fun. It can push you out of your comfort zone and make you study the night light and the view in front of you in a way that digital probably won’t. You can also embrace the reciprocity failure and shoot for very long, continuous star trails without the need to do any stacking in post.

I’ve also been very impressed with what Jason Defreitas is doing with film and star trackers. The Milky Way was impossible to shoot on film because of the low light levels and reciprocity failure, but Jason has done some beautiful astrophotography on film.

Bannerman Armory, Pollepel Island, New York. Mamiya 7 with a 43mm lens, shot on Fujifilm Acros 100 film. 90 minutes, f/11.

I will say that digital has made me a better film shooter. As I mentioned earlier, when I go out with my combined digital and film setup, I can use the former to quickly find the right exposure for the latter. And because the film exposure tends to be so long, I then use the digital camera to keep shooting, which keeps my overall productivity up.

I hope I’ve inspired you to dust off a film camera you might have sitting on the shelf and to seize the night— with film!

Note: Want to learn more about classic cameras and film photography? Our friends at B&H Photo are celebrating Classic Camera Week from February 8 to 12. Gabe will be hosting several online events where he talks to camera collectors and pros who shoot film, discussing best camera choices. A there will be a happy hour on Thursday to raise a toast to everyone’s favorite film cameras! To learn more about B&H’s week of programming, click the link above.

Gabriel Biderman is a partner and workshop leader with National Parks at Night. He is a Brooklyn-based fine art and travel photographer, and author of Night Photography: From Snapshots to Great Shots (Peachpit, 2014). During the daytime hours you'll often find Gabe at one of many photo events around the world working for B&H Photo’s road marketing team. See his portfolio and workshop lineup at www.ruinism.com.

UPCOMING WORKSHOPS FROM NATIONAL PARKS AT NIGHT

Midwinter Musings: The Importance of the Solstice to the Night Photographer

Happy winter solstice to you!

Historically the winter solstice welcomes the beginning of winter, and it’s the shortest day and the longest night of the year.

It occurs when one of the earth’s poles is at its maximum tilt away from the sun. At and near the pole, there is continual darkness or twilight during the winter solstice—the exact opposite of summer solstice when inside the polar circles you can witness the midnight sun. In the Southern Hemisphere the winter solstice generally falls on June 20 or 21, and in the Northern Hemisphere on December 21 or 22. This year, it’s the 21st!

Winter Solstice Celebrations

The winter solstice (or, “midwinter”) has been celebrated and observed in many ways by humankind since as early as the end of the Stone Age (around 10,000 B.C.).

One of the most famous prehistoric monuments to the winter solstice is Newgrange in Ireland. Built in 3200 B.C., its opening perfectly aligns with the midwinter sunrise. For 17 minutes the sun shines directly down a long passage and illuminates the inner chamber to reveal carvings inside, including the most famous Irish megalithic symbol, the Tri-Spiral.

Newgrange and the Tri-Spiral at sunrise of the winter solstice. Photo CC Ken Williams.

And of course one of the most famous landmarks in the United Kingdom is Stonehenge, constructed between 3000 and 2000 B.C. The monument is aligned to the movements of the sun—or, more precisely, to the winter and summer solstices.

Many other monuments and celebrations exist and have existed throughout history. Great feasts and rituals have long been held on the winter solstice all over the world. Fires and lights are universal symbols of these celebrations. Some examples:

  • Dong Zhi, which means “winter arrives,” is the Chinese observance of the winter solstice, Like many solstice celebrations, it started as a harvest festival. Families continue to come together and feast, to share well-wishes, and to celebrate the increase of positive energy for the year to come.

  • St. Lucia Day, celebrated in Scandinavian countries, is meant to bring hope and light during the darkest time of the year.

  • During Toji in Japan, people create massive bonfires on Mount Fuji to encourage the sun’s return and to focus on healing and good health.

  • Persians have celebrated Shab-e Yalda, the “rebirth of the sun,” for centuries. It marks the longest night and the return of longer daylight hours. Fires were built at sundown and were continually stoked to last until the first rays of the next day. The celebration included food and song, as well as tales of the great battle of the sun god Mithra triumphing over darkness. 

  • The Hopi of northern Arizona have celebrated the kachina dance during the winter solstice for over a millennium. The Soyal ceremony begins on the shortest day of the year and can last for up to 16 days. Dancing and sacred rituals focus on a plan of life in the coming year and celebrate turning back the sun toward the summer path.

What About Night Photographers?

For a night photographer, the winter solstice and the winter months are natural to celebrate, because they make for great night-shooting opportunities. Earlier and longer nights mean that even those of us who live in middle latitudes can start photographing as early as 4 or 5 p.m. We can still log a productive night’s work and be home for a cup of tea by 10!

Of course, many photographers hibernate when the weather turns cold. The galactic core of the Milky Way is not visible for most of the winter months in the Northern Hemisphere. Colder temperatures don’t inspire us to venture outside as much. But we need to celebrate and seize these winter months! (I wrote about this a few years ago in a post titled “Be Out in the Cold: Why Winter is Great for Night Photography.”)

First, of course, snow happens in winter! That soft, white blanket on a scene can make for truly inspiriting astro-landscape photos.

The mountain Skottinden looming over the snowy landscape of Ballstad, Norway. Hasselblad X1D II 50C with a Hassellblad 21mm f/4 XCD lens. 11 seconds, f/5.6, ISO 400.

Auroras happen year-round, but are much more visible during the darker months. (For more on photographing this dynamic feature of the night, see our previous blog posts “How to Photograph the Aurora Borealis” and “8 Illuminating Tips for Photographing Auroras.”)

Aurora over abandoned boat in Djúpavík, Westfjords, Iceland. Nikon D750 with a Nikon 14-24mm f/2.8 lens. 10 seconds, f/2.8, ISO 6400.

The moon can be our friend during the long winter months—you might be familiar with the lunar halo, or moon ring, which is caused by moonlight refracting, reflecting and dispersing as it passes through high-altitude ice particles and thin cirrus or cirrostratus clouds.

Lunar Halo over the Owens Valley Radio Observatory in California. This can be a common appearance in the winter, and according to folklore is a precursor to impending stormy weather. Nikon Z 7 with Nikon Z 14-30mm f/4 lens at 14mm. 15 seconds, f/5.6, ISO 800.

When the air gets even colder, the natural phenomenon known as light pillars can be another magical experience to capture during winter months.

Wait, There’s More!

If all that isn’t enough, the 2020 winter solstice will be an especially momentous one for the night photographer. For the first time in almost 800 years, we will witness the “great conjunction,” when Jupiter and Saturn, as seen from Earth, move together to be separated by only 0.1 degree. This will be visible from around the globe (weather permitting) in the western twilight sky. Both planets are very bright to the naked eye on their own, but if they were to join, what an amazing beacon that would be!

Composite of Saturn and Jupiter images. Both images courtesy of NASA.

Many of the news agencies are calling this the return of the “Star of Bethlehem” or “Christmas Star,” as history does show that in 7 B.C. a similar great conjunction happened three times in 8 months.

What will it look like for us? Will the planets form a superstar in the sky? It’s hard to say, as this phenomenon has never been photographed before. When asked about this, EarthSky’s lead sky writer Bruce McClure commented:

“I do not know for certain, but I doubt it. I’m guessing people with decent vision will view Jupiter and Saturn as two distinct points of light. Part of the fun is to wait and see. Remember that people with good vision can see Venus as a crescent with the eye alone when its angular diameter is one minute of arc or larger. At their closest, the angular separation between Jupiter and Saturn will be six times that distance: 6 minutes of arc.”

You might be getting a sense of the effect already, though, if you’ve had a clear twilight recently. Since December 16, the planets have been inching closer, and a lot of stargazers and photographers have been watching and shooting.

The 0.1-degree conjunction will happen on Monday, December 21—the winter solstice! It will last for about an hour after sunset—so get out there early and find a clear horizon to the west. Then, of course, stay out and continue to shoot!

The Solstice Shoot

As night photographers, let’s make sure we do two things:

First, remember that this is a special celestial event that the whole world can witness and share—let’s go out and celebrate this winter solstice! We’d love to see your interpretations of the great conjunction. You’ll definitely want to capture them as “star points,” but perhaps a superclose double star trail would be stellar too. Whatever you do—share your images and make sure to tag #nationalparksatnight.

Second, let’s continue this new night photography tradition of shooting during the winter solstice from now on. This is our longest night—let’s make sure to seize it!

Gabriel Biderman is a partner and workshop leader with National Parks at Night. He is a Brooklyn-based fine art and travel photographer, and author of Night Photography: From Snapshots to Great Shots (Peachpit, 2014). During the daytime hours you'll often find Gabe at one of many photo events around the world working for B&H Photo’s road marketing team. See his portfolio and workshop lineup at www.ruinism.com.

UPCOMING WORKSHOPS FROM NATIONAL PARKS AT NIGHT

Loving Luna: A Photo Essay Celebration of the Halloween Blue Moon

Over 600 full moons have pulled at me during my lifetime. The moon has not only guided me, but has provided balance to our planet and instructed timekeepers since, well, the dawn of time. It is the second brightest celestial object after the sun, and is Earth’s own private and natural satellite.

Most night photographers object to the brightness of the moon—a veritable star eater that streaks across the sky and blows out the details of the Milky Way. Many night photographers prefer to stay inside than to be out under soft moonlight.

But just as the moon brought wonder and awe to our ancient ancestors, it can bring just as much wonder to our photographs—not to mention the superwonder that even modern humans have been gifted from supermoons, blood moons and eclipses.

Along those same lines, today we experience a blue moon—on Halloween, no less!

Of course, any full moon that falls on Halloween would be a blue moon, but that doesn’t mean it’s common. The last time the two events coincided was 1944, and the next will be 2039.

To honor this event, all five National Parks at Night instructors got together to share images of when they lassoed the moon. We hope this inspires you to get out tonight (after trick-or-treating, of course) to bring back some inspired images!


Matt Hill

The Headless Horseman, Sleep Hollow Cemetery. Nikon Z 6 with a Venus Optics Laowa 15mm f/2 FE Zero-D lens. 4 seconds f/5.6, ISO 800.

Jim Logan invited me to photograph the Headless Horseman in Sleepy Hollow Cemetery in early October. This wasn’t the first time—it’s nearly an annual tradition that I enjoy very much. Each time I challenge myself to light it differently, and this year we were extra lucky to have clear skies (very unusual!) plus the conjunction of Mars and the moon (what luck!). 

After consulting PhotoPills, we set up where the moon would rise. I brought along five Nanlite PavoTubes and lit a scene that covered a large area, as the horse sometimes wanders. 

I used my wireless Phottix Aion remote intervalometer to trigger my camera, and walked around with a CTO-gelled speedlite to highlight the horse and rider. The final touch was inserting a Nanlite Pavotube 6C 10" tube light into the pumpkin to illuminate it from within. 

Fortune smiled upon us! The moon rose, the planets and satellite aligned, and this magic moment unfolded in front of my camera.

Lance Keimig

Mesquite Sand Dunes, Death Valley National Park. Nikon D750 with a Nikon 14-24mm f/2.8 lens. 30 seconds, f/8, ISO 400.

Experiencing sunset followed by the slow fade into darkness along with the full moonrise in the sand dunes of Death Valley is unforgettable. Death Valley is one of my favorite parks, and I think moonrise in the sand dunes is one of the very best parts of any visit to the park.

After walking about a mile from the road to get into the dunes and then cresting over the first ridge, it feels as if the dunes go on forever and that I am alone in the universe. That sensation can be at times both calming and exhilarating. The landscape is vast, but also intimate. It can be challenging to photograph––especially if one is trying to accurately record the essence of the experience.

On this particular night, I allowed myself to get lost in the experience, and hadn’t set up a shot for when the moon rose over the horizon. As a result, I wasn’t ready when it happened. The best light lasts only a few minutes, and it was rapidly slipping away from me. 

Full Stop. Breathe. Be present in the moment. Any pressure I feel is self-imposed. I stopped dead in my tracks, realizing that I had been hurrying to find “The Shot” when the reality was there was no one image to be made. The images were all around me and I had to choose.

Backlighting by the moon with soft light scraping across the surface of the dunes was the common element to every image I saw. I composed, planning in the field to later crop to panoramic proportions. I decided to let the moon blow out, and exposed to keep some detail in the darkest areas in the sand. In the end, it was a straightforward shot, but captured the sensation of being there, alone, in the moonlight.

Tim Cooper

Moon over Trona Pinnacles National Natural Landmark. Nikon Z 6 with a Nikon 14-24mm f/2.8 lens, light painted with a Luxli Viola. 20 seconds, f/5.6, ISO 1600.

For many night enthusiasts, if the night doesn’t have a Milky Way, it isn’t a night to photograph. I love night photography. Any night. Any time of the month.  I enjoy the challenge of making images under various conditions. And one of my favorite challenges is shooting under the full moon.

Moonlit landscapes provide limitless possibilities. I can use the moonlight as the key (main) light, which renders the scene as a near duplicate of a daytime image, or I can use it to simply fill in the shadows of my favorite light painting scheme. I can draw out texture or emphasize shape in the foreground, or I can shoot directly into the moon and use it as backlight.

One of my favorite techniques mimics the popular sunburst technique used in daylight photography. On a clear moonlit night, I simply point my camera directly into the moon and stop down to f/5.6 or f/8. The smaller aperture renders the moon as a moonburst. Shutter speeds under these conditions can still be short enough to render star points, and a decent exposure can be made at lower ISOs, keeping high exposure noise to a minimum.

Chris Nicholson

Lathe Arch and Mount Whitney, Alabama Hills National Scenic Area. Nikon D5 with an Irix 11mm f/4 lens. 30 seconds, f/11, ISO 3200.

I love shooting the moon, so it’s hard to pick just one moon image. So rather than spending an inappropriate amount of time searching through my images (OK, I admit—after spending an inappropriate amount of time searching through my images), I decided to show a photograph I made just this past week.

This actually started as a challenge from Lance. I was in Alabama Hills National Scenic Area in California with Tim and our workshop group, and Lance told me to see if I could get a photo of Lathe Arch with Mount Whitney in the background. He was setting me up, for sure. The arch is small—about two feet high—and photographing it from said angle requires wedging yourself into a steep crevice in the rock.

I guess I kind of cheated. I used an Irix 11mm f/4—a superwide but rectilinear lens that allowed me to set up superclose to the arch, so that I could use horizontal rather than flat rock to balance my tripod. Still, it wasn’t easy—the tripod legs were flat to the ground, two of them spreading precariously close to creeping into the frame, and the third extending precariously over the edge of the crevice.

Of course, there was light painting too, and that required some calisthenics to jump up and down and over rocks so that I could work in foreground light, as well as background light from two angles, in a short enough exposure to keep the moon from trailing into an oval. This is why I wear good trail shoes when shooting.

And hey, I got the shot! With the moon. Thanks to a challenge from a friend.

Gabe Biderman

Supermoon and bridges in New York City. Nikon D750 with a Tamron 150-600mm f/5-6.3 lens. 1/2 second, f/11, ISO 400.

I began my official supermoon chase in earnest in 2016. Everything aligned perfectly on November 14, which would feature the biggest supermoon since 1948. The moon would rise at 5:14 p.m., but as much as I love New York City, there isn’t much of a horizon line here. I used PhotoPills to find the best spot, which I determined to be on the southern shores of the East River, at Pier 17, where views of the Brooklyn, Manhattan and Williamsburg bridges align.

As the day of the moon event drew near, I chose to share the experience as a National Parks at Night photo walk with B&H Photo. Our friends from Tamron brought a couple of 150-600mm lenses in Nikon and Canon mounts, which we set up on Wimberley Gimbal heads so people could easily track the moon.

The biggest challenge was the cloudy sky. The moon rose, but we couldn’t make out anything against the cityscape. Then one hour later the moon found an opening in the clouds and peeked out for exactly two minutes.

I was able to make eight exposures during that time, ranging from 1/4 second to 6 seconds. The 1/2-second exposure ended up being my favorite, as it revealed detail in the moon as well as the surrounding clouds. The moon is as big as the arch of the Williamsburg Bridge, and I love the abstract layers of the beams of the Brooklyn and Manhattan bridges. 

It was a thrilling two minutes. I loved pre-visualizing and then waiting for that moment. I imagine this might be close to what wildlife photographers feel when they are hidden quietly in the brush and waiting for perfection to happen. I got my supermoon.

Wrapping Up

Have you shot the moon? We’d love to see your images. Feel free to share in the comments, on our Facebook page or by tagging @nationalparksatnight on Instagram!

Gabriel Biderman is a partner and workshop leader with National Parks at Night. He is a Brooklyn-based fine art and travel photographer, and author of Night Photography: From Snapshots to Great Shots (Peachpit, 2014). During the daytime hours you'll often find Gabe at one of many photo events around the world working for B&H Photo’s road marketing team. See his portfolio and workshop lineup at www.ruinism.com.

UPCOMING WORKSHOPS FROM NATIONAL PARKS AT NIGHT

Keeping Our Galaxy Real: How Not To Overprocess the Milky Way

Note: This post concludes with a video of Gabe walking through how to process a realistic-looking Milky Way. Want to jump straight to that? Click here.


Do you remember the first time you saw the Milky Way?

So few of us have access to starry skies that the wow factor was undoubtedly very high. What you saw on the back of your camera and then on your monitor was even more exciting, and in this excitement you probably pushed your post-processing to bring out the stars just a bit more … and just a bit more … and just a bit more … and. …

This is a very normal and common experience. However, taken too far, it also detracts from reality—many of the night images we see online simply do not reflect what the Milky Way actually looks like.

In this post, I aim to help you process your Milky Way shots in a more natural and realistic way.

Milky Way panorama. Nikon D750 with a Nikon 14-24mm f/2.8 lens at 14mm. Seven stitched frames shot at 30 seconds, f/4, ISO 6400.

Star Witnesses

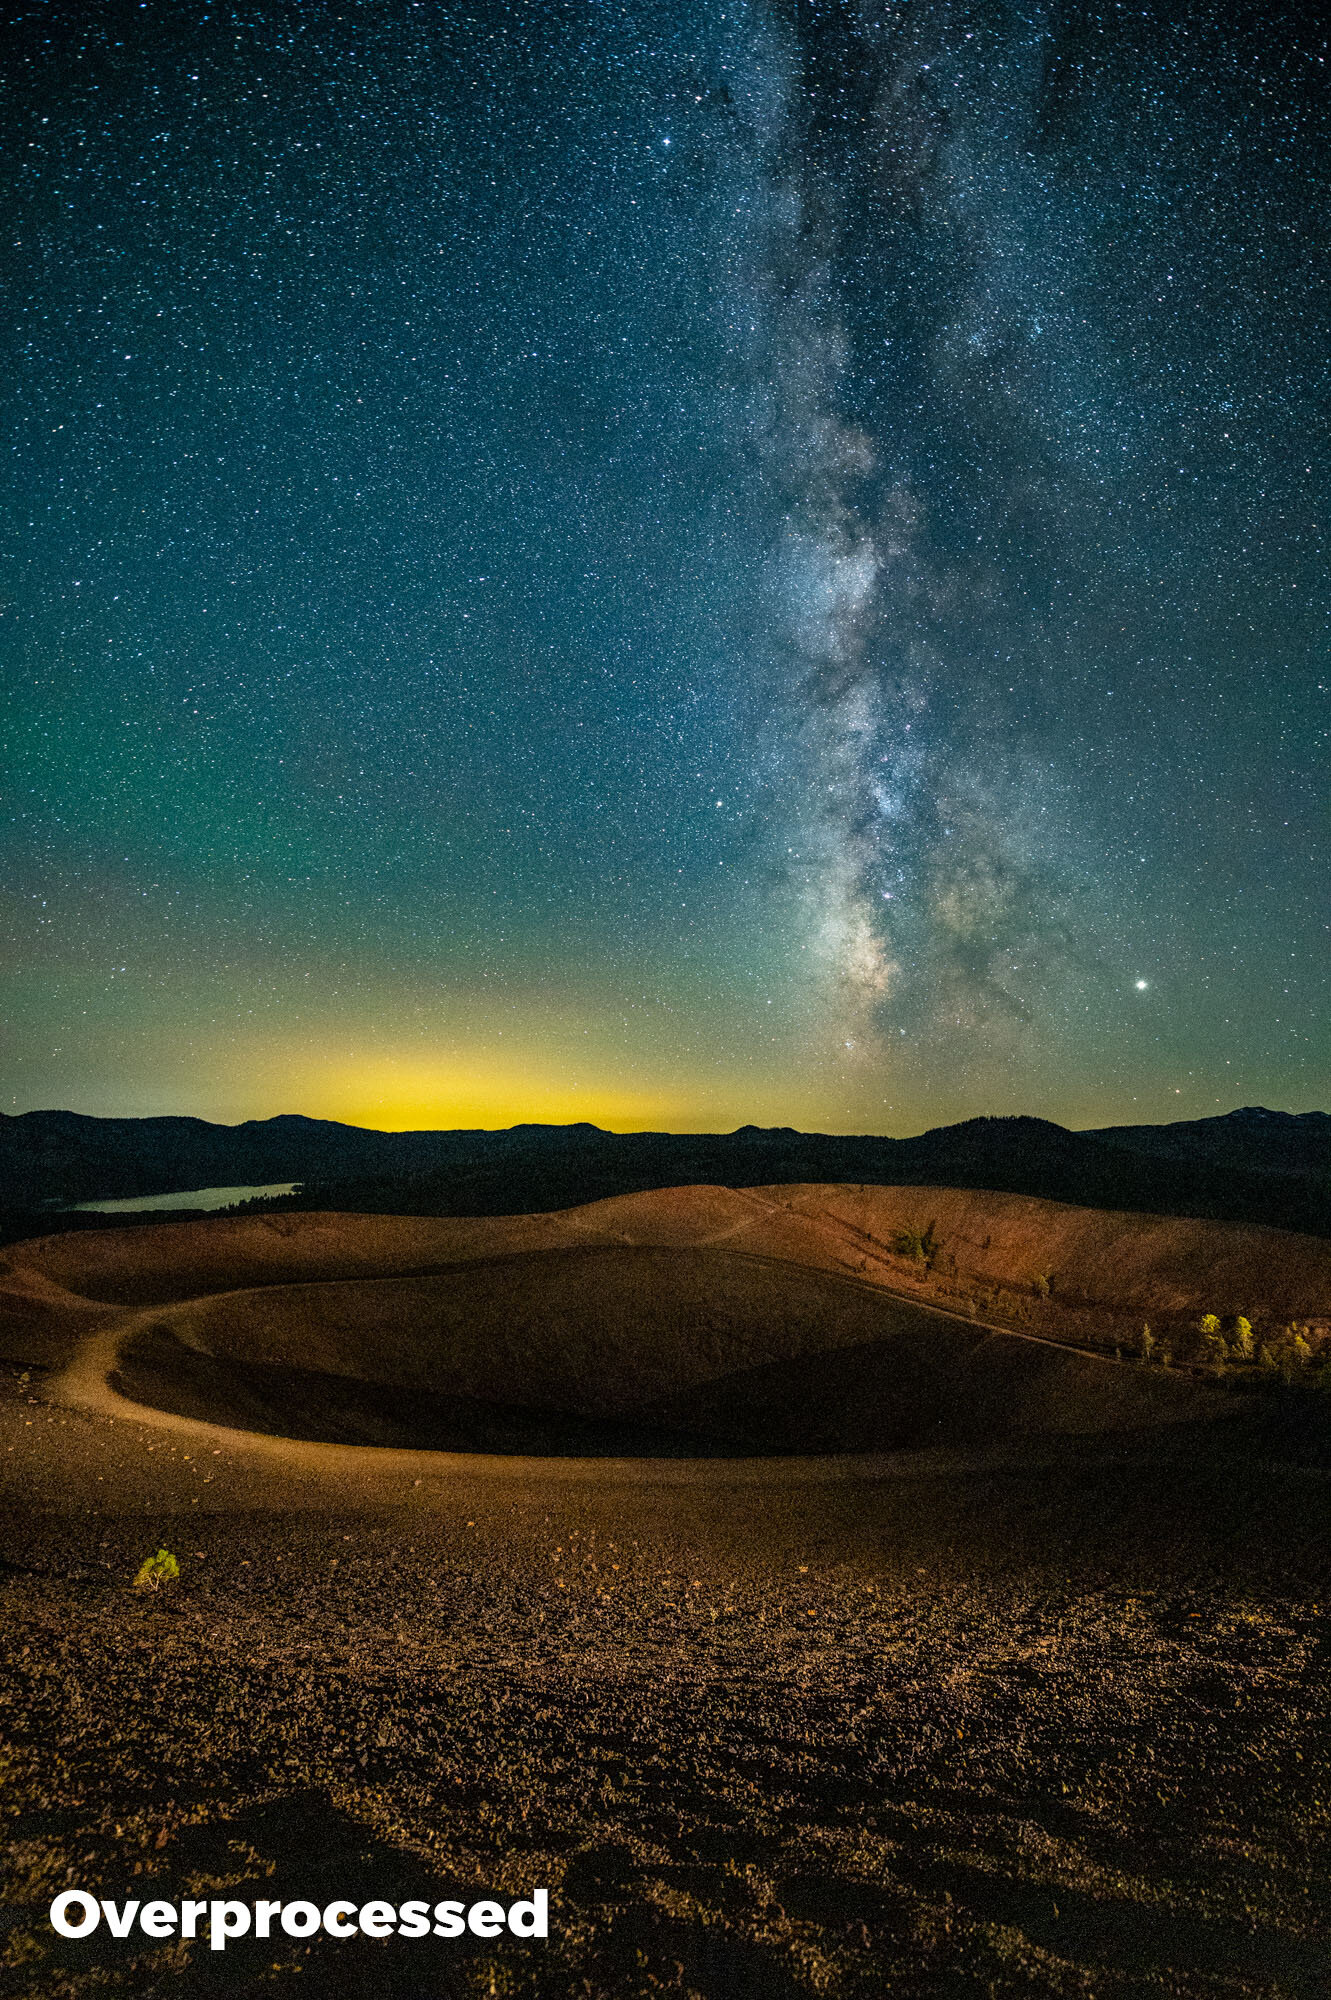
If you search the 3 million images tagged #milkyway on Instagram, you’ll notice that over 80 percent of them are overprocessed.

What do I mean by that? In those images, the Milky Way looks very unrealistic—too contrasty, over-sharpened and full of colors that jump out at you. In short, it looks like no Milky Way we have ever seen in the actual sky.

Yet the likes and positive comments pile on! Why is this?

The general public is still unfamiliar with what the Milky Way really looks like. Their only experience with it is what they see online. The Milky Way still has a high wow factor, and as technology and post-processing techniques become more powerful, photographers can eke out all sorts of additional detail. The problem is that so many eke out every detail.

We want to bring a realistic vision back to the Milky Way. The Milky Way should be the chorus to your song, but all good songs have a gradual build: highs and lows that build to that chorus. A good photograph should guide us throughout the whole image with a similar tempo.

Below is an example of a Milky Way image that is processed naturally versus one overprocessed in a way that’s commonly seen on the web. Note that in the overprocessed version the tonal range is not as smooth, the colors are too punchy, and there is very little separation between the Milky Way and the stars that surround it.

The left version might look "wow," but the right is closer to what the Milky Way actually looks like. Nikon Z 6 with a Nikon 14-24mm f/2.8 lens at 14mm. 15 seconds, f/2.8, ISO 12,800.

Avoiding Overprocessing

Most overprocessing pitfalls can be rectified by fewer global adjustments and more local adjustments. I know the global tools in Lightroom’s Basic module are right there and ready to use. But the astro-landscape photo is made of two different elements of exposure: the sky and the landscape. They often require different considerations on how to process them.

Globally applying Dehaze because it will successfully enhance your sky could very well have an adverse effect on the colors and shadows of your foreground. Unless your foreground is a silhouette, it’s best to think of your Milky Way image as two images and process them accordingly with local brushes and gradients.

If you are working under dark skies with little to no moonlight, you might even consider shooting two images: one correctly exposed for the stars and another longer exposure that reveals detail in the foreground. (I covered this type of blending of two images in my previous blog and video about Starry Landscape Stacker.)

An example of a blended image. First I shot a lower-ISO long exposure during civil twilight for the foreground, then a higher-ISO sharp-star exposure for the background, and layered the two in post-production. Being able to process the foreground and background separately allowed me to maintain a more realistic Milky Way. Hasselblad X1D with a Hasselblad 30mm f/3.5 lens. Foreground: 6 minutes, f/4, ISO 800; background: 23 seconds, f/4, ISO 6400.

Presence Sliders in Lightroom

Texture, Clarity and Dehaze are very attractive tools, as they can increase local contrast in a scene and really make an image pop. However, overusing them can lead to crushed shadows and unwanted shifts in color (as seen in the blog post linked above).

Think of these three adjustments as coming with great responsibility. To understand what they do, crank them to 100 percent, then slowly bring them back, and toggle between your full view and 100 percent to see how they fundamentally affect your image. Then when processing, use them judiciously.

presence.jpg
  • Texture

The newest filter in Lightroom (and the one I am most enamored by) increases sharpness without amplified grain or saturation. However, when overused, every star is sharpened and jumps out in the sky. This can compete too much with the Milky Way as well as falsely make every star look as bright as the next.

Depending on the scene, I like to add 3 to 8 points of Texture to my Milky Way by using a brush to add the effect locally. If I go above 10 on Texture, I really need to examine the effect at 100 percent zoom to make sure I’m not overdoing it. (However, that threshold applies only to the sky. If I have a well-lit rocky landscape, Texture is just what the doctor ordered to enhance the granularity of those rocks—for that I might use anywhere between 20 and 60 points.)

  • Clarity

I often use Clarity in lieu of the Contrast slider. I’ll adjust my white and black points first. Then, if the Milky Way needs more punch, I’ll slide Clarity to anywhere from 5 to 25. However, I always keep an eye on the top corners of my image, as Clarity quickly heightens any vignetting and can make smooth graduations in the sky seem choppy.

  • Dehaze

Brings contrast and saturation to an image. The former is great for boosting the low contrast that is often found in night skies. But keep an eye on that saturation—that’s where blues get wonky real quick. I never apply Dehaze globally; I typically apply it only via the Graduated Filter tool. My Dehaze adjustments can vary depending on the scene, but they usually range between 10 and 30.

It is also very important when you are combining global and local adjustments to remember that they build on top of each other. If you’re not precise in your workflow, you might get stuck fighting back and forth between how your global and local adjustments overlap and affect each other, sending you down the road of overprocessing. To avoid this, hone your global adjustments first, and only then start with the local changes to your Milky Way.

Another important thing to keep in mind is that our editing tools grow and change over time. I love Texture, but just a few years ago that tool wasn’t even in my imagination. It didn’t exist until about this time last year! Be sure to always keep a lookout for innovations in Lightroom that you can use to make your images better and better.

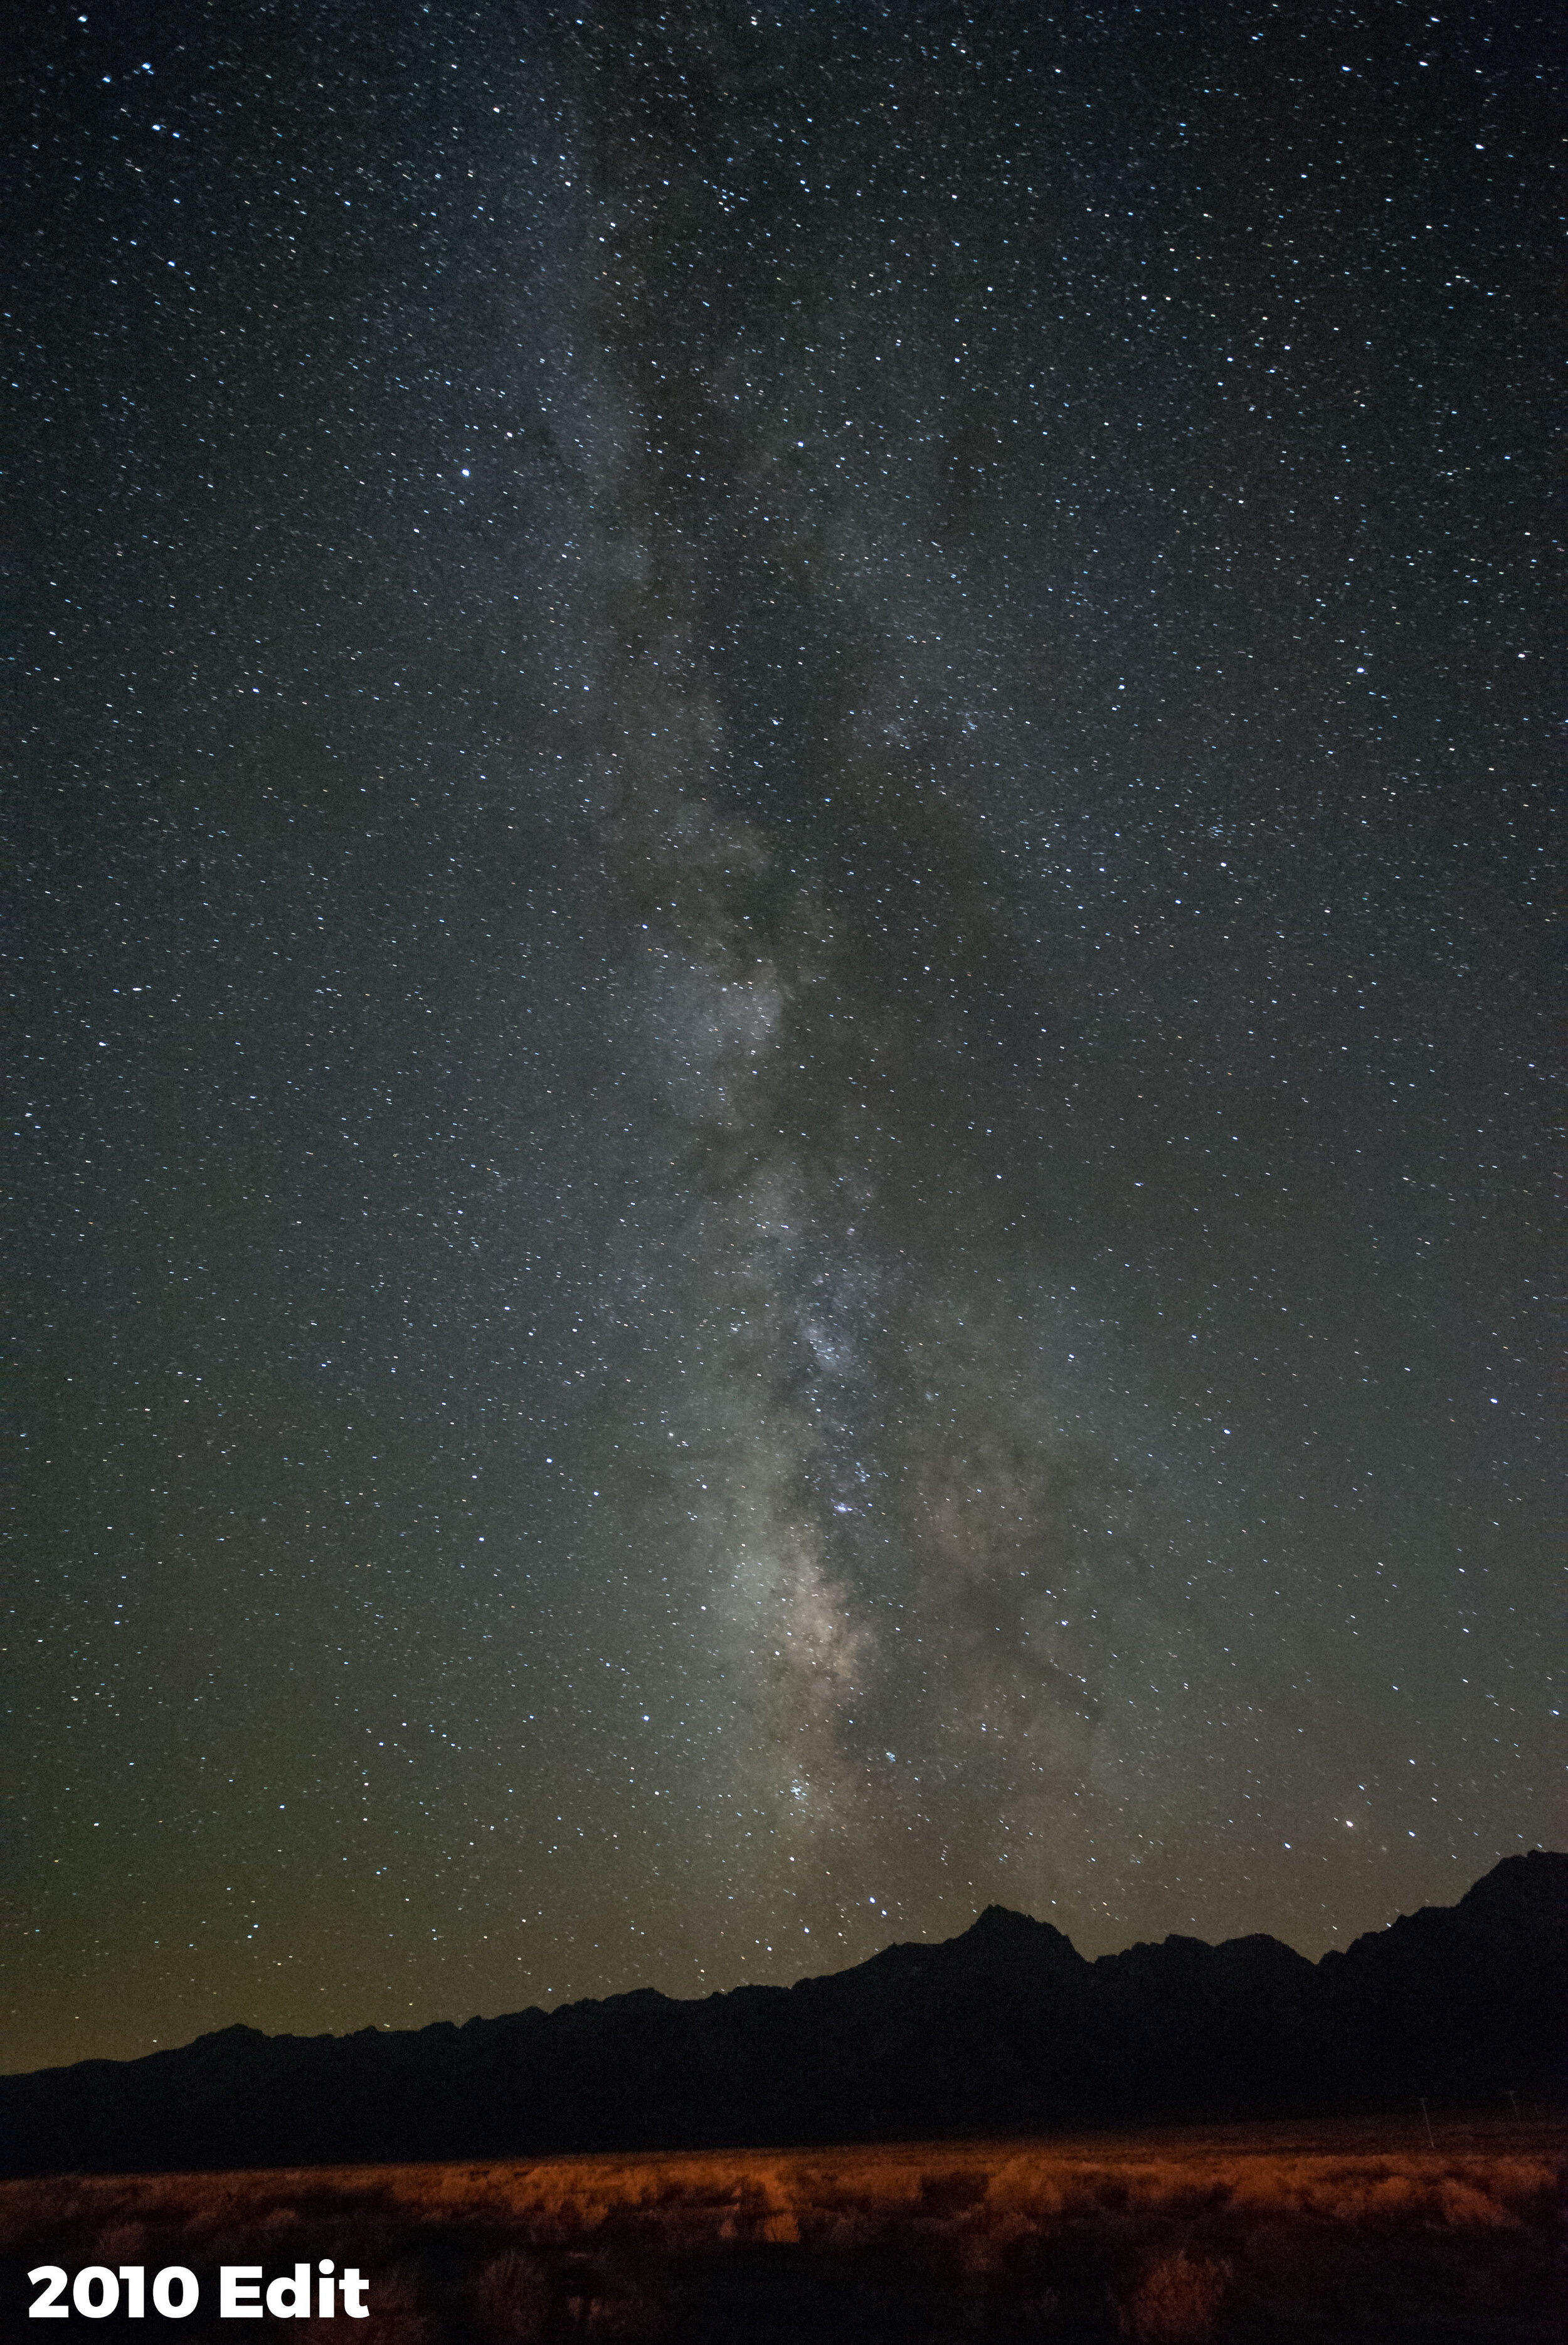
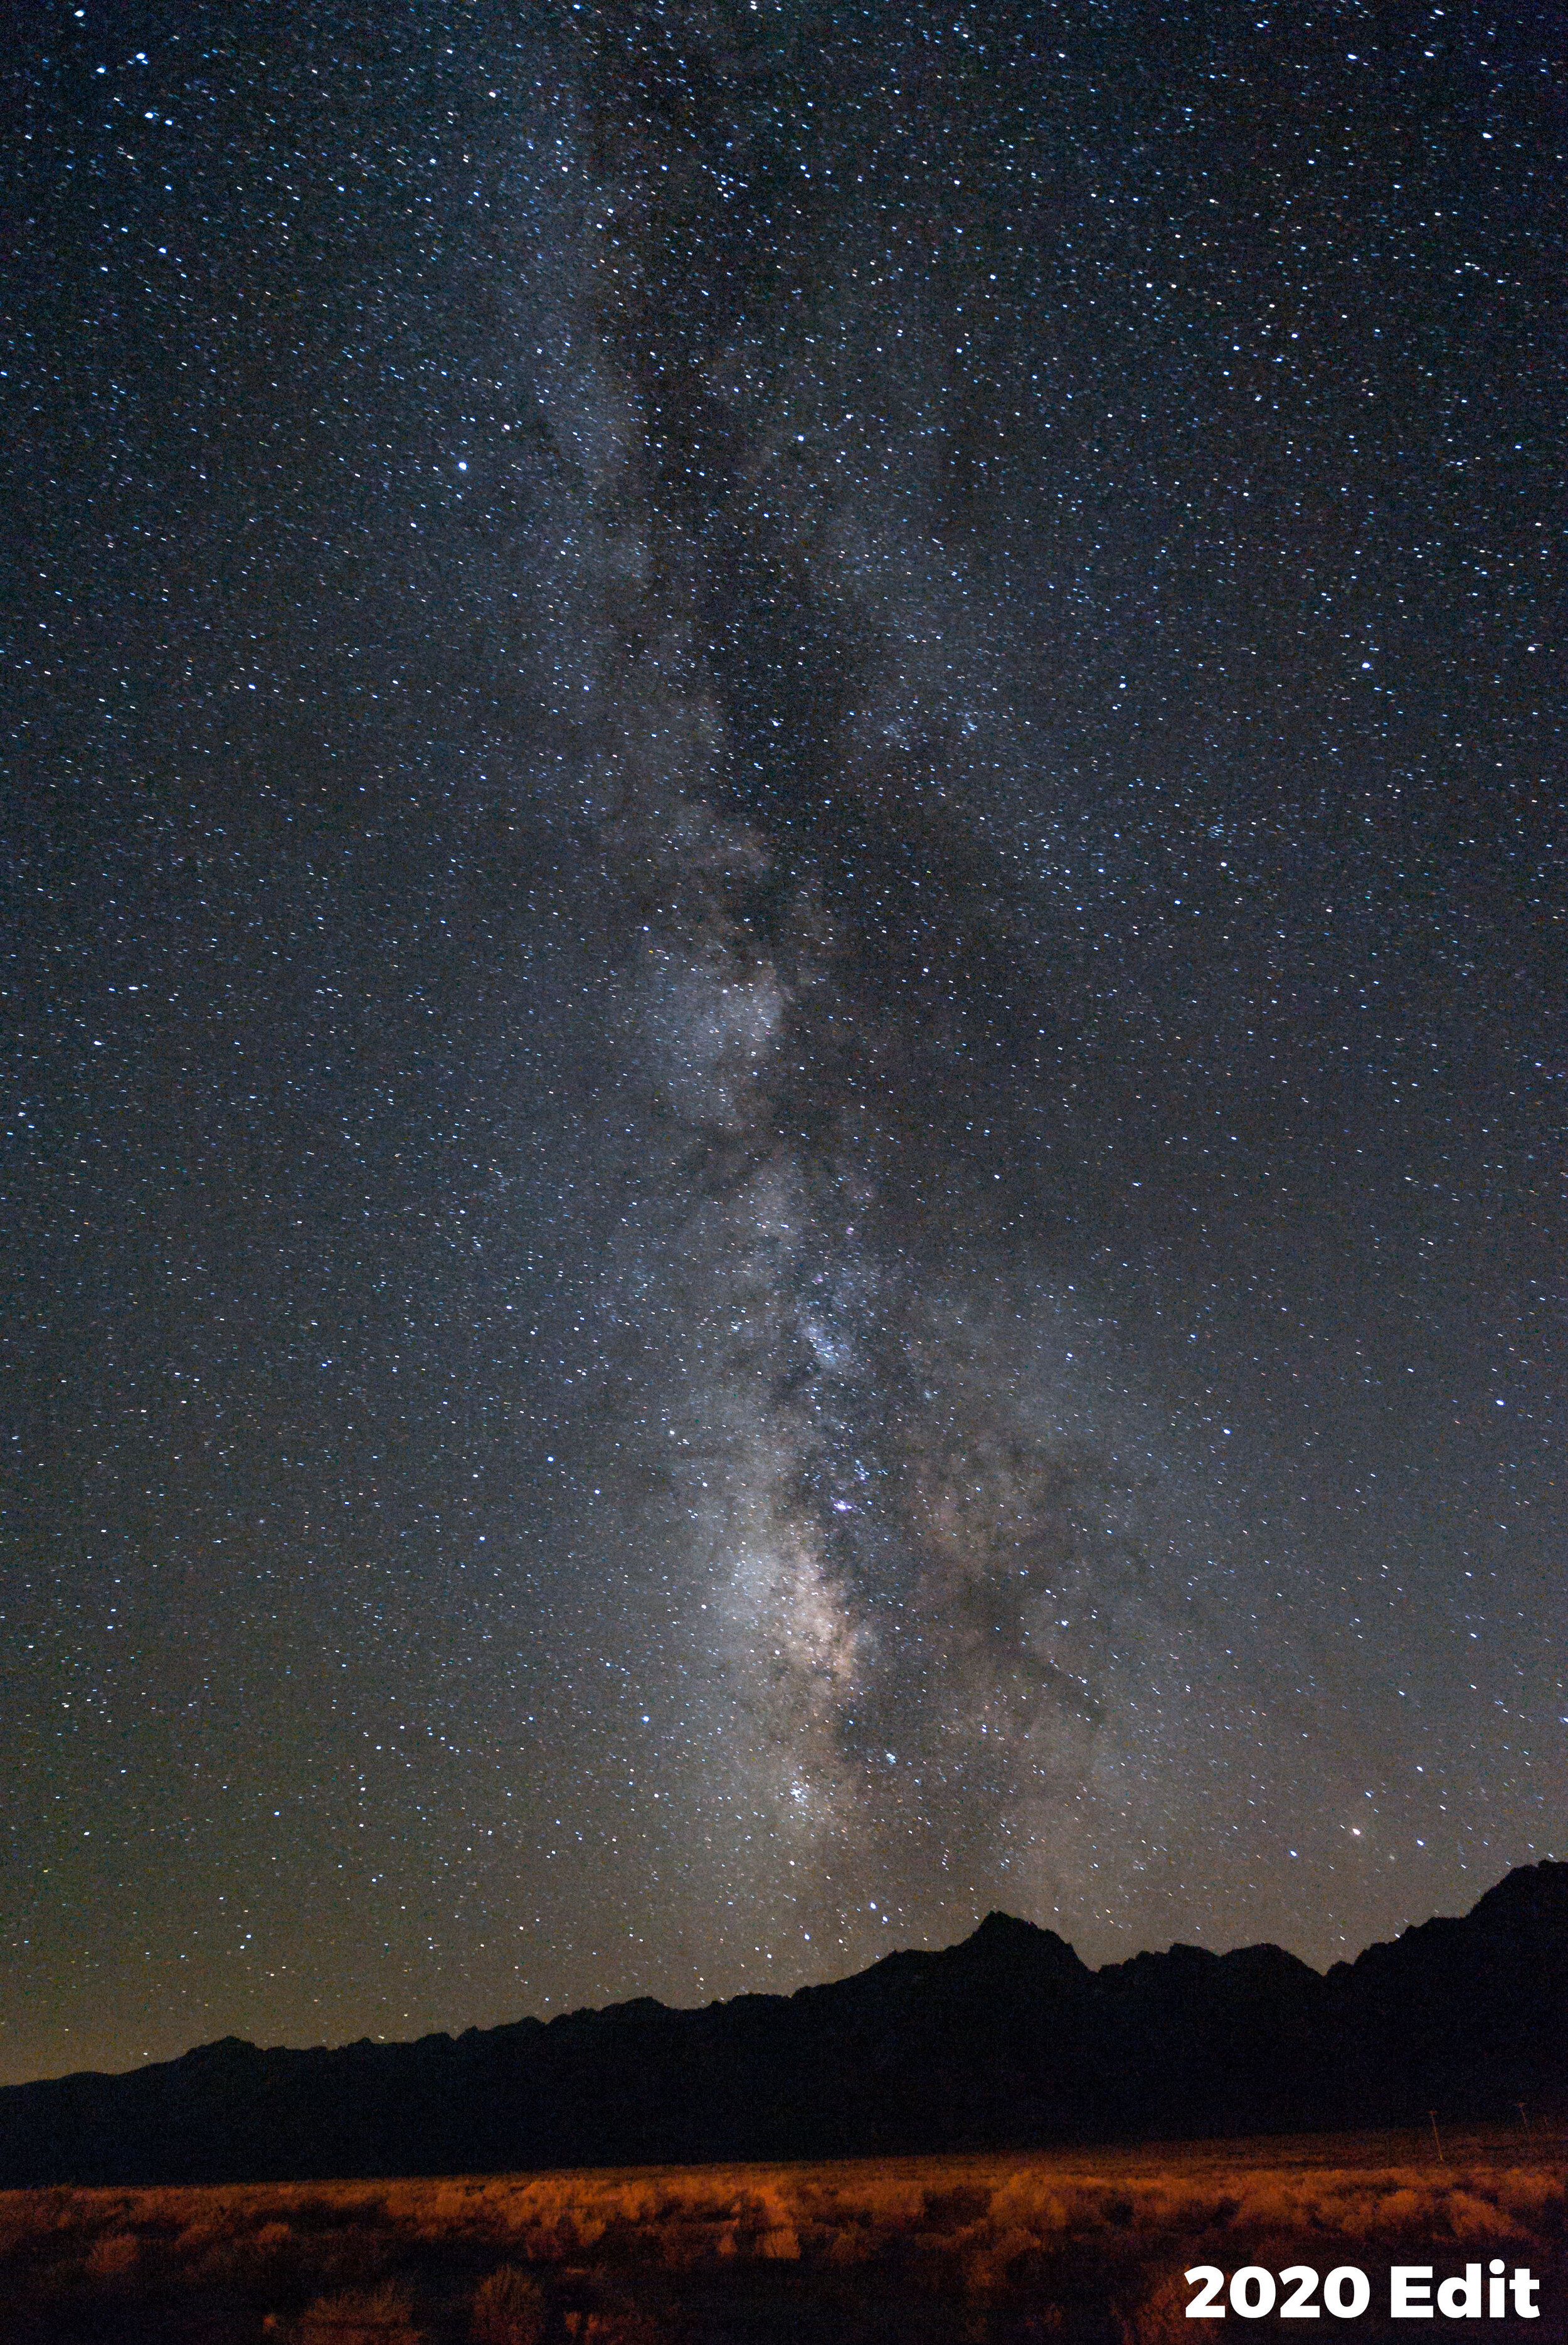
For example, I recently revisited the very first successful Milky Way image I’d ever shot. I hadn’t overprocessed then, but I had processed it with Lightroom 3 (below, left). That was a great program for its time, but it had some limitations compared to what’s on my computer today. Now, using Lightroom Classic 2020 (below, right), I get some finer detail out of the file.

Shot in 2010 with a Nikon D700 with a Zeiss 21mm f/2.8 lens at 30 seconds, f/4, ISO 6400. Left: Processed in Lightroom 3 with +12 Clarity, +11 Vibrance and +20 Luminance Noise Reduction. Right: Processed in Lightroom Classic 2020 with more subtle local adjustments, less noise reduction and more magenta.

Putting it All Together

I made this video that walks through my considerations for processing the Milky Way in a more natural way. I point out the sliders that we might slip too far on, and I share my Milky Way brush technique for subtly bringing out the finer details.

Now, if you’re one of the overprocessing culprits … First, know that you have a lot of company. But second, know there’s a better way, and we’re happy to help.

Stop processing the Milky Way with a hammer and a bucket of paint, and then share your images with us below in the comments. Or, better yet, share them online on Facebook or Instagram! Tag @nationalparksatnight and let’s educate the world on what the natural Milky Way really looks like!

Gabriel Biderman is a partner and workshop leader with National Parks at Night. He is a Brooklyn-based fine art and travel photographer, and author of Night Photography: From Snapshots to Great Shots (Peachpit, 2014). During the daytime hours you'll often find Gabe at one of many photo events around the world working for B&H Photo’s road marketing team. See his portfolio and workshop lineup at www.ruinism.com.

UPCOMING WORKSHOPS FROM NATIONAL PARKS AT NIGHT

That’s a Wrap: Recapping Our Livestream Night Photography Shoot in Pittsburgh

Greetings from Pittsburgh!

I’ve spent the last week here, visiting family, but also upping my night photography portfolio of this beautiful place. Pittsburgh has all the classic elements that make for a great urban night photography experience: rivers surrounding a downtown skyline, tons of iconic bridges, and plenty of vantage points along the riverfront or up in the hills to compose multiple interpretations of this scenic city.

I was having so much fun photographing Pittsburgh that I wanted to share it with anyone else who wanted to come—virtually, anyway. So this past Wednesday, for the first time ever, we did a live night shoot, livestreamed on Instagram. It ended up being an online night photography party!

The Shoot

I set up at one of the perfect viewpoints of Pittsburgh: Allegheny Landing, between the Roberto Clemente and Andy Warhol bridges. We livestreamed during twilight, the blue hour, which is the best time to balance the city lights with the night sky in one exposure. Big shout out to all of you who joined in, asked questions and enjoyed the shoot. For those who missed it, you can watch it here:

The Photos

Of course, that was just the shoot. Post-processing is half of the photographic process, and that’s the half I’ve been doing in the two days since. So now, with that done, I’m checking in to share the three photos I shot during the livestream, as well as a couple of others from my trip to hopefully inspire you to seize the twilight in your city!

The Movement

I shot my first frame about 10 to 15 minutes into civil twilight. The city lights and sky perfectly matched in terms of exposure. However, I wanted more movement in the clouds and water, so I waited another 10 minutes. Twilight illumination changes quickly—in that 10 minutes I lost more than 3 stops of light. Then I was able to get to a 30-second exposure, which gave me smoother reflections and a better sky. However, some of the brighter city lights were blowing out, so I took an additional shot at 1/2 second to blend in post.

Fujifilm X-T2 with a Fujifilm 8-16mm f/2.8 lens. Two blended frames shot at 1/2 and 30 seconds, f/16, ISO 200.

The Drama

The next goal was to start looking for different angles to shoot the bridge. I loved the drama of shooting under the bridge, so that’s what I tackled first. This proved to be a fairly easy shot to pull off, but I still needed two frames: a base exposure at 30 seconds and 5-second exposure for maintaining the brightest highlights.

Fujifilm X-T2 with a Fujifilm 8-16mm f/2.8 lens. Two blended frames shot at 5 and 30 seconds, f/16, ISO 200.

The Detail

For the last bridge shot, I got up on the deck and looked for a detail to home in on. I kept things simple and looked for even illumination that didn’t include a large swath of the sky (which was recording as just black at that point).

Fujifilm X-T2 with a Fujifilm 90mm f/2 lens. 2 seconds, f/6.4, ISO 400.

The Pano

I love shooting Pittsburgh at night, so I got out for a couple of other evenings too. One of my favorite photos from the trip was this five-image panorama I shot from a high vantage point that looks directly at Point State Park and the confluence of the three rivers (the Allegheny, Monongahela and Ohio). I shot this during the end of civil twilight and had to blend to maintain a few of the brightest highlights.

Fujifilm X-T2 with a Fujifilm 90mm f/2 lens. Five stitched frames shot at 4 seconds, f/13, ISO 200.

The Rotunda

I finally own a wide enough lens (the Fujifilm 8-16mm, which is a 12-24mm full-frame equivalent) to do justice to The Pennsylvanian, one of the most famous rotundas in the U.S. Built at the turn of the 20th century, The Pennsylvanian is one of the finest examples of Beaux-Arts architecture. It served as a sheltered turning space for carriages transporting people to and from the nearby train station.

Fujifilm X-T2 with a Fujifilm 8-16mm f/2.8 lens. 2 seconds, f/10, ISO 400.

Wrapping Up

Let us know in the comments what you thought of the live shoot. The response so far has been great and we hope to soon share similar experiences. Make sure you are following us on Instagram—we typically do a live conservation every Wednesday at 8 p.m., and of course we’re always posting new images from our night adventures!

Gabriel Biderman is a partner and workshop leader with National Parks at Night. He is a Brooklyn-based fine art and travel photographer, and author of Night Photography: From Snapshots to Great Shots (Peachpit, 2014). During the daytime hours you'll often find Gabe at one of many photo events around the world working for B&H Photo’s road marketing team. See his portfolio and workshop lineup at www.ruinism.com.

UPCOMING WORKSHOPS FROM NATIONAL PARKS AT NIGHT