How I Got the Shot

How I Got the Shot: Light Painting and Star Trails at Devils Tower

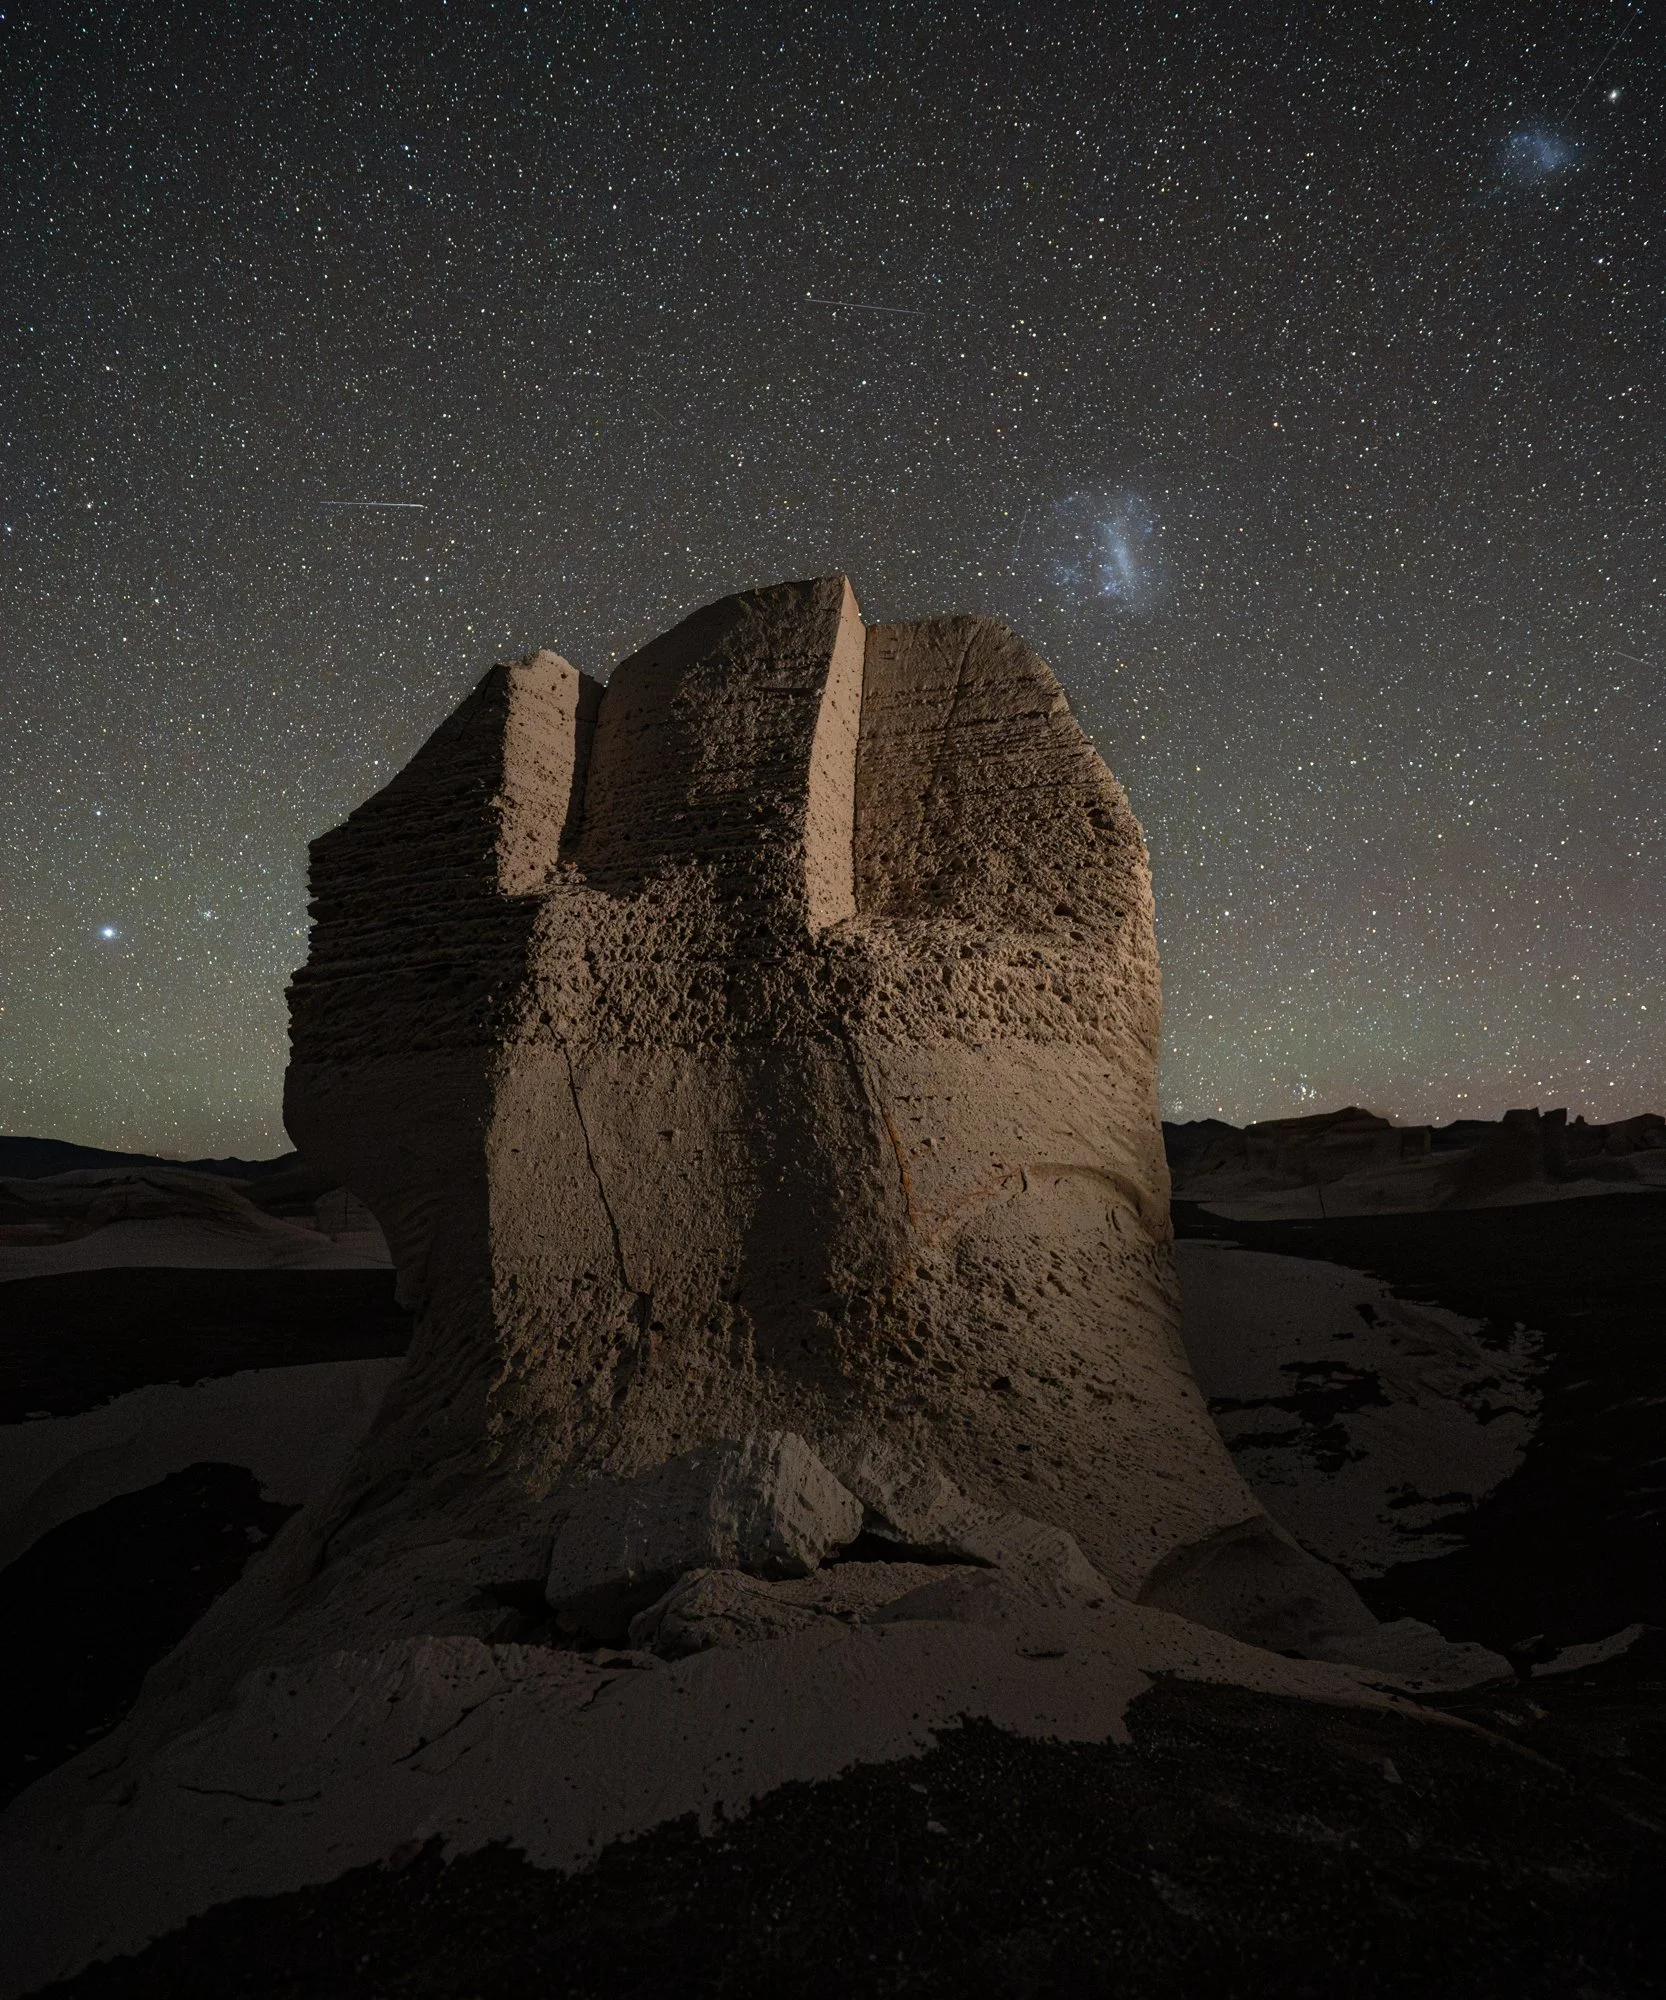
Stars at Devils Tower. Nikon D750 with a Zeiss 15mm Distagon f/2.8 lens. Ten stacked frames, each shot at 150 seconds, f/2.8, ISO 1600 (1,500 seconds total).

The Conditions

Shooting under moonless conditions can create consistent challenges for astro-landscape photography. The primary challenge is lighting your main subject. When it’s the Devils Tower in Wyoming, you’ve gotta get it right.

Gabe and I were leading a group of eager learners on a workshop a few years ago when I made the above image.

I was not standing at my camera—I was up at the base of the Tower, illuminating it.

So how did we do this?

The Shoot

Well, lemme first show you how it looks without being lit, which you can see in Figure 1.

Figure 1. Nikon D750 with a Zeiss 15mm Distagon f/2.8 lens. 150 seconds, f/2.8, ISO 1600.

It lacked the detail that screams, “Is that the mountain from that famous movie?!?” Right? Yeah.

But one frame did stand out: when some climbers who had to descend after dark illuminated the deep crevices that are the hallmark of this natural stone edifice (Figure 2).

Figure 2. Nikon D750 with a Zeiss 15mm Distagon f/2.8 lens. 30 seconds, f/2.8, ISO 6400.

Aside from that, we wanted more detail in the Tower. So I set my intervalometer to take many, many (infinite, in fact) exposures. (You can read more on how to do that in our post “Mastering the Intervalometer for Night Photography and Long Exposures.”

I knew I intended to make an epic star trail from this. So I aimed for longer exposure lengths of 150 seconds and let the sequence begin. I knew this was still short enough to manage the long exposure noise that the camera would generate in the mid-August Wyoming heat.

I grabbed a two-way radio and drove up to the parking lot. I hit the loop trail and started doing my own lighting. From so far away from the camera, how did I know I was executing the light painting sufficiently? That’s where the radio came in—I kept pinging Gabe to see if my flashlight was providing proper detail and coverage. Trusting Gabe to be the lighting director from the camera position was crucial.

Gabe advised me to cover about one-quarter of the arc around the base of the Tower. We tried a few variations and settled on a final strategy (Figure 3).

Before and after light painting from the base of the tower.

I shot many different variations (Figure 4) through the evening, sometimes re-framing, sometimes adjusting the exposure length. Even when you’re confident about your approach in the field, it’s always good to push the boundaries of your decisions and to give yourself more options to look at when back at the computer.

Figure 4. The different strategies I shot that night gave me lots of options to choose from in post.

The Post-Production

The final set of frames I chose to work with is this:

Figure 5.

Each image required a gradient for the sky, and a proper Range Mask set to 28/100 Luminance and 19 Smoothness. I also used the mask brush to remove the gradient from Devils Tower itself and from the trees below.

Once the mask was done, I made the adjustments, which were intended to emphasize (but not over-process) the sky. Sometimes that’s a fine line, and one we always want to be conscious of. You can see the mask I created in Figure 6, and the adjustments in Figure 7.

Figure 6.

Figure 7.

Then I needed to stack the frames in Photoshop. In several previous How I Got the Shot blog posts we’ve discussed stacking frames to create star trails and to combine different light-painted compositional elements into one image. This time I used the same technique to achieve both those goals in one photograph—i.e., to get the stars to trail and the light-painted sections of the Tower to composite.

The process is:

  1. Select all the pertinent frames in Lightroom by shift-clicking the first and last.

  2. From the menu, choose Photo > Edit In > Open as Layers in Photoshop.

  3. Once the image opens select all the layers by clicking on the top layer, pressing the shift key and then clicking on the bottom layer.

  4. In the Blending Mode dropdown above the layers (the box that defaults to saying Normal), choose Lighten.

  5. Save and close, which will bring the stacked image back into Lightroom where you can make final edits.

I was really pleased with the stacked result:

Nikon D750 with a Zeiss 15mm Distagon f/2.8 lens. Ten stacked frames, each shot at 150 seconds, f/2.8, ISO 1600 (1,500 seconds total).

The photograph has more mystery with the tree line falling into silhouette and the Tower having detail. This emphasizes where the viewer should look.

A Little Cleanup

Due to some people’s red headlamps and flashlights, the trees and ground closest to us picked up the color. It’s quite hard to edit away, so I brushed in some local adjustments subtracting highlights and whites. After stacking, that still wasn’t enough, so I ended up using layer masks to eliminate the distracting details.

(Hmmmm. Come to think of it, it may have been the brake lights of my rental car when I returned to the group. D’oh! And possibly a “mea culpa” moment. Whoops. Bad Matt.)

When I re-edited the stack this time, I noticed something new. I wanted to crop it to a vertical. It felt … more powerful. More focused.

The final, final result:

Nikon D750 with a Zeiss 15mm Distagon f/2.8 lens. Ten stacked frames, each shot at 150 seconds, f/2.8, ISO 1600 (1,500 seconds total).

Wrapping Up

I gotta say, I am excited to return to the Devil’s Tower with Chris later this year. It’s going to be amazing. What will he and I dream up together? And what will the workshop participants dream up? I bet it’ll be out of this world. (Yeah, I went there.)

How do you achieve better astro-landscape photography by collaborating with friends and peers? Tell us more in the comments, and show us photos!

Note: Want to join Matt and Chris to make epic night photography images at Devils Tower National Monument? We have two spots left for the workshop, so sign up now!

Matt Hill is a partner and workshop leader with National Parks at Night. See more about his photography, art, workshops and writing at MattHillArt.com. Follow Matt on Twitter Instagram Facebook.

UPCOMING WORKSHOPS FROM NATIONAL PARKS AT NIGHT

How I Got The Shot: Star Trails Over the Amphitheater, Bryce Canyon National Park

Star Trails Over the Amphitheater, Bryce Canyon National Park. Fujifilm X-T2, 10-24mm f/4 lens at 10mm. Light-painted with a Coast HP7. Two blended exposures of 1 second, f/8, ISO 200 and 15 minutes, f/5.6, ISO 100.

The Location

Bryce Canyon National Park is truly one of the wonders of our park system. It’s not as big or varied as some other parks, but what is has to offer is nothing short of astonishing.

Despite its name, Bryce Canyon is actually not a canyon at all. A canyon is the technical term for a gorge formed by a river. Bryce is instead a series of natural amphitheaters, or bowls, that line the eastern side of Utah’s Paunsaugunt Plateau. These bowls are filled with red, orange and white rock spires that were eroded into existence by water freezing into ice. These spires are called hoodoos. It’s the endless variety of these hoodoos that make Bryce so magical.

The Light

Standing on the rim of the canyon at one of the many overlooks affords the visitor with an awe-inspiring view. The sprawling amphitheater spreads out below you with the orange-red colors of the towering spires contrasting with the deep blue sky. This view is especially popular at sunrise as many of the viewpoints face directly east. How then, does one capture this incredible canyon at night?

As with any location, the first step is to decide which phase of the moon you would prefer to shoot in. Moonless nights (new moon) are great for photographing the Milky Way, but they leave the foreground completely black. On the other hand, moonlight (full, quarter or crescent) helps illuminate the foreground, but the brightness of the sky masks many of the dimmer stars. All phases of the moon are great to shoot under, so you just have to consider how much moonlight you actually want. My choice for Bryce would have been to shoot under some moonlight. Unfortunately for me, I was there during a new moon. Complete darkness.

Under these conditions, it made sense to concentrate on shooting the Milky Way, which I did on the first night. While I like some of those images, the lack of moonlight means I didn’t include the canyon because it was completely black. And the canyon is the hero of this location.

Figure 1. Milky Way over Bryce Canyon. Fuji X-T2, 10-24mm f/4 lens at 17mm. Twelve stitched frames shot at 30 seconds, f/4, ISO 6400.

Being in Bryce, I really wanted to include the canyon with the night sky. But how do we do that with no moon? I could have done a little painting on the foreground, which I did for the photo in Figure 2. This worked out well for some of the details, but it still did not show the entire canyon.

Figure 2. Light painting in a small area of the canyon. Fuji X-T2, 10-24mm f/4 lens at 10mm, Coast HP7.

To illuminate the entire canyon I needed something stronger than a flashlight. It needed to be the sun or the moon. Since I didn’t have the moon, I had to use the sun.

The Shoot

The next day I headed out in late afternoon to scout a location to shoot. Once I decided on the spot, I set up my camera and tripod and began fine-tuning my composition.

The goal here was to take one shot in the waning light of dusk and then another once the sky became completely dark. Back at home I would combine them together in Photoshop.

The trick was to get the right light on the canyon. Sunset would look fake if combined with the night sky, so I needed the illumination to look somewhat like moonlight. That time came around half an hour after sunset. This time of the day is called civil twilight and is great in its own right for making landscape images. (For more on this, see one of my previous posts, “Out of the Blue: The Importance of Twilight to the Night Photographer.”) I experimented with several exposures to find one that sort of looked like night. Figure 3 shows the exposure I ended up using for the final composite.

Figure 3. The canyon during civil twilight. 1 second, f/8, ISO 200.

Keeping my camera set up—not moving it one centimeter—I waited until complete darkness.

The kind of darkness I wanted begins at the time of evening called “astronomical twilight.” Depending on your latitude, this is somewhere between 1 to 1.5 hours after sunset. (Click here for a great description of the different types of twilights.)

Once the sky became completely dark, it was time to start experimenting with light painting. I changed my ISO to 100 and opened up my aperture to f/5.6 so I would capture more stars.

With these new settings I experimented with walking up and down the trail, painting as I went along. I determined that painting at an angle back toward the camera—while returning back up the trail toward my setup—created better texture in the lit areas. It also kept my silhouette from blocking the light on the trail. Had I painted while walking away from the camera, my body would have blocked some of the light from the camera’s view, thereby creating a blotchy effect.

Once I felt confident that my light painting approach was effective, it was time for the long shot. Figure 4 shows the 15-minute exposure that captured the star trails while I lit the trail.

Figure 4. Light painting during the long exposure. 15 minutes, f/5.6, ISO 100.

The Post-Production

Once I was back at the computer, it was time to put the images together in post-processing. I began in Lightroom by fine-tuning the exposure and white balance. Then with both images selected, I chose Photo > Edit In > Open as Layers in Photoshop. This command brings both of the images into Photoshop and combines them into one file, with each image as a separate layer.

Figure 5. The two images combined into one file in Photoshop.

Next I highlighted the upper layer by clicking on it. From the Blending Mode dropdown (the box that defaults to saying Normal), I chose Lighten. This blending mode automatically shows the brightest parts of all the layers it’s applied to (in this case, two layers). Voila! Now I could see the brighter canyon (lower layer) as well as the stars and the light painting (upper layer).

Figure 6. The Lighten blending mode revealing the brightest parts of each layer.

At this point I could have been done with the image. This technique works well for so many situations found in night photography, but in this case it needed a little tweaking. Because the sky was brighter at dusk during my first shot, that part of the scene also showed through when I applied the Lighten blending mode. To solve this problem, I clicked on the lower layer, made a selection of the sky with the Quick Selection Tool, and then created a Curves adjustment layer to darken the sky.

Figure 7. The Curves Adjustment over the bottom layer.

Figure 8. The Curves adjustment darkening the sky.

Because the Curves adjustment layer is below the stars layer, the adjustment does not affect the night sky. It darkens the sky only in the dusk layer. And now that the sky was darker in the dusk layer, only the stars layer would show through.

Then I needed to apply a little cleanup. The hard edge of the mask near the horizon looked a little odd, so I blurred the edge of the mask to smooth out the gradient of the curves adjustment. To do this, I clicked on the mask and increased the feather in the Properties dialog, as seen in Figure 9.

Figure 9. Feathering the mask to smooth out the transition of the curves adjustment.

At this point the bulk of the compositing was complete. Figure 10 shows the finished composite of the stars layer and the dusk layer.

Figure 10. The completed composite.

Once the images were put together I was able to judge the overall look of the picture. I felt it was still a bit dark and the color somewhat off, so using more adjustment layers in Photoshop, I fine-tuned the exposure and color.

Figure 11. The final image after fine-tuning white balance and exposure.

Wrapping Up

The moral of the story is that you can’t always get what you want, but if you try sometimes … well, you get the picture. Matching the locations, moon phase, time of year and our creative vision can be a daunting task—and sometimes an impossible task. But with creative thinking, and a full grasp of all of your available tools, you might just find you can get what you need.

Tim Cooper is a partner and workshop leader with National Parks at Night. Learn more techniques from his book The Magic of Light Painting, available from Peachpit.

UPCOMING WORKSHOPS FROM NATIONAL PARKS AT NIGHT

How I Got the Shot: Stars and a Rock in Lassen Volcanic

Lassen Volcanic National Park. © 2018 Chris Nicholson. Nikon D5 with a Nikon 14-24mm f/2.8 lens, light painted with a Coast HP7R flashlight. 25 seconds, f/2.8, ISO 6400.

The Location

Last summer, Lance and I visited Lassen Volcanic National Park to shoot for a few days (er, nights). For both of us, it was our first time there, and we quickly discovered that this Northern California wilderness is one of the best kept secrets of the national park system. The scenery is beautiful, bewildering and varied: volcanoes of different types and shapes, snowcapped peaks, reflecting lakes, babbling brooks, lush meadows, multicolor pumice fields, steaming geothermals and more await photographers and their cameras. Not to mention … deliciously dark skies.

On our second day in the park, we stopped at a visitor center to talk to a ranger about possible places to photograph in the dark. She gave us a lot of great information, including an auto-tour map with suggested sites to see, and she marked the areas that she thought would be of interest to us. We ventured out for our daytime scouting, driving the main road (the aptly named Lassen National Park Highway), hiking short trails, making daytime photos (gasp!) and all-in-all enjoying the experience of being in the outdoors in such a captivating space.

Along the way we stopped at a trailhead parking lot that afforded a 360-degree view of mountain peaks and valleys, all with great visual lines to the sky above them—i.e., no trees, cliffs and so on that would block our sky views in any direction. In other words, it was a perfect place to set up for a night shoot. And then we spotted what turned out to be the star of the scene: a massive boulder perched at the edge of a cliff.

A scouting photo of the boulder.

A scouting photo of the boulder.

We were both pretty excited about the rock as a subject, as it has an interesting shape, is in an interesting place visually, is in front of an interesting background from all available angles, and we could safely set up and shoot from about 180 degrees around it. In other words, this was going to be a lot of fun.

Moreover, because the cliff faces south, we knew we could get the Milky Way galactic core in the composition. So we pulled out PhotoPills to see exactly when and where the Milky Way would appear, planned our shots, and then continued exploring the park with the knowledge that we would definitely return to this spot after sundown.

The Shoot

We arrived back at our shoot location early in twilight—so early that we couldn’t see the Milky Way yet, but that was fine because we were surrounded by many other creative opportunities. Lance ventured a little east on the cliff edge to work on a separate idea with a twisted tree, and I stationed a camera at the far end of the parking lot to rip some longish exposures over the mountain ridge to the west (Figure 1).

Figure 1. Star trails over a Lassen ridge. Nikon D850 with a Nikon 80-200mm f/2.8 lens. 6 minutes, f/6.3, ISO 64.

As the sky grew darker, I started working with the boulder. The Milky Way was not yet apparent in the sky, so I worked on some alternative compositions with the mountains in the background, using the silhouette of the distant ridge as a leading line into the rock (Figure 2).

Figure 2. Nikon D5 with a Nikon 14-24mm f/2.8 lens. 15 seconds, f/8, ISO 4000.

Once I was done with that, I looked south, and there it was: the galactic core rising over the valley. So I repositioned my camera and tripod to start working on the photo I was there to create.

The valley below the cliff is a scenic wonder in daylight (in moonlight too), but in pitch-dark it was just vast blackness—so I lowered my tripod to get it out of the frame (Figure 3). The real stars of the composition were the Milky Way and the boulder.

Figure 3. Working on the composition, but with a poor-choice white balance of Daylight.

Figure 3. Working on the composition, but with a poor-choice white balance of Daylight.

I worked the composition a little more, and then changed my white balance. I’d been using Daylight during the blue hour portion of the shoot, but once the sky darkened, I wanted a white balance that would help the sky look more like “night” and that would also help draw out the delicate colors of the Milky Way. So I switched the white balance of my D5 to manual and dialed it in to 3800 K (Figure 4). (For more on this, see Matt’s blog post “How to Choose the Right White Balance for Night Skies.”)

Figure 4. White balance at 3800 K.

Figure 4. White balance at 3800 K.

At this point you can see that Lance was in the background doing his light painting on a different subject. This didn’t bother me. First, I was only making test shots. I didn’t care about someone else’s light; I cared only about the specific elements that I was testing for, i.e. composition, focus, exposure, white balance, etc. Second, once I was ready to start executing my “real” image, I knew Lance and I could communicate and take turns light painting our different setups, and that when his flashlight was off, he and his camera would disappear into the shadows.

For focus, a quick check of a hyperfocal distance chart confirmed that I could lock in on the boulder and still have the stars sharp. So I shined my Coast on the rock and auto-focused. Easy peasy.

The exposure was pretty simple too. I knew I wanted sharp stars for a sharp Milky Way. Using the 400 Rule with a 14mm focal length, that gave me a top shutter speed of 25 seconds (400 / 14 = 28.57, rounded down to 25 for safety), which I shot at f/2.8 and ISO 6400.

Then I started working on the light painting. Using a Coast HP7R flashlight with a homemade color-warming filter, I worked from the left of the frame. I chose this angle for three reasons:

  1. Working from the right was nearly impossible because of the cliff drop. I could have done it if I learned how to fly, but I didn’t have time for that in the middle of the shoot.

  2. When light painting, I usually want the direction of the added light to “make sense” visually, to almost look like the illumination could be coming from something else in the scene—in this case, the galactic core. Of course no one will think that the Milky Way was actually bright enough to illuminate the boulder, but I find that the visual suggestion of it works better.

  3. When light-painting a subject on the right side of the composition, I usually like to have the light coming from the left, across the majority of the frame. (And vice-versa for a subject on the left.) If I’d painted from the other side (Figure 5), then the brightest, highest-contrast parts of the boulder would have been way over on the right edge of the frame, separated from the secondary subject of the image (the Milky Way) by a large shadow. That would have been far less compositionally effective. (This is a personal guideline, and an effective one. But it’s not a rule. In fact, you can see that I went against this guideline in the image above of the boulder without the Milky Way.)

Figure 5. I moved as close to the edge of the cliff as I could to light paint from camera-right, and the result proved the efficacy having the light come across the majority of frame. Also, it was nearly impossible to paint from that angle without h…

Figure 5. I moved as close to the edge of the cliff as I could to light paint from camera-right, and the result proved the efficacy having the light come across the majority of frame. Also, it was nearly impossible to paint from that angle without having the light hit the sapling too.

The final step was just a matter of playing around with the light painting, trialing-and-erroring, repeatedly coming back to the LCD to review my results. I was evaluating factors such as:

  • how out far out of the frame I needed to stand so the camera couldn’t see the flashlight

  • whether to use direct light (harder, more contrast) or reflected (softer, less contrast)

  • which angle to paint from to create the most texture

  • which angle would illuminate enough of the boulder to be interesting but not so much that I was light painting everything (which is boring)

  • which angle accomplished all that without lighting the sapling to the right of the rock, which I deemed a compositional distraction

  • how long to keep the light on so the boulder would be bright enough to draw interest yet subtle enough to not be garish or overwhelming

Failed iterations of my light painting approach. Or, rather, honing by trial and error.

Once I’d made all of my decisions, I was ready to make the final photograph. By that point Lance had joined me at the boulder, and we took turns light painting our individual setups. Again, the key was communication, so that we didn’t inadvertently ruin each other’s images—each of us asking if the other was in the middle of an exposure before turning our flashlights on.

I loved how everything came together. One of my field rules is that when I finish executing my idea, before changing the setup I always try something I wasn’t planning, just to push myself out of the immediate box and see if I stumble across a great idea. In this case, I tried backlighting the rock (Figure 6). I hated it—so I moved on. …

Figure 6. The failed backlighting idea.

Figure 6. The failed backlighting idea.

Incidentally, while I was doing all of this, I still had my second camera, a D850, capturing star trails from the top of the hill, creating the image in Figure 7. That’s a great use for having two cameras in the field—one for long exposures and one for doing other work during the wait.

Figure 7. Star trails over Lassen Peak. Nikon D850 with a Nikon 80-200mm f/2.8 lens. 13 minutes, f/2.8, ISO 160.

The Post-Production

This particular photography didn’t need a lot of work in post.

I cropped out the bright star that was sitting immediately on the right edge of the frame, where it served as only a visual distraction, pulling attention far away from both the primary and secondary subjects.

Using the Spot Removal tool, I cloned out a patch of snow that was picking up just enough light to be seen in the background, as well as one bright and three faint plane trails (Figure 8).

Figure 8.

I boosted Exposure (+20) and Whites (+34) to increase overall brightness, then Clarity (+19), Dehaze (+24) and Vibrance (+8) to add some punch to the sky (Figure 9).

Figure 9.

Usually I’ll go over the galactic core with a custom Milky Way brush, but I didn’t think this image needed it. Sometimes not doing something is the best decision.

Figure 10.

Figure 10.

The Final Adjustment

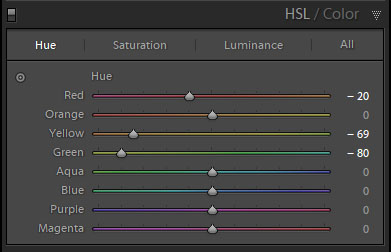
The last correction was one I couldn’t make by myself. The combination of using a CTO filter and shooting with a white balance of 3800 K made the light kind of green. I’m red-green color blind, so I asked Tim if he’d be a second (better) set of eyes while I tried to get the color of the rock accurate. Using the targeted adjustment tool in the Hue section of the HSL panel, we clicked a green sample in the rock and dragged down, which brought the Yellow slider to -69 and the Green to -80. The rock was then a little too warm, so we manually pulled Red down to -20. (Figure 10.)

There are two lessons here:

  1. Knowing how to work around your limitations can be critical. Much thanks to Tim, my sister Ann and several past girlfriends for helping me color-correct through the years.

  2. In the field, knowing my limitations and when shooting at a non-Daylight white balance, I should have used a Luxli Viola LED panel for the painting. Why? Because that would have allowed me to dial in the color temperature of the light to 3800 K or slightly warmer—then I would have known the color was accurate even if I can’t see it. (Another way to do this is to use a combination of color-correcting gels to alter the Coast’s output accordingly. Check out Tim’s post “Level Up With Light Painting: Correcting the Color of Your Flashlight (Part II).”)

Figure 11. The final image.

Wrapping Up

I finished my photo before Lance finished his. I tooled around with a few other image ideas in the same area (Figures 12 and 13), but soon settled on light painting Lance while he worked, creating a portrait of one night photography’s true masters in his element (Figure 14). By this time the moon had risen, which illuminated the valley in the background, adding more of a sense of place to the scene.

Figure 12. Tail end of the Milky Way over Lassen Peak. Nikon D5 with a Nikon 14-24mm f/2.8 lens. 20 seconds, f/2.8, ISO 8000.

Figure 13. Milky Way disappearing in the moonrise. Nikon D5 with a Nikon 14-24mm f/2.8 lens. 25 seconds, f/2.8, ISO 6400.

Figure 14. Lance at work. Nikon D5 with a Nikon 14-24mm f/2.8 lens, light painted with a Coast HP7R flashlight and a Luxli Viola LED panel. 25 seconds, f/2.8, ISO 6400.

Afterward we moved on to our second shoot location of the night, a placid alpine lake just up the road, where we ripped some long exposures of star-circle reflections above Lassen Peak.

Lassen Volcanic is truly an extraordinary national park. I have no idea when I’ll be back, but the day I am can’t come soon enough.

Want to explore Lassen Volcanic with Lance and Gabe on an epic night photography adventure workshop this August? Sign up here!

Chris Nicholson is a partner and workshop leader with National Parks at Night, and author of Photographing National Parks (Sidelight Books, 2015). Learn more about national parks as photography destinations, subscribe to Chris' free e-newsletter, and more at www.PhotographingNationalParks.com.

UPCOMING WORKSHOPS FROM NATIONAL PARKS AT NIGHT

How I Got the Shot: Lighthouse Beams at Fire Island

Fire Island Lighthouse. Nikon D750, Irix 15mm f/2.4 lens. Nine exposures at 1/2 second, f/2.4, ISO 6400.

The Location

Lighthouses are the great sentinels of the sea and their true souls shine at night.

The northeast U.S. has some of the most famous lighthouses in the country. They’re mostly in New England, but here in New York we have a couple of noteworthy examples too, including the amazing Fire Island Lighthouse at the western end of Fire Island National Seashore.

We shot here a few times last fall, including twice with attendees of our New York Night Photography Summit. I created the above image on one of those nights.

Well, perhaps I should say I created this image partly on one of those nights, and partly at my desk at home—because this technique involves a fair amount of post-processing, which is what this installment of How I Got (er … processed) the Shot is all about.

The Shoot

The Fire Island Lighthouse has a rotating beam. When a lighthouse has a rotating light it gives us more opportunities to depict the beams at different widths, depending upon the length of our exposure—i.e., a longer exposure will capture more of the beam as it moves, thereby making the beam appear wider in the image.

So the first thing to consider is shutter speeds. For the Fire Island Lighthouse I experimented with everything from 1/4 to 4 seconds. The 1/4 exposures resulted in very narrow beams of light; the 1/2 exposures were obviously wider, and also (naturally) resulted in fewer beams to stack in post, and both those trends continued as the shutter speeds got longer. Each exposure generates a different interpretation of the lighthouse, so I always suggest exploring your shutter speeds first so you can figure out what works best for you.

You can see in my test shots how the width of the rotating lighthouse beam changes with longer shutter speeds. In these examples, 1/8 resulted in the narrowest beam, 1 second in the widest.

Once I settled on 1/2 as my favorite shutter speed, that determined my aperture and ISO. Of course, shorter shutter speeds at night generally mean you need to push the envelope on the other aspects of the exposure triangle—shooting with a wide-open aperture (f/2.8 or wider) and a higher ISO (3200 to 6400). These combinations will generally allow you to capture bright beams of light as well as adequate detail in the lighthouse structure and the foreground.

Another image of the Fire Island Lighthouse from the same night. This one is composed of 1/4-second exposures, which resulted in the narrower beams of light. Nikon D750, Irix 15mm f/2.4 lens. 20 stacked frames shot at 1/4, f/2.4, ISO 6400.

Once I was happy with my exposure—i.e., beams that are bright but not blown out—I set my camera to burst mode. To prevent camera shake, I used a cable release (the Vello Shutterboss II) to fire the shutter. I kept my finger on the remote’s trigger until the beams did a full rotation around the lighthouse. (If you need to take another longer shot for more detail in the foreground, you can do that as well.)

Once I captured the assets, I was able to blend them in Lightroom and Photoshop to get that multiple-beam effect.

The Processing

Processing all of those raw images together into the final version is not terribly complicated, but involves a few steps and some finessing. So we’ve put together this video to show how I brought the photograph to completion.

In the video I talk about everything from the planning to the execution to how to put it all together in post.

Wrapping Up

If you live near or are planning to visit a rotating-beam lighthouse for night photography, we highly recommend giving this a go. It’s a fun technique that can generate some very dynamic images.

When you do, please share your work! We’d love to see your photos in the comments section below or on our Facebook page.

Note: Did you like that video, and think you’ll like more? Consider subscribing to the National Parks at Night YouTube channel to get notified about all our new videos when they come out.

Gabriel Biderman is a partner and workshop leader with National Parks at Night. He is a Brooklyn-based fine art and travel photographer, and author of Night Photography: From Snapshots to Great Shots (Peachpit, 2014). During the daytime hours you'll often find Gabe at one of many photo events around the world working for B&H Photo’s road marketing team. See his portfolio and workshop lineup at www.ruinism.com.

UPCOMING WORKSHOPS FROM NATIONAL PARKS AT NIGHT

How I Got the Shot: Milky Way and Planets in Lassen Volcanic

Looking across Cinder Cone to the Milky Way, Mars, Saturn and Jupiter. © 2018 Lance Keimig.

Last summer Chris and I had a chance to spend a few days in Lassen Volcanic National Park in Northern California. Lassen is one of the least known and least visited parks in the West, but it had been on both our radars for a long time. As the more popular parks like Joshua Tree and Yosemite become increasingly crowded, hidden jewels like Lassen Volcanic provide tremendous opportunities for photographers––or for anyone who wants to explore the wonder of our public lands without being overwhelmed by other tourists.

Lassen peak from Cinder Cone at Sunset. iPhone 6S+.

The Location

Roughly an hour east of Redding, California, Lassen is remote and far from the state’s major cities, which probably explains its relative obscurity. It certainly isn’t because the park doesn’t have much to offer—quite the contrary. In some ways, the park typifies the High Sierra landscape: rocky, mountainous terrain, rivers, lakes, wildlife, fragrant Jeffrey pines, hot days, cool nights, and clear, crisp air. Add some recently erupting volcanoes to the mix, and perhaps you can start to appreciate what makes this park special.

All four of the major types of volcano are present in the park. Lassen Peak, which the park is named after, is the southernmost active volcano in the Cascade Range. It is a lava dome, and is the largest of this type anywhere in the world. Lassen Peak last erupted between 1915 and 1918. The park also contains composite and shield volcanoes, as well as cinder cone. In today’s post, I’m going to write about the appropriately (if unimaginatively) named Cinder Cone volcano.

Cinder Cone from the Butte Lake Campground trailhead. iPhone 6S+.

Nestled in the northeast corner of the park, far from the main visitor center, accommodations and other infrastructure, many visitors to Lassen Volcanic never get to see Cinder Cone. It’s the youngest volcano in the park, formed only 350 years ago!

Getting to the top of the cone is one of the more challenging hikes in the park, but the solitude and the views of Lassen Peak, nearby Butte Lake and the Painted Dunes below are well worth the effort. Cinder Cone has a relatively rare feature in that it contains two concentric craters, making it twice as photogenic as your ordinary volcano!

Nikon D750, Irix 15mm f/2.4 lens. A 10-frame panorama. All exposures 8 seconds, f/3.2, ISO 100.

The Experience

We arrived late in the afternoon and made the 1.5-mile hike to the base of Cinder Cone from the trailhead at Butte Lake Campground. It was slow going, having to trudge through the forest over the loose, sandy volcanic soil, but when we rounded a bend and first saw the cone appear before us we quickened our pace at the excitement.

The sun was sinking quickly as we began our ascent. Chris was determined to get to the top before the sun set, and we were literally racing the shadow up the side of the mountain. It’s a testament to how challenging the climb was that the shadow was at many times moving faster than we were. During one of our frequent stops to catch our breath, Chris said that we were experiencing “Type 2 fun.” Apparently, misery that is remembered nostalgically is what makes for Type 2 fun. It’s only in hindsight that you realize you were having a good time. It was worth every minute of the effort, and I was happy to be sharing the experience with Chris as his determination to beat the sun to the top kept me going.

Type 2 Fun. Chris racing the sun to the top of Cinder Cone. Nikon D750, 24-120mm f/4 lens at 110mm. 1/60, f/7.1, ISO 100.

When we finally reached the summit, the scene before us was extraordinary. We were surrounded by an awesome panoramic view on all sides, staring across a 1,000-foot-wide double crater with Lassen Peak to the southwest, Butte Lake to the northeast, and the Painted Dunes to the south.

Our excitement led to newfound energies that had us circling the rim of both the outer and inner craters, but not quite enough energy or madness to descend into the inner crater, knowing we’d have to come back up at some point. The local terrain was spartan, with only a few trees and colorful low flowers dotting the landscape. We spent about an hour and a half alone on the summit, exploring, photographing and waiting for darkness.

The Painted Dunes at sunset from Cinder Cone. Nikon D750, 24-120mm f/4 lens at 34mm. 1/25 second, f/8, ISO 400.

The Night

We knew that once darkness set, we would have a spectacular view of the Milky Way, and that a rare planetary alignment we had witnessed earlier in the trip would present us with a unique opportunity to make a great image.

We were there in early July. Mars was approaching opposition, the point where Earth is exactly between our red neighbor and the Sun. Mars was approximately 40 million miles away from us, compared to its normal average distance of 140 million miles. It was five times brighter than usual and was the brightest object in the sky after the sun and moon. Jupiter and Saturn were not to be left out, as they had just passed their own oppositions.

All of this meant that if Earth was almost directly between the sun and planets, the planets would appear relatively close to each other in the sky. Of course, early July around the new moon is a great time to view the Milky Way too. The best time of year to view the galactic core is when it is at opposition. Can you guess where this is all headed?

As astronomical twilight faded the scene before us made our hearts race with excitement. It was incredible.

We positioned ourselves on the northwest side of the crater so that we could look across it to see the Milky Way and planets rise as the sky darkened. We had a pretty good idea of where the core and planets would appear based on experience and our previous nights photographing in the park. Despite having a good idea of what was coming, as astronomical twilight faded the scene before us made our hearts race with excitement. It was incredible.

As the objects in the night sky brightened, the landscape before us darkened dramatically, and we wondered if we would be able to capture both the crater in front of us and the celestial glory above. We were constrained by the requirement to keep our exposures short enough to maintain the stars as points rather than trails, aperture-limited by comatic aberration, and ISO-limited by high ISO noise.

Of course there are several ways to deal with the differing exposures for ground and sky in astro-landscape photography. One could compromise and have an underexposed foreground and an overexposed sky and make the best of it, or make separate exposures for each at different settings and combine them during post-processing. Because we are masochists, we decided to light paint the 1,000 feet of crater during our 20-second exposure.

The Shoot

Chris and I both follow a similar procedure when we make night photographs. Every image is made by following the same basic steps. They are:

  1. compose

  2. focus

  3. calculate exposure

  4. determine lighting

  5. tweak and repeat

In this case, the composition was fairly straightforward. We knew we wanted the crater in the foreground and Milky Way above it. We aligned ourselves, and set up our cameras about 40 or 50 feet apart. Because the scene was so large, the distance between us made for only a slight variation in the foreground of our compositions.

A few test shots to get the lines right, and it was time to focus. I was using the Irix 15mm f/2.4 lens, which has a convenient and accurate detent at infinity. There was nothing closer than about 50 feet in my foreground, so I knew that I could safely focus at infinity without worrying about anything being soft. I rotated the lens until I felt the detent, and that was it for step 2.

On to exposure. There was no moon yet (it wouldn’t rise for another couple of hours), and only a little light pollution on the horizon from the resort towns surrounding Lake Almanor to the southeast. The standard astro-landscape (ALP) exposure of 20 seconds, f/2.8, ISO 6400 would be about right. I chose to close down one-third of a stop to f/3.2 because I wanted to minimize coma in the bright planets, which were close to the left and right edges of my frame. To compensate, I increased the shutter speed by one-third of a stop to 25 seconds, and made a test.

Test image looking across Cinder Cone to the Milky Way, Mars, Saturn and Jupiter. Nikon D750, Irix 15mm f/2.4 lens. 25 seconds, f/3.2, ISO 6400.

Every ALP exposure is a compromise. The Earth’s rotation limits shutter speed because of the need to maintain star points. The limit is based on sensor size, focal length and the cardinal direction your camera is facing. Increase your shutter speed, and risk star trails instead of points. Open up your aperture to maximum, and risk coma and softness at the edges of the frame, as well as potential depth of field issues with foreground objects. Raise your ISO and the noise increases, especially in the underexposed shadow area common in the foregrounds of ALP images. It’s up to the photographer to decide which variable to compromise based on experience, equipment, taste and how the final image will be displayed. But I digress—on to the lighting.

The final image. Looking across Cinder Cone to the Milky Way, Mars, Saturn and Jupiter. Nikon D750, Irix 15mm f/2.4 lens. 25 seconds, f.3.2, ISO 6400. Lighting with two Luxli Violas at 3200 K and 100 percent brightness for the entire exposure. Mars on the left, Jupiter on the right. Saturn is hard to make out because it is right in front of the galactic core.

We really didn’t know if it was going to work or not, but there was nothing else to do but try it. We both had Luxli Violas, and the same idea. Usually we set these lights at 1 percent brightness for ALP images, and sometimes even that is too much. We are not usually trying to light the better part of a square mile in 20 seconds.

We set the color temperature to 3200 K and the brightness to 100 percent, opened the shutters, and walked quickly away from the cameras holding the lights toward the crater but tilted upward so that the foregrounds would not be overly bright. The technique worked remarkably well, and after a few adjustments we felt like we had it in the bag.

Wrapping Up

As we approach Thanksgiving and I look back at the images I made this year, this may well be my favorite from 2018. It’s a unique photograph made in an amazing location, collaborating with a great friend. It took some determination to make it happen, along with the good fortune of being in the right place at the right time. #ISO6400andBeThere

Note: Lance will be back at Lassen Volcanic National Park, this time with Gabe, for our 2019 night photography workshop. Click here for more information.

Lance Keimig is a partner and workshop leader with National Parks at Night. He has been photographing at night for 30 years, and is the author of Night Photography and Light Painting: Finding Your Way in the Dark (Focal Press, 2015). Learn more about his images and workshops at www.thenightskye.com.

UPCOMING WORKSHOPS FROM NATIONAL PARKS AT NIGHT