Night Photography Blog — National Parks at Night

Milky Way

How I Got the Shot: Milky Way and Planets in Lassen Volcanic

Looking across Cinder Cone to the Milky Way, Mars, Saturn and Jupiter. © 2018 Lance Keimig.

Last summer Chris and I had a chance to spend a few days in Lassen Volcanic National Park in Northern California. Lassen is one of the least known and least visited parks in the West, but it had been on both our radars for a long time. As the more popular parks like Joshua Tree and Yosemite become increasingly crowded, hidden jewels like Lassen Volcanic provide tremendous opportunities for photographers––or for anyone who wants to explore the wonder of our public lands without being overwhelmed by other tourists.

Lassen peak from Cinder Cone at Sunset. iPhone 6S+.

The Location

Roughly an hour east of Redding, California, Lassen is remote and far from the state’s major cities, which probably explains its relative obscurity. It certainly isn’t because the park doesn’t have much to offer—quite the contrary. In some ways, the park typifies the High Sierra landscape: rocky, mountainous terrain, rivers, lakes, wildlife, fragrant Jeffrey pines, hot days, cool nights, and clear, crisp air. Add some recently erupting volcanoes to the mix, and perhaps you can start to appreciate what makes this park special.

All four of the major types of volcano are present in the park. Lassen Peak, which the park is named after, is the southernmost active volcano in the Cascade Range. It is a lava dome, and is the largest of this type anywhere in the world. Lassen Peak last erupted between 1915 and 1918. The park also contains composite and shield volcanoes, as well as cinder cone. In today’s post, I’m going to write about the appropriately (if unimaginatively) named Cinder Cone volcano.

Cinder Cone from the Butte Lake Campground trailhead. iPhone 6S+.

Nestled in the northeast corner of the park, far from the main visitor center, accommodations and other infrastructure, many visitors to Lassen Volcanic never get to see Cinder Cone. It’s the youngest volcano in the park, formed only 350 years ago!

Getting to the top of the cone is one of the more challenging hikes in the park, but the solitude and the views of Lassen Peak, nearby Butte Lake and the Painted Dunes below are well worth the effort. Cinder Cone has a relatively rare feature in that it contains two concentric craters, making it twice as photogenic as your ordinary volcano!

Nikon D750, Irix 15mm f/2.4 lens. A 10-frame panorama. All exposures 8 seconds, f/3.2, ISO 100.

The Experience

We arrived late in the afternoon and made the 1.5-mile hike to the base of Cinder Cone from the trailhead at Butte Lake Campground. It was slow going, having to trudge through the forest over the loose, sandy volcanic soil, but when we rounded a bend and first saw the cone appear before us we quickened our pace at the excitement.

The sun was sinking quickly as we began our ascent. Chris was determined to get to the top before the sun set, and we were literally racing the shadow up the side of the mountain. It’s a testament to how challenging the climb was that the shadow was at many times moving faster than we were. During one of our frequent stops to catch our breath, Chris said that we were experiencing “Type 2 fun.” Apparently, misery that is remembered nostalgically is what makes for Type 2 fun. It’s only in hindsight that you realize you were having a good time. It was worth every minute of the effort, and I was happy to be sharing the experience with Chris as his determination to beat the sun to the top kept me going.

Type 2 Fun. Chris racing the sun to the top of Cinder Cone. Nikon D750, 24-120mm f/4 lens at 110mm. 1/60, f/7.1, ISO 100.

When we finally reached the summit, the scene before us was extraordinary. We were surrounded by an awesome panoramic view on all sides, staring across a 1,000-foot-wide double crater with Lassen Peak to the southwest, Butte Lake to the northeast, and the Painted Dunes to the south.

Our excitement led to newfound energies that had us circling the rim of both the outer and inner craters, but not quite enough energy or madness to descend into the inner crater, knowing we’d have to come back up at some point. The local terrain was spartan, with only a few trees and colorful low flowers dotting the landscape. We spent about an hour and a half alone on the summit, exploring, photographing and waiting for darkness.

The Painted Dunes at sunset from Cinder Cone. Nikon D750, 24-120mm f/4 lens at 34mm. 1/25 second, f/8, ISO 400.

The Night

We knew that once darkness set, we would have a spectacular view of the Milky Way, and that a rare planetary alignment we had witnessed earlier in the trip would present us with a unique opportunity to make a great image.

We were there in early July. Mars was approaching opposition, the point where Earth is exactly between our red neighbor and the Sun. Mars was approximately 40 million miles away from us, compared to its normal average distance of 140 million miles. It was five times brighter than usual and was the brightest object in the sky after the sun and moon. Jupiter and Saturn were not to be left out, as they had just passed their own oppositions.

All of this meant that if Earth was almost directly between the sun and planets, the planets would appear relatively close to each other in the sky. Of course, early July around the new moon is a great time to view the Milky Way too. The best time of year to view the galactic core is when it is at opposition. Can you guess where this is all headed?

As astronomical twilight faded the scene before us made our hearts race with excitement. It was incredible.

We positioned ourselves on the northwest side of the crater so that we could look across it to see the Milky Way and planets rise as the sky darkened. We had a pretty good idea of where the core and planets would appear based on experience and our previous nights photographing in the park. Despite having a good idea of what was coming, as astronomical twilight faded the scene before us made our hearts race with excitement. It was incredible.

As the objects in the night sky brightened, the landscape before us darkened dramatically, and we wondered if we would be able to capture both the crater in front of us and the celestial glory above. We were constrained by the requirement to keep our exposures short enough to maintain the stars as points rather than trails, aperture-limited by comatic aberration, and ISO-limited by high ISO noise.

Of course there are several ways to deal with the differing exposures for ground and sky in astro-landscape photography. One could compromise and have an underexposed foreground and an overexposed sky and make the best of it, or make separate exposures for each at different settings and combine them during post-processing. Because we are masochists, we decided to light paint the 1,000 feet of crater during our 20-second exposure.

The Shoot

Chris and I both follow a similar procedure when we make night photographs. Every image is made by following the same basic steps. They are:

  1. compose

  2. focus

  3. calculate exposure

  4. determine lighting

  5. tweak and repeat

In this case, the composition was fairly straightforward. We knew we wanted the crater in the foreground and Milky Way above it. We aligned ourselves, and set up our cameras about 40 or 50 feet apart. Because the scene was so large, the distance between us made for only a slight variation in the foreground of our compositions.

A few test shots to get the lines right, and it was time to focus. I was using the Irix 15mm f/2.4 lens, which has a convenient and accurate detent at infinity. There was nothing closer than about 50 feet in my foreground, so I knew that I could safely focus at infinity without worrying about anything being soft. I rotated the lens until I felt the detent, and that was it for step 2.

On to exposure. There was no moon yet (it wouldn’t rise for another couple of hours), and only a little light pollution on the horizon from the resort towns surrounding Lake Almanor to the southeast. The standard astro-landscape (ALP) exposure of 20 seconds, f/2.8, ISO 6400 would be about right. I chose to close down one-third of a stop to f/3.2 because I wanted to minimize coma in the bright planets, which were close to the left and right edges of my frame. To compensate, I increased the shutter speed by one-third of a stop to 25 seconds, and made a test.

Test image looking across Cinder Cone to the Milky Way, Mars, Saturn and Jupiter. Nikon D750, Irix 15mm f/2.4 lens. 25 seconds, f/3.2, ISO 6400.

Every ALP exposure is a compromise. The Earth’s rotation limits shutter speed because of the need to maintain star points. The limit is based on sensor size, focal length and the cardinal direction your camera is facing. Increase your shutter speed, and risk star trails instead of points. Open up your aperture to maximum, and risk coma and softness at the edges of the frame, as well as potential depth of field issues with foreground objects. Raise your ISO and the noise increases, especially in the underexposed shadow area common in the foregrounds of ALP images. It’s up to the photographer to decide which variable to compromise based on experience, equipment, taste and how the final image will be displayed. But I digress—on to the lighting.

The final image. Looking across Cinder Cone to the Milky Way, Mars, Saturn and Jupiter. Nikon D750, Irix 15mm f/2.4 lens. 25 seconds, f.3.2, ISO 6400. Lighting with two Luxli Violas at 3200 K and 100 percent brightness for the entire exposure. Mars on the left, Jupiter on the right. Saturn is hard to make out because it is right in front of the galactic core.

We really didn’t know if it was going to work or not, but there was nothing else to do but try it. We both had Luxli Violas, and the same idea. Usually we set these lights at 1 percent brightness for ALP images, and sometimes even that is too much. We are not usually trying to light the better part of a square mile in 20 seconds.

We set the color temperature to 3200 K and the brightness to 100 percent, opened the shutters, and walked quickly away from the cameras holding the lights toward the crater but tilted upward so that the foregrounds would not be overly bright. The technique worked remarkably well, and after a few adjustments we felt like we had it in the bag.

Wrapping Up

As we approach Thanksgiving and I look back at the images I made this year, this may well be my favorite from 2018. It’s a unique photograph made in an amazing location, collaborating with a great friend. It took some determination to make it happen, along with the good fortune of being in the right place at the right time. #ISO6400andBeThere

Note: Lance will be back at Lassen Volcanic National Park, this time with Gabe, for our 2019 night photography workshop. Click here for more information.

Lance Keimig is a partner and workshop leader with National Parks at Night. He has been photographing at night for 30 years, and is the author of Night Photography and Light Painting: Finding Your Way in the Dark (Focal Press, 2015). Learn more about his images and workshops at www.thenightskye.com.

UPCOMING WORKSHOPS FROM NATIONAL PARKS AT NIGHT

(No, We’re Not Crazy) Why You Should Use a Circular Polarizer at Night

I had another “What if?” moment, dear readers.

It was this: What if I use a circular polarizer at night?

My mind boggled. It balked. It basically said, “There are tons of reasons you should not even consider doing that.”

Such as:

  • You’ll lose up to 1.5 stops of light! My precious light …

  • It’s going to be hard to see the effect through the lens.

  • A polarizer is another thing to carry and/or take care of. (Have you seen my backpack? I call it the “kitchen sink.”)

  • Your sensor will capture fewer stars—perhaps?

  • You may be disappointed.

So What?

Despite all those naysaying, braying voices in my head, I set about scraping out some moments during our Rocky Mountain National Park workshop to run some experiments.

Why? Well, I know polarizers have these positive traits:

  • minimized reflections, making water easier to see through

  • more vibrant colors and deeper saturation

  • reduced highlights, which puts more of the exposure inside the dynamic range of my camera

  • eliminating or reducing off-axis light

That last one was really exciting to me, as we would have lots of moon at Rocky Mountain, as well as at our workshop immediately afterward at Chaco Culture National Historical Park.

Maybe, just maybe, I could make a polarizer do something useful—or even something amazing.

Note: Since my polarizer was a screw-in 95mm, I did not go through the hassle of removing it during tests. I simply set it to minimum effect for the “before” images and maximum effect for the “after” images.

Testing My Hypothesis on Star Trails

So I set out to test my hunch that it would work. After all, it’s just science, right?

On our final day of the workshop, we embarked on an add-on adventure with five attendees, during which we hiked with our gear almost 2 miles (one way) with 650 feet of elevation gain at over 8,000 feet of altitude. It was challenging, but we did it.

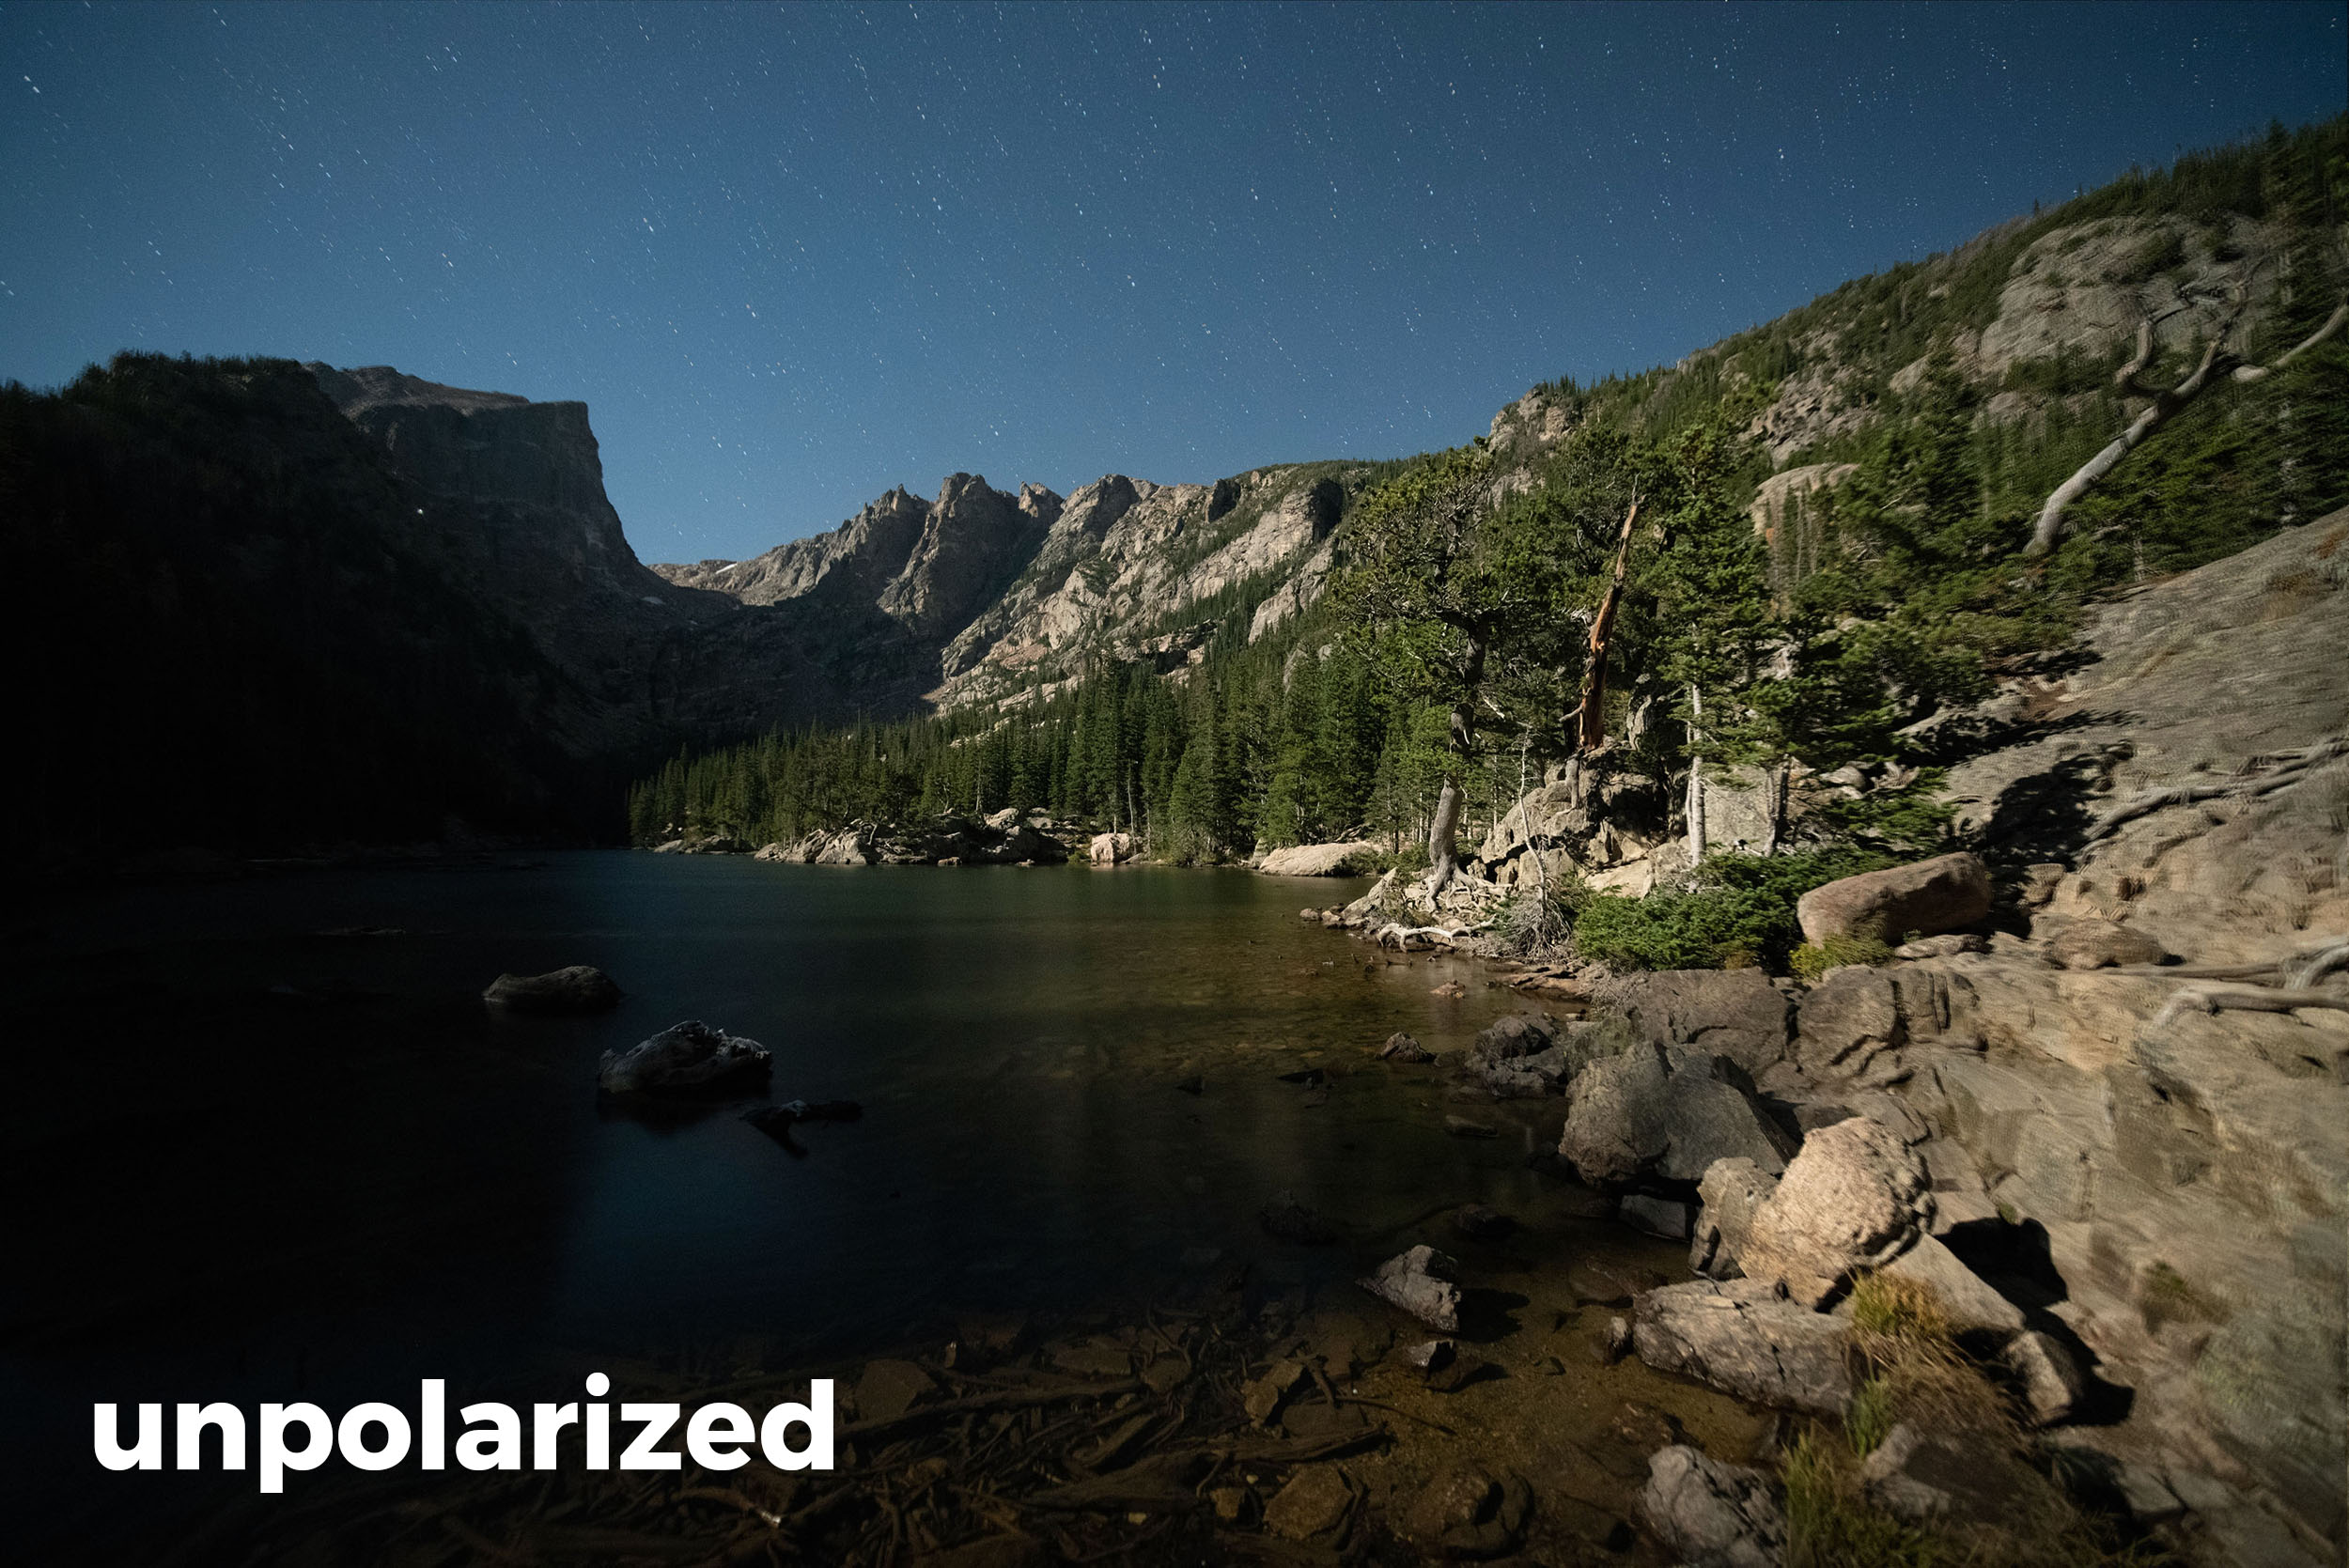
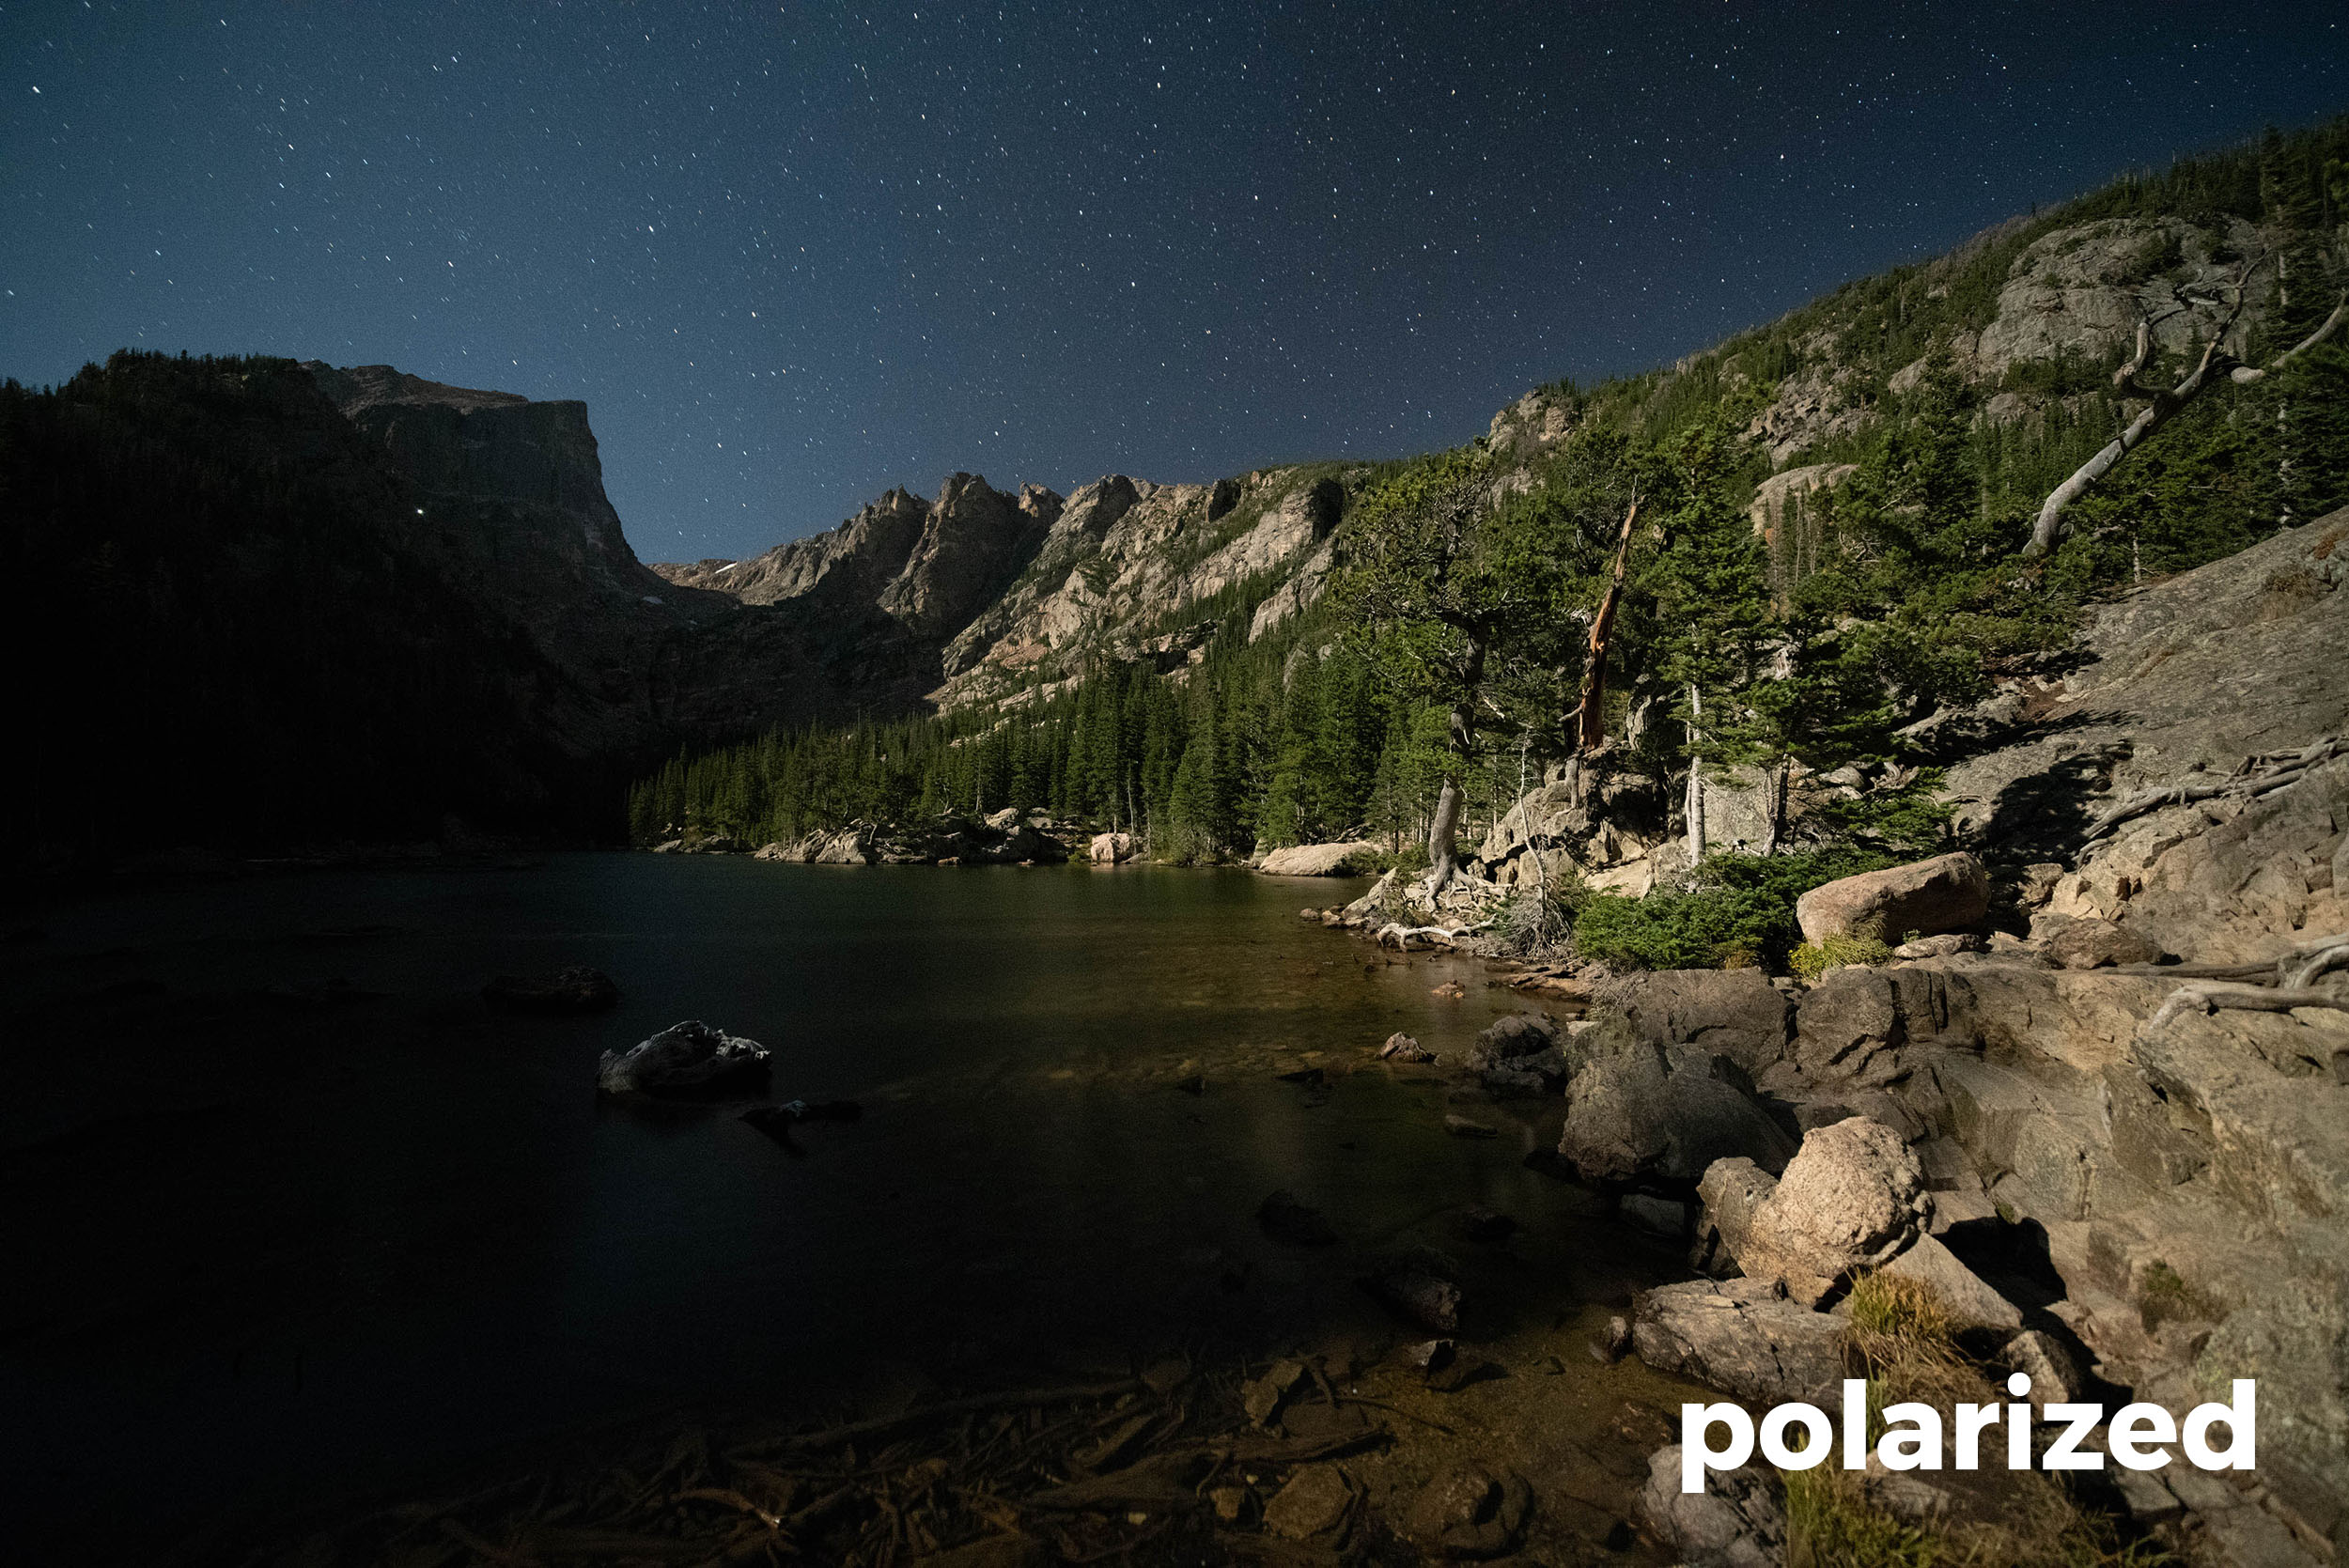
Our first shoot location, Emerald Lake, had a moon shadow slipping around to the right. The moon was at my left shoulder—ideal conditions to make a polarizer work.

Tip: Polarizers work best when used perpendicular to the light source (90 degrees). So keep the moon (or sun, if you are so inclined), on your right or left shoulder.

I set the polarizer to minimum effect:

Nikon D850, Zeiss 15mm Distagon f/2.8. 30 sec, f/2.8, ISO 6400.

Exactly what I’d expected. Not a lot of stars. So I turned off my camera, peeped through the viewfinder, turned the polarizer and found the area of deepest effect:

Nikon D850, Zeiss 15mm Distagon f/2.8. 30 seconds, f/2.8, ISO 6400.

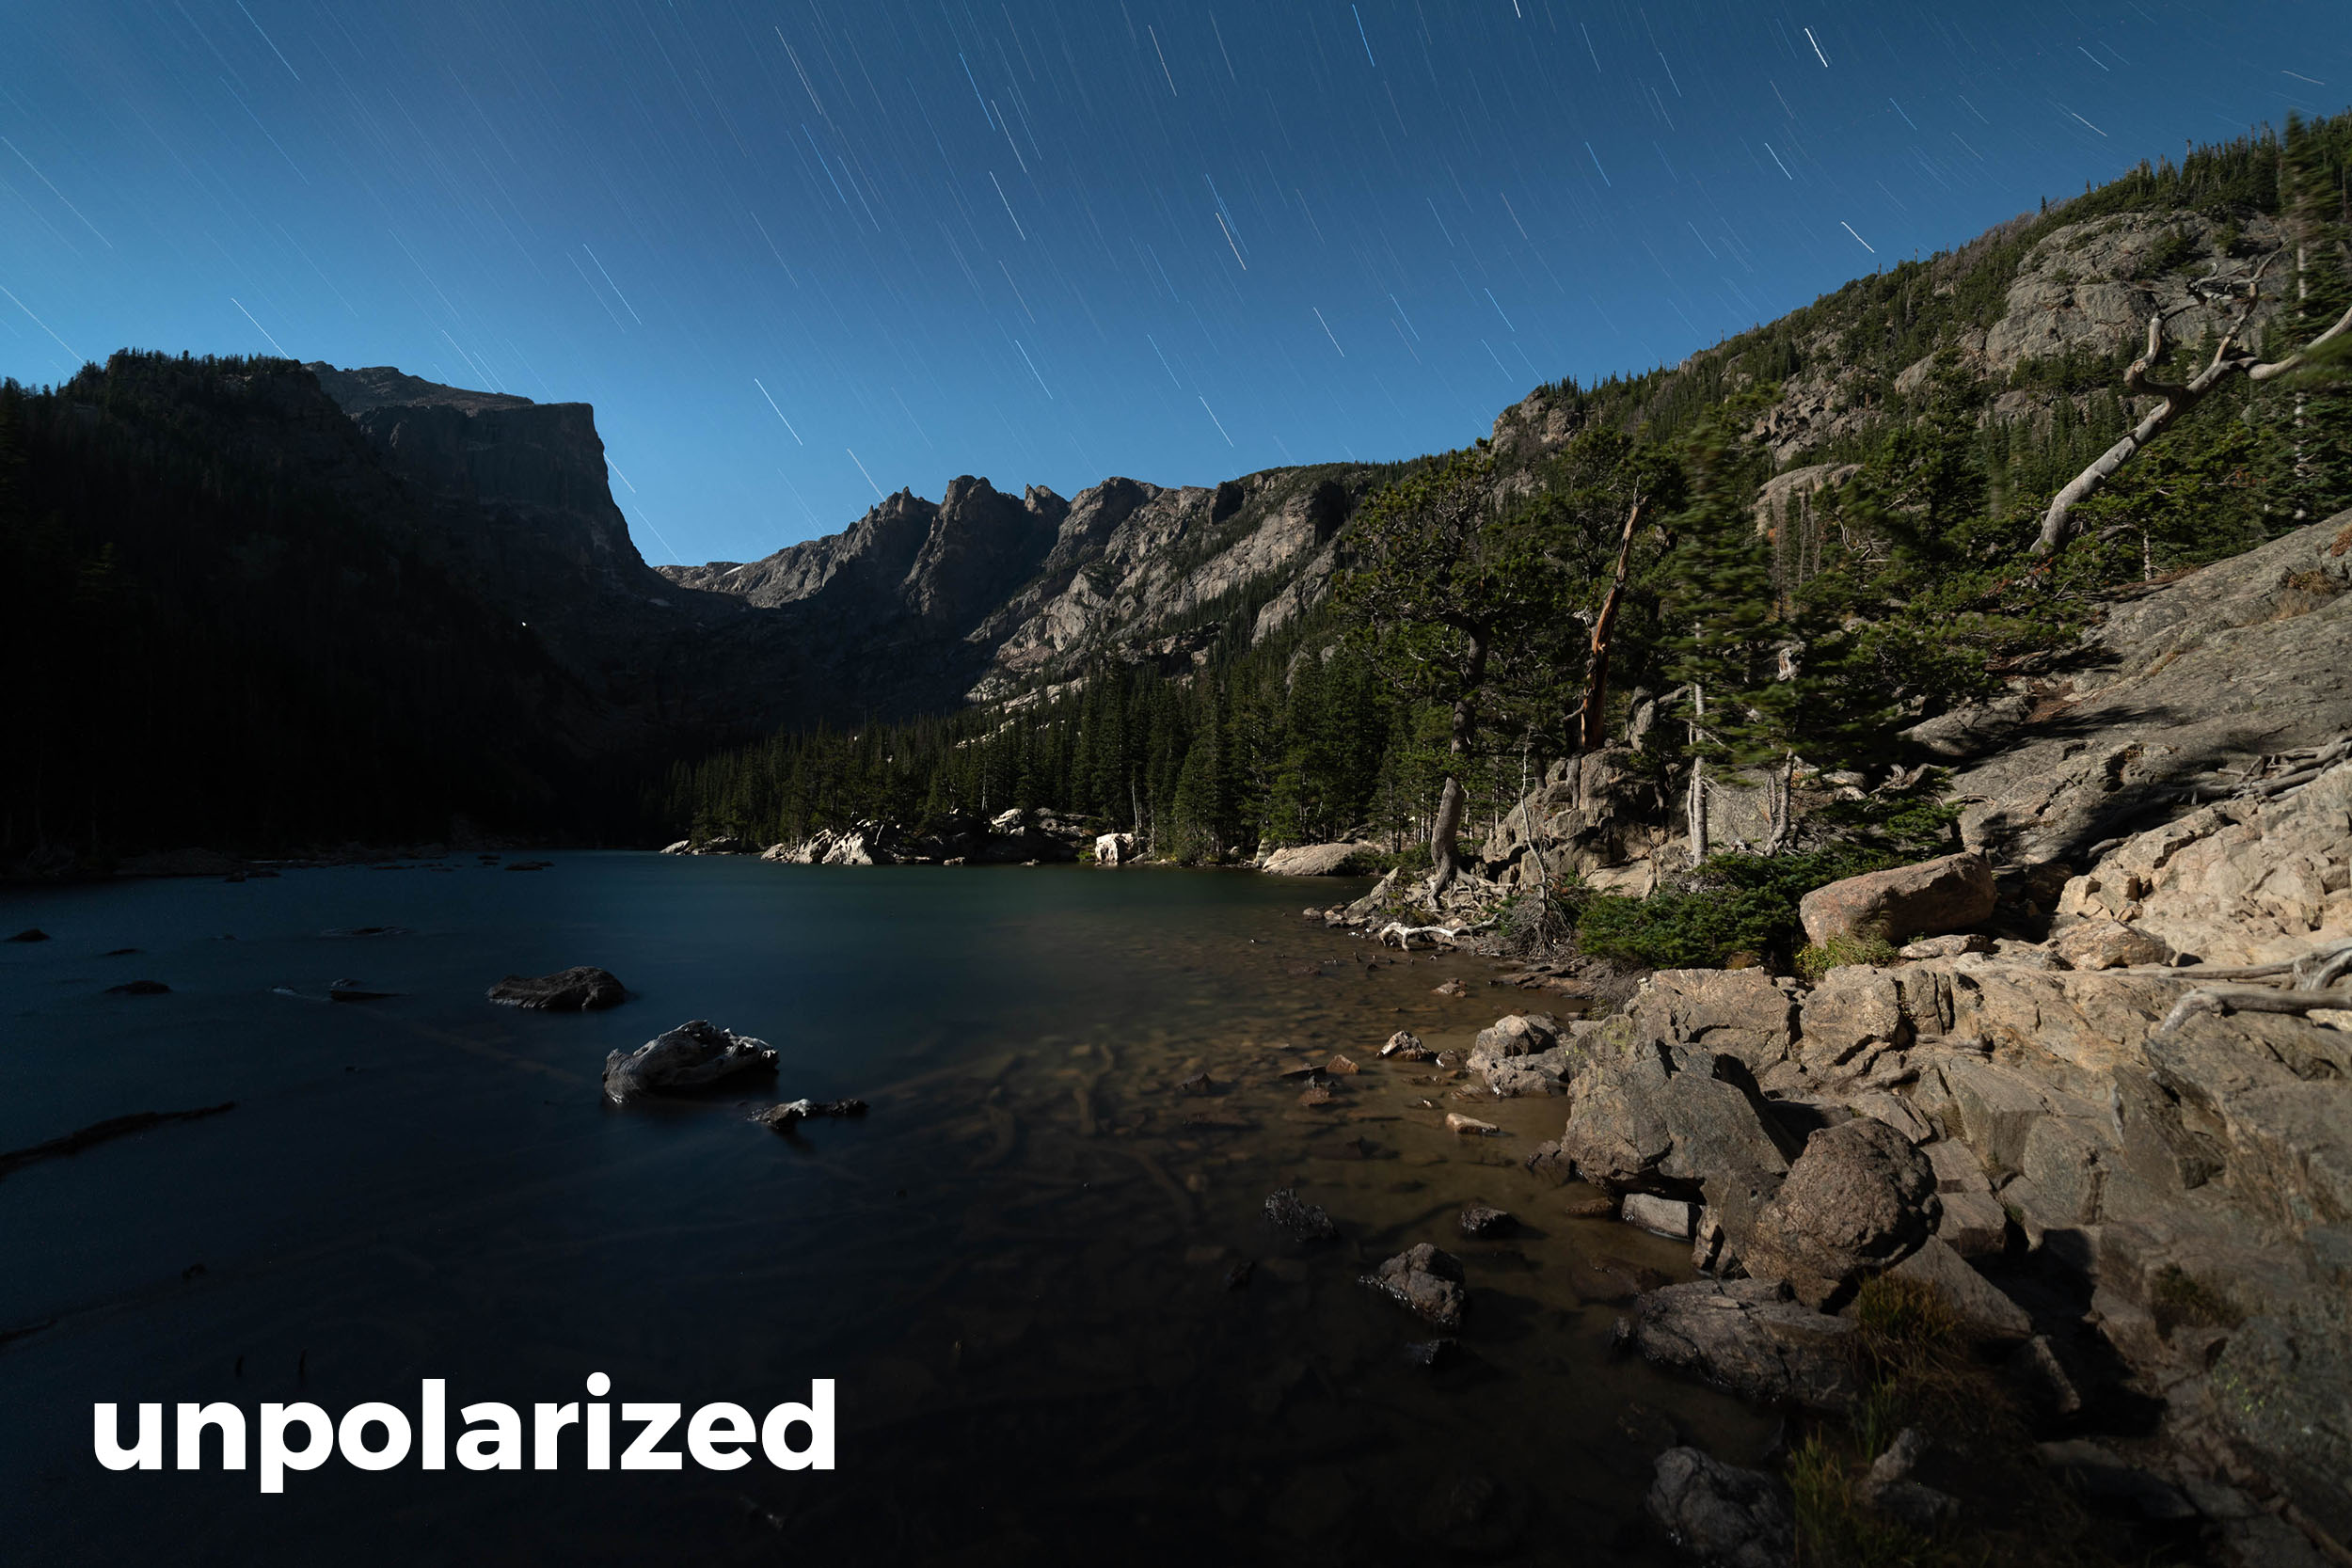
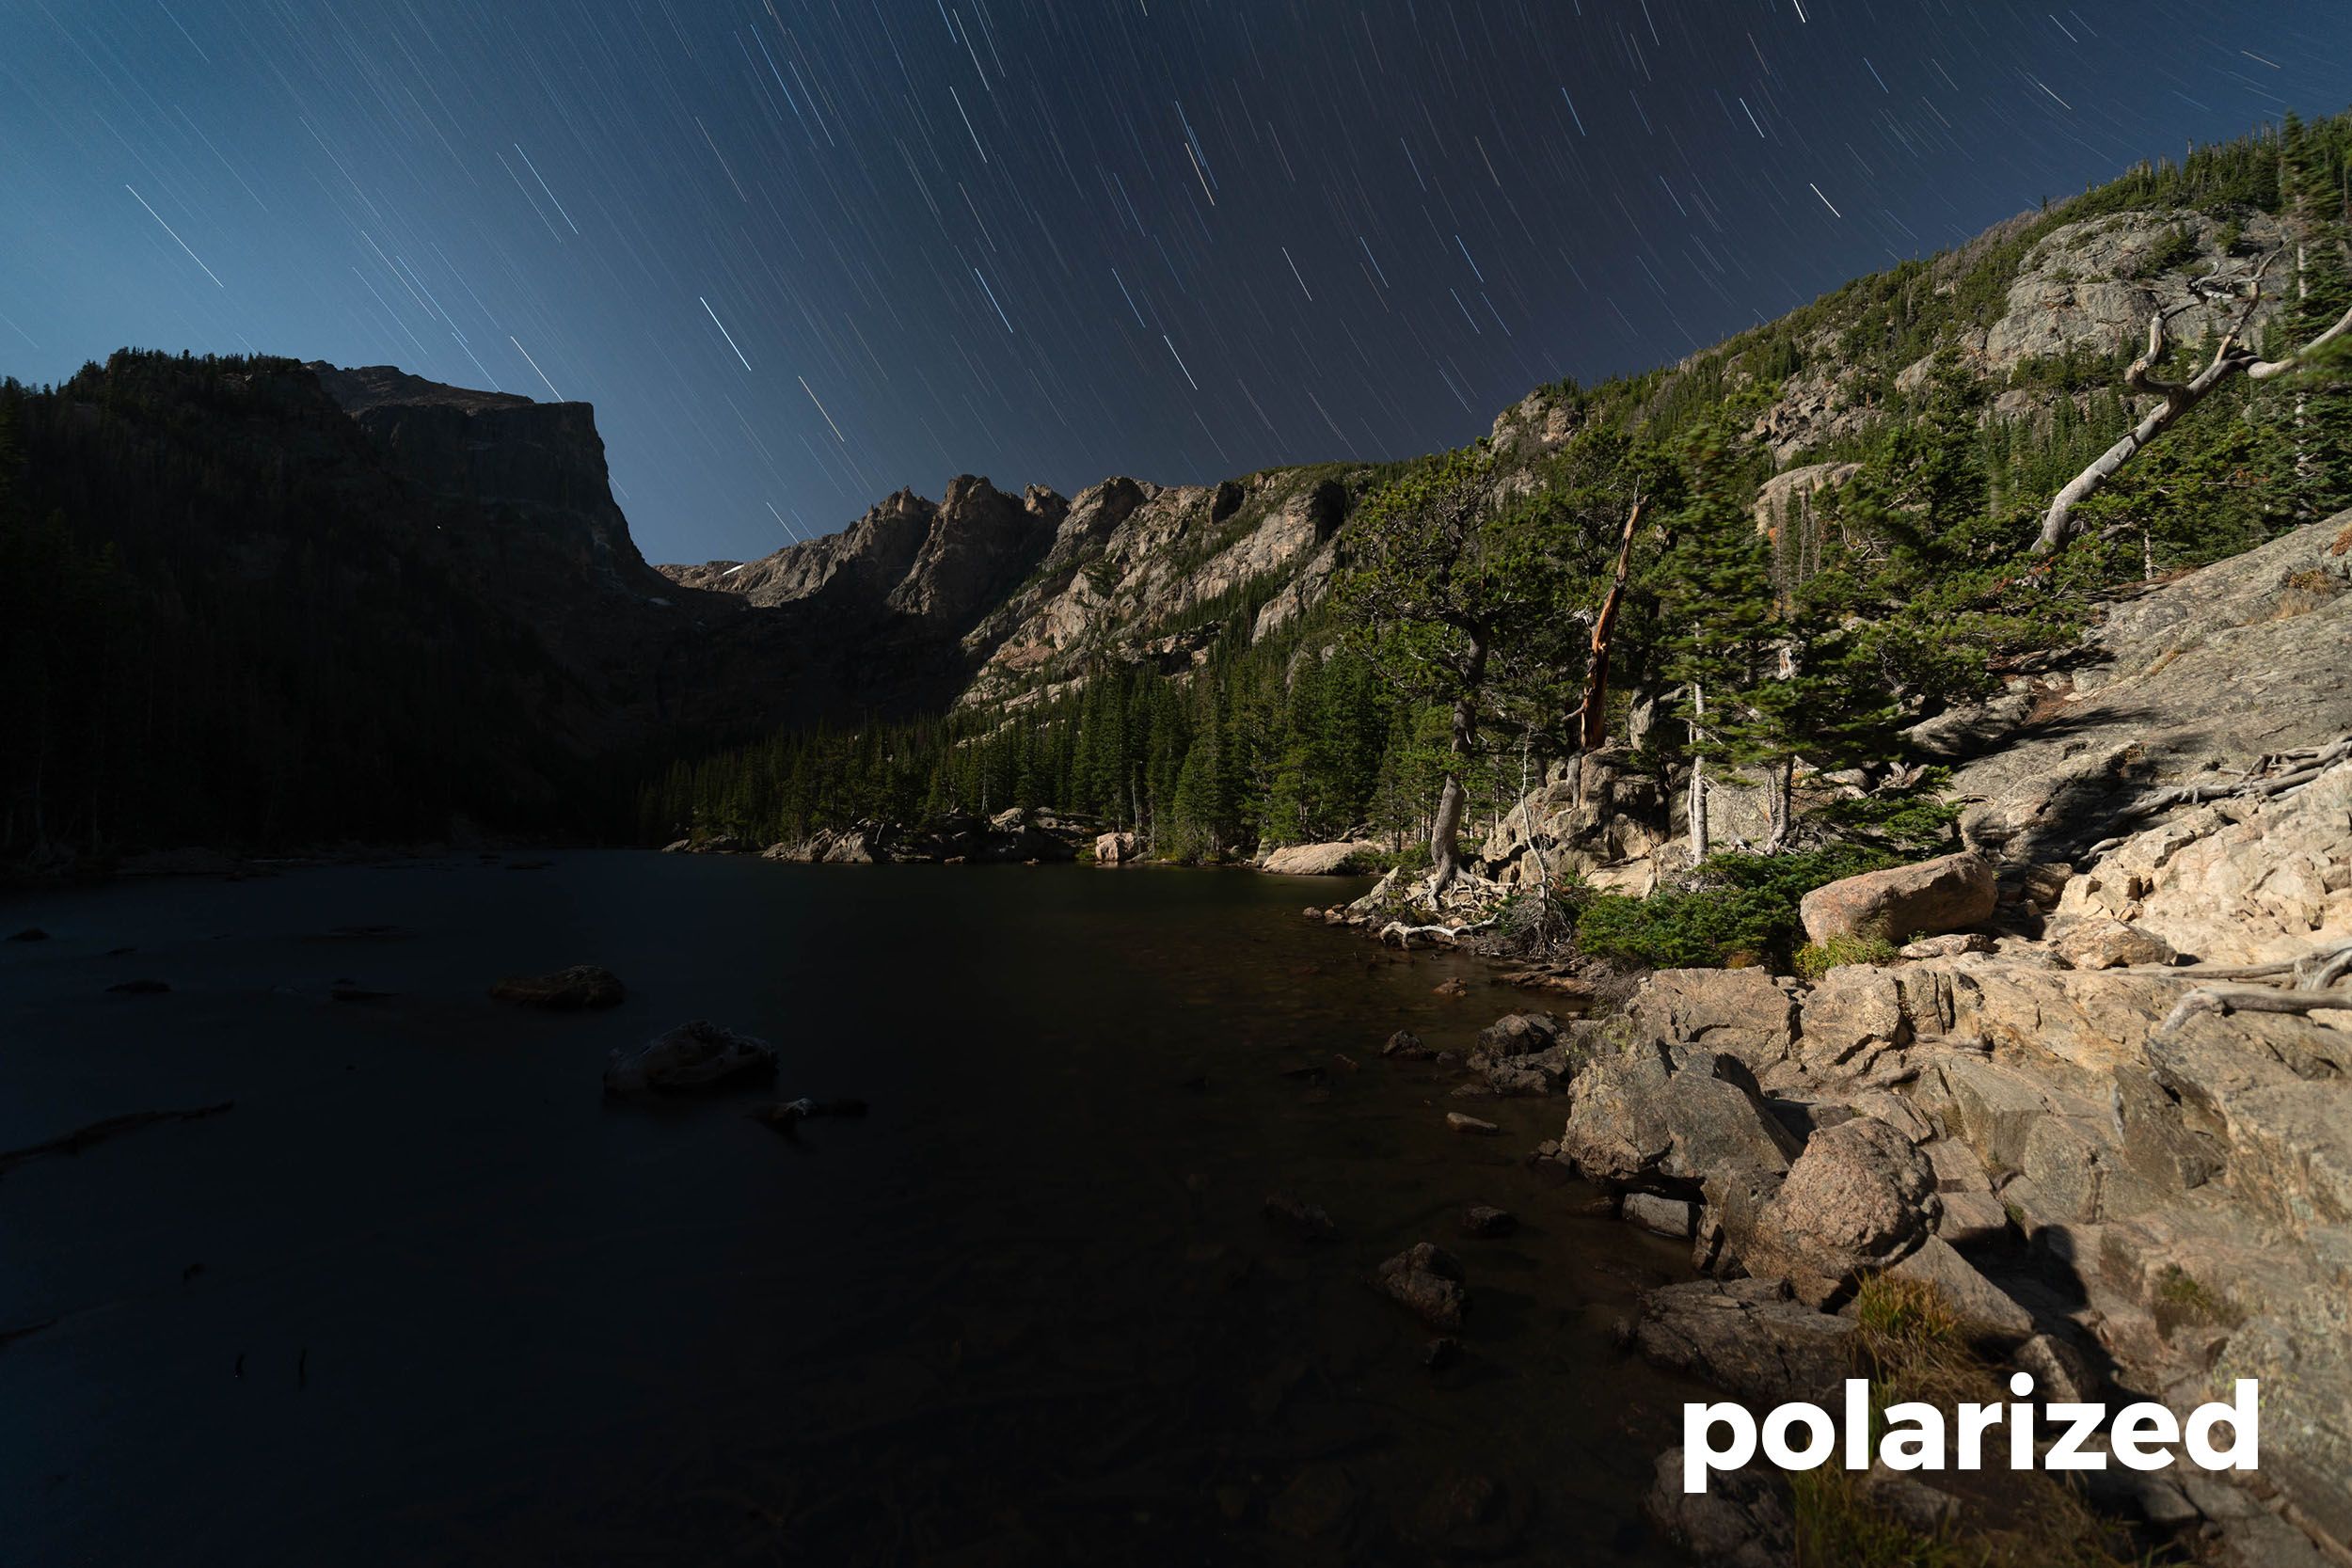
I was so excited (and it was so cold) that I settled into a sequence of eight 7.5-minute exposures, totaling one hour:

Nikon D850, Zeiss 15mm Distagon f/2.8. Eight frames at 7.5 minutes, f/2.8, ISO 6400.

Booyah. Many stars, despite shooting with broad moonlight. It worked!

As we started hiking back down, we stopped at Dream Lake. I wandered to the south end of the lake with a student and set up another test, this time with stiller water. (There had been crazy wind up at Emerald Lake.) I ran two high ISO tests at 15 seconds, f/2.8, ISO 6400:

I loved what was happening so much that I wanted to grab two 15-minute exposures to compare:

(I wish I’d done the “without” photo first, because the moon came out more during that exposure.)

So, then I had another “What if?” moment during editing. What if I used the water from the zero-polarizer shot and masked it in to the yes-polarizer shot?

Nikon D850, Zeiss 15mm Distagon f/2.8. 15 minutes, f/2.8, ISO 100. Maximum polarization (in the sky portion).

Again, a wonderful solution for pulling out more stars and deeper, darker skies. Plus, if you shoot both, you can choose the best of each and blend them together. That’s powerful stuff.

And then the Rocky Mountain workshop was over. … But I had another workshop (with Lance) in two days, so Chris and I hustled down to Chaco Culture. And during the second-to-last night, I had a couple of moments here and there to test again.

Facing north, I wanted to test how many stars I could capture at f/13 for a star trail rip.

Test shot No. 1. Nikon D750, Zeiss 15mm Distagon f/2.8. 25 seconds, f/11, ISO 3200. Maximum polarization.

Test Shot No. 2, with a different polarizer orientation: Nikon D750, Zeiss 15mm Distagon f/2.8. 25 seconds, f/11, ISO 3200. Three-quarter polarization.

I felt it had better skies. I wanted a touch darker, so I dropped to f/13 and I committed to a one-hour shot with Long Exposure Noise Reduction turned on.

I admit, I had to do some post work to pull out the stars on the skies, but they’re there!

Nikon D750, Zeiss 15mm Distagon f/2.8. 1 hour, f/13, ISO 50. Three-quarter polarization.

I think next time I’ll shoot such a photo at f/8 to see a touch more stars. But it’s not the normal, cluttered sky we get without polarization and a much wider aperture. And the sky in the background is darker—much darker—which is something we don’t generally see when shooting in moonlight.

But what about the Milky Way?

Well, what about the Milky Way? It’s a silly question, right? You can’t shoot the Milky Way on a moonlit night.

Or … ?

This last test, if successful, would be the coup de grace, on my circular polarizer experiments. Can I extract a Milky Way from moonlit skies? It was an idea raised by Jason, a Rocky Mountain attendee who was on that hike with us the week before. And now I could try it out.

Now in New Mexico, we were shooting at Pueblo Bonito, the park’s showpiece ancient structure, which features over 600 rooms plus multiple kivas of fascinatingly intricate architecture.

There was a 25-minute window of darkness between the end of twilight and moonrise. We hustled to nail the Milky Way during that window, but I suspected I had an advantage with a circular polarizer and hoped I could make it appear even after moonrise.

As soon as the moon rose, people started repositioning to re-frame to make the Milky Way less important. They couldn’t see it. But … maybe I could?

First shot, with minimum polarization:

Nikon D750, Zeiss 15mm Distagon f/2.8. 25 seconds, f/2.8, ISO 6400. Minimum polarization.

And then...

Nikon D750, Zeiss 15mm Distagon f/2.8. 25 seconds, f/2.8, ISO 6400. Maximum polarization.

Double booya. Ignoring the fact that someone did light painting in the foreground for this shot, check out that Milky Way! This is not a composite. It’s one frame, with some Lightroom adjustments.

You may notice that the area of sky around the Milky Way is darkest. That’s not from a local adjustment in post, but rather that’s where the circular polarizer’s effect happens. I strategically placed the effect right along the axis of the Milky Way. The polarization occurs only in that area (rather than the whole sky) because I am using a superwide lens and the effect covers a limited angle.

Anyway, back to the exciting part. I was able to shoot a clear Milky Way sky with a full moon lighting the landscape. My whoops of pleasure resonated from the canyon walls. I let out massive yawps of glee.

Folks, a revolution has arrived. You can put one more big gun in your bag to make your night skies sing. You can use a polarizer to photograph the Milky Way in moonlight.

When Does a Circular Polarizer Not work?

One caveat: When using ultrawide-angle lenses (like my Zeiss 15mm Distagon), you will discover that the area affected by polarization can be narrower than you want.

Check this out—I adjusted the polarizer all around to find a sweet spot, but didn’t find one: (

I also experienced some flare when the moon was at the edge of my ultrawide lens in the above.

So to avoid these two things that I found disadvantageous, I switched lenses to my 35mm, went vertical with a lens hood, and made a pano stitch (without a polarizer), and am very happy.

Note: Polarizing with pano stitches is rarely successful.

Nikon D850, Sigma 35mm f/1.4 Art. Ten frames at 10 seconds, f/5, ISO 6400. No polarizing filter.

So watch your images to be sure the effect is one you want to commit to, but give it a shot.

Wrapping Up

A circular polarizer is definitely worth putting in your toolkit for night photography. ’Nuff said.

And I can’t wait to see what you do with this! Please test for yourself and post your results in the Comments section here or on our Facebook page. We’d love to see what amazing things you make.

Gear

For you gear geeks: I used the Benro Master Slim Circular Polarizing screw-in filter on my Zeiss 15mm Distagon.

In case your superwide lens doesn’t accept a screw-in, know that many manufacturers, Benro Filters included, now make 100mm and 150mm square filter holders that allow for a circular polarizer to be mounted, as well as neutral density and graduated neutral density filters. It’s an amazing photography world we live in these days.

Matt Hill is a partner and workshop leader with National Parks at Night. See more about his photography, art, workshops and writing at MattHillArt.com. Follow Matt on Twitter Instagram Facebook.

UPCOMING WORKSHOPS FROM NATIONAL PARKS AT NIGHT

The Night Photography Mindset: Seeing Beyond the Milky Way

Ever since the introduction of cameras that were capable of producing quality images at high ISOs, night photographers have understandably been obsessed with photographing the Milky Way. For the first time in the history of photography, it was possible to make images of the starry night sky with short enough exposures to register stars as points of light rather than as star trails. It’s hard to understate the significance of this development, as it allowed us for the first time to see in a photograph the densest part of the Milky Way galaxy in the context of our place in the universe.

Keys Desert Queen Ranch, Joshua Tree National Park, 2018. Nikon D750, Sigma 24mm f/1.4 lens. 15 seconds, f/2.8, ISO 5000.

Beginning in late 2008 with Nikon’s introduction of the D700 and then the D3S a year later, photographers began making nighttime exposures in nature by starlight. By using the previously unheard-of ISO of 6400 with an f/2.8 lens, one could expose the landscape under a starry sky for 20 or 30 seconds and end up with a clear image of the galactic core of the Milky Way in all its glory. In the decade since, even entry-level cameras have become capable of producing decent-quality images at high ISOs, making astro-landscape photography accessible to almost anyone with a tripod.

Today, such images are commonplace enough to be taken for granted by people who have never stood under a sky dark enough to see the Milky Way with their own eyes. I’m reminded of Edward Steichen’s images of Rodin’s Balzac taken by moonlight in 1908. The authenticity of these remarkable images was questioned repeatedly because it was believed to be impossible to make photographs by moonlight.

Edward Steichen, Rodin’s plaster cast of his Balzac Sculpture, photographed by moonlight in 1908. Some of the earliest extant photographs made by moonlight are Steichen’s series of Rodin’s sculpture made in France in 1908 over a period of three nights. Steichen experimented with a range of exposures and lighting, resulting in a series of images that are now considered among his most important works.

Fast-forward to today and it feels like the concept of night photography is synonymous with astro-landscape, the term we now use for short-exposure high-ISO photography of the night sky. Most night photography workshops are planned around the new moon phase when the sky is darkest, and we giddily await the return of “Milky Way Season” (which coincidentally is just starting as I write this). In April, the galactic core rises above the horizon very late at night, and those who venture out two or three hours before dawn will be rewarded with the rich sight that the rest of us have to wait until late May to see at the “more reasonable” time of two hours after sunset when the sky first gets dark.

However, as all of the images made before the era of astro-landscape photography have taught us, night photography is about much more than just the Milky Way. This is a point I discussed in this space last summer (see “Beyond the Milky Way”). I ended that piece suggesting that night photographers create images that are “about more than just that great big galactic cloud in the sky.”

That sentiment is something I’d like to elaborate on now. The remainder of this article is about the attitudes and approaches of working in different nighttime conditions.

Urban Night Photography

Most people’s first attempts at night photography are made in brightly lit urban environments because that is where most of us live. Photographically speaking, the city is a sea of darkness punctuated with pools of light, and the main challenges are finding light that’s interesting and controlling contrast in the scene.

An SUV waits at the rail crossing, Houston, Texas, 2011. Canon 5D Mark II with a 50mm f/1.4 lens. 15 seconds, f/8, ISO 200. Everything came together in this spontaneous image–– the timing of the train, the composition and the lighting. The red warning light at the crossing provides a color accent and the cool xenon headlights of the SUV illuminate the passing train.

Broad cityscape images made at night often yield disappointing results. Images can be exposed for the overall scene, which leads to clusters of blown-out highlights or to dark, underexposed scenes with puddles of well-exposed highlights near the light sources. Learning to “see” what works for urban night photography is a skill that takes some time to develop.

In my own experience, I tend to see light before subject matter in these conditions. The alluring combination of different-colored light sources or the strong interplay of light and shadow draw me to a scene first, and then I try to find an interesting composition that takes advantage of that light. The best photographs are the ones where the light and subject matter complement each other. In situations with a dominant monochromatic light source, such as low pressure sodium vapor or mercury vapor, I often plan to convert to black and white. The quality of light from these sources is usually appealing only when used in conjunction with a contrasting light source.

Photographing By Moonlight

When I first began teaching night photography back in the late 1990s, workshops were always scheduled around the full moon, because film and early digital cameras were not capable of making usable images by starlight. Exposures of 15 minutes to an hour or more were the norm. The moonlit landscape is a subtle environment, and one that naturally leads a photographer to slow down and quietly observe the world around them. The romantic notions often associated with the night––loneliness, solitude, mystery and danger—can easily be appreciated by a long walk alone under a full moon. The best photographs made by moonlight often reflect these sensitivities.

Study Butte, Texas, 2007. The moon rises behind a rock formation in the Texas desert. I achieved careful exposure and backlight by placing the rising moon behind the rock, which made this a much more interesting photograph than it would have been if it were front-lit and fully exposed. Canon 5D, lens unrecorded. 268 seconds, aperture unrecorded, ISO 100.

In contrast, fully exposed moonlit images often lack those very qualities that make moonlight special. If one follows traditional exposure guidelines and exposes for a right-biased histogram, any sense of mystery is lost and the result is a strangely bluish scene that looks like weak sunlight. I often say that a good night photograph leaves the viewer with more questions than answers. Rather than revealing everything there is to know about a scene, a successful moonlit image pulls the viewer into the scene, and it evokes that irresistible but slightly uneasy voyeuristic feeling of being somewhere or doing something that we shouldn’t. Careful underexposure, supplemented with well-conceived light painting, can lead to powerful images that are suggestive rather than revelatory.

Astro-Landscape Photography

I’ve often thought of those first few years of astro-landscape photography in the same way as the earliest incarnations of Adobe Photoshop, when filters and silly composites ruled the day, because We Could. Another example might be the heady days when Photomatix was first released, along with those briefly seductive and garish HDR images we are all trying to forget. Perhaps it wasn’t quite that bad, but the idea was the same.

The Discovery, Death Valley National Park, 2015. Nikon D750, Tamron 15-30mm f/2.8 lens at 26mm. 25 seconds, f/3.5, ISO 6400. The combination of bizarre subject matter and light painting make this photograph about more than just the Milky Way. There’s a story here, and the viewer is left with more questions than answers after studying the image.

Likewise, astro-landscape photography was something new, and there was a pervasive energy to explore and test the limits–– the very qualities that lead to advances in art and science in the first place. Now that we are a bit more accustomed to seeing and photographing the Milky Way, galactic imagery has become a bit more sophisticated. Technically, it’s a relatively straightforward process to make a galactic core photograph. Be in the right place at the right time, point your camera in the right direction, focus carefully, and make an exposure.

What makes for the most successful images is context. Rather than just a simple horizon line and starry sky, strive for more complex images where the Milky Way core is just one element of the photograph. Compose an image where that element relates to the foreground, and use the foreground to convey the scale of the night sky and all those stars. Pay attention to the principles of design, and place the various elements smartly within the confines of the image frame the same way that you would with any other good photograph.

Bring It Home, Make It Yours

Some people have strong preferences about where and when they like to photograph at night. Perhaps the energy of the city at night, the pensive solitude of the moonlit landscape or the awesome grandeur of the Milky Way in one of our great national parks is what most attracts you. By all means, follow your heart, and do what you love. Just know that great night photographs can be made at any time of the year and during any phase of the lunar cycle, in the middle of Manhattan or deep in Yosemite.

Different skills or approaches may be required. No self-respecting daytime photographer would limit themselves to photographing at only certain times of the month or during only a few months of the year, and neither should you. Be an anytime, anywhere photographer and make the most of the conditions that you find before you.

Lance Keimig is a partner and workshop leader with National Parks at Night. He has been photographing at night for 30 years, and is the author of Night Photography and Light Painting: Finding Your Way in the Dark (Focal Press, 2015). Learn more about his images and workshops at www.thenightskye.com.

UPCOMING WORKSHOPS FROM NATIONAL PARKS AT NIGHT

Meteors and Eclipses and Comets, Oh My!—The Celestial Events of 2018

A happy new year to all of our readers! 2017 was pretty amazing for all of us at National Parks at Night. We led workshops at nine different locations in the United States and Iceland. We witnessed auroras, the total solar eclipse, meteor showers, and billions and billions of stars.

2018 is looking just as exciting. We are kicking the new year off with a blue supermoon in Biscayne National Park, celebrating both the Biscayne and Redwood National Park 50th anniversary with a group show that will feature our students’ work at both parks in October, and will be offering 12 workshops including stops in Scotland, South Iceland and all along the Blue Ridge Parkway, to name a few. (Three workshops are sold out, but if you are interested in those, sign up for the wait list, as anything can happen!)

We hope that you join us for an adventure sometime soon. Whether you’re coming with us or heading out on your own, there are as many reasons to photograph at night as there are stars in the sky. Shooting any night can be, and often is, spectacular, but there are also some special dates to get outdoors with your camera, as there are scores of notable celestial events to photograph in 2018.

You already know about many of these if you own a copy of our 2018 calendar, “Shots in the Dark,” where they’re marked conveniently for you! As for any specific times mentioned, we gleaned that information by using our favorite photo-planning app, PhotoPills. The approximate times in the list below are based on the U.S. Eastern time zone—so if you live elsewhere, we recommend double-checking the times in the planner section of PhotoPills.

It also goes without saying that most of these celestial events are best viewed in dark sky locations—of which our National Park system has plenty! If you live in an area with high levels of light pollution and want to find darker skies, we recommend checking out Dark Site Finder.

With no further ado, here’s the list of great night sky happenings to focus your wide apertures on in 2018! (The first two of these have already passed, but we’re including them for the sake of being comprehensive.)

January 2: Full Moon/Supermoon

Supermoon through 3 Bridges. Nikon D750 and Tamron 150-600mm f/5-6.3 lens. 1/2 second, f/11, ISO 400. © Gabriel Biderman.

We immediately led off the year with a full moon—and a supermoon, no less! A supermoon occurs when the full moon coincides with the moon’s closest approach to Earth. The moon is super because it appears closer and brighter than normal. Your best bet for photographing it is during moonrise the day before (in this case, January 1) so that you can have better balanced exposure with the twilight foreground. Find and interesting foreground like I did in capturing the moon rising between the Brooklyn, Manhattan and Willaimsburgh bridges in New York City (above). (Rest assured, these tips will become useful again at the end of the month.)

January 3-4: Quadrantids Meteor Shower

There was no rest for the night photographer, as right after the full blue moon kicked off, the first meteor shower of the year hit! (Stay tuned for an article on how to photograph and process meteor showers, coming later this year.) The peak of the shower has passed, but you may be able to spot some sky streaks this weekend. (It’s good to note throughout this article that, just like with fall foliage, the peak times are the best for shooting meteor showers, but they’re not the only times. You should be able to find streaks in the sky for several nights before and after peak.)

Quadrantids is an above-average meteor shower with up to 40 meteors per hour at its peak, which lasts from the evening of January 3 into the early morning of the 4th. The field of meteoroids was produced by the now-extinct comet 2003 EH1, which was discovered in, you guessed it, 2003. The meteors appear to radiate from the constellation Bootes.

Best Viewed: after midnight

Moon Phase: waning gibbous 95% that will be up all night

Worth Shooting? This is a tough one. The full moon will make all but the brightest meteors invisible. If you are in a warm, dark sky location—why not? But in the north, we might sit this one out.

January 31: Full Moon, Supermoon, Blue Moon and Total Lunar Eclipse

Full Moon over Hudson. Nikon D700 and Zeiss 21mm f/2.8 lens. 2 minutes, f/11, ISO 200. © Gabriel Biderman.

OK, lots going on this night. We will be leading a workshop in Biscayne National Park (still a couple of spots left!), which will be a perfect location to view the supermoon rising over the forever horizon. We may even explore some reflecting moon trails as we explore this water world of a park.

A total lunar eclipse happens when Earth blocks the sun’s light from directly hitting the full moon. During this time, the moon is in Earth’s shadow—no direct sunlight reflects off the lunar surface. However, the 0.12-albedo surface does catch some scattered light, which causes the moon to still be visible with a slight reddish hue. This is sometimes called the “blood moon.”

The total lunar eclipse will not be viewable in Biscayne, but will be in many other national parks and wild spaces in large parts of the world. If you live in western North America, eastern Asia, Russia, Australia or around the Pacific Rim, you’ll be in the path of totality.

February 15: Partial Solar Eclipse

Taking a bite out of the Great American Solar Eclipse. Fujifilm XT-2 and 100-400mm f/4.5-5.6 lens. 1/250, f/8, ISO 800. © Gabriel Biderman.

If you live in Chile, Argentina or are planning a trip to Antarctica, this would be a fun day to be outside with a camera. This will not rival the total eclipse we saw in the U.S. last year; instead it will look like a bite is taken out of the sun when viewed with solar glasses and filters. But it’s absolutely still worth shooting. (For advice about gear, techniques and safety when photographing an eclipse, see our free e-guide, “Here Comes the Sun.”)

March 20: Vernal Equinox (Northern Hemisphere), Autumnal Equinox (Southern Hemisphere)

Winter is over and there will be equal parts of day and night … with the days slowly getting longer, boohoo!

March 31: Full Moon, Blue Moon

Full Moon through the Auroras, Iceland. Sony A7s and Zeiss 21mm f/2.8 lens. 15 seconds, f/8, ISO 25,600. © Gabriel Biderman.

Our second blue moon in the first three months of the year. This is unique, as is the interesting fact that 2018 features no full moon in February.

April 16: First New Moon of the Milky Way season

You’ll need to stay up late. Depending on where you are, the return of the Milky Way’s core to the night sky is reason to celebrate! It should break the horizon around 1:30 a.m. and hang around for three hours before the morning twilight erases the stars.

April 22-23: Lyrids Meteor Shower

Lyrids is an average shower that can have about 20 meteors per hour at its peak on the evening of April 22 and the early morning of the 23rd. The shower is produced by dust particles left behind by comet C/1861 G1 Thatcher, which was discovered in 1861. The meteors appear to radiate from the constellation Lyra.

Best Viewed: after midnight

Moon Phase: first quarter 50% that will set at 1:46 a.m.

Worth Shooting? Yes! With the half moon setting after midnight, the Lyrids could definitely put on a good show.

May 6-7: Eta Aquarids Meteor Shower

Eta Aquarids is an above-average shower that can have up to 30 meteors per hour in the Northern Hemisphere, and up to 60 per hour in the Southern Hemisphere! Its peak is on the evening of May 6 into the early morning of the 7th. It is produced by the dust particles left behind by the famous Halley’s Comet, which has been recorded since ancient times. The meteors appear to radiate from the constellation Aquarius.

Best Viewed: from 10 p.m. to 2 a.m.

Moon Phase: waning gibbous 59% that will rise at 1:41 a.m.

Worth Shooting? Yes. With no moon to begin the night, you should be able to see the start of the show during clears skies. After 1:30 a.m., only the brightest of the meteors will be visible.

May 15: New Moon

The Ruins of Hovenweep. Hasselblad X1D and 30mm f/3.5 lens. Blend of foreground at 6 minutes, f/4, ISO 800 and sky at 23 seconds, f/4, ISO 6400. © Gabriel Biderman.

Welcome the Milky Way galactic core someplace dark, as it rises around 11 p.m.!

June 13: New Moon

Milky Way Arching over Centennial Valley, Montana. Nikon D750 and 14-24mm f/2.8 lens. Five-image panorama at 30 seconds, f/4, ISO 6400. © Gabriel Biderman.

Even better Milky Way core, as it will be up around 9:15 p.m.—during nautical twilight in most of the U.S. Prime time of the year for the Milky Way arching shots!

June 21: Summer Solstice

Shortest night of the year. Boo!

July 13: New Moon, Partial Solar Eclipse (way south)

Under Sipapu, Natural Bridges National Monument. Nikon D750 and 14-24mm f/2.8 lens. 20 seconds, f/2.8, ISO 6400. © Gabriel Biderman.

The Milky Way will be high in the sky during twilight. Perfect for straight-through-the-sky Milky Way shots. (To learn more about the difference between this type of Milky Way photo and arching panos, see our “Five Questions” blog post from last July.)

Also on this day is a partial solar eclipse for our friends in southern Australia and Antarctica.

July 27: Total Lunar Eclipse

Higher Rolling with the Blood Moon, Vegas 2014. Sony A7r and Nikon 70-200mm f/2.8 lens. 4 seconds, f/11, ISO 800. © Gabriel Biderman.

Visible throughout most of Europe, Africa, western and central Asia, the Indian Ocean, and Western Australia. (Visit the NASA website for more information.)

July 28-29: Delta Aqaurids Meteor Shower

This is an average shower, with 20 meteors per hour during its peak from the evening of July 28 through the early morning of the 29th. These meteors are produced from the debris left behind by the comets Marsden and Kracht, and they appear to radiate from the constellation Aquarius.

Best Viewed: after midnight

Moon Phase: waning gibbous 99% (essentially, a full moon) and will be up all night

Worth Shooting? Probably not. The full moon will obscure all but the brightest of meteors. (Though you can be sure we’ll be on the lookout during our Blue Ridge Parkway workshop.)

August 11: New Moon, Partial Solar Eclipse

The August Core over Centennial Valley, Montana. Nikon D750 and 14-24mm f/2.8 lens. 20 seconds, f/2.8, ISO 6400. © Gabriel Biderman.

During this new moon, the Milky Way will appear high in the sky immediately as darkness falls.

This partial solar eclipse will be seen in parts of northeast Canada, Greenland, extreme northern Europe, and northern and eastern Asia. Best viewing will be in northern Russia with 68 percent of the sun blocked.

August 12: Perseids Meteor Shower

Great Sand Dunes National Park, Colorado. Nikon D750 and 15mm Zeiss Distagon f/2.8 lens. 234 images at 22 seconds, f/2.8, ISO 6400, plus a single exposure at 382 seconds, ISO 2000 for the landscape after moonrise. © 2017 Matt Hill.

One of the best meteor showers of the year, with 60 per hour during its peak on August 12 into the early morning of the 13th. These meteors are produced from the comet Swift-Tuttle, and they appear to radiate from the constellation Perseus.

Best Viewed: from darkness to morning

Moon Phase: waxing crescent 3%, but will have set by nightfall

Worth Shooting? Yes, yes, yes! This is our personal favorite meteor shower. Lots of meteors, new moon and comfortable temperatures. So fingers crossed for clear skies, and fire away!

September 9: New Moon

The Milky Way core will be visible for only the first three hours of darkness (will set around 11:30 p.m.).

September 23: Autumnal Equinox (Northern Hemisphere), Vernal Equinox (Southern Hemisphere)

Equal parts day and night (the moon and sun will be rising and setting around the same time)which could create some beautiful twilight photos.

Also, in the Northern Hemisphere, the nights start to get longer—woohoo!

October 8: Draconids Meteor Shower

Draconids is a minor meteor shower which averages 10 meteors per hour during the peak of early evening on October 8. The meteors are produced by comet 21P Giacobini-Zinner, which was discovered in 1900. They appear to radiate from the constellation Draco.

Best Viewed: early evening, from 8 p.m. to midnight

Moon Phase: new moon 0.4%, and will not be visible at night

Worth Shooting? Yes. Even though it is a minor meteor show, no moon means that you’ll see even the faintest meteors in a dark sky location.

October 9: New Moon

Milky Way core will be visible for 1 1/2 hours after astronomical twilight.

October 21-22: Orionids Meteor Shower

Orionids is an average shower that has about 20 meteors per hour at its peak from late on October 21 until early morning on the 22nd. The meteors are produced from the dust left behind by the prolific Halley’s Comet. They appear to radiate from the constellation Orion.

Best Viewed: after midnight

Moon Phase: waxing gibbous 91%—essentially full and will be up most of the night

Worth Shooting? Yes. Even though the full moon will block the fainter meteors, the Orionids produce very bright streaks that should be visible throughout the night.

November 5-6: Taurids Meteor Shower

Taurids is a minor meteor shower that averages five to 10 per hour, and peaks on the evening of the November 5 into the morning of the 6th. They are produced by Asteroid TG10 and comet 2P Encke, and appear to radiate from the constellation Taurus.

Best Viewed: after midnight

Moon Phase: no moon—the thin crescent will set about the same time as sunset

Worth Shooting? I wouldn’t make plans around it, but if you happen to be in a dark location with clear skies, be on the lookout.

November 7: New Moon

Milky Way core will be visible for approximately the first hour of darkness.

November 17-18: Leonids Meteor Shower

Average meteor shower—15 per hour during peak from the evening of November 17 until early morning on the 18th. Produced by the comet Temple-Tuttle, which was discovered in 1865. The meteors appear to radiate from the constellation Leo.

Best Viewed: early morning (before twilight) of November 18

Moon Phase: waxing gibbous 72%, setting at 1:36 a.m.

Worth Shooting? Yes, for the night owl. Factor in the bright moon not setting until 1:36 a.m. on the 18th, but you’ll have between then and 5:30 a.m. to shoot the meteors. (These might add an interesting night-sky component during our black-and-white workshop in Sloss Furnaces National Historic Landmark that week.)

December 7: New Moon

No Core in the Haystack, Oregon 2016. Nikon D750 and 14-24mm f/2.8 lens. 30 seconds, f/2.8, ISO 3200. © Gabriel Biderman.

Milky Way core will not be visible during the night in the Northern Hemisphere.

December 12-16: Comet 46P/Wirtanen

It looks like we will witness the 10th closest comet in modern times! It should be viewable to the naked eye on December 12 as it reaches perihelion—its closest approach to the sun. Look toward the bull constellation, Taurus, that night.

On December 16, the comet will make its closest approach to Earth, soaring by only 7.1 million miles away, and will be visible to the naked eye. Look toward the Pleiades and Hyades star clusters.

For more information, see this breakdown from the University of Maryland.

December 13-14: Geminids Meteor Shower

This is probably the best meteor shower for photography, with an average of 120 multicolored meteors during peak from the evening of December 13 until early morning on the 14th. The roaming meteoroids were produced by Asteroid 3200 Phaethon, which was discovered in 1982, and the meteors appear to radiate from the constellation Gemini.

Best Viewed: after midnight

Moon Phase: waxing crescent 36%, and sets around 10:30 p.m.

Worth Shooting? If you can find someplace not too cold and have clear skies—YES, YES, YES!

December 21: Winter Solstice

Longest night of the year!!!

Warning—Northern Hemisphere nights start to get shorter after this.

December 21-22: Ursids Meteor Shower

Ursids is a minor meteor shower—with an average of five to 10 per hour from the evening of the December 21 until the early morning of the 22nd. Produced by the comet Tuttle (discovered in 1790), the meteors appear to radiate from the constellation Ursa Minor.

Best Viewed: after midnight with your fingers crossed

Moon Phase: waxing gibbous 99%, and sets just before sunrise

Worth Shooting? Probably not—with the full moon up the entire night, likely cold temperatures and not many bright meteors, I’d sit this one out.

Wrapping Up

Phew! That about sums up the top celestial events to photograph in 2018. I hope this inspires you to seize the night in the upcoming year!

As you do, remember that we love to see your night images! Feel free to share them on our Facebook page, or to tag us in Instagram. We always love looking, we will always respond, and we are eager to share in more and more conversations about night photography.

Gabriel Biderman is a partner and workshop leader with National Parks at Night. He is a Brooklyn-based fine art and travel photographer, and author of Night Photography: From Snapshots to Great Shots (Peachpit, 2014). During the daytime hours you'll often find Gabe at one of many photo events around the world working for B&H Photo’s road marketing team. See his portfolio and workshop lineup at www.ruinism.com.

UPCOMING WORKSHOPS FROM NATIONAL PARKS AT NIGHT

Beyond the Milky Way: There’s More to Night Photography Than the Trendy

Pemaquid Point Lighthouse, Maine. 20 seconds, f/3.5, ISO 6400. Pano of six stitched frames, with clouds, Milky Way and light pollution.

A couple of years ago during a conversation about trends in night photography, a friend of mine (who shall remain nameless) said, “If I see one more Milky Way picture, I’m gonna puke.”

While I don’t exactly share the sentiment, I understand where he was coming from. Since the advent of digital cameras that perform well at high ISOs––the Nikon D700 and Canon 6D are the best early examples—night photographers have understandably been obsessed with photographing the core, or galactic center, of our galaxy.

Experiencing the Milky Way for the first time under a truly dark sky is an unforgettable experience. Seeing the core light up the LCD on the back of your camera screen for the first time is another “Holy Shit!” moment for many people. It’s easy to be smitten with the Milky Way, with its 100 billion to 400 billion stars. Every star we see in the sky from anywhere on Earth is part of the Milky Way galaxy, which is one of an estimated 100 billion galaxies in the universe.

Lady Boot Arch, Alabama Hills. 15 minutes, f/2.8, ISO 200 for the foreground, combined with 20 seconds, f/2.8, ISO 6400 for the sky, with tea lights and flashlight.

Lady Boot Arch. 15 minutes, f/2.8, ISO 200, with tea lights and flashlight.

Spend any time on social media or photo sharing websites like Flickr or 500px, and you’ll find hundreds of thousands of images of the Milky Way core. Many of them are heavily processed and rendered in an unrealistic way. They remind me of the images of early HDR enthusiasts––wild, colorful and dynamic, but full of post-processing artifacts, and far from believable. Nowadays, people use HDR imaging more responsibly, and the true power of the technique comes through in stunning examples.

With Milky Way photography, we are just starting to get to that point. Rather than simply photographing the core because it was suddenly possible, without much consideration for anything else, many night photographers are now including the Milky Way in their images in much more fulfilling ways.

Steve’s Rock, Olmsted Point, Yosemite National Park. 30 seconds, f/5.6, ISO 800. Clouds back-lit with moonlight high in the Sierra with light from a Coast HP5R filtered with two gels, a 1/2 CTO and a 1/8 minus green.

Instead of images of the core rising over a dark and empty foreground, I’m seeing much more interesting compositions where the Milky Way is just one component of a composition. People are developing more sophisticated ways of capturing and processing foreground detail combined with core exposures. Panoramas of the arch of the Milky Way have been popular for some time, but now photographers are using the arch to frame interesting foreground subjects. This trend is encouraging.

Where we’ve come from

Throughout the history of night photography, photographers were limited to long exposures in natural light situations due to the limited sensitivity of film or early digital sensors. Star trails, rather than star points, were the norm.

Reciprocity failure—which caused film to become less sensitive the longer it was exposed—also played a part in making star point or Milky Way photography next to impossible. Most films began to show signs of reciprocity failure in as little as 1 second! Fuji’s amazing Neopan Acros was a game-changer, as it maintained its sensitivity up to 2 minutes, and then only slowly lost it with longer exposures. Acros is only a 100 speed film however, which means star point exposures were not an option.

2 minutes, f/4, ISO 6400. Star points, clouds and light pollution over the Sound of Rassay on the Scotland’s Isle of Skye.

15 minutes, f/4, ISO 400.

In late 2002, students at my night photography class at the New England School of Photography began showing up with new digital cameras: first the Nikon D100, and then a few months later the Canon 10D. For the first time, non-professional photographers began to take digital photography seriously, and these cameras made reasonably good night images––at 100 ISO and if the exposures were kept to 30 seconds or less.

Later, when the D700 came out in 2007, and the 5D Mark II the following year, digital night photography took a huge leap forward. A few brave souls cranked up their ISOs to 1600, 3200 and beyond, and began making exposures under moonless skies. They discovered that not only was it possible to record stars as points of light, but it was also possible to show the incredible galactic core of the Milky Way. A new chapter in the history of night photography had begun.

Where we are now

These days, it’s not uncommon for National Parks at Night to encounter other night photographers, or even other workshops, when we are out in the field with our groups––if we happen to be holding a workshop during the new moon.

Joshua Tree National Park. 20 seconds, f/3.5, ISO 6400. Lingering twilight in the western sky combined with light painting on the foreground.

But when we hold workshops around the full moon, or first or last quarter, we rarely encounter anyone else. This is almost the opposite of when I first started teaching workshops, in that we went out to photograph only within a day or two of the full moon, because that was the only time the light was strong enough to be particularly useful for film work.

It’s great to have amazing locations at Joshua Tree National Park or Yosemite to ourselves, but I feel like we are keeping a secret. For all of those photographers who never shot at night with film, or with those first-generation DSLRs, don’t limit yourselves to photographing just during the high Milky Way season at 20 seconds, f/2.8, ISO 6400 around the new moon! There are amazing photographs to be had all year long, during all phases of the moon, at all ISOs.

Where do we go next?

One of the things we try to emphasize in our workshops is just that point: There’s never a bad time for night photography!

Maine. 20 seconds, f/4, ISO 6400. Clouds and the light from Marshall Point Lighthouse on the distant shore and foreground, combined with lingering twilight.

Make your images about more than just that great big galactic cloud in the sky. By all means, photograph the Milky Way and show it in all its glory. But try to push outside of the boundaries of your comfort zone. How about a Milky Way trail image, or a moon trail? Combine star points and the Milky Way with partly cloudy skies, rather than cursing the clouds. Shoot under a quarter or crescent moon. Combine a light-painted foreground with the Milky Way. See if you can photograph star trails in the city.

Most importantly, challenge yourself to learn new techniques and to make images that are different from what you have done before.

Note: Please read Michael Frye's excellent related blog post for a tangential view on this topic. I encourage you to subscribe to Michael's blog, as he always has interesting, relevant content, outstanding images, and frequently photographs at night and writes about night photography.

Lance Keimig is a partner and workshop leader with National Parks at Night. He has been photographing at night for 30 years, and is the author of Night Photography and Light Painting: Finding Your Way in the Dark (Focal Press, 2015). Learn more about his images and workshops at www.thenightskye.com.

UPCOMING WORKSHOPS FROM NATIONAL PARKS AT NIGHT