Astronomical Events

Wishing Upon Some Falling Stars: The Tau Herculids May (or May Not) be a Night of a Lifetime

One autumn night in 1995 I arrived home late. I was about to walk into the back door of the house when I casually looked up at the stars, and there it was: comet 73P/Schwassmann-Wachmann 3. Wow. It was as clear as anything else in the sky, beautifully floating amidst the stars. I’d never seen anything like it. Moreover, after Halley’s Comet had so disappointed me as a young teen in 1986, I’d really expected never to see any comet at all.

Sometimes the universe can seem so static. From one night to the next we look up and see what seems like the same stars, the same moon, the same unfathomable expanse of nothing that surrounds our pale blue dot.

Then something reminds us that the universe is always in motion, always in flux, always ready with a surprise. We get a lunar eclipse that seizes the interest of half the globe. Or a comet that no one had known existed sails in from the Kuiper belt and dazzles us for a glorious summer month. Or, in the case of this week, a brand new meteor shower rains stars into our night sky.

Comet NEOWISE over Jordan Pond, Acadia National Park. © 2020 Chris Nicholson. Nikon D5 with a Nikon 24-70mm f/2.8 lens. Six stitched frames shot at 15 seconds, f/2.8, ISO 6400.

What? Well, maybe. This Monday, May 30, we might see one of the most dazzling displays of meteors ever. Or not. Astronomers aren’t sure, and the only way to find out is to stay up and look up.

The meteoroids in question do exist. They’re left over from that 1995 flyby, and now Earth is maybe about to come upon them in space.

Maybe? Well, astronomers aren’t exactly sure how far the debris has traveled, but some credible projections put them right in Earth’s path. If those projections are accurate, and if we pass through the heart of the debris cloud, it could produce one of the densest clusters of shooting stars ever witnessed. The Tau Herculid Meteor Shower, as its come to be known, could be astronomically historic.

What does that mean in terms of the number of potential shooting stars? The meteorologist for The Washington Post says 1,000 per hour. Universe Today says as many as 1,400. (To put those numbers in perspective, consider that a really good year for the famous Perseid Meteor Shower yields about 100 per hour.)

Perseid Meteor Shower outburst over Badlands National Park. © 2021 Matt Hill.

But, again, the Tau Herculid number could be zero.

In fact, zero is the hunch of Tyler Nordgen, astronomer, Night Photo Summit speaker and author of the book Stars Above, Earth Below: A Guide to Astronomy in the National Parks. “If I were to bet, I’d say this upcoming meteor shower will turn out to be nothing,” Nordgren says. “I still remember spending a perfectly starry night out in Sleeping Bear Dunes National Lakeshore for the supposed Camelopardalids meteor ‘storm’ in May 2014 and not seeing a single meteor all night.”

Still, Nordgren says the potential for what could happen is probably worth a look. “It only has to actually happen once for you to see (or miss) the experience of a lifetime. So if it’s clear, I’ll go out. I’m not making a special trip to the desert Southwest, but I’ll hang out in my backyard and see what I can see. What’s the worst that can happen?”

Shooting the Potential Shower

This all brings us to what to do as photographers. I say get the camera ready and get outside.

If you choose that option, Nordgren has some advice: “Use a wide-angle lens to capture a lot of sky. Point upward with something on the horizon in the field of view to give a sense of scale, and just let the camera expose for 10, 20, 40, 90 seconds or more. See what you capture. It takes only one photo to make a night to remember.”

If you want to shoot the meteor shower, download our e-book Great Balls of Fire by clicking the image above.

For even more to strategize such a shoot, see our blog post “How to Photograph a Meteor Shower.” Better yet, read our e-book Great Balls of Fire: A Guide to Photographing Meteor Showers.

Boötes the Herdsman

For this particular meteor shower, the radiant will be near the Boötes the Herdsman constellation, which is around the bright orange star Arcturus and not far from the handle of the Big Dipper. To find it, use an app such as Sky Map (Android), Sky Guide (iOS) or Stellarium (ambivalent). Alternatively, use PhotoPills—they just added the Tau Herculids to their meteor shower data, so you can do a full scout like with pretty much any other celestial event. Include the radiant in your composition to get the best chance of capturing a meteor, or to capture a series of exposures for creating a “meteor radiant” image.

The Western Hemisphere (and a small part of West Africa) will be the best place to view the shower (weather-permitting), unless you’re in a midnight-sun or simmer-dim kind of area. Be outside and look up around 1 a.m. EDT, or 10 p.m. PDT.

Again, this event might not be an event at all. If you’re undecided whether to try to witness or photograph the potential shower, here are some pros and cons:

Pros

  • If the meteors do show, they could produce a once-in-many-lifetimes experience.

  • We’re in a new moon, so lunar conditions are optimal to see any stars that may fall.

Cons

  • Though the number of meteors could be high, most are likely to be dim. (Visible and photographable, but not bright like the Perseids.)

  • The radiant is high—halfway up from the horizon on the east coast, and nearly overhead on the west. This makes including the landscape in compositions more challenging. (But not impossible.)

More Information

For more about the Tau Herculids, see these great articles:

Show Us What You Get

Will you wish upon some falling stars? If you’re feeling lucky or adventurous and you go out to shoot, we’d love to see your photos. Please share them in the comments section or on our Facebook page, or tag us (@nationalparksatnight) on Instagram.

Chris Nicholson is a partner and workshop leader with National Parks at Night, and author of Photographing National Parks (Sidelight Books, 2015). Learn more about national parks as photography destinations, subscribe to Chris' free e-newsletter, and more at www.PhotographingNationalParks.com.

UPCOMING WORKSHOPS FROM NATIONAL PARKS AT NIGHT

Once in a Red Moon: Photographing the Lunar Eclipse

Cameras ready! This evening’s night skies will feature a total lunar eclipse.

The show will last about 3.5 hours, beginning at about 10:30 p.m. Eastern time, and ending at about 2 a.m., with totality falling between about 11:30 and 1. Moreover, the eclipse will be visible to about one-third of humans around the world—in most of Europe, Africa, and North and South America (including all of the United States)—providing extraordinary photo opportunities to countless photographers.

A lunar eclipse differs from its solar cousin in that we don’t get a total blackout, or a ring of fire, or any of that kind of end-of-days drama. But the moon, should weather allow you to see it, will become completely dim and red.

Why? Because a solar eclipse is a phenomenon of the light source (the sun) being blocked from view, while a lunar eclipse is a phenomenon of the moon moving into a shadow. When something is in a shadow, you can usually still see it—just dimmer, and perhaps with altered color. That’s exactly what’s happening during a total lunar eclipse. The moon appears dimmer in the Earth’s shadow, and takes on first a yellowish and then a reddish hue because the only light hitting it is being bent and filtered through our atmosphere.

A Quick Rundown

Here are a few notes on photographing a lunar eclipse:

No special gear is needed beyond what you’d use to photograph any moon at night: camera, lens, tripod. You can add a cable remote, an intervalometer, a star tracker, etc., but you won’t need any special light filters or anything of that nature.

Use PhotoPills to see ahead of time where the moon will be in the sky during the eclipse. You can do this with the Eclipse panel in the Planner, or if you’re already on location just use Night AR in the Moon pill to visualize where the moon will move during the times mentioned above.

PhotoPills.com showing the location of the moon at the time of peak totality, as it can be seen from the North Rim of Grand Canyon National Park.

Consider using both long and wide lenses to create different types of compositions. The former will give you great moon portraits, while the latter will allow you to portray the moon as an element of a wider night scene.

Slow down. The eclipse will last 3.5 hours from beginning to end, and totality will last about 90 minutes. You can work through a lot of scenarios and ideas in that much time, and you can even wait out clouds that might be blocking the moon for a bit.

Pay attention to shutter speed. The moon moves faster than it appears—a little less than 2,300 miles per hour. According to Lance Keimig’s book Night Photography and Light Painting, that means the moon moves the length of its diameter every 2 minutes. If your shutter speed is too long, it will blur. The wider your lens, the longer shutter speed you can get away with—even as long as 10 seconds or so. But with longer lenses, you’ll be limited to much shorter speeds. (Below, see a graphic from a test Matt Hill ran a few years ago, based on using a 300mm lens.)

Be ready to change exposure. The moon will get darker closer to the middle of the eclipse, so an exposure that looks good at 10:30 p.m. EDT will appear dark at midnight, and your good midnight exposure will blow out the moon at 1:30 a.m. But you have to be careful about compensating for that loss of illumination by changing your shutter speed too much, lest your moon go soft from motion (see the previous point). Therefore, during totality you’ll probably want to increase your ISO instead.

Further Exploration

Obviously you can dive a lot deeper into a topic such as this. Here are a few options:

Wrapping Up

We wish all of you great success in shooting for the moon tonight! Please come back and share your photos with us.

Chris Nicholson is a partner and workshop leader with National Parks at Night, and author of Photographing National Parks (Sidelight Books, 2015). Learn more about national parks as photography destinations, subscribe to Chris' free e-newsletter, and more at www.PhotographingNationalParks.com.

UPCOMING WORKSHOPS FROM NATIONAL PARKS AT NIGHT

Capturing the Comet: How to Photograph the Night Surprise of NEOWISE

The lighthouse on Monhegan Island is an amazing place to shoot at night. But then we saw the comet, and the lighthouse may as well have not even existed. We quickly moved away from the compositions we’d been working so hard on and focused on the celestial visitor instead.

Lance and I are midway through a two-week trip to Maine, where we’re leading two workshops along some of the most beautiful coastline in the U.S. And gosh did we (and the attending night photographers) luck out, because our time here coincided perfectly with the astronomy surprise of the year: Comet NEOWISE.

Photographing the comet quickly became high on the priority list not only for our participants, but also for us. It’s not common to get such an opportunity—once every 7 millennia, for this particular comet—and all of us have been pretty excited by the chase.

We have one more week in Maine, shooting first on Monhegan Island, then moving to Acadia National Park. But before moving on, we wanted to share some tips about photographing the comet, so you can get outdoors too and take advantage of this amazing night-sky event.

Comet NEOWISE over the Monhegan Island Lighthouse keeper’s quarters, Maine. © 2020 Chris Nicholson. Nikon D5 with a Nikon 14-24mm f/2.8 lens, illuminated by the lighthouse and a Luxli Viola. 25 seconds, f/3.5, ISO 6400.

Finding NEOWISE

First you need to know where in the sky to look for the comet, and when to look there. Fortunately both are pretty easy.

When the comet was first appearing earlier this month, it was doing so in early, early morning—but now (thank goodness) it’s showing up at nautical twilight and hanging around for a few hours before dipping below the horizon. This schedule is much easier for most people to work with.

Where is the comet hanging around? In the north-northwest sky, below the Big Dipper. (See Figure 1. This is for the Northern Hemisphere. Unfortunately our night photography friends south of the equator don’t get to share this show.)

Figure 1. A rough projection of where in the sky to find Comet NEOWISE this coming week. In general, starting at dusk, look north-northwest, below the Big Dipper. The comet will appear to rotate with the rest of the sky, and will set below the horizon a few hours after first appearing.

Each night the comet will appear slightly more west, as well as slightly higher from the horizon (thereby lasting a little longer before setting). As the evening hours progress, NEOWISE will appear to move toward the horizon with the stars and constellations, eventually setting out of view. Assuming clear skies, you’ll have lots of time to experiment with different strategies and compositions.

Figure 2. If you’d like help finding the comet in the field, try the Sky Guide app (for iOS and Android), which will pinpoint the comet.

How long will the comet be visible? Astronomers are hypothesizing that we’ll be able to see it until about the end of July. But precision is hard to come by. The good news this week is that the comet is traveling closer to Earth, which should make it larger in the sky; the bad news is that it’s traveling further from the sun, which should mean it won’t be as bright. At some point NEOWISE will cross a threshold where those variables make it even less visible, and then invisible.

Either way, the rest of this week should be the prime opportunity for photography. The comet will be detectable at reasonable hours during very dark skies (i.e., with a new moon). After that, as the comet fades from view, the moon will be growing larger and setting later, eventually obscuring the final acts of the NEOWISE show.

Photographing NEOWISE

As mentioned, we’ve been photographing NEOWISE for a week, so we have some tips we can offer. We hope these will help as you get out this week to capture the comet.

Sharpness

To keep the comet sharp with a long exposure, you’ll want to approach shutter speed the same way as when trying to keep stars or the Milky Way sharp: Use either the 400 Rule, or for more precision, the NPF Rule. In other words, if your stars are sharp, then your comet will be too.

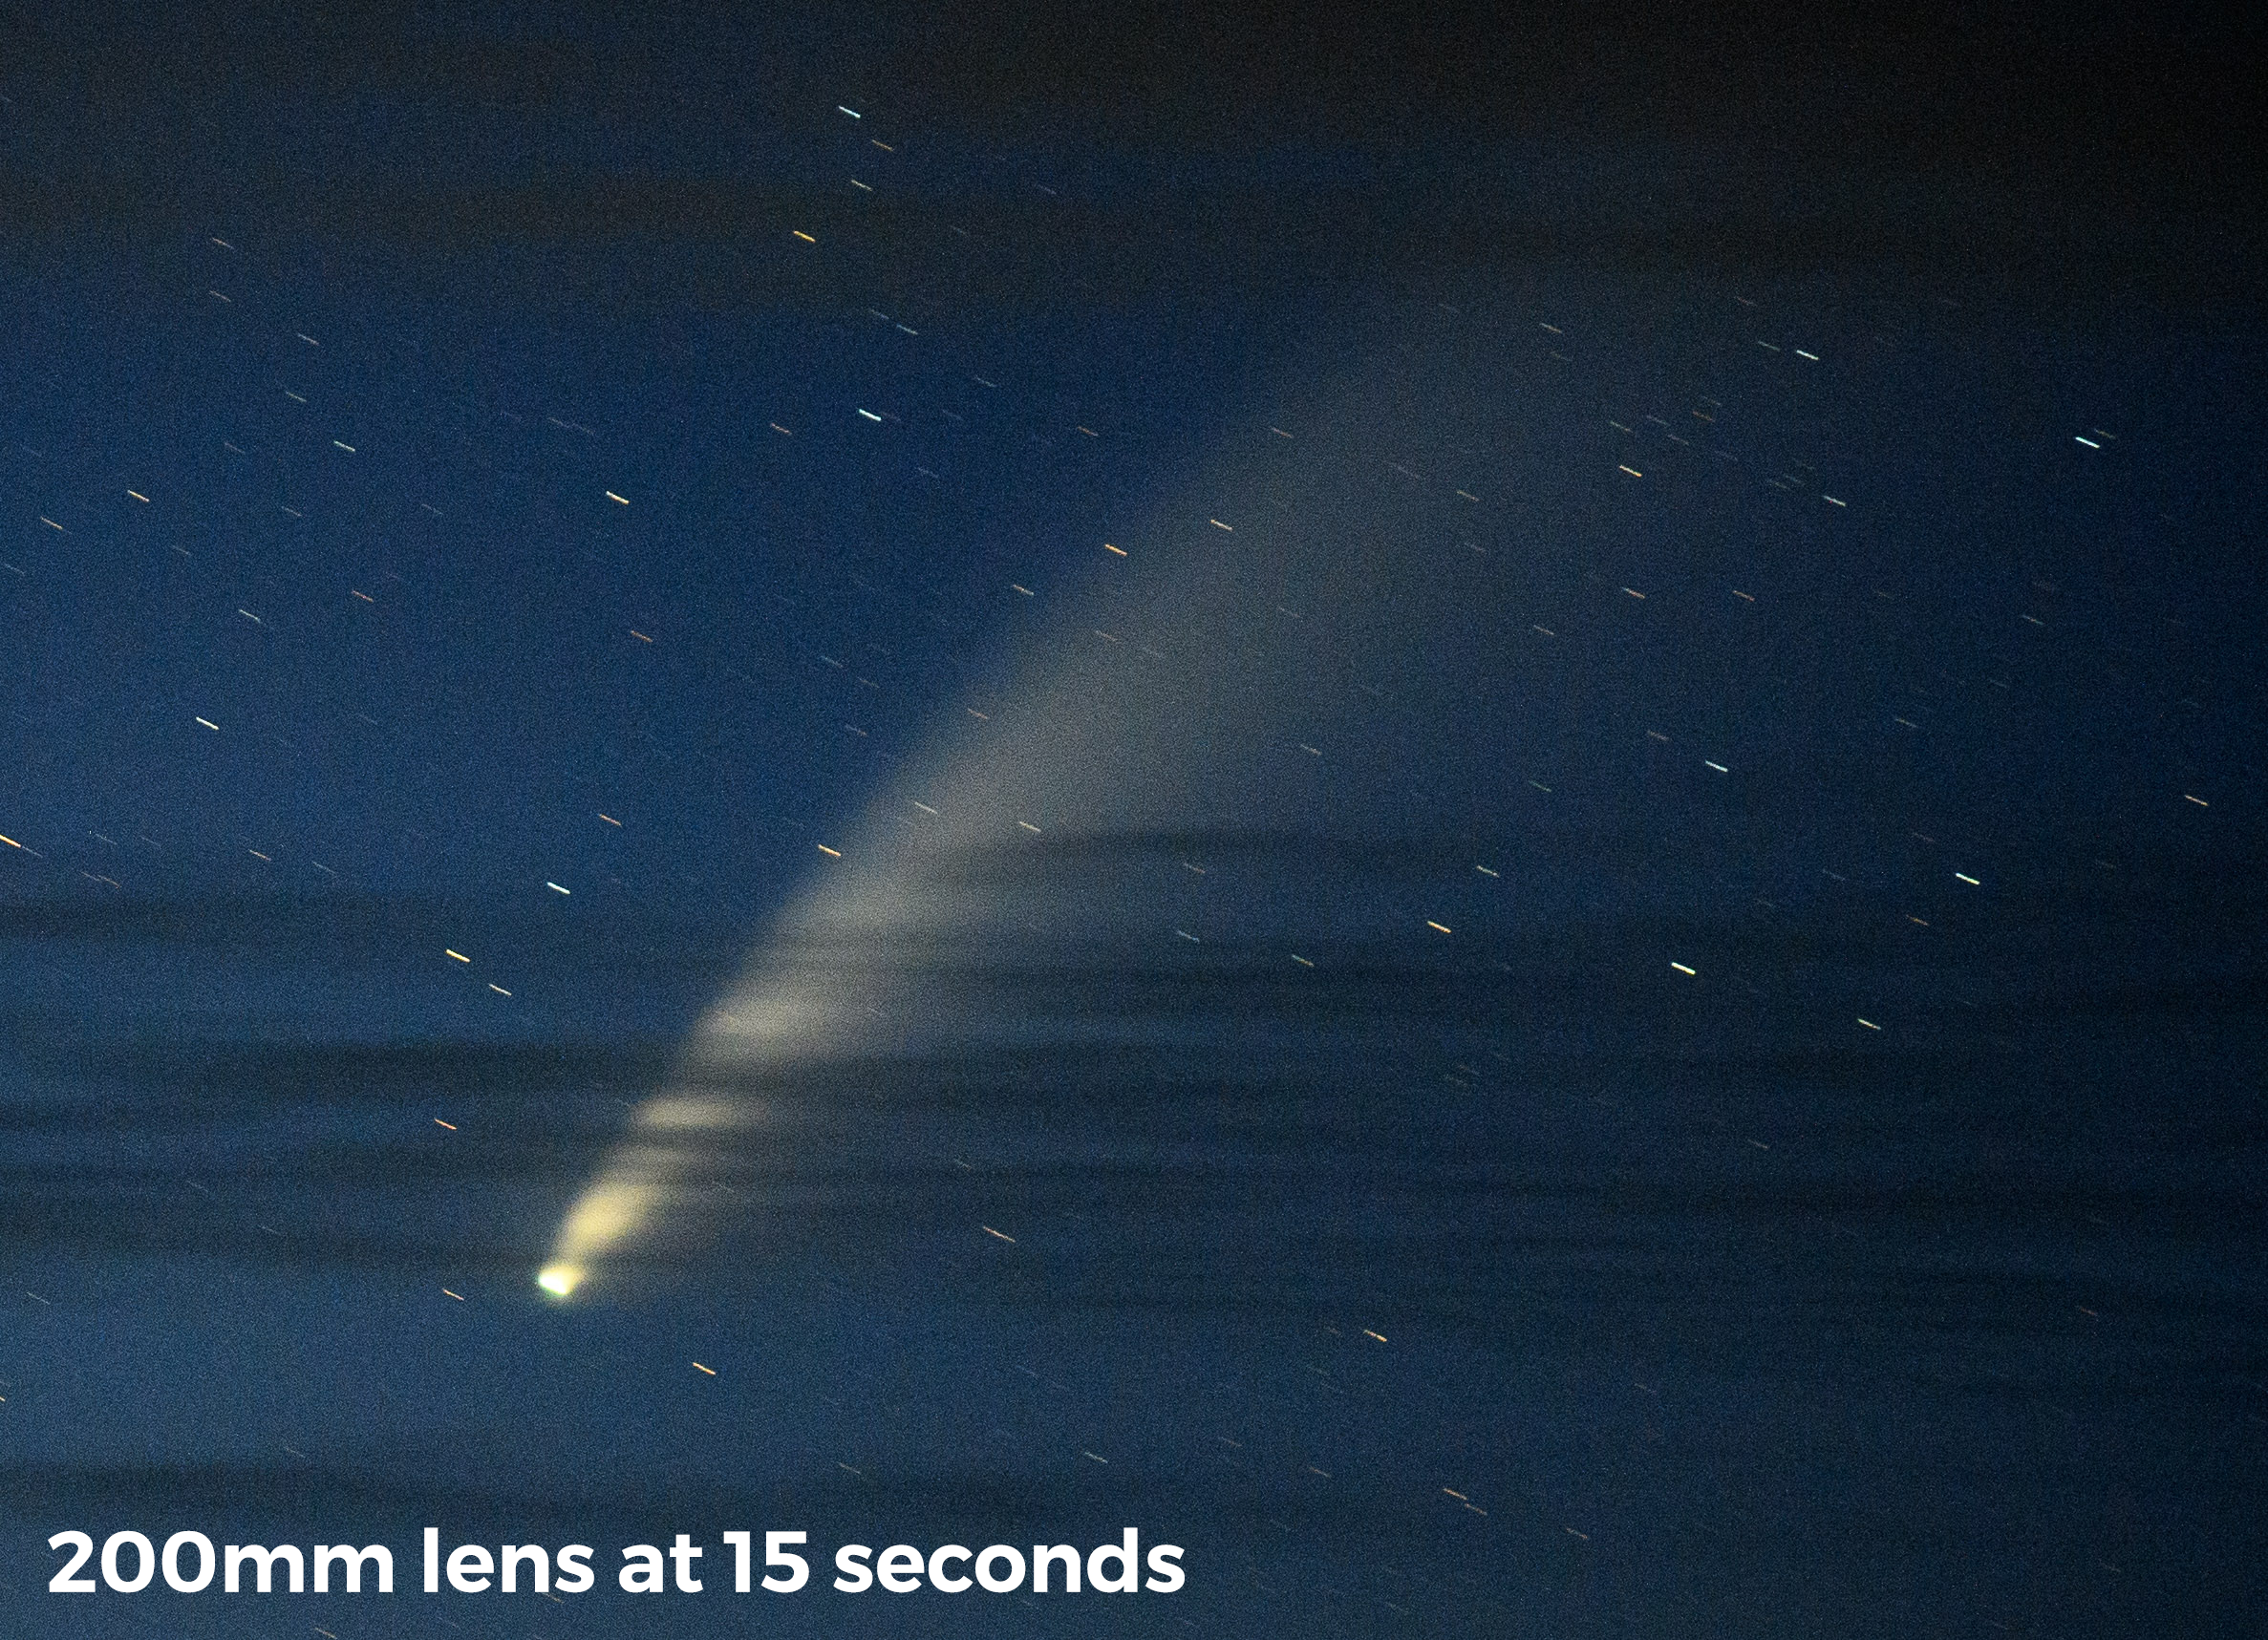
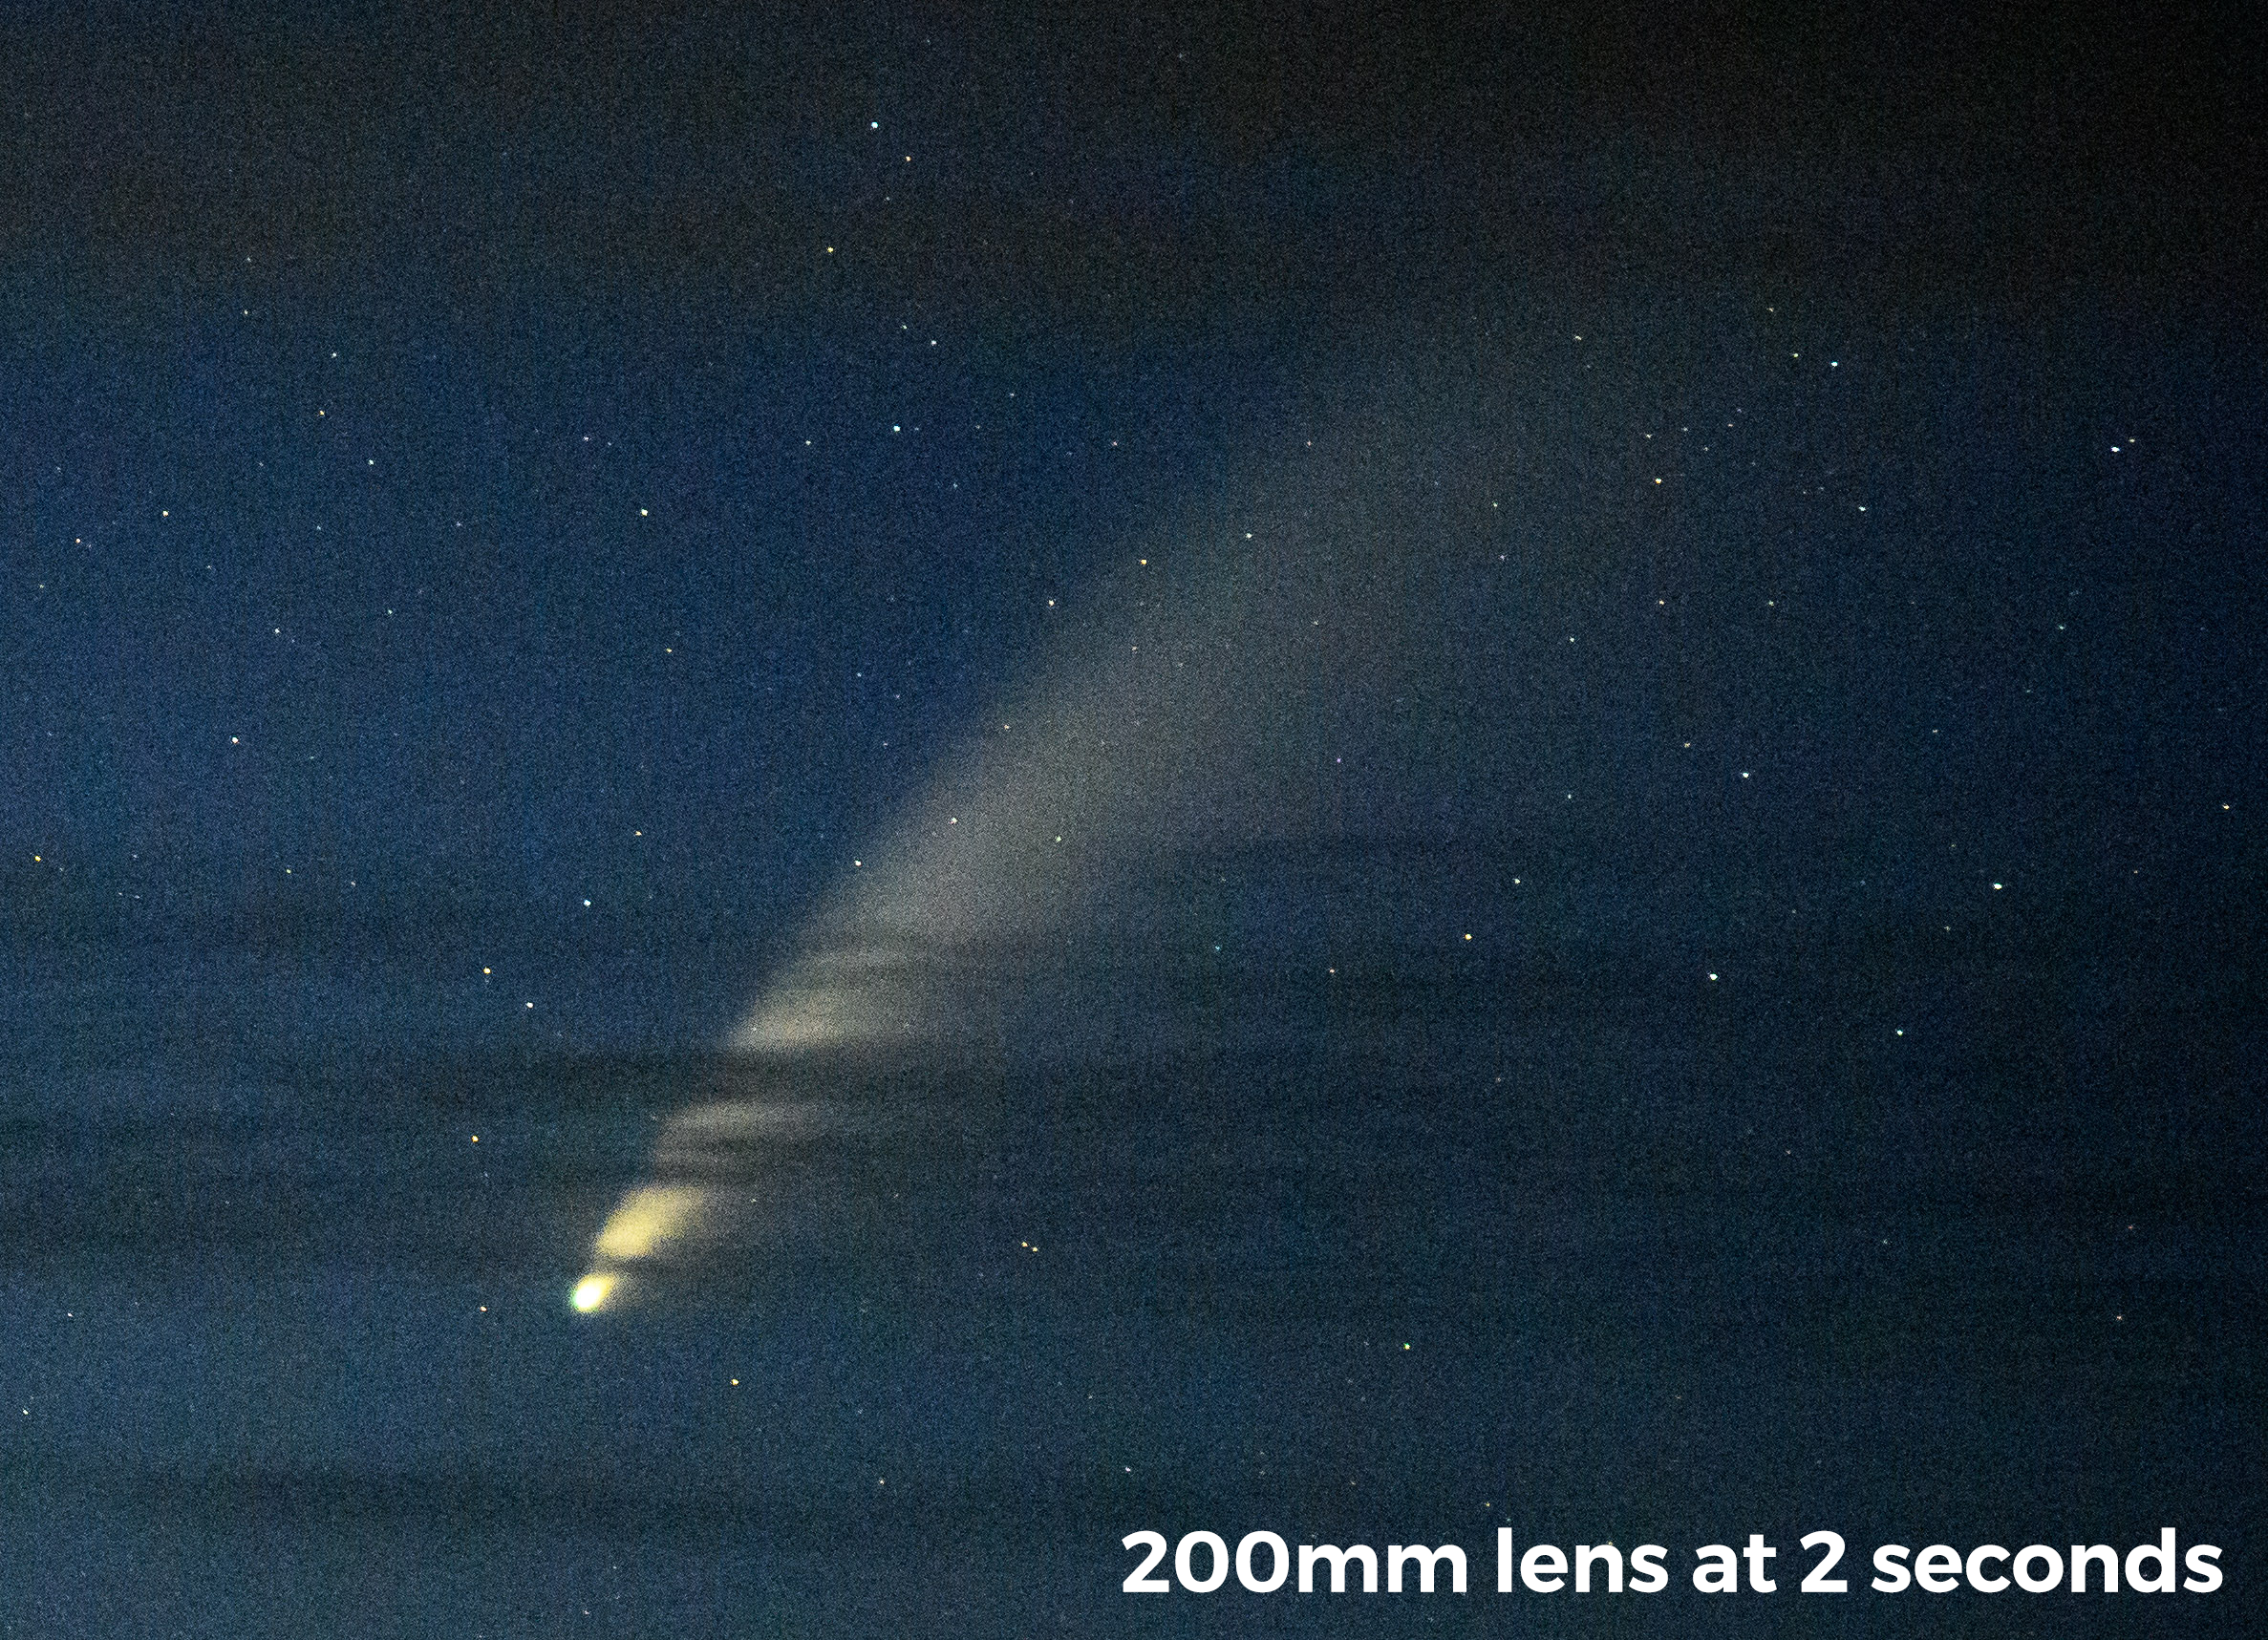
Of course, the comet is by nature a fuzzy-looking thing, so you can get away with a longer shutter speed—perhaps even twice as long as you’d use for a standard sharp-star shot. For example, if a camera/lens combo would allow for a 15-second exposure to freeze the stars, you might be able to shoot for 30 seconds and acceptably freeze the comet. However, then the stars in your image would begin to trail (Figure 3). So it’s probably best to keep shooting for sharp stars, and then everything in your frame will be crisp.

Figure 3. Both of these photos were shot with a 200mm lens—one at 2 seconds, which is compliant with the 400 Rule, the other at 15 seconds, which allowed for shooting at a lower ISO. The comet isn’t that much fuzzier in the latter image, but the stars are trailing. In the former image, despite the higher noise, everything is sharp.

(Another tactic could be the opposite philosophy. Why keep the comet sharp? Maybe photograph a comet trail!)

Lens Choice

The lens you choose will depend on your composition, of course, but it will also depend on your priorities.

If you would like the comet to appear larger in your frame, you’ll want to use a longer lens. However, the longer the lens you use, the shorter your exposure will need to be to keep the comet and stars sharp, which means you’ll need more light to make a good image.

Therefore, if you want to use a longer lens, you’ll probably want to shoot during twilight, when there’s more light in the sky to work with. For example, if shooting with a 200mm lens, the 400 Rule dictates a maximum of 2 seconds for the shutter speed before stars and the comet begin to trail. At twilight with an f/2.8 lens you can shoot for 2 seconds at ISO 3200 or 6400, but after twilight you would need an ISO of 64,000. So, yeah, best to save those telephotos for twilight.

Once you’re into astronomical twilight and beyond, stick with shorter lenses. The comet will appear smaller in your frame, but with creativity you can make the image work (Figure 4). Just put the comet somewhere in the scene where it will be noticeable and will complement the composition. In other words, you’re essentially making an environmental portrait of NEOWISE. Most of the good comet photos I’ve seen were made this way.

Figure 4. Comet NEOWISE over the Pemaquid Point Lighthouse, Maine. © 2020 Lance Keimig. Nikon D750 with a Sigma 24mm f/1.4 Art lens. 13 seconds, f/4, ISO 6400.

Compositing

You could also use both types of lenses to make a composite image. You could shoot a big comet with a long lens earlier in the evening, the foreground and a big sky with a short lens later in the evening, and blend them together in post-production.

This approach is not something I favor either for my artistic process or when looking at others’ artwork—I just don’t like unnatural proportions of natural objects (i.e., a giant moon over a wide-angle alpine landscape). But such a strategy is possible, so it’s prudent to mention here. If you like that style, or you’d like to try that style, the comet is a good subject for it.

Compiling Light

Just like with stars, there are other approaches to keeping the comet sharp, and they involve some way of “stacking” the available light to create a low-noise image in a high-ISO situation. This might allow you to use that longer lens at a lower ISO, or to just get a cleaner final photograph.

  1. Stack multiple exposures of the same sky scene using a program such as Starry Landscape Stacker for Mac or Sequator for PC. (See our blog post “Processing Star Point Images … .” This works great for creating crisp, low-noise photos of stars, and works well with a comet too. On the other hand, it means more work both in the field and at the computer.

  2. Use a sky-tracking device, such those made by SkyWatcher and Move Shoot Move (Figure 5). These mount to your tripod and slowly rotate the camera to counteract the rotation of the earth, which allows you to shoot the night sky with longer exposures and lower ISOs. This method also requires a little more field work, as well as some extra post-production time if you want to mask in a sharp foreground.

Figure 5. The Sky-Watcher Star Adventurer (left) and Move Shoot Move Portable Star Tracker (right) are two gear options that allow you to shoot longer exposures of moving stars (and comets).

White Balance

The approach to white balance is not much different than it would be photographing any other night. Just shoot how you normally would for a given environment. Here are a couple of resources from our blog to help you decide:

Mind the Moon

As mentioned previously, the moon is about to crash the comet party. This means two things:

  1. In the nights after the Monday new moon, a thin crescent will be low in the sky during twilight, which might sound tempting for including it in a composition with NEOWISE. However, the moon rises in the east, more than 100 compass degrees away from the comet. So you’re not likely to get them in the same frame in a good composition. (Unless you shoot a pano. Hmm.)

  2. After a few nights (Friday, where we are), the moon will still be in the sky after astronomical twilight is over. It will be at 20 percent illumination that night, and getting brighter, and setting later, on each successive night. Concurrently, the comet will be traveling further from the sun and from Earth. All of these factors together mean that NEOWISE will grow fainter each night.

Find a Foreground

Shooting a comet certainly has a wow factor—just like shooting the Milky Way, or a meteor shower, or a moon rise, etc. But all of those are better when set in the context of a composition that includes other elements.

So rather than just pointing your camera at the sky, remember to look for an interesting foreground, and set the comet behind it. A good rule of thumb is that if the composition isn’t interesting without the comet, then it won’t be a great photo even with the comet.

Look for a lighthouse, or a building, or a shoreline, or a sea stack, or a train trestle, or a rock formation, or mountain road, or an old barn, etc. Make a good composition with the comet as an important element alongside whatever else, and you’re on your way to artistic greatness.

Wrapping Up

Of course, as always, we would love to see your images of Comet NEOWISE. Share them in the comments section or on our Facebook page. (To view a bunch of great images our workshop alumni and others have already shared, see this post.)

Chris Nicholson is a partner and workshop leader with National Parks at Night, and author of Photographing National Parks (Sidelight Books, 2015). Learn more about national parks as photography destinations, subscribe to Chris' free e-newsletter, and more at www.PhotographingNationalParks.com.

UPCOMING WORKSHOPS FROM NATIONAL PARKS AT NIGHT

Great Balls of Fire, Part 3: How to Process a Meteor Shower Radiant

Welcome to Part 3 of our journey through the how-to of photographing meteor showers:

  1. Using PhotoPills to Scout Meteor Showers,” by Chris Nicholson

  2. How to Photograph a Meteor Shower,” by Matt Hill

  3. How to Process a Meteor Shower Radiant,” by Matt Hill

All of this, plus a guide to gear and a guide to shoot locations, is contained in our brand new PDF e-guide, Great Balls of Fire: A Guide to Photographing Meteor Showers. To download the whole e-guide, click here:


So … You’re creating a meteor shower photograph. You’ve scouted in PhotoPills. You’ve shot the shower. Now you have hundreds of images. How do we make that cool composite where all the meteors appear to come from a particular origin in the sky?

Find Your Background

Start by editing one image. It should be the best image. This will be the “base” sky that all the meteors get stacked onto later.

Identify the frame that has the most aesthetically pleasing sky. In my example from Great Sand Dunes National Park, the Milky Way is arcing through the composition. Since there were clouds in all the images, I chose the one that I believed has the best-looking clouds and with the Milky Way leading to the upper right corner of the frame (Figure 1). I marked this image in Lightroom with a Pick flag and a Green color label to make it easy to find later.

Figure 1. I like these clouds the best.

Perform your edits to taste. I made my edits to accentuate the galaxy gliding across the sky. But then consider backing those off those edits a bit to de-accentuate the sky. In other words, make the sky darker than you normally would, because you will be masking in meteors, and they need to “pop.”

Sync your Develop settings across all the dark-sky images in your meteor series (Figure 2). If you shot into moonrise or sunrise, process those separately for the foreground (ignoring the sky, which you will eventually mask out).

Figure 2.

Don’t forget to spot/clone out any planes or satellites from your main image (but don’t worry about any of the other images—that would be a waste of time).

Identifying Sky Objects

Here’s a cheat sheet on how to identify the four primary “streak” objects you’ll find in your night sky images. If you want to dive even deeper into this, see my blog post “How to tell the Difference Between Planes, Satellites and Meteors.”

Plane trails are straight or curved (or both), are usually accompanied by dots (from the wingtip lights) at regular intervals, and they traverse many frames.

Iridium satellite flares usually taper in/out like a meteor, but traverse more than one frame because they move slower than a meteor. Also, they may not have any notable color. These are becoming considerably less frequent.

A satellite or the International Space Station creates a straight, very thin line that traverses many frames. No color/tint.

A meteor appears in only one frame (unless you’re unlucky for it to happen during an interval between frames, which would create a gap in its trail). It can be many different colors or gradients—yellow, red, green, blue. Also will vary greatly in size and intensity.

Find Your Meteors

You could export all the images as layers in Photoshop, but imagine how much that would choke your computer. I have over 300 images from that shoot. It’s easier to export and work with only the ones with meteors. So first spend some time in Lightroom to identify every image that has an actual meteor in it. Some tips:

  • Zoom in and around each frame.

  • Toggle back and forth between pairs of images while looking for differences. You will eventually train your eyes to see the meteors.

  • Make a few passes through the whole series. Do your first pass with the zoom at “to fit screen” to find the dramatic, obvious meteors. Then do a few more subsequent passes at the “fill” zoom setting on different areas of the sky.

Finding all those meteors is time-consuming—possibly the most time-consuming part of this post-processing project. And it’s taxing on your eyes. But persevere! The end is in sight.

As I found mine, I used a Yellow color label (number 7 on the keyboard, Figure 3) to mark each one. I found only 23 frames with meteors out of 325 images. Yes—only 7 percent of my frames captured meteors. And I was running an exposure sequence for over two hours. Lesson: Maximize your chances; keep that sequence going as long as you can.

Figure 3. My meteor images, yellow-coded.

Also note that each meteor shower has a different potential yield for meteors per hour. (This is part of the info that PhotoPills provides.) This may vary by location, and will certainly vary by the amount of moonlight in the sky. And even if you’re supposed to be witnessing massive activity, your camera angle may not capture what does end up being visible, despite your best scouting efforts. So stay positive, be smart and work with what you get.

Find Your Foreground

You may have shot several options to use as your foreground—some long exposures at a low ISO, some with light painting, some with moonlight, etc. Look through and pick your favorite. I knew pretty much exactly what I was going to use, because I love my first photo from when the moon rose over the Sangre de Cristo Mountains.

Let’s prep the foreground image to make it easier to blend with the other frames.

For my sky image, I had deliberately crushed the blacks and shadows with a gradient mask and range mask to make the ground as dark as possible (Figure 4, left). Why? Because it would be easier to use a selection tool later in Photoshop.

For my foreground image, I did the opposite: I pushed up the whites and highlights in a gradient mask and range mask, and I carefully edited the edge so as not to blur the ground/sky transition (Figure 4, right). I also imagined what this should look like and made the ground edit believable—not too bright, not too warm.

Figure 4. Crushed blacks in the foreground (left) and crushed highlights in the sky (right), to make masking them out easier in Photoshop later.

Stacking Your Assets

Use the Attribute filter in Lightroom to find all the Yellow-coded photos (or whatever attribute you chose). To do that, press Command-F (Mac) or Control-F (PC), then select Attribute and click on the Yellow rectangle. Select all the Yellow images in Grid view. Cancel out of the filter by clicking None at the top, then also select the edited versions of your background sky image and your foreground/landscape image.

With all those frames selected, from the Lightroom menu choose Edit > Open as Layers in Photoshop (Figure 5).

Figure 5.

Less Ideal, But Less Computer-Stressing Method

If your computer can handle the task, load the images into Photoshop using the method I described above. It will result in the highest-quality final image, albeit one that’s huge (in this case, a 7 GB PSB file). But if you have an older computer or not a lot of scratch-disk space, you may want to instead export all these frames as JPGs (full-resolution) and then load those files into Photoshop layers using Adobe Bridge. You could also use a Photoshop script to load the JPGs as layers. In Photoshop, choose File > Scripts > Load Files into Stack.

Both of those options will stress the computer less, but because JPGs are lossy, this option will be less flexible to edit later.

Editing Your Layers

Time to plug in that Wacom tablet if you have one! Although, a mouse is fine. I actually found it very easy to use a mouse for this with click/shift-click straight-line painting.

Power user tips:

  • Save every 10 minutes. Just do it. Losing detailed work will make you cry.

  • This will be huge file. Probably bigger than 2 GB, which is the size limit for a PSD. Therefore, you will want to save as a PSB, which is Photoshop’s native large-file format. If you want to be able to see your PSB in Lightroom, make sure you’ve updated your Creative Cloud software since February 2020.

  • Give your eyes a rest. Look out the window now and then.

  • Organize your layers. Make a layer group (essentially a folder for layers) to hold all the meteor images, and name it “Meteors.” Name your sky layer “Sky” and your foreground layer “Ground.” This will eliminate future confusion.

  • Lock your Sky and Ground layers to avoid accidental edits. (Press Control-/, or click the “Lock all” icon above the layers.)

Masking

For each meteor layer, the only image data you want is the meteor itself. Why don’t you want the rest of the sky? Because the stars will be in a different place than in your Sky layer. The sky has only one Vega, etc., and we want to keep it that way. So on each meteor layer, we need to mask out everything except that streak of light.

Here are your steps (for tool locations, see Figure 6):

  1. Turn off your Sky and Ground layers.

  2. Turn off all the meteor layers except the one you are working on.

  3. Click the Add Layer Mask button at the bottom of the Layers panel.

  4. Press D to reset the foreground color to black and the background color to white.

  5. Press B to enable the Brush tool.

  6. Press the bracket keys to change the size of the brush to just a tad wider than the widest part of the meteor streak. [ makes the brush smaller and ] makes the brush bigger.

  7. Click on the thumbnail for the layer mask (not on the thumbnail for the image layer).

  8. Zoom in so the meteor’s path fills your screen.

  9. Now paint out the meteor on the mask. I know it’s counterintuitive. Trust me. (You can use the shift-click trick since meteors burn in a straight line: Click once at one end of the meteor streak, then hold Shift on your keyboard and click once at the end of the streak. )

  10. Use the brush sizing and feathering to finesse your masking.

  11. When you think you have successfully painted out the meteor, invert the layer mask by pressing Command-I (Mac) or Control-I (PC), or from the menu select Image > Adjustments > Invert. I prefer the keyboard shortcut because I use it to flip back and forth to finesse the masking. Try it—most likely you’ll see how convenient it is, too.

  12. Look around the whole layer—there may be more than one meteor in each.

  13. Optional: Make laser-beam noises when you find another meteor. I did. It’s fun.

Figure 6.

Rinse and repeat! Go back to step 2 and do this for every meteor layer you have in the Photoshop document (Figure 7).

Figure 7. All the meteors I found, masked in.

Making the Radiant

It’s magic time!

Alignment

The radiant of the meteor shower is always in motion, as seen from our perspective on earth. Keep this in mind. When you composed, you knew if it was in the frame or not and made good decisions about placement.

In my example, the Perseids were easy since they are so close to Polaris that they do not appear to move much. The Geminids, however, are so far up in the sky you’re not likely to have land and sky in the same composition, even with a 14mm lens. So they will come into your frame from the edge and point to a place not in clear view. And alignment will not be exact.

You’ll see this happen in our next steps:

  1. Select all the layers by pressing Command-Option-A (Mac) or Control-Alt-A (PC), or shift-click the first and last layer.

  2. On any layer with the Eyeball turned on, Control-click (Mac) or right-click (PC) on the eyeball, then select Show/Hide all other layers.

  3. Near the top of the Layers panel, change the Blend Mode to Lighten. You’ll now see the brightest elements of every layer blended together—the stars, the lit foreground and the meteor streaks.

And see? It’s likely that not all your meteors are pointing to the same place.

Note: Any meteor that does not line up with the origin (in this case, the constellation Perseus) is called a “sporadic” (Figure 8). Don’t let those meteors make you think you did anything wrong. They happen. (More on Sporadic meteors here.)

Figure 8. A sporadic.

Because everything in the universe is in motion, to adjust for this perception error, our layers also need to be “put into motion.”  Specifically, we have to rotate each meteor layer, ideally around a visual anchor in the Sky layer. Lucky for me, Polaris is in my scene. Easy peasy. (If Polaris isn’t in your frame, you’ll just need to do a little more work by eye to line up the rotation correctly.)

If the Radiant is in Your Frame

The most surefire way to get all the meteors pointing toward the radiant is if you actually have the radiant in your composition. (See Figure 9 for tool locations.)

  1. Invert the layer mask.

  2. Set the layer to 50 percent opacity.

  3. Enter the Free Transform mode (Edit > Free Transform or Command/Control-T).

  4. Move the center point of the Transform bounding box to just inside Polaris (north)

  5. Rotate the layer. You can do this by clicking and dragging outside the corner of the Transform box. But you can control things easier this way: Locate the Rotate box at the top of the screen, and click into it. Now press the up/down-arrow keys until the star points align.

  6. When aligned, press Enter twice to lock in the rotation angle as well as your Transform adjustment.

  7. Set the layer opacity back to 100 percent.

  8. Invert the layer mask again.

  9. Repeat for each meteor layer.

Figure 9.

If that’s a bit too tedious for you, there are two faster (if less precise) ways to accomplish the same task:

  1. Use Free Transform when zoomed to fit to screen, move the center point roughly into position without zooming all the way in, and rotate each layer using your eyeballs.

  2. Evaluate if you want to do this at all. My first gut reaction without rotating the layers was, “This looks great!” I turned off all the sporadic meteors and called it a day. But then I went back and did things “right” for the sake of perfecting the image for this blog post.

If the Radiant is not in Your Frame

Simply rotate and align each layer until all of the meteors appear to be originating from the same point. Sometimes I put a piece of tape on the wall behind the monitor and eyeball the lines so they all line up with that point. Reminds me of art school and learning about vanishing points.

Dealing with Sporadics

The sporadics might be bothering you. After all, you went through all this work to create an image where scores of meteors are pointing toward the same point in space, just to have a few rogues that point wherever they want (Figure 10).

Figure 10: Sporadic meteors circled in red. Note they do not point toward Perseus. I removed them.

You have a few options:

  • If you only want a “clean” radiant, turn off the layers with the sporadics.

  • If you don’t care, leave them on.

  • Free transform and rotate/move the sporadics so they look as if they came from the radiant.

It’s your choice. But my choice is not to pretend they all were radiant meteors if they were not. I chose to turn those layers off.

Along the same lines, you may choose to move some meteors that cross over or are too near to each other. It’s your fiction … or not. I chose to rotate each layer to honor the origin of the radiant.

Mask in the Ground and Sky

Your base images (which should be the lowest layers in your Photoshop file) for the sky and ground need to be masked over the meteor stack. Here’s how I did mine:

Photoshop is getting very good at auto-detecting with the Quick Selection tool (W). I set Point Sample to a tolerance of 2, and checked Anti-Alias and Contiguous. Then I clicked and dragged on the sky/ground (both of which we crushed in Lightroom earlier to make the unwanted pixels similar, specifically to ease the masking process now).

Figure 11.

When I had the selection I wanted (Figure 11), I added a layer mask and inverted it. Voila! Sky and Ground perfection (Figure 12).

Figure 12. The Sky and Ground layers blended, minus the stacked meteors.

After all this work (and pausing to save many times!), you have a Photoshop document with lots of layers, and it might look something like this:

Figure 13. Final image. Great Sand Dunes National Park, Colorado. Nikon D750 with a Zeiss Distagon 15mm f/2.8 lens. 17 images at 22 seconds, f/2.8, ISO 6400, plus a single foreground exposure at 382 seconds, ISO 2000.

Your final steps are to:

  1. Save it once more (Command/Control-S).

  2. Flatten the layers by choosing Layer > Flatten Image from the menu.

  3. From the Menu choose File > Save As and then choose Photoshop from the Format menu to save this file as a PSD. This process should automatically save the file and return it to Lightroom. If the PSD does not appear back in Lightroom, do the following: Navigate to the Library Module. Right-click on the folder containing the meteor images, and choose Synchronize. When prompted, choose to import the new image into Lightroom.

  4. Discard the giant layered PSD/PSB when you are totally comfortable that you are done editing it. I suggest giving it at least a week. (If you have giant hard drives and don’t care about gigabytes, feel free to skip this step.)

Wrapping Up

At this point, do whatever you do to celebrate. It’s a major accomplishment—to plan, to shoot and to edit a meteor shower radiant. Good on ya.

And please—please, please, please—if you go through all of this work, share what you’ve done. We’d love to see it. Post in the comments below or on our Facebook page.

Now be sure to download the e-book, Great Balls of Fire: A Guide to Photographing Meteor Showers, which includes all three blog posts, plus a gear guide and a location guide!

Matt Hill is a partner and workshop leader with National Parks at Night. See more about his photography, art, workshops and writing at MattHillArt.com. Follow Matt on Twitter Instagram Facebook.

UPCOMING WORKSHOPS FROM NATIONAL PARKS AT NIGHT

Great Balls of Fire, Part 2: How to Photograph a Meteor Shower

Welcome to Part 2 of our three-day journey through the how-to of photographing meteor showers:

  1. Using PhotoPills to Scout Meteor Showers,” by Chris Nicholson

  2. How to Photograph a Meteor Shower,” by Matt Hill

  3. How to Process a Meteor Shower Radiant,” by Matt Hill

All of this, plus a guide to gear and a guide to shoot locations, is contained in our brand new PDF e-guide, Great Balls of Fire: A Guide to Photographing Meteor Showers. To download the whole e-guide, click here:


How to Photograph a Meteor Shower

Great Sand Dunes National Park, Colorado. Nikon D750 with a Zeiss Distagon 15mm f/2.8 lens. 17 images at 22 seconds, f/2.8, ISO 6400, plus a single foreground exposure at 382 seconds, ISO 2000.

It’s amazing to capture a meteor. An accomplishment that makes most of us say, “Yeah!” and fist-pump in the air. But you know what’s even better? Lots of meteors. And all of them zooming out of one spot in the sky.

One meteor can often be problematic, compositionally. One looks like just a bright streak going through the frame, brighter than a plane trail, usually not in a pleasing spot along a line of thirds or along a swirl of the golden spiral. But many meteors all emanating from one place in the heavens? Wow!

So get your biggest memory card(s) and format them, because this could be a lot of photos!

Let’s assume:

  • you know where the radiant is, because you used PhotoPills

  • you choose a night that has favorable sky conditions (I love the Wunderground app)

Let’s also assume you have the following:

  • a high ISO-capable DSLR or mirrorless camera

  • freshly charged batteries or an external battery pack such as the TetherTools Case Relay

  • a reliable tripod

  • an intervalometer or a camera with one built in

You are now ready.

The Scenario

Our Great Sand Dunes group shooting the shooting stars.

Location

I am going to use a workshop shoot in Great Sand Dunes National Park to illustrate the process. The park is north of Alamosa, Colorado, which unfortunately is a source of light pollution. But the northern view into the crook of the Sangre de Cristo Mountains is not only ripe with dark skies, but also offers a beautiful visual contrast between the top of the dunes at 8,660 feet and the mountains at 12,000.

Having visited Great Sand Dunes twice before, I had performed a fair amount of both daytime and nighttime scouting. The first time I failed, and the second I fared much better. This would be the third trip, and the shot I had in mind was rather epic.

Meteor Shower

The peak of the Perseid Meteor Shower on the overnight of August 12 to 13, 2017.

Sky Conditions

We had peak darkness from about 9:30 p.m. until just before 11 p.m. when the moon started to rise behind the mountains and brighten the sky.

Challenges

Ascending 600 feet of sand dunes at 8,000 feet of elevation, with gear, to achieve the view of the mountains over the dunes. Plus the patience to wait out the meteors.

A lucky first shot. Nikon D750 with a Zeiss Distagon 15mm f/2.8 lens. 22 seconds, f/2.8, ISO 6400.

Setting Up

I chose a 15mm lens and a vertical orientation for the camera to keep the composition ratio to one-third landscape/dunes and two-thirds sky.

When deciding on a composition, it’s important to confirm the location of the meteor radiant—the place in the sky where all the meteors appear to originate from. The radiant is always near a constellation (not by magic—only because human imagination has seen and named a lot of constellations, so there’s always one nearby). A meteor shower is named for the constellation near its radiant. The Perseids are named such because the meteors appear to originate from the constellation Perseus.

In 2017 PhotoPills didn’t have the Meteor Showers feature, so we did it the old fashioned way: We used an astronomy app to spot Perseus and to see how it would appear to move during the shoot. We set up our cameras facing the direction of the meteor shower radiant, keeping in mind that it would move through the frame (like the rest of the night sky) over the course of the evening.

In Chris’ post yesterday, he walked through how we would have used PhotoPills to plan this photo. In short, here’s the info I would have loved to have at our fingertips that night three years ago:

From left to right: Path of the meteor radiant, plus moon shadow angles and times. The same, plus the Milky Way. Nearing the end of a usable dark sky. Moonrise—the end of the shoot … or not?

I placed the radiant near the center of my composition. Again, constellations appear to move during the night, which means the radiant center travels through your composition. So definitely plan for that movement. If you are not careful, the radiant may drift out of your frame. Fortunately, the Perseids are located not too far from Polaris. So, from the earthbound point of view, everything was pretty much rotating around a close fixed point, making shooting (and later, post-processing) easier.

I chose to include a generous portion of sky to maximize meteor captures, plus some of the landscape for context. My framing deliberately included some featureless foreground: the utterly dark dunes. We encouraged everyone in the workshop shooting with us to stay behind a line in the sand (so to speak) so as not to get footprints in others’ foregrounds.

The foreground is dark—but we’ll deal with that later.

You may ask, “If the foreground is dark, why are you including so much of it?” Well, it’s awfully hard to see meteors when the moon is in the sky. That causes an opposite problem: dark landscapes. But we still, ideally, want our images to have artful foreground that provides both context and rich details.

How do we do that? We have a few choices:

  1. Set up during the end of the day and shoot some twilight images. Then, do not move your camera. Not a millimeter. When darkness descends, shoot your meteor shower images and blend them with your daylit foreground in post.

  2. Light paint your foreground for the beginning and end frames of your meteor shower sequence. In post, blend your best light painting with your meteor radiant.

  3. Wait for the moon to scoot around and light up the landscape from a right angle. This is what I chose, and I urged the attendees to do this too. It takes patience. But knowing your goal helps.

No matter what, be sure to give your skies some context and plan for your foreground to be composed and lit well.

Setting Up the Rest

OK. Next we do the bread-and-butter night photography stuff:

  1. Focus.

  2. Compose.

  3. Perform a high ISO test.

  4. Check everything at 100 percent on the back of your camera. Carefully. Especially look at your focus. Four times. Not joking.

  5. Make sure your camera is set to capture in RAW.

  6. Choose your color balance.

  7. Lock down everything on your tripod.

  8. Put a fresh battery in your camera, or plug in to an external battery.

  9. Determine a good shutter speed using the NPF Rule. (More on that later.)

  10. Choose an ISO that complements the scene and your camera. For my Nikon Z 6, it’s usually ISO 6400, but I know Gabe really digs pushing that camera to 12,800.

  11. Shoot as wide open as your lens permits without coma.

  12. Connect your intervalometer and set its program as needed. Your interval between images should be 1 second, which is as short as almost any intervalometer can effectively go.

Shooting for Sharp Stars

Why is the shutter speed so important? You want to have exposure times that create star points, not short star smudges. Your sky should be tack-sharp, so I suggest calculating a shutter speed using the NPF Rule.

But when you do, calculate the ideal NPF exposure in PhotoPills using “Default,” but not “Accurate.” For example, these days I often shoot with a Nikon Z 6 and a Laowa 15mm f/2.8 lens. When I run that combination through the NPF calculator, the “Default” shutter speed is 18.62 seconds, while “Accurate” is 9.31 seconds.

A 9.31-second exposure will create amazingly sharp starts, but it is also short enough to increase the chance of cutting off meter tails. 9.31 seconds + 1 second delay in the intervalometer = 10.31-second exposure cycles. That means the shutter will be closed for 9.7 percent of the total exposure time of the final composite image.

An 18.62-second exposure is more likely to capture a meteor in its entirety—its blackout time during intervals will account for only 5.2 percent of the cumulative exposure of the series. I like those odds better.

NPF Rule shutter speeds for the Nikon Z 6 when used with a Laowa 15mm f/2.8 lens, at the “Default” (left) and “Accurate” (right) settings. (Forget about the 500 Rule. It’s two generations old—enough to consider obsolete.)

You might decide that you don’t mind missing a few meteors because you want to make a magnificent mural print for your wall and the pointier stars will look better when blown up. I would agree. But photography is always a game of deciding which variables to adjust to match your goals. My goal was maximum meteor strikes.

Also consider this: You might capture only 10, 20 or 40 meteors in hundreds of photos over a few hours of shooting. My final in this example has only 16 meteors originating from the radiant. Shooting at 9.31 seconds, with more frequent 1-second intervals, may have reduced that count by quite a few.

The Shoot

So now what?

Set your intervalometer (or camera software or app) to start a sequence of images that begins right after twilight ends (or right when the meteor shower starts to pick up). Also, base your start time around when the moon might be rising or setting, if applicable. In my case, in Great Sand Dunes, I wanted to keep shooting until a little after the moon rose at 11:04 p.m.

If you want to run your exposures until dawn, I suggest returning to your camera during twilight to adjust your exposures manually as the sun approaches the horizon, because they will change quickly. But consider this: Why should the foreground look like daytime when meteors are visible only on the darkest of nights?

Go! Let it rip. Don’t move the camera. Don’t walk in front of it. Maybe light paint the first few exposures. But then sit back (maybe on a portable chair) and enjoy the meteor shower with your naked eyes or go for a safe hike in the darkness.

Waiting out the long series of exposures.

Waiting out the long series of exposures.

At Great Sand Dunes, I let the exposures run for just over two hours. Yup. Made 325 RAW files. For a wedding photographer, that’s no big deal, but for a night photographer, that might usually be three or four night’s work.

I put together the 325 images in a time lapse, so you can see (in an accelerated way) how the meteor shower looked in person:

Patience pays off. Moonlight sculpts the dunes for my lit-foreground frame. Nikon D750 with a Zeiss Distagon 15mm f/2.8 lens. 382 seconds, f/2.8, ISO 2000.

Foreground Exposure

My final step was to expose for the moonlit foreground and mix in some light painting.

I wanted the moon to be scraping over the dunes perpendicular to my scene. As soon as the moon was about to do what I wanted to capture, I stopped the intervalometer to cease the meteor series. I quickly shot another high ISO test to determine a good exposure, then dropped down to ISO 2000 and made a 382-second frame for a higher-quality image of the sand.

I didn’t choose to make an even longer, even higher-quality exposure because the moon, and thus the shadows, were moving quickly, which made the dunes look flat. I could have also walked into or around the scene and performed some artful light painting to accent the landscape, but I liked how the moonlight looked, so I packed up the setup and moved on for the night.

Post-Production

Congratulations! You photographed a whole meteor shower! Believe it or not, that was the easy part. Now you have to process it. … Buckle up! Tomorrow we go to the digital darkroom.

Now move on to “How to Process a Meteor Shower Radiant.” And be sure to download the e-book, Great Balls of Fire: A Guide to Photographing Meteor Showers.

Matt Hill is a partner and workshop leader with National Parks at Night. See more about his photography, art, workshops and writing at MattHillArt.com. Follow Matt on Twitter Instagram Facebook.

UPCOMING WORKSHOPS FROM NATIONAL PARKS AT NIGHT