Exposure

Control the Color Monster: Making the Move to Manual White Balance

While many of the automatic settings on our cameras can be useful from time to time, photographing at night requires us to set nearly everything on our cameras manually. Typically, when most people hear this, they think of manual exposure mode, wherein they are required to set both the aperture and shutter speed independently of each other. This is true. However, it could also mean manually focusing your lens, or switching your ISO from auto to a specific value. It could also mean setting your white balance manually.

Manual white balance?! Yup.

With the useful presets in your white balance setting (Direct Sunlight, Tungsten, Cloudy, Shade, Fluorescent, Auto, etc.), itโ€™s easy to forget that you can go manual here as well.

To set your white balance manually, you first need to understand what the white balance setting does for us. Simply put, it alters the color cast of our photographs. It can make an image look bluer or more orange. It can render our image greener or more magenta.

The Color of Light

Letโ€™s start outside of our camera first. All light has a certain color cast. Some light seems warmer (more orange)โ€”for example, the color of an orange sunset or older household tungsten bulbs.

The warm colors of sunset.

Some light seems cooler (more blue)โ€”for example, the light on a cloudy day or the sky when it just starts getting light in the morning.

The cool colors of pre-dawn.

Often our eyes ignore these color casts and we perceive the light as neutral (no cast/white/no color). Itโ€™s not that we canโ€™t detect the color cast. We can, if we are paying attention. Itโ€™s just that other aspects of the light rate as more important in our visual hierarchyโ€”such as noticing shadows so we can resolve ground structure and subsequently not trip and fall. Although we may not give much conscious thought to subtle shifts in the color of light throughout the day, our cameras are excellent tools for recording these precise color casts, or even for fixing those casts if we so desire.

The Kelvin Scale

Scientists found the terms โ€œwarmer,โ€ โ€œyellowishโ€ or โ€œmore orangeโ€ simply too vague to accurately describe the color of light, so they use the Kelvin scale to avoid imprecision. Here is a chart that shows temperatures of some common photographic light sources:

The warmer the color, the lower its Kelvin rating. Cooler colors have higher Kelvin ratings. Notice that daylight at 5500 K is neutral. No real color cast. Some even call it โ€œwhite light.โ€ Whereas sunsets are warm and cloudy days appear cool. These are the real colors that are present under those conditions, even though, again, we may not perceive them as such.

The Cameraโ€™s White Balance Setting

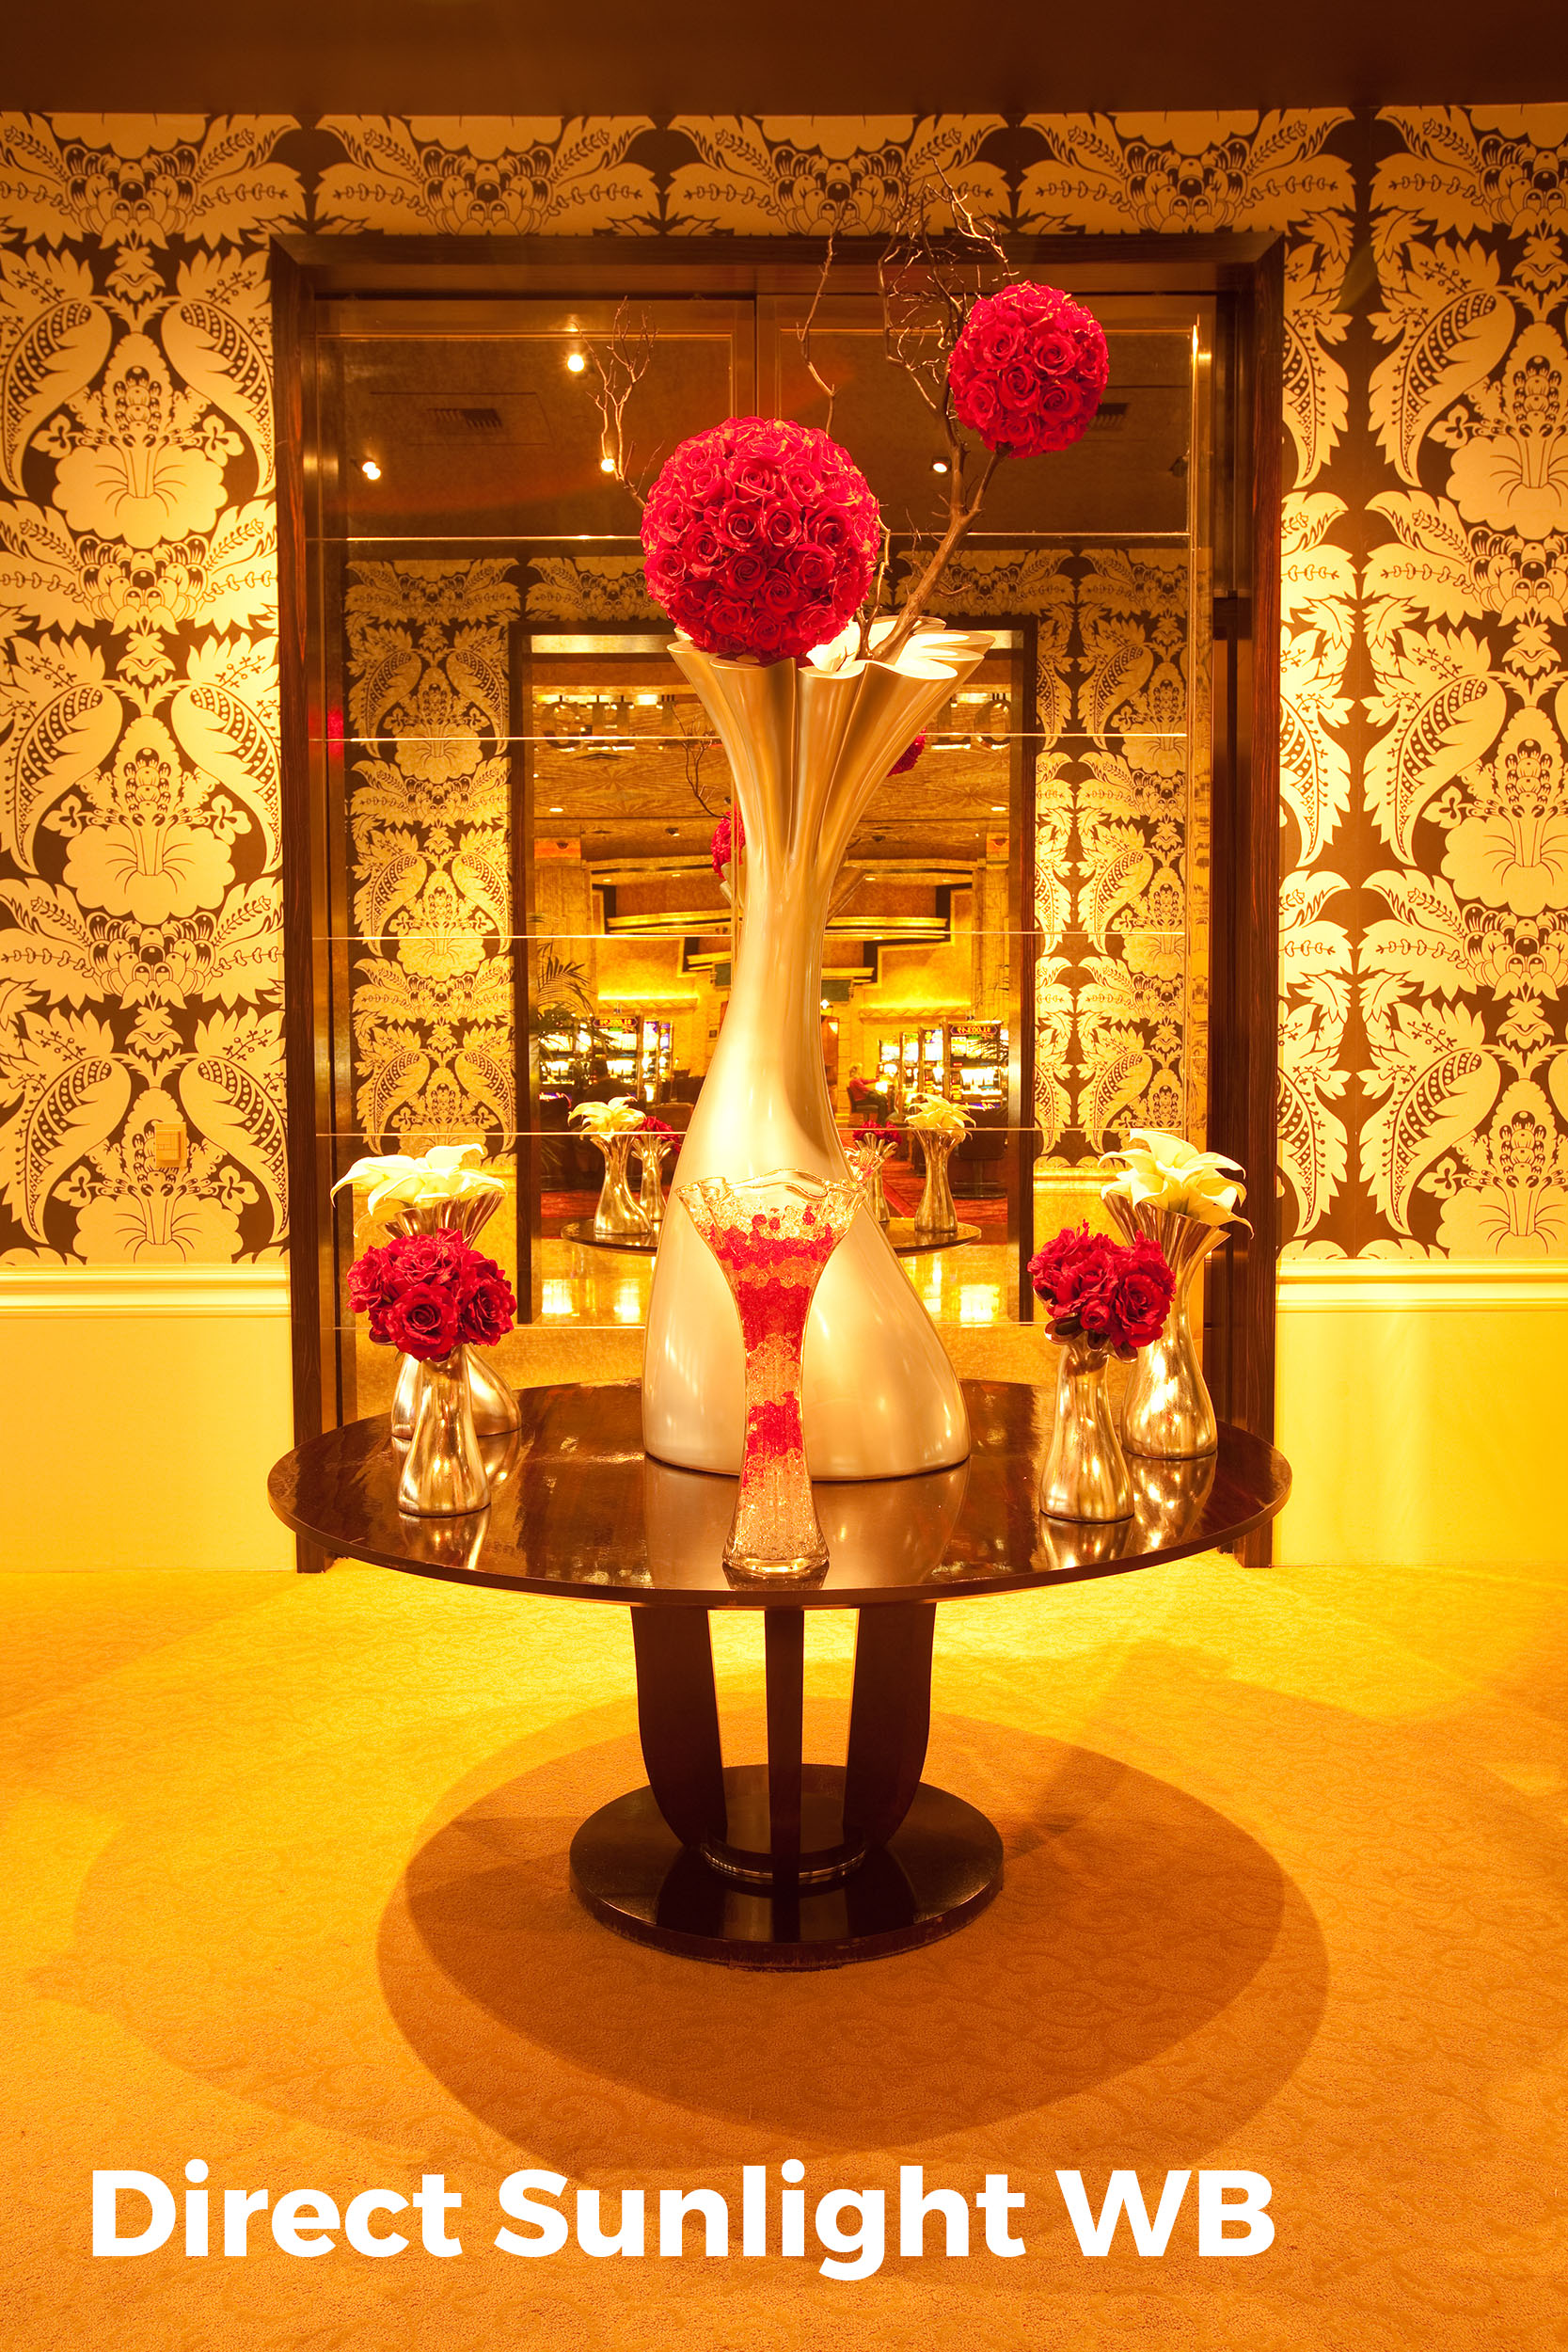
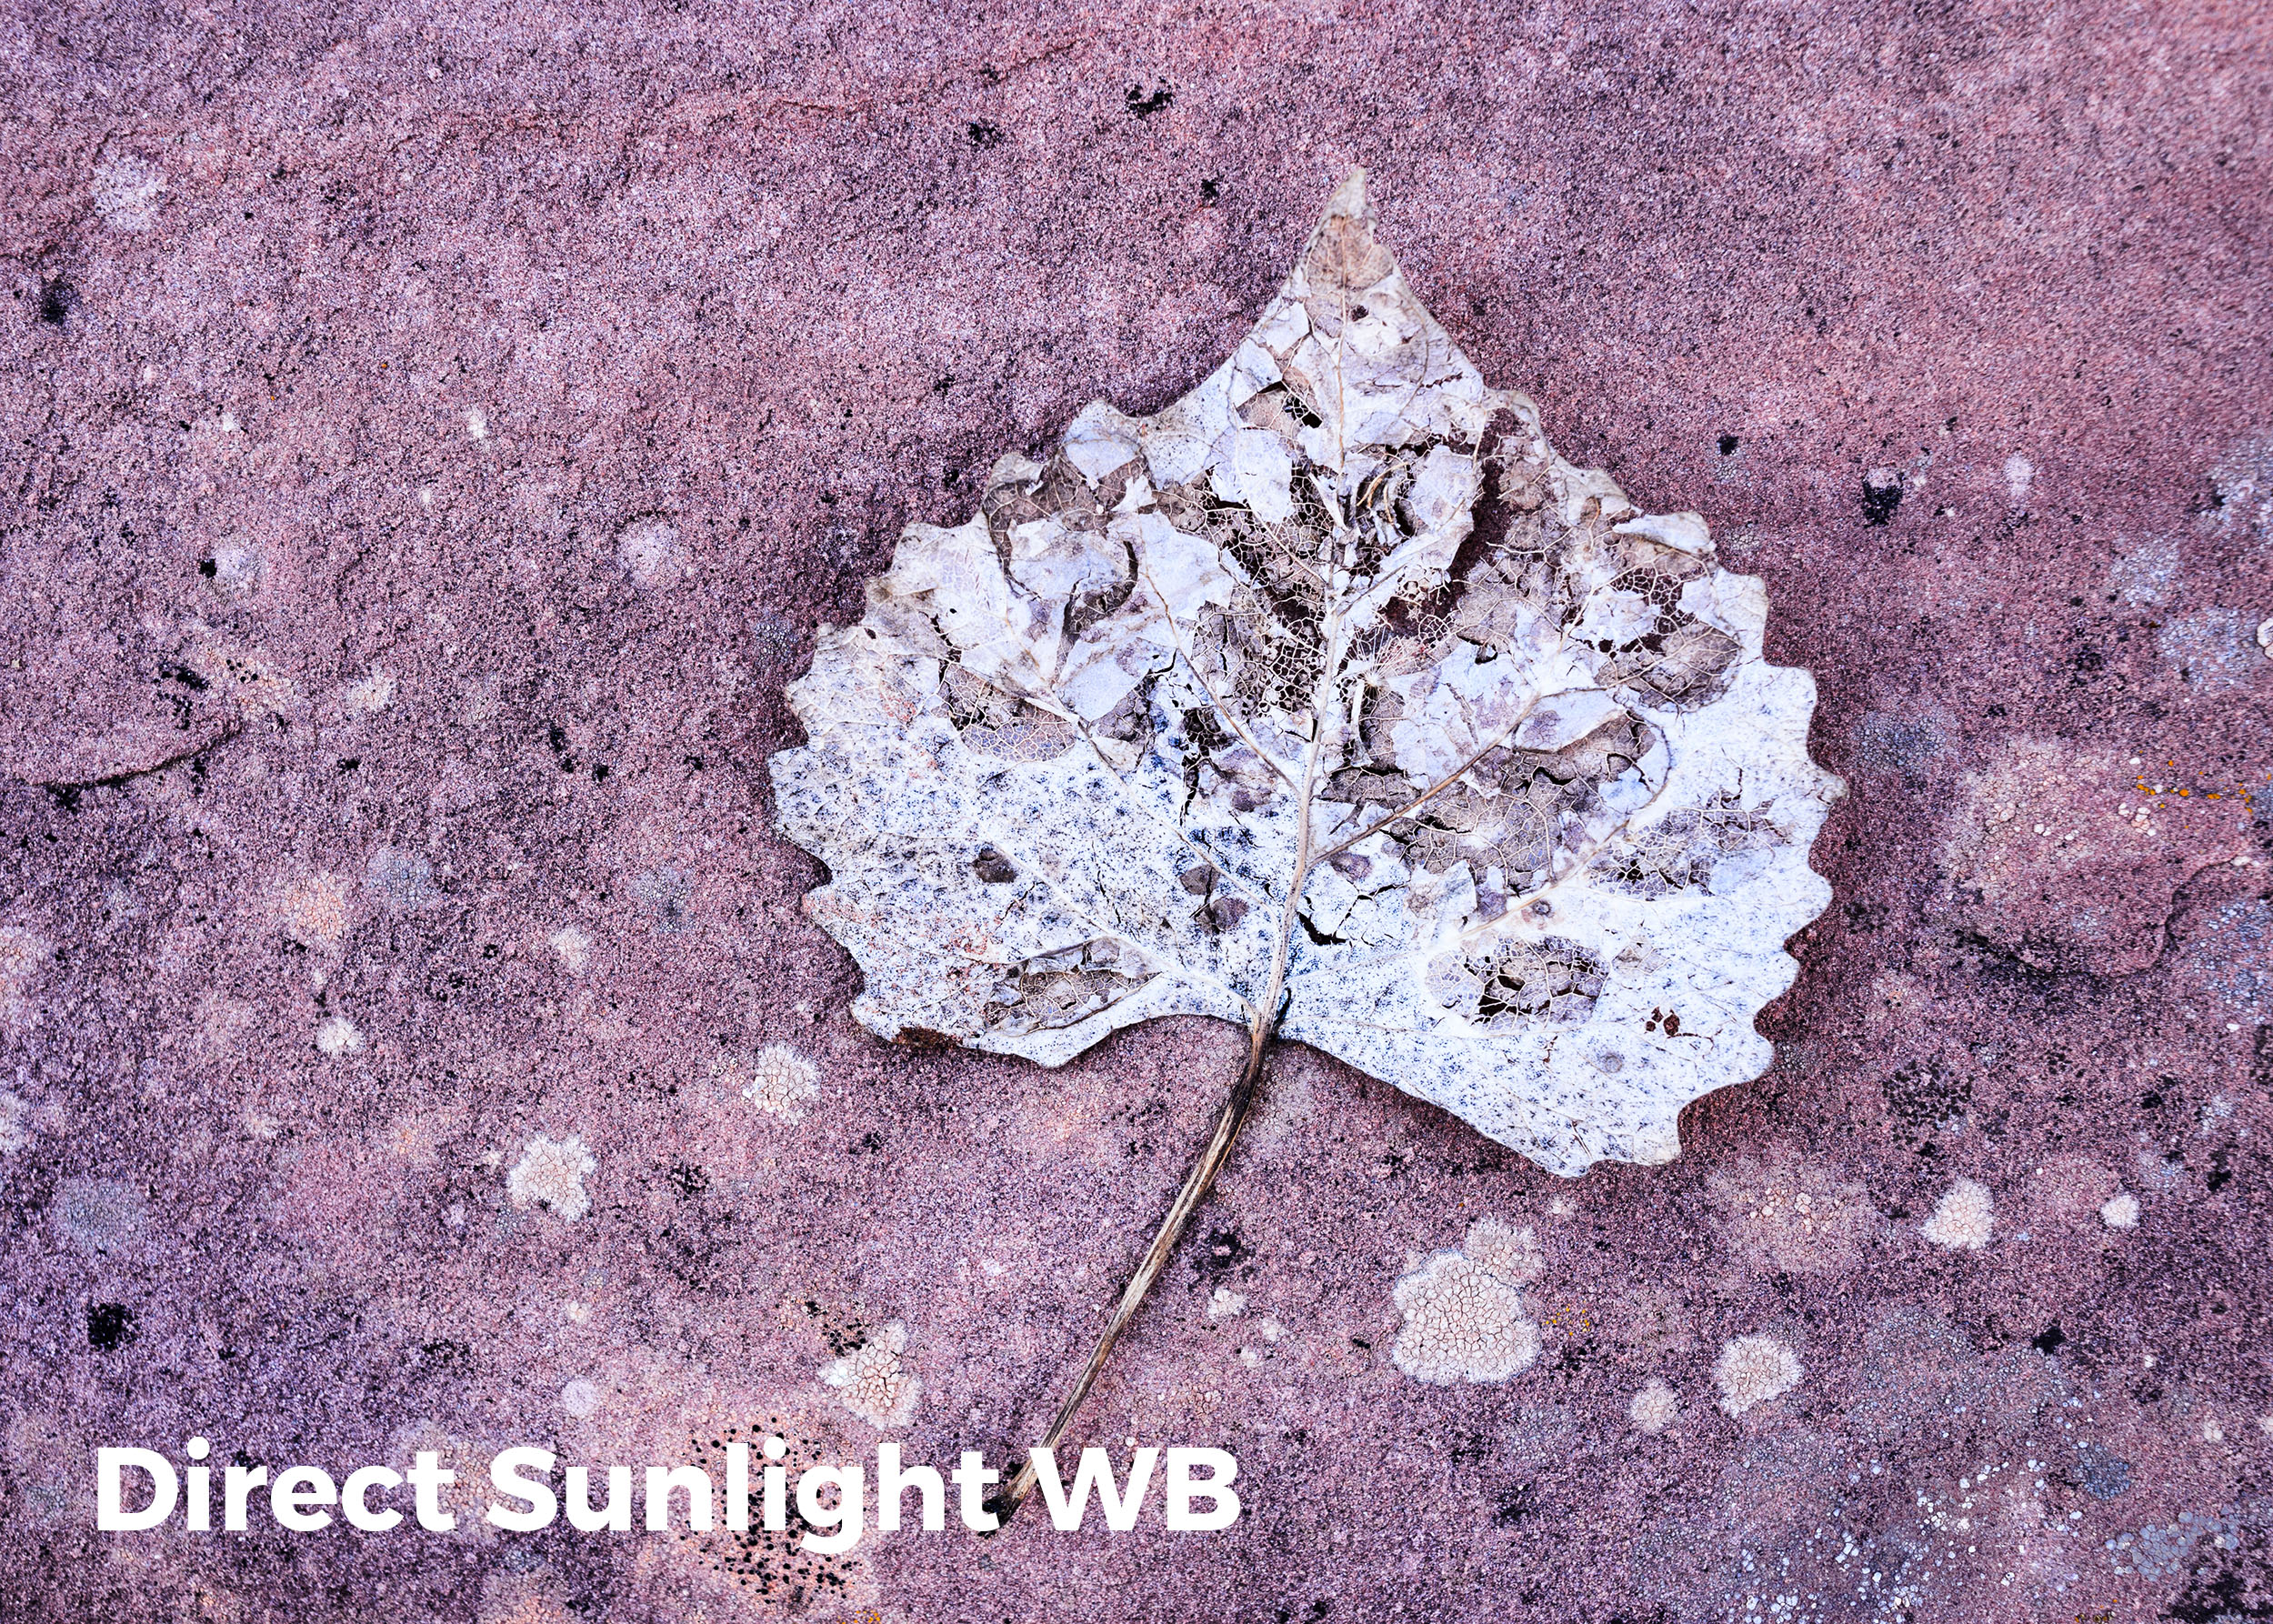
Depending on the white balance setting we choose, the camera can either render the real color of the scene or render an alternate to reality. When our cameras are set to Direct Sunlight (also called Daylight or Sun on some cameras), the camera is rendering the colors of the scene precisely as they are. The resulting picture may appear more warm or cool to our eye, but thatโ€™s because we failed to notice the color cast at the time.

On the other hand, any of the cameraโ€™s other white balance presets will alter the color. They are designed to โ€œfixโ€ the color cast to match what our minds expect it to be. This may or may not be want you want. In the following images, I decided to keep the natural color by using the Direct Sunlight white balance.

Warm colors captured by using Direct Sunlight white balance (above), and the cool colors of an overcast day captured by using Direct Sunlight white balance.

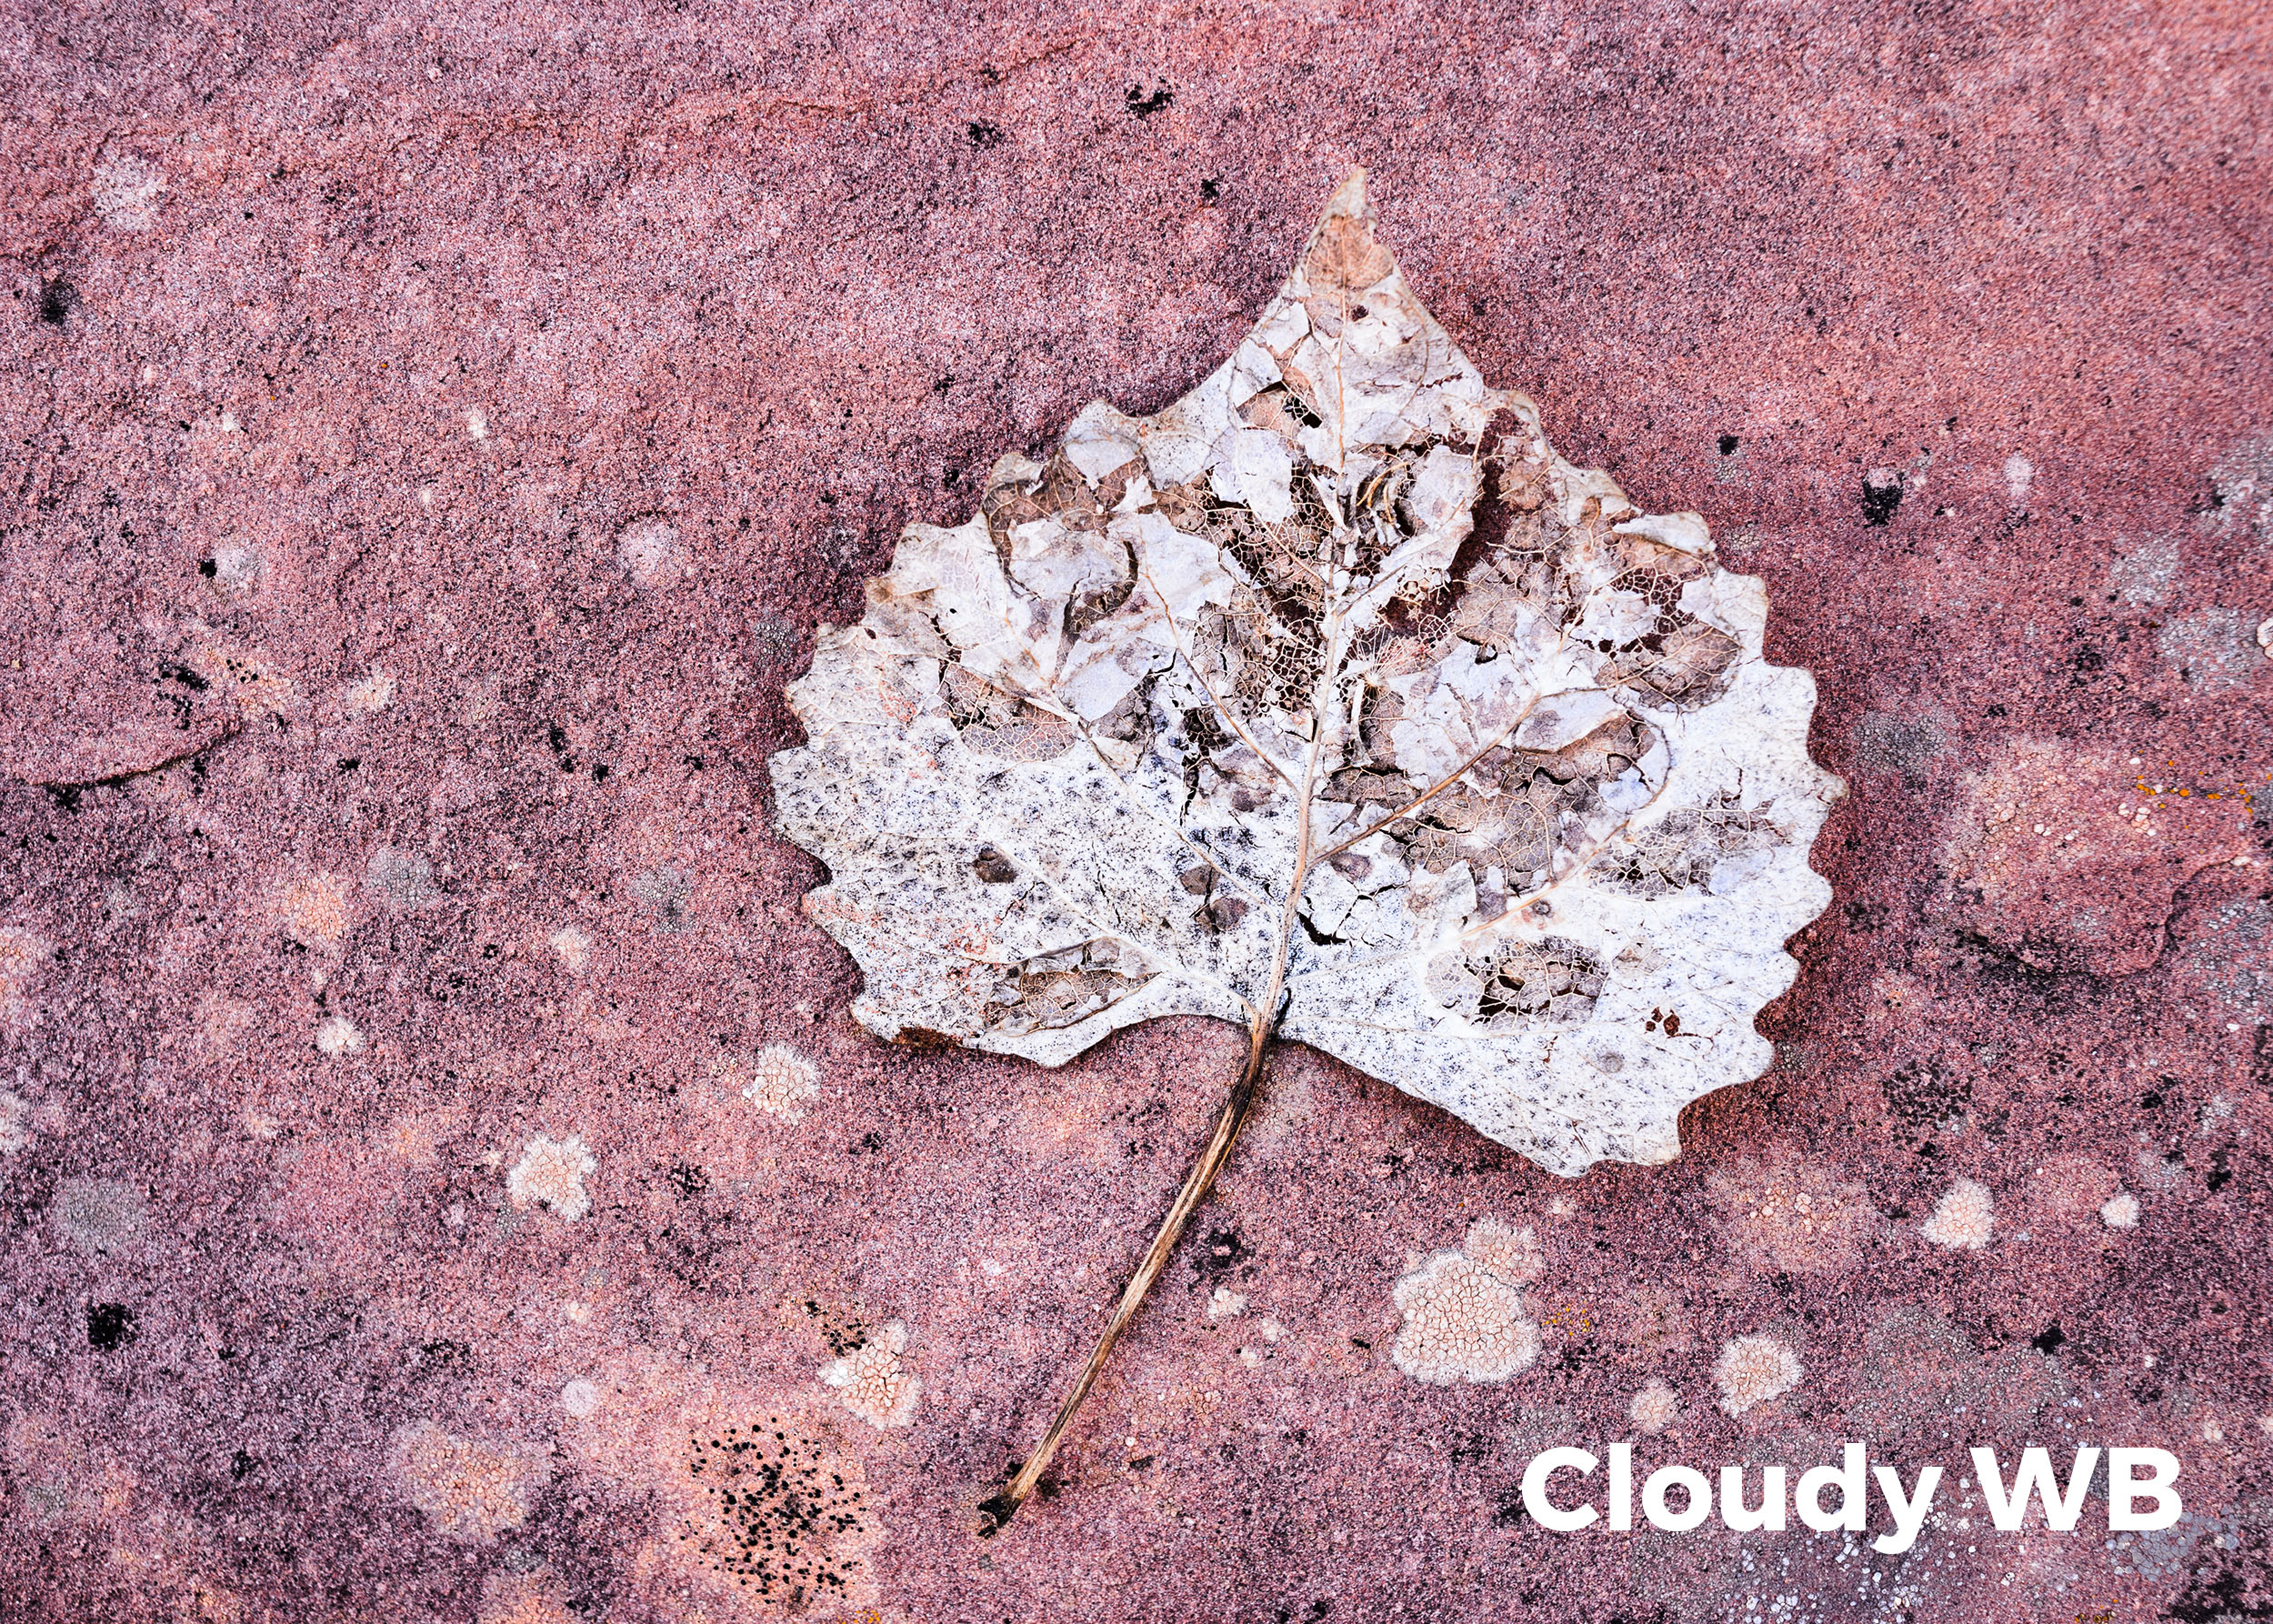
So, if you find the cool light of an overcast day (around 6500 K) unpleasant, you can switch your white balance to Cloudy and the camera will add in warmth to cancel out the extra blue in that situation.

An overcast day is around 6500 K. The Cloudy white balance setting will warm the scene by adding in yellow/orange to cancel out blue and make โ€œwhiteโ€ light.

Letโ€™s look at this in a real-world scenario. Below you can see an image photographed at two white balances. The version on the left shows how it looks on an overcast day when shot with Direct Sunlight white balance. The version on the right shows the same image shot with Cloudy white balance.

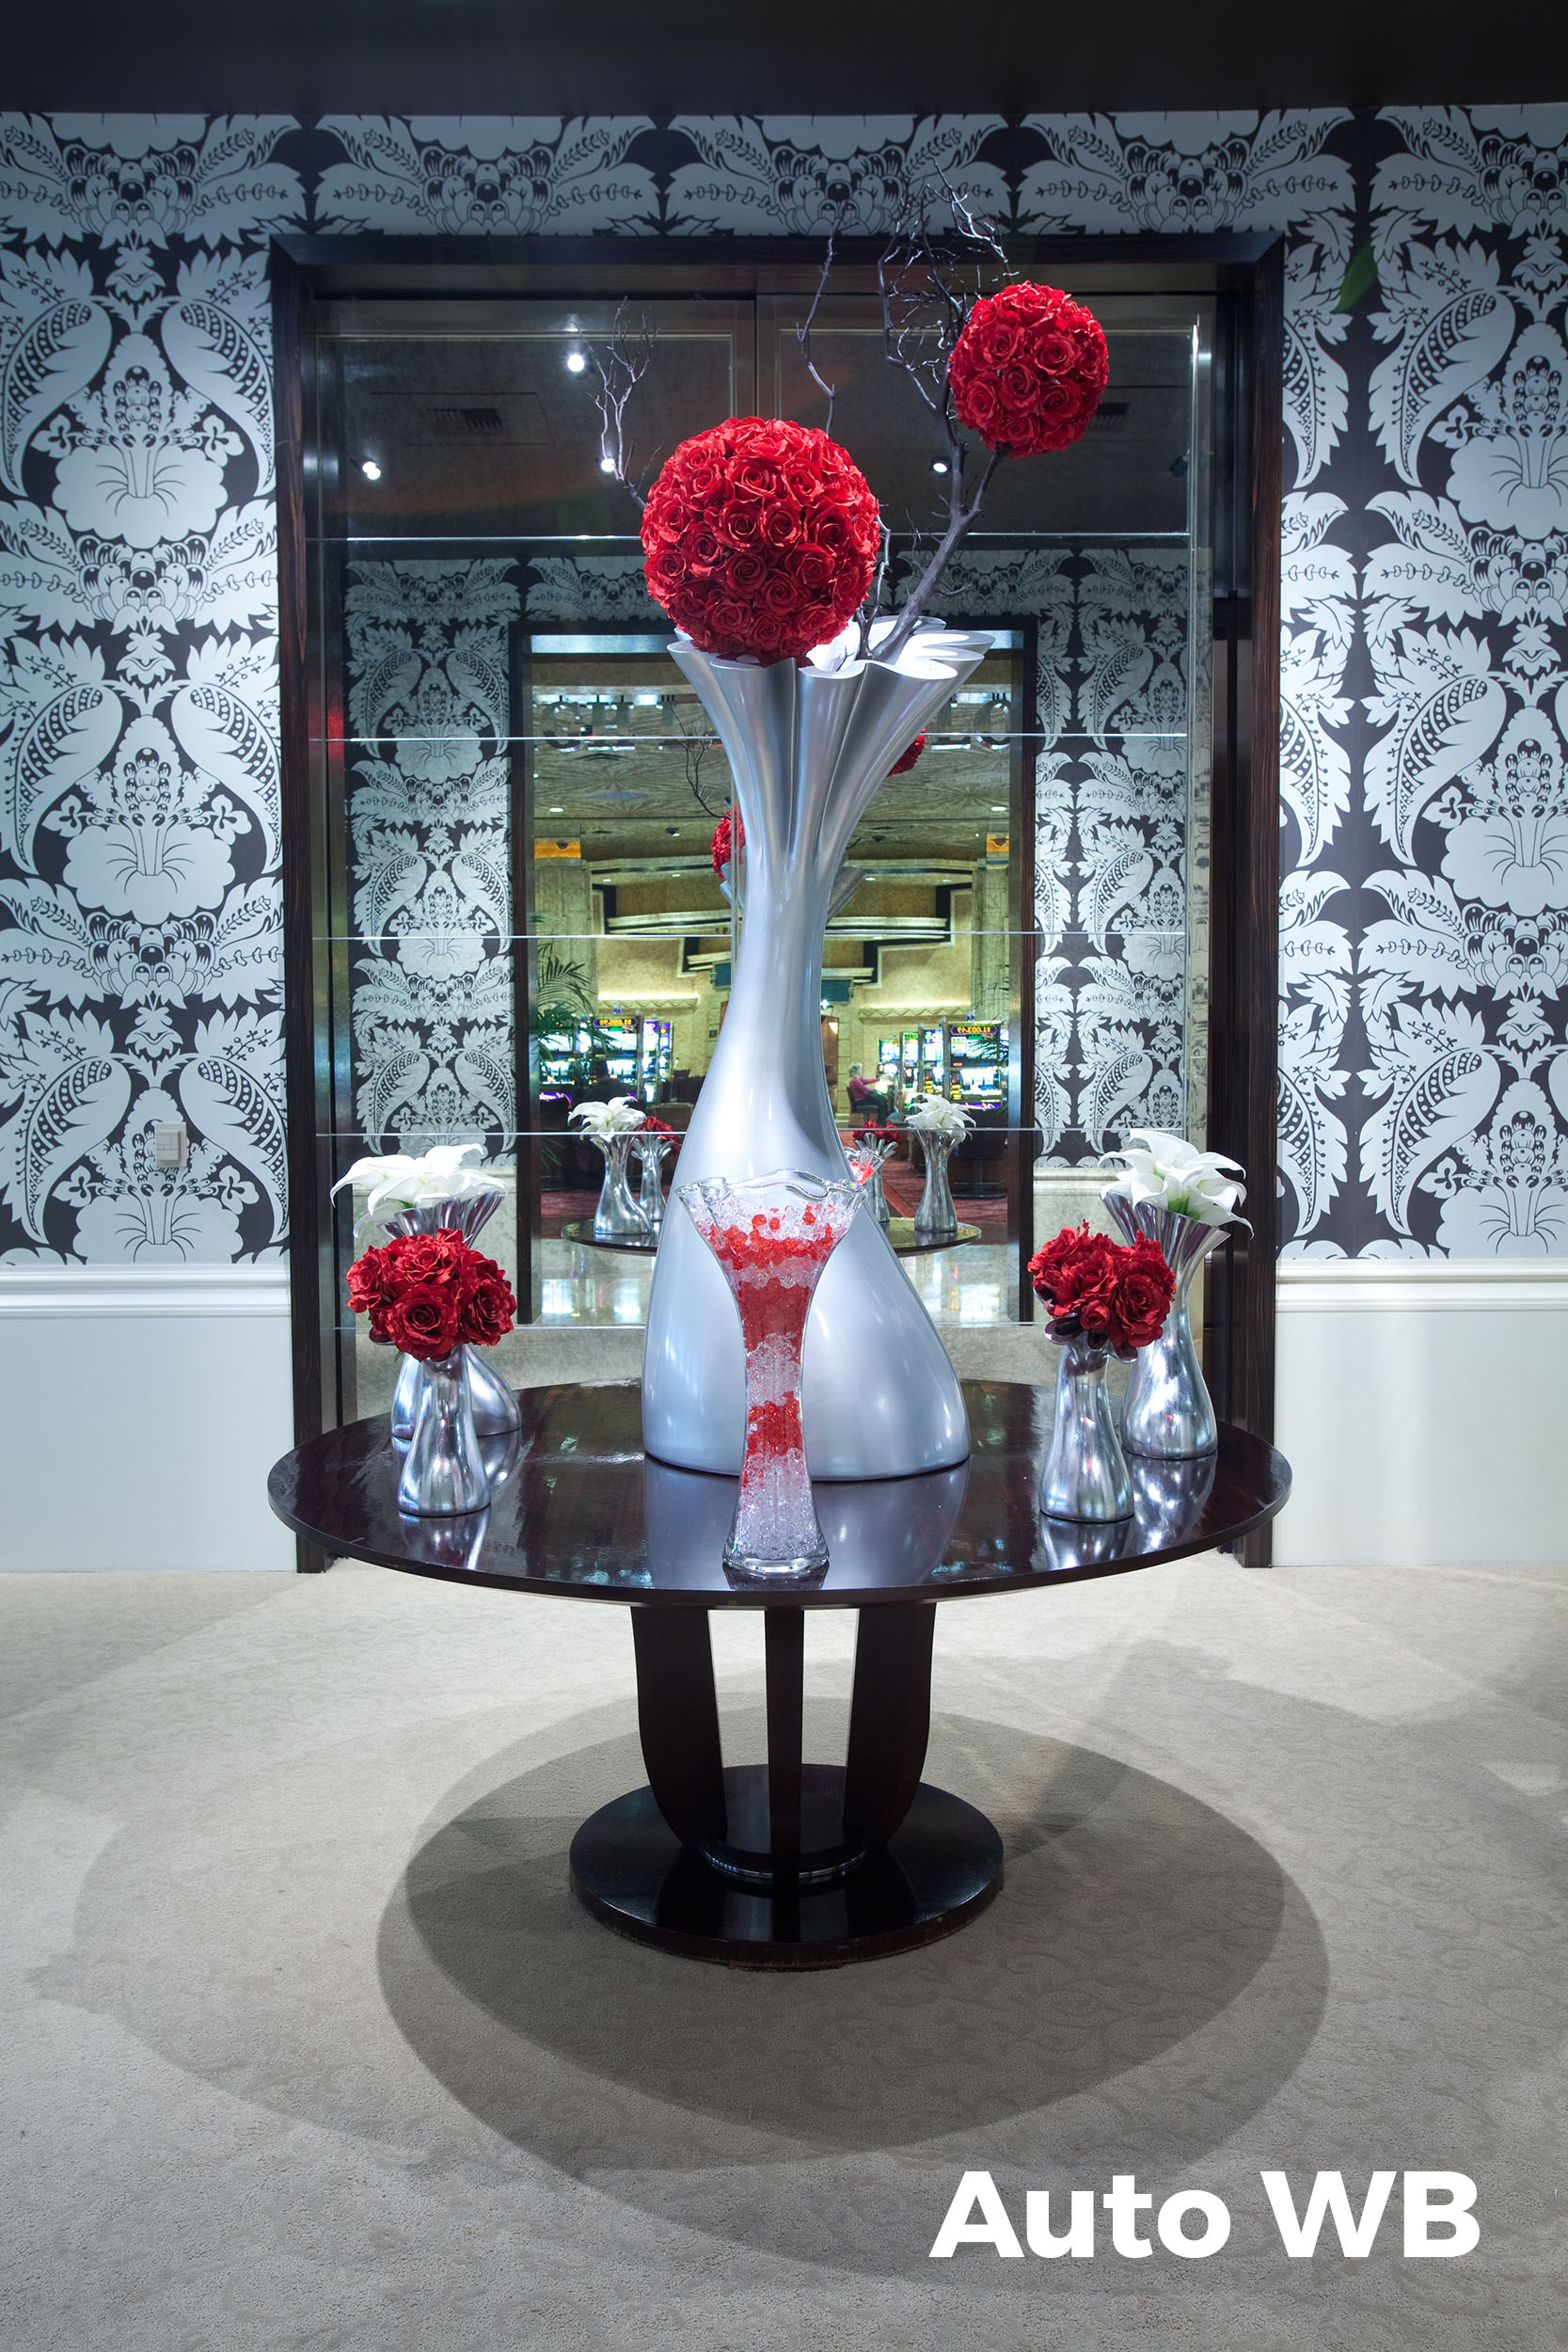
Unlike the presets of Cloudy, Shade, Tungsten and Direct Sunlight, which have set values, the Auto white balance setting varies depending on what the camera detects. It looks at a percentage of the brightest pixels in the scene, determines their color cast, and then adds in the opposite color to neutralize.

The Question of Fixing Color

Of course, itโ€™s always your choice whether to fix the color cast or leave it as. For example, why would you want to โ€œfixโ€ or neutralize the beautiful warm colors of a sunset? I also find that when shooting forests or waterfalls on a cloudy day, I tend to keep my white balance set to Direct Sunlight to allow the โ€œcoolโ€ feeling to come through.

White balance is very subjective. We can, however, list out a few rough guidelines. Here are mine:

  • When shooting outdoors on a sunny day, I choose Direct Sunlight.

  • When shooting sunrise and sunset, again, Direct Sunlight.

  • On overcast days, I choose Direct Sunlight or Cloudy.

  • In the open shade, I choose Cloudy or Shade.

  • When shooting indoors under artificial light, I choose Auto.

  • When shooting at night? I set my white balance manually.

Manual White Balance

I choose a manual white balance at night so that I can completely control the color of the night sky along with any existing light or any light that I choose to add to the photo.

Manual white balance is achieved by using the Kelvin white balance setting. It allows you to set your white balance to any color temperature you desire. No presets, no Auto fix. Just your choice of how you want your image to look.

This setting is found in your White Balance presets and is signified by either a K or the word Kelvin.

Nikonโ€™s White Balance menu.

Clicking on this choice allows you to choose from Kelvin values of anywhere from 2000 K to 10,000 K.

  • The higher the number you use, the warmer the picture will be.

  • The lower the number you use, the cooler the picture will be.

Using the Kelvin white balance setting allows for very precise control over the color of the resulting image.

Setting the Kelvin value.

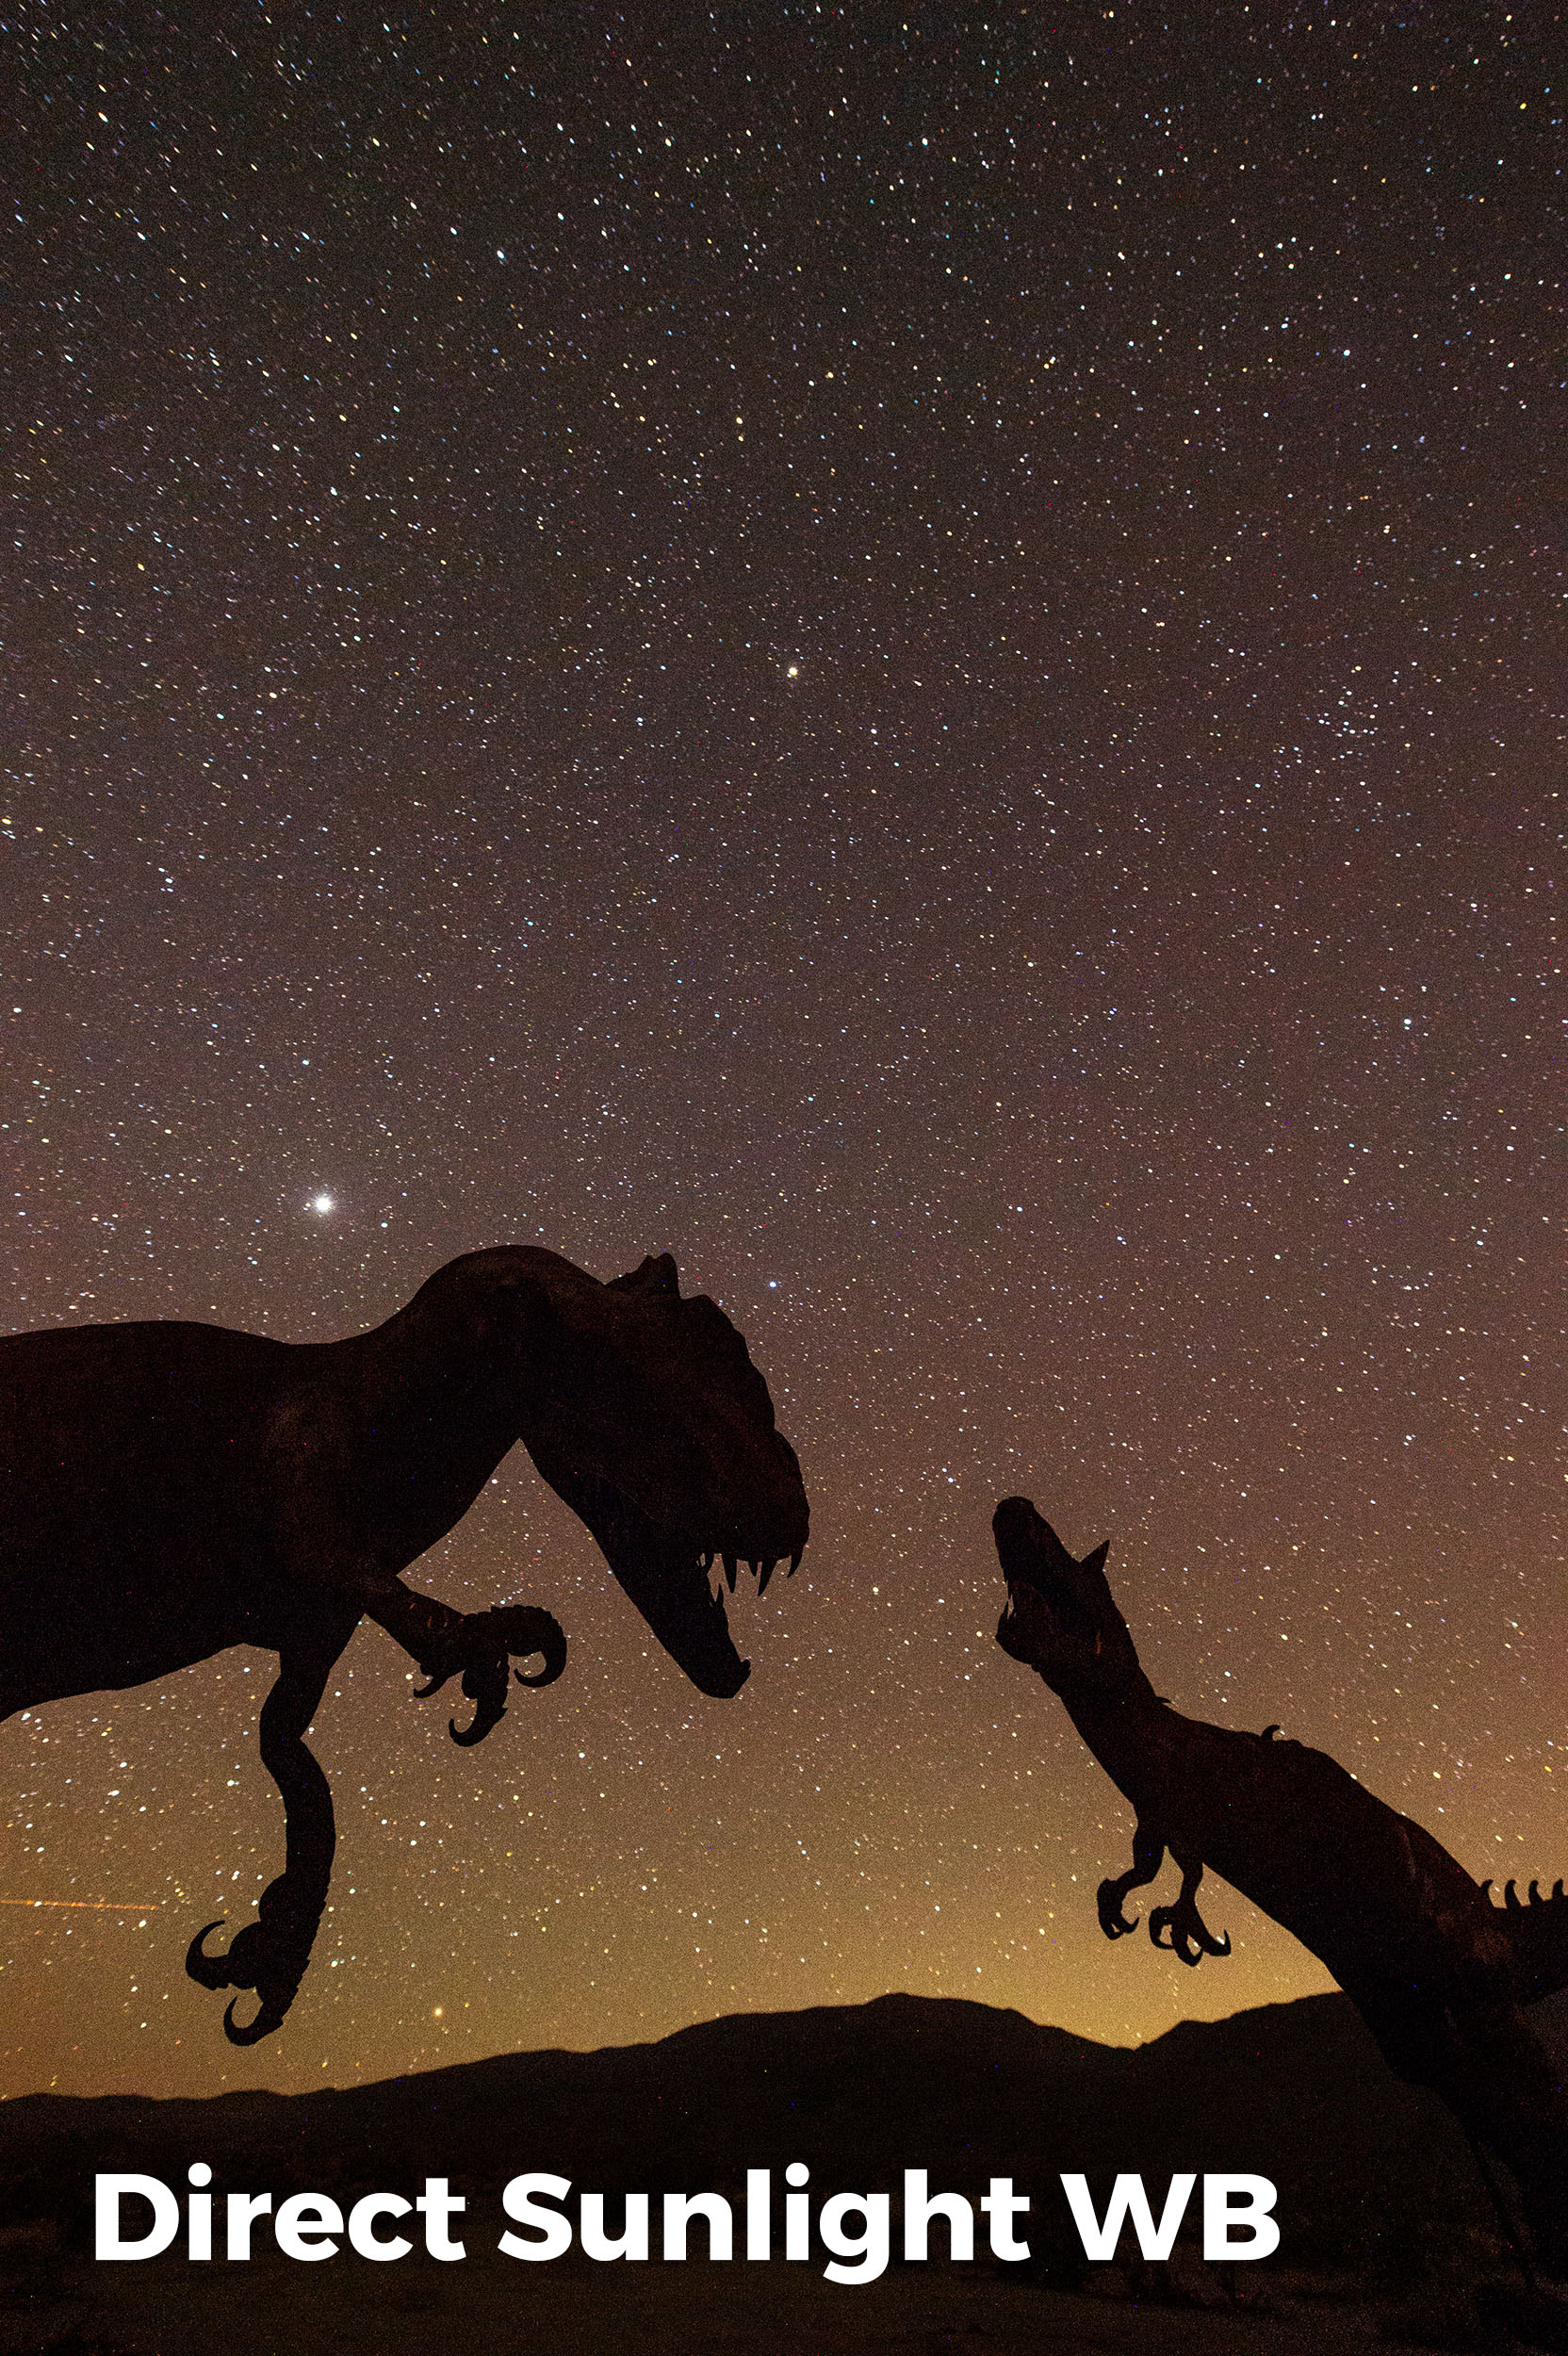
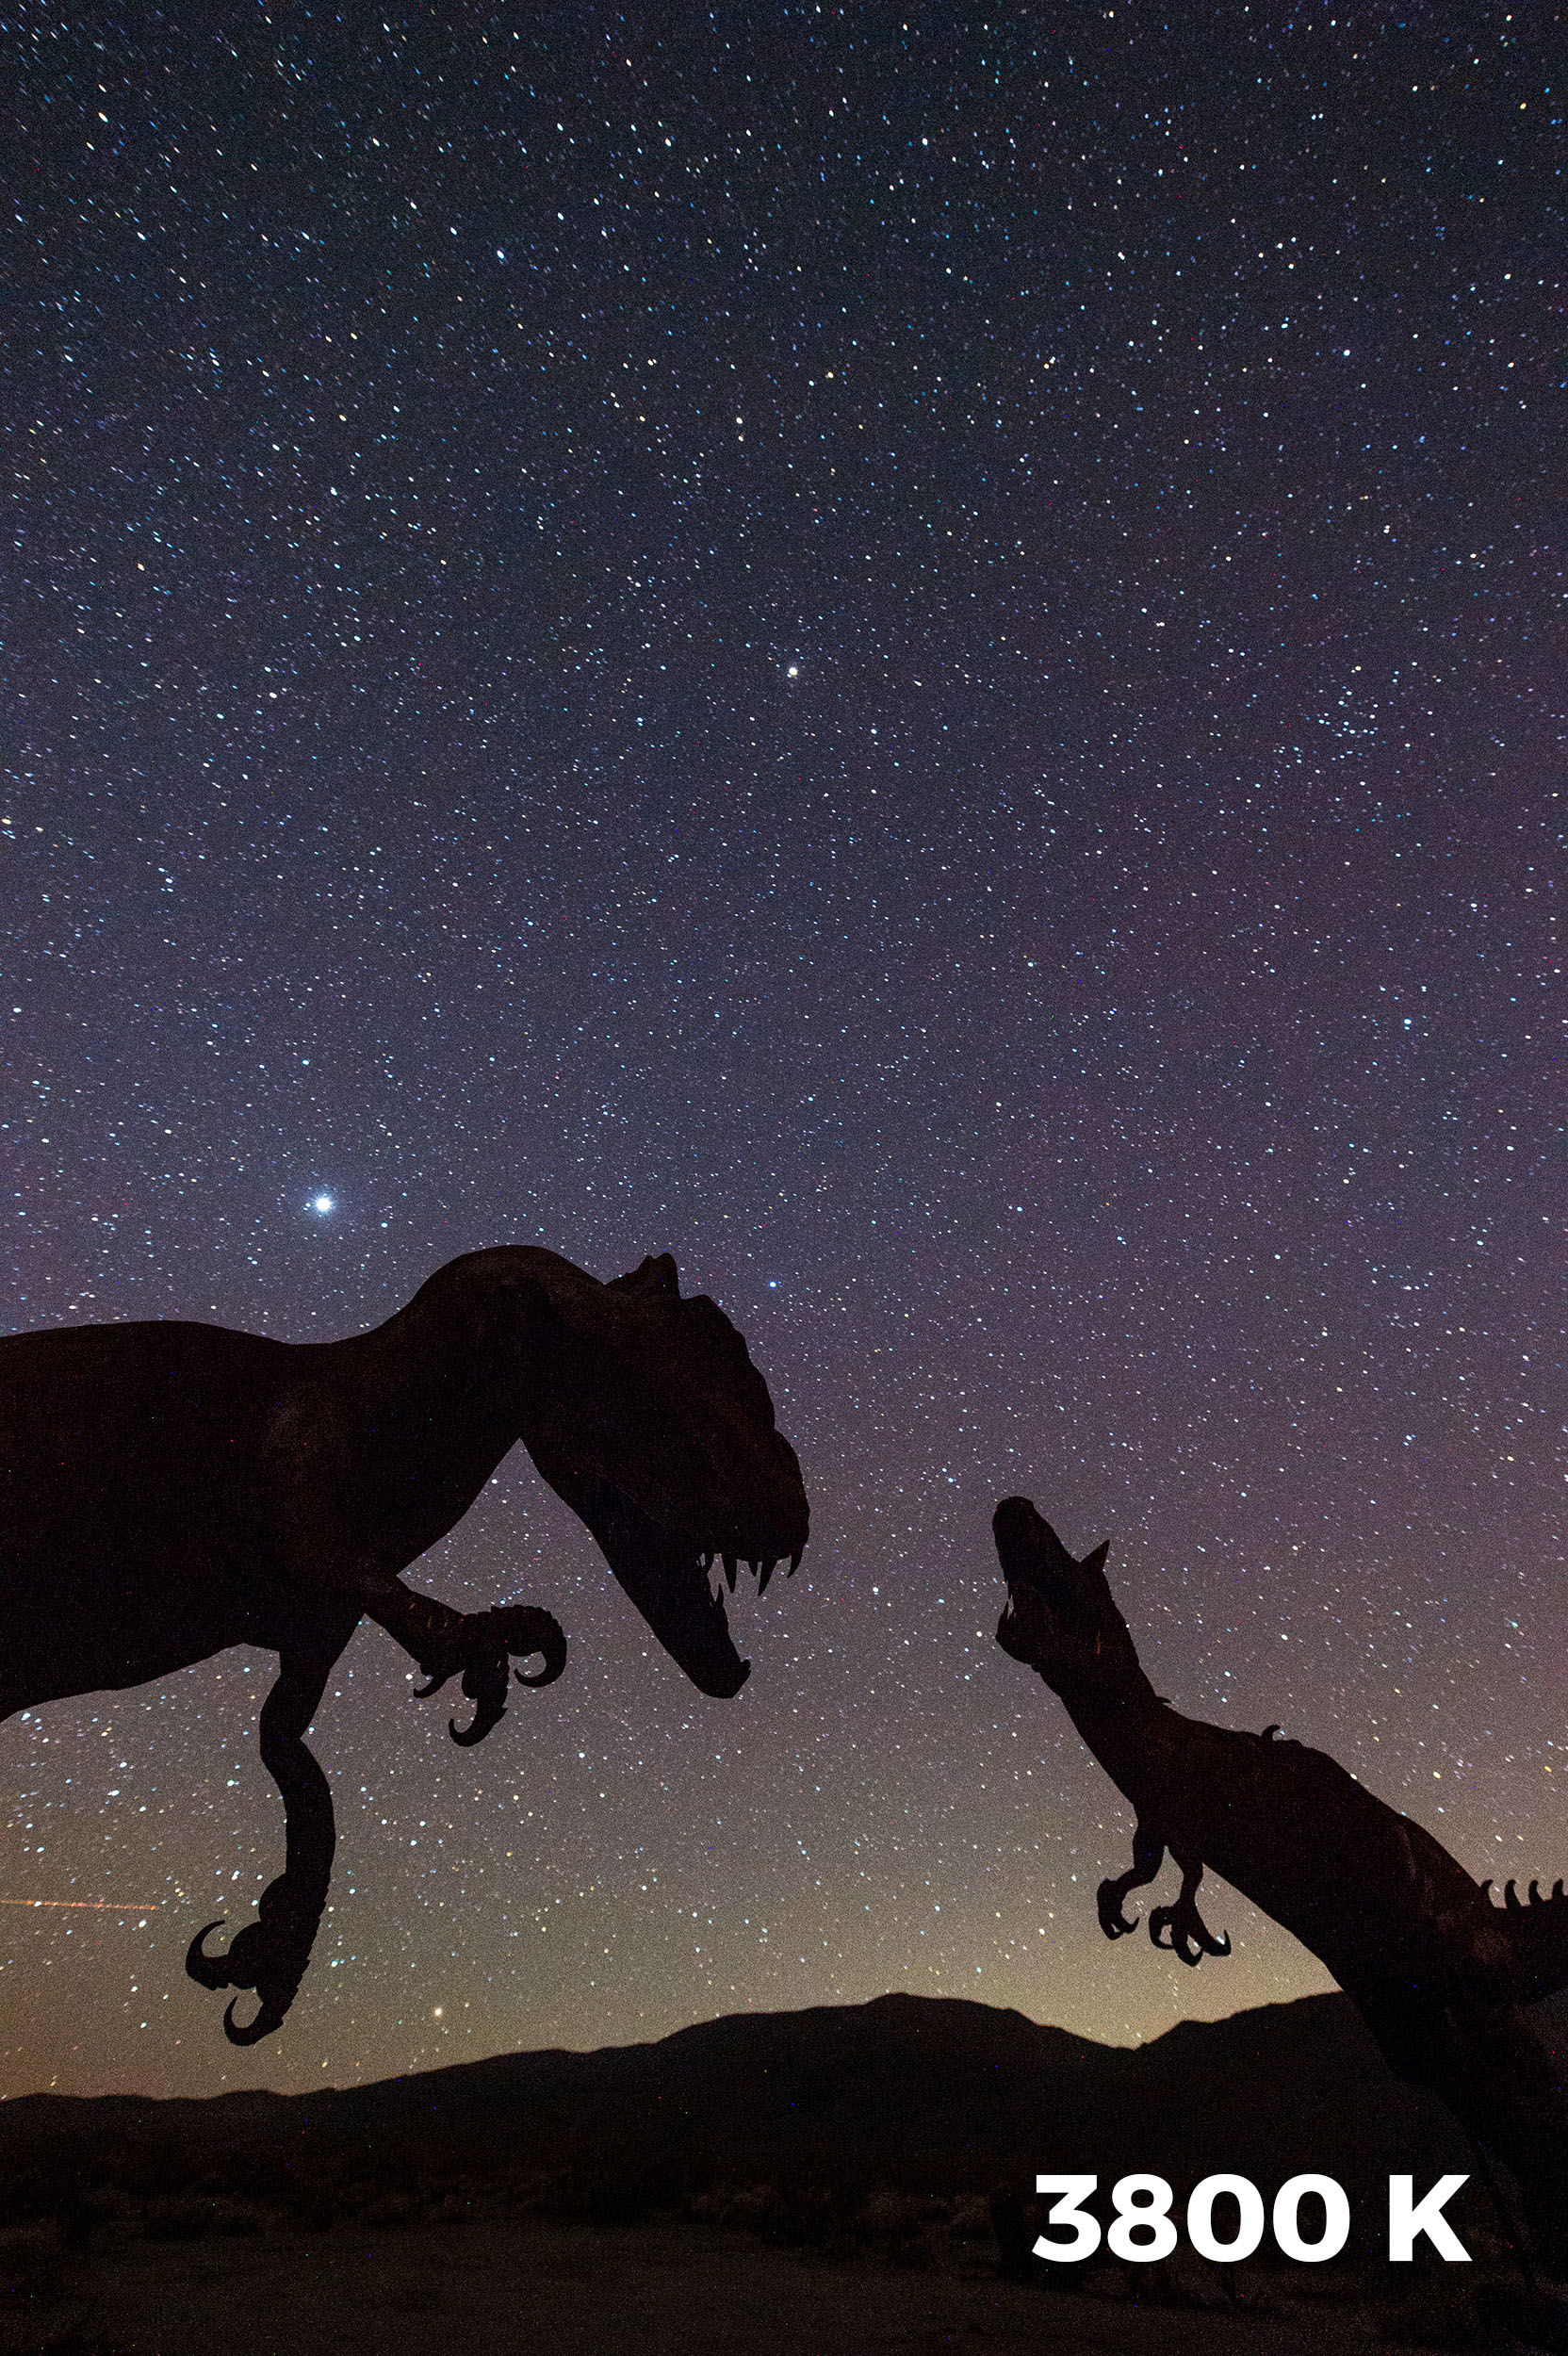
Itโ€™s very common for photographers to leave their white balance set on Direct Sunlight when shooting at night. Even with no moonlight this can cause an overly warm look to the image. By your using Kelvin white balance and lowering the setting to, say, 3800 K, youโ€™ll be cooling down your photo and thereby making it look and feel more like night.

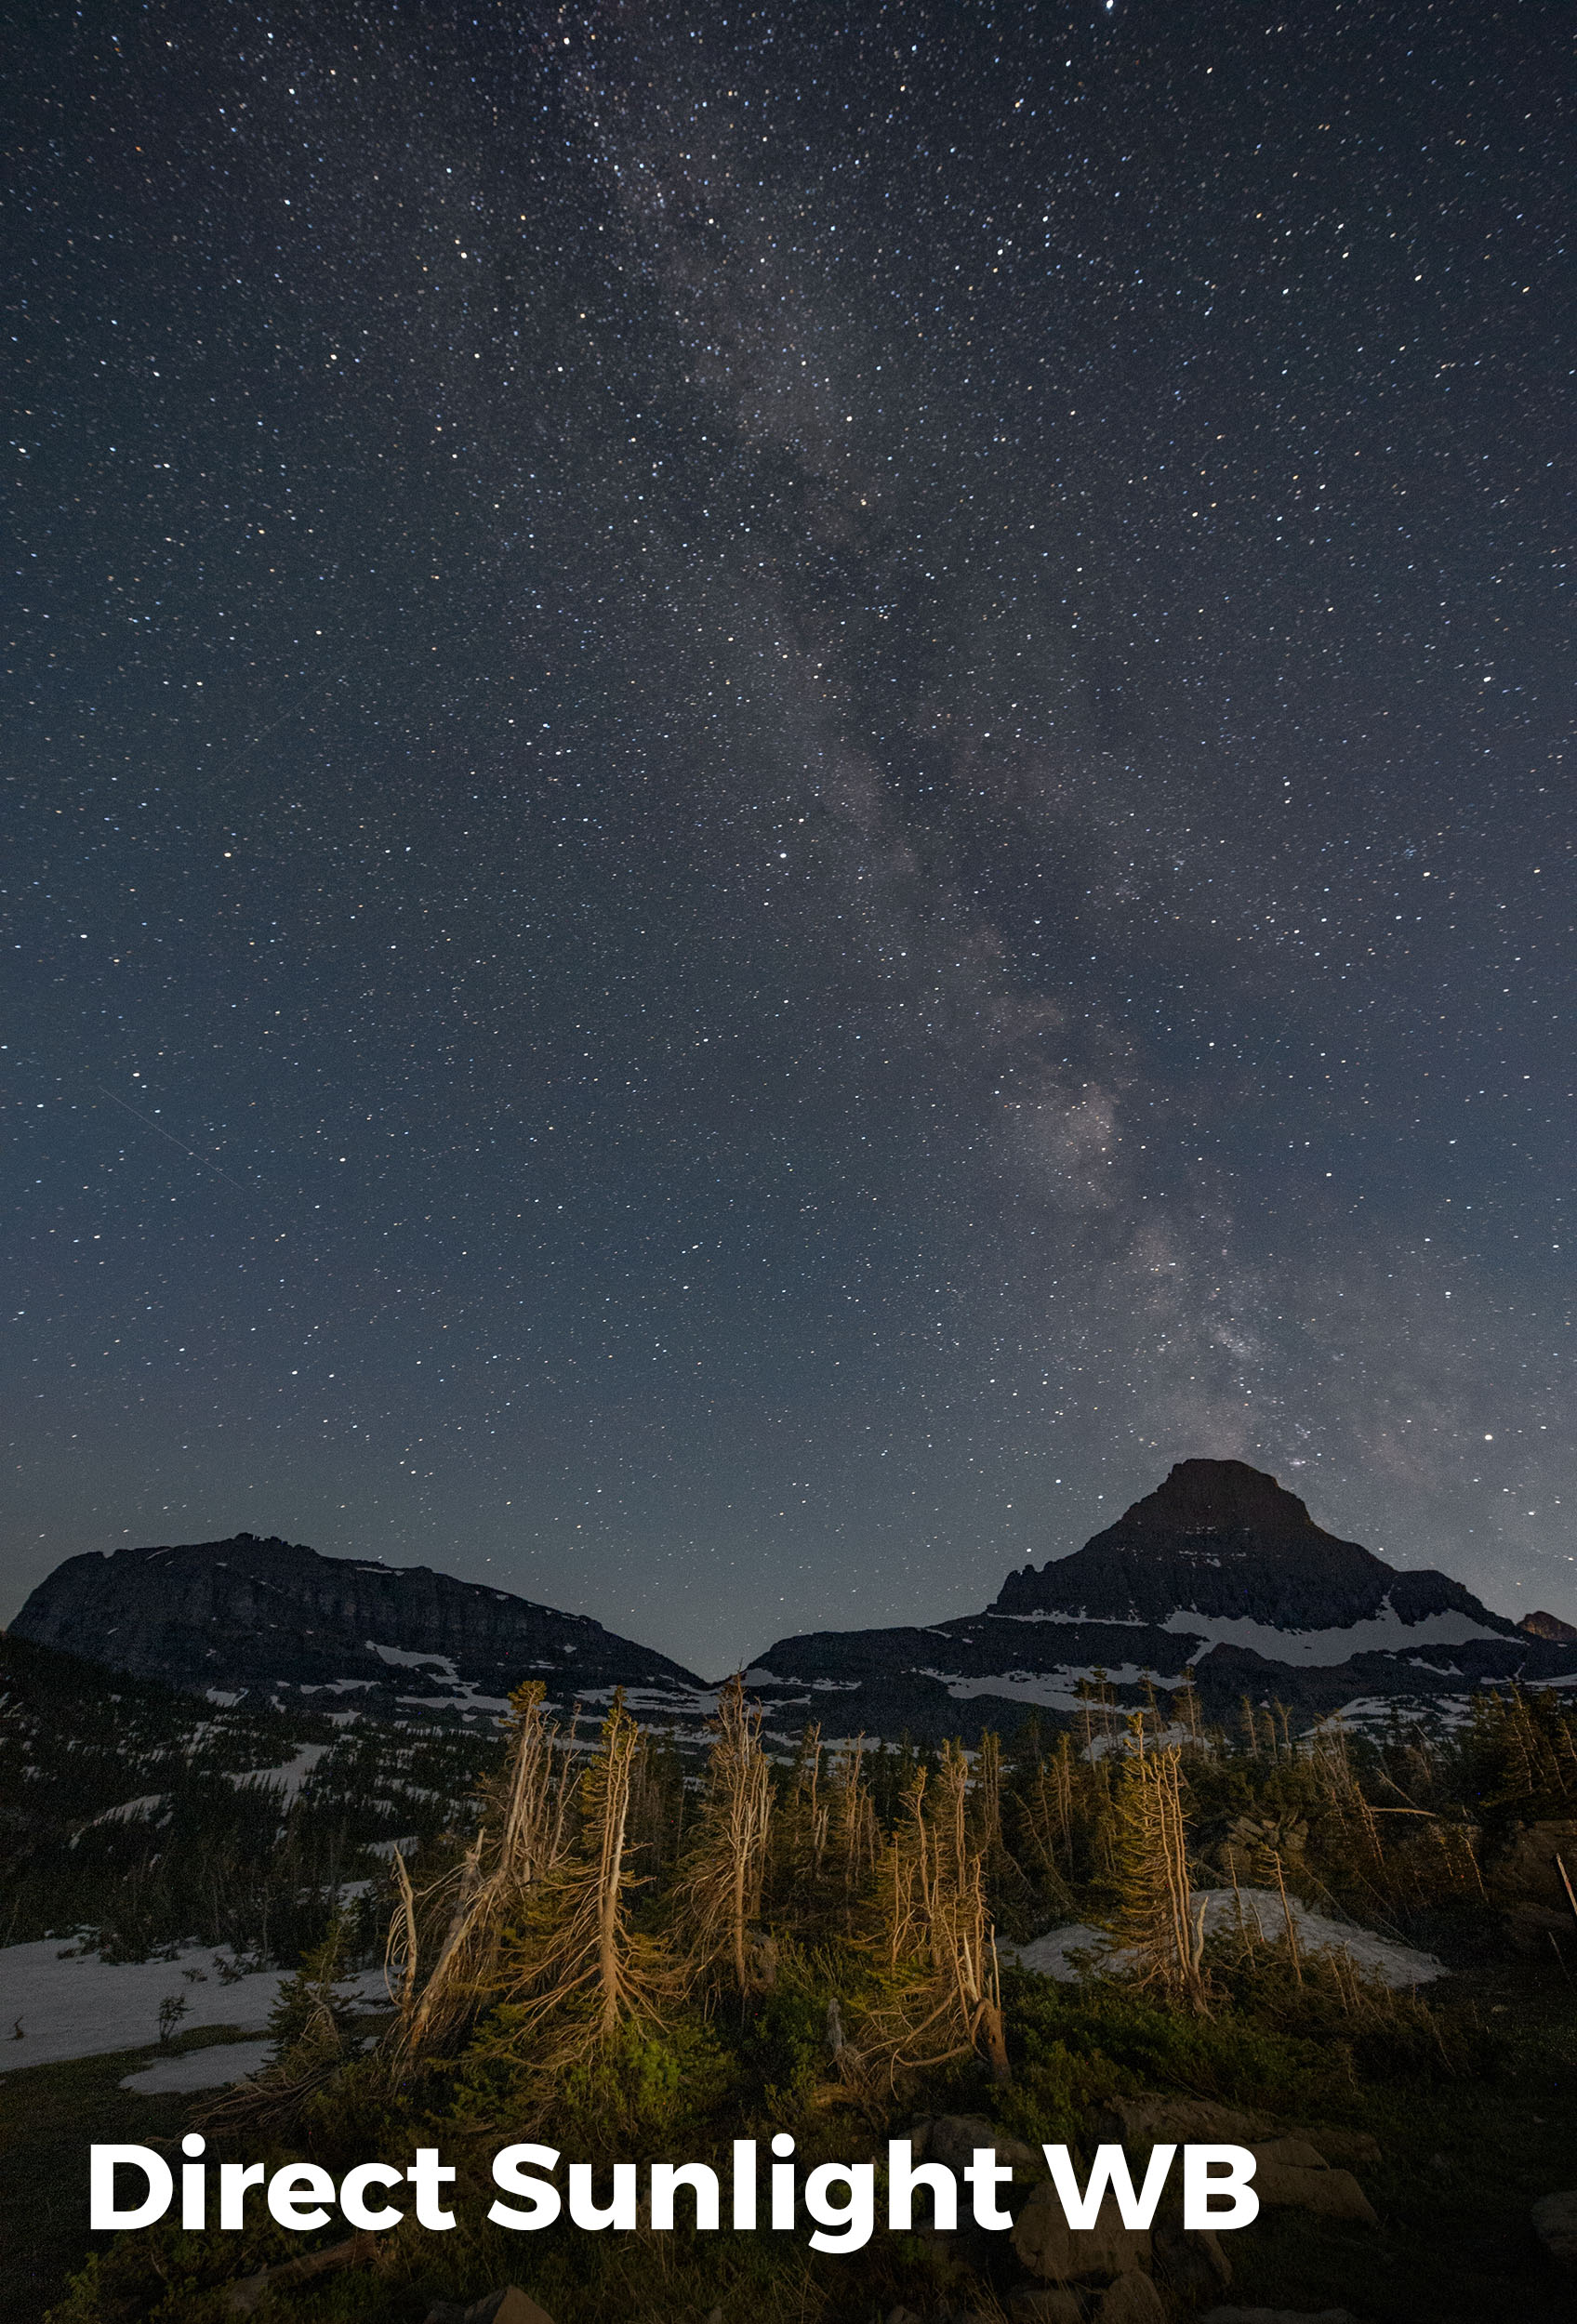
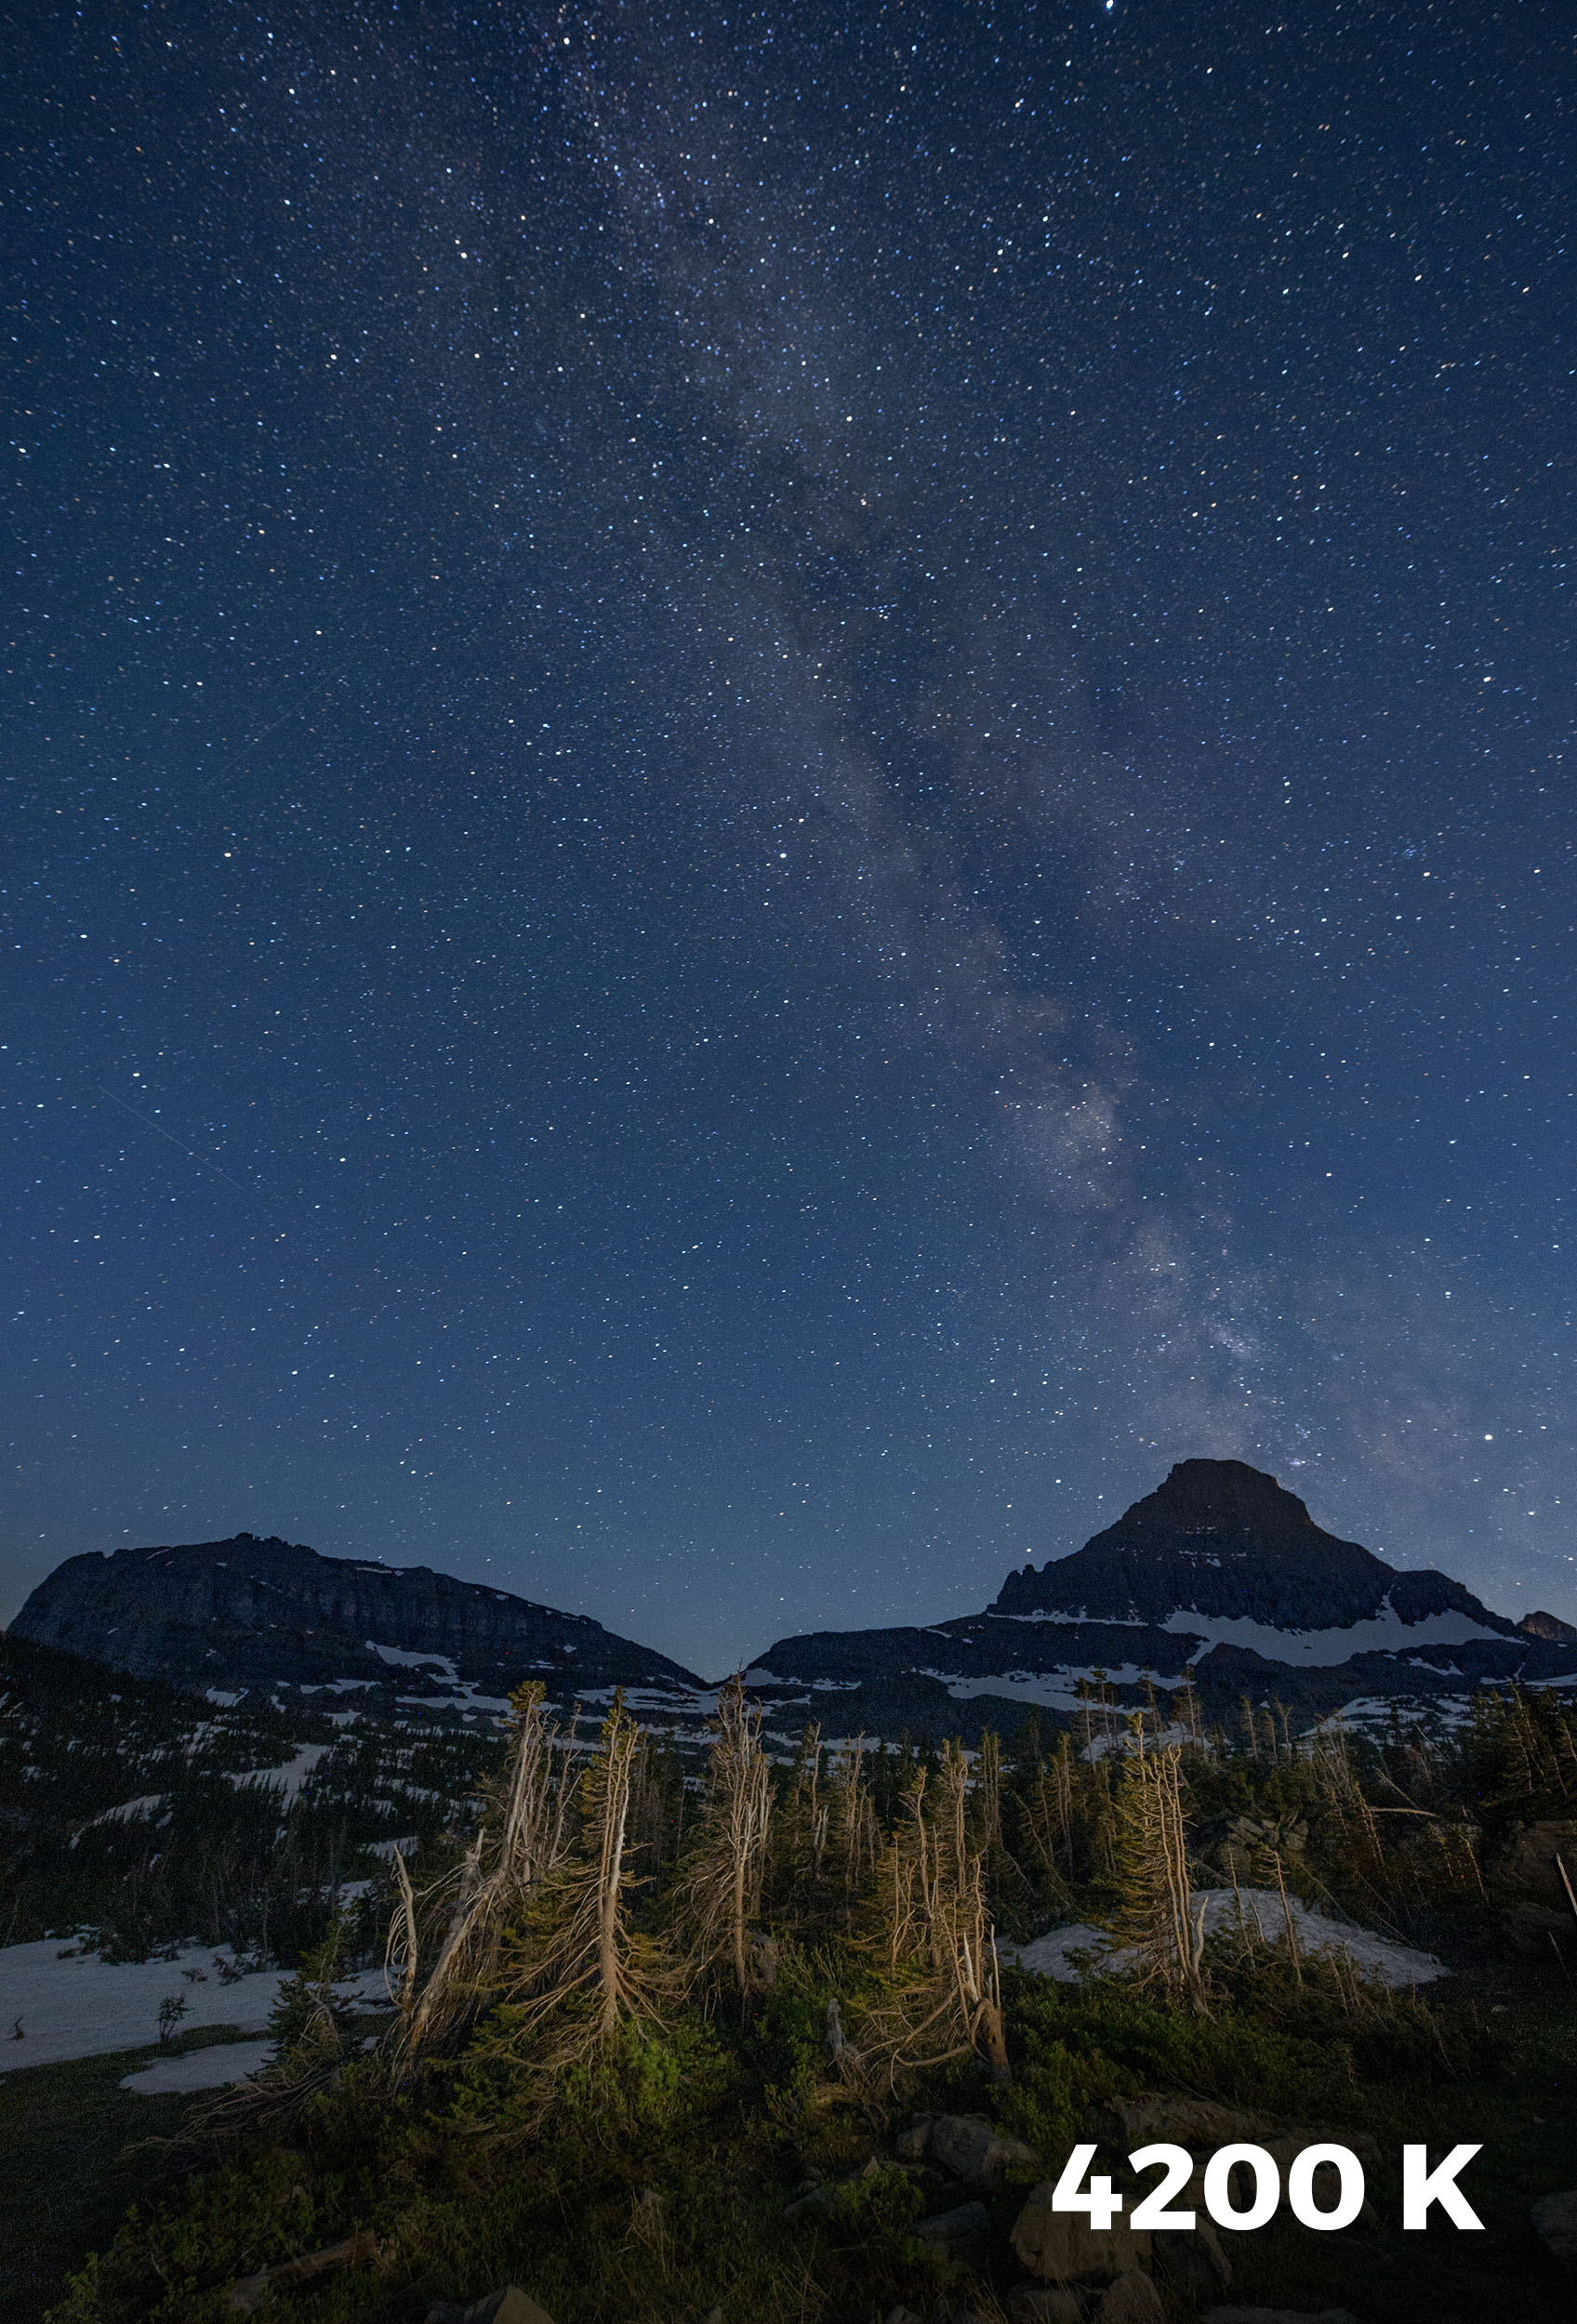
The exact Kelvin setting you choose will vary greatly depending on the circumstances. Here the white balance of the first shot was set to Direct Sunlight. There was very little moonlight and little to no light pollution from nearby towns. In this case, I cooled down my photo by setting a Kelvin temperature of 4200 K.

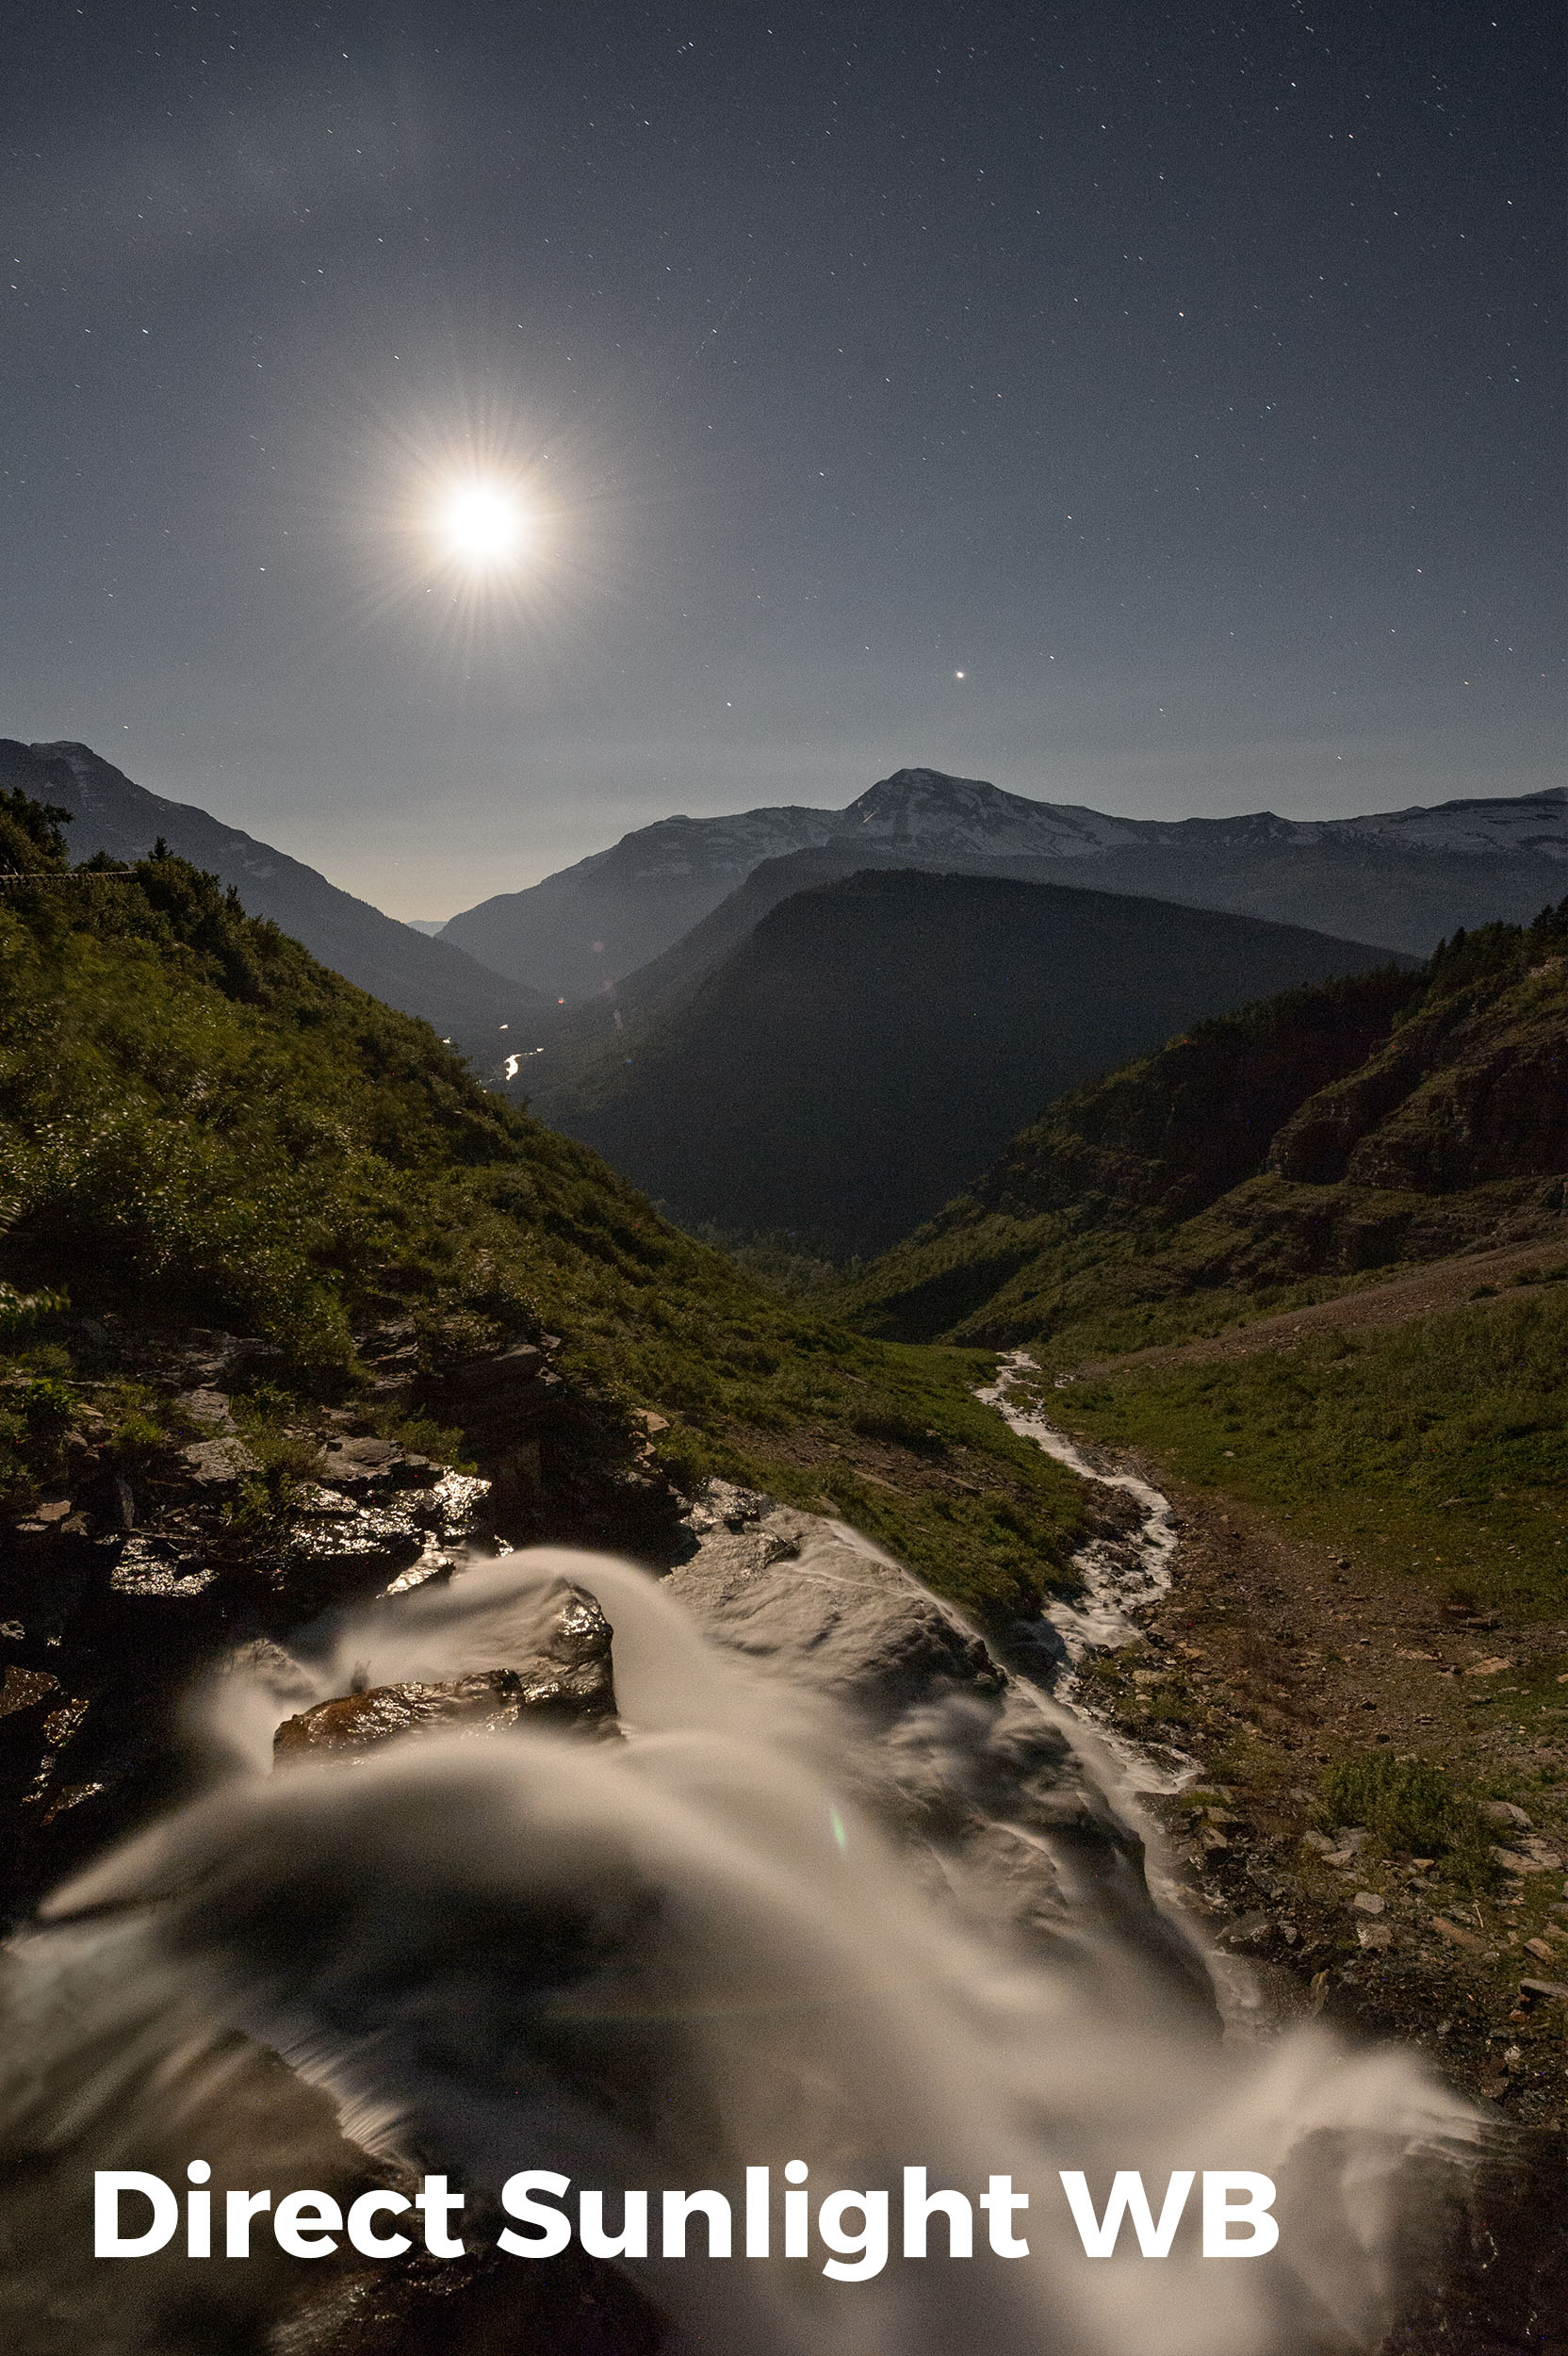
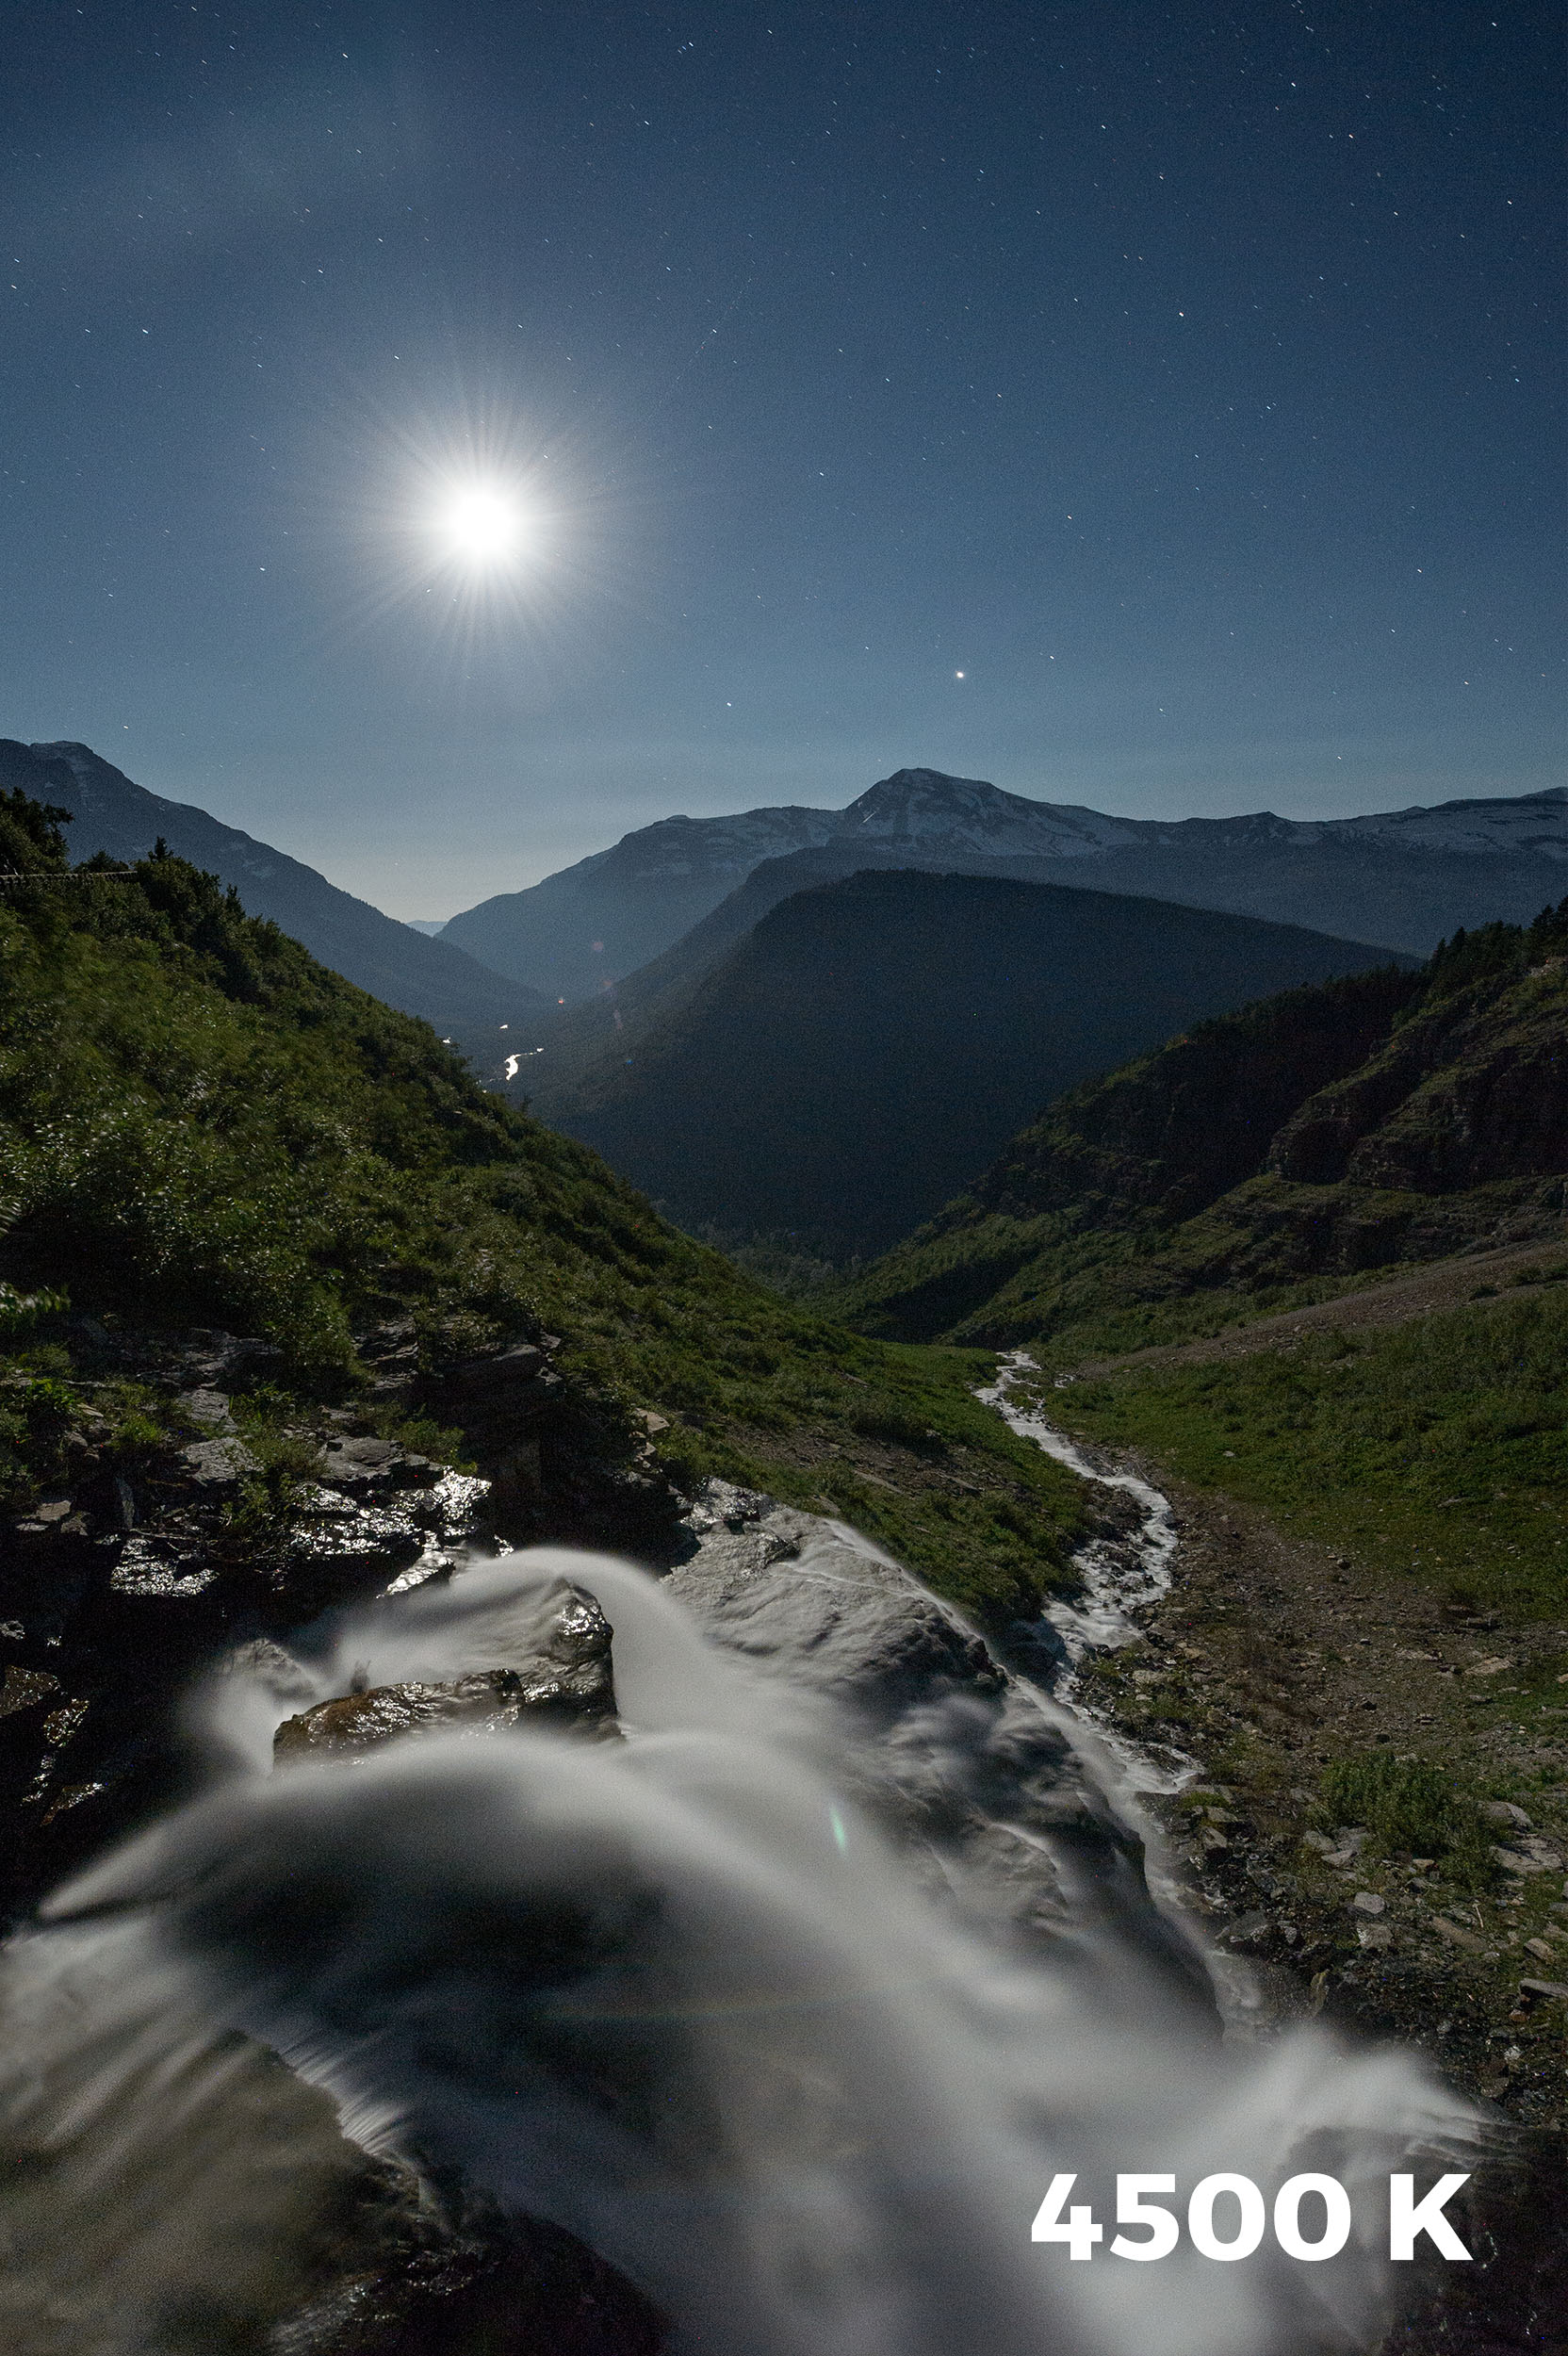
The following images were made under a full moon. The first was made with a white balance of Direct Sunlight. The second image was with a manual setting of 4500 K.

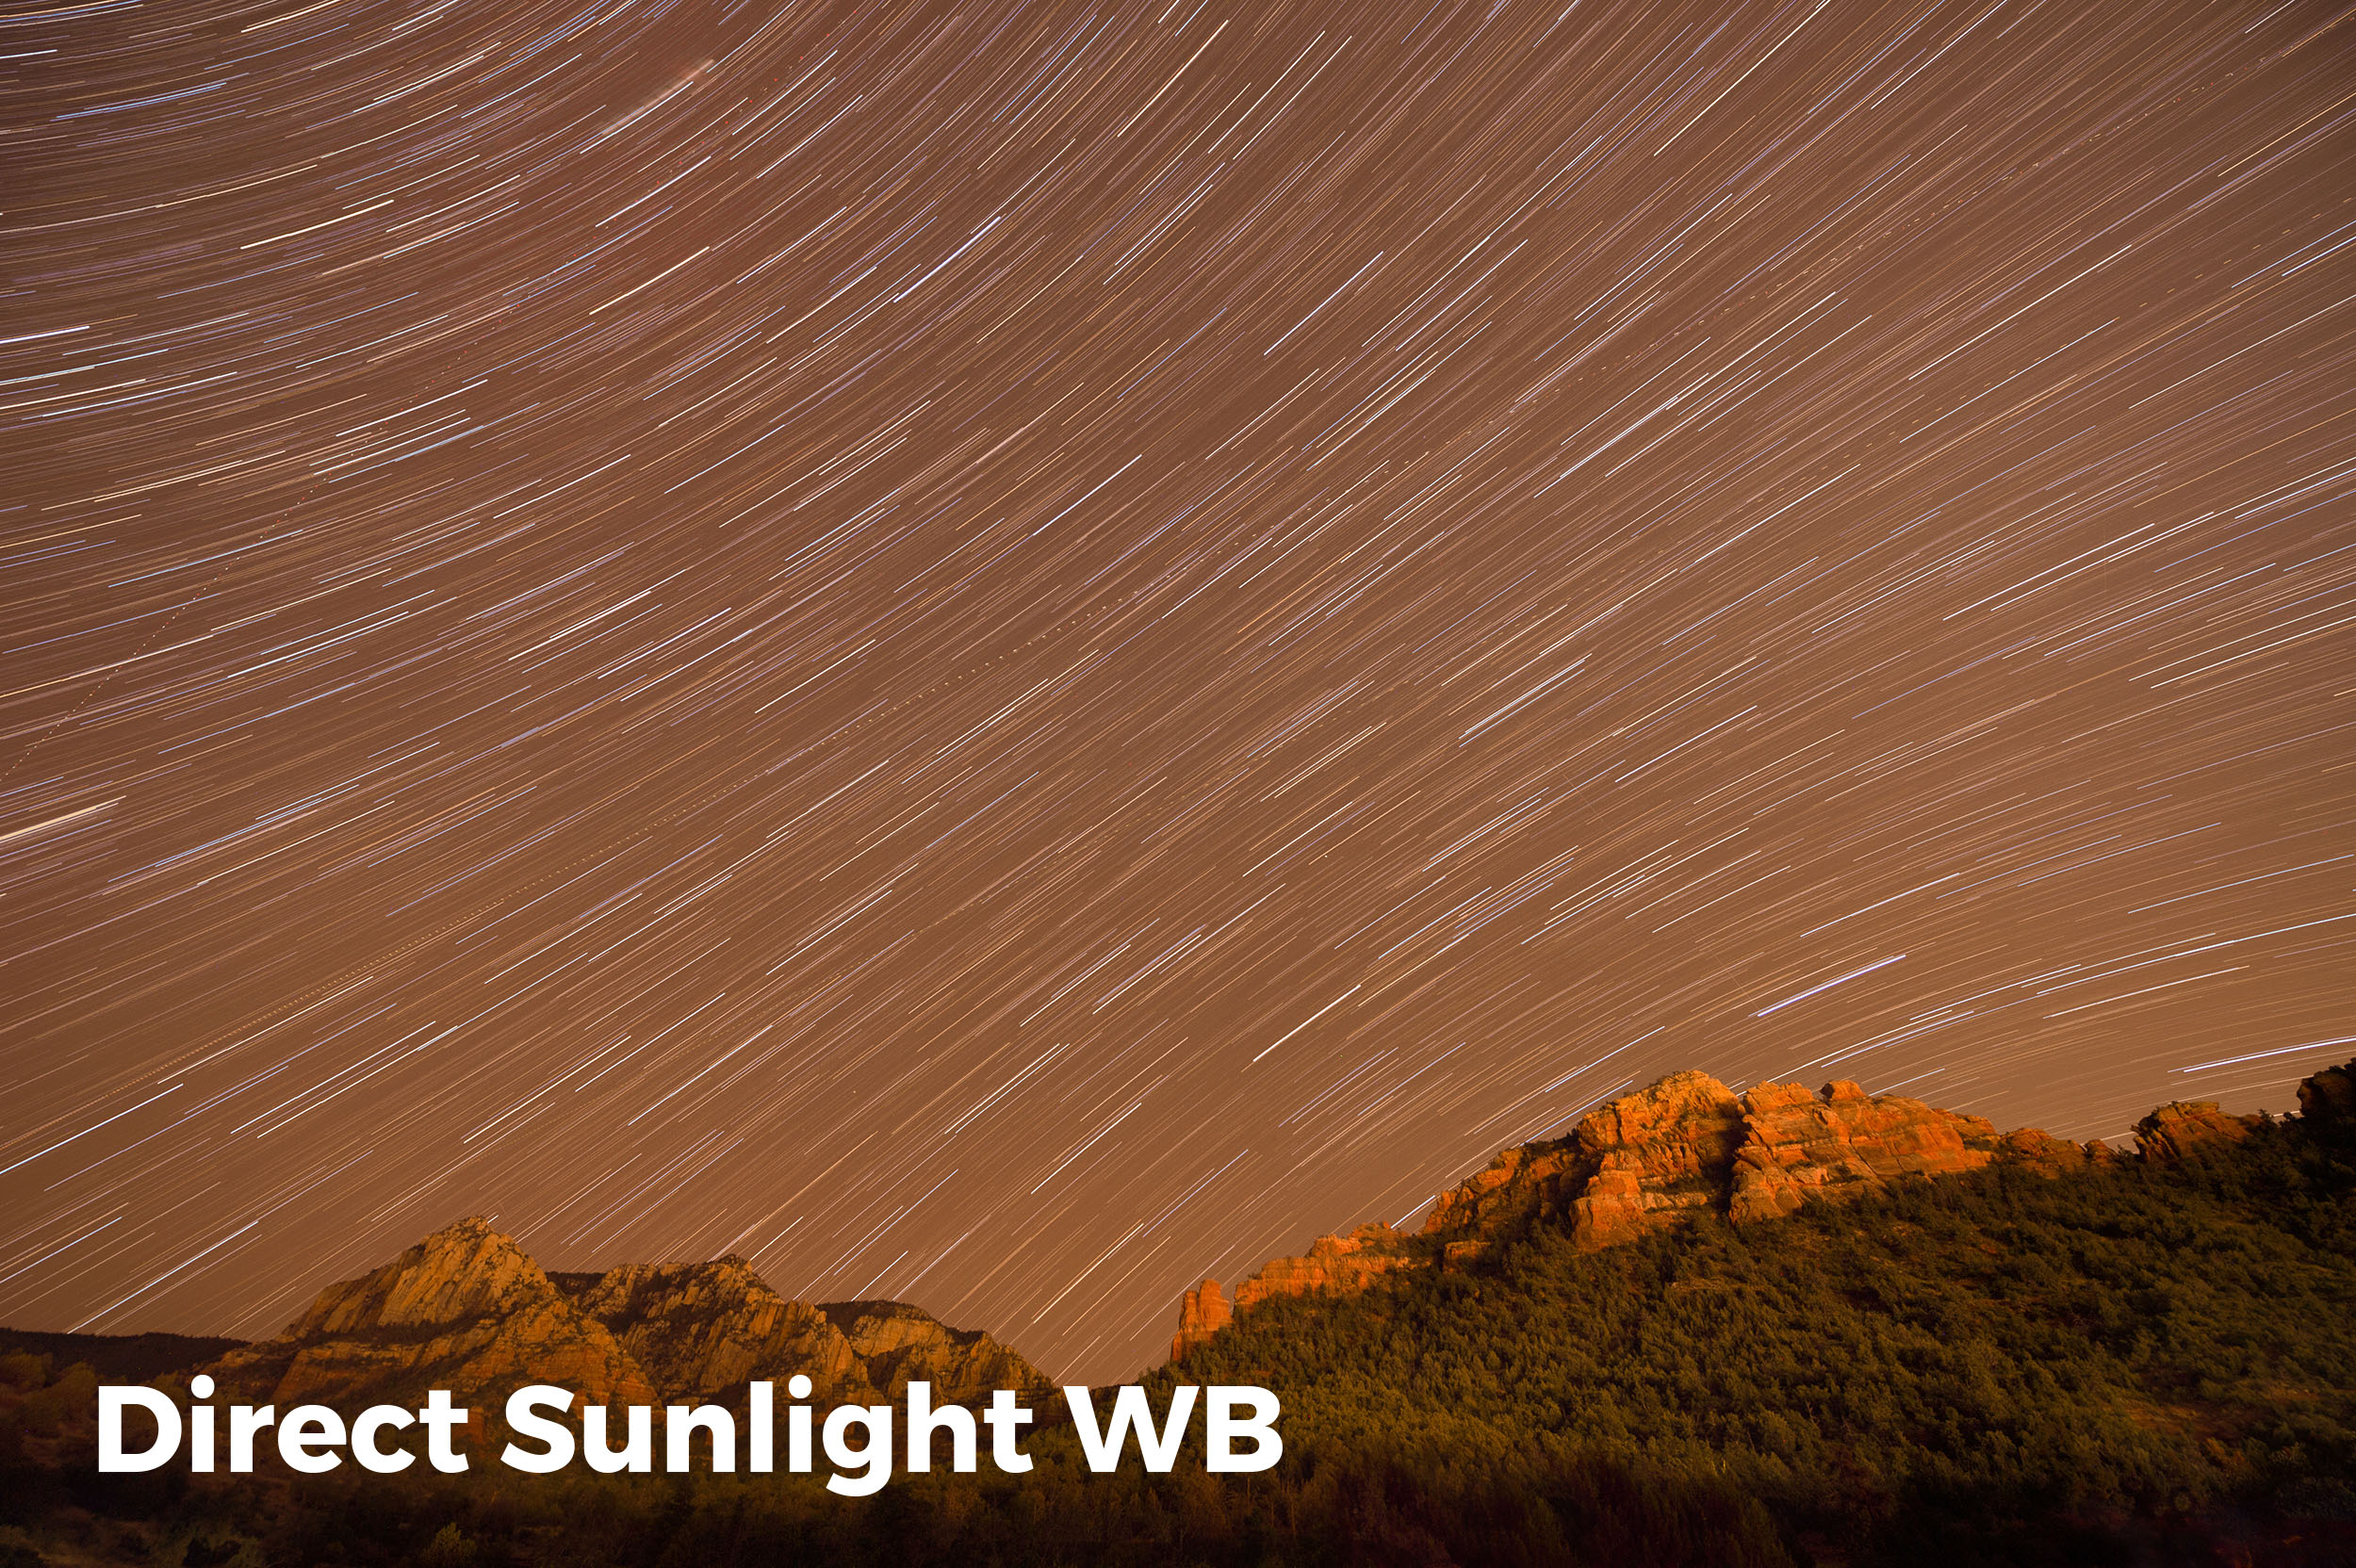
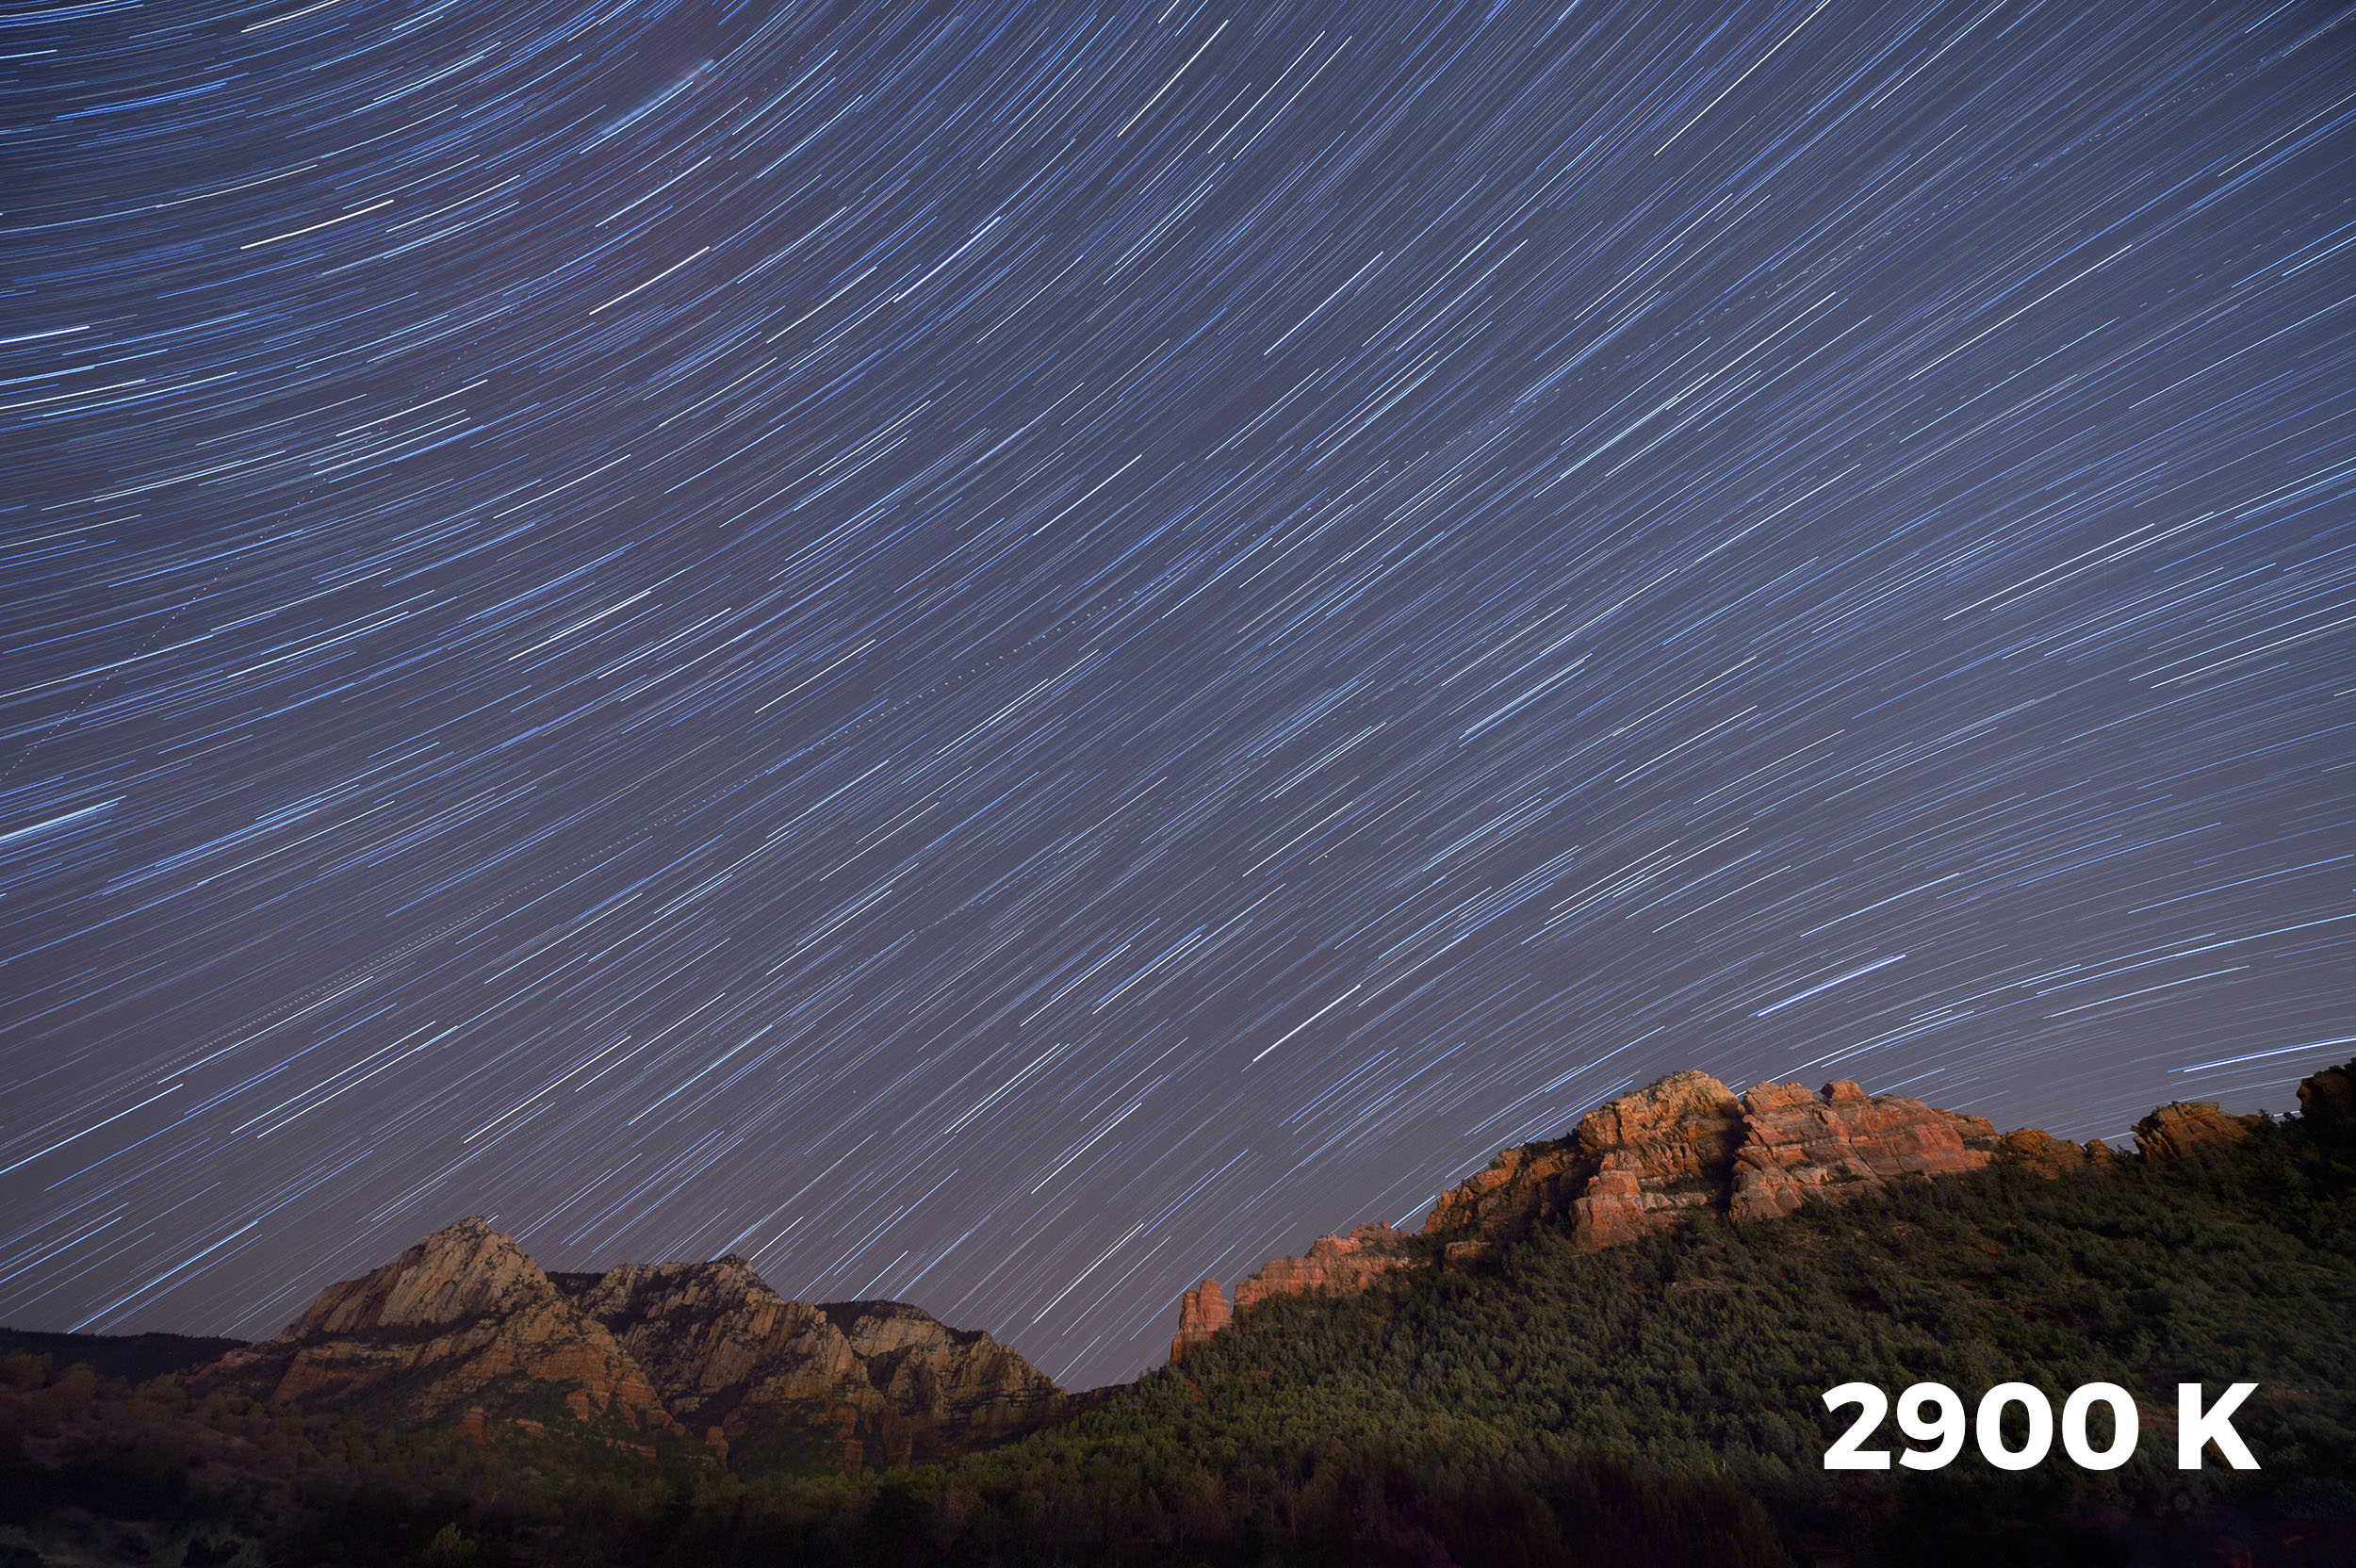
When you are near cities or towns, the lights can dramatically influence the color cast of your photographs. In the following images I was just outside of Sedona, Arizona. With the white balance set to Direct Sunlight, the color cast was way too warm. In this case I had to move my Kelvin setting all the way down to 2800 K.

As with most white balance settings, there are no absolutes. So much depends on your personal choice, the current moon phase, the amount of ambient light pollution from nearby towns or cities, and even the type of camera you use. Every camera will render colors a little differently.

The key here is experimentation. Try different K settings under many different conditions. After downloading, examine them closely on your computer. Make notes. Go out and try again. The more you experiment, the better youโ€™ll be at setting your Kelvin temperature. And the better you are nailing the white balance in the field, the less time you have to spend fixing the image in post-processing!

Tim Cooper is a partner and workshop leader with National Parks at Night. Learn more techniques from his book The Magic of Light Painting, available from Peachpit.

UPCOMING WORKSHOPS FROM NATIONAL PARKS AT NIGHT

Whatโ€™s the Longest Usable Shutter Speed for Astro-landscape? (Part II)

In Part I of this article I wrote about the subtleties of managing different variables to determine the best exposure for maintaining star points in astro-landscape photographs. We learned that determining the longest usable shutter speed based on sensor size, focal length and cardinal direction was the starting point for all astro-landscape photograph images.

Additionally, considerations for depth of field and image quality needed to be taken into account. When an image contains a nearby foreground element, a smaller aperture is required to increase depth of field. When an image will be printed to a high degree of magnification, the ISO must be kept as low as possible to maintain image quality. Either choosing a small aperture or a low ISO will require a longer shutter speed, increasing the probability of the stars being rendered as trails or lines in the sky. This is something we try to avoid as much as possible, so finding just the right compromise of these three exposure variables is key to successful astro-landscape photographs.

Under the Milky Way. 20 seconds, f/2.8, ISO. 20mm lens.

Under the Milky Way. 20 seconds, f/2.8, ISO. 20mm lens.

400 vs. 500

In Part I of this article, the concept of the 500 Rule was briefly mentioned without explanation. In this second part, I will explain what it is and how to use it.

An internet search of the 500 Rule turns up a lot of information, much of it contradictory. I have been unable to find a clear answer as to when, how or by whom it was created. It is a fairly crude tool to help with determining the longest usable shutter speed for star points. Simply stated, if you divide 500 by the focal length of your lens, the result is the maximum number of seconds you can expose without star trails with a full-frame DSLR camera. The 500 Rule does not take print size or camera orientation into account, nor does it accommodate APS-C or smaller sensors.

If you delve into those search results, youโ€™ll find a variety of highly technical alternatives and variations to the 500 Rule. If you are as much into mathematics as photography, check out TL-Photography or Greg Boratynโ€™s sites. My goal is to keep things simple and convenient.

โ€œThe 400 Rule results in shorter shutter speeds, and greater likeliness of sharp stars.โ€

The 500 Rule often yields unsatisfactory results. This is in part due to modern cameras having higher resolution than those available when the rule was first used, and in part because it doesnโ€™t account for camera orientation or the possibility of large-format prints. Therefore, instead of the 500 Rule, I propose using the 400 Rule (divide 400 by the focal length of your lens to reveal the maximum number of seconds before star trails begin to appear). The 400 Rule results in shorter shutter speeds, and greater likeliness of sharp stars.

For APS-C cameras, the 250 Rule yields approximately equivalent results. Another way to determine shutter speeds for APS-C cameras is to use the 400 Rule and then divide the result by the crop factor, which is 1.5 for Nikon and Sony cameras, and 1.6 for Canon cameras. Since our goal is to keep things simple, I suggest using the 250 Rule, which yields almost identical results.

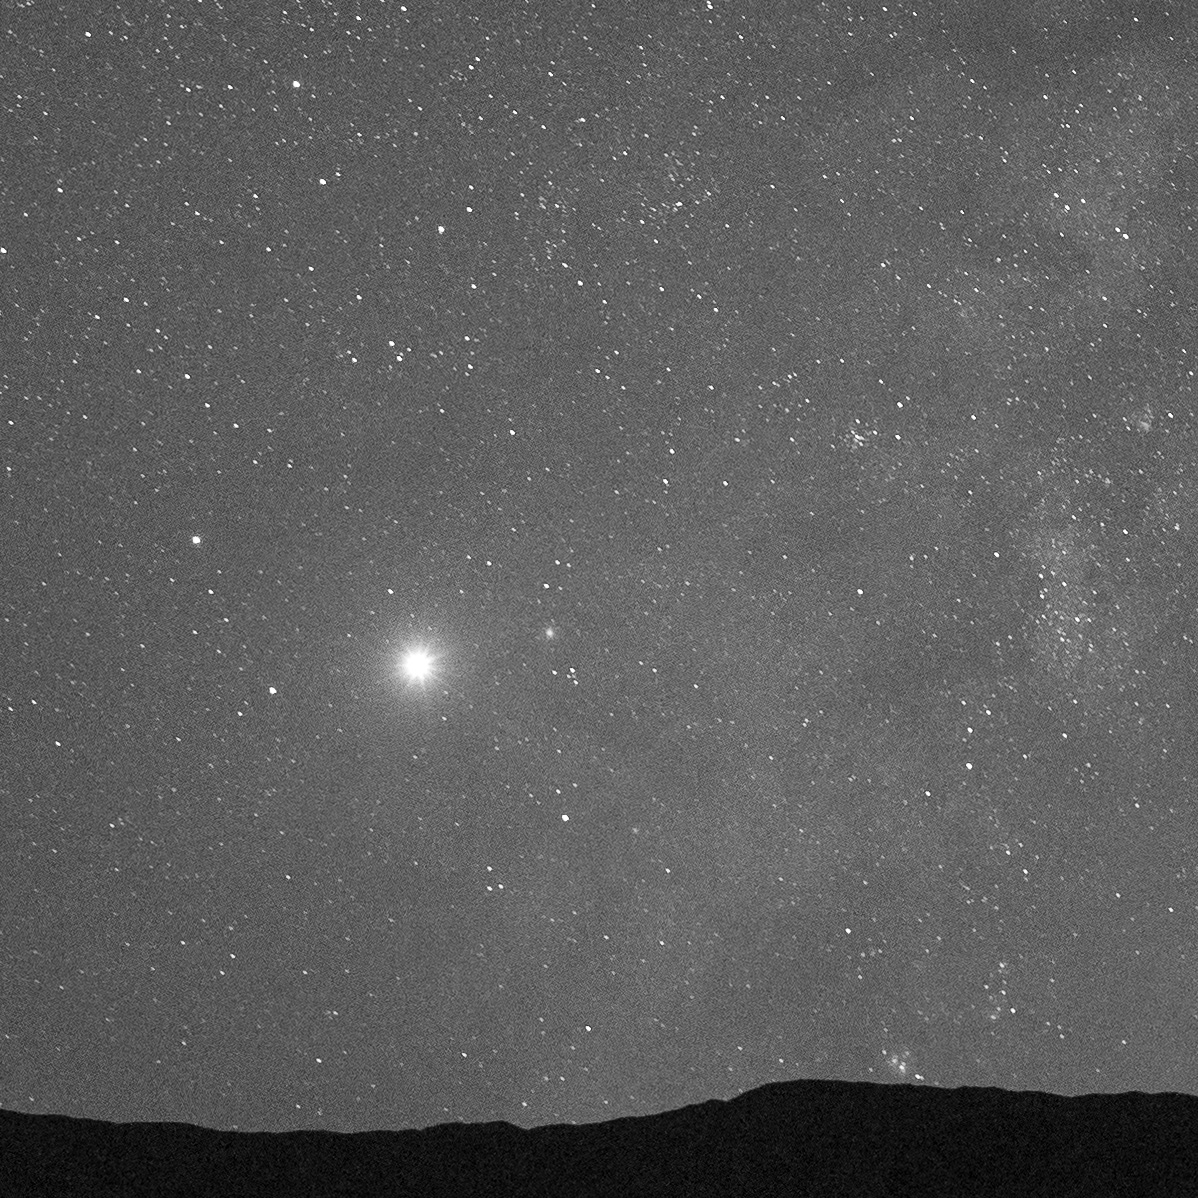
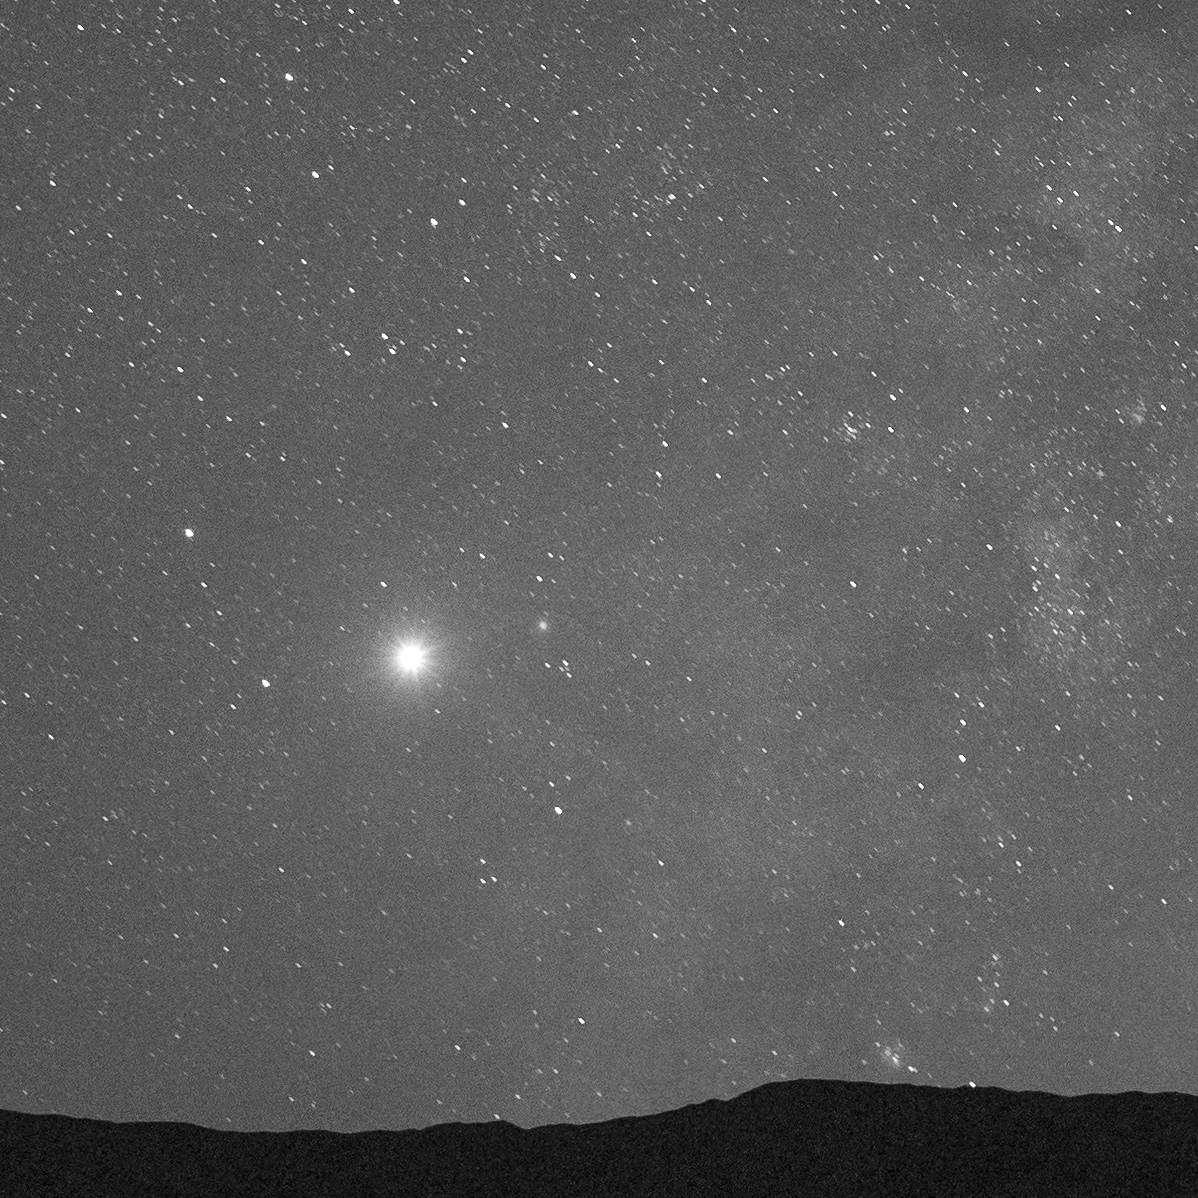
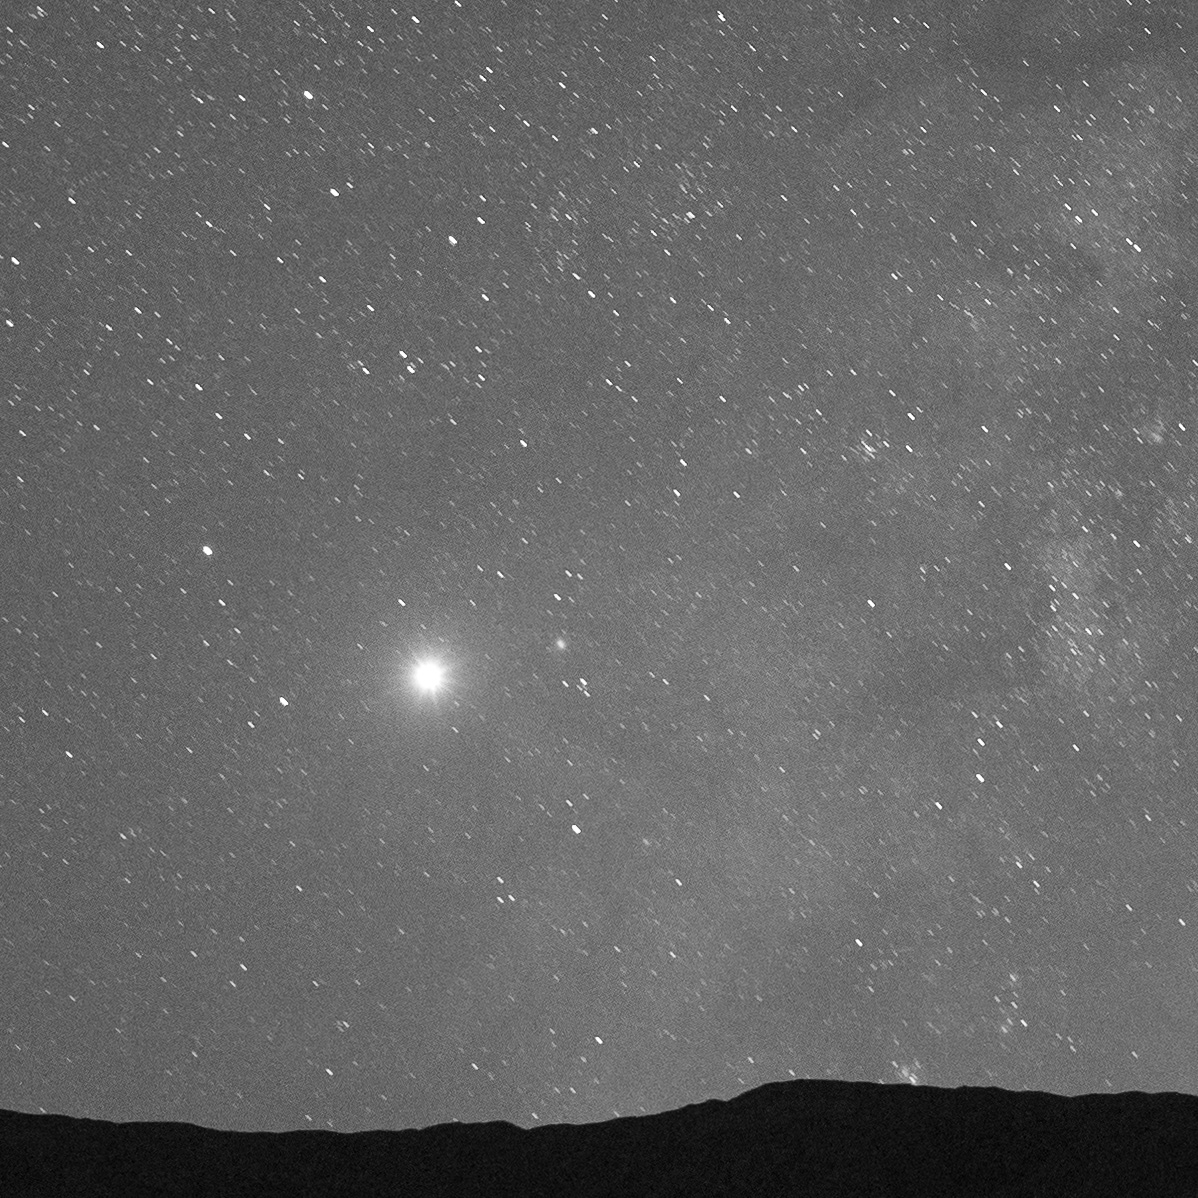
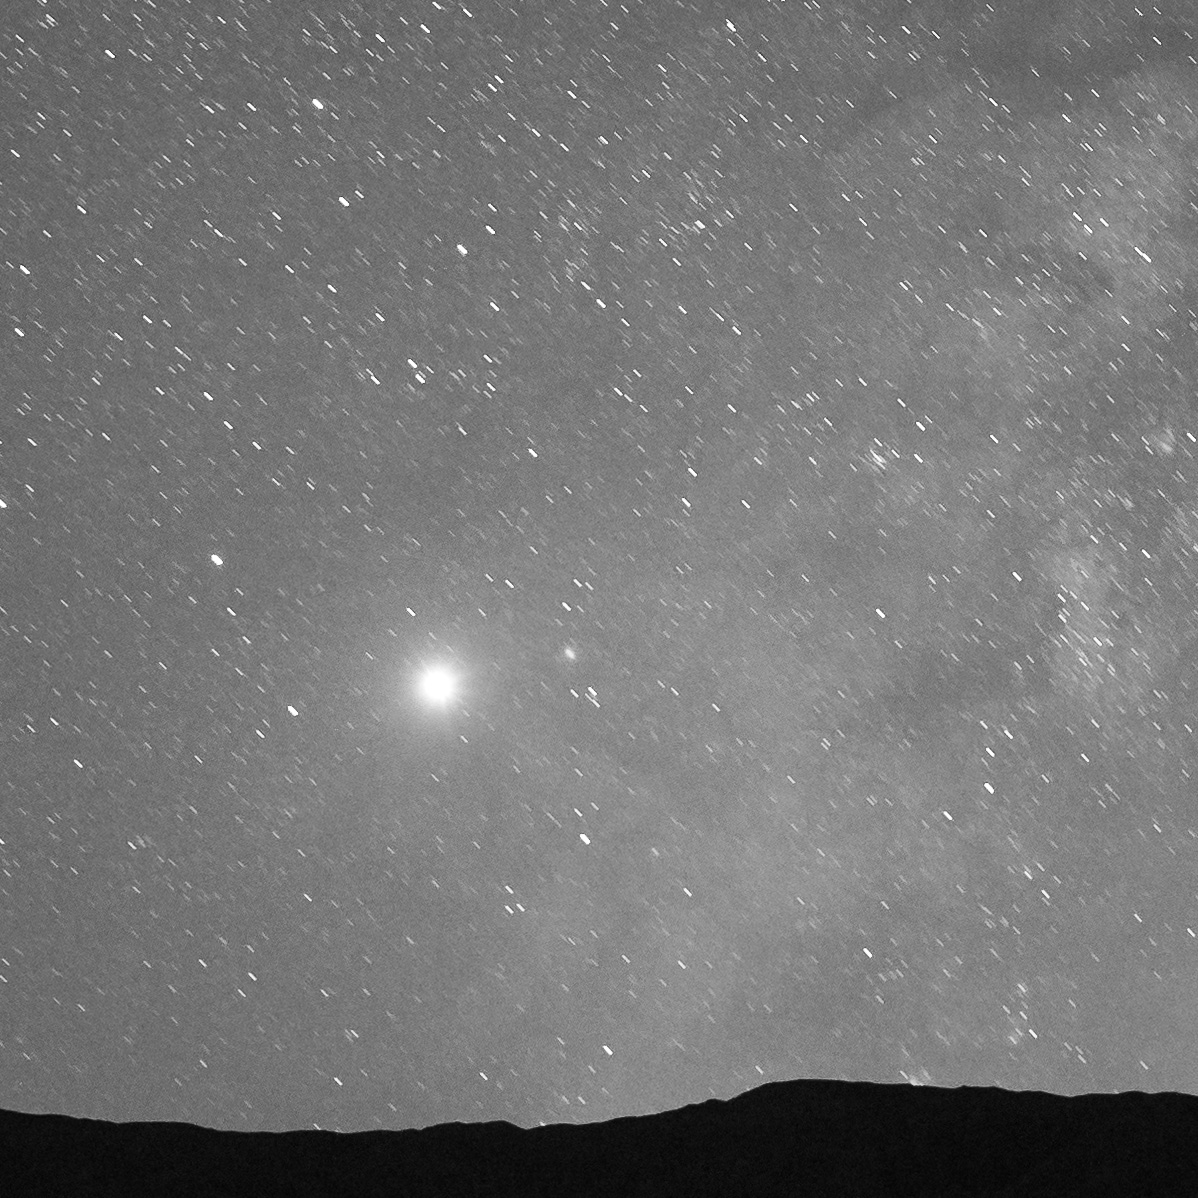
Below you can see the results of test photos shot with a 24mm lens on a full-frame camera, shot at shutter speeds ranging from 8 seconds (very sharp stars) to 30 seconds (very apparent motion).

8 seconds

10 seconds

15 seconds

20 seconds

30 seconds

All of these images were shot with a 24mm lens. Above, see the transition of how much apparent motion is visible at different shutter speeds. Below, click/tap each to view at full size.

Putting This Into Practice

Letโ€™s look at some examples.

For a 20mm lens on a full-frame camera, using the 500 Rule results in a maximum shutter speed of 25 seconds (500 / 20 = 25).

With the same 20mm lens and full-frame camera, the 400 Rule yields a maximum shutter speed of 20 seconds (400 / 20 = 20).

If you use that same 20mm lens on an APS-C camera, you end up with only 10 seconds as your longest usable shutter speed (250 / 20 = 12.5). If you instead use the 400 Rule and then divide by the crop factor, you get 13 seconds for a Nikon APS-C camera, (400 / 20 = 20, 20 / 1.5 = 13) and 12.5 seconds for a Canon APS-C camera (400 / 20 = 20, 20 / 1.6 = 12.5).

If your head is swimming with all of these calculations, remember that the results are constant for each focal length. This means that you can precalculate the longest usable shutter speed for each focal length lens in your bag, and make a cheat sheet to carry with you. This modified rule still does not account for camera orientation, but because you are starting with shorter maximum shutter speeds, itโ€™s more likely that you will end up with star points rather than star trails.

Workshop attendees on the salt flats of Death Valley National Park.

Workshop attendees on the salt flats of Death Valley National Park.

The way to make sure you are using the best shutter speed for the situation is to review your images in camera at full magnification, and adjust the time accordingly. Bear in mind that you should check all sky areas in the frame, because the stars closer to north may be sharp while those farther away are notโ€“โ€“even in the same image!

Youโ€™ll need to consider the various factorsโ€”star sharpness, depth of field and focus, and image qualityโ€”and make the best exposure decision you can based on prioritizing those factors. Itโ€™s a combination of science, art and simply what feels right for the image. Getting to the place where you have a strong sense of when it feels right is simply a matter of practice, so get out there under the stars and photograph.

Lance Keimig is a partner and workshop leader with National Parks at Night. He has been photographing at night for 30 years, and is the author of Night Photography and Light Painting: Finding Your Way in the Dark (Focal Press, 2015). Learn more about his images and workshops at www.thenightskye.com.

UPCOMING WORKSHOPS FROM NATIONAL PARKS AT NIGHT

What's the Longest Usable Shutter Speed for Astro-Landscape? (Part I)

One of the things that makes night photography rewarding and fun is that there are really no absolutes of right or wrong when it comes to exposure.

Under โ€œnormalโ€ lighting conditions, a well-exposed image is pretty easily defined. Clean highlights, no clipped shadows, a good histogramโ€”there are plenty of ways to evaluate exposure, and itโ€™s usually obvious when an exposure is โ€œcorrectโ€ or โ€œincorrect.โ€

But at night, exposure is much more open to interpretation. Rather than a right or wrong exposure, the photographer has more leeway to interpret the scene to their own tastes or liking. Additionally, with regard to astro-landscape photography, exposure relates to more than simply an appropriate amount of light reaching the sensor. In particular, exposure length has a profound impact on the appearance of stars in the sky.

The solution is relatively straight-forward, though the reasons and the factors that play into it are many and intertwined. But let's explore! This is the first of a two-part blog post about all the decisions and considerations that go into determining the optimal exposure for creating astro-landscape images with star points.

Workshop students in Zion National Park. This view of Checkerboard Mesa faces southeast, and shows movement in the stars that would be visible only in a very large print, or when pixel-peeping at 100 percent magnification. Nikon D750, Nikkor 24mm f/โ€ฆ

Workshop students in Zion National Park. This view of Checkerboard Mesa faces southeast, and shows movement in the stars that would be visible only in a very large print, or when pixel-peeping at 100 percent magnification. Nikon D750, Nikkor 24mm f/1.4 lens. 15 seconds, f/f2.8, ISO 12800.

Finding the (In)Correct Exposure

One of the most frustrating aspects of night photography is that it can be difficult to establish the โ€œcorrectโ€ exposure. Yes, I just contradicted myself, and there lies the rub. Night photography is not an exact science, and trying to make it so is an exercise in futility of the highest order. There are so many variables, some of which are beyond the photographerโ€™s control.

Attempting to โ€œget it rightโ€ is more than science, more than art, and more than an ambiguous combination of the two. Some nocturnal imagery is more about a feeling, an atmosphere or a mood, but other images are more grounded in technical considerations. Good night photography exposures can be like Supreme Court Justice Potter Stewartโ€™s view on pornographyโ€”you know it when you see it!

โ€œFor every image, there is a set of variables that affect how long an image may be exposed before the stars appear as trails, and managing those variables is key to a successful image.โ€

Astro-landscape imagery is a type of night photography that requires a good deal of thought and many considerations about what might be the best exposure for any given situation. Usually, determination of a photographic exposure is led by one of the exposure variablesโ€”aperture, ISO or shutter speed. One would choose a small aperture to have large depth of field. For example, you might have a subject in the foreground and stars in the background that both need to be tack sharp. Alternatively, in the case of a portrait, a large aperture that yields a shallow depth of field would usually be the better choice. In the case of an image where you know in advance that you want to make a large print, a low ISO would take priority.

In the case of astro-landscape photography, finding a shutter speed that is fast enough to record the stars as points of light rather than showing them as trails is usually the critically important variable. (Unless, of course, you want to produce star trails, but thatโ€™s a whole other issue and technique. Here weโ€™re just talking about reproducing the look of actually being under a starry sky.)

Additionally, the combination of extremely low light levels, short shutter speeds and the need for depth of field necessitate compromise. We need to consider all three exposure variables, and the challenge is to combine them in such a way that addresses both the technical limitations and the constraints of the image.

Unhappy Trails

The stars are moving in space, but their distance from Earth makes that movement negligible in our photographs. Instead, it is the Earthโ€™s rotation that causes long-exposure photographs of the night sky to show star โ€œtrails,โ€ or lines of light in the sky that create a circular pattern centered over the polar axis.

Here in the Northern Hemisphere, stars appear to revolve around Polaris, or the North Star, which is centered approximately over the north polar axis. Stars in the northern sky form relatively small circles around the North Star, and stars in the eastern, western or southern skies form larger, longer star circles around Polaris.

Mesquite Sand Dunes, Death Valley National Park. This image shows the stars rotating around the North Star, and faces north-northwest. Nikon D750, Nikkor 20mm f/1.8 lens. Stacked exposures totaling 2 hours, f/3.3, ISO 400.

Mesquite Sand Dunes, Death Valley National Park. This image shows the stars rotating around the North Star, and faces north-northwest. Nikon D750, Nikkor 20mm f/1.8 lens. Stacked exposures totaling 2 hours, f/3.3, ISO 400.

For every image, there is a set of variables that affect how long an image may be exposed before the stars appear as trails, and managing those variables is key to a successful image. Accounting for those variables and weighing the pros and cons of compromising exposure, noise, depth of field and stellar movement can be a daunting task.

Many photographers attempt to scientifically calculate values for each of these variables and in turn come up with an exposure that is optimized for the conditions at handโ€”but this is tedious and, honestly, unnecessary. Having an understanding of the various factors that affect the appearance of stars in astro-landscape images is helpful, so letโ€™s review them before coming up with a strategy to maintain sharp stars in your nocturnal landscape photographs.

Five Factors

Focal length

More than anything else, the focal length of your lens determines the longest usable shutter speed. In general, the wider your lens, the longer you can expose without showing stellar movement. Some people use a formula such as the 400 Rule or 500 Rule to calculate shutter speed. These formulas can be helpful, but do not take variables other than focal length into account.

Orientation

Camera orientation relative to the North Star is the next variable that needs to be factored into an exposure. Since it takes Earth 24 hours to make one complete rotation, a hypothetical 24-hour exposure with the camera oriented toward the north or south (depending on which hemisphere the photographer is shooting in) will record star trails that form a complete circle. Stars near the pole star will create small circles, while stars in the opposite part of the sky will create much larger circles in the same exposure.

Therefore, if a camera is directed due-north in the Northern Hemisphere, or due-south in the Southern Hemisphere, the resulting star trails created during a long exposure will be noticeably shorter than star trails in photographs where the camera is pointed away from the pole. This means that the longest usable shutter speed for โ€œfreezingโ€ stars increases substantially as the cameraโ€™s orientation approaches north or south.

Pemaquid Point Lighthouse, Maine. This wide-angle view of the oft-photographed lighthouse shows relatively little stellar movement in the northern part of the sky on the left side of the frame, and much more to the east on the right side of the framโ€ฆ

Pemaquid Point Lighthouse, Maine. This wide-angle view of the oft-photographed lighthouse shows relatively little stellar movement in the northern part of the sky on the left side of the frame, and much more to the east on the right side of the frame (see detail photos, below). Nikon D750, Zeiss 21mm f/2.8 lens. 30 seconds, f/4, ISO 6400.

Pemaquid detail north

Pemaquid detail north

Pemaquid detail east

Pemaquid detail east

Sensor

Sensor size, or camera format, also make a difference. Movements during an exposure cover a larger percentage of a small sensor relative to a larger one. This is similar in principal to a telephoto lens giving the impression of longer star trails due to a narrower angle of view than a wide angle lens. It takes less time for a star to transverse a smaller sensor than a larger one, or to cross the image plane of a telephoto image than a wide-angle one. The star trails are actually the same size in each photograph, but appear larger due to their size relative to the frame. Therefore, the smaller the sensor, the shorter the longest usable shutter speed.

Resolution

Camera resolution also impacts apparent movement of stars, or anything else in an image. Higher-resolution sensors show more detail, and therefore amplify any flaws in an image as well as the image itself.

Final view

However, increased resolutionโ€™s impact on an image is tied to the last considerations in determining longest usable shutter speed: final image size, viewing medium and viewing distance.

If a photograph will be viewed as a small print, there is more tolerance for movement, because it wonโ€™t be noticeable to the viewerโ€”and thus you can get away with a longer shutter speed than you could for a more highly magnified, larger print. The same is true if the image will be viewed only on a screen, as opposed to as a print.

Lastly, the more distant the image from the viewer, the less apparent any movement or other โ€œflawsโ€ will be. An extreme example of this is demonstrated by Appleโ€™s use of iPhone photographs on giant billboards! A 12 megapixel file from an iPhone 7 must be magnified tremendously to achieve billboard scale, resulting a very low resolution image. But because billboards are viewed from a substantial distance, the images used can be extremely low resolution and still appear to be good quality. Typically, billboard images are printed at 40 to 50 dpi, as opposed to 300 dpi and higher for photographic prints.

This means that a low resolution image viewed from a great distance is very forgiving of subject, or for that matter, of camera movement. Conversely, a high resolution print that is meant to be viewed at close distance will reveal every possible detail (and flaw) contained in the photograph.

Putting It All Together

Despite the apparent complexity of this multitude of variables, a little experience is all that it takes to effectively determine the longest usable shutter speed for astro-landscape photographs. By keeping these variables in mind while photographing, making critical observations and appropriate adjustments, sharp star images are well within reach.

The Milky Way over Mono Lake. The moon is just about to rise under the arch of the Milky Way in the eastern sky. Some movement is visible at full magnification, but the best combination of exposure variables was used to achieve a balance between imaโ€ฆ

The Milky Way over Mono Lake. The moon is just about to rise under the arch of the Milky Way in the eastern sky. Some movement is visible at full magnification, but the best combination of exposure variables was used to achieve a balance between image noise, depth of field and star points. Compromise is almost always necessary to get the shot. Figuring out how to make those compromises is what makes for successful astro-landscape photographs. Canon 6D and Sigma 24mm f/1.4 lens. Panorama consisting of five vertical images, each 20 seconds, f/4, ISO 6400.

In the second part of this article, Iโ€™ll compare the use of the 400 and 500 Rules with different focal length lenses to help you further refine your technique.

Click here to read Part II of this article.

Lance Keimig has been photographing at night for 30 years, and is the author of Night Photography and Light Painting: Finding Your Way in the Dark (Focal Press, 2015). Learn more about his images and workshops at www.thenightskye.com.

UPCOMING WORKSHOPS FROM NATIONAL PARKS AT NIGHT