white balance

Control the Color Monster: Making the Move to Manual White Balance

While many of the automatic settings on our cameras can be useful from time to time, photographing at night requires us to set nearly everything on our cameras manually. Typically, when most people hear this, they think of manual exposure mode, wherein they are required to set both the aperture and shutter speed independently of each other. This is true. However, it could also mean manually focusing your lens, or switching your ISO from auto to a specific value. It could also mean setting your white balance manually.

Manual white balance?! Yup.

With the useful presets in your white balance setting (Direct Sunlight, Tungsten, Cloudy, Shade, Fluorescent, Auto, etc.), it’s easy to forget that you can go manual here as well.

To set your white balance manually, you first need to understand what the white balance setting does for us. Simply put, it alters the color cast of our photographs. It can make an image look bluer or more orange. It can render our image greener or more magenta.

The Color of Light

Let’s start outside of our camera first. All light has a certain color cast. Some light seems warmer (more orange)—for example, the color of an orange sunset or older household tungsten bulbs.

The warm colors of sunset.

Some light seems cooler (more blue)—for example, the light on a cloudy day or the sky when it just starts getting light in the morning.

The cool colors of pre-dawn.

Often our eyes ignore these color casts and we perceive the light as neutral (no cast/white/no color). It’s not that we can’t detect the color cast. We can, if we are paying attention. It’s just that other aspects of the light rate as more important in our visual hierarchy—such as noticing shadows so we can resolve ground structure and subsequently not trip and fall. Although we may not give much conscious thought to subtle shifts in the color of light throughout the day, our cameras are excellent tools for recording these precise color casts, or even for fixing those casts if we so desire.

The Kelvin Scale

Scientists found the terms “warmer,” “yellowish” or “more orange” simply too vague to accurately describe the color of light, so they use the Kelvin scale to avoid imprecision. Here is a chart that shows temperatures of some common photographic light sources:

The warmer the color, the lower its Kelvin rating. Cooler colors have higher Kelvin ratings. Notice that daylight at 5500 K is neutral. No real color cast. Some even call it “white light.” Whereas sunsets are warm and cloudy days appear cool. These are the real colors that are present under those conditions, even though, again, we may not perceive them as such.

The Camera’s White Balance Setting

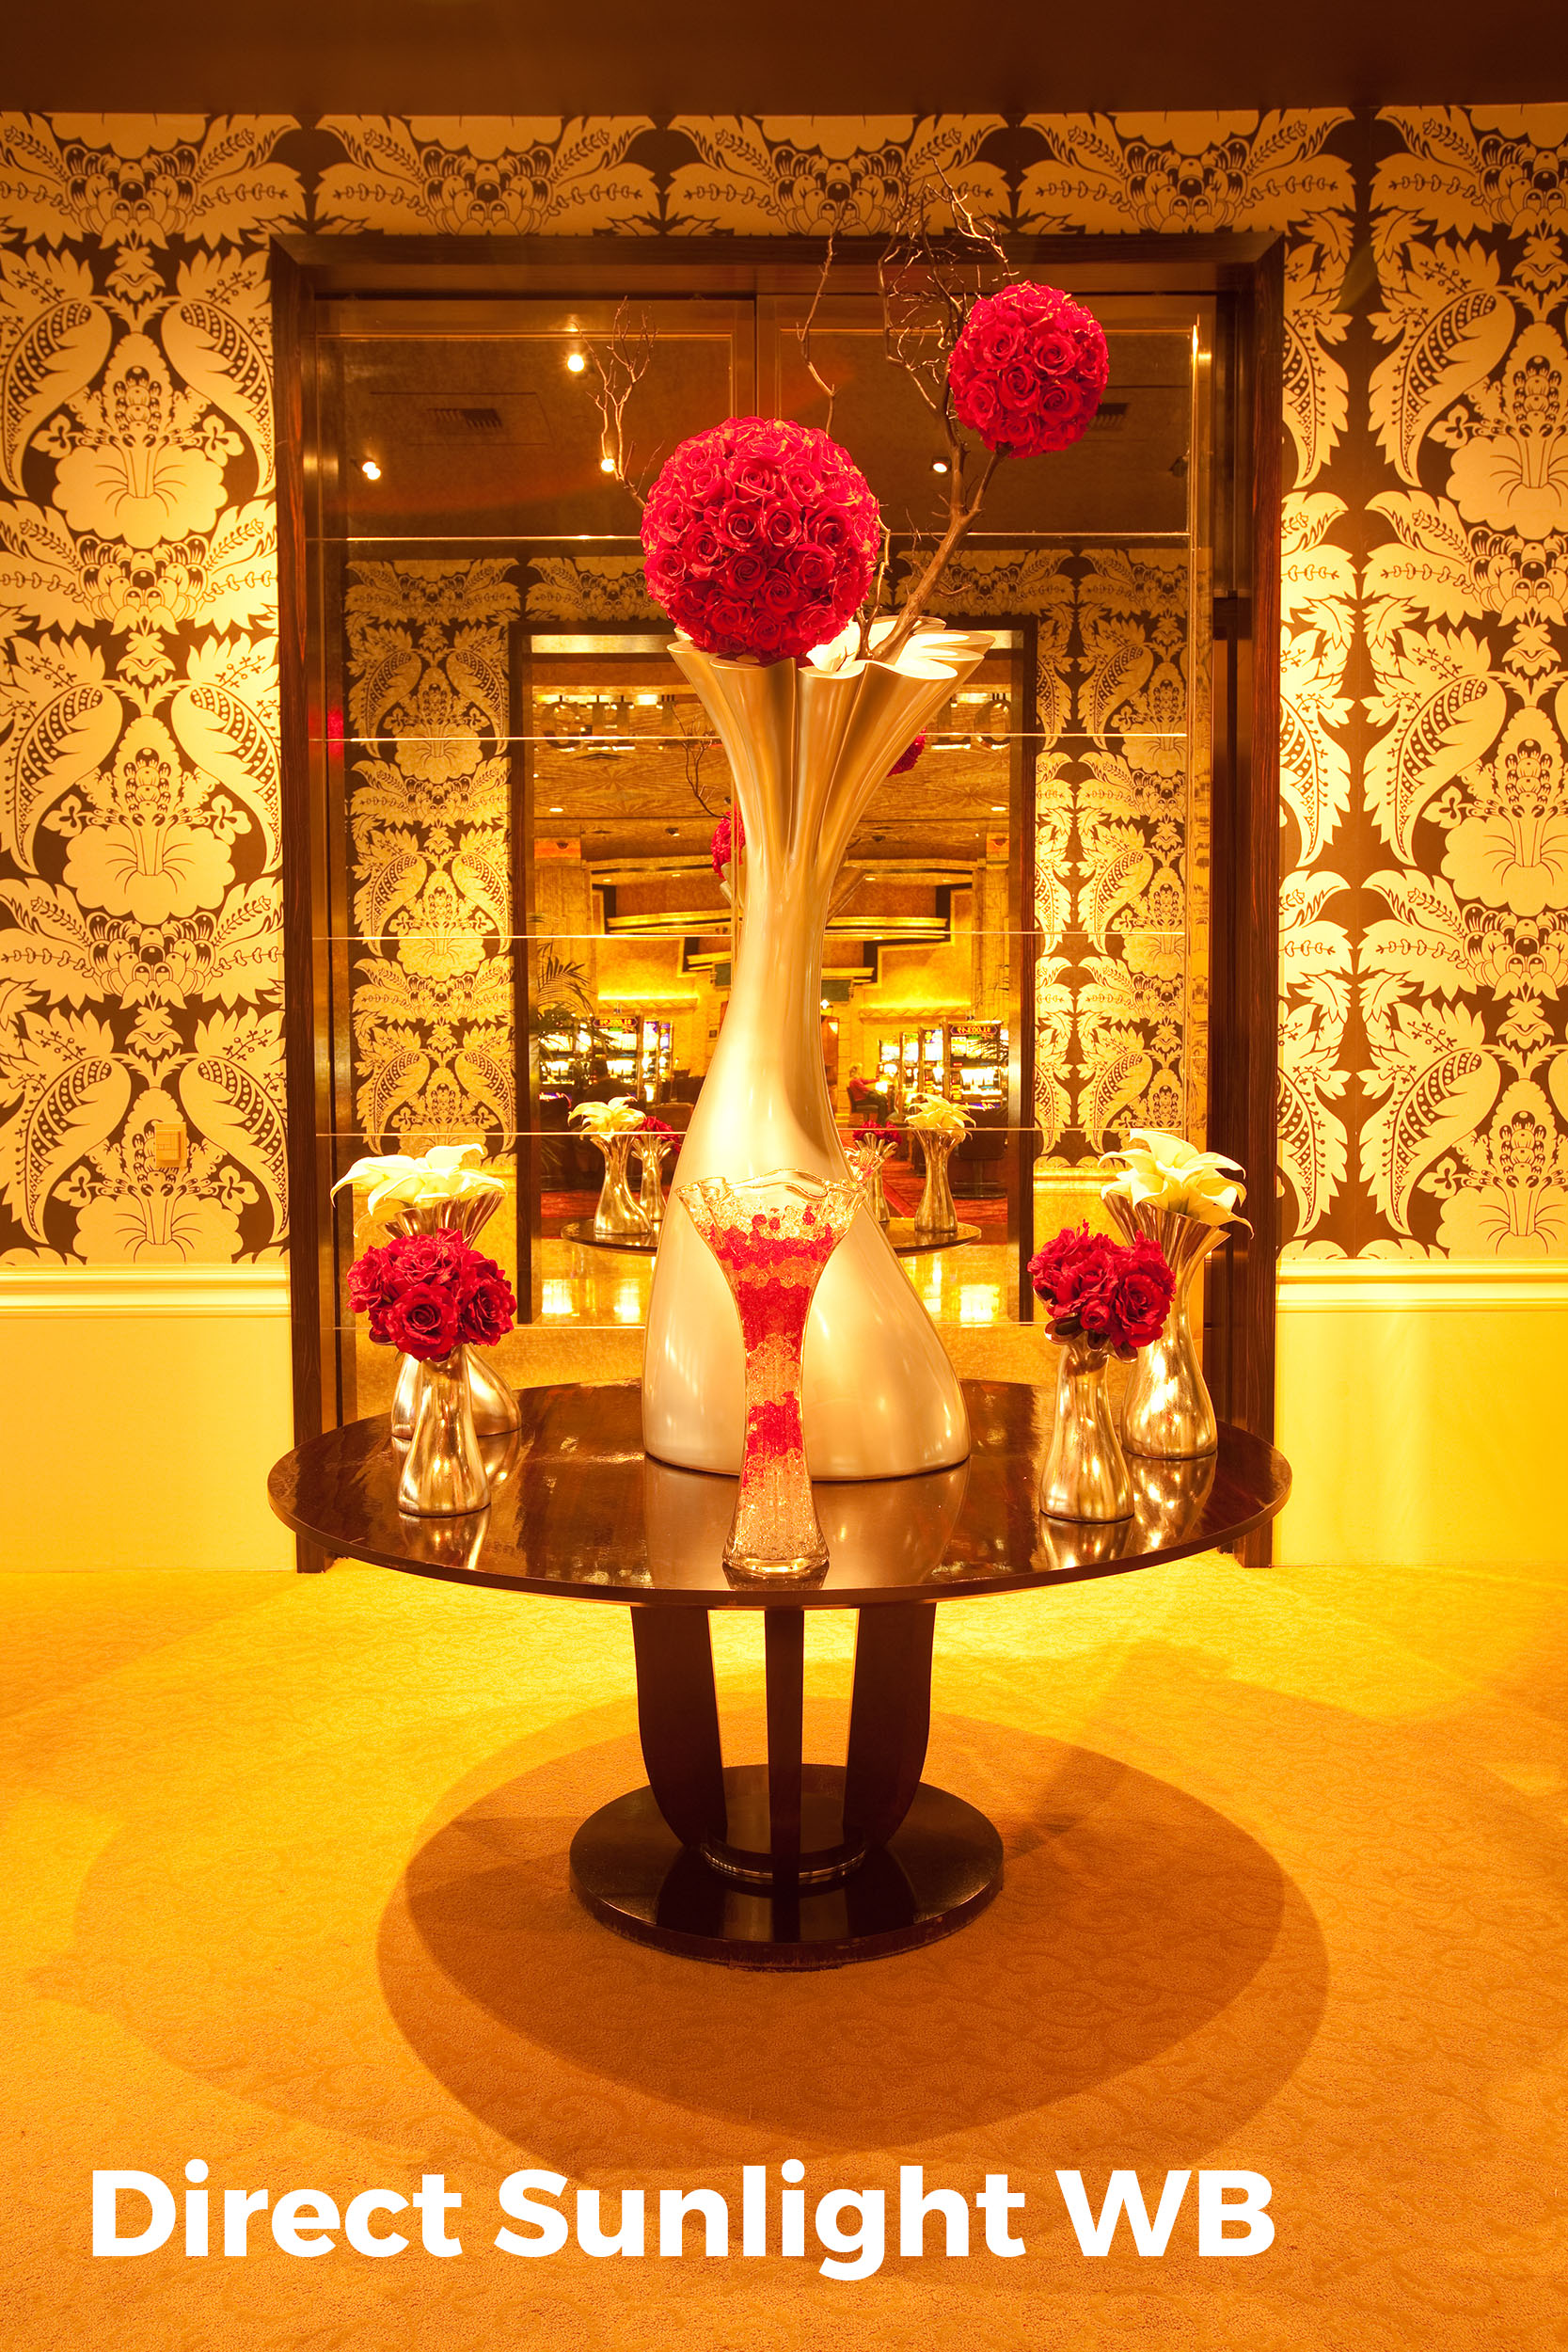
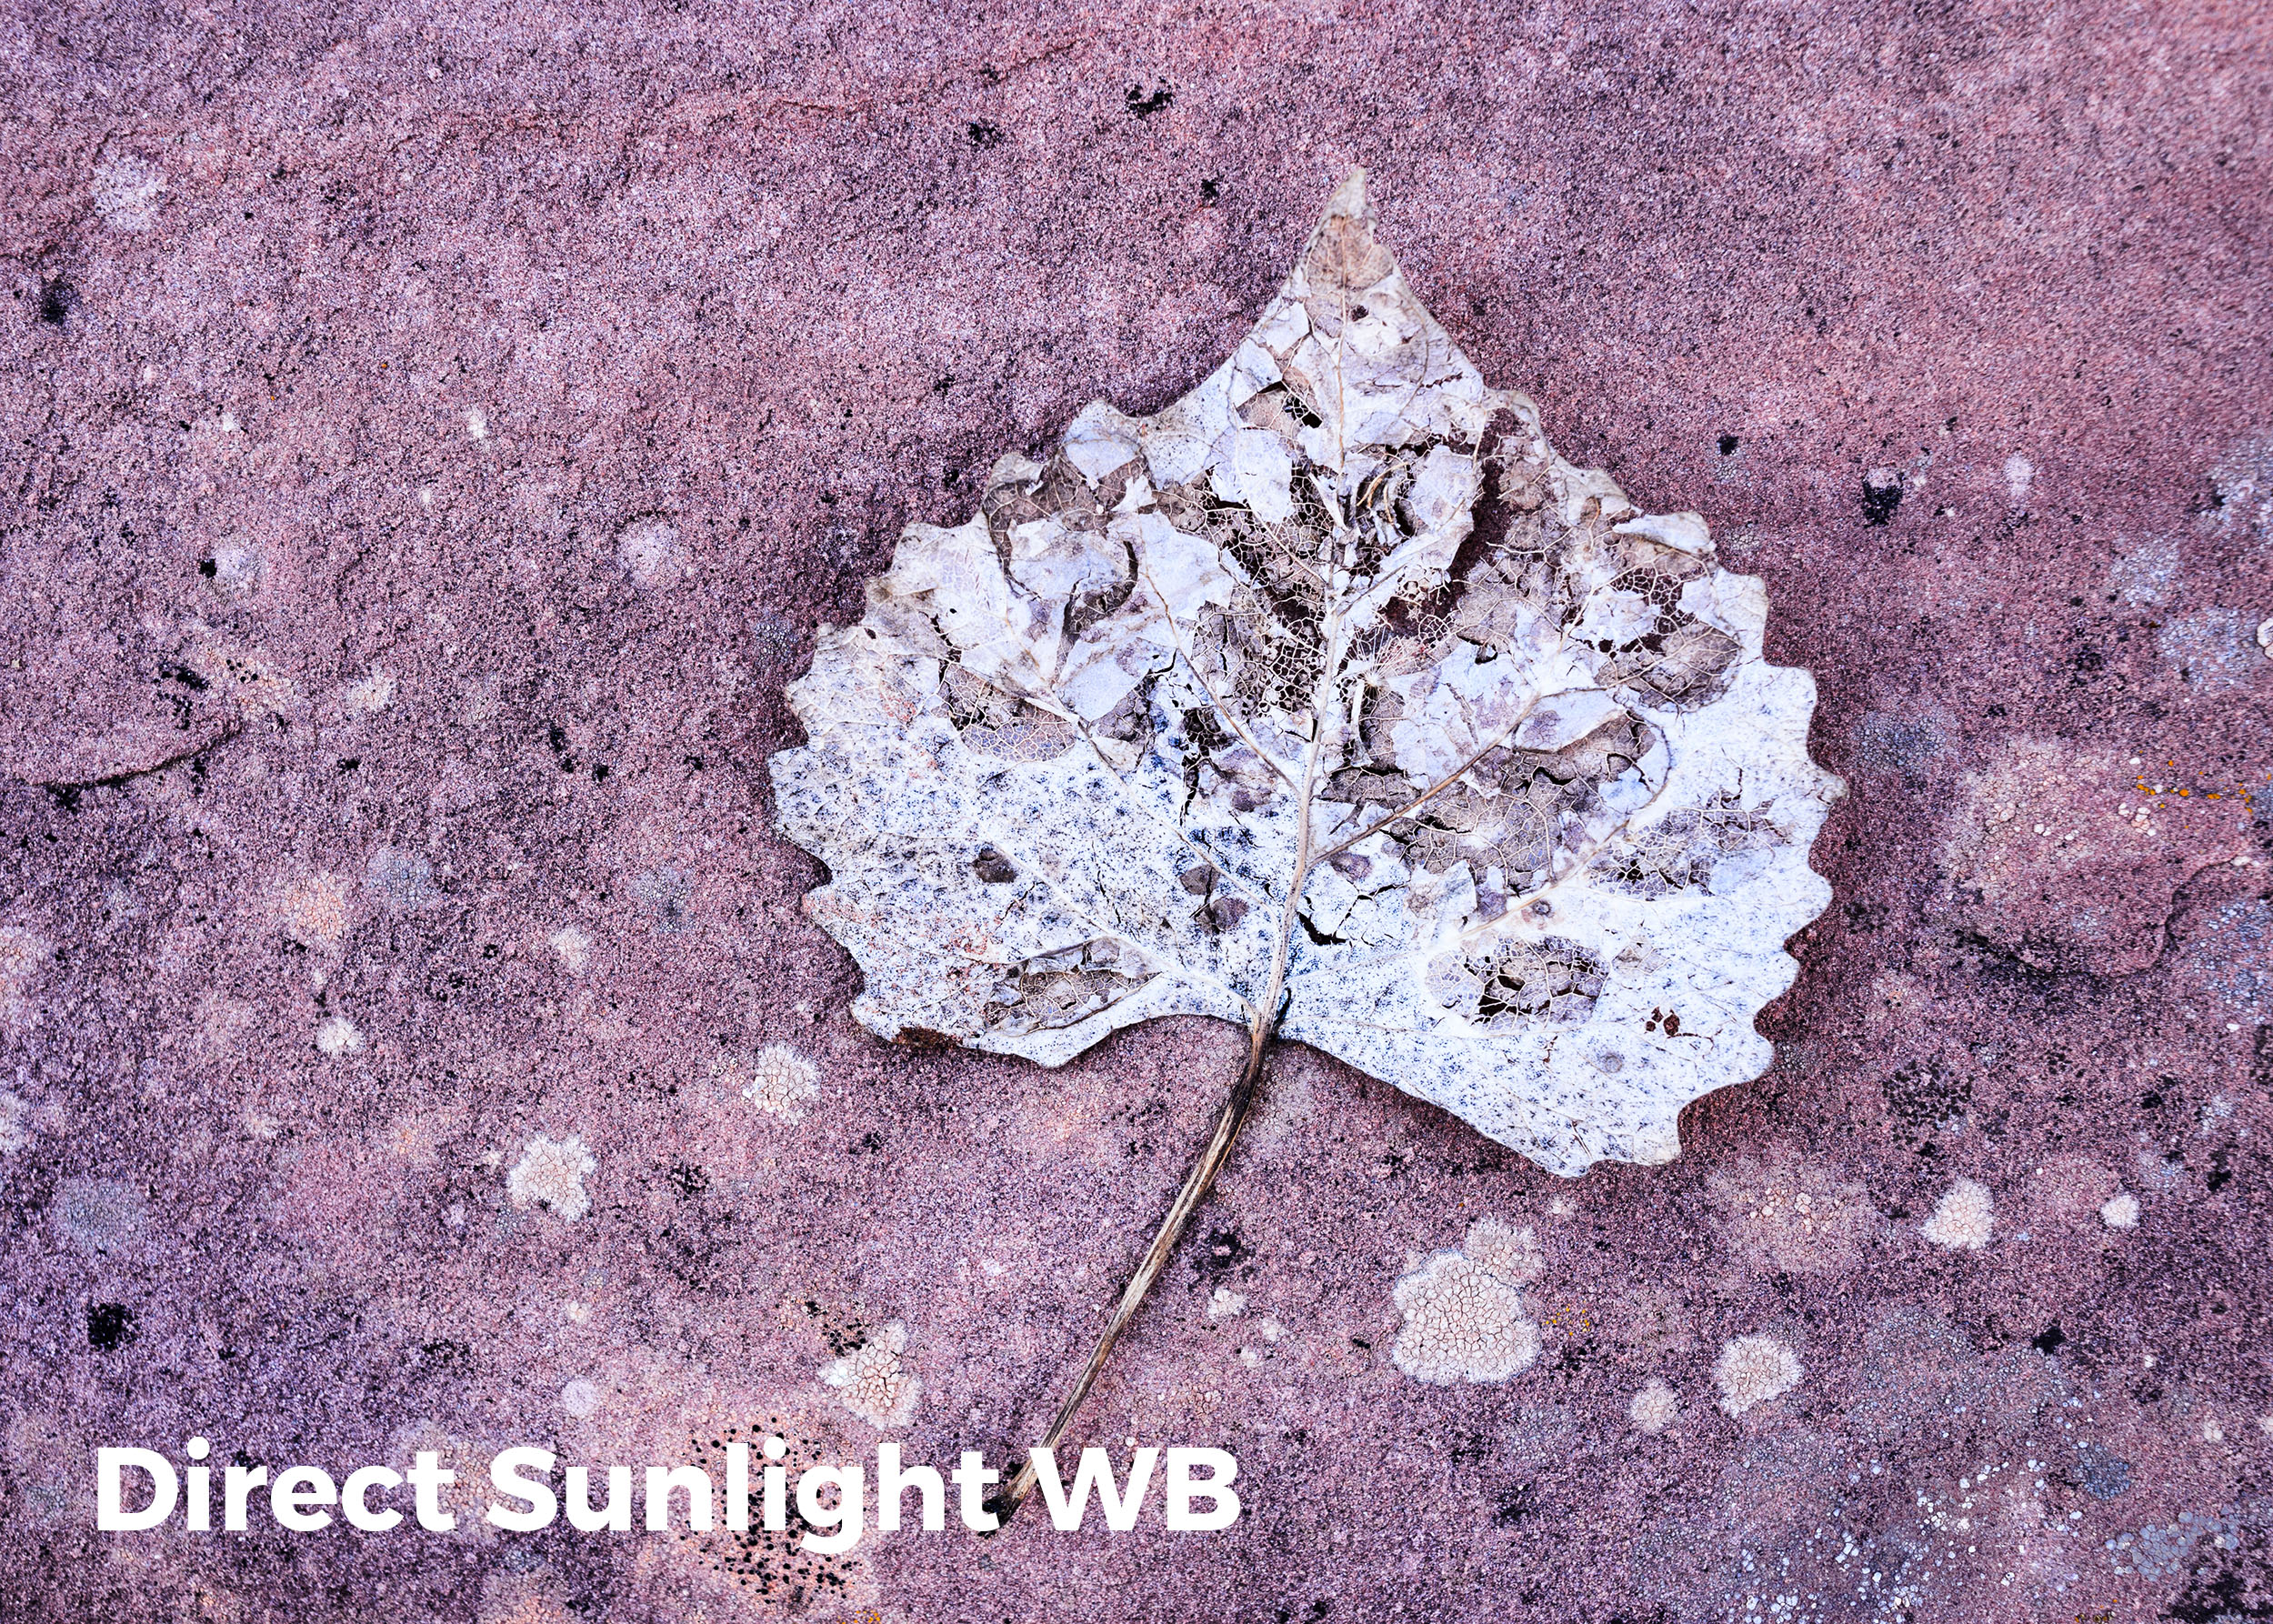
Depending on the white balance setting we choose, the camera can either render the real color of the scene or render an alternate to reality. When our cameras are set to Direct Sunlight (also called Daylight or Sun on some cameras), the camera is rendering the colors of the scene precisely as they are. The resulting picture may appear more warm or cool to our eye, but that’s because we failed to notice the color cast at the time.

On the other hand, any of the camera’s other white balance presets will alter the color. They are designed to “fix” the color cast to match what our minds expect it to be. This may or may not be want you want. In the following images, I decided to keep the natural color by using the Direct Sunlight white balance.

Warm colors captured by using Direct Sunlight white balance (above), and the cool colors of an overcast day captured by using Direct Sunlight white balance.

So, if you find the cool light of an overcast day (around 6500 K) unpleasant, you can switch your white balance to Cloudy and the camera will add in warmth to cancel out the extra blue in that situation.

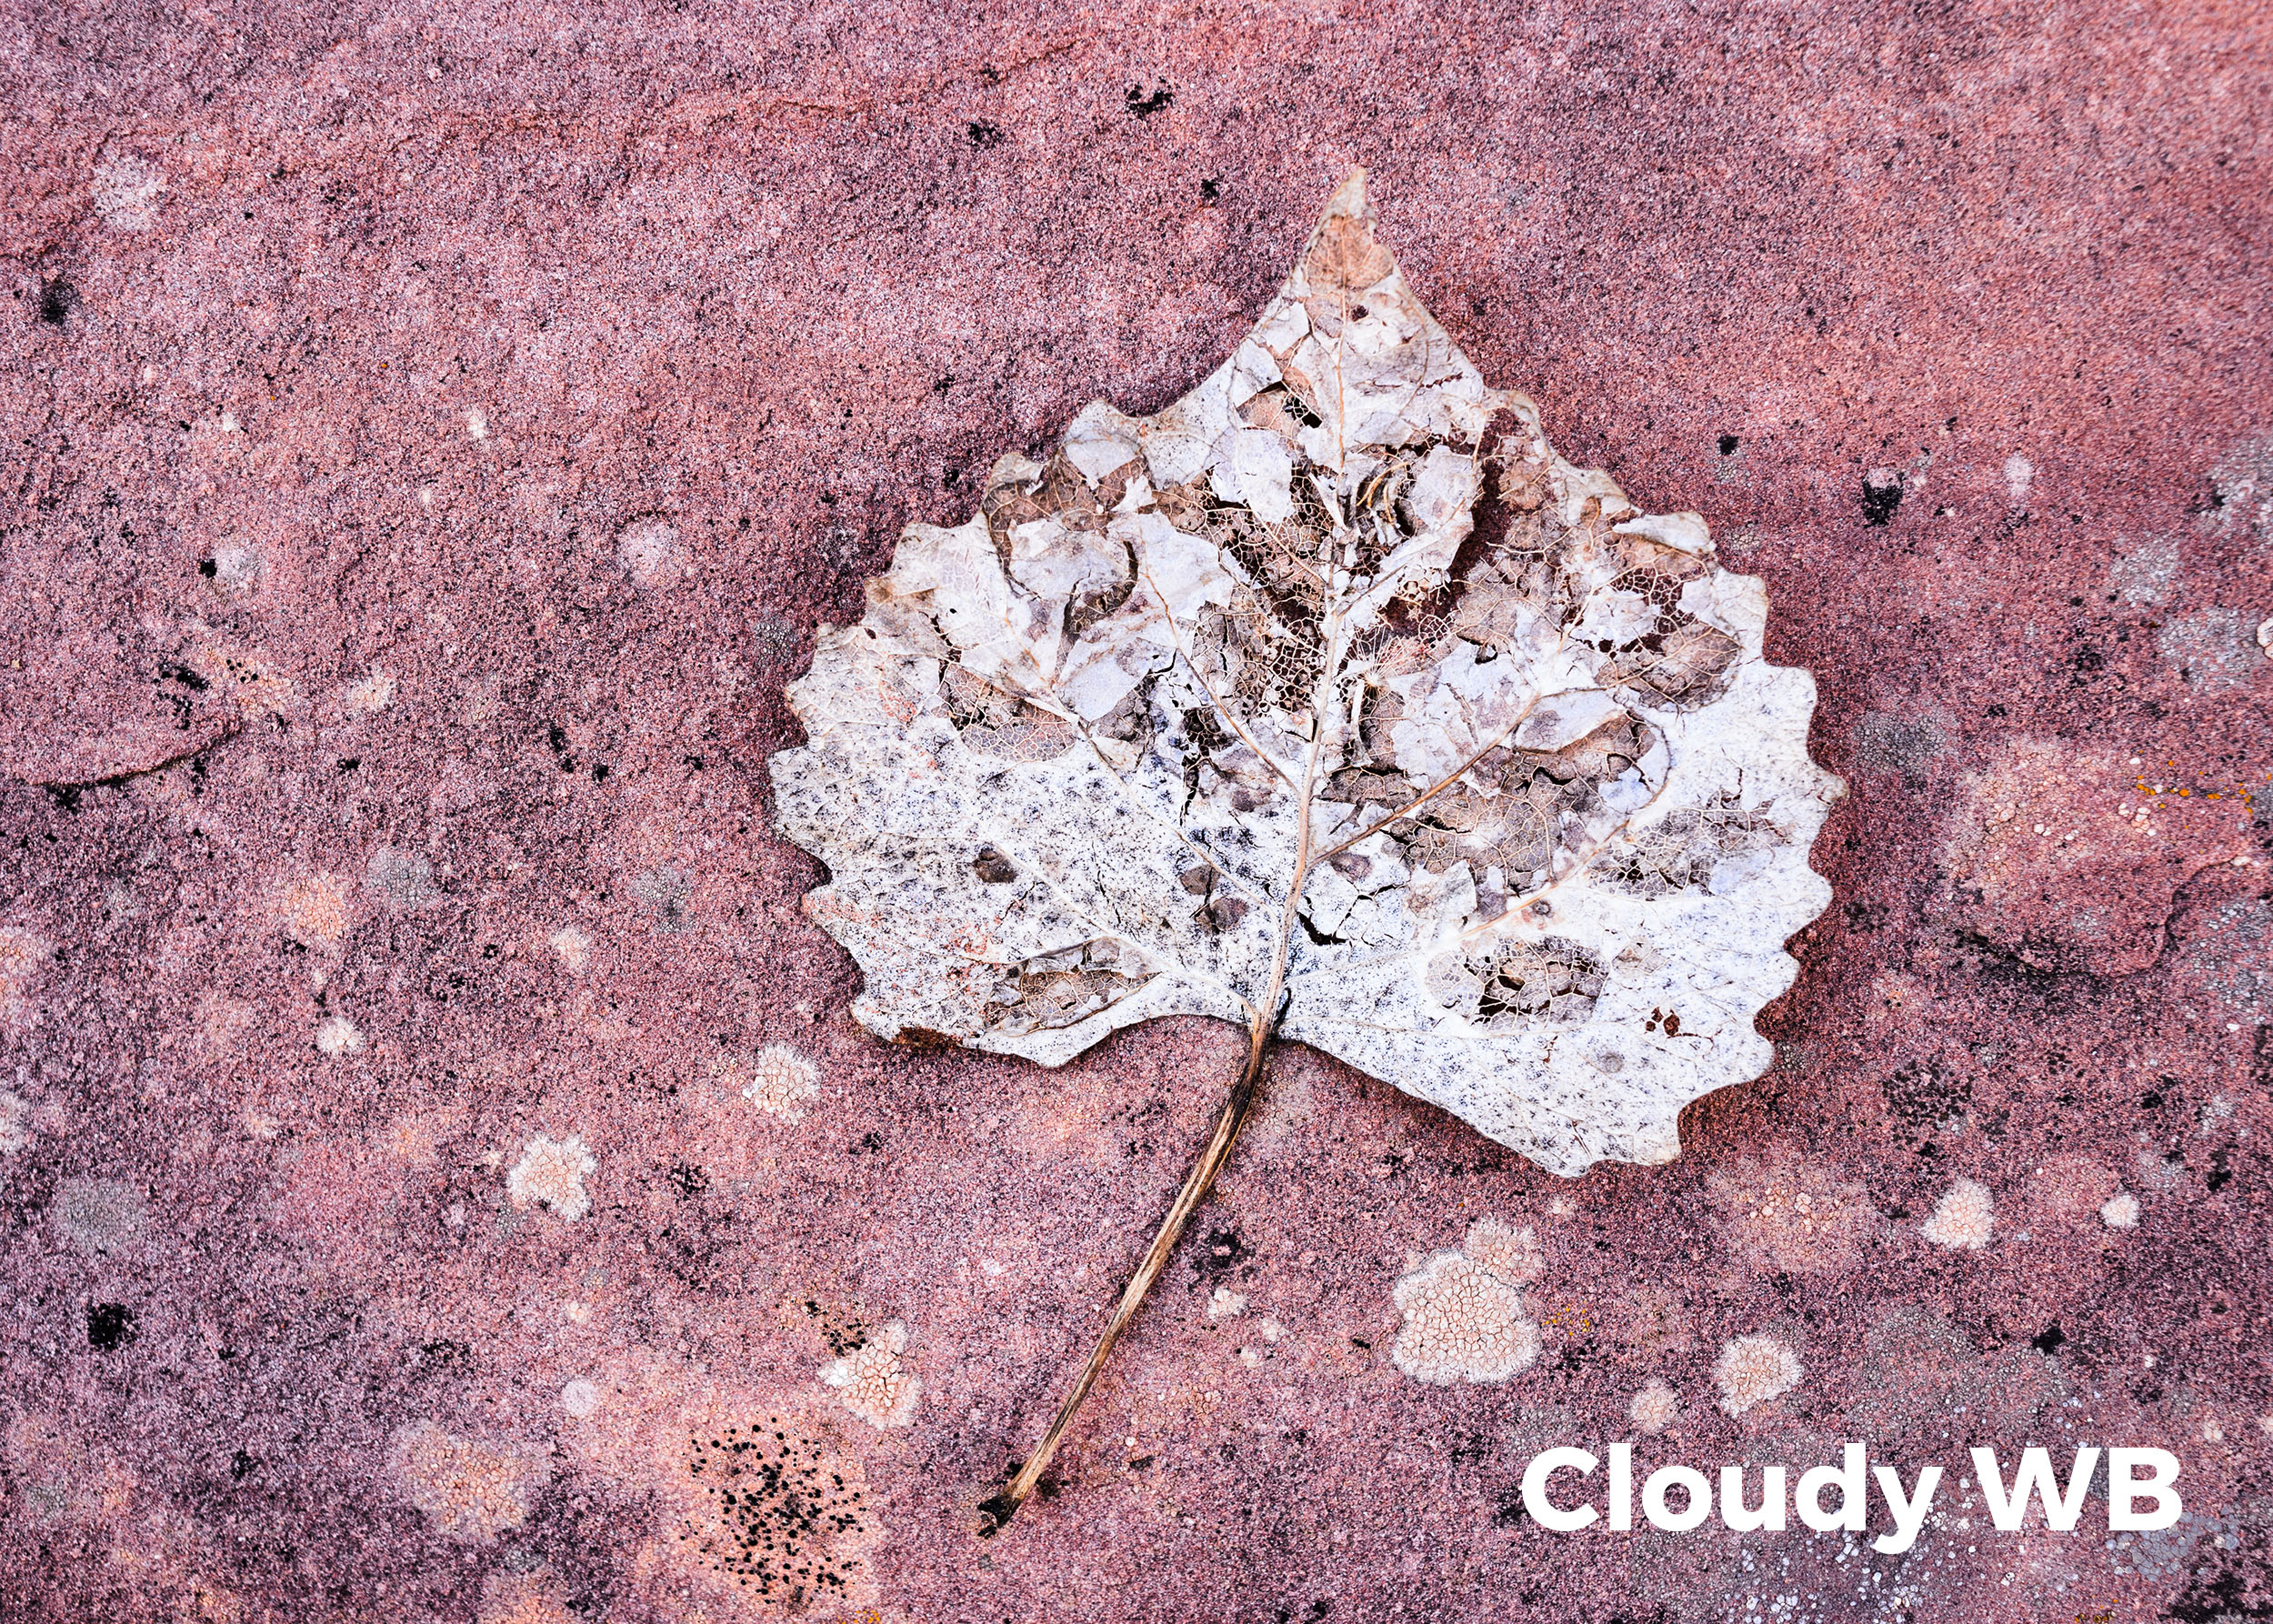
An overcast day is around 6500 K. The Cloudy white balance setting will warm the scene by adding in yellow/orange to cancel out blue and make “white” light.

Let’s look at this in a real-world scenario. Below you can see an image photographed at two white balances. The version on the left shows how it looks on an overcast day when shot with Direct Sunlight white balance. The version on the right shows the same image shot with Cloudy white balance.

Unlike the presets of Cloudy, Shade, Tungsten and Direct Sunlight, which have set values, the Auto white balance setting varies depending on what the camera detects. It looks at a percentage of the brightest pixels in the scene, determines their color cast, and then adds in the opposite color to neutralize.

The Question of Fixing Color

Of course, it’s always your choice whether to fix the color cast or leave it as. For example, why would you want to “fix” or neutralize the beautiful warm colors of a sunset? I also find that when shooting forests or waterfalls on a cloudy day, I tend to keep my white balance set to Direct Sunlight to allow the “cool” feeling to come through.

White balance is very subjective. We can, however, list out a few rough guidelines. Here are mine:

  • When shooting outdoors on a sunny day, I choose Direct Sunlight.

  • When shooting sunrise and sunset, again, Direct Sunlight.

  • On overcast days, I choose Direct Sunlight or Cloudy.

  • In the open shade, I choose Cloudy or Shade.

  • When shooting indoors under artificial light, I choose Auto.

  • When shooting at night? I set my white balance manually.

Manual White Balance

I choose a manual white balance at night so that I can completely control the color of the night sky along with any existing light or any light that I choose to add to the photo.

Manual white balance is achieved by using the Kelvin white balance setting. It allows you to set your white balance to any color temperature you desire. No presets, no Auto fix. Just your choice of how you want your image to look.

This setting is found in your White Balance presets and is signified by either a K or the word Kelvin.

Nikon’s White Balance menu.

Clicking on this choice allows you to choose from Kelvin values of anywhere from 2000 K to 10,000 K.

  • The higher the number you use, the warmer the picture will be.

  • The lower the number you use, the cooler the picture will be.

Using the Kelvin white balance setting allows for very precise control over the color of the resulting image.

Setting the Kelvin value.

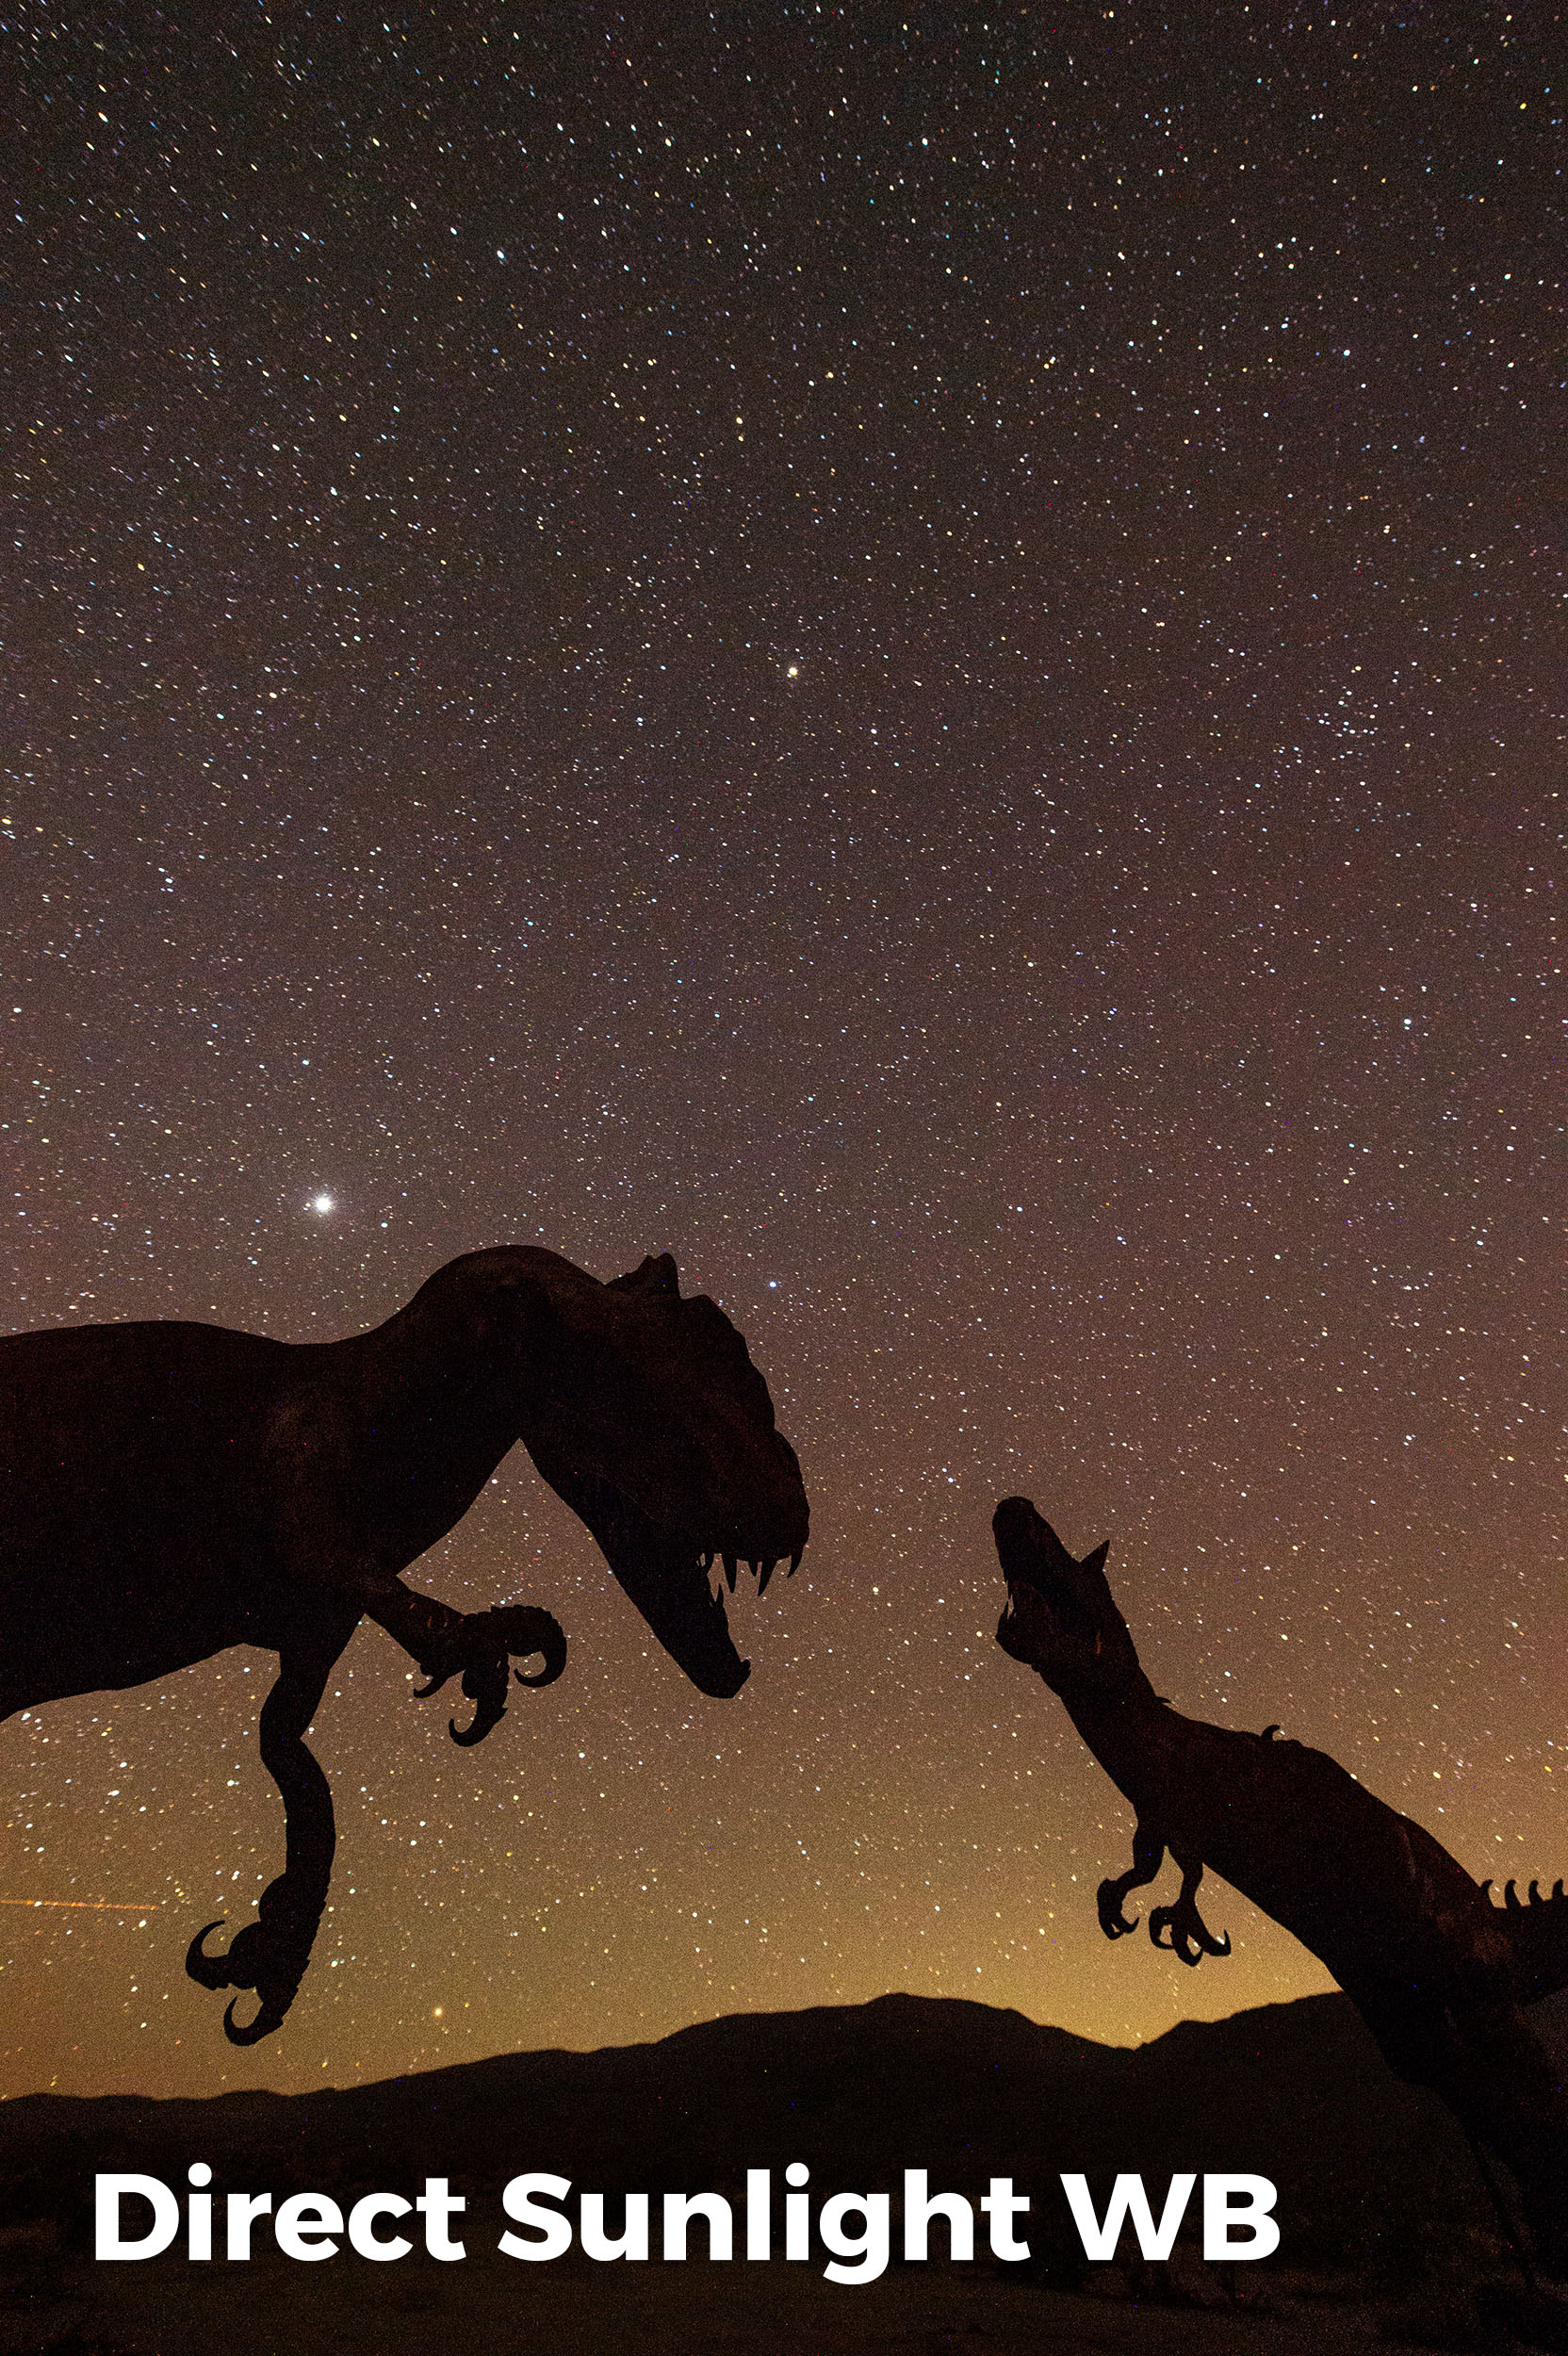
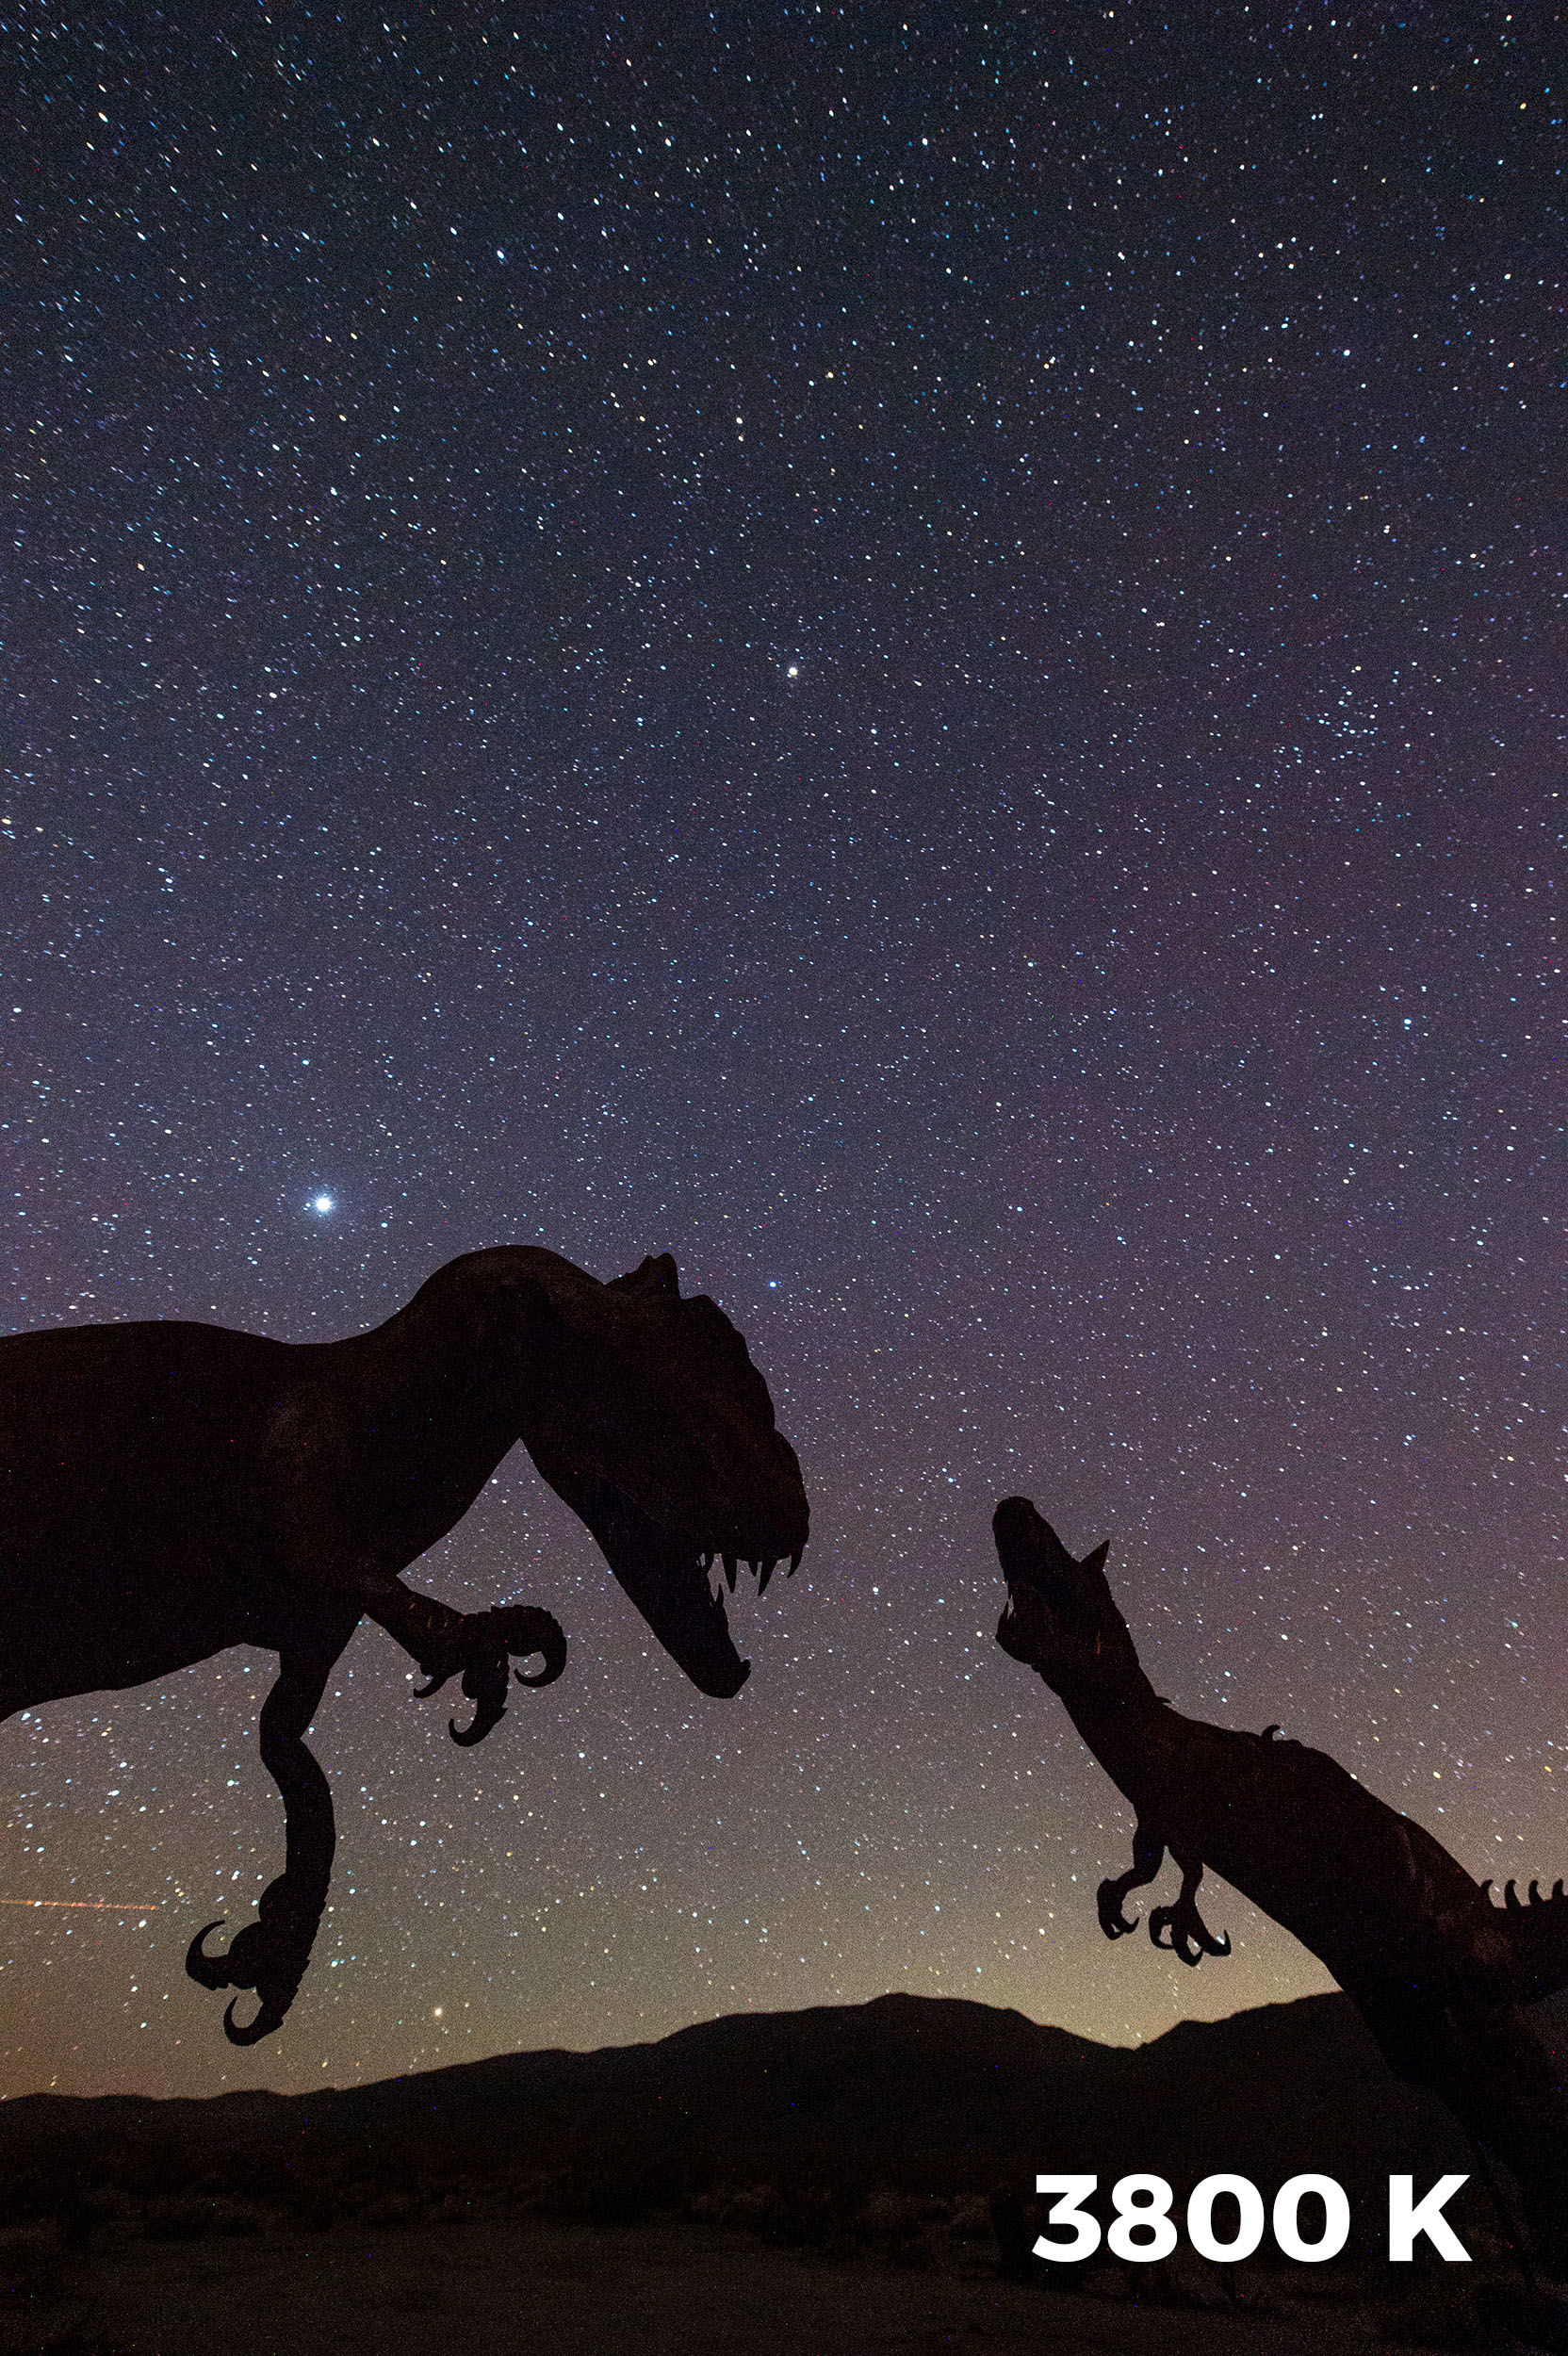
It’s very common for photographers to leave their white balance set on Direct Sunlight when shooting at night. Even with no moonlight this can cause an overly warm look to the image. By your using Kelvin white balance and lowering the setting to, say, 3800 K, you’ll be cooling down your photo and thereby making it look and feel more like night.

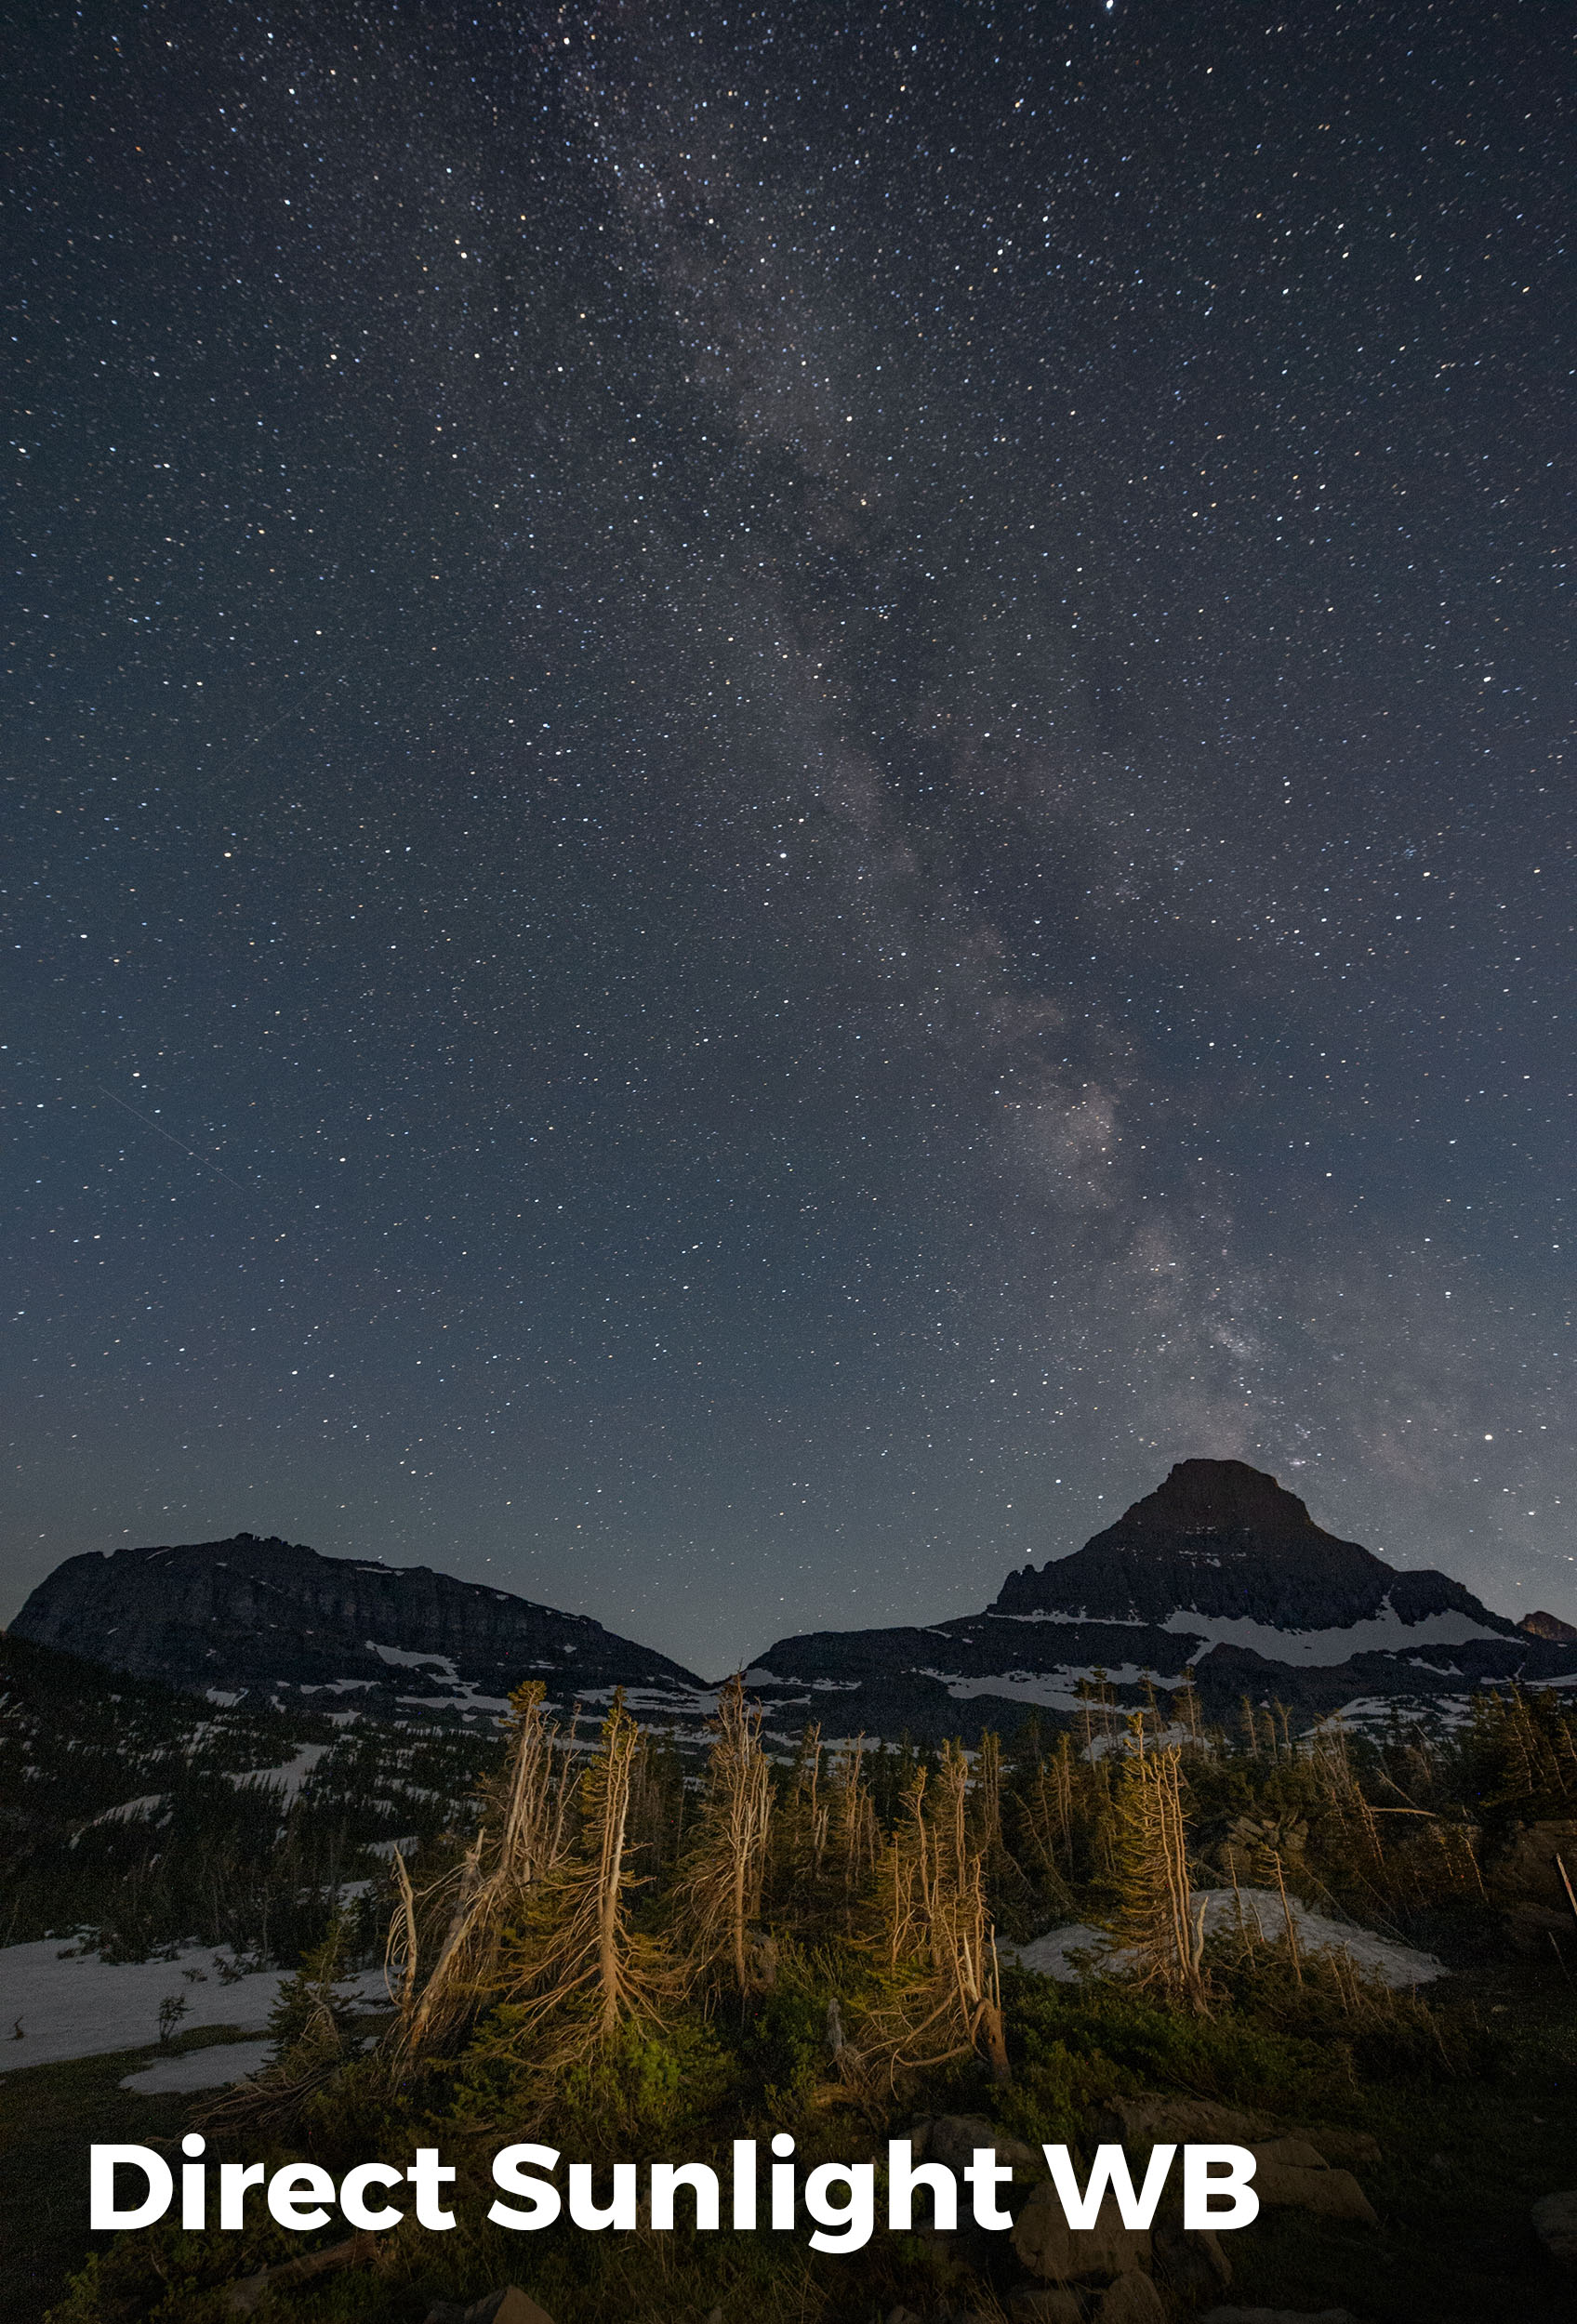
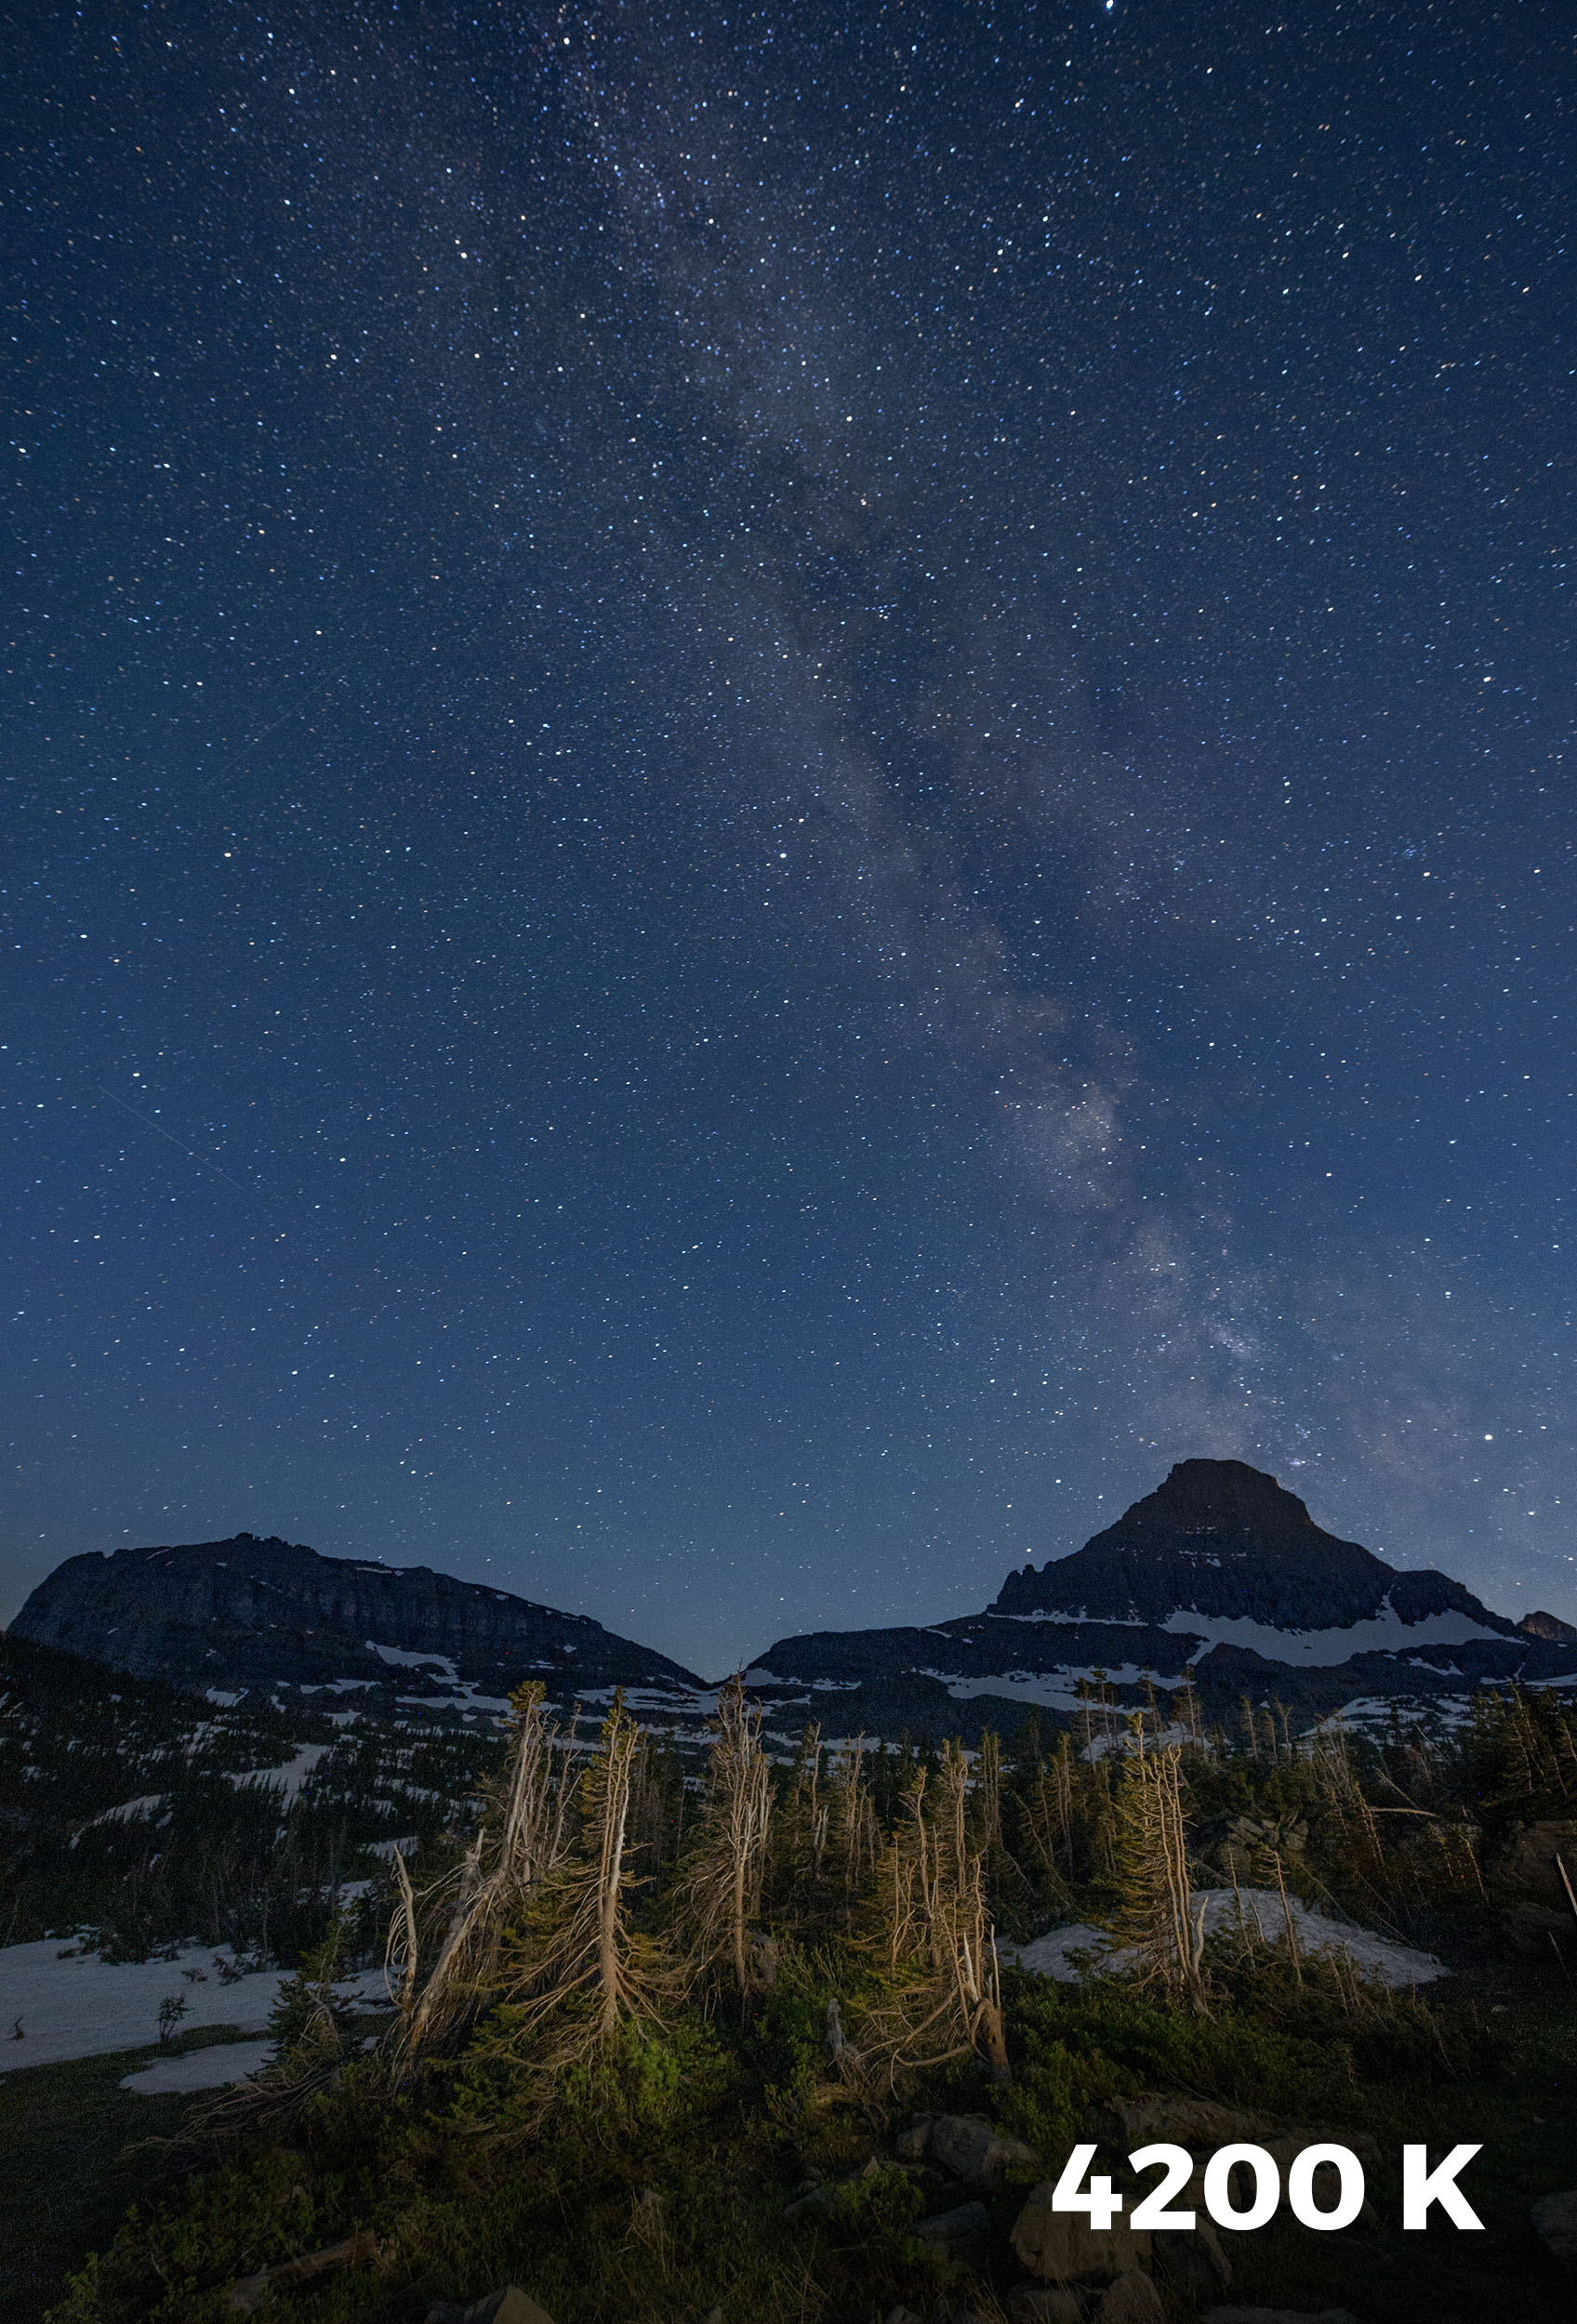
The exact Kelvin setting you choose will vary greatly depending on the circumstances. Here the white balance of the first shot was set to Direct Sunlight. There was very little moonlight and little to no light pollution from nearby towns. In this case, I cooled down my photo by setting a Kelvin temperature of 4200 K.

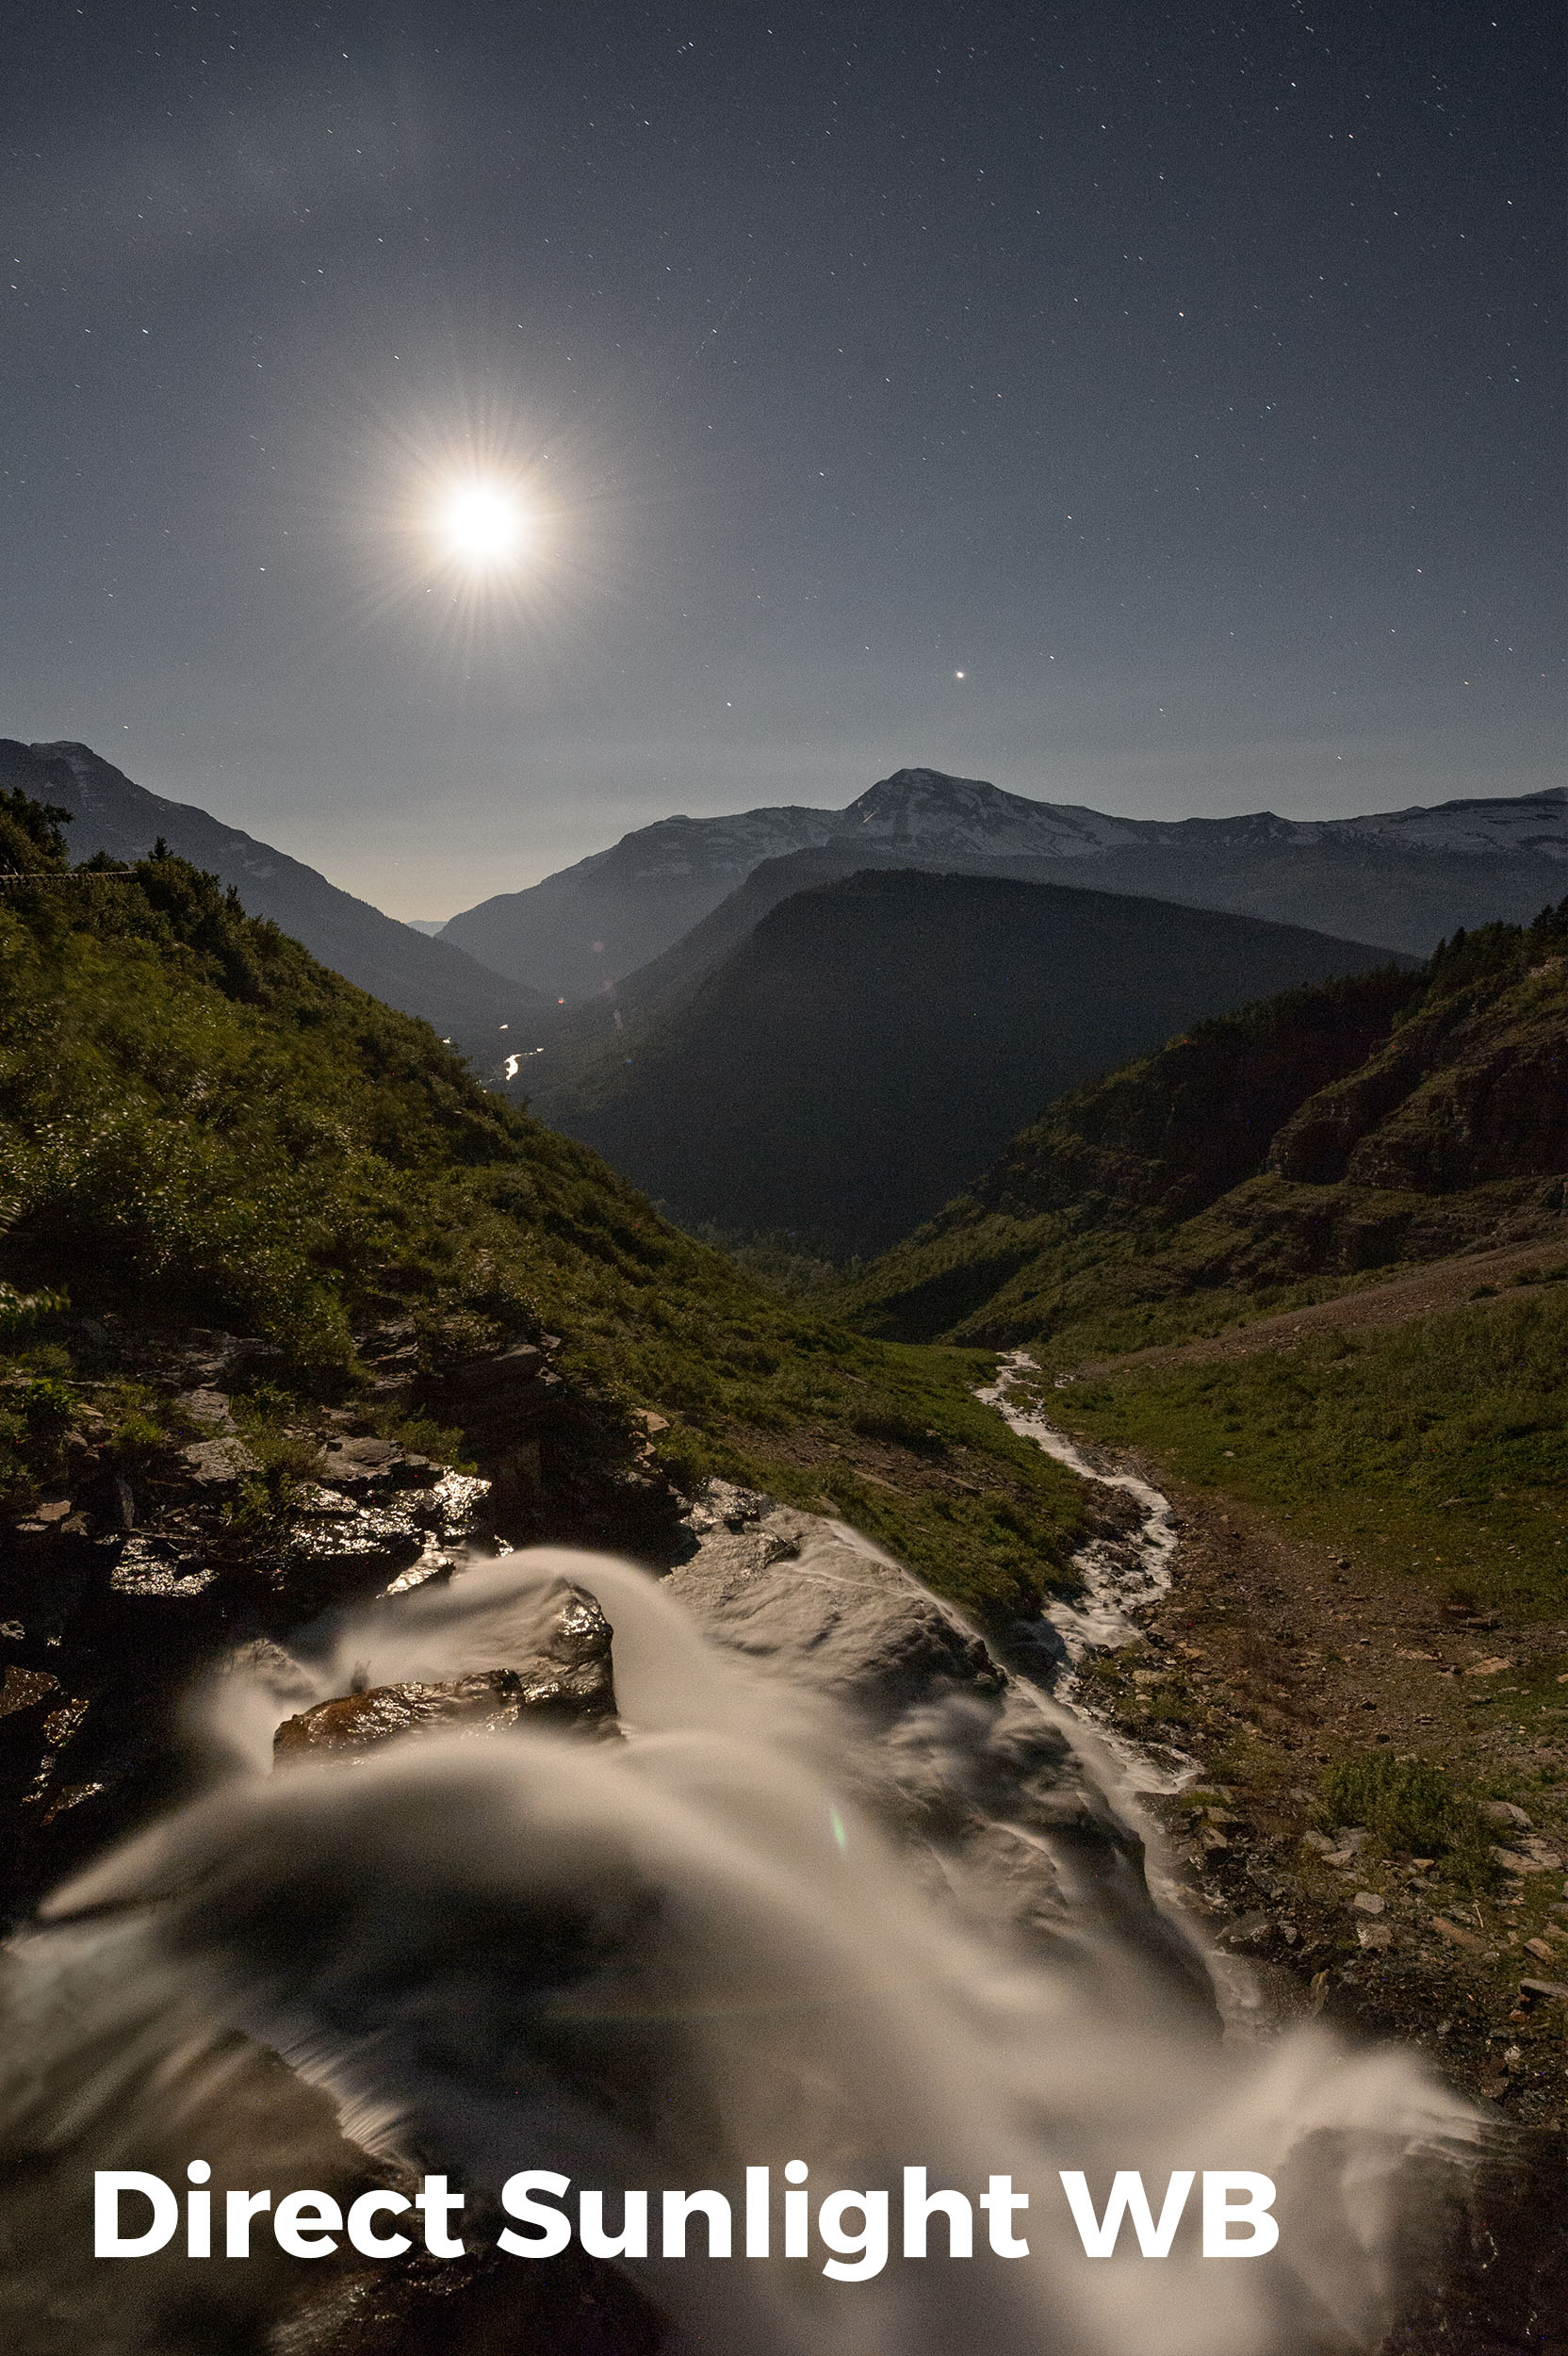
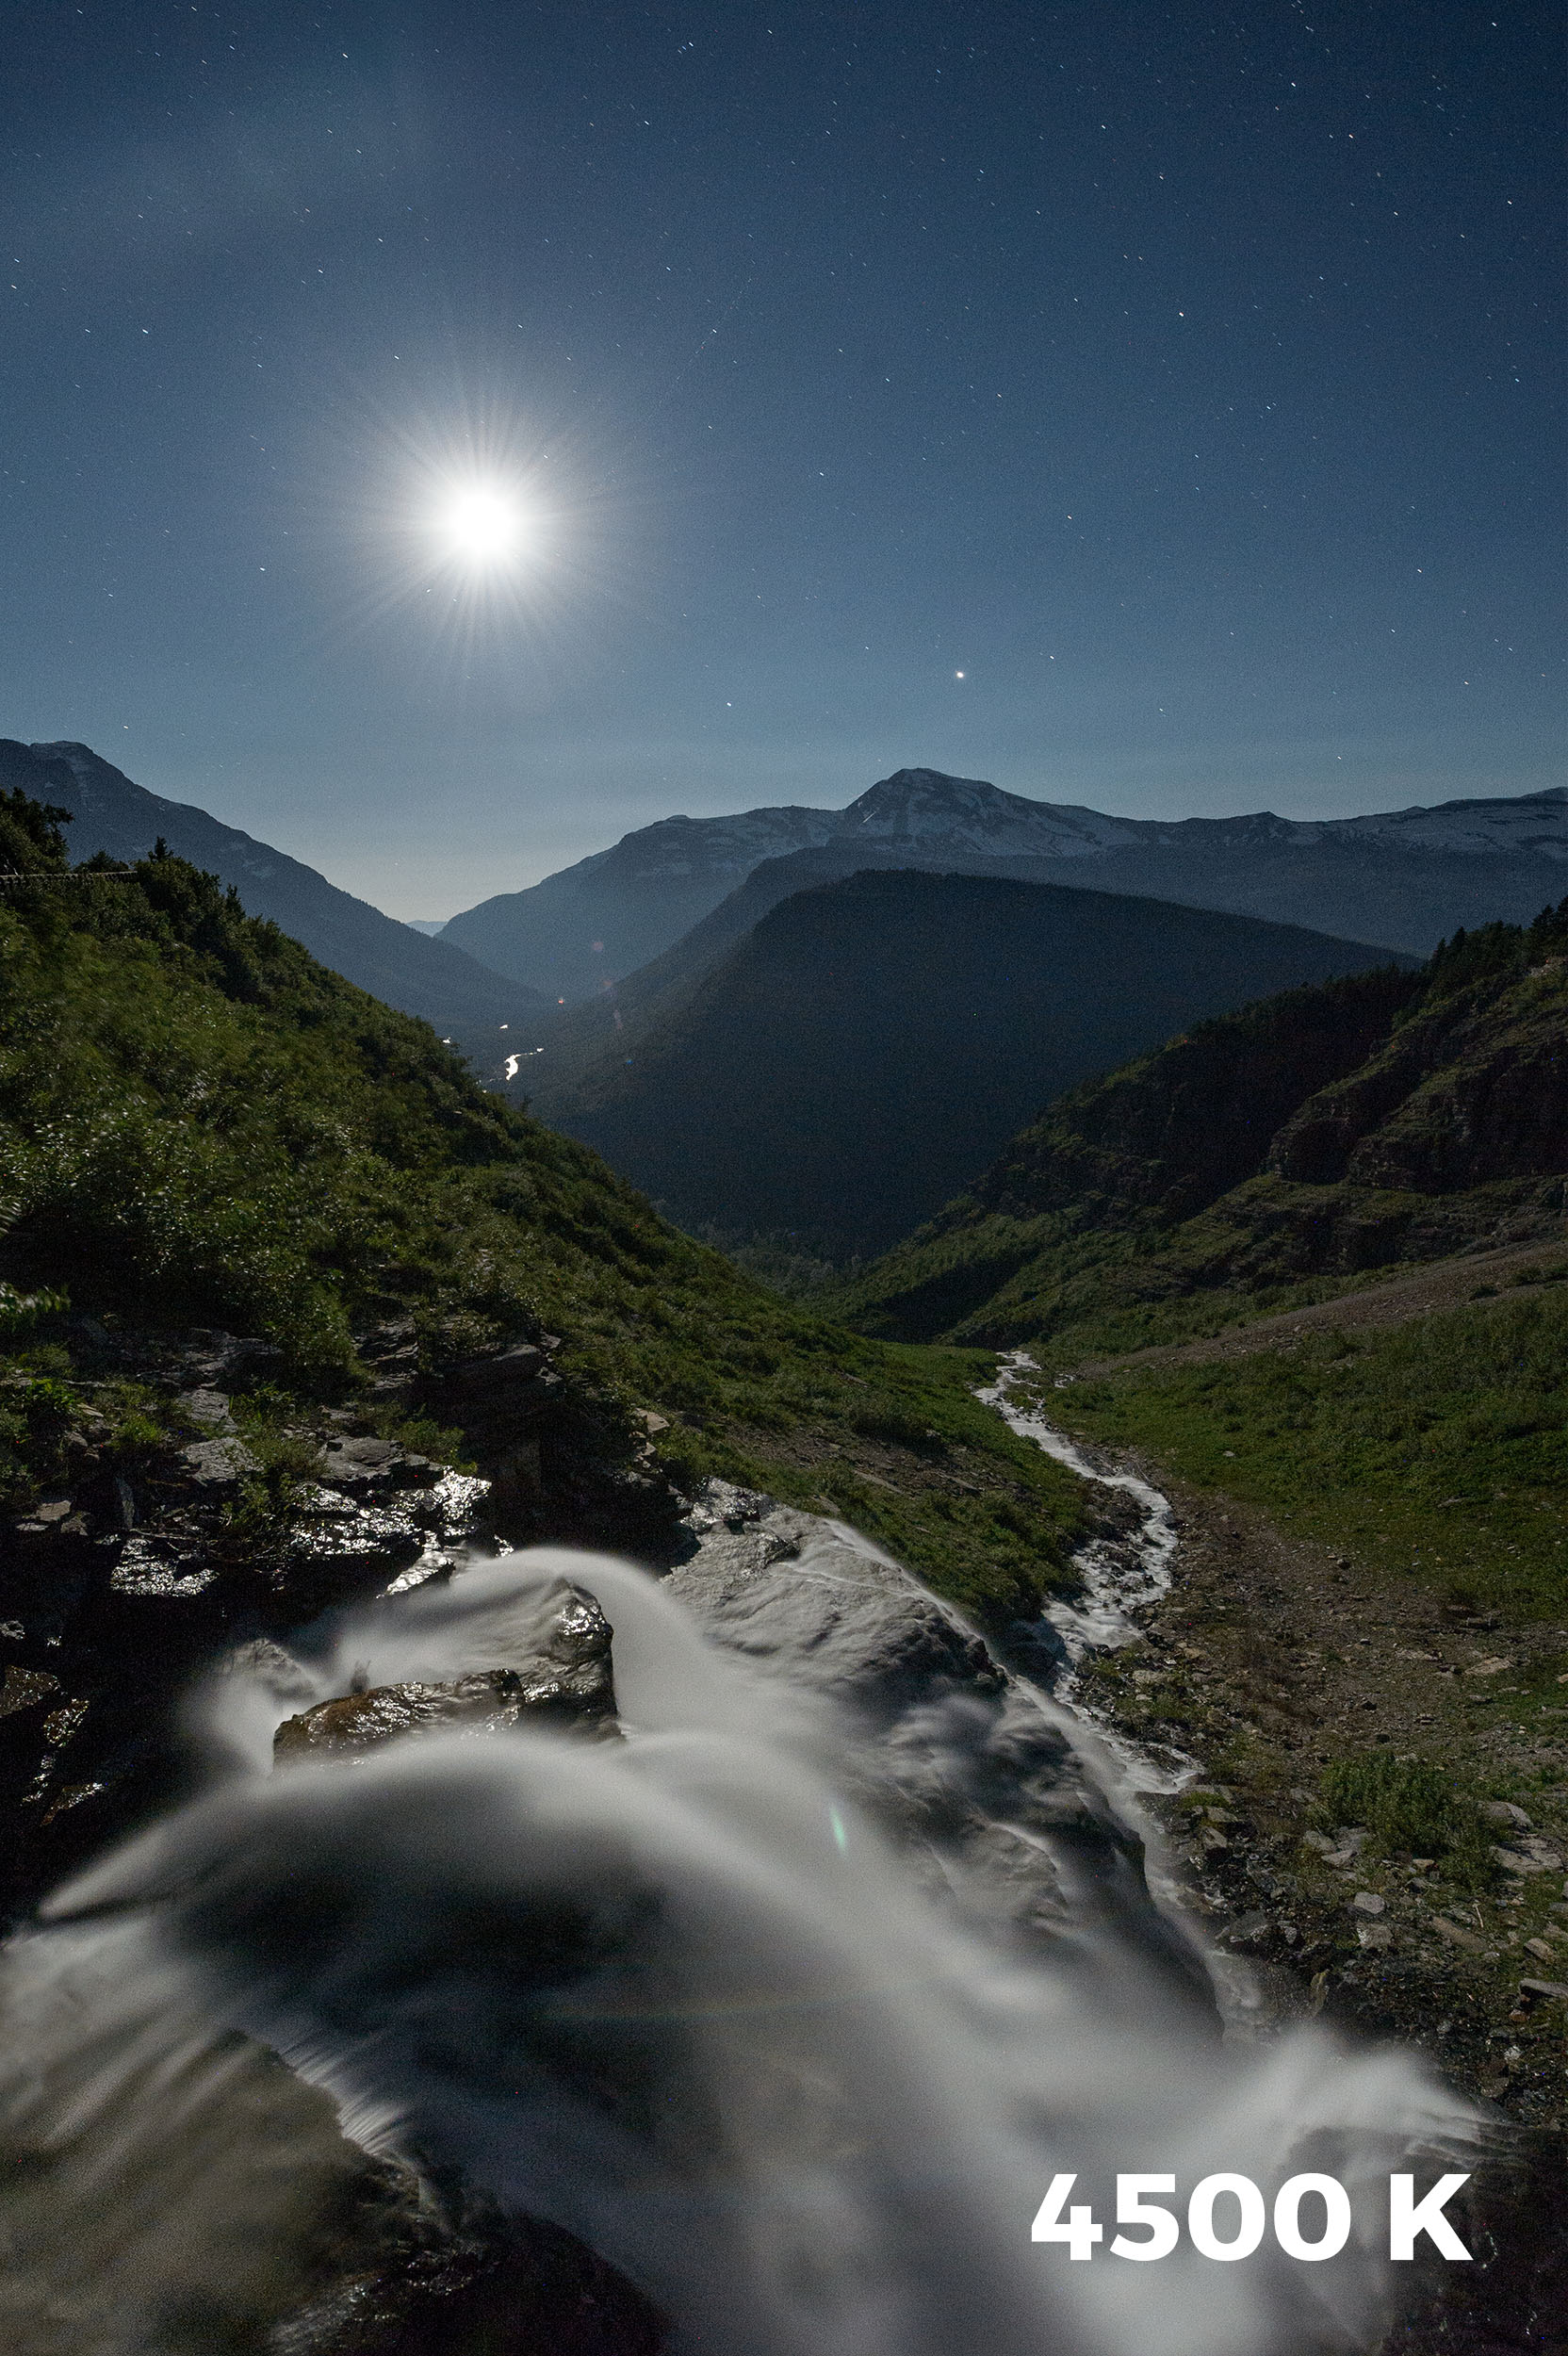
The following images were made under a full moon. The first was made with a white balance of Direct Sunlight. The second image was with a manual setting of 4500 K.

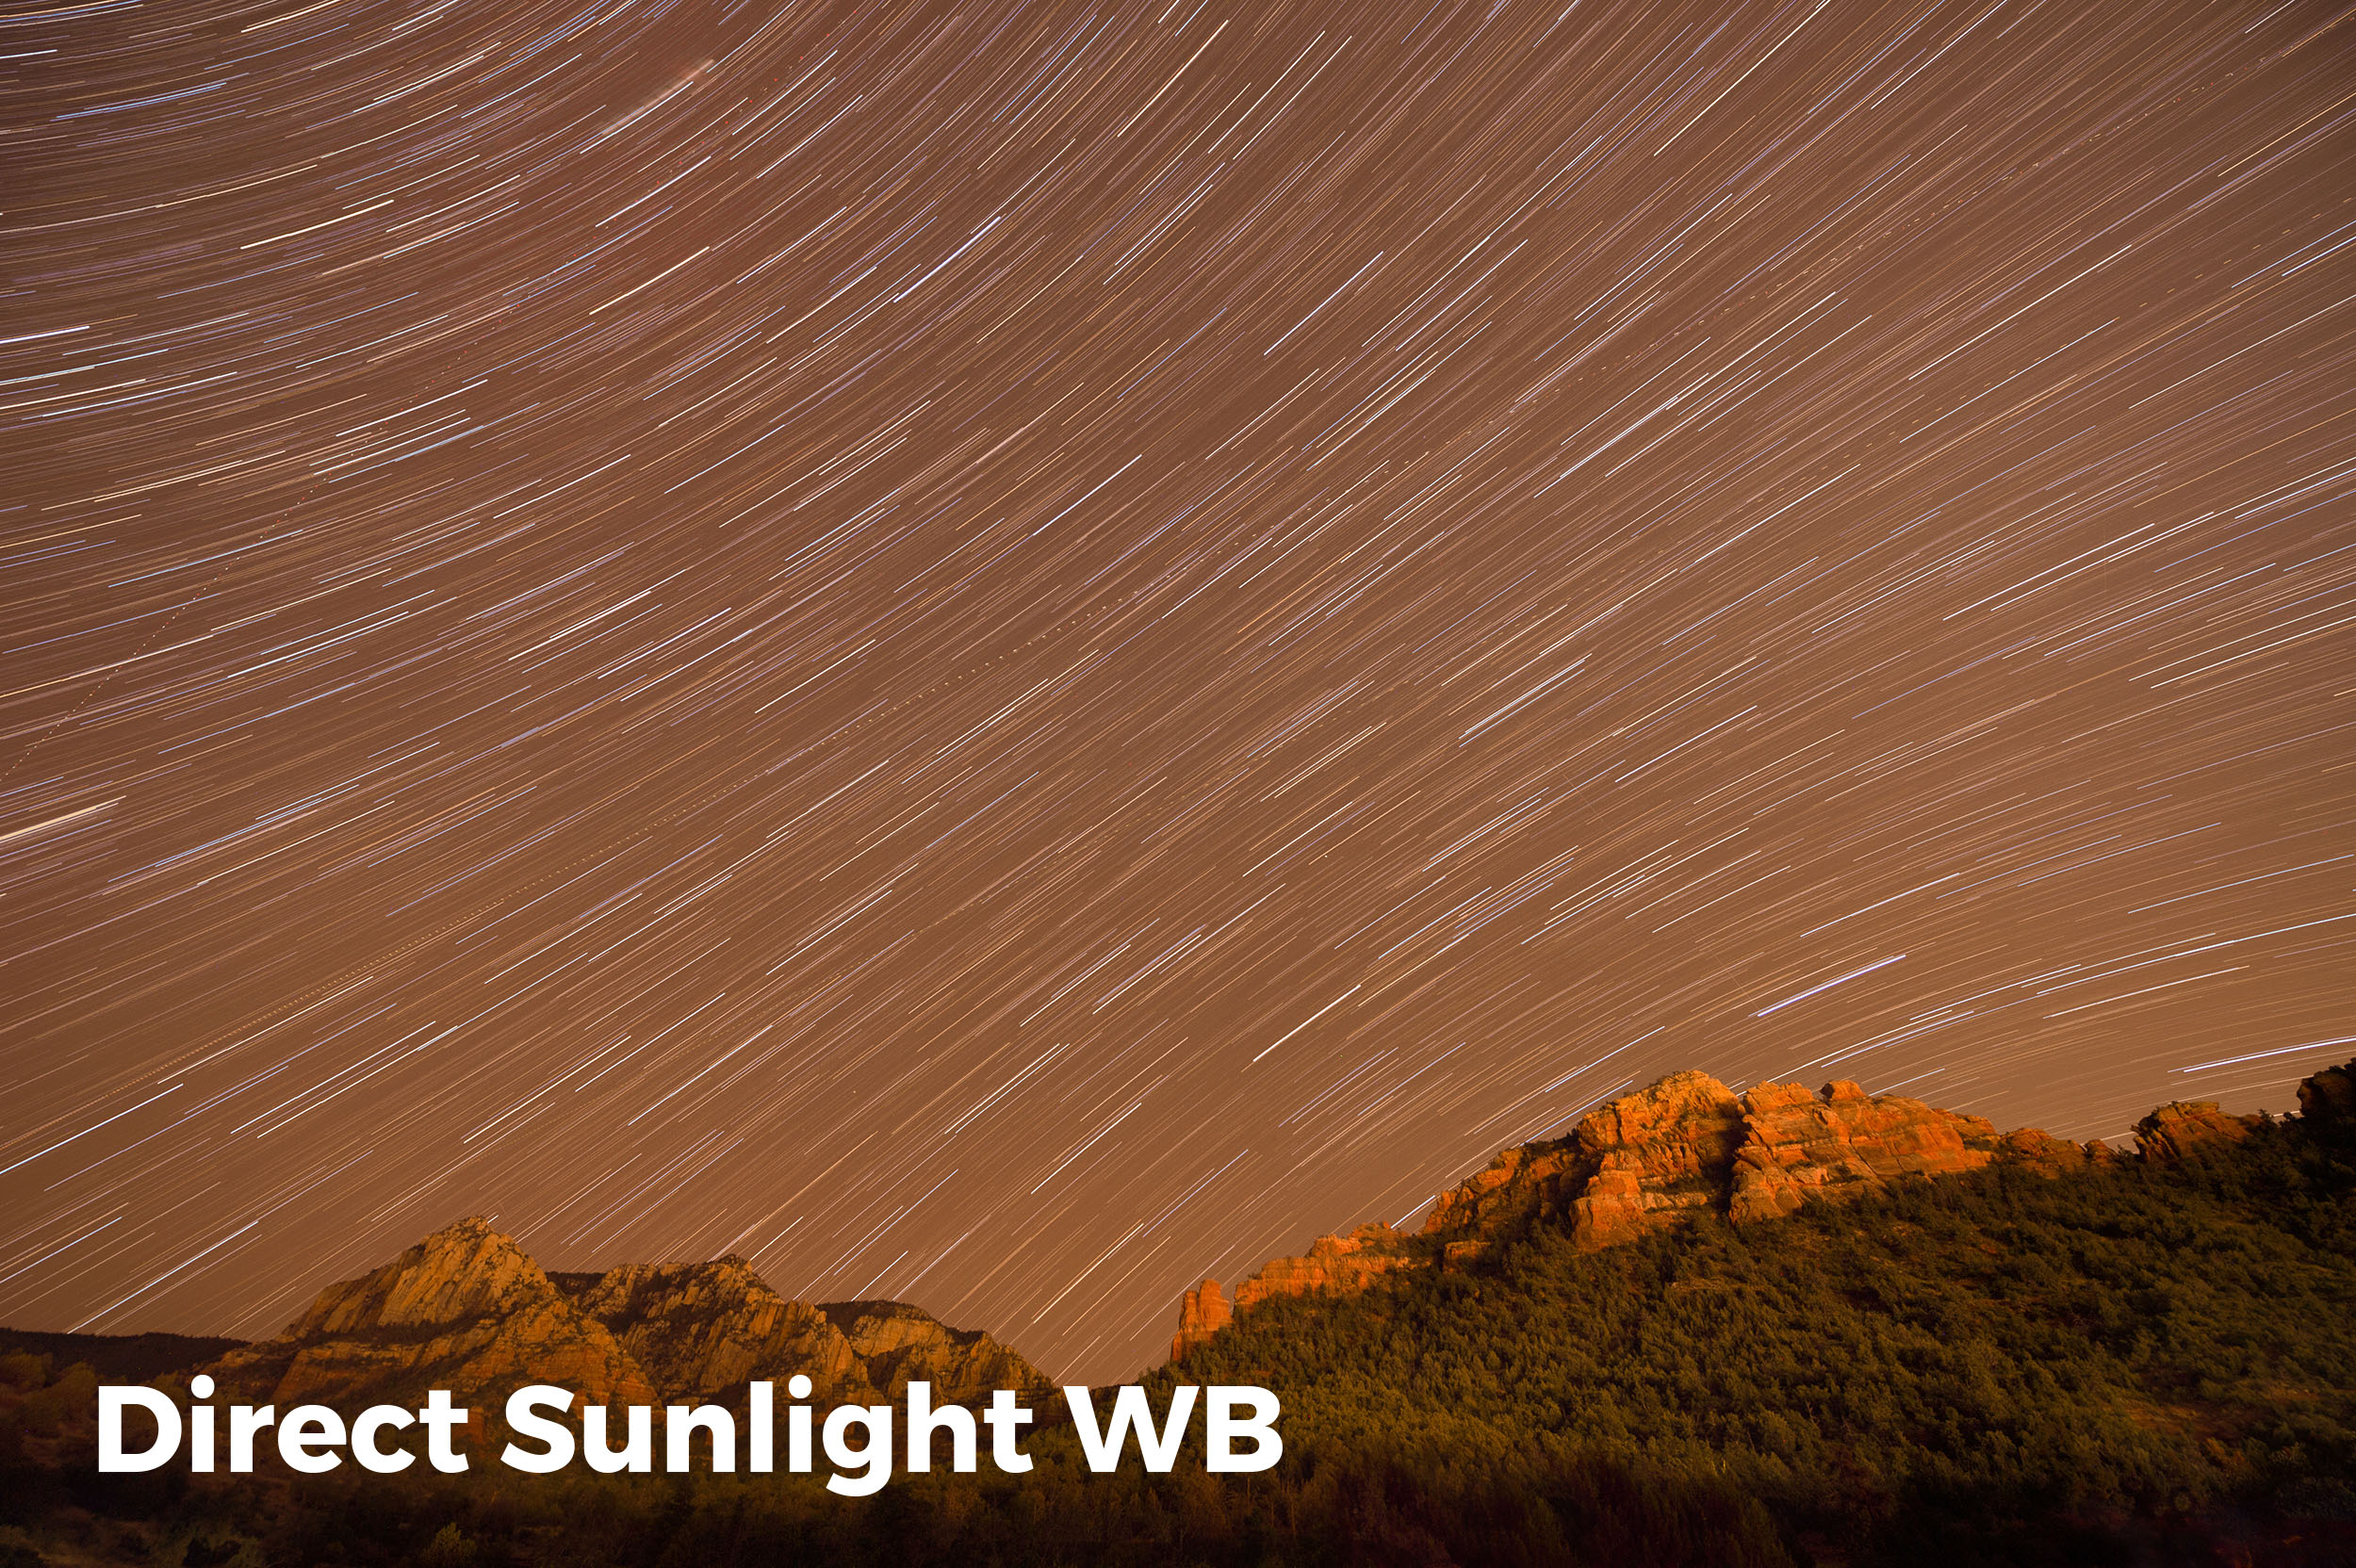
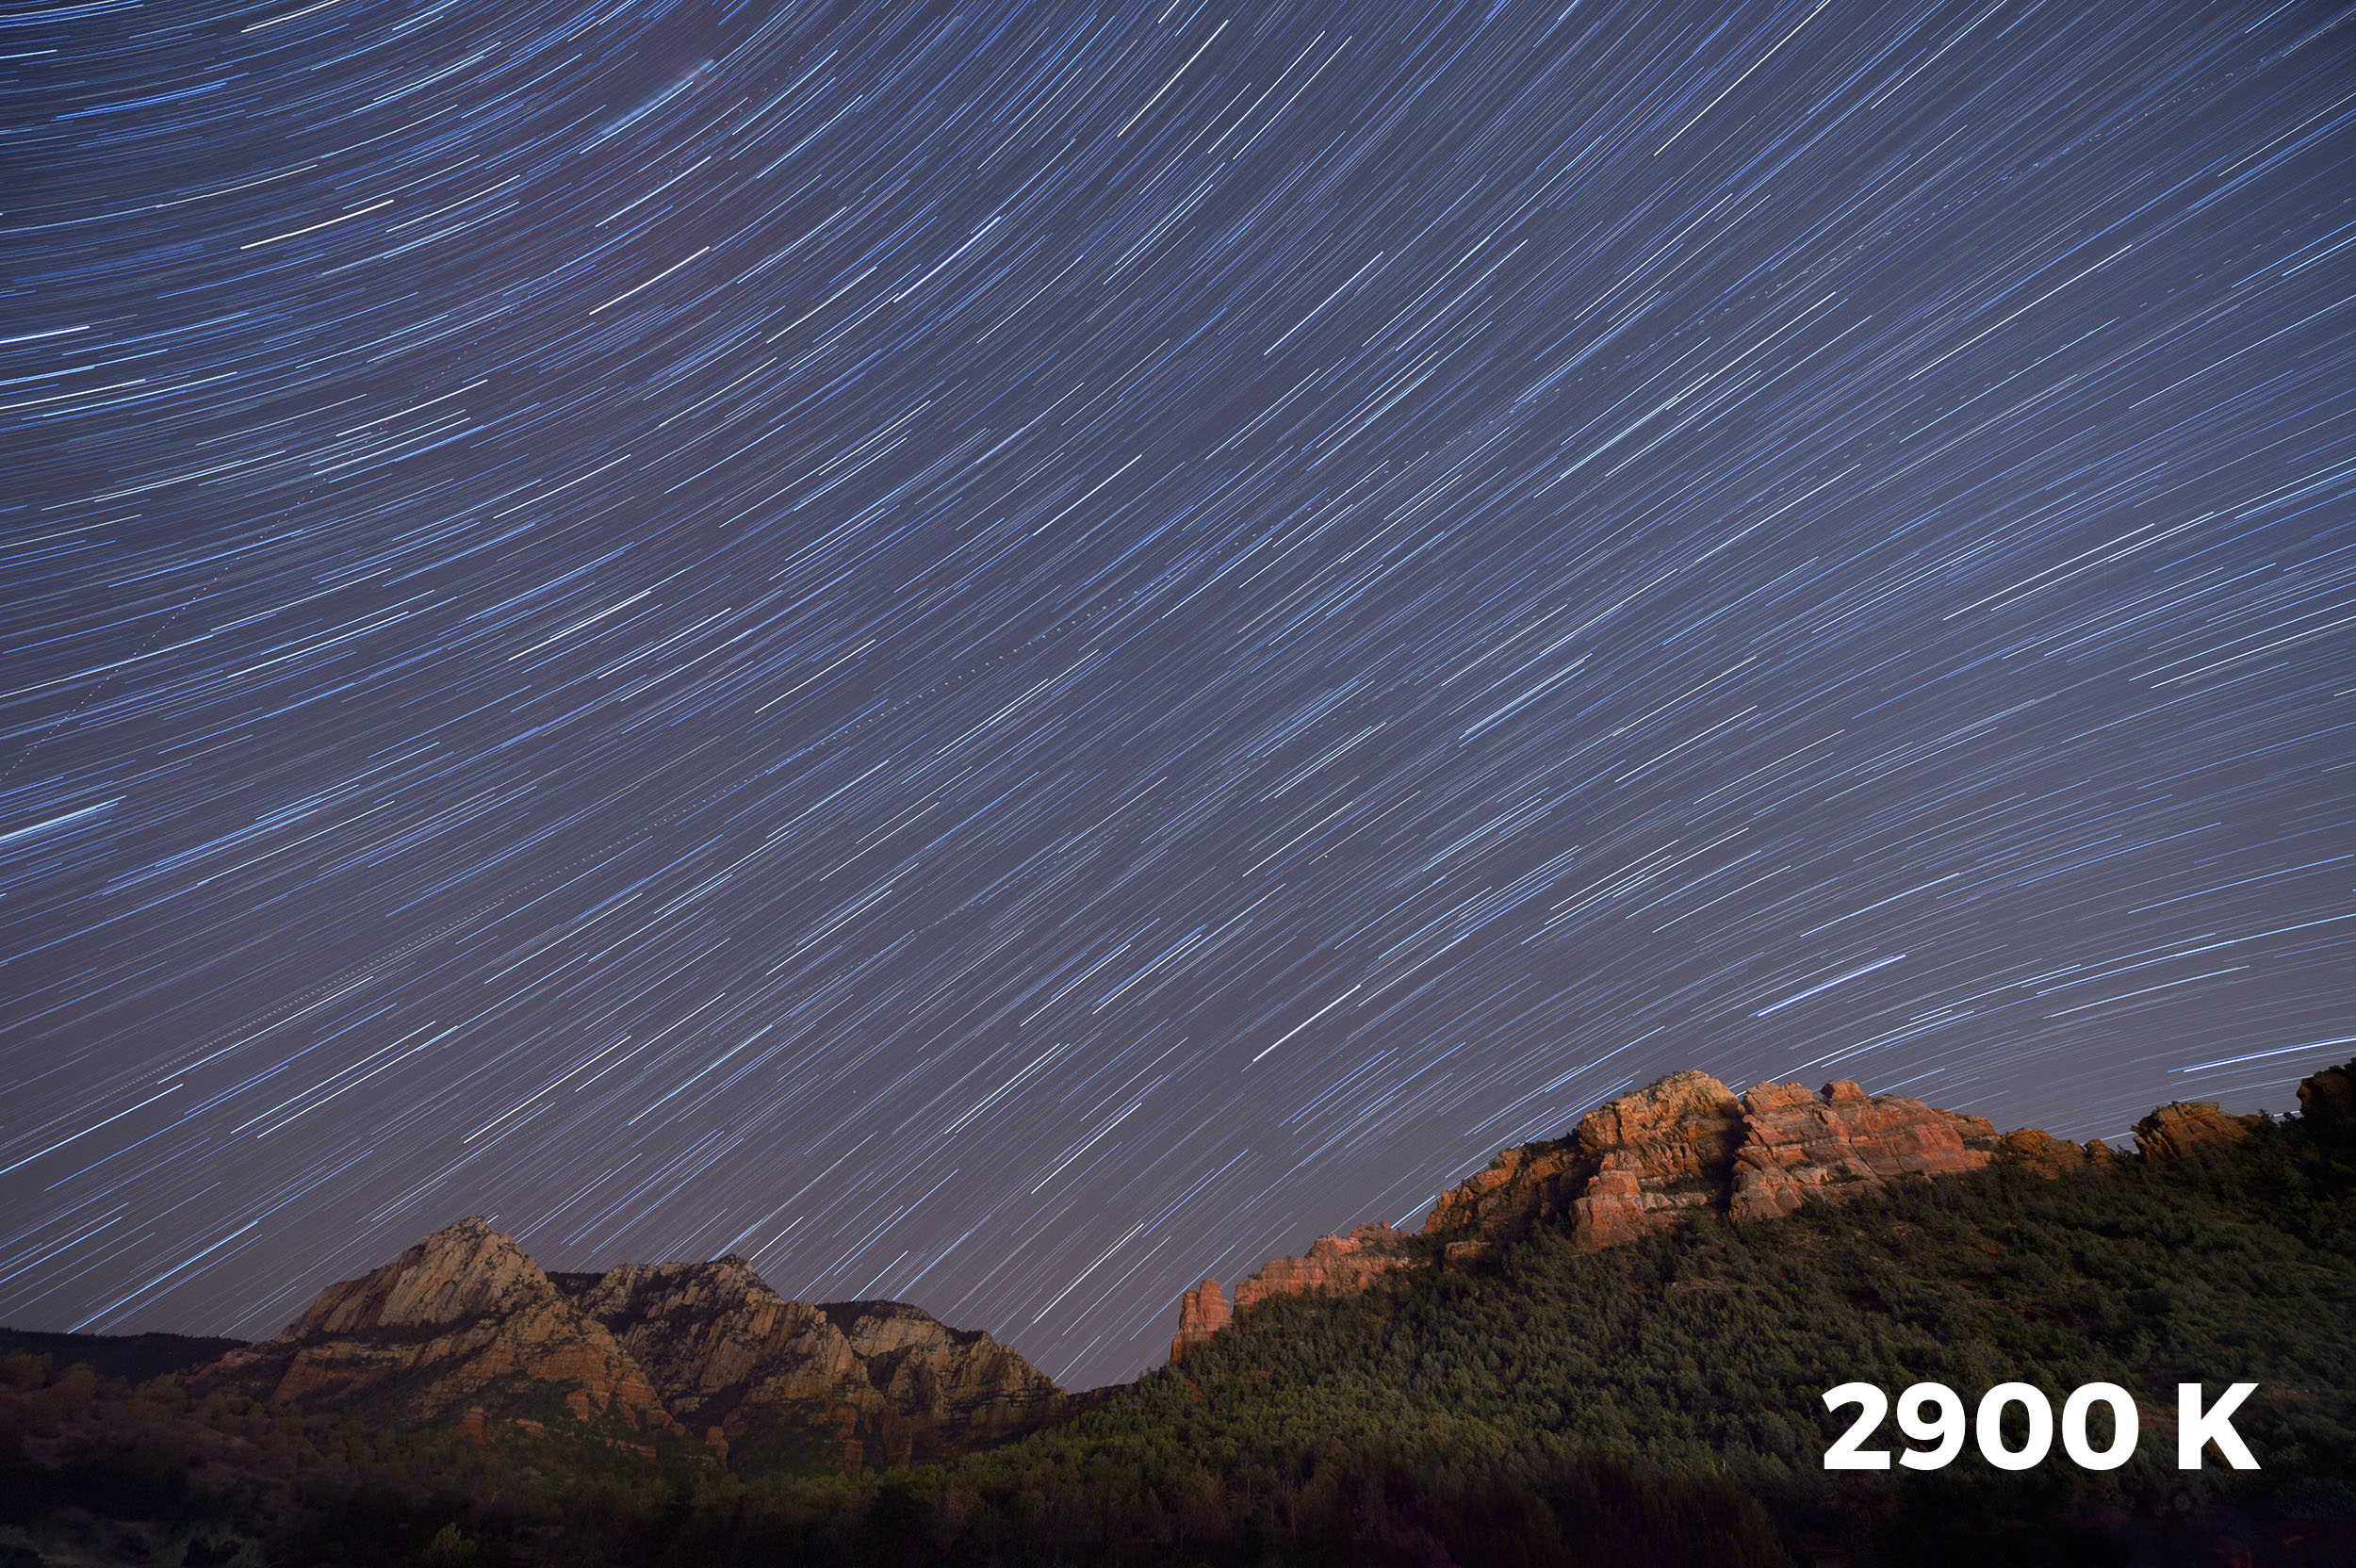
When you are near cities or towns, the lights can dramatically influence the color cast of your photographs. In the following images I was just outside of Sedona, Arizona. With the white balance set to Direct Sunlight, the color cast was way too warm. In this case I had to move my Kelvin setting all the way down to 2800 K.

As with most white balance settings, there are no absolutes. So much depends on your personal choice, the current moon phase, the amount of ambient light pollution from nearby towns or cities, and even the type of camera you use. Every camera will render colors a little differently.

The key here is experimentation. Try different K settings under many different conditions. After downloading, examine them closely on your computer. Make notes. Go out and try again. The more you experiment, the better you’ll be at setting your Kelvin temperature. And the better you are nailing the white balance in the field, the less time you have to spend fixing the image in post-processing!

Tim Cooper is a partner and workshop leader with National Parks at Night. Learn more techniques from his book The Magic of Light Painting, available from Peachpit.

UPCOMING WORKSHOPS FROM NATIONAL PARKS AT NIGHT

Northern Exposure: 8 Illuminating tips for Photographing Auroras

Witnessing an aurora is one of life’s truly magical experiences. Watching the pulsating light and soaking in the surreal green glow fills you with excitement, awe and wonder. As photographers, however, we’re not content to just stand by and watch. We want to capture this spectacle, share it with others, and relive it again and again.

To help you do that even better, Lance, Gabe and I put together eight killer tips for seizing the northern (or southern!) lights.

(For a primer on this topic, read Lance Keimig’s February blog post Capturing Clouds of Light: How to Photograph the Aurora Borealis.”)

15 seconds, f/3.3, ISO 3200. Shot with Nikon D750 and 24mm lens. © Lance Keimig.

Lance Keimig

1. Aurora Exposures

The correct exposure for an aurora can vary dramatically depending on both its intensity and movement. Sometimes there may be a relatively stable band of light in the sky that grows in intensity over time. This is easy to photograph, and usually does not change the exposure from what the normal landscape exposure would be.

For a static aurora, typical exposures are equivalent to landscape exposures based on corresponding moonlight or artificial light.

If you’re lucky, the band will grow into the magical dancing lights that can become so bright as to illuminate the landscape with green. To photograph a dancing aurora, it is important to keep the shutter speed as short as possible to prevent the crazy shapes from blending into electric pea soup.

For a rapidly changing aurora, try to keep exposures in the neighborhood of about 2 to 10 seconds. I recommend setting the ISO based on the ambient landscape light—i.e., not factoring the aurora into your exposure determination. So, for new moon conditions, shoot at ISO 1600 to 6400, and for full moon conditions, shoot at 400 to 800. From there, pick a wide aperture that gives adequate depth of field for the scene, usually stopping down 1 or 1 1/2 stops from wide-open, depending on the focal length and quality of your glass. Lastly, vary the shutter speed as needed to get a balance between a decent exposure and stopping the movement of the dancing lights.

6 seconds, f/3.3, ISO 3200. Shot with Nikon D750 and 14mm lens. © Lance Keimig.

6 seconds, f/3.3, ISO 3200. Shot with Nikon D750 and 14mm lens. © Lance Keimig.

2. Finding the Aurora: What the Camera sees Versus what You See

Because human eyes lose sensitivity to color in low light, an aurora may sometimes fool you into thinking it is just a cloud. The show often begins as a faint glow in one location in the sky, and it may not be very impressive. If there is a high probability of auroras, it’s a good idea to take test images of different parts of the sky while you are waiting in case there is something that your eyes don’t pick up.

If you live in—or will be traveling to—extreme northern or southern latitudes where auroras are commonly seen, it’s a good idea to have an app like Aurora Forecast (Apple, Android) or Aurora Alerts (Apple, Android) on your phone, and set notifications for specific activity levels. Auroral strength is measured on a scale of 0 to 9 Kp. In high latitudes like Alaska or Iceland, a Kp of 4 or higher indicates a high probability of photographable auroras. In middle latitudes like New England or the Pacific Northwest, a Kp of 5 means that you just might see something on the northern horizon. In mid-latitudes, a Kp of 6 or higher makes it worthwhile to seek out the lights.

In high latitudes, auroras may appear in any part of the sky. In middle latitudes, they are generally seen only as a faint green glow on the northern horizon.

Four-frame panorama shot at 20 seconds, f/4, ISO 6400. Nikon D750 with a 24mm lens. © Lance Keimig.

Gabriel Biderman

3. Keep Clicking and Make a Time-lapse

Bring two rigs and set up one for a time-lapse. If the auroras are really active, this is a great way to show off how much they dance in the sky. Once you figure out your exposure, use an intervalometer to make sure the camera keeps firing for at least 30 minutes. The longer you let it rip, the longer the “movie” will be.

Here’s a time-lapse I did of aurora in Iceland:

4. Look for Interesting Foreground and Subjects

When chasing after an aurora, look for interesting foregrounds to play against the dancing green lights. Trees, mountains and other landscape elements are common subject matter—so look for dramatic compositions to include them.

On our last workshop in Iceland, we were fortunate enough to have the ruins of an old herring factory, old boats and other striking buildings beautifully collide with the auroras. And on our recent workshop in Olympic National Park, Matt, Chris and the participants were able to photograph an aurora alongside a massive sea stack.

10 seconds, f/2.8, ISO 6400. Nikon D750 with a 14mm lens. © Gabriel Biderman.

5. Create an Aurora Portrait

Try to capture your experience under the northern/southern lights. There is such a sense of wonder and amazement when you are experiencing an aurora, so take a portrait of yourself or your friends under the night sky! A flash can be your friend for freezing the portrait with one pop, as your shutter speeds will generally be 2 to 4 seconds.

We had an amazing time taking our Iceland participants’ portraits during a night when the auroras just wouldn’t stop! My base exposure was 4 seconds, f/2.8, ISO 6400, so we just needed 1/64 power from the flash to make the night portrait complete.

Lance under an Icelandic aurora. 4 seconds, f/2.8, ISO 6400. Nikon D750 with a 14mm lens. © Gabriel Biderman.

Tim Cooper

We should always strive to get the perfect picture in-camera, and shooting the auroral lights is no different. Composition and exposure (f-stop and shutter speed) are crucial. Severe cropping and exposure changes will damage your photo, and fixing shutter speed or depth of field is impossible after the fact.

That being said, there are several things that can be altered in post-production that have no bearing on the initial capture. In fact, some of these things you can’t even accomplish in-camera.

6. Change Your White Balance

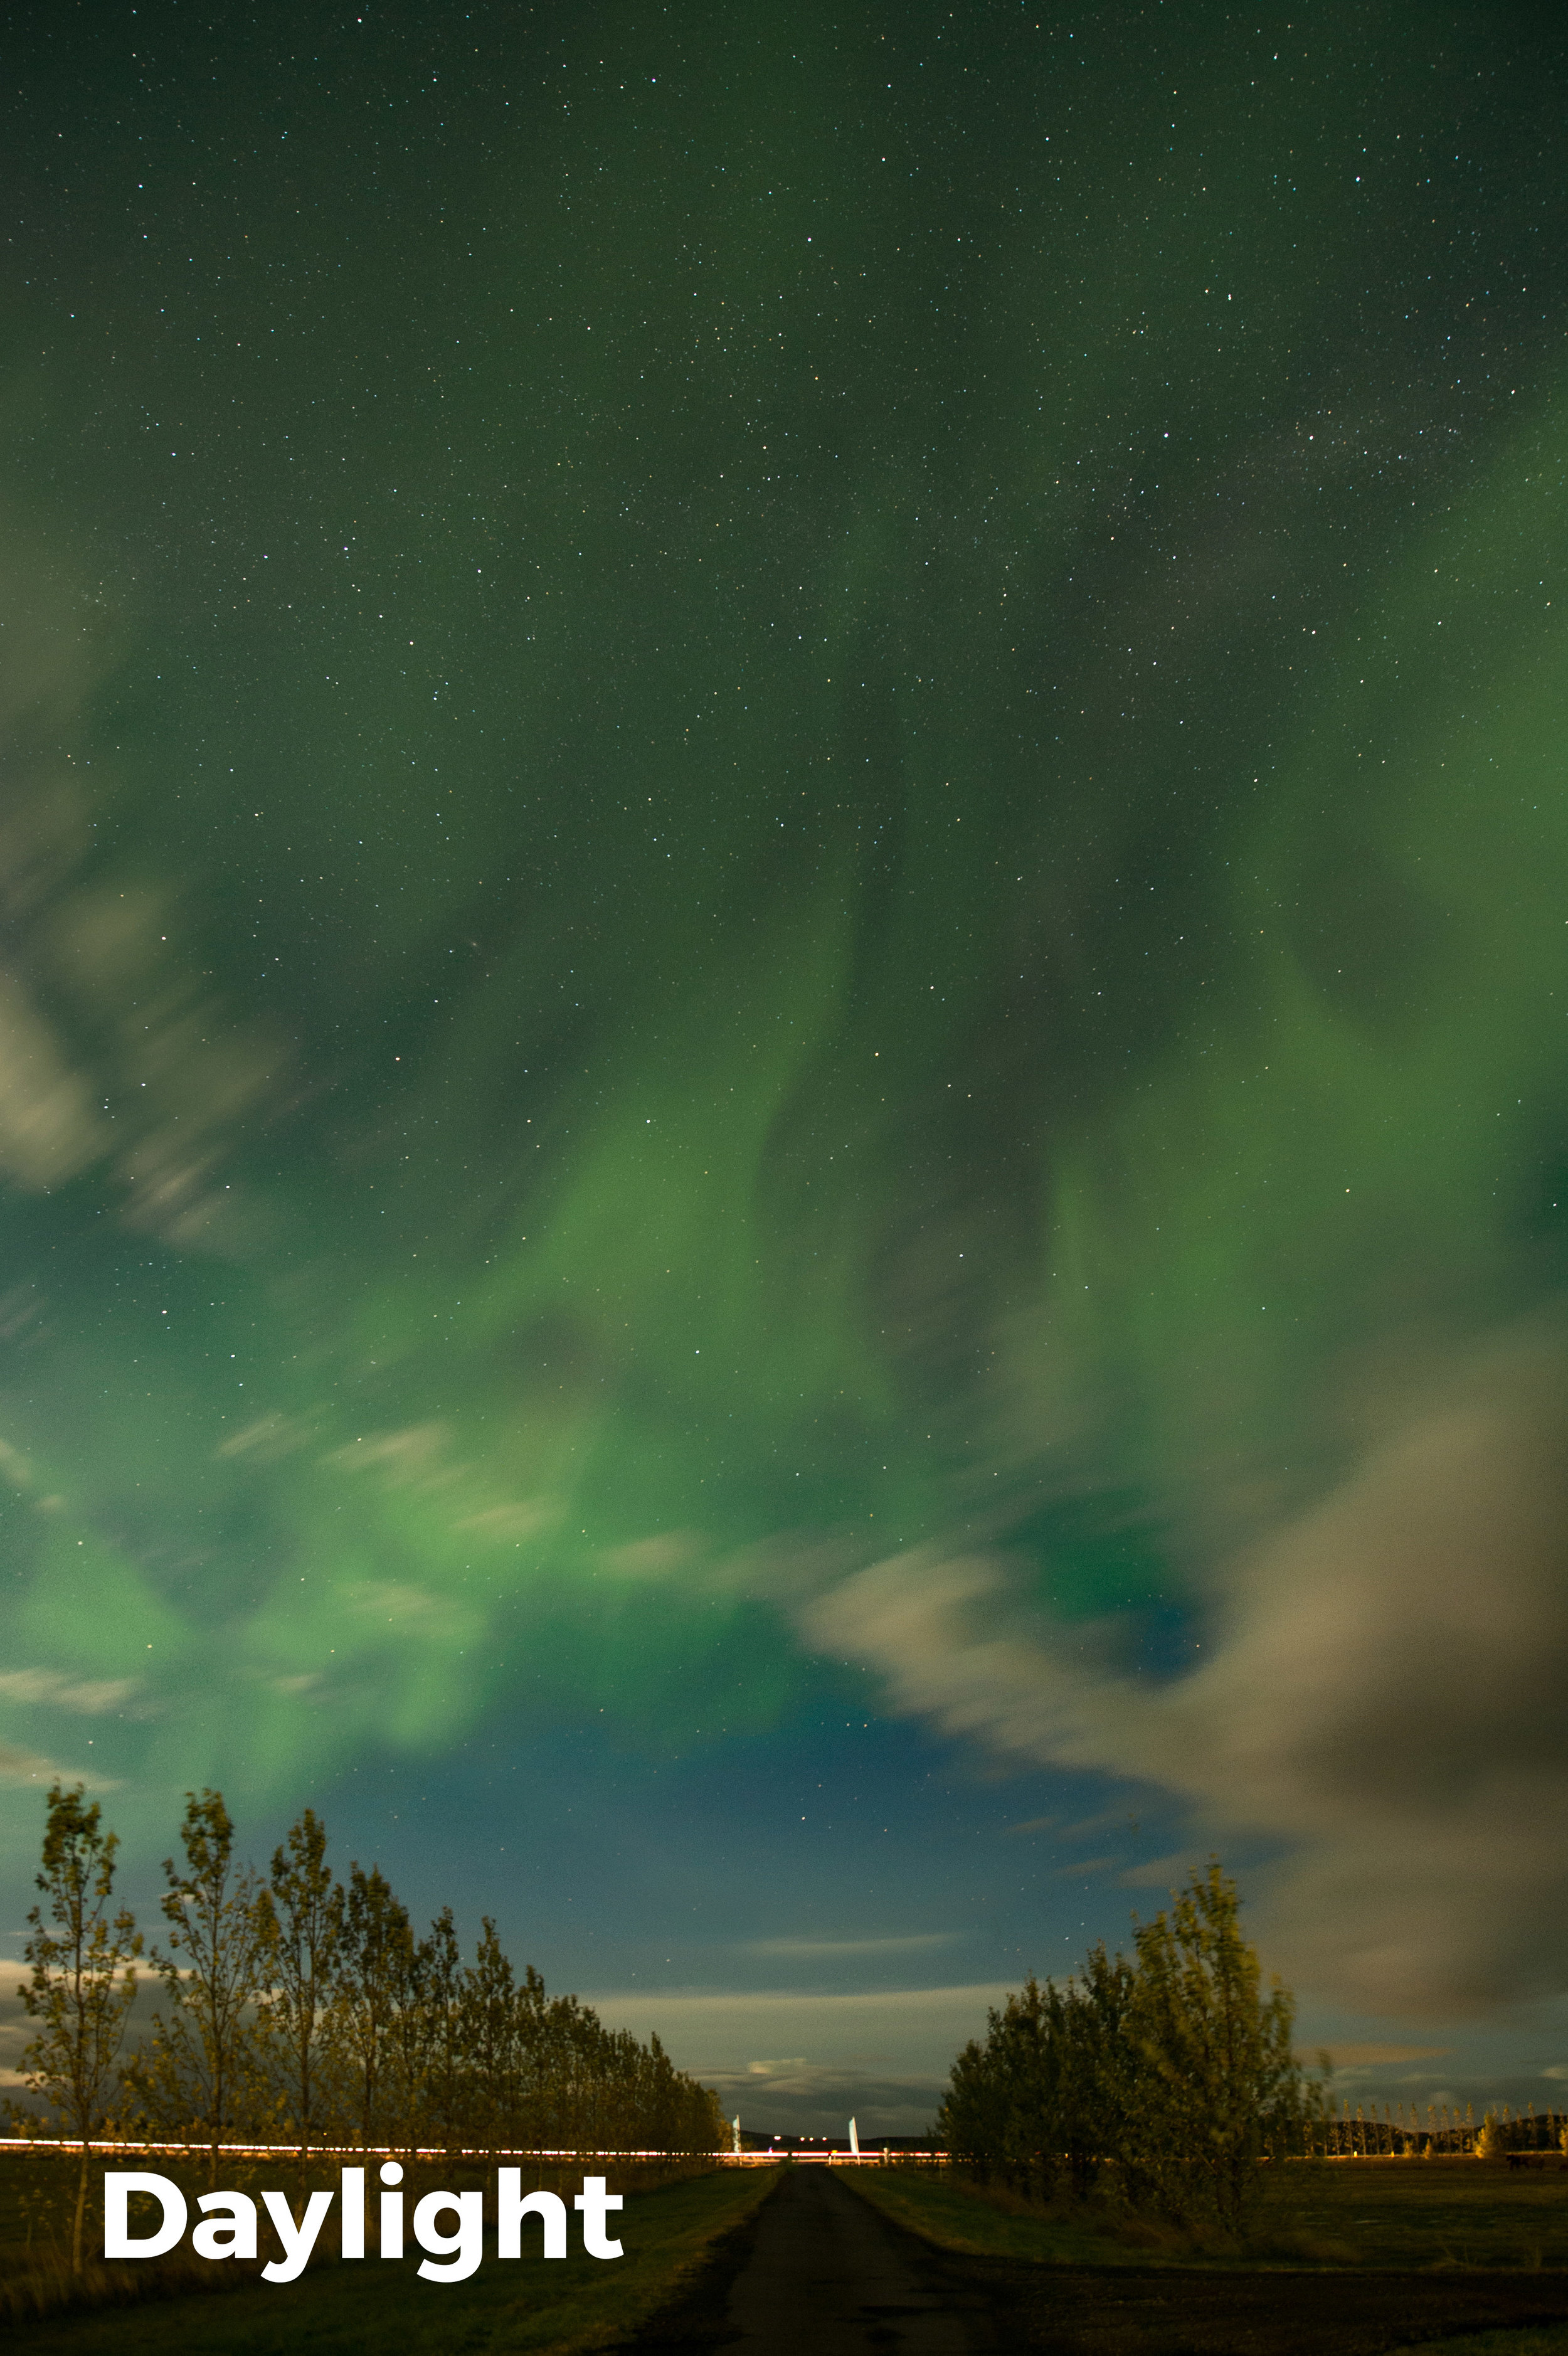
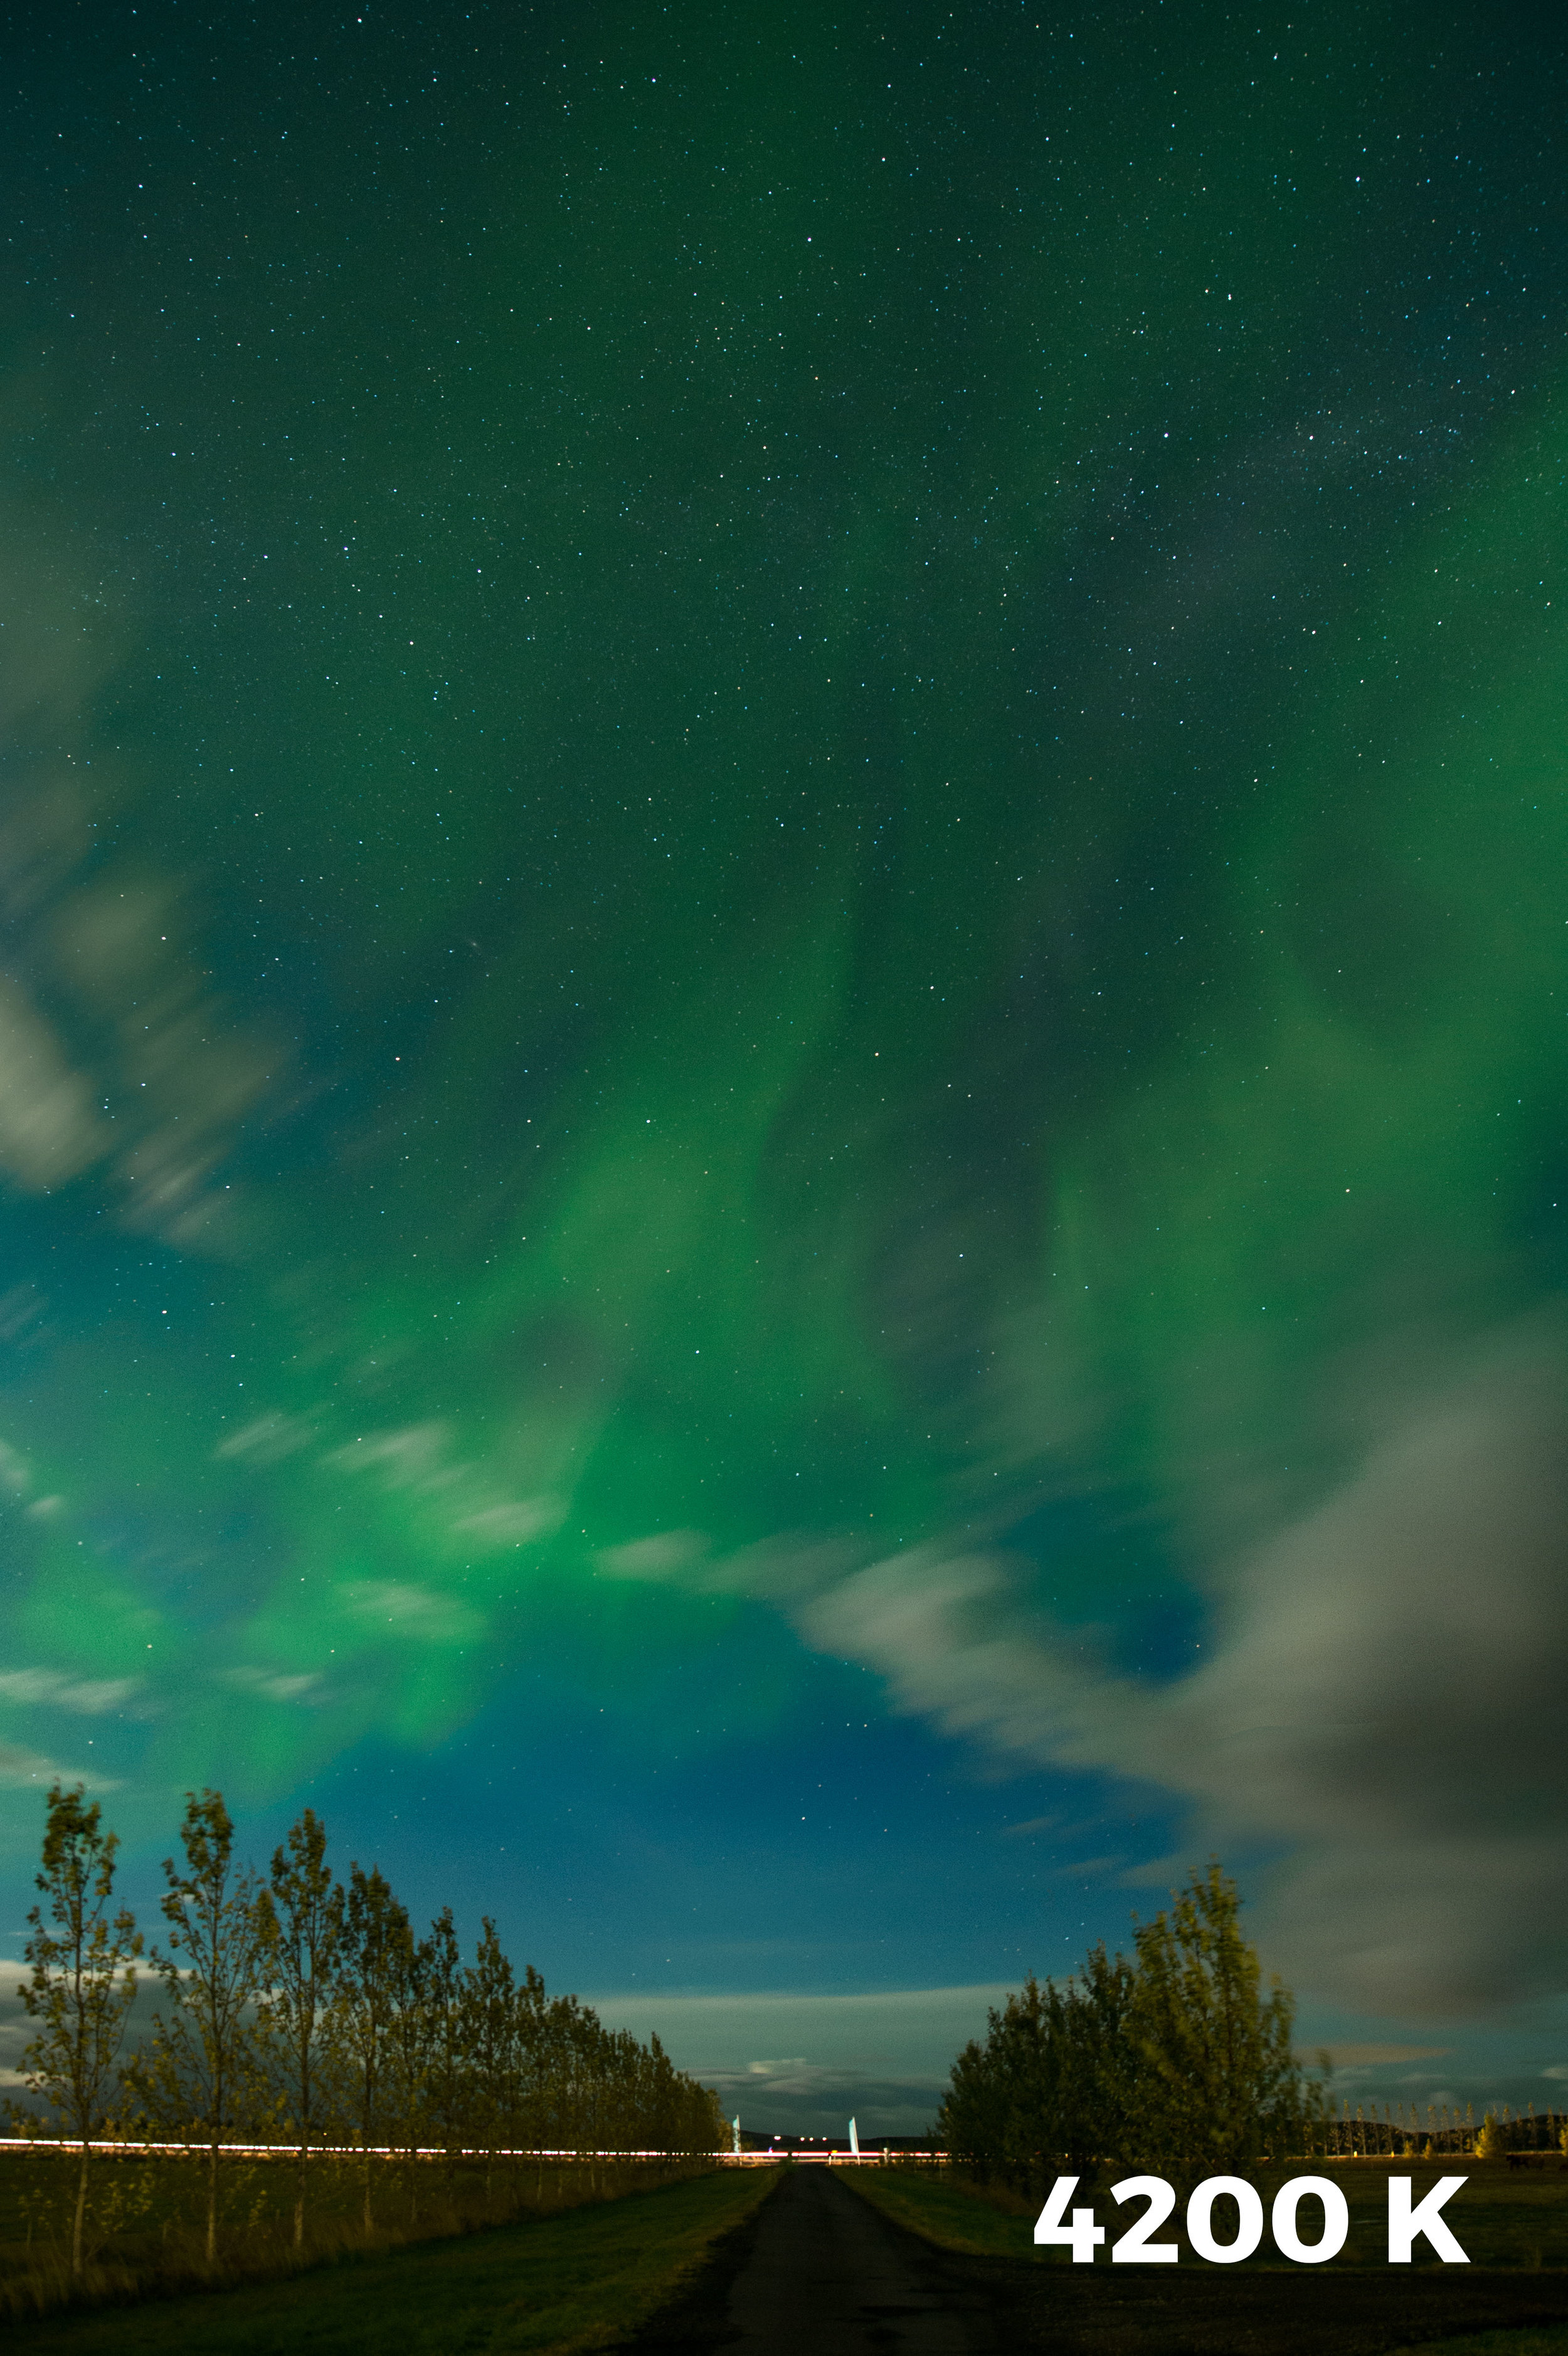
White balance can and should be set correctly for the initial capture. While it’s difficult to give an exact white balance setting for all situations, it’s safe to say that you’ll probably want to run a bit cooler than a typical Daylight (direct sun) setting. In the comparison below, the first image was made with a Daylight white balance, while the second was made at 4200 K. (Both images shot at 20 seconds, f/4, ISO 1600 with a 14mm lens.) Notice how the cooler white balance setting of 4200 K separates the color and makes the image feel more dynamic.

Experiment while out in the field to find the best look. If you find your images are too warm when back in Lightroom, slide the Temp slider toward the blue end.

7. Add Whites

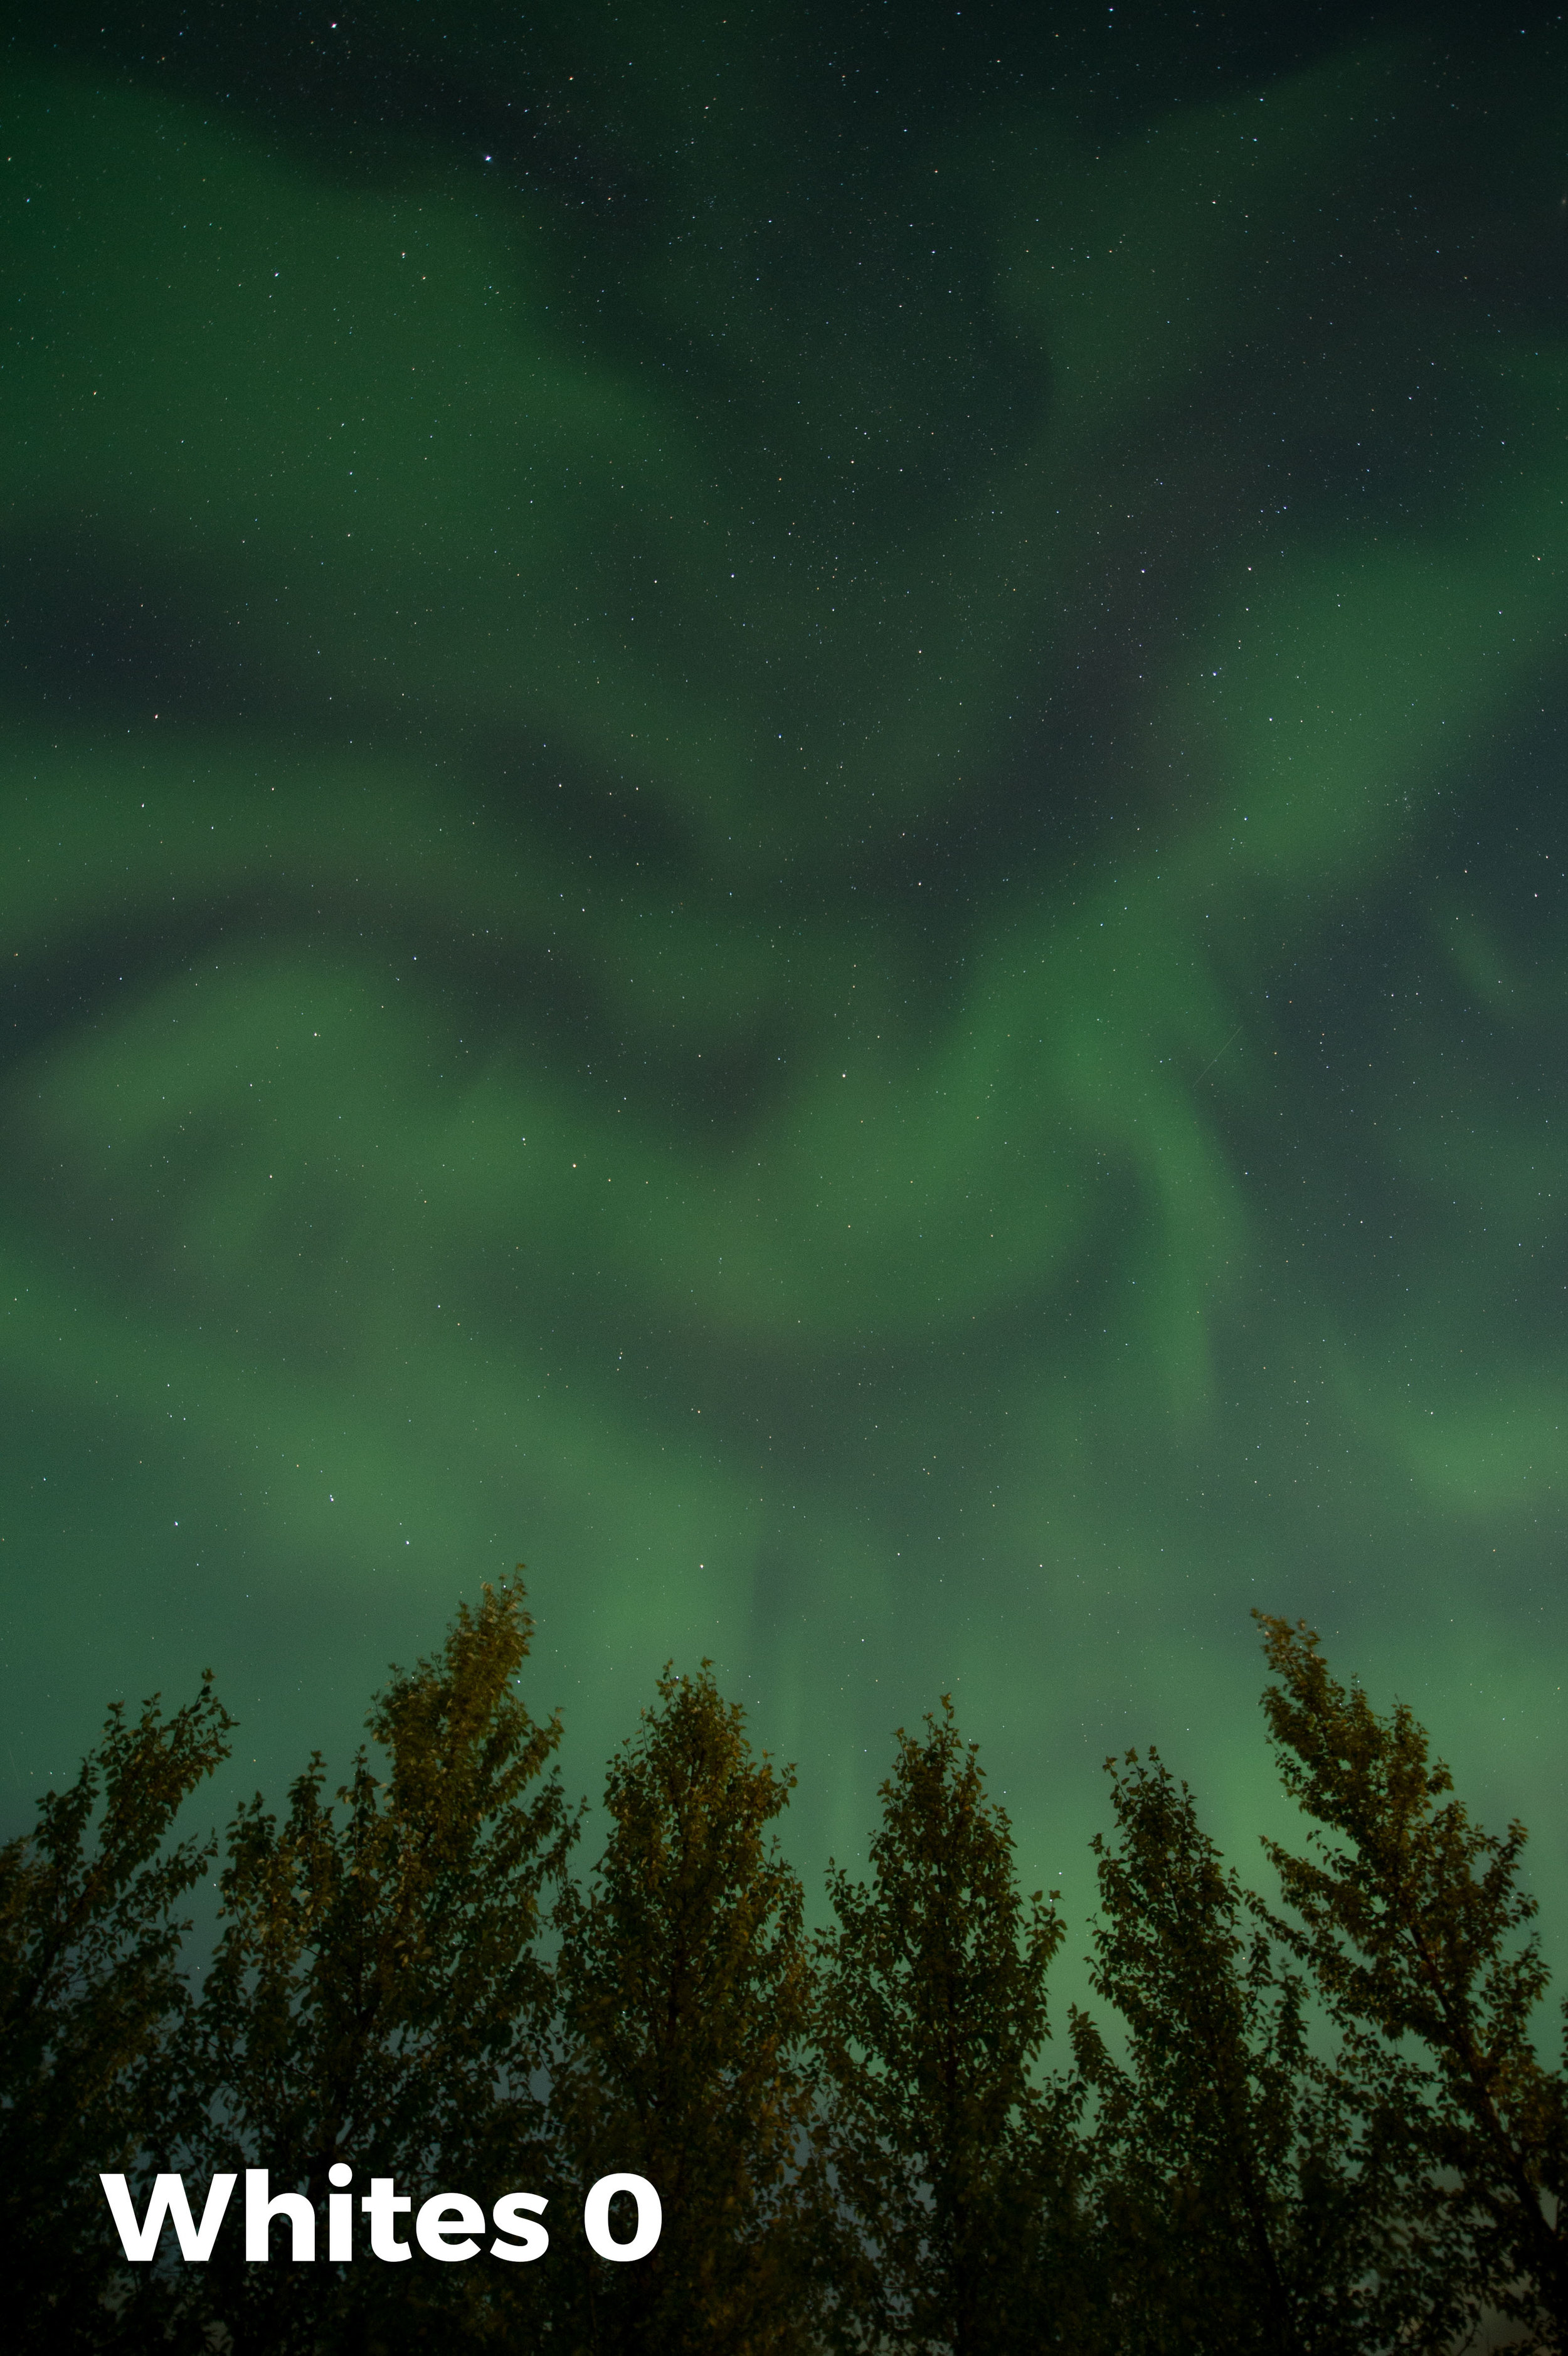
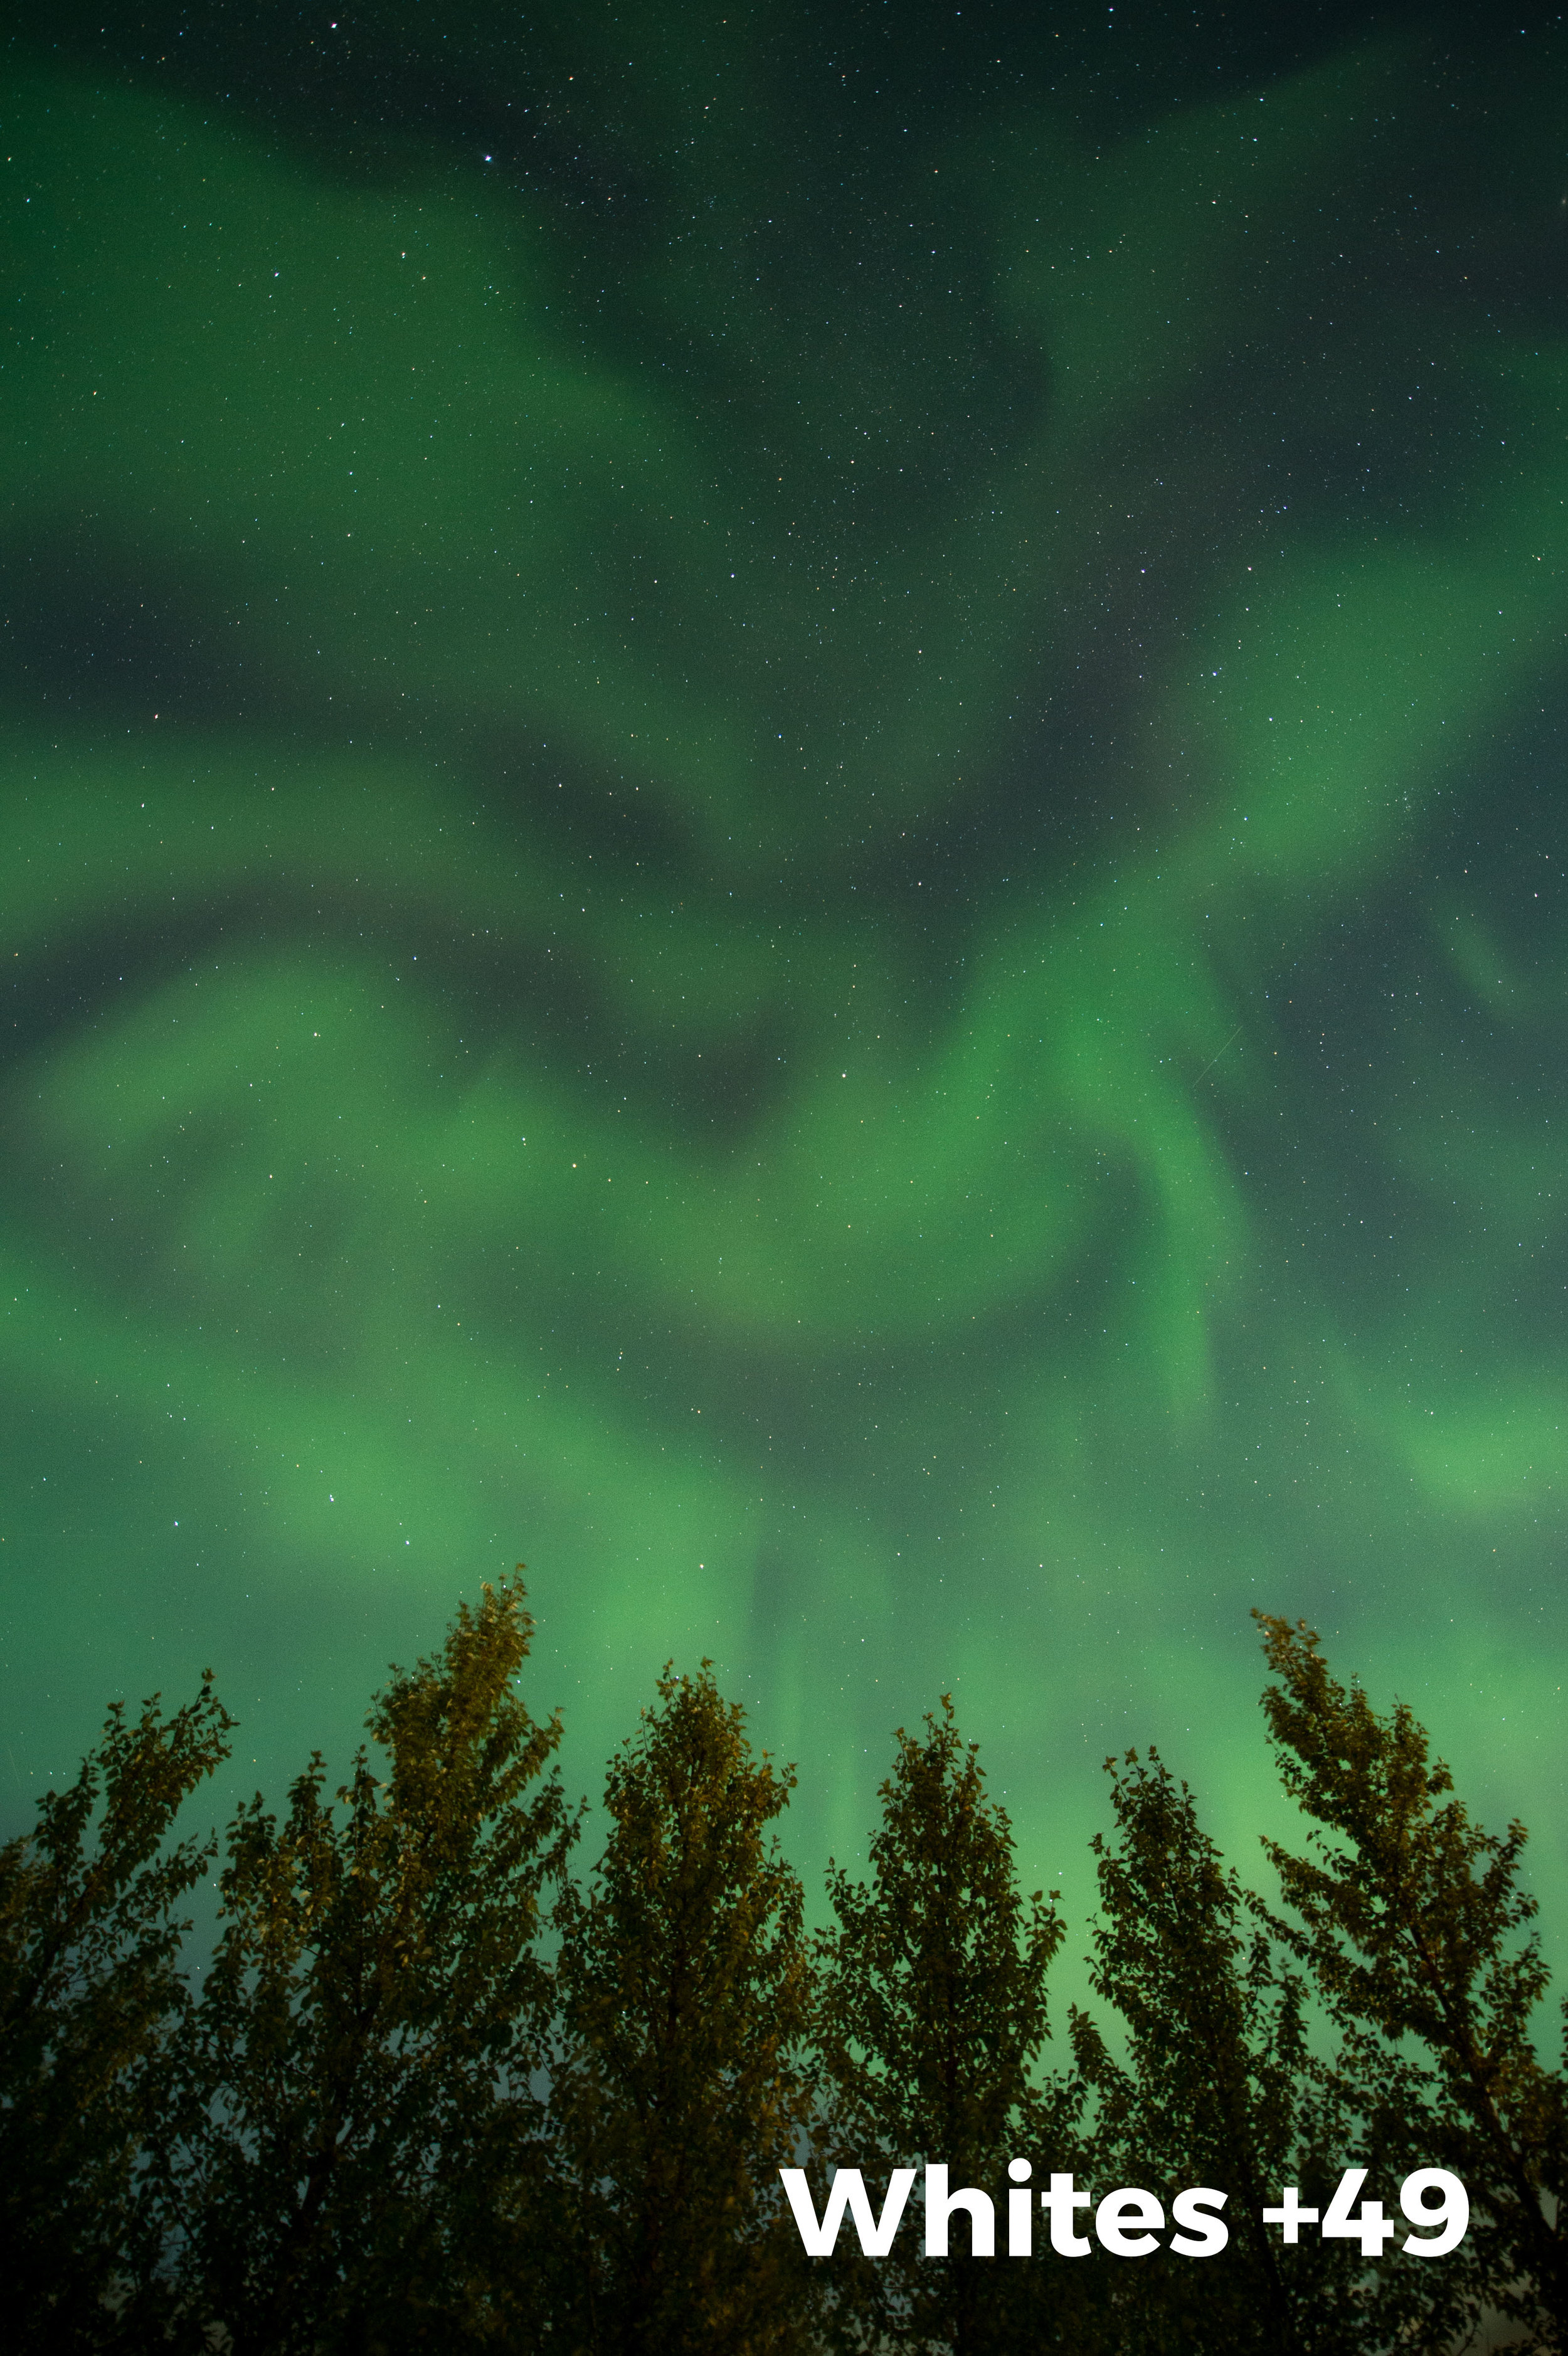
It would seem odd to address the Whites slider in Lightroom’s Basic panel while working aurora images, but it really works! This has to do with the underlying algorithm of the tool itself. Moving the slider to the right has the effect of increasing overall contrast, thereby adding more snap and pop to your images. In the comparison below, the first image (10 seconds, f/2.8, ISO 1600 with a 14mm lens) is as shot, while the second has been adjusted in Lightroom with Whites at +49, and therefore has more pop.

8. Add Dehaze

The Dehaze slider is the night photographer’s secret weapon. It increases contrast and saturation in the low-contrast portions of the image. Be careful here. This slider can be seductive. Adding too much can make your image look really fake. Start slow and add small increments at a time. Continue to compare your adjustments with the original by clicking on the before-and-after view (circled below).

We hope some of these tips will help make your aurora photographs even more stellar!

Are there any tips or techniques you’d like to share? How about some amazing aurora images? Feel free to post in the Comments section below!

Tim Cooper is a partner and workshop leader with National Parks at Night. Learn more techniques from his book The Magic of Light Painting, available from Peachpit.

UPCOMING WORKSHOPS FROM NATIONAL PARKS AT NIGHT

How to Choose the Right White Balance for Night Skies

TIP: If you're reading this via email, try using a Web Browser for the best experience.


What do you do when you want just that perfect night sky?

  1. Know your light sources and their color temperatures (in Kelvin). See below.

  2. Know the feeling you want to evoke in the viewer.

  3. Set the white balance on your camera manually.

  4. Shoot RAW. 

  5. Process to taste later if the photo doesn't really match your expectations.

With a little knowledge in-hand, you can shoot it right, in-camera. Keep in mind, I'm not going to offer some dogma about the "right" settings. It's not that simple. There are no rules. But a little knowledge goes a long way. So let's get on with it.

Here is a cheat sheet on understanding Kelvin:

Temperature Source
1700 K Match flame, low pressure sodium lamps (LPS/SOX)
1850 K Candle flame, sunset/sunrise
2400 K Standard incandescent lamps
2550 K Soft white incandescent lamps
2700 K Soft white compact fluorescent and LED lamps
3000 K Warm white compact fluorescent and LED lamps
3200 K Studio lamps, photofloods, etc.
3350 K Studio "CP" light
4100-4150 K Moonlight
5000 K Horizon daylight
Tubular fluorescent lamps or cool white/ daylight compact fluorescent lamps (CFL)
5500-6000 K Vertical daylight, electronic flash
6200 K Xenon short-arc lamp
6500 K Daylight, overcast
6500-9500 K LCD or CRT screen
15000-27000 K Clear blue poleward sky

* These temperatures are merely characteristic; there may be considerable variation.
Source: Wikipedia
 

If you set your camera to 5500 K (Daylight), you'd see any light source mentioned in the chart above rendered in colors similar to what is shown in the first column. If you want a warm light to be warm, or a cool light to be cool, play it safe and shoot at the Daylight setting.

If you set your camera's white balance to 3200 K and you have a tungsten light source in your scene (or you're illuminating it), it will render as neutral. Read on for more about this.

Make it look cool like the night

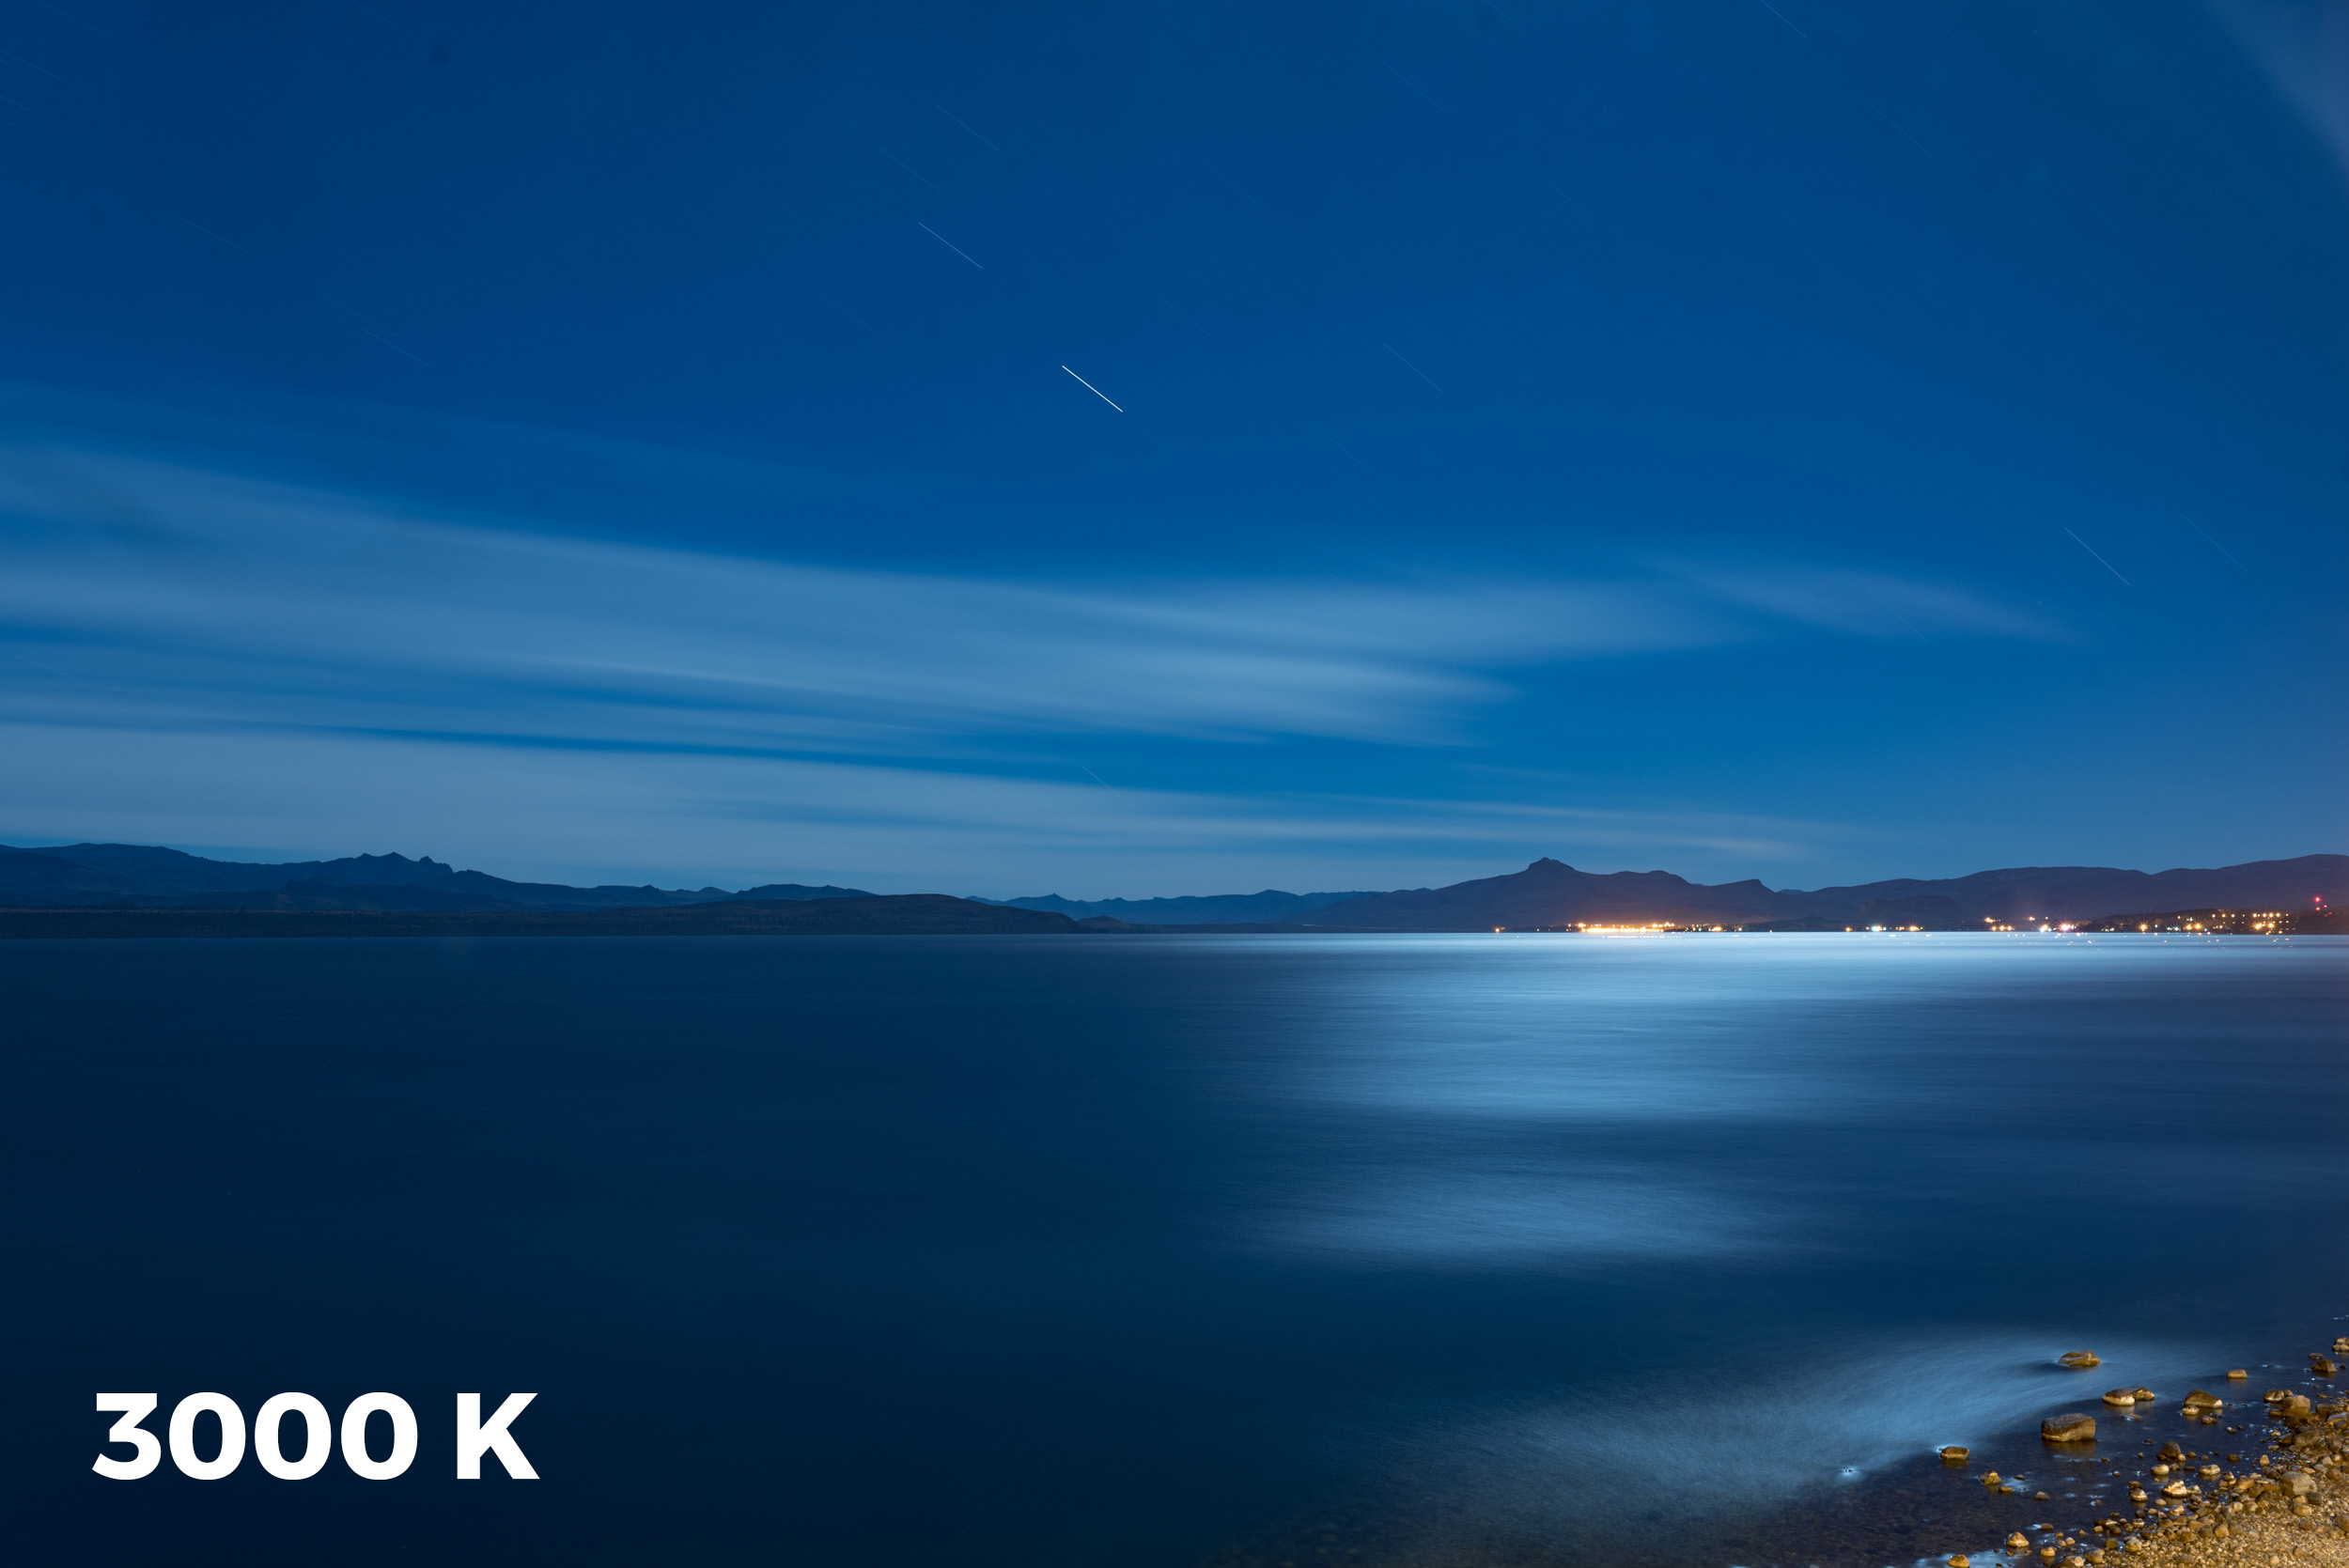
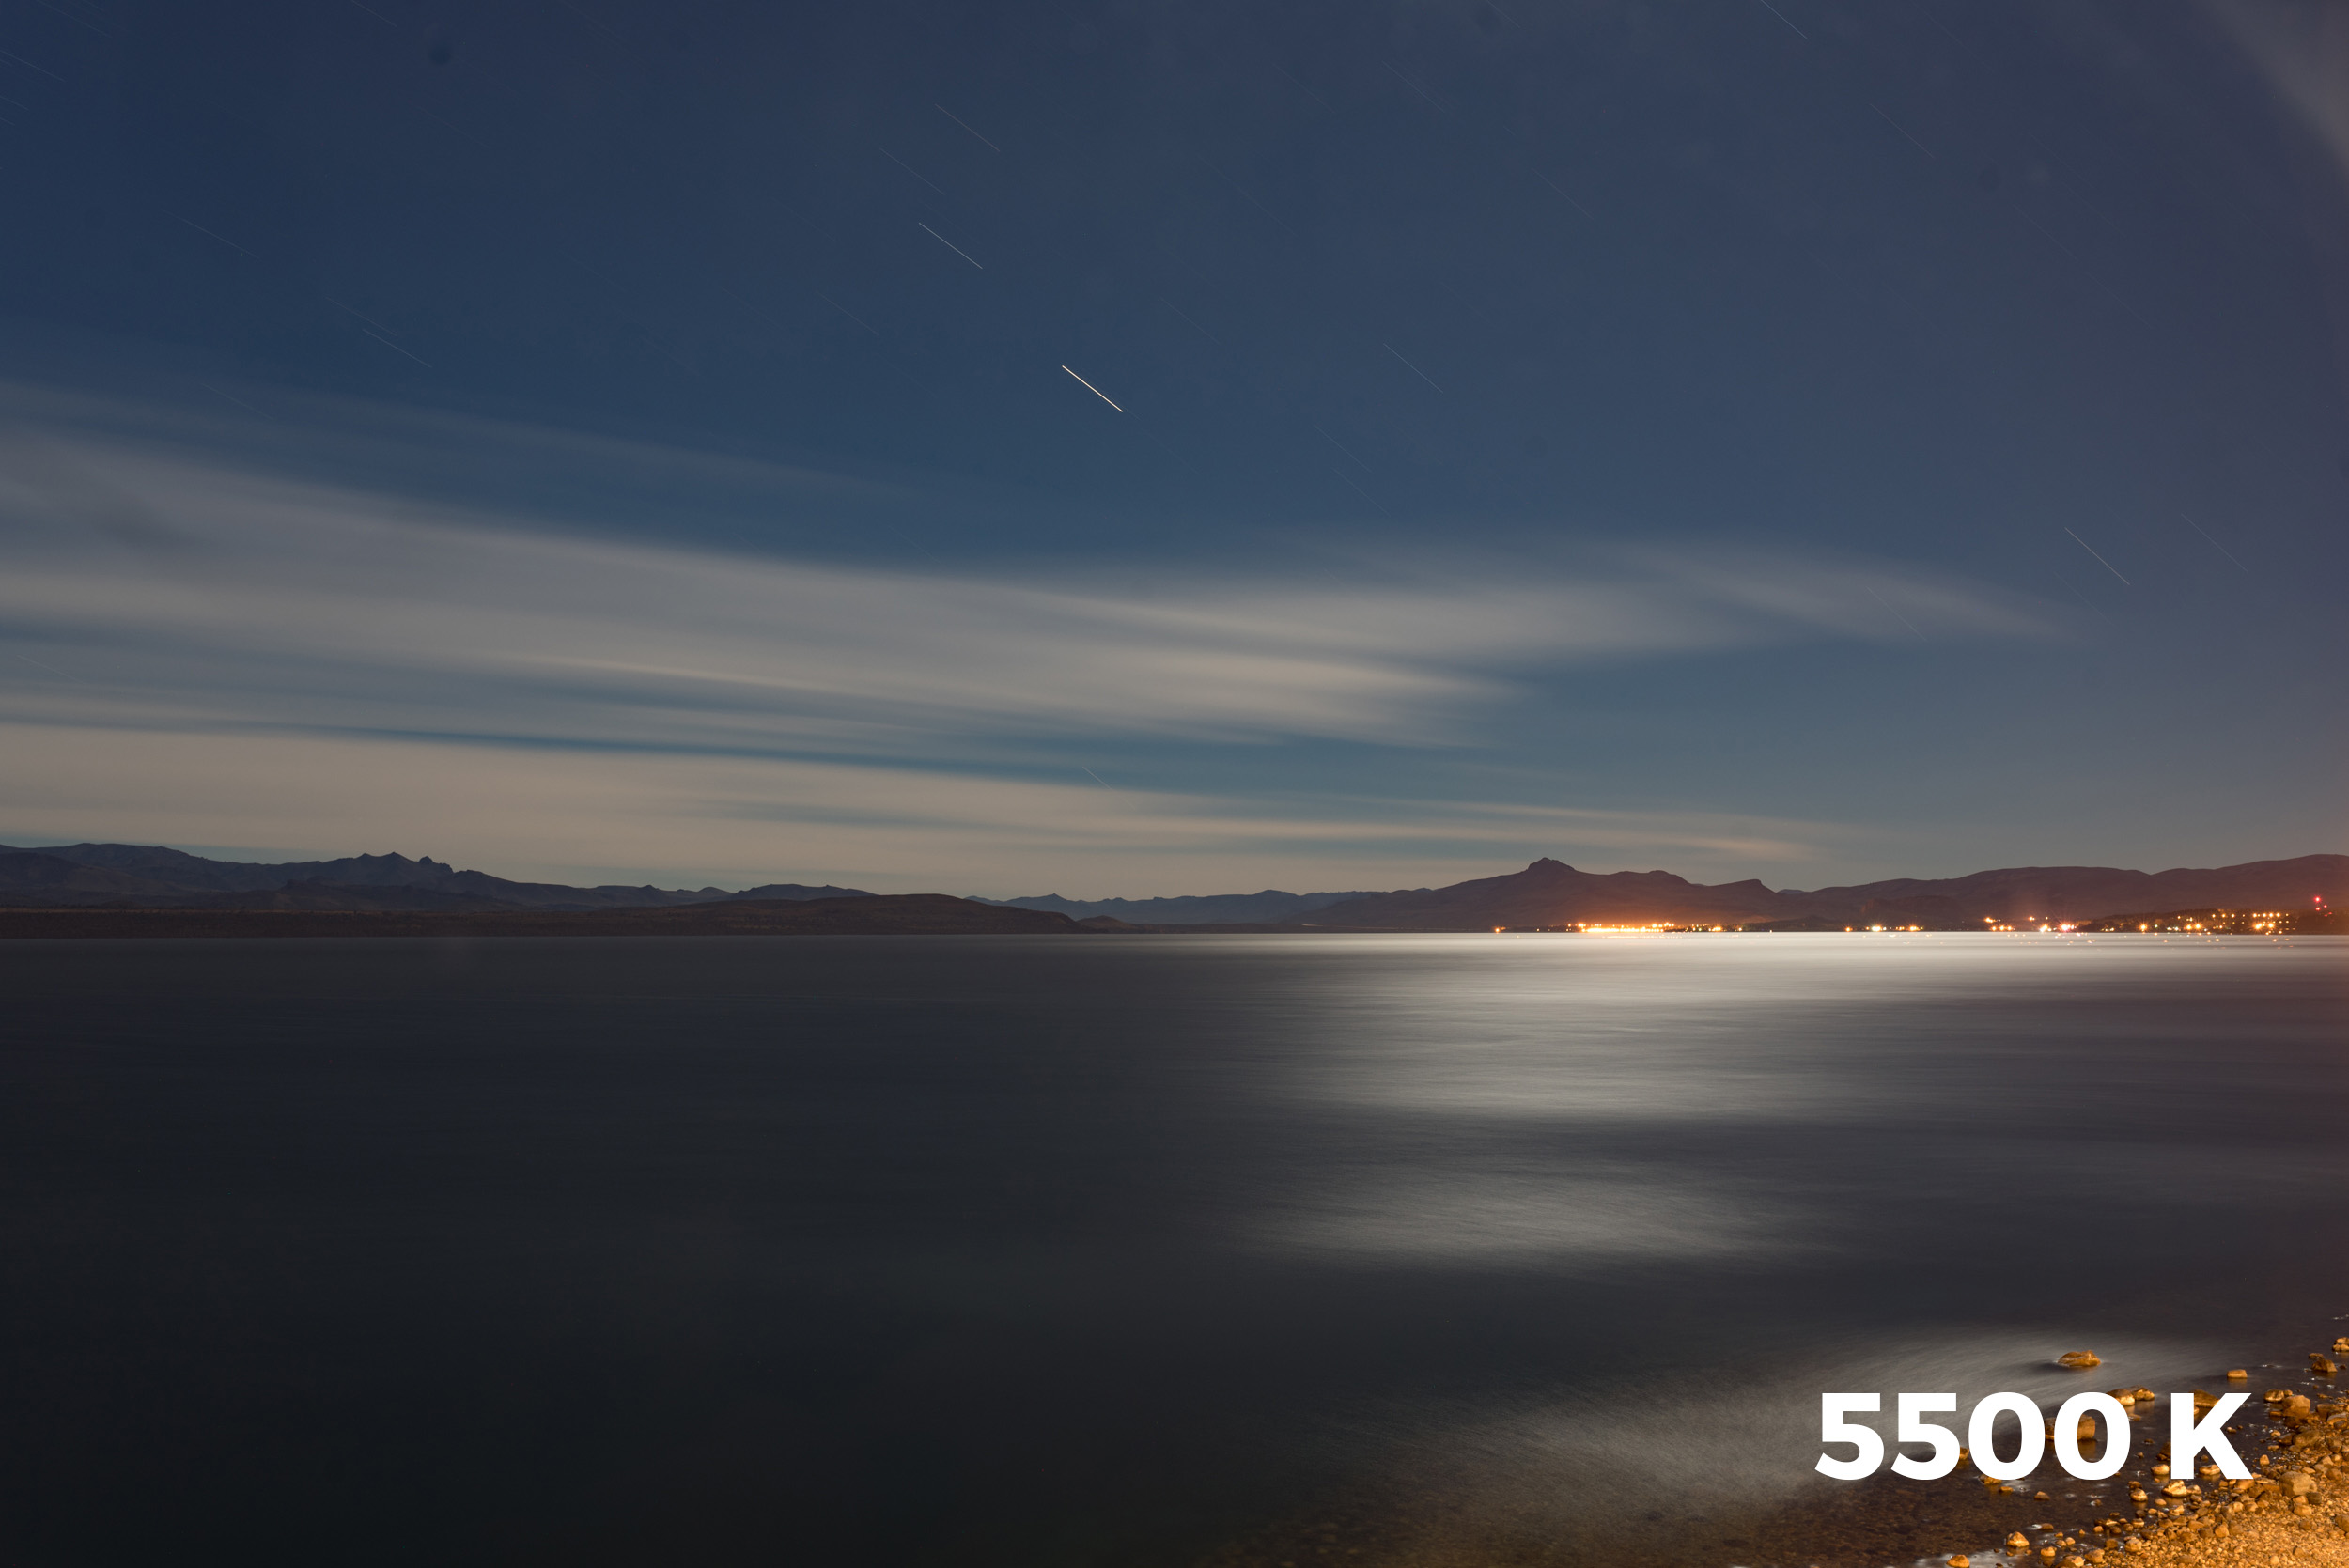
In the above comparison (shot at Nahuel Huapi National Park in Barlichoe, Argentina), the very cool 3000 K white balance in full moonlight (left) makes it look distinctly like a night photograph, but a neutral 5500 K white balance (right) looks dull and lacks emotional qualities.

This works well when you're away from city lights. There were some sodium vapor lights in the above image that added an orange glow, but when I shot at 3000 K, the glow was much less noticeable.

Set it to Tungsten (3200 K)

If the above is too radical for your image, shoot at 3200 K or the Tungsten/Incandescent setting. This works well with moonlight, which is really just sunlight bouncing off a big, grey rock in space. So by choosing a cooler setting for "daylight at night," you'll be accessing that visual knowledge we all have of how the night should look to us. But did you know we can't see colors so well at night and we bias toward blue?

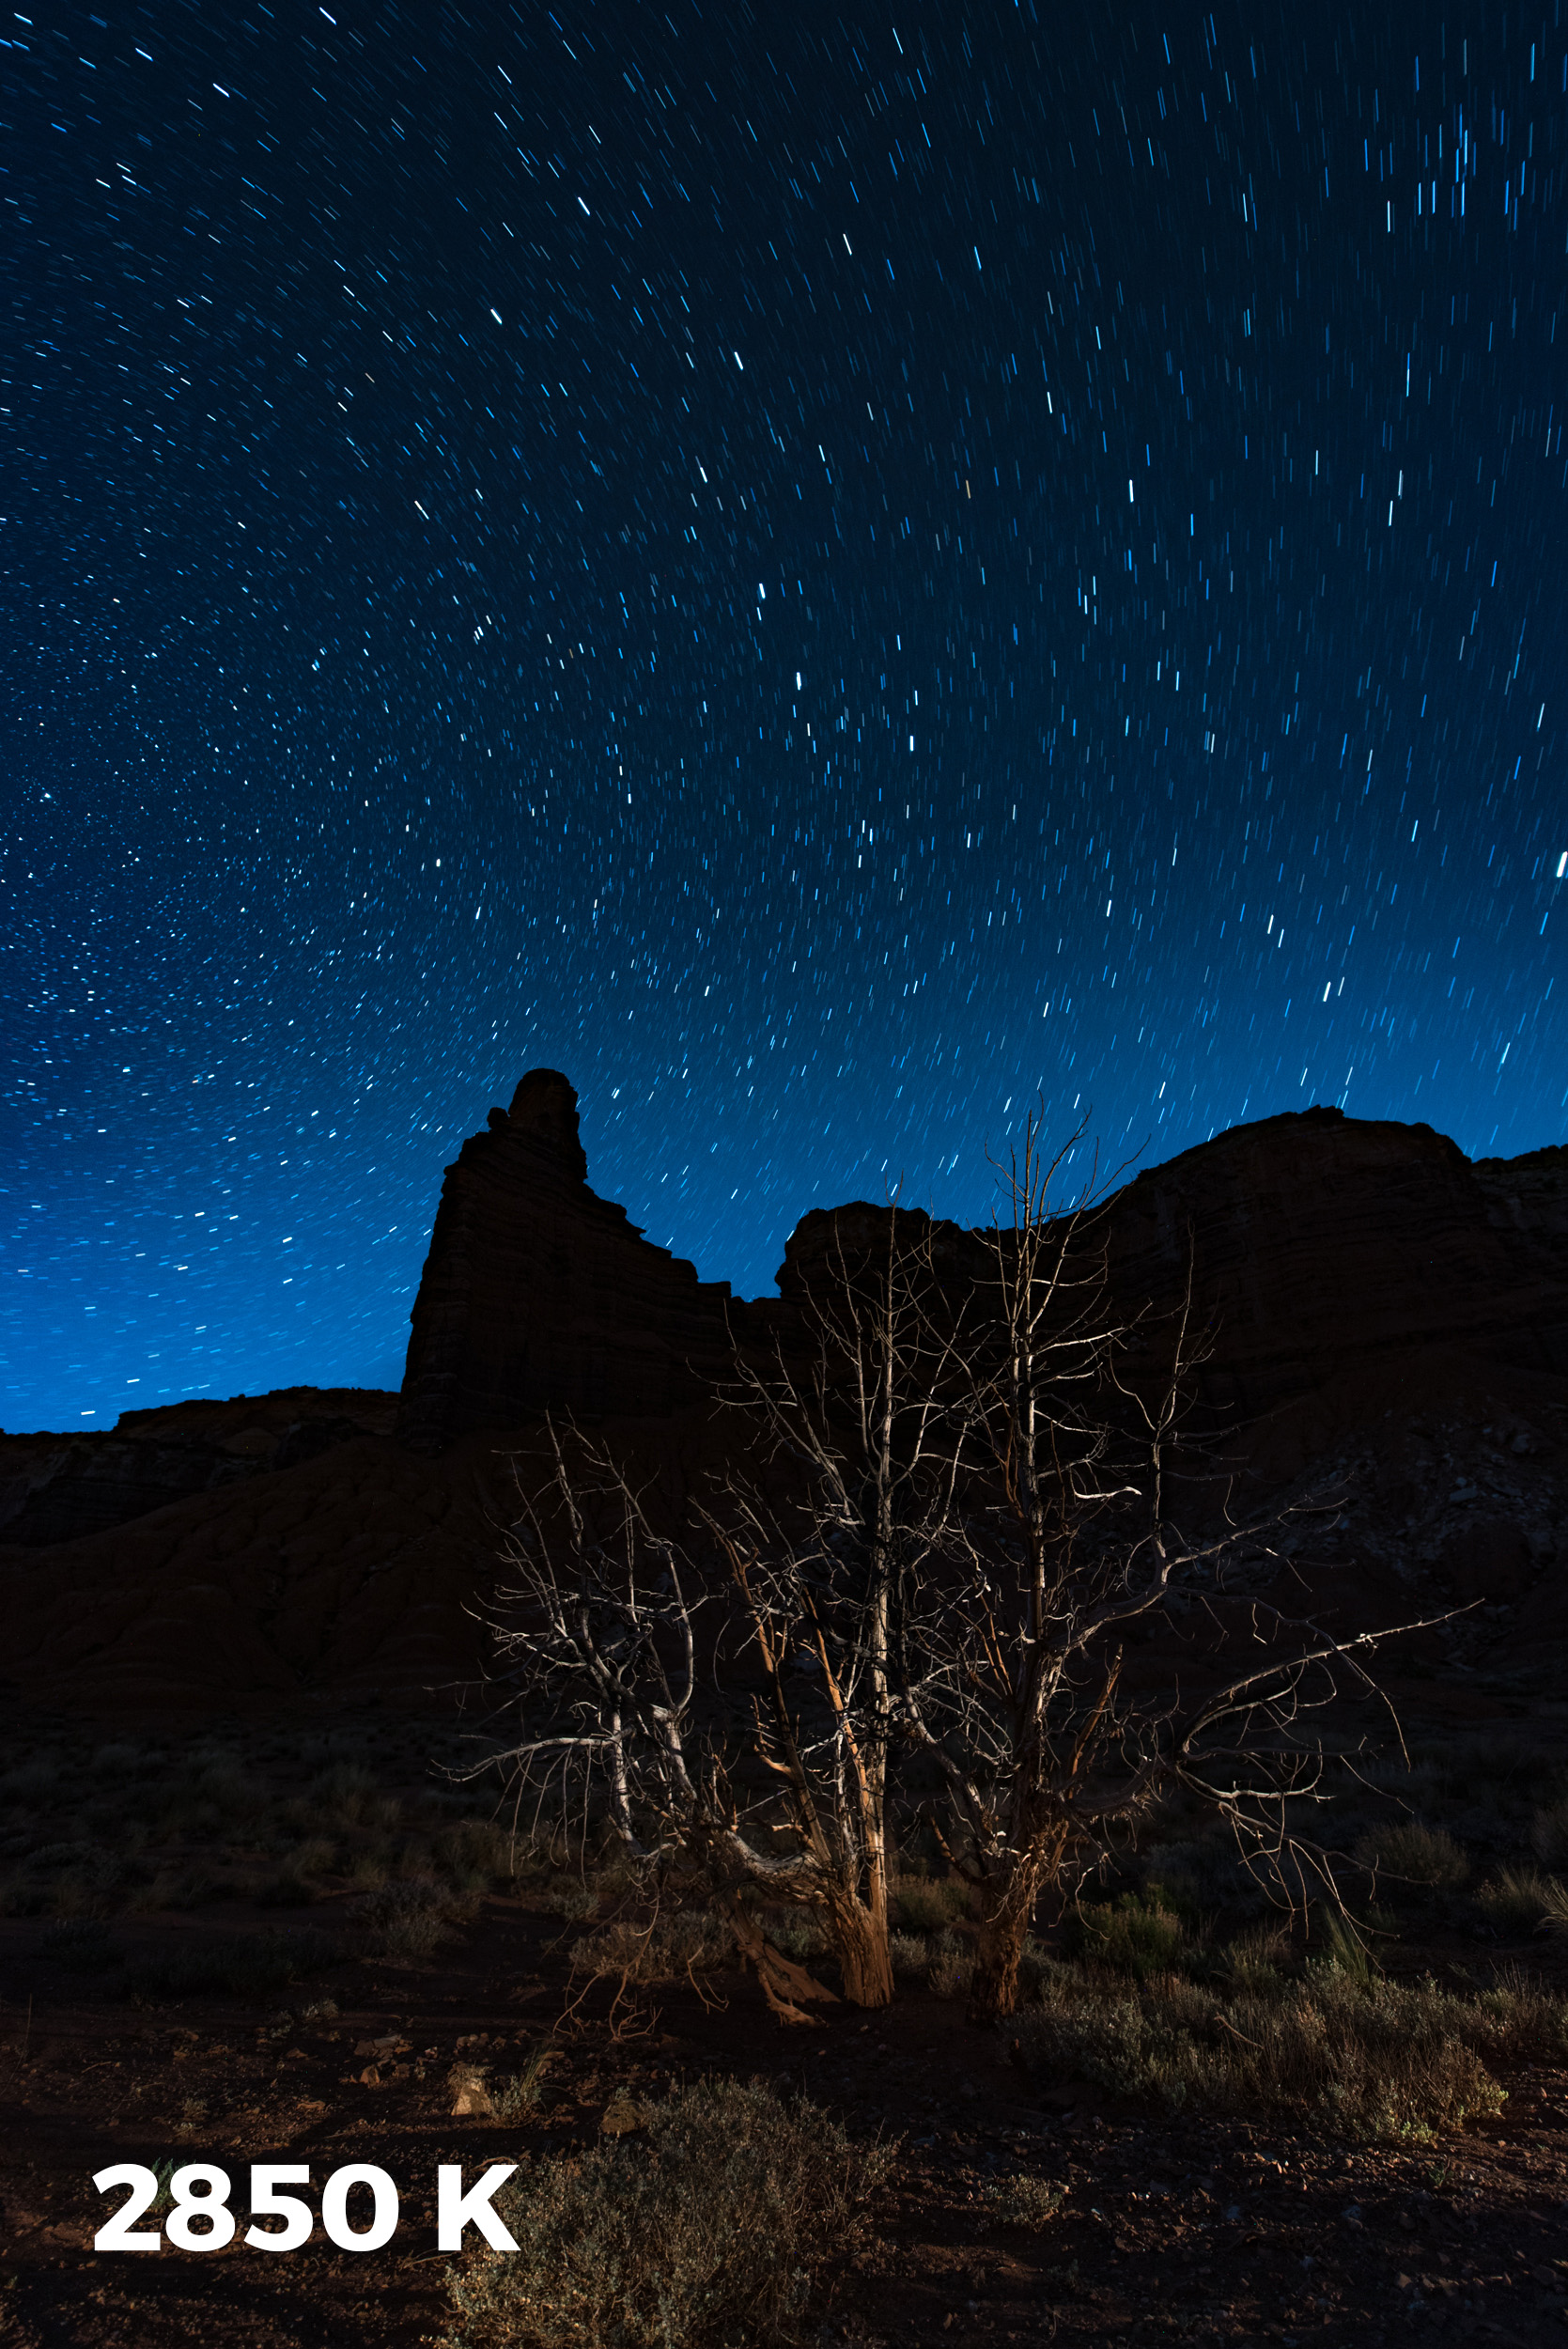
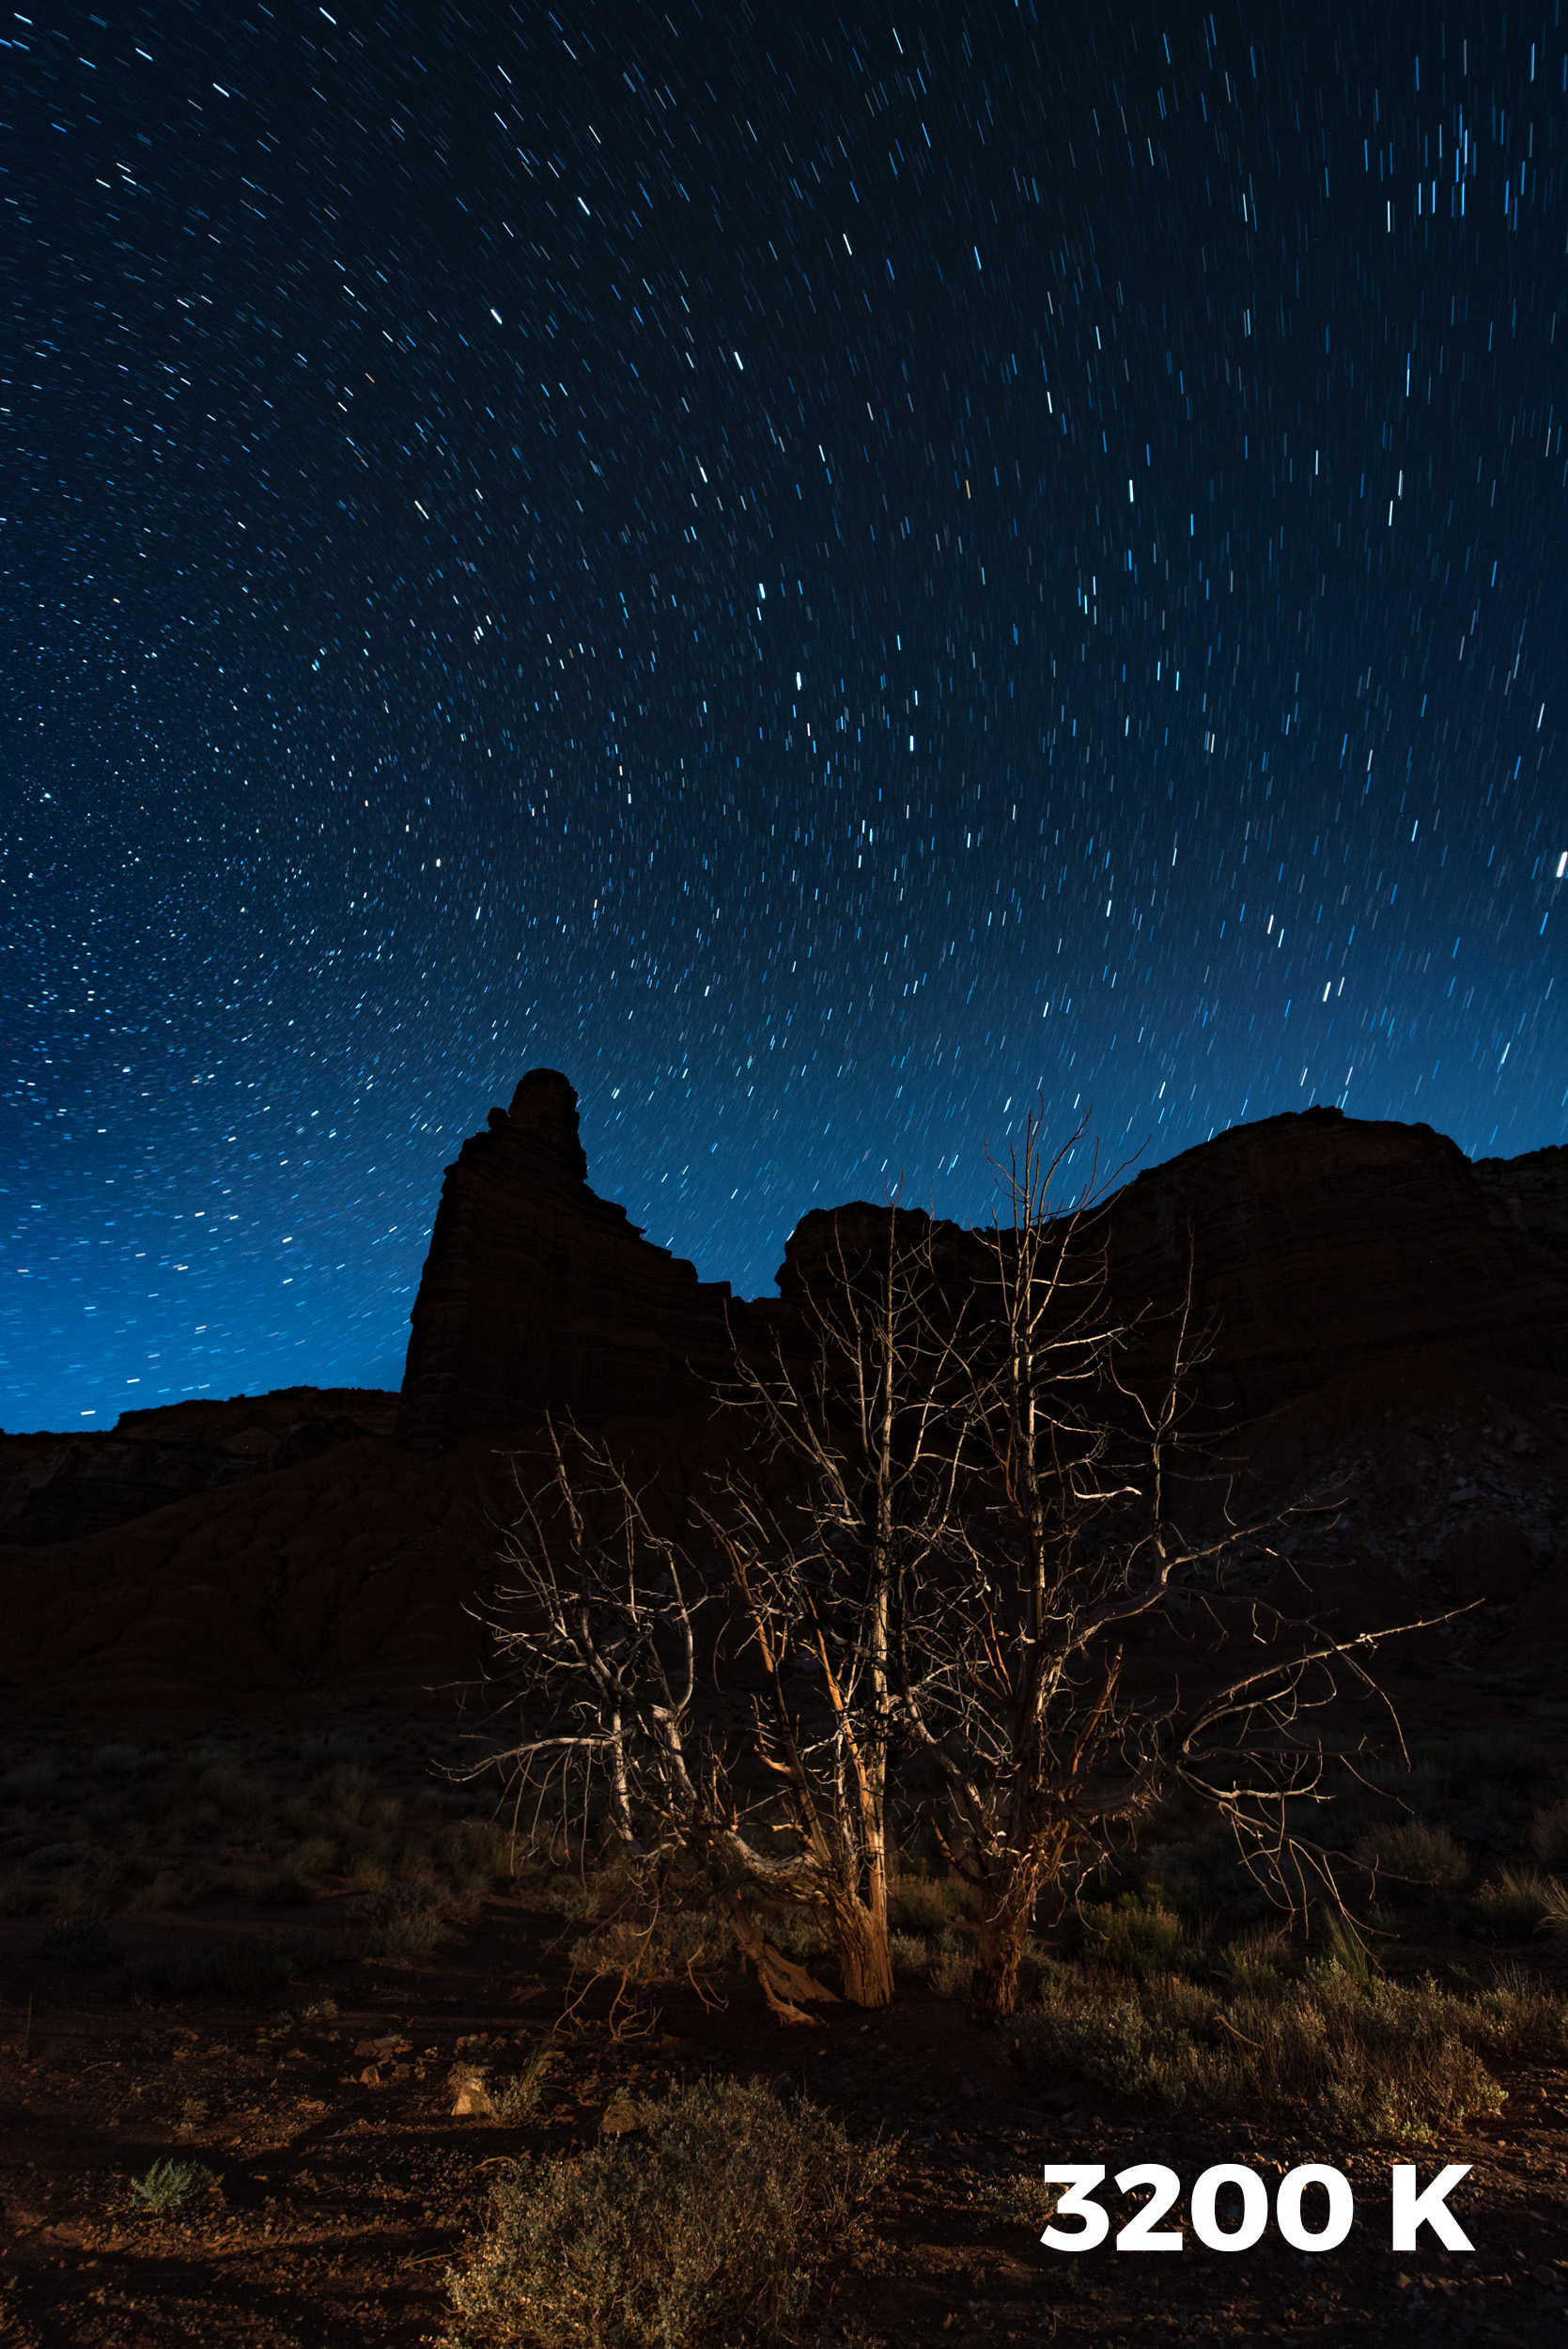
It's worth noting that Adobe Lightroom's native Tungsten setting is 2850 K, not 3200 K. Check out the subtle difference it makes in this photo from Capitol Reef National Park.:

Personally, I like the skies in the 2850 K shot better (left), but the foreground in the 3200 K better (right). Adding a color temperature gradient to slightly cool the sky would solve that in post-processing.

Shooting in Urban/Suburban areas

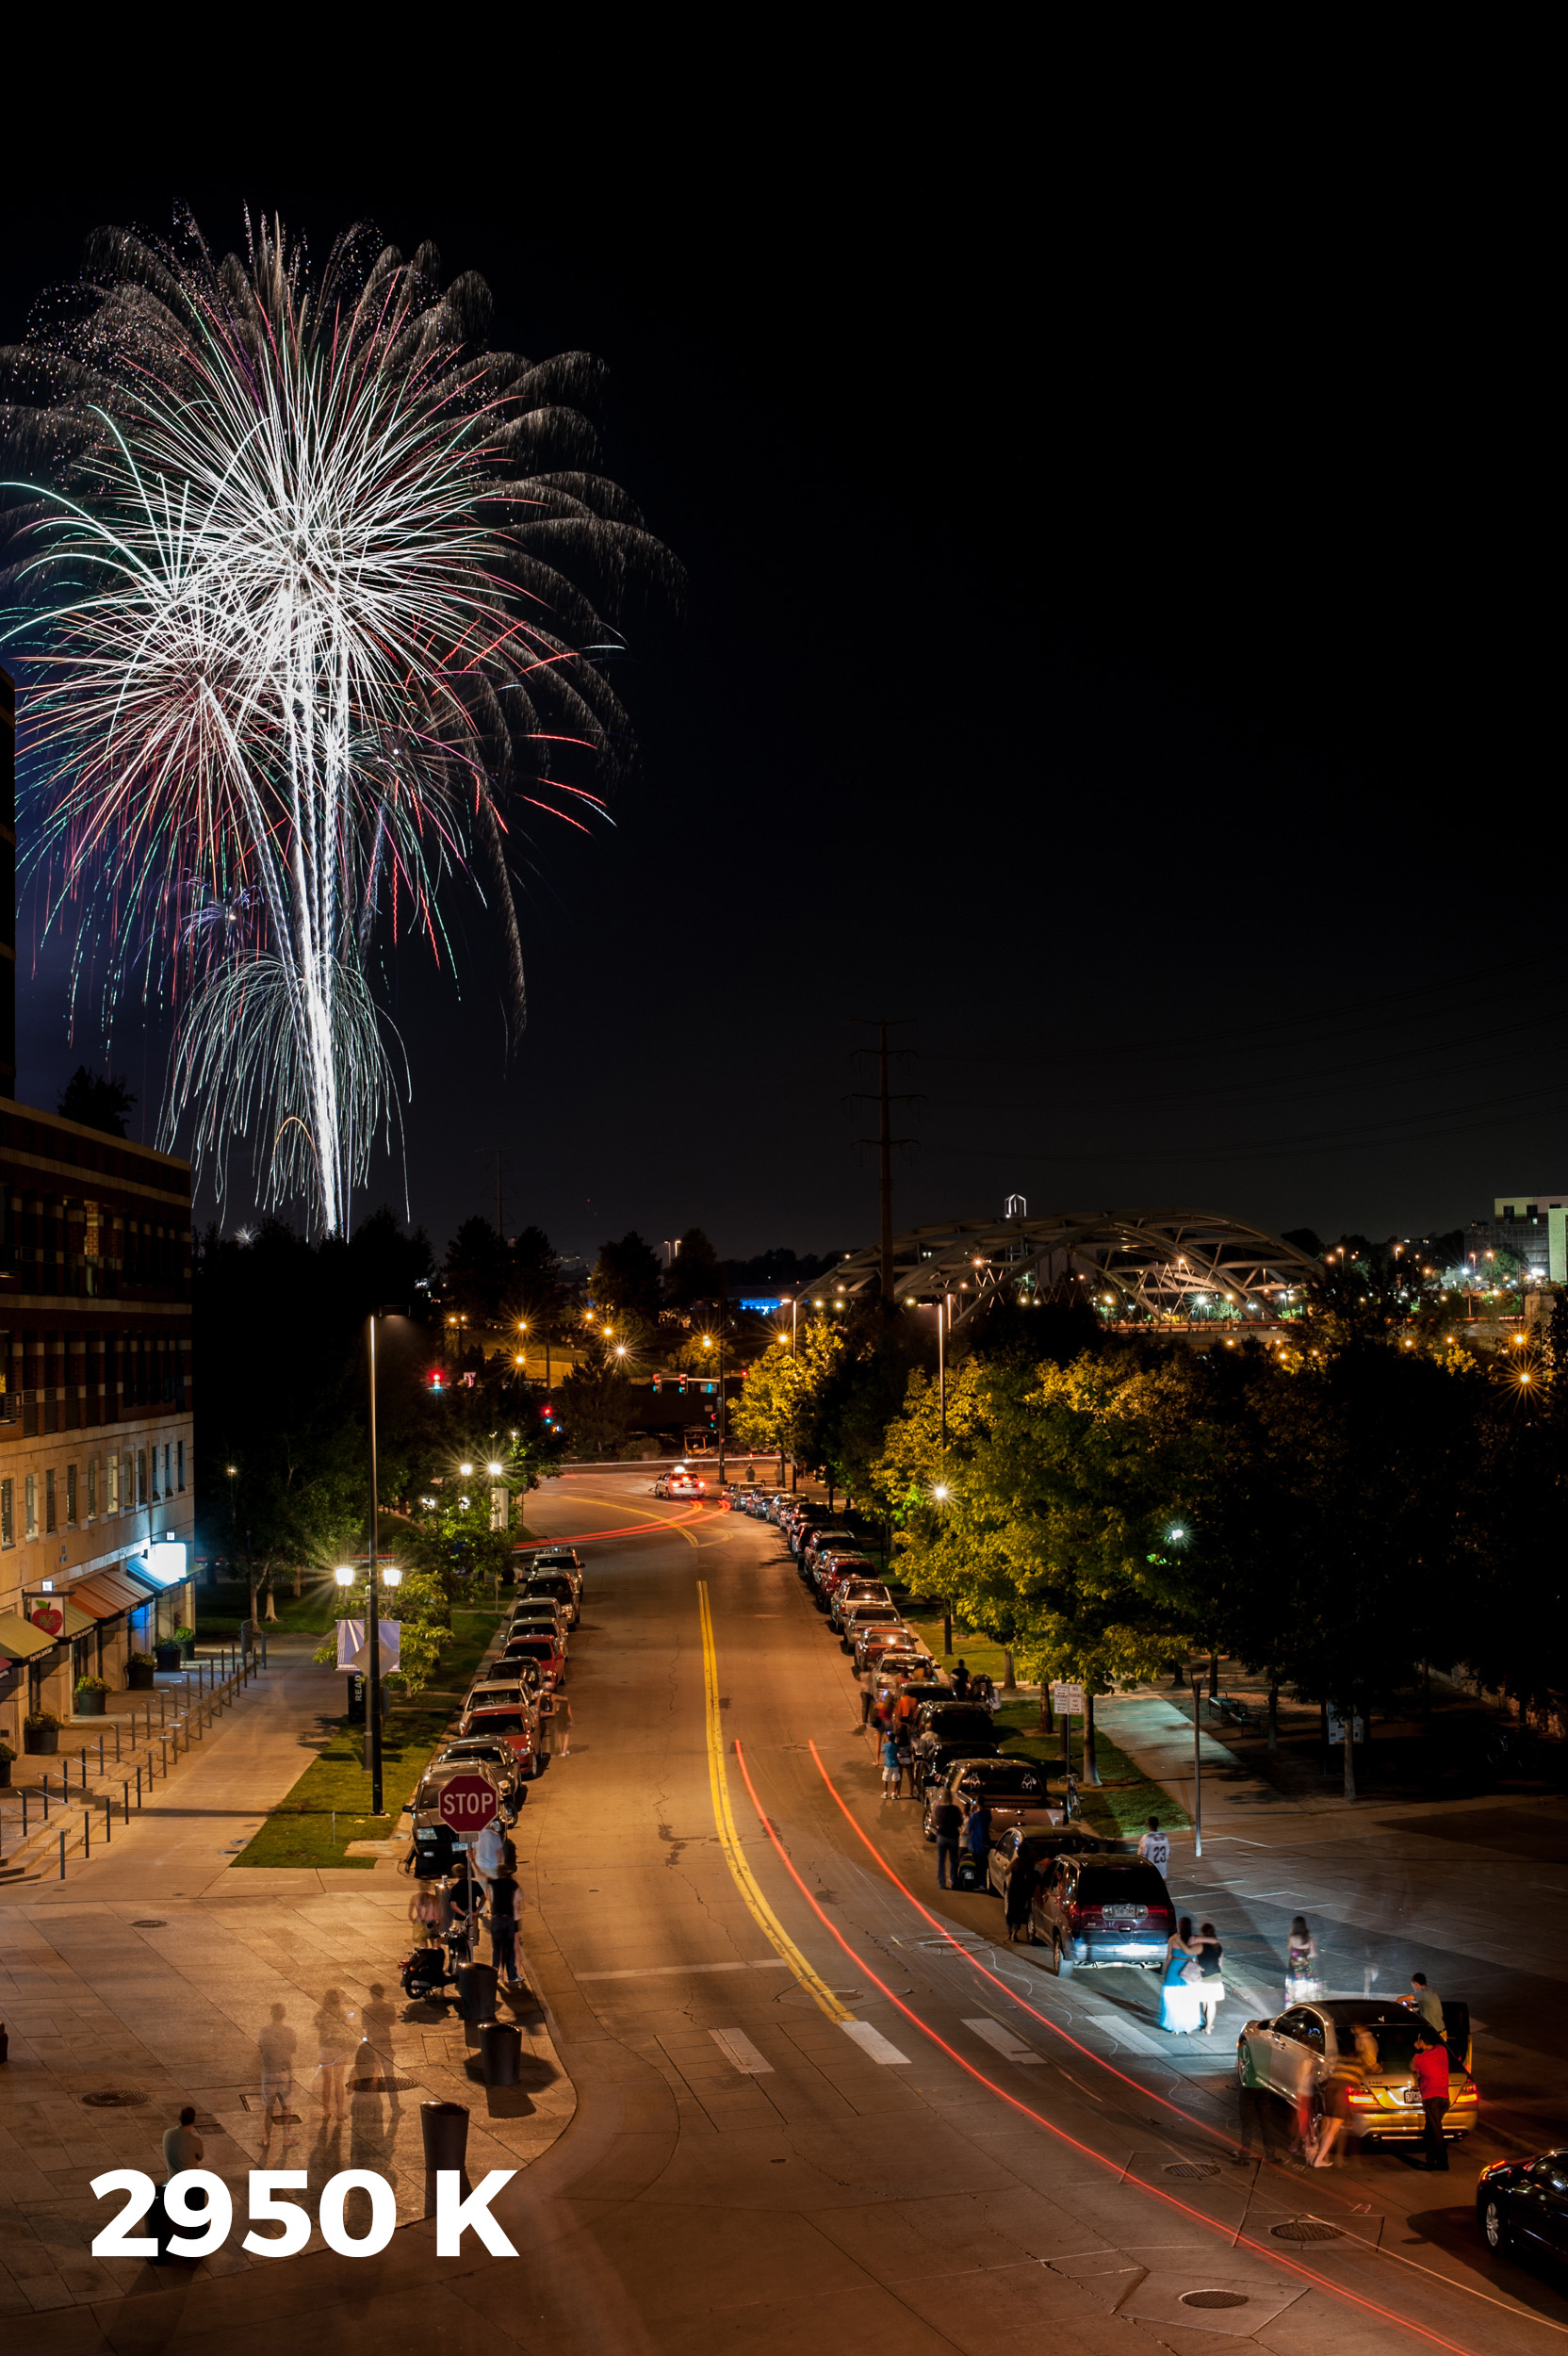
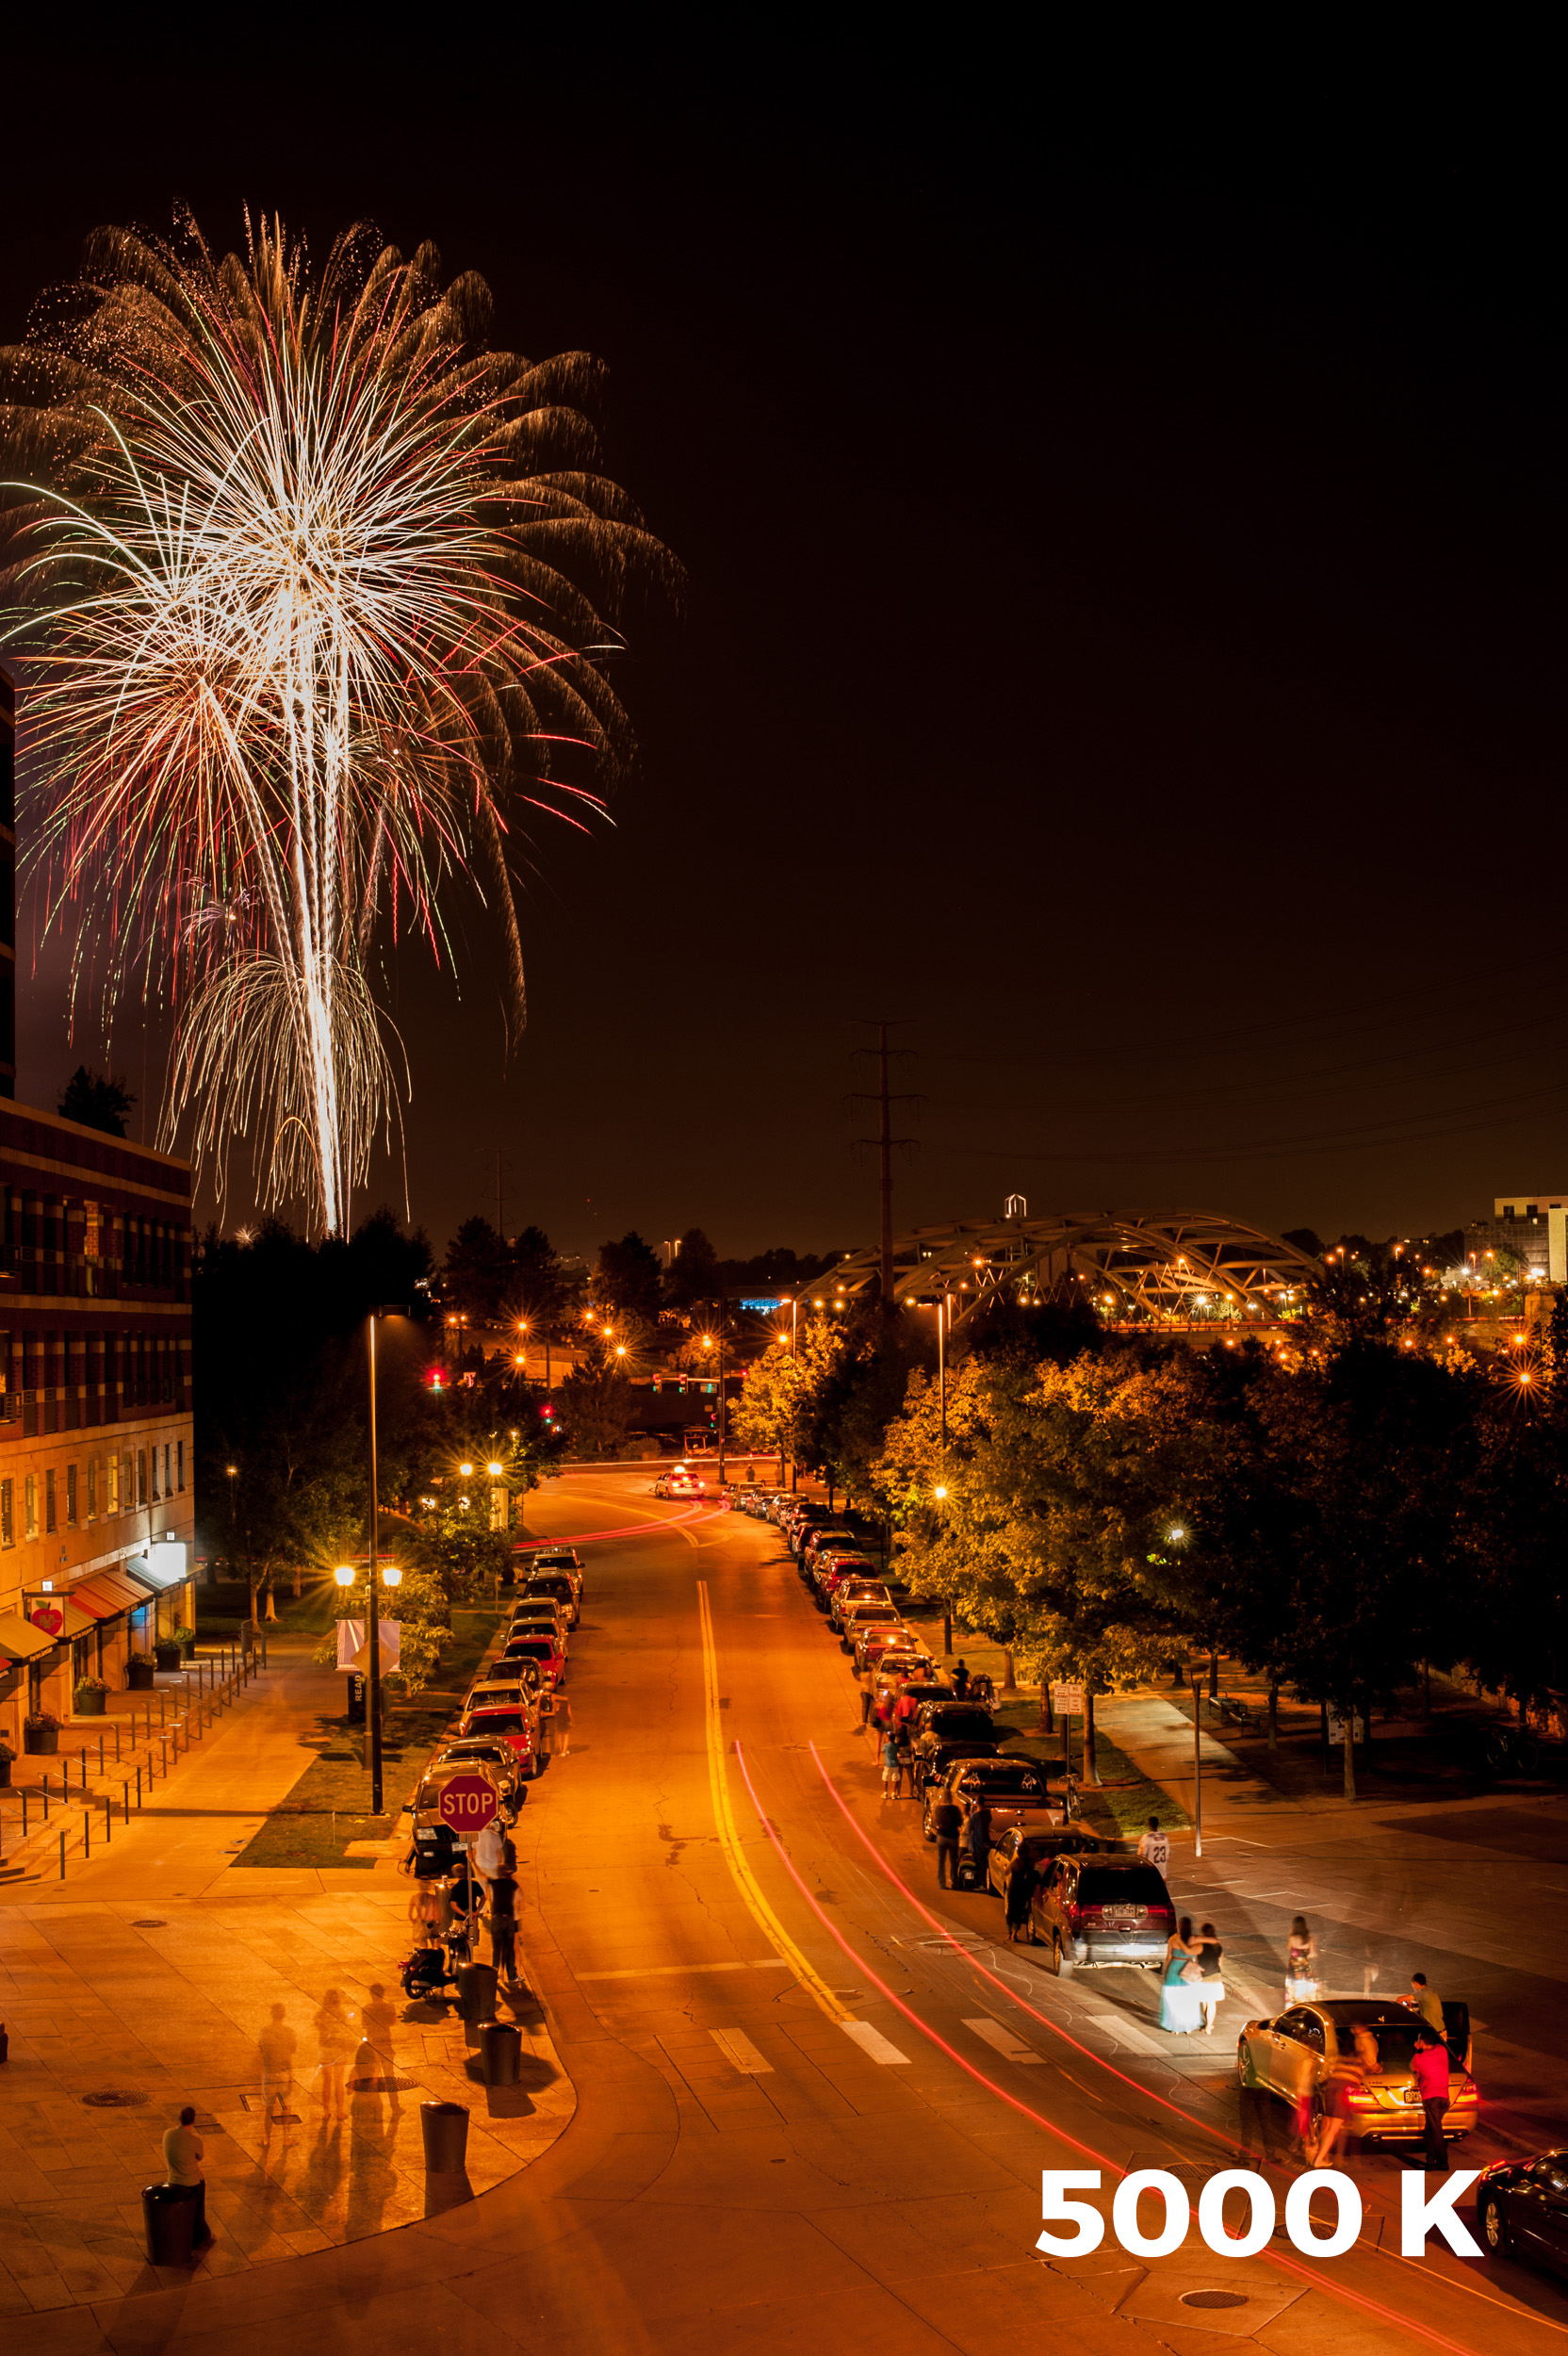
This is a little bit of a dilemma, because there are so many different light sources in inhabited areas. Here is an example where I shot fireworks in Denver (2950 K on the left, 5000 K on the right):

Making the Milky Way POP

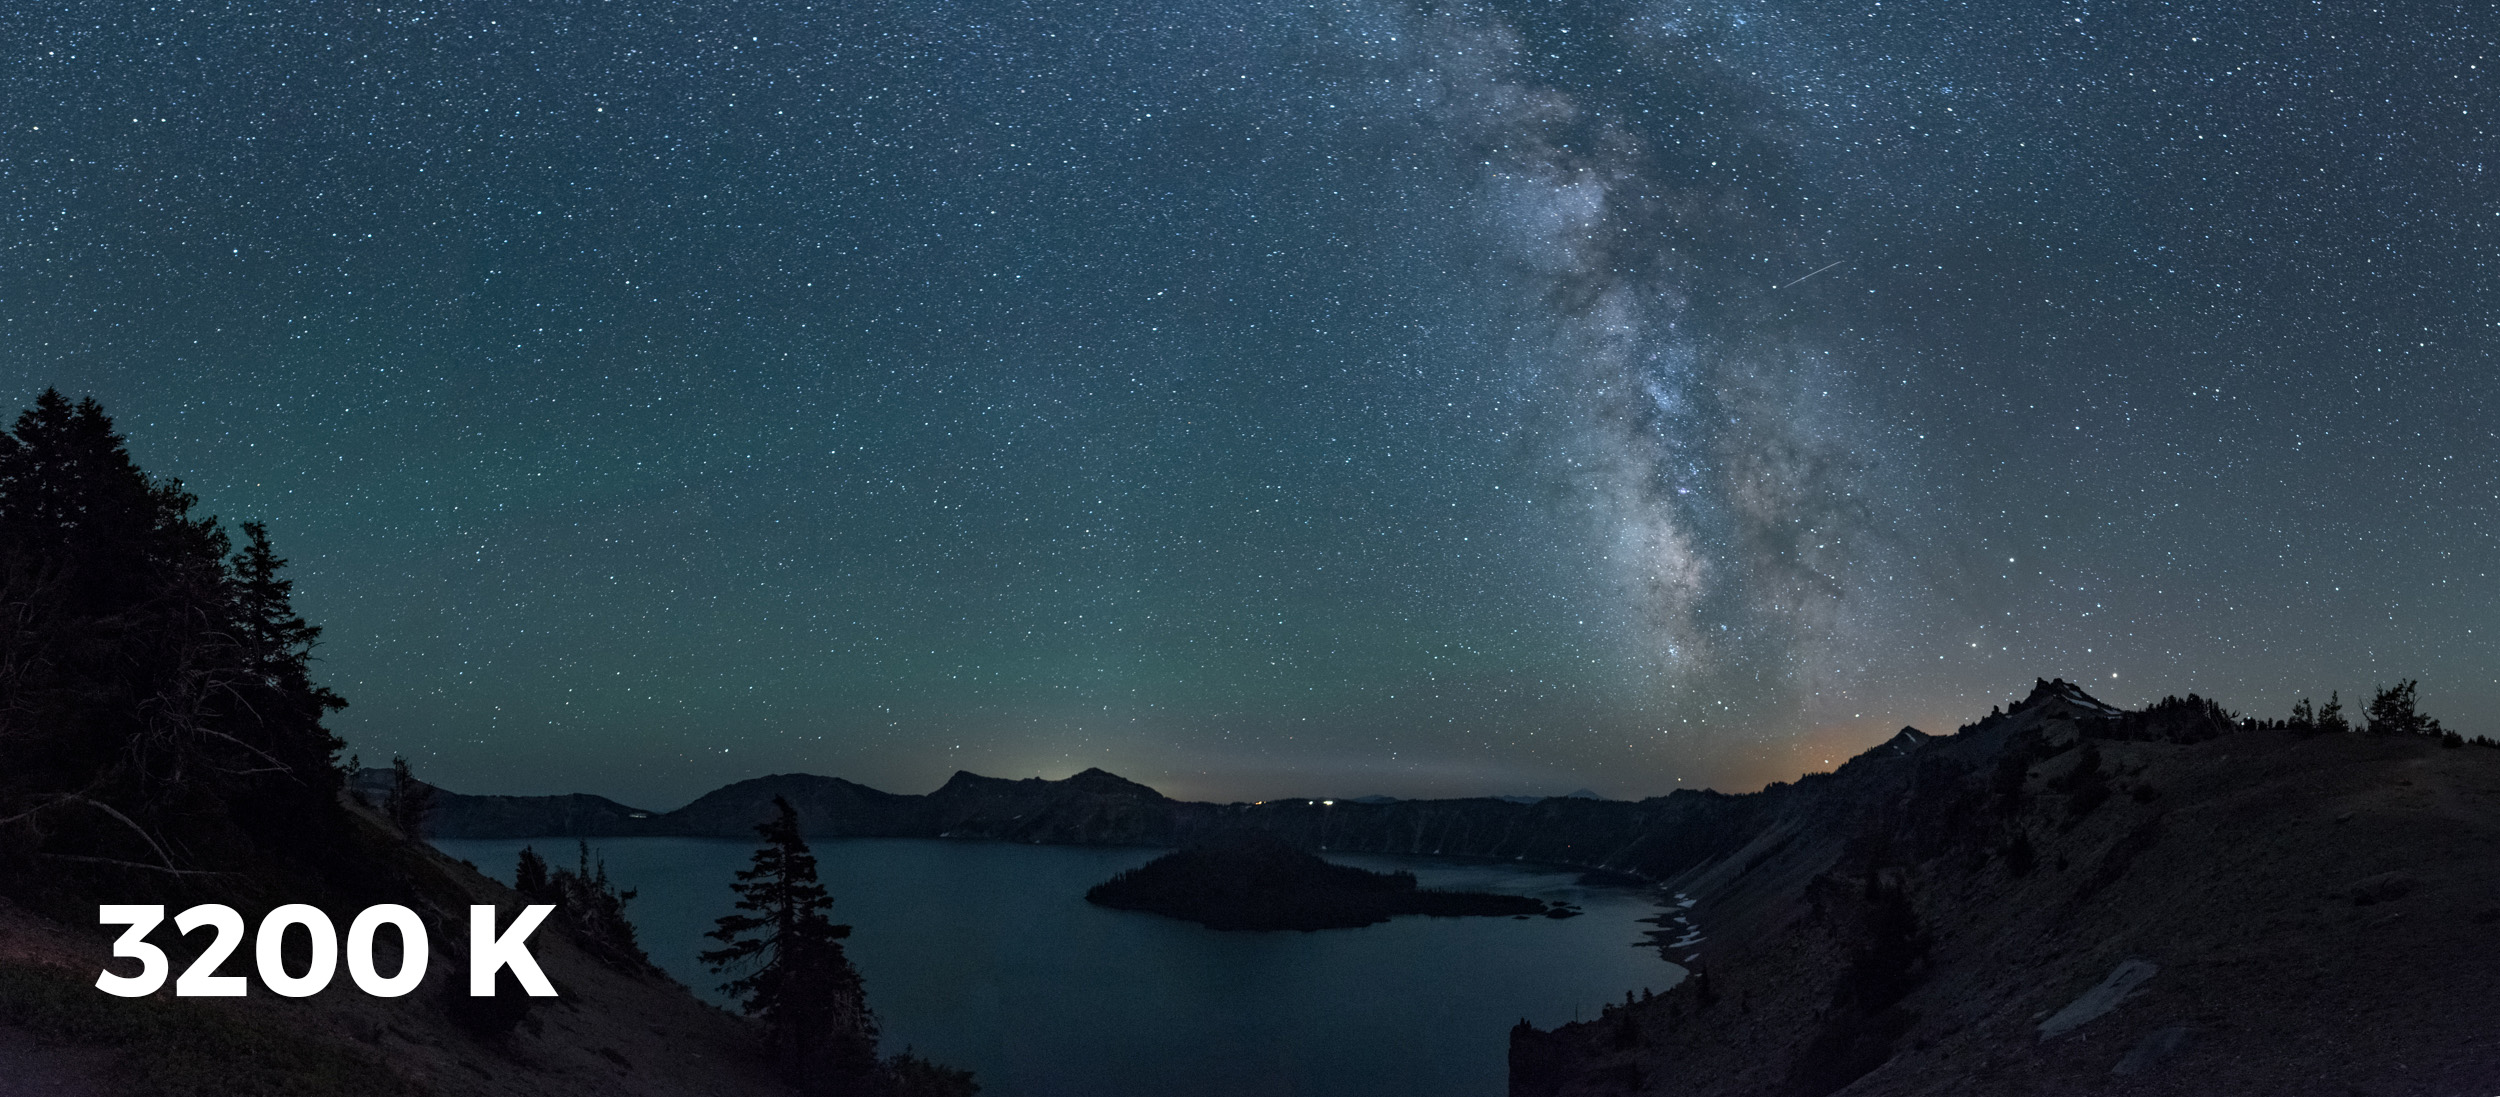
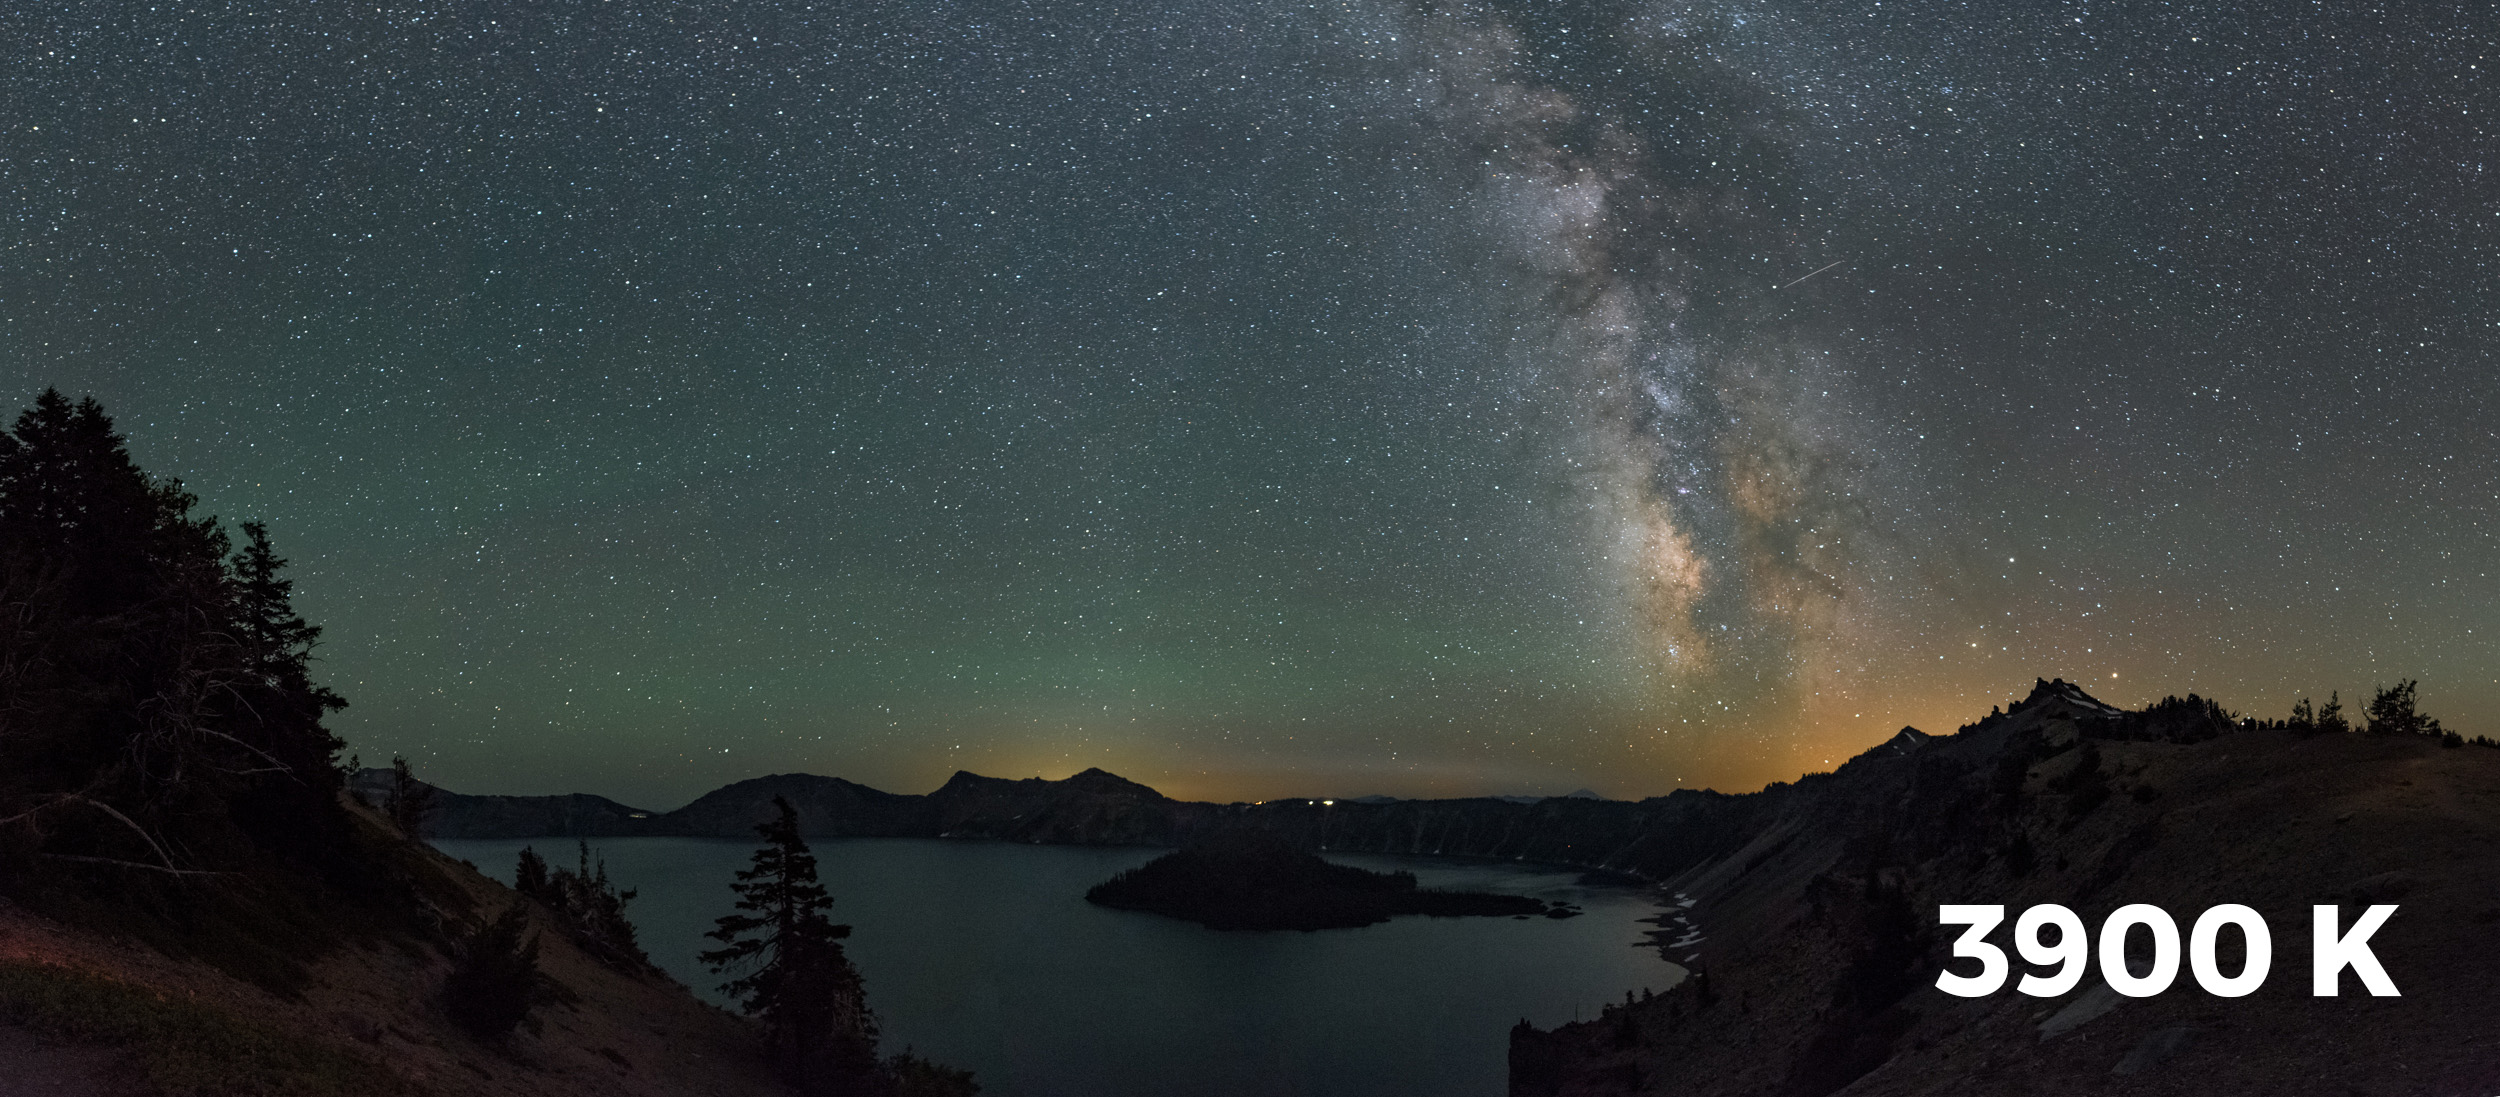
When the moon is hiding around the other side of the Earth, and you can see the galactic center of the Milky Way, you want those colors to jump off the screen or print, right? To encourage those delicate colors to emerge like a flower opening up, set your white balance to 3900 K (right, versus 3200 K on the left).

Making that change in the above photo (from Crater Lake National Park), you can see the Milky Way colors jump right out at you, and the green airglow becomes much more noticeable. (The orange glow is from a nearby forest fire over the edge the caldera. We were not in any danger.)

Wrapup

Once you start thinking in terms of what you want your photos to feel like and surveying the light sources in the sky—whether natural or otherwise—you'll start to master choosing a white balance that makes your vision of the night come to life. 

Honestly, just don't fret about it. Enjoy your quiet creative time. And always shoot RAW with a manual white balance. You can adjust files you shot in RAW no matter the color balance you set in the field. But isn't it fun to nail it when you're on the scene?

Seize the night (skies)!

Matt Hill is a partner and workshop leader with National Parks at Night. See more about his photography, art, workshops and writing at MattHillArt.com. Follow Matt on Twitter Instagram Facebook.

UPCOMING WORKSHOPS FROM NATIONAL PARKS AT NIGHT