How I Got the Shot: Heather Whatever at Rockaway Beach

Heather Whatever at Rockaway Beach. Β© Matt Hill.

The early fall evening at Rockaway Beach seemed to echo the buzz of relaxing sun revelers and carousers. We approached the shore with Heather Whatever, a local burlesque performer in NYC, and chatted about how β€œat least this time it’ll be warmer. …” (Last time Heather had collaborated with us, she’d been knee-deep in the fresh-fallen snow of a private backyard in Brooklyn. This time was downright balmy.)

The Goal: Bake more art for my series Night Paper (note: link NSFW).

The Method: Combine long exposure, flash and a flashlight to make a kinetic night portrait.

The Aesthetic: brilliant white hand-cut paper fashions, including a mask and body piece, along with Heather’s natural beauty (and crazy cool enthusiasm).

Night Portraiting

There are a dozens and dozens of ways to make portraits at night. During the course of developing my artistic voice for Night Paper, I zeroed in on tactics and methods that helped me solve the question I had.

What question, you may ask? How can I make a portrait that dilates time, adds overt and subtle surreal elements, yet retains identifiable elements of classic portraiture?

It’s crucial to have a mission. Once you have that, you can begin to make decisions about what you’re going to do to reach the goal.

The Shoot

Our first location was the stone jetty.

I established a baseline exposure using the high ISO test. I wanted to retain the highlights in the shoreline buildings at the bottom right, plus nab some of those stars peeking out.

Once I got that, I pulled out a pair of speedlights that mount in a portable beauty dish, and added the diffusion sock over the end. I mounted the setup on a light stand and placed it about 4 feet away to the left and about 4 feet above Heather.

I grabbed my trusty Sekonic L-308 flash meter and adjusted the output to match my ambient exposure. Essentially, that means turning the power of both speedlights up or down until the aperture/ISO combination matched the f/stop set on my camera.

I then moved my attention away from technical matters and focused on Heather’s costume and pose, and on connecting with her to start a portrait session.

In beauty lighting, I prefer the face to turn toward the light source. I find the shadows to be complimentary. The shadows create structure and depth, especially on rounded contours such as the thigh, cheekbone and jaw. It’s not a rule, but it’s where I start, and I experiment from there.

We achieved the shot I loved most from this scene. It satisfies my mission:

  • It looks like a human.

  • It’s well exposed.

  • There are elements that show the passing of time (stars, soft surf, edge blur from behind).

  • The outfit adds the surreal what-is-going-on-here? component.

17 seconds, f/4, ISO 200. Nikon D750, Zeiss 15mm Distagon f/2.8 lens.

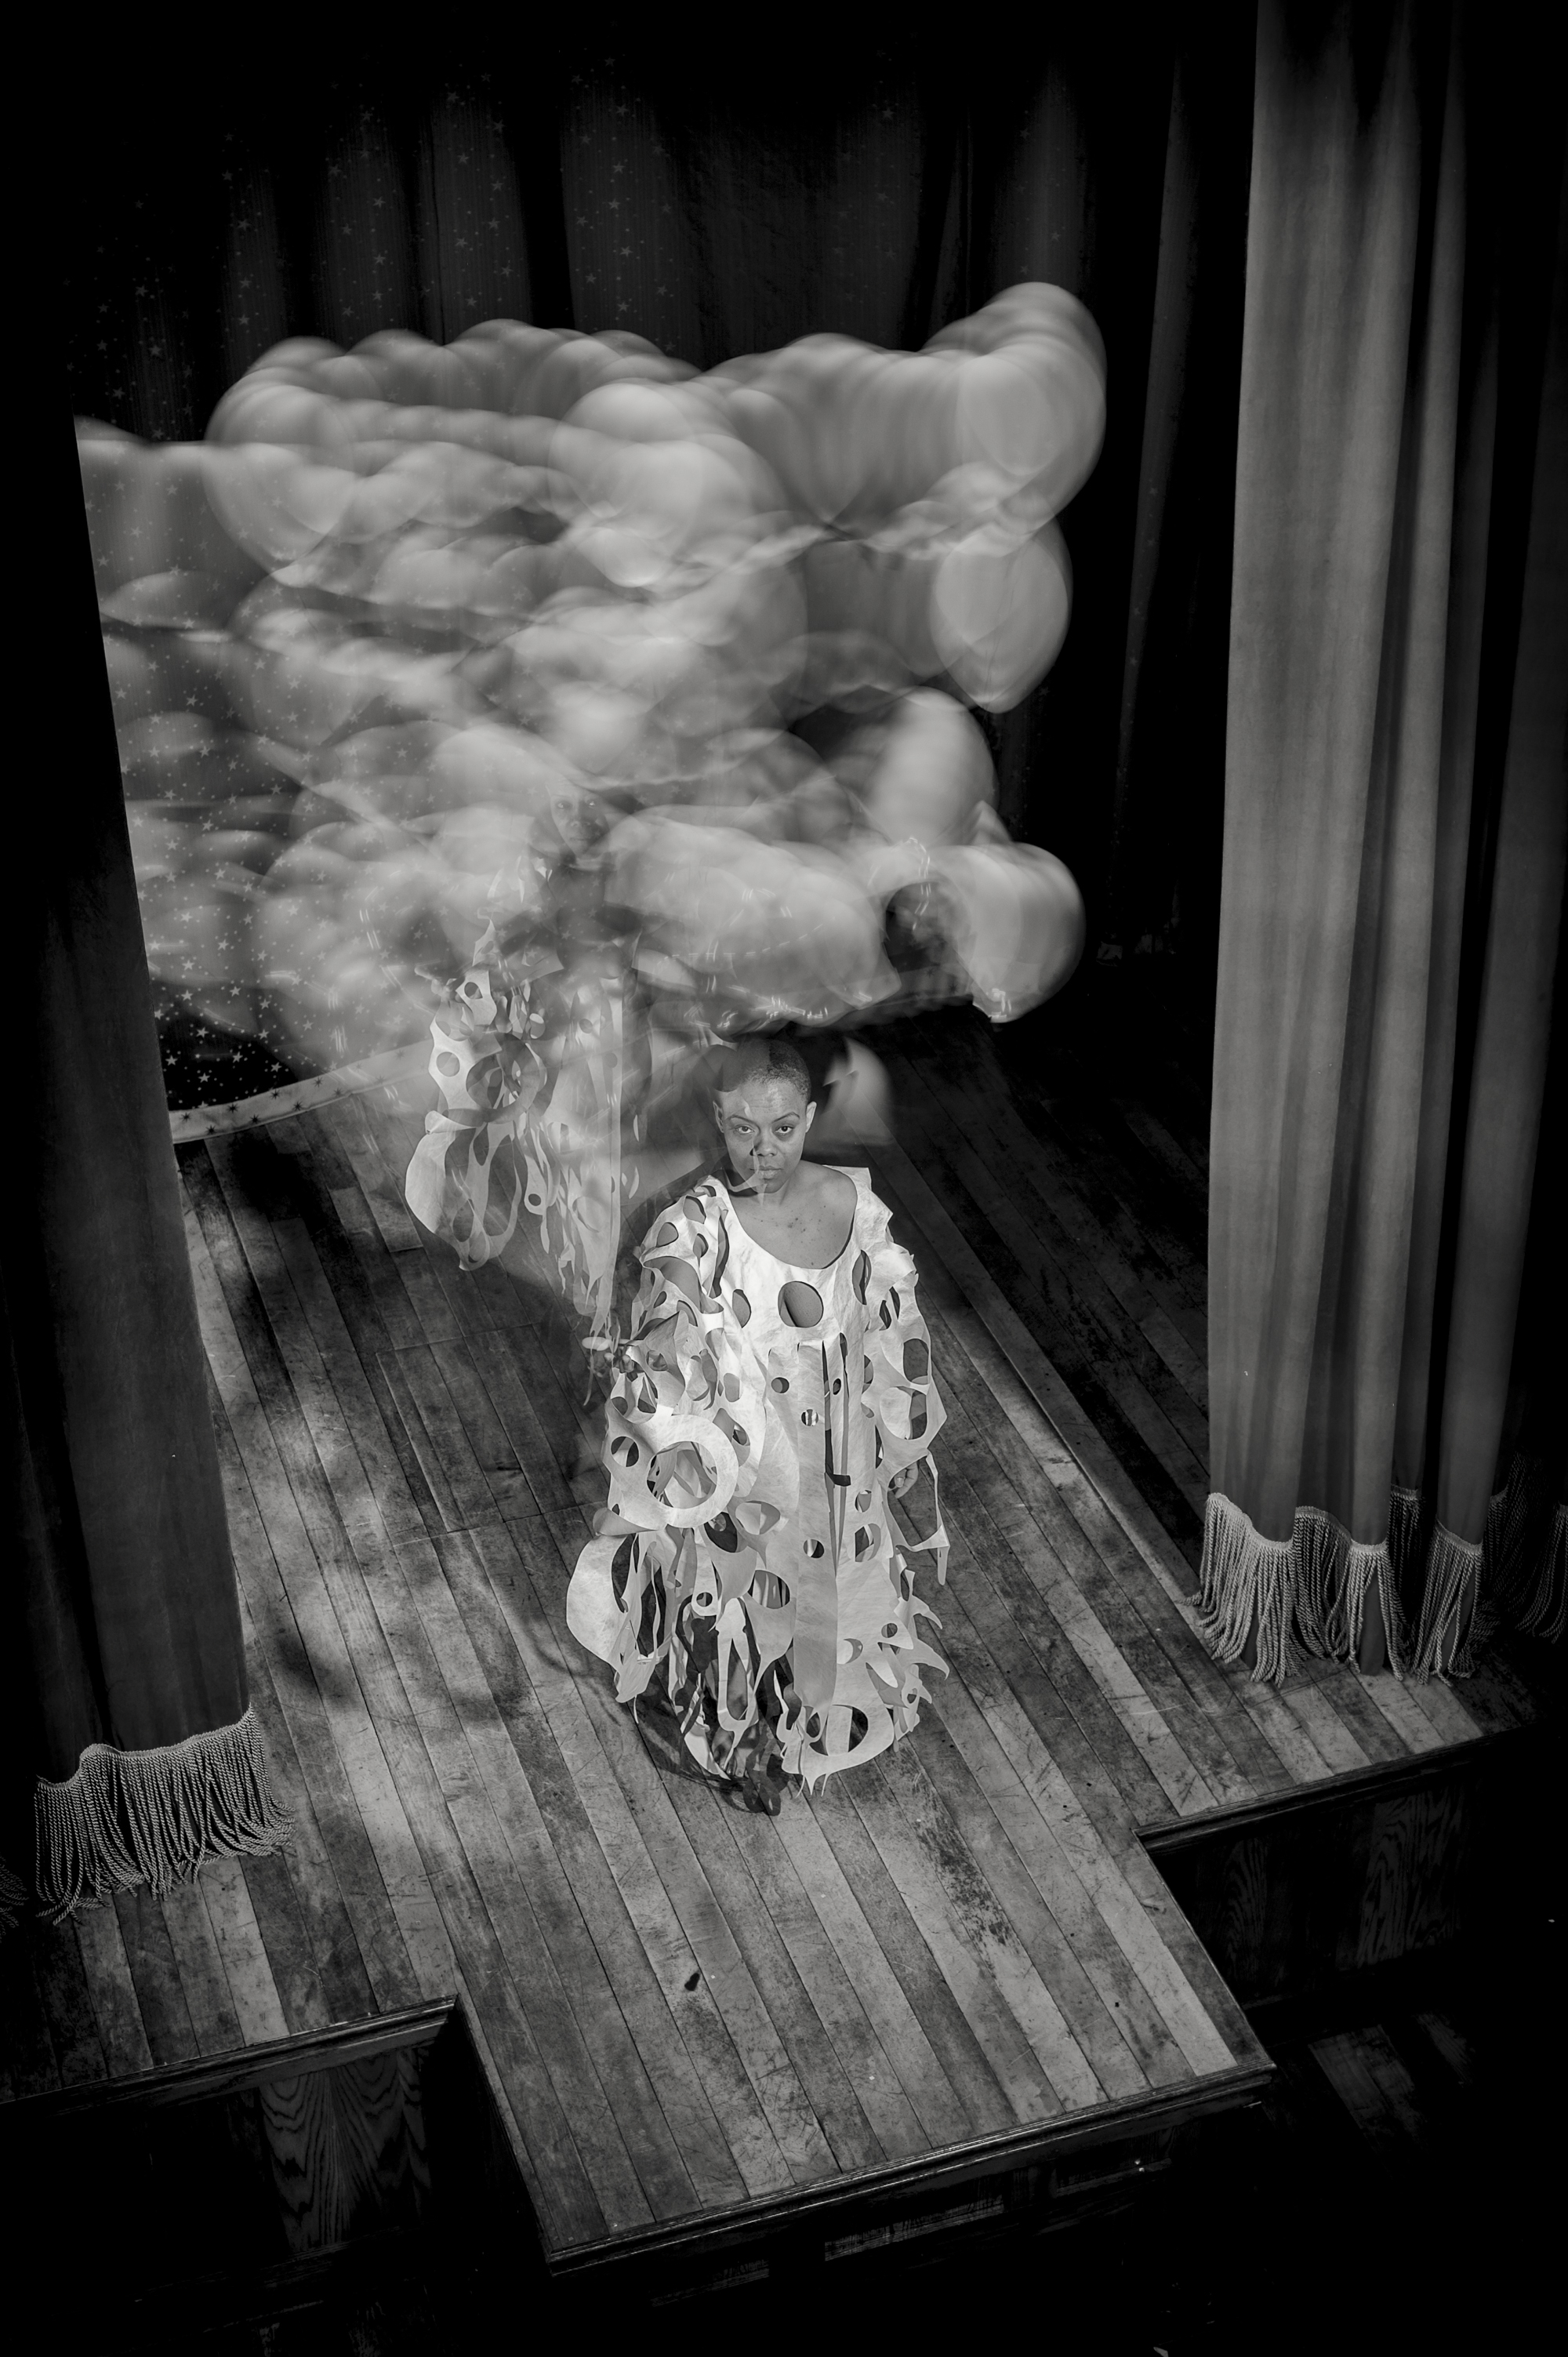
I usually shoot two to three scenes during every night portrait session. Our second location that night resulted in another series that I adore. Because the haze was coming in and there was a lack of distant lights, I ramped up my exposure to 49 seconds. I added a 65-degree long-throw reflector to the flashes and a grid to eliminate light spill.

Every instance you see where Heather is β€œfrozen” was created with flash. The rest of the effect is a result of the following: During the open shutter, I walked into the edge of the surf at left and cupped my hand around the end of my Coast HP7R flashlight to create a snoot that I could open and close by squeezing and un-squeezing my hand. I pulsed that beam of light on Heather as she frolicked in the breaking waves.

It was completely unknown what would happen. Except the magic that did.

Success! Very surreal, with recognizable human elements.

Wrapping Up

I hope you try your hand at telling stories with people at night via portraiture. Admittedly, it requires mastery of separate practices in night photography, and a willingness to work with people. But if you choose to climb that mountain, it’s worth the effort. Your art will amaze you.

For further perusal …

And finally: Want some hands-on instruction and immediate feedback for doing this kind of creative work? Join me on the 2018 Night Portraiture Workshops with National Parks at Night.

Matt Hill is a partner and workshop leader with National Parks at Night. See more about his photography, art, workshops and writing at MattHillArt.com. Follow Matt on Twitter Instagram Facebook.

UPCOMING WORKSHOPS FROM NATIONAL PARKS AT NIGHT

Advanced Light Painting: Balancing Ambient and Added Light to Achieve Your Objective

Light painting can be fun, creative and rewarding, but also one of the most challenging aspects of night photography. Carefully crafted light painting can make the difference between a boring and a spectacular image. The range of tools and techniques we have at our disposal make for unlimited possibilities. Effects can range from subtle (from simply filling in shadows to manage contrast and exposure) to dramatic and bold (highlighting a subject in a way that only light can do).

The full moon is rising behind the vertical car. The bus has a Luxli Constructor light on medium power inside at ground level and facing toward the back of the bus. The car in the foreground does not have any added light. The backlighting from the moon created strong shadows and a glow in the sky around the car. All three variations 20 seconds, f/6.3, ISO 3200 with a Nikon D750 and Irix 15mm f/2.4 lens.

Even a quick pass of a Surefire P6 from camera-left was too much light because of the high ISO.

In the final version, I bounced the light from a Surefire P6 off my hand held over my head while standing about 6 feet to the left of the camera. It was enough to subtly light the car in the foreground while preserving the shadows and overall feel of the image.

The first step to light painting is to figure out what you want to light, and what you are trying to achieve by lighting it.

Once you have that down, the next step is to determine the amount, color and quality of light required. There are lots of decisions to be made, and the answers are different for every image and every situation:

  • Are you lighting multiple objects or multiple surfaces?
  • Do you need to illuminate from multiple positions?
  • Do you want soft, diffuse light or contrasty directional light?
  • Should you use light that matches or contrasts the color of the existing light?

The remainder of this article assumes that you have gotten to this point, and are ready to take it to the next step.

The last-quarter moon was just rising behind camera to the right. Lit with a Surefire P9 incandescent flashlight from the left and right sides at oblique angles. It was a challenge to light both sides of this large building in 30 seconds, but it was freezing cold so I ran from side to side to do the lighting to keep warm. You can see that I overlit the right side and the underside of the top of the building. The background was too dark. 30 seconds, f/8, ISO 800. Canon 6D and Nikkor 28mm f/3.5 PC lens.

After several attempts, I conceded that I would need to use a longer shutter speed, both to add more exposure to the background and to do a better job at the lighting. The light painting is more evenly distributed, and I added light to the foreground. Additionally, the longer exposure opened up the inside of the store, which is lit by vintage, very orange Edison bulbs that have been burning continuously for decades. 75 seconds, f/8, ISO 800. Canon 6D and Nikkor 28mm f/3.5 PC lens.

Controlling the Look

Learning to control lighting ratios between the existing light and whatever light you bring to the party is one of the most powerful ways that you can influence the overall look of your images.

If you are not sure what I mean, think of it in terms of a rudimentary on-camera flash. If you use flash on a point-and-shoot camera, or even a DSLR in β€œP” mode indoors at night, you’ll end up with a foreground that is properly exposed, and a background that is likely to be dark and underexposed. You can adjust the flash compensation to reduce the amount of flash relative to the existing light for a better balanced overall exposure. Another way to achieve the same end would be to increase the exposure time to increase the background exposure.

β€œThe more light you add to your subject relative to the ambient light, the more your illuminated subject will stand out from the background.”

We can do that same thing in the field with light painting. But it takes a bit of work, and a clear idea of what we want to say with our images.

It’s all about the context. If your added light is two or three stops darker than the existing light, it will be barely noticeable. If it is two or three stops brighter, the more pronounced and dramatic it will be.

In the simplest terms, the more light you add to your subject relative to the ambient light, the more your illuminated subject will stand out from the background. Within the parameters of a workable exposure, exactly how much light to add compared with the ambient light is a matter of taste, and is one of the ways a night photographer can style their images.


Case Study: Mono Lake Series

The exposure for all five images is 20 seconds, f/4, ISO 12800, and they were shot with a Canon 6D and Nikkor 28mm f/3.5 PC lens. Starlight conditions with practically no light pollution.

Starlight only.

Very low power, broad-beam LED flashlight from camera-right for 2 seconds.

Bright LED flashlight from camera-left for shortest possible time. The brightness of the light meant that I had to use it like a flash by waving it in and out of the scene as quickly as possible. It was impossible to control the light with any consistency.

Very low power, broad-beam LED flashlight from camera-left and right for 3 seconds from each side. I liked the look, but wanted to try a warm light that would contrast the cool, blue sky.

Very low-power, incandescent flashlight from camera-left and right for 1 second from each side. This light was brighter, and therefore harder to control at ISO 12800. It was also less diffuse, which made it difficult to light the formation with just a single 1-second pass of the light from each side, but it was my preferred result.


Arriving at a Ratio

How, though, do you decide how much light to add in comparison with your ambient exposure?

There are two main ways to vary the lighting ratio:

  1. Just as in the flash example above, you could increase or decrease the amount of added light. This can be achieved with a brighter or dimmer light source, or by using a continuous light for a longer or shorter period of time, or by popping a flash once or multiple times.
  2. Extend or shorten the exposure time. Assuming that you used the same amount of light painting, the length of the shutter speed would affect only the ambient exposure. (Whereas changing either the ISO or the aperture would affect both the existing and added light. Our goal is to separate the ambient and added light, not to adjust them proportionally.)

To summarize, you change the lighting ratio by increasing or decreasing the amount of added light, or lengthening or shortening the overall exposure time without changing the added light. Use whichever method works better for each particular shot.

Controlling the Light

You can control how much light you add in different ways depending on the painting tool you’re using:

  • If you are using flash, or a variable brightness continuous light source such as our beloved Luxli Viola, you can increase or decrease the intensity.
  • With a flash, you could also use multiple pops of light, and each additional fire doubles the amount of light on your subject.
  • If you are using a flashlight, then you can increase or decrease the amount of time you employ it to light your subject, provided that time fits within your exposure length. (Increasing the exposure time without altering the added light painting will reduce the ratioβ€”and therefore the impactβ€”of the light painting. Reducing the exposure time without altering the light painting will make the light painting stand out more.)
  • In some situations, of course, you may need to adjust both the added light and the exposure time to find the right combination.
  • One other way to modify your light painting is to increase or decrease the distance between your light source and your subject, keeping the Inverse Square Law in mind. The Inverse Square Law essentially states that doubling the light-source-to-subject distance results in one-quarter of the light reaching the subject.

Case Study: Trona Series

From my β€œLoos With Views” series. A nearly full moon, with light pollution from Trona and Ridgecrest in the background.

The first attempt. 30 seconds, f/4, ISO 800. Canon 5D Mark II with an Olympus Zuiko Shift 35mm f/2.8 lens. Incandescent flashlight from the right, and inside the loo. I considered this to be overlit.

The second attempt. 30 seconds, f/4, ISO 800. Canon 5D Mark II with an Olympus Zuiko Shift 35mm f/2.8 lens. Incandescent flashlight reflected off my hand from camera-left, and LED bounced off the back wall of the structure. The LED was too harsh, and I didn’t want to see the signage on the front.

The third attempt. 30 seconds, f/4, ISO 800. Canon 5D Mark II with an Olympus Zuiko Shift 35mm f/2.8 lens. Better-controlled LED bounced off the back wall of the structure, and no light on the front.

The final attempt. 10 minutes, f/4, ISO 100. Canon 5D Mark II with an Olympus Zuiko Shift 35mm f/2.8 lens. A few seconds from camera-far-left with a Surefire P6 incandescent flashlight to show texture in the structure. I used the same light for a few seconds inside the loo, bounced off the front wall. The light on the rock and the vent pipe was ambient that accumulated during the long exposure. The color of the sky is so different due to the combination of the long exposure and the moonlight’s effect on the white balance.


Complications

Other constraints (such as shooting at high ISOs to avoid star trails) may come into play, and these can complicate things further.

A common scenario when light painting at high ISOs to preserve star points is that a light source may be so bright that a fraction of a second is all that is required to light a scene, making it next to impossible to control the light well. Reducing the camera exposure would have a negative impact on the stars, and would also even further reduce the amount of time available to get into position and execute the lighting.

In that case, using a dimmer light source is the best option. If the location is treacherous and getting into position takes some time, two good strategies are setting a delay on the exposure or triggering the shutter remotely once you get into position.

Conversely, when working under the light of a full moon, a longer duration of light painting is a good way to increase the added-to-existing light ratio. In urban environments with a lot of ambient light and relatively short exposure times, utilizing a brighter light source might be the best approach.

But It’s Really Not Complicated

In any case, some thoughtful examination of the situation and available options will go a long way toward achieving the desired look.

If after reading this you are thinking about going back to daytime photography, please know that these decisions and tactics are really not that complicated. I don’t know anyone who does mathematical calculations in the field to figure out their light paintingβ€”at least no one who has done it more than once!

Like everything related to night photography, it’s a mΓ©lange of art and science that can be mastered only by trial and error, accumulating knowledge and experience along the way.

Lance Keimig is a partner and workshop leader with National Parks at Night. He has been photographing at night for 30 years, and is the author of Night Photography and Light Painting: Finding Your Way in the Dark (Focal Press, 2015). Learn more about his images and workshops at www.thenightskye.com.

UPCOMING WORKSHOPS FROM NATIONAL PARKS AT NIGHT

Lightroom for the Night Photographer: Learning to Master Local Adjustments (Part I)

Post-processing photographs has become an everyday affair for modern photographers. Increasing contrast, fine-tuning the exposure and correcting color balance have become as familiar to us as brushing our teeth.

Adobe Lightroom, the industry’s standard editing program, is at the heart of this editing process for most photographers. Its cataloging capabilities are incredible; its Develop module is very intuitive yet extremely powerful. Within that module, most photographers are quite comfortable working with using the sliders and other controls that make global changes to the image: from the Basic panel’s Exposure, Contrast, Highlights sliders, et al., right down through Tone Curve, Detail and Lens Corrections panels, et al.

But many photographers don’t have quite the same level of comfort with the local adjustmentsβ€”those tools remain a mystery.

So, what exactly is a local adjustment? Well, a local adjustment is when you are effecting a change to only a specific portion of a photograph. A global adjustment, on the other hand, affects the entire image.

In the following video, I’ll demystify Adobe’s two local adjustment toolsβ€”the Graduated Filter and Radial Filterβ€”and show you how can use them to tightly control the look of your night photographs.

Tim Cooper is a partner and workshop leader with National Parks at Night. Learn more techniques from his book The Magic of Light Painting, available from Peachpit.

UPCOMING WORKSHOPS FROM NATIONAL PARKS AT NIGHT

Muses from the Past: The Night Photographs of Volkmar Kurt Wentzel

Analyzing classic photographs can be an effective way to progress in one’s own work. The key is not to simply mimic someone else’s great ideas, but to use the knowledge that comes with reproducing the work of masters and move on to create something new. With this in mind, National Parks at Night's Lance Keimig offers this ongoing series highlighting some of the early masters of night photography. We'd love to see any photographs you create after learning more about the pioneers of this nicheβ€”please share in the comments section!


The great Hungarian photographer Brassai is arguably the most influential night photographer of all time, particularly due to his work during the 1930s after the release of his seminal book, Paris De Nuit. I was introduced to Brassai while studying with Steve Harper in San Francisco in the late 1980s, shortly after Paris De Nuit was reprinted in the classic Parthenon edition in 1987.

Last year I wrote about Howard Burdekin and John Morrison, who paid a backhanded compliment to Brassai in their own book London Night. The English photographer Bill Brandt admired and even copied Brassai’s night work. But this article is not about Brassai, but rather about Volkmar Kurt Wentzel, a German American photographer who also found inspiration in the pages of Brassai’s Parisian nocturnes.

β€œLafayette Square.” A silhouetted sculpture of Andrew Jackson on a rearing horse opposite the North Portico of the White House. Wentzel used an exposure that kept the sculpture in shadow, but preserved the detail of the illuminated White House. As was typical of this series, Wentzel chose to photograph on a wet and foggy night, a strategy that he no doubt observed in the night work of Brassai, and perhaps in Stieglitz’s as well.

Wentzel moved to America in 1926 at the age of 9, when his father, an amateur photographer and photo chemical salesman from Dresden, Germany, was offered a job as director of an Ansco photographic paper manufacturing plant in New York. Wentzel’s mother died a few years later, after which he set off with a friend on foot for South America.

After three days of walking and hitch-hiking, they found themselves in Washington, D.C., where the two parted ways. The friend went home to his mother, and Wentzel rented a room in Lafayette Square near the White House. He found a job working in the darkroom of Underwood & Underwood portraiture studio and news agency, where he also assisted the staff photographers. His first break came when one of his images was published in a Washington newspaper.

β€œThe Waterfront.” The Washington canal was where fishermen delivered and sold their catch from the Chesapeake Bay to the restaurants and wealthy homes of Washington, D.C. In this image, a fisherman shows his catch to a customer in the shadow of the Washington Monument.

β€œNational Archives.” The National Archives building had just been completed in 1935 when Wentzel made this image on a foggy night. Two groups of people illustrate the grand scale of the building, and the looming presence of the bare trees in the foreground add an air of mystery to the image.

After being given a copy of Paris De Nuit by a friend, Wentzel began to photograph the well-known landmarks of D.C. at night. He often would process his images the same night, and then go out again to reshoot to improve his exposures, often staying out until dawn.

Wentzel’s next big break came in 1936 when a chance tour of the photographic facilities of National Geographic led him to discover that there was a job opening. He fortuitously had some of his night prints with him, and was granted an interview and then the job.

β€œU.S. Capitol.” Shot on a rainy night, the squares in the plaza reflect a darker side of the dome of the Capitol. There is a great irony in our majestic Capitol building–– the finial atop the dome is a nearly 20-foot statue of a woman titled β€œFreedom,” designed by sculptor Thomas Crawford, and cast in bronze by slave labor in 1863.

β€œThe Mall.” The classic view of Washington: the Capitol peeking out from behind the Washington Monument as viewed from between the columns of the Lincoln Memorial. The shadowy figure in the foreground is Wentzel’s friend Eric Menke, the man who gave him his copy of Barassai’s book.

β€œPennsylvania Avenue.” An image made on a snowy night from behind the gates of the Treasury building to the Capitol. Note the reflections off of the street car tracks, and the trails from car headlights, but not tail lights. Perhaps tail lights didn’t yet exist in the 1930s, or they were so dim as to not register on Wentzel’s film. The tower on the right is the old post office.

Although he was hired as a darkroom technician, in less than a year Wentzel had an opportunity to complete an assignment for the magazine when a photographer was pulled from a job in West Virginia for another story. Wentzel had spent time in West Virginia, and his familiarity landed him the assignment. It was the beginning of a career that spanned nearly 50 years at the magazine, where he photographed 45 stories and authored 10. He traveled extensively in Africa and Asia, and was later named the director of the National Geographic archives, where he was responsible for saving millions of images that had been destined for the rubbish bin.

Wentzel did not photograph extensively at night after his early Washington images, but they were shown at the Royal Photographic Society in England and at other venues in Europe before being published in the April 1940 issue of National Geographic. An exhibition of the work was presented by the Corcoran Gallery of Art, and published in book form as Washington By Night in 1992.

β€œDecatur House.” A shallow depth of field detail image of Decatur House at the corner of Jackson Place and H Street in Lafayette Square. The square had long been one of the most prestigious addresses in Washington, with the residences of presidents, vice presidents, secretaries of state, and other wealthy and powerful people. Wentzel planted the light bulb behind the frame of the lamp to minimize overexposure, but the light bled out from the sides all the same. You can just make out a row of late-1930s cars in the middle ground.

β€œNational Archives II.” A dramatic image of the sculpture β€œGuardianship” by James Earle Fraser, best-known as the designer of the buffalo nickel. Fraser’s sculpture graces many of the buildings constructed during the New Deal era. Beneath the sculpture is a quote by Thomas Jefferson: β€œEternal vigilance is the price of liberty.” Careful placement of a light source behind the sculpture adds to the drama.

Wentzel died in 2006 at age 92. Unfortunately, little is known about the technical aspects of his early night work, other than that he printed it at Underwood & Underwood studios, β€œsurreptitiously using their best portrait paper” (as he writes in his book). He used a 4x5 Speed Graphic camera, occasionally supplementing the existing light with flashbulbs that, as he wrote, β€œwere in fashion at the time.”

Lance Keimig is a partner and workshop leader with National Parks at Night. He has been photographing at night for 30 years, and is the author of Night Photography and Light Painting: Finding Your Way in the Dark (Focal Press, 2015). Learn more about his images and workshops at www.thenightskye.com.

UPCOMING WORKSHOPS FROM NATIONAL PARKS AT NIGHT

A Guide to Light Writing Tools

When you turn your lights away from your subject and toward the lens, a world of creative opportunity opens up to you.

Light writing can be a fun and fantastic way to add "something extra" to a night photo, whether you're shooting a city scene, a natural landscape or night portraits. (In fact, we'll be playing with a lot of light writing tools and toys during our Catskills Night Portraiture this spring and fall.)

But what to use? Where do we start? Help, Matt!

Fear not, explorer of the night. … Grab a mug of cocoa and settle in. Let's get jiggy with light.


The Basic Tools

Flashlights

You can use a really bright flashlight (like a Coast HP7R) to make a visible beam in the sky, or a low-powered penlight (like the Coast A9R) or a simple keychain LED light for delicate scribing in the air.

Lomo also makes the really interesting Light Painter Z140TORCH.

Flashlight Add-Ons

When you use a flashlight, you can accessorize it by adding some cool tools made just for light writing (and painting, but that's another topic …).

Light Painting Brushes is the premier manufacturer that really understands light painters/writers. Jason Page (the creator) has made a robust system of tools to choose from, including plexiglass bladesfiber optic wands, color filters, light painting bottles and light swords. But if you really want to get serious about drawing in the air, snag a Light Writer set and loosen up your shoulder muscles.

Be sure to grab a Universal Connector and get started! FWIW, having this one accessory doubles as a great snoot. Kill the spill from the edges of your flashlight for more control.

Laser Pointers

Laser pointers aren't just for making cats dizzy. They are also a cool way to scribe really sharp lines on objects. Tip: Never point it directly at your lensβ€”it can irrevocably damage your camera's sensor.

Kerosene Lanterns

I love October, because there are lantern tours at cool places like Sleepy Hollow Cemetery. Waiting for a tour to walk through with that gorgeous upglow makes for delicious, warm light. 

A less combustible option is an LED camping lantern.

Lighters

Gosh, I haven't done this since I was a teenager (can't you tell by the above photo?). But grabbing a simple cigarette lighter and using it behind objects can create smooth, warm light trails. Just be careful not to burn your thumb!


Specialized Professional Tools

Pixelstick

The classic commercial realization of being able to write images in the air, one row of pixels at a time. Load your designs into the 6-foot Pixelstick and swing it around for massive light writing effects. 

Magilight

This 3-foot tool, currently still in crowdfunding mode on Indiegogo at the time of writing, promises some upgrades versus the Pixelstick, including a splash-proof design, a sliding/rotating handle, mini LED stick accessory and more. Fingers crossed they make it to production, and on time, because I can't wait to get my hands on one. (Or two!)

Make your own Digital Light Wand

Are you handy with electronics and programming? Well, you can make your own Pixeltstick/Magilight with the instructions provided by Michael Ross on his website. He released this project back in 2010, making him the O.G. digital light writing wizard.

Westcott Icelight 2

This powerful handheld LED wand has a rechargeable battery, diffuser, tungsten gel filter and more. Pointed toward the lens, it makes a smooth bar of light.

Night Writer

Darren Pearson (aka prolific and talented artist @dariustwin) created the Night Writer light writing system with interchangeable color tips so you can craft your fantasies in the air like Picasso.

Lapiz Freehand RGB

The Lapiz Freehand RGB is a tool I haven't used (yet …) but I had to share. It's for the artist who wants to draw their visions freehand. RGB controls, dimmer and 20 color presets with memory. Hella cool. Visit the website (link above) for some images showing what you can do.

Projectors

Digital projectors are tiny now! Pocket Pico Projectors even come with batteries. So, you can bring your images or designs out into the field and project them onto surfaces, people and more!


The Less-Than-Obvious Tools

Your phone or tablet

The flashlight and screen are both light sources. Plus, I bet you already have one! The larger the light source, the softer the effect.

I often use the GlowStickGo app to make pretty colors. The $0.99 upgrade is worth it.

Using other people's lights

In the above examples, I noticed hikers or climbers using headlamps and flashlights in my scene. Rather than gnashing my teeth, I said, "Heck, let's use this as an advantage."


My Favorite Toys

Balloons

Either stuff a glow stick inside pearlescent balloons, or get some with the LEDs already inside. Makes a soft, ethereal effect.

Battery-powered Christmas lights

Christmas lights make sharp, crisp lines of light. And if you tape them together in a bundle, you can create a bright grouping of light streaks. Or you can be like one our Death Valley attendees and make a suit out of them, put it on, then frolic in front of your open shutter. Be sure to get battery-powered lights, or you'll have to bring a noisy gas-powered AC generator.

LED Frisbees

Want a good workout? Try throwing an LED Frisbee back and forth with a pal for eight minutes without pause. It will test your endurance, but makes for fun night photography!

LED Helicopters

I love these little rubber-band launched LED toy helicopters. Keeping three to five of these in my bag takes up barely any room at all. Creating mysterious alien landings anytime is easy.

Glow Sticks

I love the foxfire effect that glow sticks have. They aren't very bright, but they can add a subtle mystery to your light writing, and are small and easy to carry.

Poi Balls

Poi Balls are as fun as a Hula Hoopβ€”without need for bodily coordination.

EL Wire

Slightly brighter than a glow stick. I use EL Wire to make fire effects, without the danger. 


Dangerous Things You Should not do Within a National Park or Without Safety & Planning

Sparklers

Duh. Fireworks are forbidden in national parks. Don't do it. But when and where you are allowed to use sparklers, there is no substitute! Sparkly, drippy fun.

Steel Wool

Again, don't light fires in national parks except where expressly permitted. Like in campsites. In fire rings. And not with steel woolβ€”stick to a lighter, or rubbing two sticks together. But for those times when you're in a place that does not have those restrictions, and it's near/on water or in the rain, and not on or near wood, spinning steel wool in a wire whisk on a string makes for some amazing effects.

Household Lighting Fixtures

Some lighting fixtures have an AC cord (not hard-wired). I've experimented with swinging them through a long exposure with great success.


Wrapping Up

So, you may think I'm nuts. Couldn't agree with you more. I am nuts about lights, and experimenting with them. I hope you try all of the above!

Have you tried something I didn't mention? Let me know in the comments! I'm game for some more light writing fun.

Matt Hill is a partner and workshop leader with National Parks at Night. See more about his photography, art, workshops and writing at MattHillArt.com. Follow Matt on Twitter Instagram Facebook.

UPCOMING WORKSHOPS FROM NATIONAL PARKS AT NIGHT