Supersize Me: Adobe Brings Us High-Quality Quadruple Enlargements

This week we’re showcasing an exciting new feature from Adobe. Want to learn even more about developing your digital photographs? Join Tim Cooper and Chris Nicholson on the Seattle waterfront this July for a weeklong Post-Processing Intensive workshop, including night shooting along the city shores of Puget Sound.


The folks at Adobe have done it again. They’ve taken a good process and made it even better. This time they have made use of advance machine learning to drastically increase the quality of enlarged images in a new process called Super Resolution.

If you’ve been paying attention to news in the photography world this past week, then you already know all of that. But what we wanted to know is this: How well does Super Resolution work with night photos?

Let’s have a look …

What is Super Resolution?

Super resolution is a new process that enlarges your image files while maintaining (creating!?) an extremely high level of detail. (For more info, see Adobe’s explanation.)

Over the years, Adobe has done a great job of tweaking and creating new algorithms for enlarging image files, but this time they have outdone themselves. A direct side-by-side comparison of enlarged photographs shows the superiority of this new process, even in finicky long-exposure and high ISO images. You can see the difference between the newer Super Resolution files and the same files upsized with Adobe’s previous enlargement algorithm, Preserve Details (enlargement), in Figures 1 through 3. (These are best viewed on a larger display to more clearly differentiate the results.)

Figure 1: Lighting painting, ISO 200. This shows an upsized image at 100 percent (actual pixels), enlarged with both the old method and with Super Resolution. (Click to enlarge.)

Figure 2. Milky Way, ISO 6400. The traditionally upsized version appears a slight bit sharper, but the Super Resolution version shows much better grain structure. It’s always easier to add a bit of sharpening as opposed to trying to reduce noise, so again Super Resolution wins. (Click to enlarge.)

Figure 3. Moonlit landscape, ISO 6400. In this comparison the Super Resolution version shows better sharpness and a smoother sky.

As you can see in the above examples, overall the new process produces better detail and smoother gradients in the areas with less detail. Super Resolution does seem to add a bit more color noise in the shadows, but that’s easily remedied.

Who Needs Super Resolution?

While this is an awesome new feature, you may not have to use it all that often. You typically need to enlarge images only when making prints. Even the resolution of older cameras exceeds what’s needed for posting on websites and social media. So when you’re Instagramming, you don’t need this. But if you are making large prints from your files, you might want to use Super Resolution to upsize the file before you send it out or send it over to your home printer.

Another possible use would be upsizing images that have been dramatically cropped. I’m not talking about trimming a bit around the edges or cropping your image into a square, but rather a severe crop (you know, the kind of crop that you feel guilty about). Super Resolution can get those files back up to a more usable size.

How to Use Super Resolution

At the time of this writing, Super Resolution is available only through Adobe Camera Raw (ACR), but will soon be available in Lightroom as well. (We’ll keep you up to date. Be sure to watch our Facebook channel for the announcement.)

1. Launch Photoshop and choose File > Open.

2. Navigate to the desired RAW file and choose Open. This will open the image into the ACR editor (Figure 4).

Figure 4. Resulting ACR dialog after opening your RAW image in Photoshop.

3. Control-click (Mac) or right-click (PC) on the image and choose Enhance (Figure 5).

Figure 5.

4. In the resulting dialog, choose Super Resolution and then click Enhance in the lower right corner (Figure 6).

Figure 6. The Enhance Preview dialog.

5. Photoshop will create a new image from the original RAW file that is twice as tall and twice as wide as the original. Click on the resulting image to highlight it, then click Open in the lower right corner (Figure 7) to open the image into Photoshop.

Figure 7.

At this point you are back in Photoshop with an image that has four times as many pixels as the original, and is ready to be edited or printed.

Now What?

If you are ready to print through Photoshop, you are all set. File > Print will bring up all of the necessary dialogs for you to make a print on your home printer.

If you want to send out this file to a professional print house such as Bay Photo Lab, simply choose File > Save. A dialog will offer options of file type and location. I suggest saving the file in Photoshop format (i.e., PSD, for future use) and as a JPG to send to the lab. To keep things organized, save the file back into to its original folder.

At this point, Lightroom may not be aware that a new photo has been created from the original. If you would like to be able to access the image via Lightroom, open your catalog and navigate to the folder with the newly created file. In the Library module, Control-click (Mac) or right-click (PC) on the folder in the Folders panel and choose Synchronize Folder. Lightroom will see your new image and make it accessible.

If you want to just make a print, you can simply navigate (outside of Lightroom) to the folder with the new file, select the image and upload it to the printer of your choice.

The Long and Short of Super Resolution

Super Resolution is awesome—for making large prints. It is not a tool that is needed on a day-to-day basis. If you want to upsize an image to make a large print (say, 20x30 inches or larger), this should be your go-to tool. Likewise, if you have an image that has been severely cropped, Super Resolution can be a good way to regain the resolution needed to display the image as you envisioned.

Note: This blog post is a quick reference on how to use Photoshop’s new Super Resolution upsizing algorithm. It begs a lot of related questions, such as, “When is your current resolution not enough?” or even “What is upsizing?” For a deeper dive into understanding resolution and upsizing, keep an eye on our blog.

Tim Cooper is a partner and workshop leader with National Parks at Night. Learn more techniques from his book The Magic of Light Painting, available from Peachpit.

UPCOMING WORKSHOPS FROM NATIONAL PARKS AT NIGHT

Resharp Your Lens: How to Calibrate Infinity Focus on the Irix 15mm and 11mm

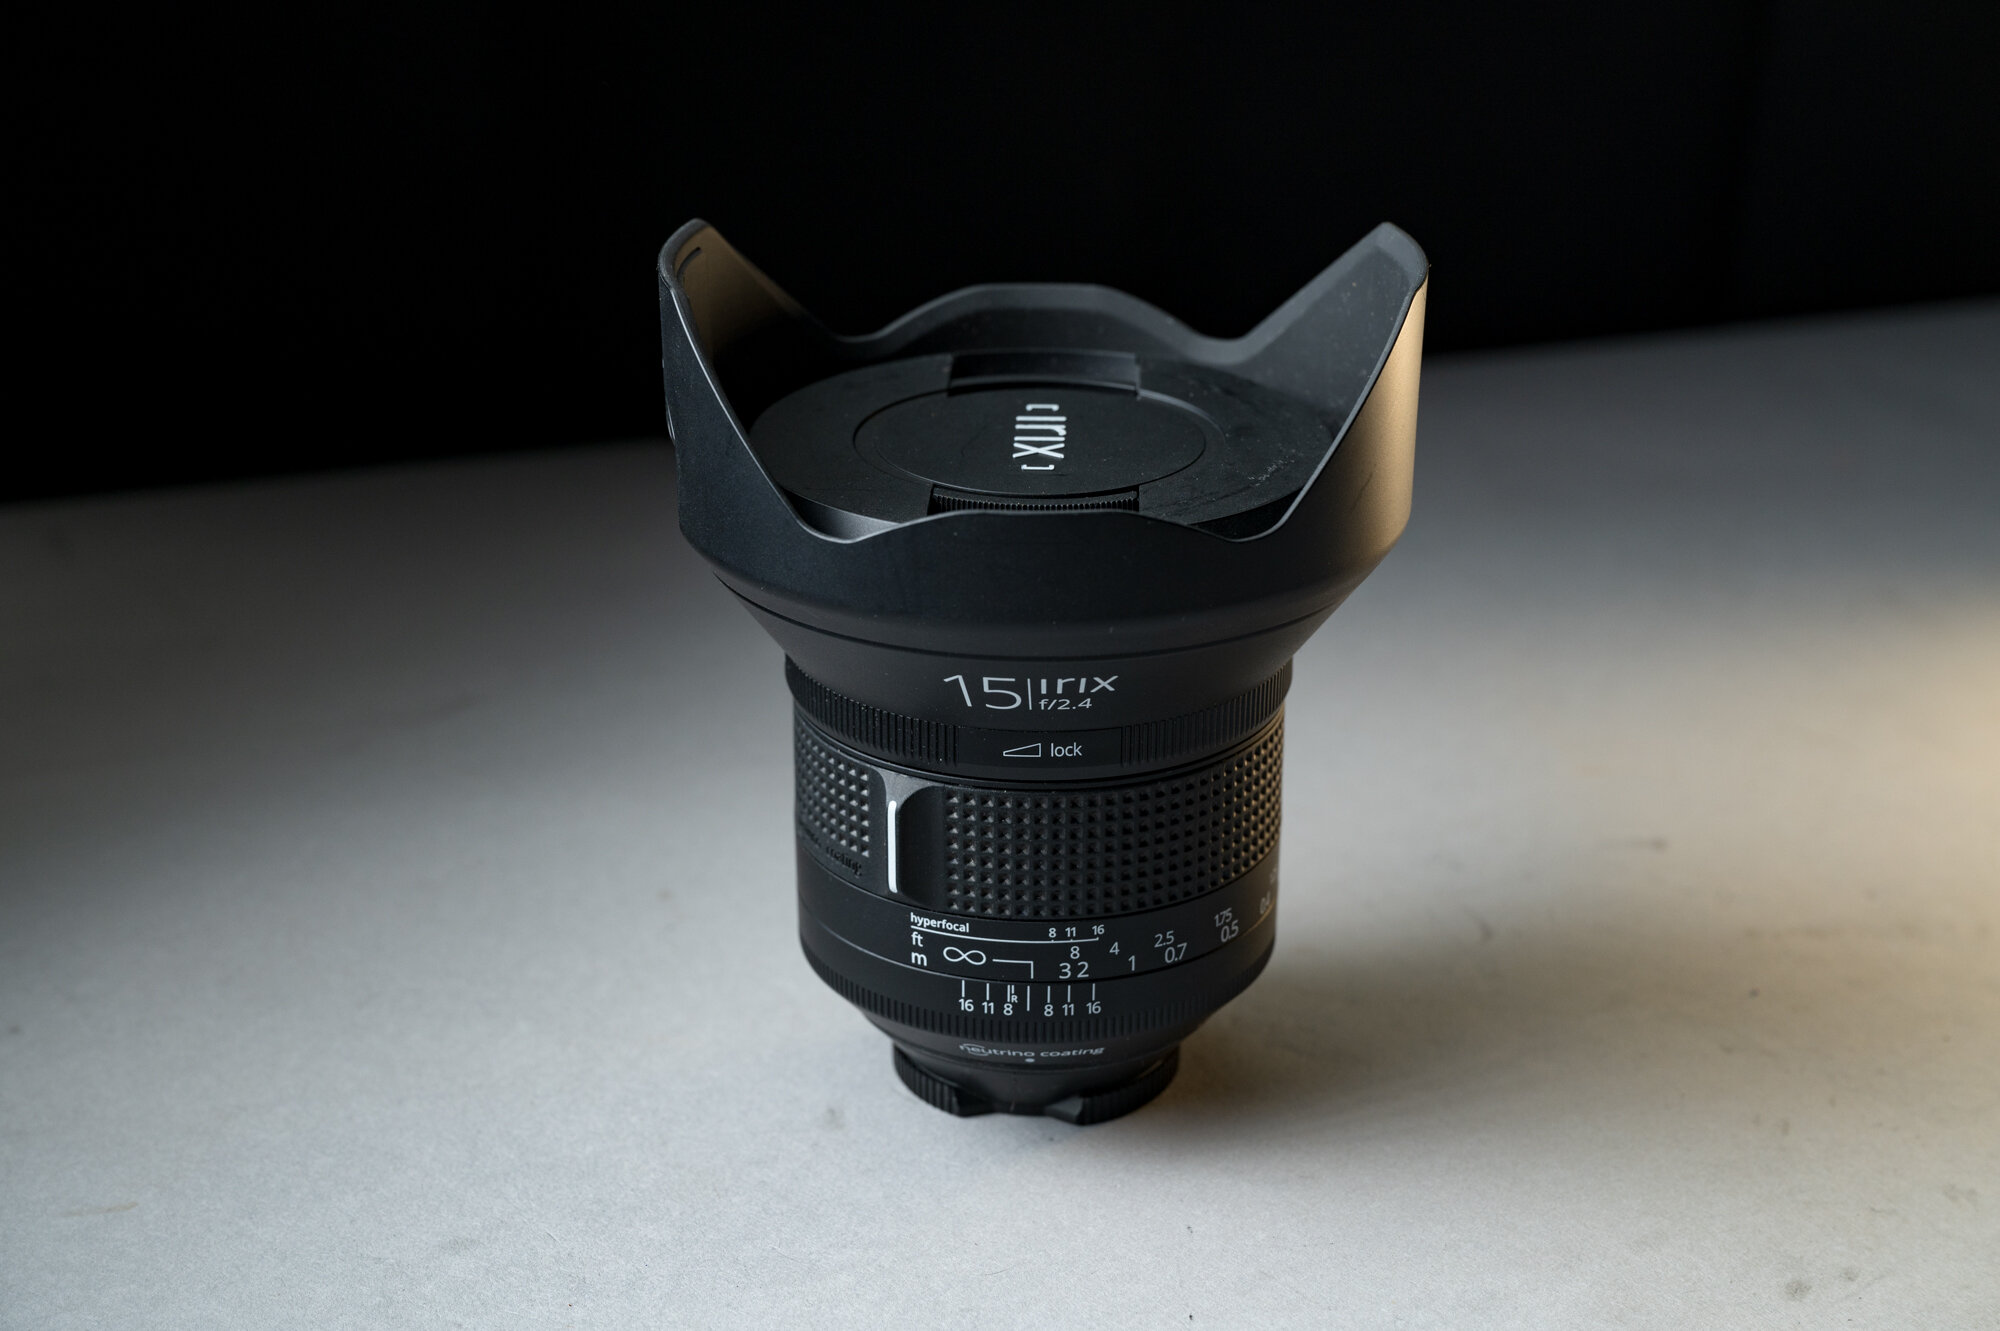
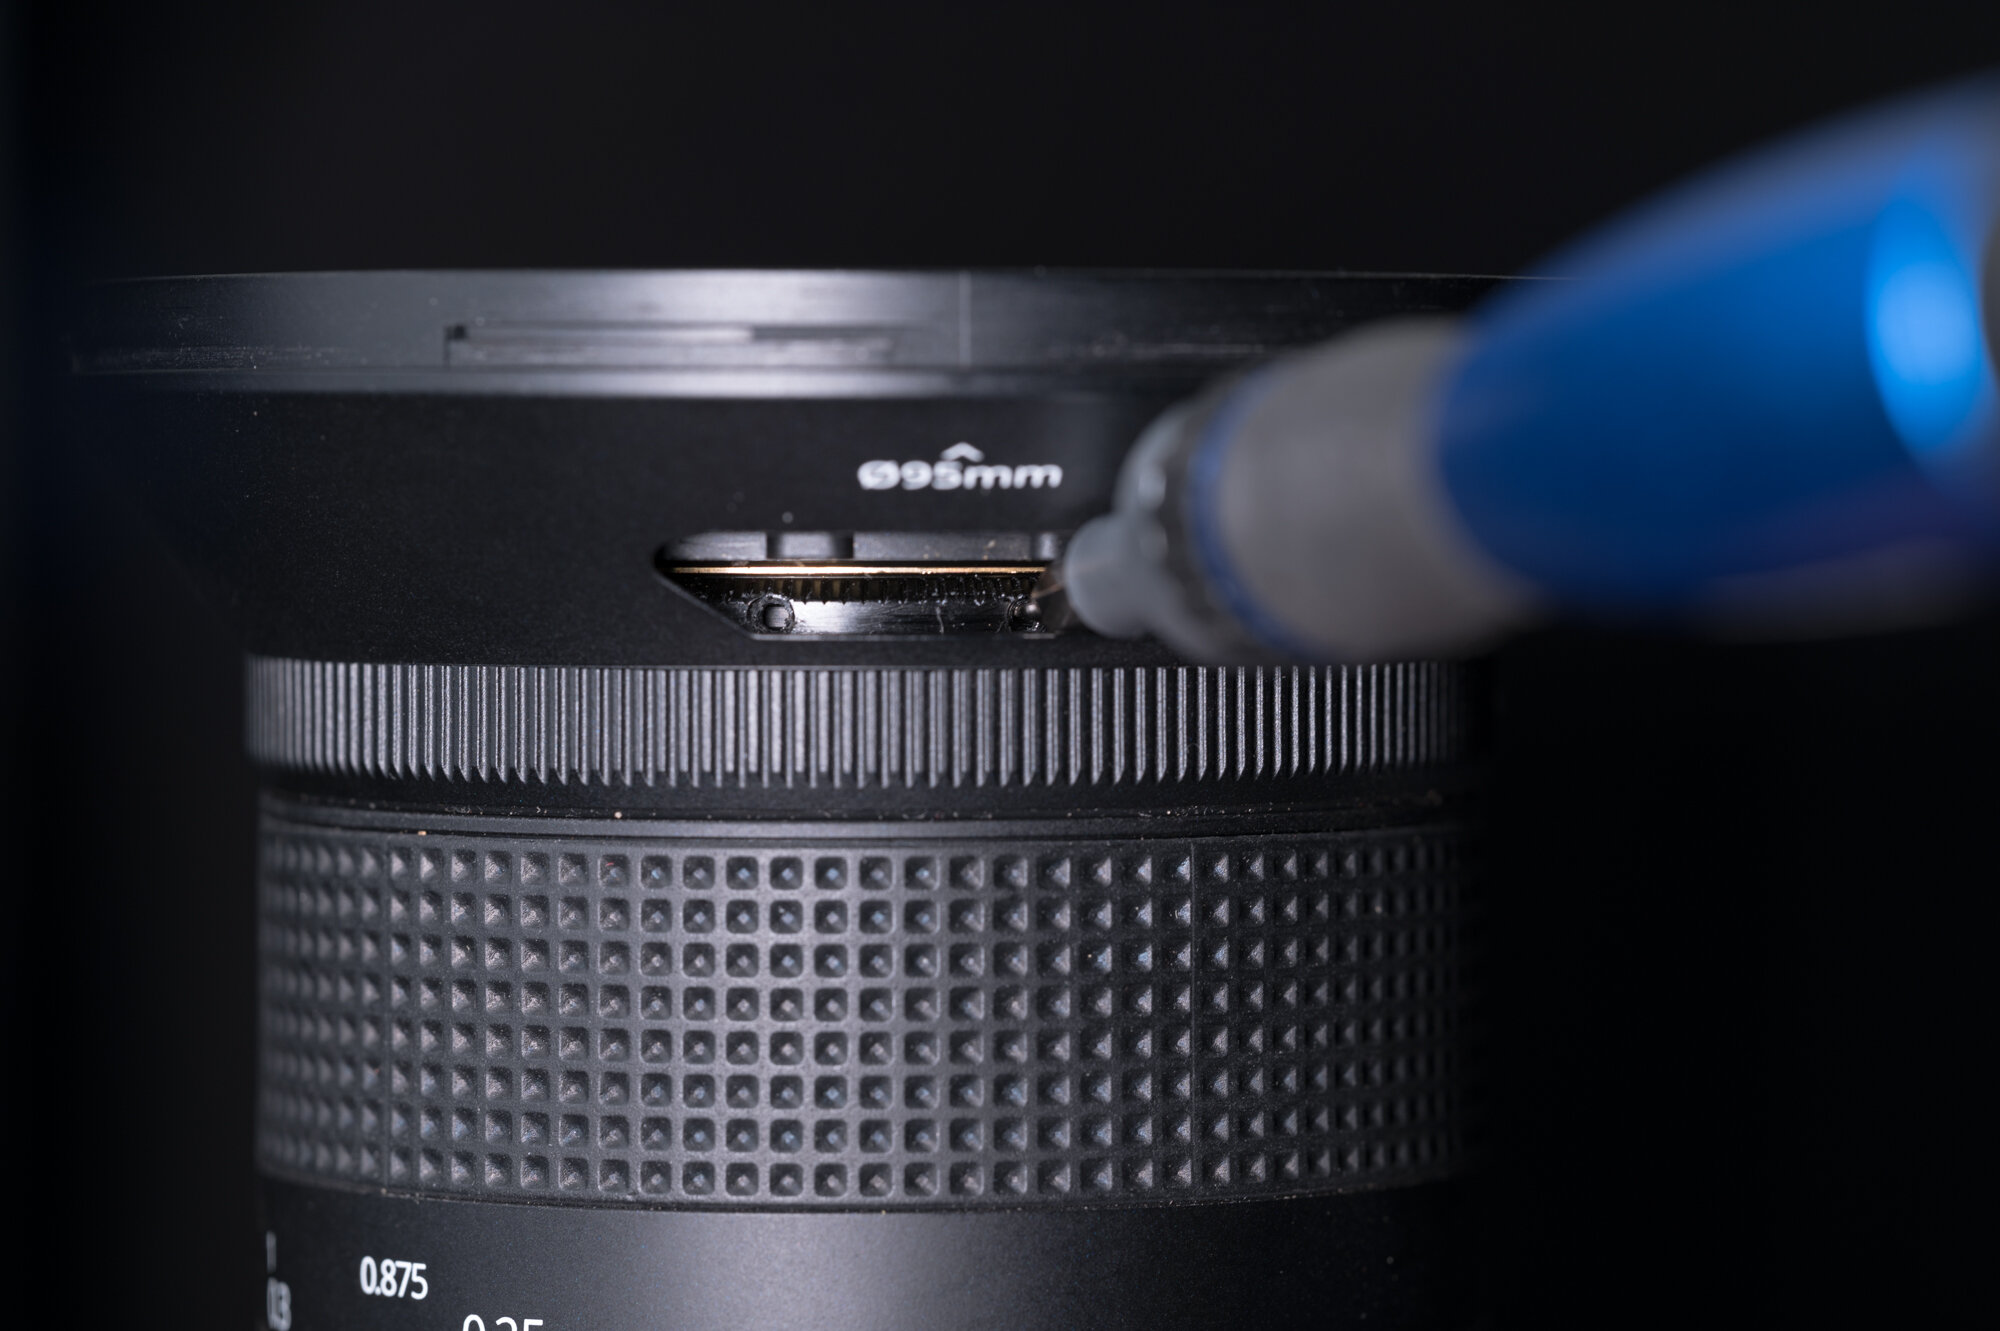
Irix 15mm and 11mm lenses are very popular among the National Parks at Night instructors and our workshop attendees. There are multiple good reasons for that, all of which have to do with sharpness, including:

  • The lenses have very little coma.

  • They’re sharp as heck.

  • The focus ring clicks into place at infinity, giving you tactile feedback for focus, which is so helpful in the dark.

Put all those together, and you pretty much have a guarantee that your stars will be sharp.

Irix has another feature that will allow you to stay sharp too: If you find that the infinity mark is off, you can calibrate it at home.

Why would you need to do this? Our experience is that the focus is perfect as received from the factory. But, as time passes and your lens gets jostled around during travels, it’s possible the focus can drift. It happens to the best of lenses. But with most brands you need to send such lenses to a repair technician, while Irix superwides enable you to self-fix this relatively quickly.

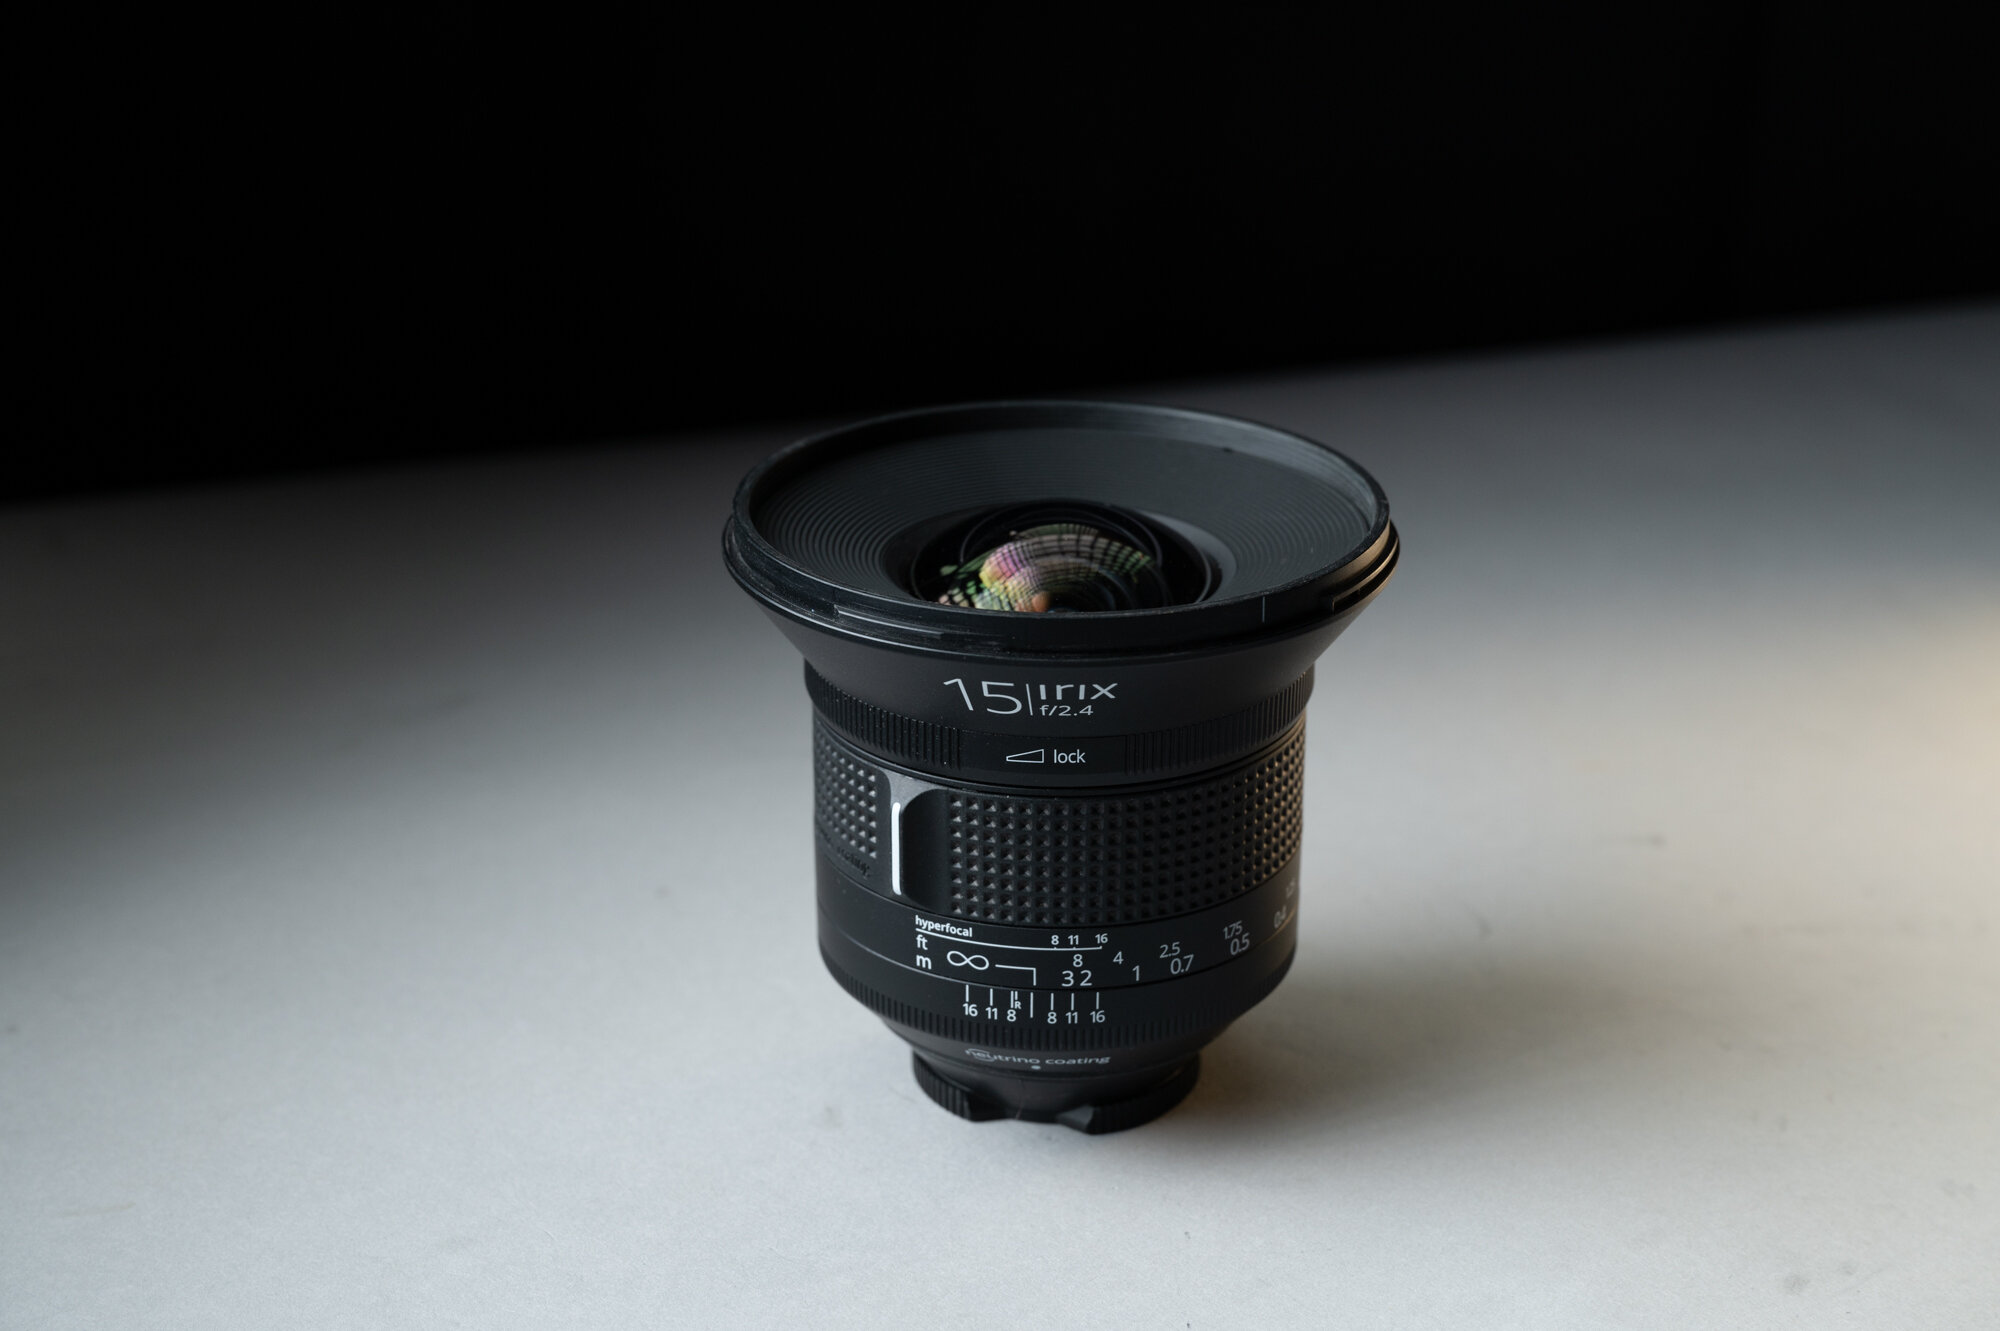
If you own an Irix 15mm f/2.4 wide angle lens or 11mm f/4.0 rectilinear wide angle lens, you can follow the instructions below to calibrate your own infinity focus.

Note: If you have really poor eyesight or your fingers aren’t nimble, you may consider sending it in to Irix instead.

The Irix Calibration Process

What you will need:

  • camera

  • tripod

  • torx T6 screwdriver with a magnetic tip

  • standard slotted 1/16-inch or 1.5mm screwdriver with a magnetic tip

  • a clean, dust-free, well-lit space with a white or very light surface

  • daylight

I used a computer repair kit I bought at a local home improvement store. If you don’t have a set like this, you can find one at B&H Photo or Amazon.

Step 1: Remove the lens hood.

You use the lens hood, right? You should, for protecting that slightly bulbous front element from bumps and scratches, if nothing else. Anyway, time to remove it, for just a few minutes.

Step 2: Lock to infinity.

As mentioned before, infinity focus is easy with an Irix. Just turn the focus ring until you feel it click into the infinity detent.

lock Itrix 15mm.jpg

Then turn the focus lock ring all the way to “lock.” I use two hands for this and I move slowly so that the focus ring doesn’t move while locking it down.

Step 3: Open the calibration window.

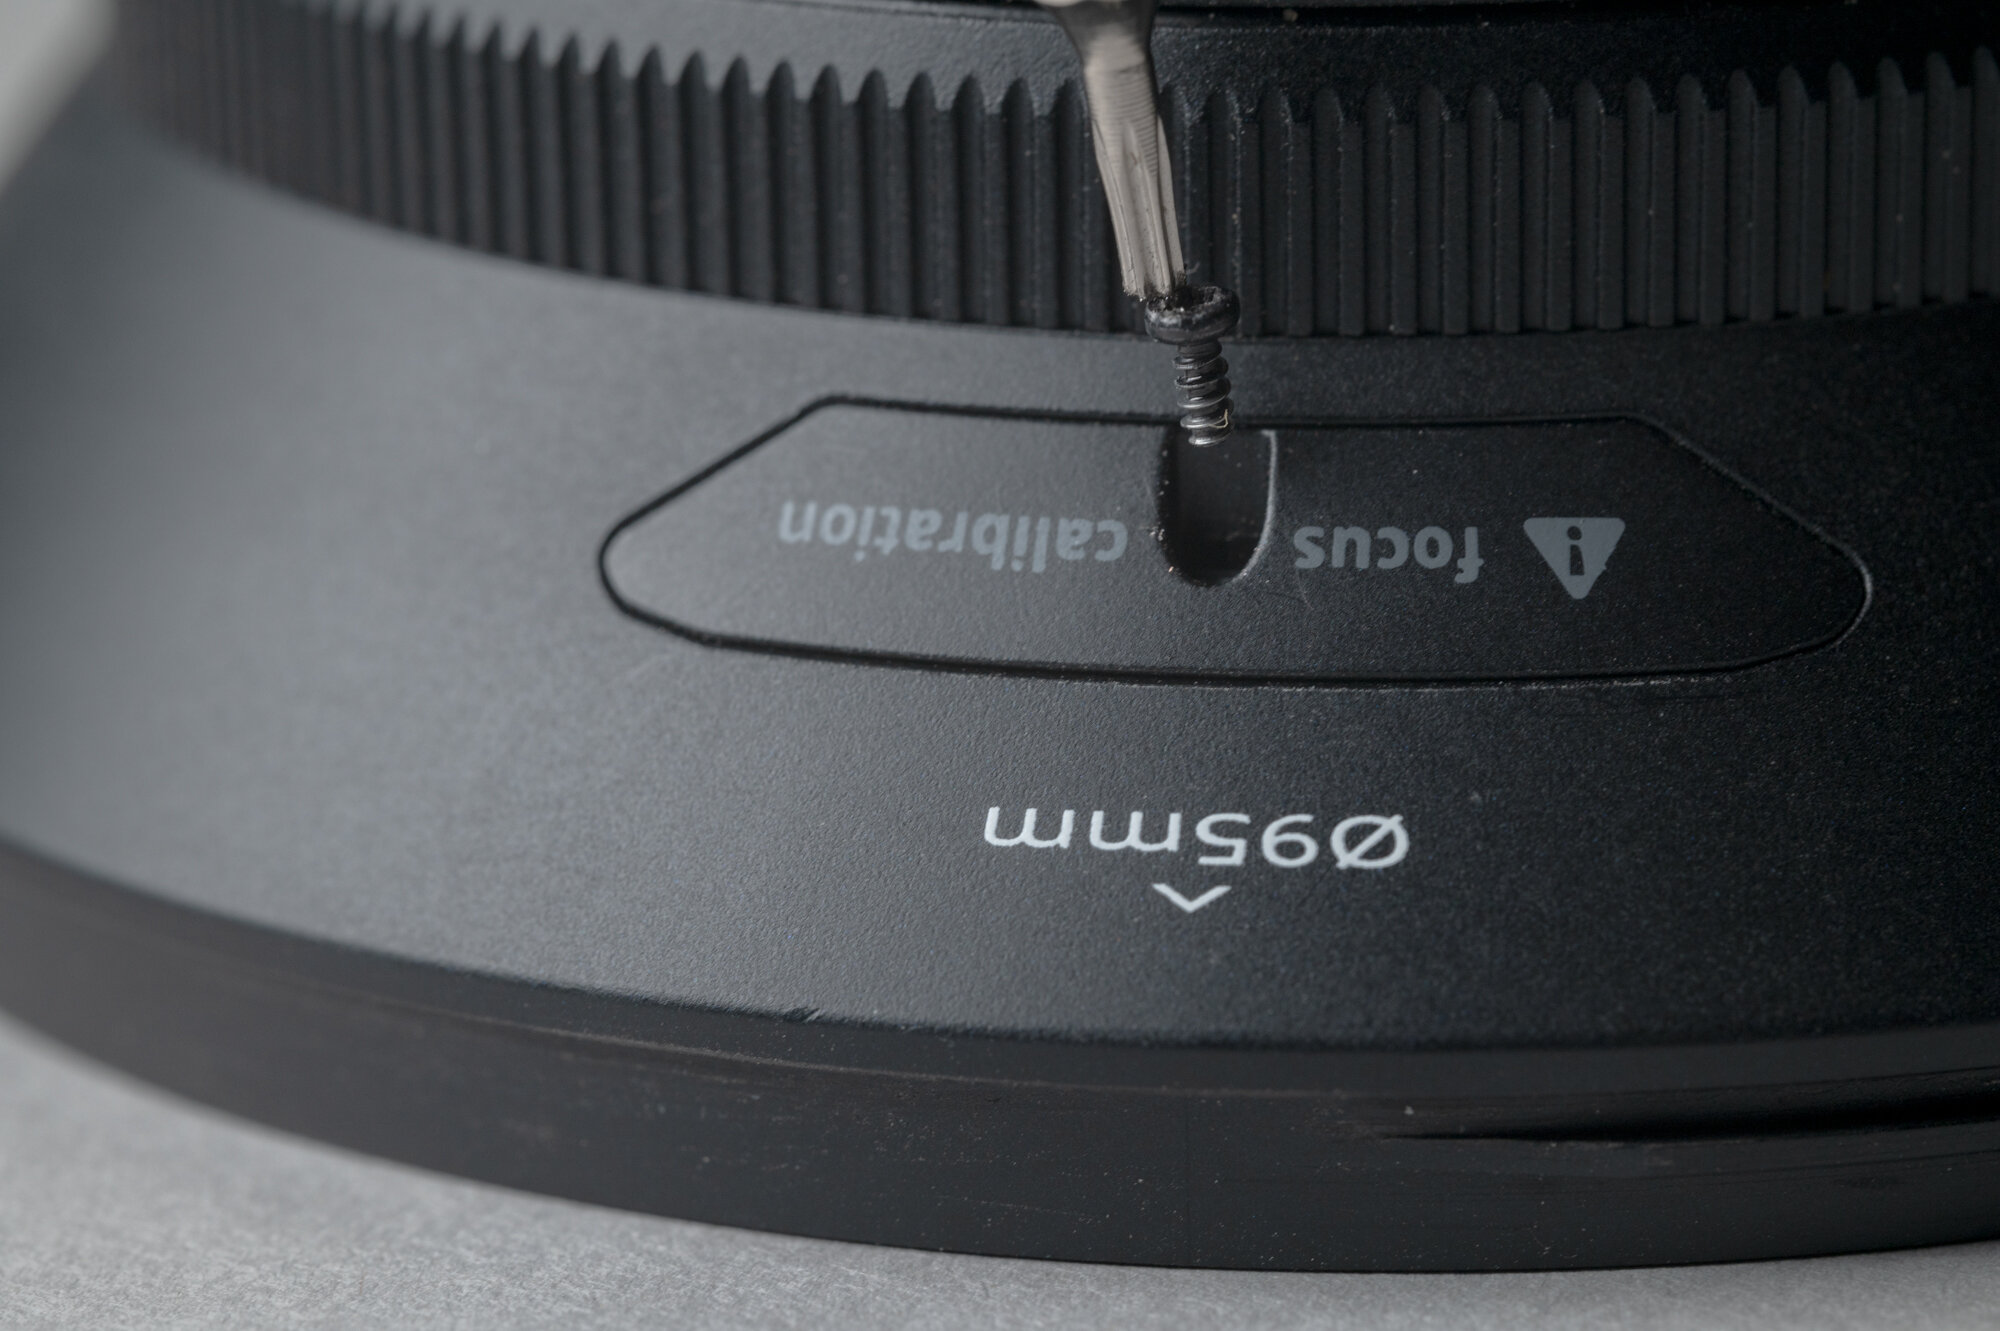
Use a Torx T6 screwdriver to open the calibration window by removing the screw entirely. Set the screw and cover aside in a safe place, such as a small plastic bin.

Carefully slide out the plastic cover labeled “focus calibration” (the head of the Torx screwdriver is convenient for lifting the cover away).

Step 4: Find the interior locking screw.

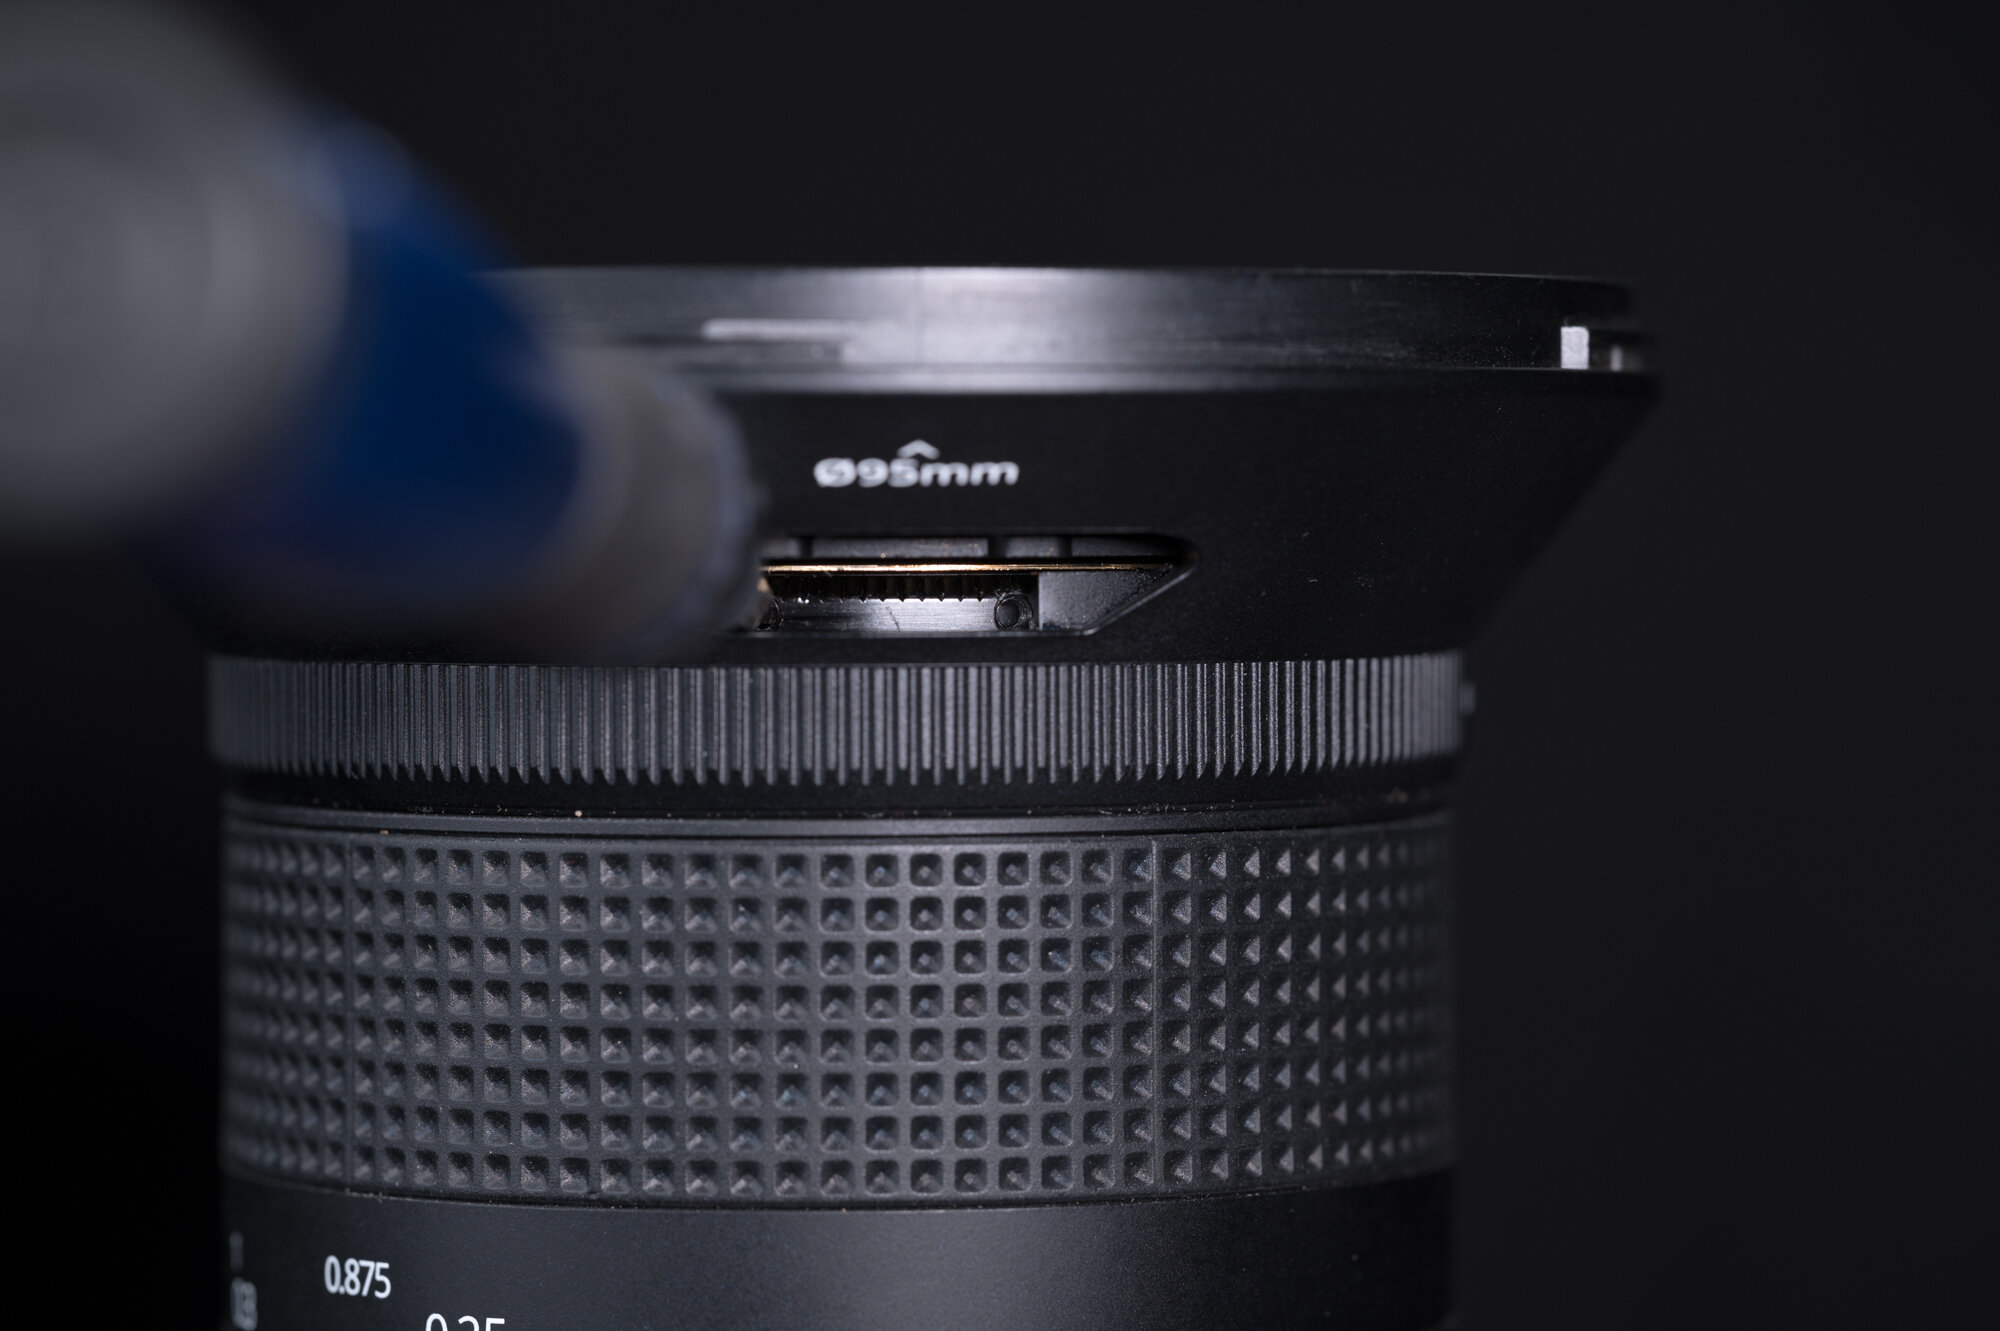
Look inside at the calibration ring, and find a slot screw. If you don’t see one, slightly turn the focus lock ring until you see the screw.

Note: You’re looking for the small slot screw, as opposed to the larger screws that keep the calibration ring in place. You absolutely do not want to unscrew the latter.

Step 5: Unlock the focus

Using a 1.5mm slotted screwdriver, fully remove the small locking screw from the calibration ring and set it aside in a safe place.

Note: This is where it’s vital you have a magnetic head on your screwdriver. You do not want to lose that screw inside the lens barrel.

Step 6: Set the lens.

Mount the lens on a camera and mount the camera vertically on a tripod. Make sure you have easy access to the calibration window.

Go outside in daylight and point the camera at a distant object (at least 36 feet away) with good contrast. Orient this object in the center of the frame and set your focus point to the exact center.

Set the aperture to the widest setting—i.e., f/2.4 for the 15mm or f/4 for the 11mm.

Step 7: Zoom in.

Activate your camera’s live view and zoom in to maximum magnification.

Step 8: Adjust the focus.

Insert the slotted screwdriver into one of the holes in the calibration ring, and then rotate the ring slowly back and forth. (As you adjust, you may need to choose a new hole.)

Keep rotating until the objects at infinity (36 feet away or further) become as sharp as possible on your rear LCD screen or when viewed in your EVF. It’s a very slow process. Take your time. If you have one, use a focusable loupe (such as the Hoodman HoodLoupe) to help you see the changing sharpness even better.

Step 9: Lock it Down.

Once focus is achieved, go back to your work area inside. Remove the lens from your camera.

Look for an open spot to thread the small locking screw back into the calibration ring. Depending on how much you adjusted the focus, that may not be the same hole you removed the screw from earlier.

Using the slotted screwdriver, carefully insert the screw and turn until firmly finger-tight. Do not over-tighten.

Step 10: Close things up.

Slide the plastic “focus calibration” cover back in, then secure it using the Torx screw and the T6 screwdriver.

Unlock the focus lock ring.

That’s it—you’re done! You now have a perfectly calibrated Irix lens for photographing amazing star images. I recommend heading out that night and shooting a few test images of the stars just to be sure.

For those who like to watch, here is Irix’s video version of this tutorial:

Matt Hill is a partner and workshop leader with National Parks at Night. See more about his photography, art, workshops and writing at MattHillArt.com. Follow Matt on Twitter Instagram Facebook.

UPCOMING WORKSHOPS FROM NATIONAL PARKS AT NIGHT

The Next Steps: 10 More Books to Round Out your Night Photography Library

Last June I wrote a post titled “10 Essential Books for the Night Photographer’s Library,” in which I confessed my addiction to collecting photo books. Not surprisingly, the list was fairly predictable and included night photography’s greatest hits. That’s not to say I didn’t sneak in a curve ball or two––Bill Brandt’s scarce and expensive A Night In London comes to mind.

Of course, the night photography world contains more than just 10 important books, so this week I’m extending the list with 10 more. In keeping with the Apple Music theme, we’ll call this post “The Next Steps.” (Yes, there will be a “Deep Cuts” edition down the road.)

Several of these books are out of print, but most are easy enough to find on the used market, although some quite expensively, for sure. Some also can be had for just a few dollars, but that doesn’t mean they aren’t worth collecting. Like me, Gabe Biderman has an expansive collection of photography books, so I consulted with him when compiling this list. They are presented here in no particular order.


Day to Night, Stephen Wilkes

I have admired Stephen Wilkes’ work for a long time. The Griffin Museum of Photography near Boston exhibited his Ellis Island photographs as 40x50-inch Cibachrome prints in 2008 and left me breathless. I haven’t picked up my own copy of Day to Night yet, but have been admiring Wilkes’ growing body of work for several years. Each panoramic image is made up of many, many (up to 2,000) photographs shot over the course of 30 hours from a single stationary camera position. The images were made in both iconic urban environments and stunning natural landscapes, and tell a great story, or more often, many intertwined stories in a single image. The results are a unique and stunning way to record the passage of time––in essence, a 24-hour time lapse in a single frame.


The World at Night, Babak Tafreshi

Babak Tafreshi is an Iranian photographer and founder of the group The World at Night, a collaboration of photographers from 25 countries who are dedicated to capturing, preserving and sharing the night sky. Tafreshi has curated the images in The World at Night, which are divided into six groups:

  1. symbols of all nations and religions embraced by the sky

  2. UNESCO World Heritage Sites at night

  3. the universe revealed through constellations, auroras and other wonders

  4. images highlighting the beauty of dark skies away from light-polluted areas

  5. celestial events, from comets to eclipses

  6. astro-tourism destinations, such as ancient astronomical monuments and modern observatories

It’s an interesting book, full of powerful images. For an anthology representing 34 photographers from around the world it’s disappointing that there are no women included, and that the photo credits are in the back of the book rather than with the images. (Yes, I realize that there is only one book by a woman on this list. There are many contemporary women night photographers, but relatively few published ones.)


Celestial Nights: Visions of an Ancient Land, Neil Folberg

Neil Folberg is the son of legendary San Francisco gallerist Joe Folberg, and when Joe died, Neil took over the gallery and moved it to Jerusalem. The images in Celestial Nights were made primarily in the Sinai desert in Israel, Egypt and Jordan. First published by Aperture in 2001, and again by Abbeville in 2008, both editions are beautiful reproductions of Folberg’s unique night photographs, which were made between 1997 and 2000. Many of the images are composites of infrared landscape images combined with sky images made with a tracking device—which is the only way to photograph star points on film.

There is a transient and mystical quality to these photographs. They are realistic and believable, yet otherworldly. They are remarkably successful, and doubly so for being film-based composites. This one is a must-have.


Nightwatch: Painting with Light, Noel Kerns

This dense collection of work from locations across the United States covers a lot of ground with light-painted scenes that are reminiscent of but distinctly different than Troy Paiva’s Lost America style. Nightwatch is a compendium of 254 pages of night photography and light painting that encompasses subjects ranging from abandoned gas stations, motels, decommissioned military bases and decaying industrial complexes, to forgotten farmhouses and ghost towns. Noel Kerns’ work is presented with supporting commentary on the locations. It’s very reasonably priced, especially for a book of this quality and size.


Lost America: The Abandoned Roadside West, Troy Paiva

Hopefully you caught Troy Paiva’s recent presentation at our Night Photo Summit last month. His images, collected over 30 years—presented with experiences and anecdotes from when they were created—made for an entertaining and informative hour. Think of his first book as a denser version of the first half of that career, on paper instead of on Zoom. Yes, you need to pick up a copy of Lost America, the seminal work from the guy who defined (if not invented) the genre of light-painted abandonments. There are four other collection-worth volumes of Paiva’s work in print, including the most recent titles Boneyard, Junkyard Nights and Night Salvage.


Night/Shift, Lynn Saville

Lynn Saville has published three books of night(ish) photographs, beginning with Acquainted with the Night in 1997, followed by Night/Shift in 2009, then Dark City in 2015. The first book contains gritty, grainy, 35mm black and white images interspersed with selected poems. (The book title is from a Robert Frost work.) I’ve just ordered Dark City recently, but it appears to be a continuation of the twilight color work of the New York images in Night/Shift. It’s remarkable how Saville can find such quiet scenes in places as busy and bustling as Manhattan. Her work reminds me of a looser version of Jan Staller’s gorgeous book Frontier New York from 1988. In Arthur C. Danto’s introduction, he writes that Saville’s images remind him of Atget’s Paris: “She is his New York counterpart, the Atget of vanishing New York, prowling her city at the other end of the day, picking up pieces of the past in the present, just before it is swallowed by shadows.” High praise indeed.


Theaters, Hiroshi Sugimoto

For almost four decades Hiroshi Sugimoto has been photographing the interiors of theaters using a large-format camera and no lighting other than the projection of the running movie. He opens the aperture when a film begins and closes it when it ends. In the resulting images, the screen becomes a reflector that subtly brings forward the rich architectural details of these spaces. Sugimoto’s minimalist black and white images draw you in to a quiet world of contemplation, be it his famous seascapes or these theater interiors that include the classic American movie palaces of the 1920s and 30s, historic theaters in Europe or disused theaters that show the ravages of time. (Tip: Theaters is quite expensive, but the French-language version can be acquired for one-third the price. It’s all about the images anyway.)


Mont St Michel, Michael Kenna

Michael Kenna has said that he doesn’t think of himself as a night photographer, and doesn’t distinguish between daytime or nighttime image-making. Like his countryman Brandt, whose work inspired Kenna early on, Kenna’s daytime images sometimes look like night, and vice versa. No matter, his photographs are always stunning. He has published more than 30 monographs in about as many years; very few photographers have consistently produced such compelling work. Once you have acquired Night Walk and Night Work, the two books mentioned in the previous post, Mont St Michel (or the equally great titles Ratcliffe Power Station, Rouge and Venezia) should be next on your list. They all contain a significant portion of night images, and are still affordable, unlike some of Kenna’s harder to come by books.


Secret City, Jason Langer

Jason Langer worked as Michael Kenna’s assistant from 1989 to ’95, but has very much set his own course since setting out on his own. He’s published three books of his work, with Secret City being the first, as well as my favorite. Many of his images include people, something you’ll never see in a Kenna photograph! Those photos aren’t portraits, at least not in the traditional sense. His noirish images tell anonymous stories that convey universal experiences, usually on the darker side of the emotional scale. You might describe Langer’s work as haunted, or more likely haunting––a fleeting moment that could easily be missed or overlooked, but when captured by Langer’s camera, cannot be ignored. Think Edward Hopper meets Brassai and you might just conjure up something close to a Langer photograph.


The End of Night, Paul Bogard

Paul Bogard gave a passionate presentation based on The End of Night at the Night Photo Summit, and it made me want to go back and reread this delightful book. A warning in many ways, it foretells of the consequences of the loss of dark skies to light pollution, and how that is affecting all life on the planet. At the same time, it’s a love story to nature, to the Earth and to the night itself. The End of Night is not a photo book, but anyone and everyone who cares about the night should read it.


Buying Books

Where can you find these titles? Aside from Amazon and eBay (the latter tends to be overpriced for books), look at AbeBooks, a used-bookseller marketplace, especially for rare and out of print titles. PhotoEye in Santa Fe is another great resource; if you find yourself in New Mexico, it should be a bucket-list stop.

I have to warn you though, photography books are addictive. I bought three more books just doing research for this article. Writing this took me several times longer than it should have because I kept getting sucked down the rabbit hole of checking out other books and adding them to my wish list.

Note: You can see these books and many more our Bookshelf page, where you can peruse volumes that the five of us love and recommend. You can also use the links above to learn more and/or to purchase them. Many are affiliate links that reward National Parks at Night with a small commission when you use them, which helps maintain this website and enables us to provide quality content at no cost to you.

Lance Keimig is a partner and workshop leader with National Parks at Night. He has been photographing at night for 30 years, and is the author of Night Photography and Light Painting: Finding Your Way in the Dark (Focal Press, 2015). Learn more about his images and workshops at www.thenightskye.com.

UPCOMING WORKSHOPS FROM NATIONAL PARKS AT NIGHT

Controlling Highlights in Urban and Suburban Night Photography

I love shooting suburban night scenes. Which is a good thing, because I live in an awesome place for it: the historic, charming, picture-perfect village of Catskill, New York.

But working a suburban environment (and especially an urban environment) at night comes with a major challenge: artificial lights. Wherever we find artificial lights at night, we also find blown-out highlights in photos.

While working on my #CatskillNights project, it’s common for me to see a cool home that looks great to the naked eye but that doesn’t look so great in a single exposure. The dynamic range between the brightest brights and the shadow details are just too far apart.

Castle in the Snow, Catskill, New York. Nikon Z 6II with a Nikon 24-70mm f/2.8 S lens at 24mm. Four merged frames shot at 30, 10, 3 and 0.6 seconds; f/5.6; ISO 100.

How do we control this? By shooting multiple images at different exposures and combining them during post-processing into an HDR image.

But you must shoot it right on scene to have a chance of processing it right in post. So let’s begin with:

Getting it Right in Camera

First up, try to strategically hide visible light sources behind columns or trees. That will save you lots of highlight headaches. Why? Because it’s not the light that’s causing the problem—it’s the light source. It’s the bulb, the lamp, the streetlight itself. If you can hide those things behind objects in the composition, they go from being a problem to being magic.

If you can’t do that, no worries. Read on.

For my first frame, I shoot for an ideal overall exposure that has clear shadow detail. The highlights will blow out. That’s fine. For now, essentially you just want your camera’s histogram not to collide with the left side (Figure 1). Don’t worry about the right.

Figure 1.

For my second frame, I stop down 1 to 2 stops to rein in some highlight data, and then I inspect the image. And the histogram. Then I shoot more frames. I keep reducing the shutter speed by 1 to 2 stops until the highlights retain color and tonality.

Nikon Z 6II with a Nikon 24-70mm f/2.8 S lens at 24mm. 30 seconds, f/5.6, ISO 100.

10 seconds, f/5.6, ISO 100.

3 seconds, f/5.6, ISO 100.

.6 seconds, f/5.6, ISO 100.

To be extra sure, I zoom to 100 percent to ensure there is detail. If I don’t see highlight detail, I stop down further and make another exposure.

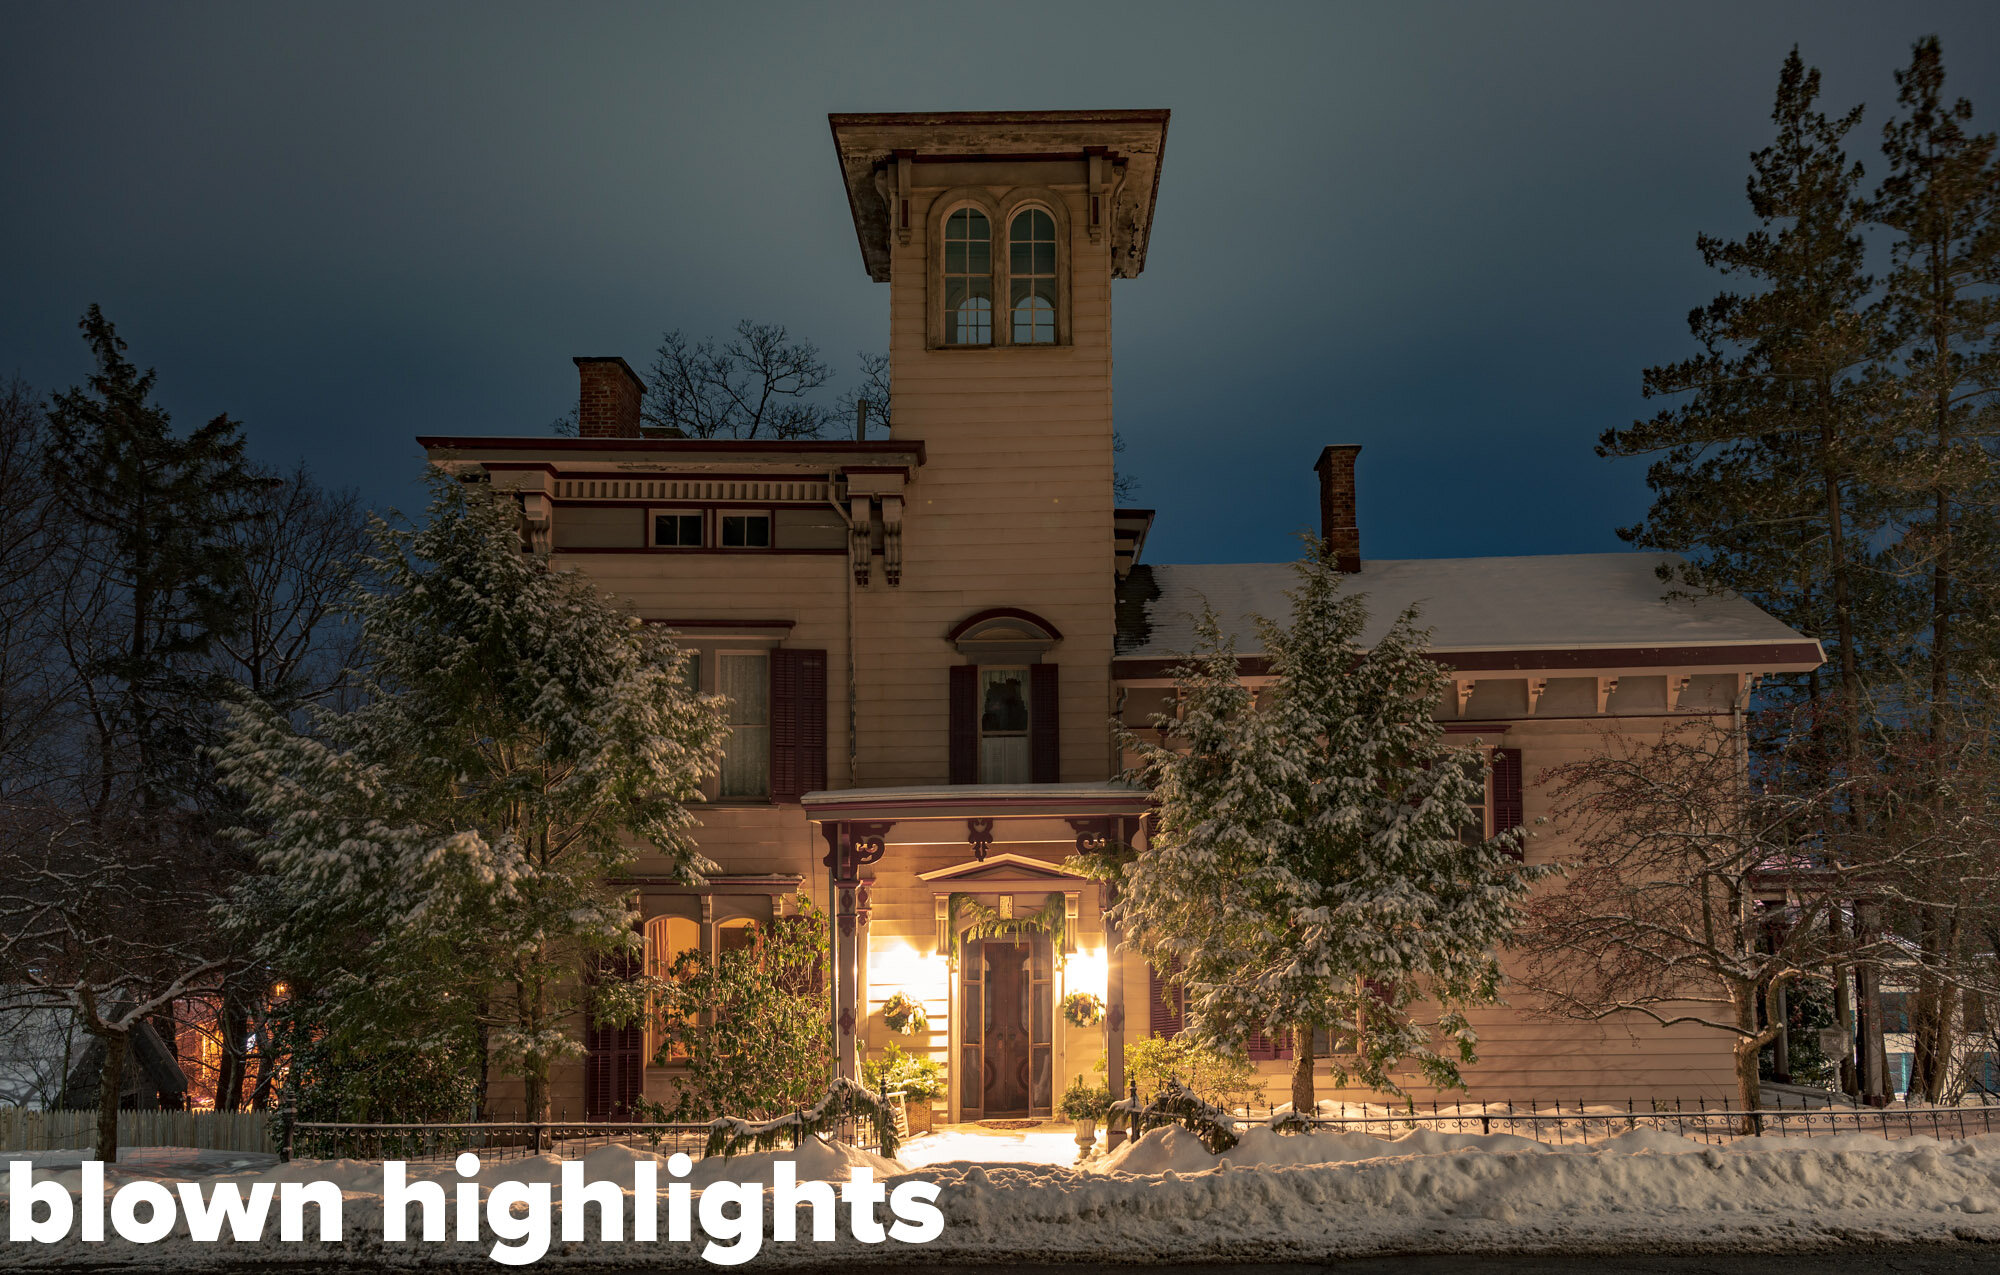
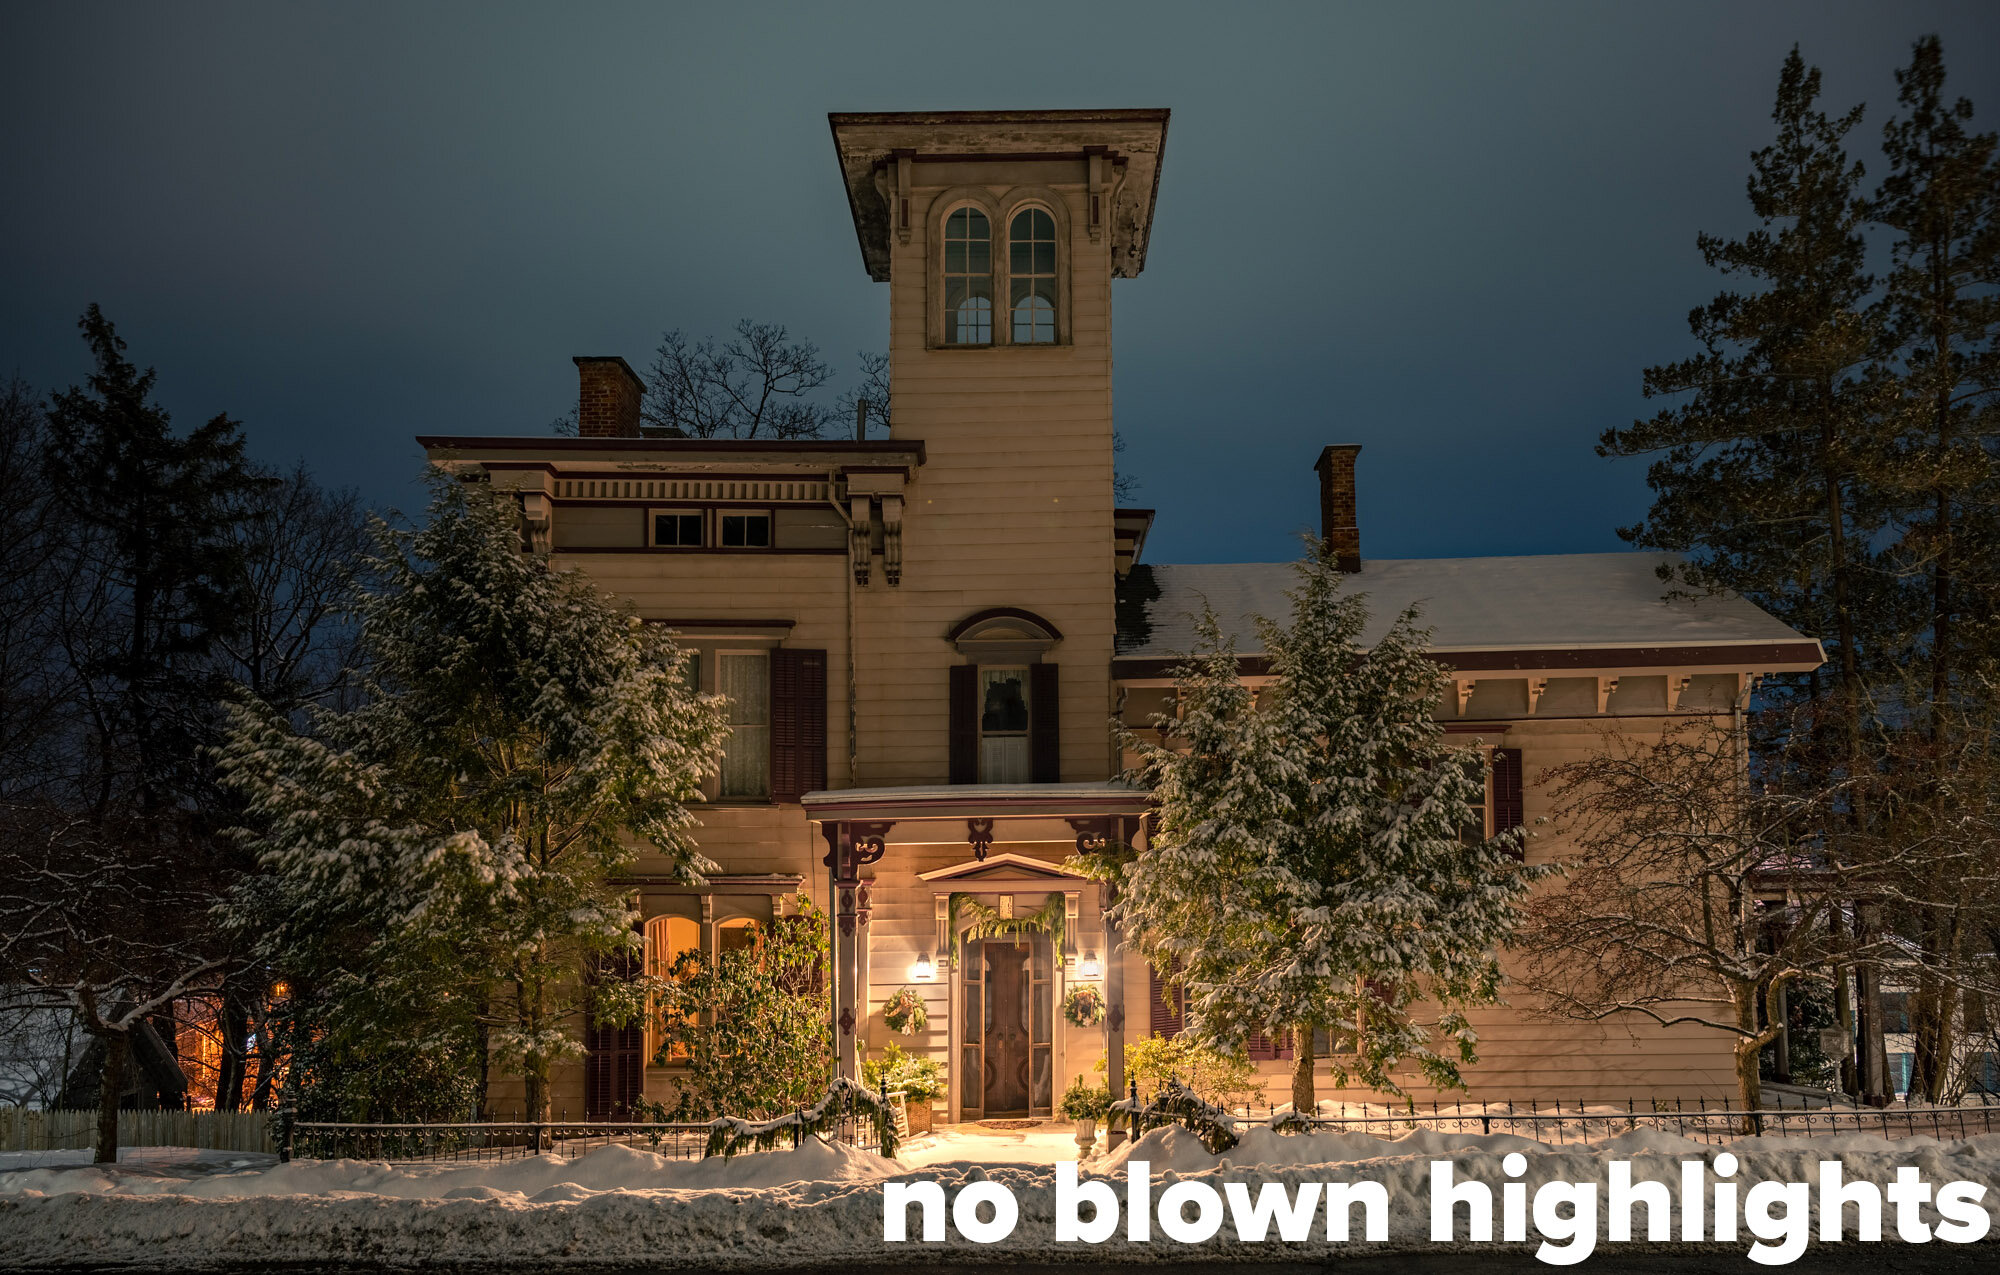
Below is an example of how a single shot can have terrible highlight transitions, versus a processed HDR composite. Look at the first image around the lantern and note the missing details on the wall, then look at the second image and note the complete details on the wall. It’s subtle when it’s right, but blatantly obvious when it’s wrong.

That’s it, really.

Make a great overall exposure and keep reducing your shutter speed until you get beautiful light sources with no highlights blowing out.

Also, you may notice that I shot every image in this post at ISO 100—because that’s the native ISO of the Z 6II. Do the same. Find your camera’s native ISO and shoot there. Cameras produce images with the widest possible dynamic range at native ISO, which is essential for this type of work.

You might consider getting fancy with your skies in a final, longer exposure (knowing you can mask the bottom half out in post—see Tim’s blog post on this in the near future). You could also create star trails, or points, or make really interesting cloud streaks. The sky is the limit (hee-hee).

Below are three more straight-out-of-camera image sets that show how I bracketed exposures to set myself up for a good night HDR final image. Each starts with the good overall exposure and ends with the frame that has decent highlight detail.

Processing the HDR Raw Materials

Thanks to constant improvements in software, making natural-looking HDR images is easier than ever. Many software vendors offer HDR options. I will be limiting this demo to how I use Adobe Lightroom Classic.

(Note: I find that using Adobe Photoshop for HDR is less intuitive and flexible—for me, anyway. I prefer the DNG workflow of Lightroom, and having only rasterized images coming back from Photoshop is too limiting.)

In the Lightroom grid mode, I select all the images in the sequence, right-click (Control-click on a Mac) and choose Photo Merge > HDR (Figure 2).

Figure 2.

In the HDR dialog (Figure 3):

  1. I toggle Auto Settings on and off to see which gets me closer to my goal. More often than not, Auto settings “on” is better for me.

  2. As for Auto Align, I always leave it on—no harm in doing so.

  3. For most nights, setting Deghost to “none” works fine for me. Unless there is a stiff wind or other movement in critical areas.

Figure 3.

Once I click “Merge,” a task is created inside Lightroom, the job will be processed, and the merged image will appear in the catalog alongside the other images (Figure 4).

Figure 4.

Now for the magic of editing.

For urban/suburban images, I first neutralize the color temperature and then warm it up a tad. (Tap the W key to activate the White Balance Selector, click on something white, then use the Temp and/or Tint sliders to warm to taste.)

Figure 5.

That gives me a good starting point for marching through the rest of my processing process:

  1. I go straight to Profile and change it to “Adobe Landscape.”

  2. I start sliding the Dehaze slider to the right. Pushing Dehaze also adds saturation, so …

  3. I usually pull back the Saturation slider a tad.

  4. I try lightly lowering Contrast.

  5. I usually drop Highlights down and push Shadows up.

  6. I make sure the black point is at the dead left of the histogram to get rid of any muddy shadows.

After doing those top-level edits, I use Transform (Figure 6) to straighten any vertical keystone effects from having used a wide angle lens tipped upward.

Figure 6.

Finally I do highlight control. Using a local brush, I make sure the visible light sources are believably detailed. I may lower the exposure, highlights or whites a little bit to taste. Or not at all. I am just looking for some details and hue in the light sources (Figure 7).

Figure 7.

I aim to shoot every light bulb to render it perfectly, yet to also make it look like a light source participating in the illumination of the scene. It’s a delicate balance to pull off naturally. Too much detail equals too much fake.

Less Has Been More

I have noticed that I’ve had a lot of success with HDR composites that are made from only two images. One that’s a solid general exposure and one that’s for extreme highlight control.

Why is that? I’m convinced the dynamic range of my Nikon Z 6II is so expansive that I have enough information to make a decent exposure of everything except for the light-source highlights. So I’ve found myself shooting fewer frames for sequences—and if I shoot more frames, they’re strictly for highlight control and not for revealing shadow details.

Here are some examples, each showing the good overall exposure followed by the highlight-control exposure followed by the final HDR:

I tested that theory by processing only one of the best single exposures to the best of my ability, then processing an HDR, and comparing. Noticing the areas of the image that actually needed to be improved really locked in for me how I need to shoot to make a “meh” urban photo into a banger.

Do the same. Test your particular camera to learn how you need to expose to make this all happen. Note that the older your camera is, the less dynamic range it probably has, so the more frames you’ll probably have to shoot to get good detail throughout the exposure.

Summary

It’s pretty simple to make gorgeous HDR images in urban and suburban areas:

  1. Get a good overall exposure, ignoring blown-out highlights.

  2. Get the highlights right in camera—shoot as many images as you need to get detail in them.

  3. Combine the images in Lightroom.

  4. Cook to taste (tastefully).

Have fun out there and be safe!

Matt Hill is a partner and workshop leader with National Parks at Night. See more about his photography, art, workshops and writing at MattHillArt.com. Follow Matt on Twitter Instagram Facebook.

The Conversation Continues …

See Matt and Lance talk more about “Controlling Highlights in Urban and Suburban Night Photography” in our #BlogChat YouTube program:


UPCOMING WORKSHOPS FROM NATIONAL PARKS AT NIGHT

Three Days of Night: A Wrap-Up of the Very First Night Photo Summit

Note: Missed the Night Photo Summit but want to catch up? For access to videos of all the presentations until February 2022, buy a Replays ticket!


Some honesty: In the weeks leading up to our Night Photo Summit, we sounded confident in our marketing. But behind the scenes, we had no idea how this would go.

We knew the speakers would be amazing—we know almost all of them personally, know they’re good people, know they always bring their best (which is among the very best in the business).

We knew that night photography is exciting to learn about, exciting to do—and that it’s hard to go outside and do it right now, at least the way we used to at this time last year.

We knew that even in the best of years, mid-winter is a time when people are looking for something new to do inside, and a weekend of e-palling around with other night photographers could more than satisfy that need.

However, that’s about all we knew. All five of us at National Parks have spoken at conferences, summits, exhibitions, trade shows, photo festivals, etc., and two of us have extensive experience on the industry side of these events. But we had never built our own event of this size, on our own, from bottom to top. Doing so felt like we were standing at one edge of a canyon wondering how to get to the other. While in some ways we were crossing a familiar bridge, in many other ways we were leaping with hesitant faith.

Now that the Summit is over, we can look back and see the results. It was an experience. It was hard work, but enjoyable work. And in the end? We feel it went great.

When we say we’re happy, that can mean different things, and it does mean different things. We were happy with a lot: the quality of the programs, the vitality of the speakers, the enthusiasm of the attendees, the participation of the sponsors. But the biggest metric of success? The number of smiles at the end.

The group shot from the “Under the Stars” closing session party.

The People

We’re happy to report that about 350 people, representing six continents, attended the first Night Photo Summit—which, as far as we know, was the first online night photography conference ever. To see 350 people there? At the very first event of its kind? Wow.

Each of you made the effort worthwhile, because each of you brought a unique energy, each of you contributed a bit of what made this collective experience special. Many have reached out in the past week to express thanks, but the gratitude genuinely goes both ways.

We couldn’t have done this without you. We started building this Summit, but you finished it. All 350 of you helped, all 350 of you brought your passion and curiosity, all 350 of you coalesced to make this conference what it really was: a community that grew closer over an extraordinary long weekend, together sharing the joy of something we all love.

The Speakers

Again: Wow.

Thirty speakers joined us to help lead this adventure, and all of them delivered some of the best educational and inspirational content we’ve ever seen concentrated into one conference. Of course, we’re not surprised—we know these people, and we knew they’d be good. Still, our lack of surprise doesn’t hinder us from being amazed.

The speakers spanned all sorts of disciplines. They brought expertise in night photography, obviously, but also in travel, astronomy, preservation, activism, environmentalism, technology, creativity, outdoors skills and more. The tapestry of knowledge and wisdom they wove was nothing short of uplifting and exhilarating, and it was beyond everything we and the attendees could wish for.

The 35 speakers of the 2021 Night Photo Summit.

The Sponsors

Don’t let any skepticism of commercialism fool you—the sponsors weren’t there just to sell to an audience. Their support made the Summit more viable, but more importantly, their contributions made it an even better experience.

The Night Photo Summit sponsors offered 33 giveaways valued at over $5,000.

Every sponsor provided giveaways for attendees, from lenses to monitors to software to books and more—33 giveaways worth over $5,000. Many sponsors also offered show specials on their services and gear, most of which attendees still have access to (some of the deals don’t expire for months!). And many of the sponsors also provided programs for the attendees: talks on calibration, light painting, star trackers, night photography filters, and so on.

Clearly, the sponsors weren’t just advertisers—they were a critical part of the team.

What’s Next?

If you weren’t able to join us, we have great news: You still can!

Replays of more than 45 sessions are available for 24/7 streaming until February 2022.

The Night Photo Summit Course Catalog of video replays.

The Night Photo Summit Course Catalog of video replays.

The Night Photo Summit registration fee covered not just the three days last weekend, but also streaming access to videos of all of the sessions for one year. Anyone can still buy a ticket to watch and learn from and be inspired by all of that content. Just visit nightphotosummit.com or click the button below to join the fun.

As for what happens in the future, beyond the replays? Well, we maybe need to rest a bit, and think a bit, and plan a bit. But we promise that we have no intention of being done with the Night Photo Summit. It will be back.

Until then, know that we are filled with gratitude for everyone who was involved—those who worked behind the scenes, those who encouraged us, those who supported us, those who joined us on stage, and especially those who joined us from the comfort of their homes and coffee shops around the world. We hope that the education we provided helps bring your night photography to new heights, and that the inspiration we offered helps you shine even brighter among the stars.

Chris Nicholson is a partner and workshop leader with National Parks at Night, and author of Photographing National Parks (Sidelight Books, 2015). Learn more about national parks as photography destinations, subscribe to Chris' free e-newsletter, and more at www.PhotographingNationalParks.com.

UPCOMING WORKSHOPS FROM NATIONAL PARKS AT NIGHT