post-processing

Pixel Perfect: 3 Workshops (1 Brand New!) for Leveling Up Your Processing Skills

Post-production. It’s the second rail of photography. But so many photographers chug along knowing only the very basics, honing just enough skill to get images off the camera and onto social media.

It’s understandable. In the film days, most people didn’t develop their own negatives nor make their own prints. So the transition to do-it-all-yourself in digital might not have been an obvious jump, nor even desired. Or maybe it’s that most modern photographers were introduced to post-processing via early versions of Photoshop, an anvil of software that’s hard and heavy to comprehend. Or maybe some photographers are just new to the game and haven’t yet had time to learn the keystrokes and mouseclicks that turn a series of 0s and 1s into an artistic masterpiece.

Regardless of the reason, plenty of folks with a great photographic eye could use more assistance learning how to turn RAW files into great photographic images.

National Parks at Night is here to help:

  • Since 2016 we’ve published post-production blog posts.

  • In 2019 we launched and ran our first Post-Processing Intensive workshop.

  • In 2020 we launched our first Lightroom Live online courses.

  • And now, in 2021, we are thrilled to announce our first Photoshop Live online course!

Here’s a rundown of all the post-production courses and workshops we’re running over the next few months. Want to level up? Come join us!


Photoshop Live

This sentence constitutes the very first time we’re publicly mentioning this brand new course—Photoshop Live: The Next Step in Post-Processing. This summer and fall, on a computer screen near you, we’ll teach how to take precise control of your images with skills such as:

  • understanding the architecture of Adobe Photoshop, including the different editing and selection tools

  • the strategy and best practices of using layers

  • mastering advanced local adjustments and masking

  • creating and editing star trail photographs

  • stacking light-painted images

  • blending Milky Way shots with blue hour foregrounds

  • and more!

We’re capping each session of the course at 12 attendees, so each will have a good amount of personal attention to their questions. And as a bonus, each attendee will receive one hour of one-on-one time to with an instructor.

tim promo benq.jpg

We’ll be running this course in sessions of four classes, each 2 hours long, on Tuesdays and Thursdays for two consecutive weeks. As of now, we’re offering three sessions:

Session 1: July 13, 15, 20 and 22 (waitlist only)

Session 2: October 19, 21, 26, 28

Session 3: December 7, 9, 14, 16

This Photoshop course is a perfect successor to our Lightroom Live course, the next session of which will be held in May (see below). So you could take both courses and—in just 16 online sessions—become proficient in these two pillars of digital photography!

For more information, see our Photoshop Live webpage by clicking here:


Lightroom Live

We launched this course last spring, and we ran three sessions of it in 2020. Now we’re offering it again—an online course designed to teach Adobe Lightroom, the most important piece of software for photographers, focused on the two most important modules, Library and Develop.

Learn everything from how to import and organize your images, to how to develop them with both basic and advanced tools and techniques. We’ll cover:

  • understanding the Lightroom catalog

  • making full use of the Library module in Lightroom, including keywords and collections

  • gaining a complete understanding of Lightroom’s Develop module

  • mastering advanced adjustments using the local adjustment tools

  • and more!

Again with this course, the session will be capped at 12 attendees in order to ensure personal attention. Each attendee will also receive one hour of one-on-one time to with an instructor, plus a free copy of our video Lightroom: Correcting Your Catalog Chaos.

Just like with Photoshop Live, we’ll be running Lightroom Live in four classes, each 2 hours long, on Tuesdays and Thursdays for two consecutive weeks. The dates are May 18, 20, 25 and 27.

For more information, see our Lightroom Live webpage by clicking here:


Post-Production Intensive: Seattle

If you want a really deep dive into both Lightroom and Photoshop, in a vibrant and beautiful location, then join us in Seattle this July for the only Post-Production Intensive workshop we’re running in 2021.

While the online courses mentioned above each entail 8 hours of total instruction, the Post-Production Intensive workshops involve 6 full days of on-site, hands-on instruction in Lightroom and Photoshop.

Moreover, on at least a couple of nights, we’ll head out as a group to photograph the urban scenery of the Seattle waterfront. That’ll be pretty easy to get to, as we’re staying in a gorgeous hotel right on the city shores of Puget Sound, in walking distance from great shoot locations, scrumptious food and plenty of baristas pressing that famous northwest espresso.

For more information, see our Post-Processing Intensive: Seattle webpage by clicking here:


Other Opportunities

We also have other ways to learn about post-processing! Including:

Night Photo Summit Replays

In February we ran the very first online conference dedicated to night photography, the Night Photo Summit! All 43 presentations from the online conference are available as streaming videos with the purchase of a Replays ticket.

Of those 43 presentations, half a dozen are heavy on post-production, from basics such as “Capturing and Processing the Milky Way” by Tim Cooper and “Noise-Reduction Strategies for Night Photography” by Michael Frye to more advanced topics such as “Blue Hour Blends & Composites” by Jess Santos and “Creating a Basic Time-Lapse Video” by David Marx.

Meteor Shower e-Book

Four meteor showers in 2021 will rate as decent to excellent for photography, including the Eta Aquarids in May! Do you know how to shoot and process a meteor shower radiant? You can learn in our e-book Great Balls of Fire: A Guide to Photographing Meteor Showers.

Blog POsts that were and Will Be

As mentioned earlier, we’ve written a few blog posts on post-production, all available to read for free anytime you want. Some examples:

To see what we’ve done in the past, here’s a link to all our posts. Scroll down to the Post-Production section to see the 22-and-counting titles we’ve written about the topic.

And … you caught the “and counting” part, right? We have more on the way! (Tips on printing, anyone? How about using Sequator for sharp stars? Keep your eyes peeled right here.)

Chris Nicholson is a partner and workshop leader with National Parks at Night, and author of Photographing National Parks (Sidelight Books, 2015). Learn more about national parks as photography destinations, subscribe to Chris' free e-newsletter, and more at www.PhotographingNationalParks.com.

UPCOMING WORKSHOPS FROM NATIONAL PARKS AT NIGHT

Five Questions: Meteor Shower in Death Valley, Leveling Bases, Coast Flashlights and More

If you have questions, we like to try to have answers. Below are five examples.

This installment of our “Five Questions” series features inquiries about photographing meteor showers in Death Valley National Park, diffusing an LED panel, saving stacked files, Coast flashlights and using leveling bases for panos.

If you have any questions you would like to throw our way, please contact us anytime. Questions could be about gear, national parks and other photo locations, post-processing techniques, field etiquette, or anything else related to night photography. #SeizeTheNight!


1. Meteor Shower Locations in Death Valley

Moon over Mesquite Flat Dunes, Death Valley National Park. © 2016 Chris Nicholson. Nikon D5 with a Nikon 17-35mm f/2.8 lens. 10 seconds, f/5.6, ISO 3200.

Question:

My wife and I and our two dogs are going to Death Valley National Park to shoot the Geminid Meteor Shower in December. Finding a foreground subject is going to be a challenge because the radiant is relatively high (72 degrees according to PhotoPills). Here is a list of potential foregrounds I have come up with: Mesquite Flat Dunes, twenty-mule team wagons, Ashford Mill, Keane Wonder Mine, Twenty Mule Team Canyon, Badwater Basin, the palm grove at Furnace Creek Ranch. Any thoughts would be much appreciated. — H.J.

Answer:

Yay! What a great idea. We love photographing meteor showers, and we love Death Valley.

As for locations: If you want the radiant in the frame, you’re looking for a view toward east-northeast. With that in mind …

  • Mesquite Flat Dunes always works. Be ready to walk in a bit to find dunes without footprints. Also be ready (food, water, second camera) to stay out there, because you’re likely not going to be walking back and forth to the car.

  • Twenty-mule team wagons: I assume you mean the ones at the Borax Museum. I wouldn’t shoot there. The wagons are surrounded by a fence. Also, the east-northeast view will have the road in the background of your frame, and being so close to Furnace Creek, cars will definitely be driving through.

  • Ashford Mill could be interesting. You could get an east-northeast angle from behind the structure; the road would be in the background, but I’d be surprised if another car goes back there at night. The downside is that there’s not a lot of variation to the location. It’s primarily just two structures, and one of them is more visually interesting than the other. I’d definitely scout it in daytime before committing to a night shoot there, because it’s just isolated enough so that changing locations midstream would be impractical.

  • Keane Wonder Mine is a fun location generally, but you’d have a tough time finding a good east-northeast angle.

  • I love shooting in Twenty Mule Team Canyon. Interesting rock formations that aren’t difficult to navigate on foot, and plenty of foreground material from east-northeast angles.

  • Badwater Basin is great any time of day or night, but it wouldn’t be the easiest spot for this particular shoot. From any east-northeast angle you’ll have either the parking lot and/or road in the background, so you’ll be dealing with headlights. My other concern is that when the shower is peaking, the radiant will be so high that you’ll need to be pointing upward with a wide-angle lens. That would minimize any flat foreground at the bottom of the frame. I’m sure there are creative ways to make it work, but my hunch is that making it work well would be challenging, so I’d definitely day-scout any ideas before trying.

  • The palm grove at Furnace Creek is an interesting place to shoot, but there’s a lot of artificial light in the area. You’d need to fight with that to find a balance that would work with star captures.

Golden Canyon, Death Valley National Park. © 2020 Chris Nicholson. Nikon D5 with a Nikon 24-70mm f/2.8 lens. 43 stacked images shot at 4 minutes, f/4, ISO 400.

Here are a few spots I like besides what you’ve mentioned:

  • I’d consider the Wildrose Charcoal Kilns. The caveat is that it will be cold up there in December, and there’s even a chance the road will be snowed in, so I’d ask a ranger before committing to the drive. But you’d surely find an east-northeast view you like, with a very interesting foreground.

  • The east-northeast view at Ubehebe Crater is spectacular. It would be cold up there at night, but the east-northeast view is also right next to the parking lot, so you could wait out the exposures in your warm car if needed. However, the crater is very dark without moonlight, which you won’t have on the peak nights, so you’d probably want to get a twilight exposure to blend in. That would require some precise positioning and waiting around for quite a while without moving the camera. Also, the rim of the crater sometimes gets too windy for even a tripod, so there’s a possibility you’d have to abandon the location mid-shoot.

  • Golden Canyon could be fun. Steep walls, but you’ll be pointing up anyway. Also, it’s close to the services at Furnace Creek.

Good luck, and please let us know how this goes! We would love to see the results. — Chris

Note: If you’re also interested in getting out to shoot next month’s Gemenids, be sure to pick up a copy of our e-book Great Balls of Fire: A Guide to Photographing Meteor Showers.

2. Viola Diffusion

Question:

I have been playing with the Luxli Viola for few months. Do you ever use the diffuser for it? Any tips on using it? — Steve W.

Answer:

I do use the diffuser on occasion, and sometimes even add a piece of neutral density gel inside if I’m looking for the subtlest kiss of light. Mostly, I pull out the diffuser when I’m aiming for a subtle natural effect, or for night portraits.

Another great tool to diffuse the Viola is a 2- or 3-foot square scrim that mimics the effect of a softbox. That’s not always practical on location, and it requires some additional grip equipment, but it is a nice option to have. An old picture frame with a piece of white sheet stretched across it is all it takes! — Lance

3. Saving or Deleting Files for Stacking

Question:

How do you manage the number and size of photo files when stacking? For example, Starry Landscape Stacker uses TIFF images to combine into one huge file. Can I delete those individual files and keep just the final image? When I create a stack in Photoshop, can I delete the images the final photo is composed of? — Sue W.

Answer:

For Starry Landscape Stacker or any other program that creates JPEGs or TIFFs to bring them into their program: Once you finish your processing and are 100 percent happy with it, you can definitely delete those individual JPGs/TIFFs. Save yourself some storage! However, if you do that, make sure you have the final file organized somewhere that makes sense to you. I typically will import this new TIFF into Lightroom, where I can do a final edit and store it in my catalog.

However, there is a caveat: What if you want to re-process the idea later? For example, I just recently revisited and reprocessed my “Road to the Milky Way” image that I originally worked on two years ago. I still had all those individual TIF files in a folder on my hard drive—that was a time-saver for me, because I didn’t have to re-export them all.

Road to the Milky Way. © 2019 Gabriel Biderman. Nikon D5 with an Irix 15mm f/2.4 lens. Foreground: 13 minutes, f/2.5, ISO 1600; background: nine frames shot at 25 seconds, f/2.5, ISO 6400 and stacked in Starry Landscape Stacker.

So there can be benefits to keeping or deleting those raw materials. The key is that whatever you do, have them organized. Whenever I create JPGs or TIFFs for third-party software or any other use, I always store them in a subfolder that is clearly marked so that I can find them down the road.

If you do delete those images, be sure you are deleting only those exported files—not your original RAW files.

Stacking in Photoshop is a different matter. For this you’re not creating multiple exported files and importing them, you’re instead opening a new Photoshop file with all those images as layers. This creates one very large file. So the question isn’t really about saving lots of individual files, but rather whether to save one giant file with tons of layers or to flatten the layers and save a smaller file. That’s a personal choice, and can be affected by circumstances.

I try to get all my layer editing adjustments done in one take, then flatten the file and save it back to Lightroom. However, if I am not done editing, or if I want to keep a version to revisit at a later date, I’ll save the layered file as a PSB (Photoshop’s large-file format), which Lightroom can absorb as part of the catalog. — Gabe

4. Value of Coast Flashlights

Question:

In your gear list and blog posts you pretty much always mention the Coast HP7R, Coast HP5R or another Coast flashlight for light painting. I’m curious why. If I have another brand of flashlight that has the same lumens output, what’s the difference? — Lynn

Answer:

You can use just about any flashlight for light painting, but we like Coast for the quality of the light (i.e, the high CRI value), as well as the precision of the focusing. Most flashlights have a lot of “spill” around a bright center spot, but Coast lights have a patented focusing mechanism that concentrates the light more intensely, as well as evenly across the beam with less spill around the edges. This makes for much more control when light painting. — Lance

5. Is a Leveling Base Redundant?

Bryce Canyon pano. © 2019 Matt Hill. Nikon Z 6 with a Zeiss 15mm Distagon f/2.8 lens. 14 stitched frames shot at 16 seconds, f/2.8, ISO 6400.

Question:

I read your blog post on night panoramas and I have a question. I have a Really Right Stuff TVC34L tripod with a BH-55 ball head, both with levels. Do I also need a leveling head? — Brien

Answer:

Technically you do not need to have a leveling base if your tripod gets leveled first. After that, anything mounted to it will pan without tilting to the left or right.

However, sometimes it’s annoying to have to separately adjust three legs to level the tripod, especially on uneven ground. Seriously. That’s the moment you wish you had a leveling base. It’s pretty much always faster to level with one. I find them invaluable when I’m serious about shooting for pano stitching.

If you shoot panos only occasionally and you’re willing to tolerate the minute adjustments to legs and then checking the bubble level on top of the tripod over and over, then no sweat—it can be tedious, but it’s easy enough. But if panos are going to be a regular thing for you, a leveling base will improve the experience.

For the record, I use the Acratech Leveling Base. I love it. — Matt

Chris Nicholson is a partner and workshop leader with National Parks at Night, and author of Photographing National Parks (Sidelight Books, 2015). Learn more about national parks as photography destinations, subscribe to Chris' free e-newsletter, and more at www.PhotographingNationalParks.com.

UPCOMING WORKSHOPS FROM NATIONAL PARKS AT NIGHT

Great Balls of Fire, Part 3: How to Process a Meteor Shower Radiant

Welcome to Part 3 of our journey through the how-to of photographing meteor showers:

  1. Using PhotoPills to Scout Meteor Showers,” by Chris Nicholson

  2. How to Photograph a Meteor Shower,” by Matt Hill

  3. How to Process a Meteor Shower Radiant,” by Matt Hill

All of this, plus a guide to gear and a guide to shoot locations, is contained in our brand new PDF e-guide, Great Balls of Fire: A Guide to Photographing Meteor Showers. To download the whole e-guide, click here:


So … You’re creating a meteor shower photograph. You’ve scouted in PhotoPills. You’ve shot the shower. Now you have hundreds of images. How do we make that cool composite where all the meteors appear to come from a particular origin in the sky?

Find Your Background

Start by editing one image. It should be the best image. This will be the “base” sky that all the meteors get stacked onto later.

Identify the frame that has the most aesthetically pleasing sky. In my example from Great Sand Dunes National Park, the Milky Way is arcing through the composition. Since there were clouds in all the images, I chose the one that I believed has the best-looking clouds and with the Milky Way leading to the upper right corner of the frame (Figure 1). I marked this image in Lightroom with a Pick flag and a Green color label to make it easy to find later.

Figure 1. I like these clouds the best.

Perform your edits to taste. I made my edits to accentuate the galaxy gliding across the sky. But then consider backing those off those edits a bit to de-accentuate the sky. In other words, make the sky darker than you normally would, because you will be masking in meteors, and they need to “pop.”

Sync your Develop settings across all the dark-sky images in your meteor series (Figure 2). If you shot into moonrise or sunrise, process those separately for the foreground (ignoring the sky, which you will eventually mask out).

Figure 2.

Don’t forget to spot/clone out any planes or satellites from your main image (but don’t worry about any of the other images—that would be a waste of time).

Identifying Sky Objects

Here’s a cheat sheet on how to identify the four primary “streak” objects you’ll find in your night sky images. If you want to dive even deeper into this, see my blog post “How to tell the Difference Between Planes, Satellites and Meteors.”

Plane trails are straight or curved (or both), are usually accompanied by dots (from the wingtip lights) at regular intervals, and they traverse many frames.

Iridium satellite flares usually taper in/out like a meteor, but traverse more than one frame because they move slower than a meteor. Also, they may not have any notable color. These are becoming considerably less frequent.

A satellite or the International Space Station creates a straight, very thin line that traverses many frames. No color/tint.

A meteor appears in only one frame (unless you’re unlucky for it to happen during an interval between frames, which would create a gap in its trail). It can be many different colors or gradients—yellow, red, green, blue. Also will vary greatly in size and intensity.

Find Your Meteors

You could export all the images as layers in Photoshop, but imagine how much that would choke your computer. I have over 300 images from that shoot. It’s easier to export and work with only the ones with meteors. So first spend some time in Lightroom to identify every image that has an actual meteor in it. Some tips:

  • Zoom in and around each frame.

  • Toggle back and forth between pairs of images while looking for differences. You will eventually train your eyes to see the meteors.

  • Make a few passes through the whole series. Do your first pass with the zoom at “to fit screen” to find the dramatic, obvious meteors. Then do a few more subsequent passes at the “fill” zoom setting on different areas of the sky.

Finding all those meteors is time-consuming—possibly the most time-consuming part of this post-processing project. And it’s taxing on your eyes. But persevere! The end is in sight.

As I found mine, I used a Yellow color label (number 7 on the keyboard, Figure 3) to mark each one. I found only 23 frames with meteors out of 325 images. Yes—only 7 percent of my frames captured meteors. And I was running an exposure sequence for over two hours. Lesson: Maximize your chances; keep that sequence going as long as you can.

Figure 3. My meteor images, yellow-coded.

Also note that each meteor shower has a different potential yield for meteors per hour. (This is part of the info that PhotoPills provides.) This may vary by location, and will certainly vary by the amount of moonlight in the sky. And even if you’re supposed to be witnessing massive activity, your camera angle may not capture what does end up being visible, despite your best scouting efforts. So stay positive, be smart and work with what you get.

Find Your Foreground

You may have shot several options to use as your foreground—some long exposures at a low ISO, some with light painting, some with moonlight, etc. Look through and pick your favorite. I knew pretty much exactly what I was going to use, because I love my first photo from when the moon rose over the Sangre de Cristo Mountains.

Let’s prep the foreground image to make it easier to blend with the other frames.

For my sky image, I had deliberately crushed the blacks and shadows with a gradient mask and range mask to make the ground as dark as possible (Figure 4, left). Why? Because it would be easier to use a selection tool later in Photoshop.

For my foreground image, I did the opposite: I pushed up the whites and highlights in a gradient mask and range mask, and I carefully edited the edge so as not to blur the ground/sky transition (Figure 4, right). I also imagined what this should look like and made the ground edit believable—not too bright, not too warm.

Figure 4. Crushed blacks in the foreground (left) and crushed highlights in the sky (right), to make masking them out easier in Photoshop later.

Stacking Your Assets

Use the Attribute filter in Lightroom to find all the Yellow-coded photos (or whatever attribute you chose). To do that, press Command-F (Mac) or Control-F (PC), then select Attribute and click on the Yellow rectangle. Select all the Yellow images in Grid view. Cancel out of the filter by clicking None at the top, then also select the edited versions of your background sky image and your foreground/landscape image.

With all those frames selected, from the Lightroom menu choose Edit > Open as Layers in Photoshop (Figure 5).

Figure 5.

Less Ideal, But Less Computer-Stressing Method

If your computer can handle the task, load the images into Photoshop using the method I described above. It will result in the highest-quality final image, albeit one that’s huge (in this case, a 7 GB PSB file). But if you have an older computer or not a lot of scratch-disk space, you may want to instead export all these frames as JPGs (full-resolution) and then load those files into Photoshop layers using Adobe Bridge. You could also use a Photoshop script to load the JPGs as layers. In Photoshop, choose File > Scripts > Load Files into Stack.

Both of those options will stress the computer less, but because JPGs are lossy, this option will be less flexible to edit later.

Editing Your Layers

Time to plug in that Wacom tablet if you have one! Although, a mouse is fine. I actually found it very easy to use a mouse for this with click/shift-click straight-line painting.

Power user tips:

  • Save every 10 minutes. Just do it. Losing detailed work will make you cry.

  • This will be huge file. Probably bigger than 2 GB, which is the size limit for a PSD. Therefore, you will want to save as a PSB, which is Photoshop’s native large-file format. If you want to be able to see your PSB in Lightroom, make sure you’ve updated your Creative Cloud software since February 2020.

  • Give your eyes a rest. Look out the window now and then.

  • Organize your layers. Make a layer group (essentially a folder for layers) to hold all the meteor images, and name it “Meteors.” Name your sky layer “Sky” and your foreground layer “Ground.” This will eliminate future confusion.

  • Lock your Sky and Ground layers to avoid accidental edits. (Press Control-/, or click the “Lock all” icon above the layers.)

Masking

For each meteor layer, the only image data you want is the meteor itself. Why don’t you want the rest of the sky? Because the stars will be in a different place than in your Sky layer. The sky has only one Vega, etc., and we want to keep it that way. So on each meteor layer, we need to mask out everything except that streak of light.

Here are your steps (for tool locations, see Figure 6):

  1. Turn off your Sky and Ground layers.

  2. Turn off all the meteor layers except the one you are working on.

  3. Click the Add Layer Mask button at the bottom of the Layers panel.

  4. Press D to reset the foreground color to black and the background color to white.

  5. Press B to enable the Brush tool.

  6. Press the bracket keys to change the size of the brush to just a tad wider than the widest part of the meteor streak. [ makes the brush smaller and ] makes the brush bigger.

  7. Click on the thumbnail for the layer mask (not on the thumbnail for the image layer).

  8. Zoom in so the meteor’s path fills your screen.

  9. Now paint out the meteor on the mask. I know it’s counterintuitive. Trust me. (You can use the shift-click trick since meteors burn in a straight line: Click once at one end of the meteor streak, then hold Shift on your keyboard and click once at the end of the streak. )

  10. Use the brush sizing and feathering to finesse your masking.

  11. When you think you have successfully painted out the meteor, invert the layer mask by pressing Command-I (Mac) or Control-I (PC), or from the menu select Image > Adjustments > Invert. I prefer the keyboard shortcut because I use it to flip back and forth to finesse the masking. Try it—most likely you’ll see how convenient it is, too.

  12. Look around the whole layer—there may be more than one meteor in each.

  13. Optional: Make laser-beam noises when you find another meteor. I did. It’s fun.

Figure 6.

Rinse and repeat! Go back to step 2 and do this for every meteor layer you have in the Photoshop document (Figure 7).

Figure 7. All the meteors I found, masked in.

Making the Radiant

It’s magic time!

Alignment

The radiant of the meteor shower is always in motion, as seen from our perspective on earth. Keep this in mind. When you composed, you knew if it was in the frame or not and made good decisions about placement.

In my example, the Perseids were easy since they are so close to Polaris that they do not appear to move much. The Geminids, however, are so far up in the sky you’re not likely to have land and sky in the same composition, even with a 14mm lens. So they will come into your frame from the edge and point to a place not in clear view. And alignment will not be exact.

You’ll see this happen in our next steps:

  1. Select all the layers by pressing Command-Option-A (Mac) or Control-Alt-A (PC), or shift-click the first and last layer.

  2. On any layer with the Eyeball turned on, Control-click (Mac) or right-click (PC) on the eyeball, then select Show/Hide all other layers.

  3. Near the top of the Layers panel, change the Blend Mode to Lighten. You’ll now see the brightest elements of every layer blended together—the stars, the lit foreground and the meteor streaks.

And see? It’s likely that not all your meteors are pointing to the same place.

Note: Any meteor that does not line up with the origin (in this case, the constellation Perseus) is called a “sporadic” (Figure 8). Don’t let those meteors make you think you did anything wrong. They happen. (More on Sporadic meteors here.)

Figure 8. A sporadic.

Because everything in the universe is in motion, to adjust for this perception error, our layers also need to be “put into motion.”  Specifically, we have to rotate each meteor layer, ideally around a visual anchor in the Sky layer. Lucky for me, Polaris is in my scene. Easy peasy. (If Polaris isn’t in your frame, you’ll just need to do a little more work by eye to line up the rotation correctly.)

If the Radiant is in Your Frame

The most surefire way to get all the meteors pointing toward the radiant is if you actually have the radiant in your composition. (See Figure 9 for tool locations.)

  1. Invert the layer mask.

  2. Set the layer to 50 percent opacity.

  3. Enter the Free Transform mode (Edit > Free Transform or Command/Control-T).

  4. Move the center point of the Transform bounding box to just inside Polaris (north)

  5. Rotate the layer. You can do this by clicking and dragging outside the corner of the Transform box. But you can control things easier this way: Locate the Rotate box at the top of the screen, and click into it. Now press the up/down-arrow keys until the star points align.

  6. When aligned, press Enter twice to lock in the rotation angle as well as your Transform adjustment.

  7. Set the layer opacity back to 100 percent.

  8. Invert the layer mask again.

  9. Repeat for each meteor layer.

Figure 9.

If that’s a bit too tedious for you, there are two faster (if less precise) ways to accomplish the same task:

  1. Use Free Transform when zoomed to fit to screen, move the center point roughly into position without zooming all the way in, and rotate each layer using your eyeballs.

  2. Evaluate if you want to do this at all. My first gut reaction without rotating the layers was, “This looks great!” I turned off all the sporadic meteors and called it a day. But then I went back and did things “right” for the sake of perfecting the image for this blog post.

If the Radiant is not in Your Frame

Simply rotate and align each layer until all of the meteors appear to be originating from the same point. Sometimes I put a piece of tape on the wall behind the monitor and eyeball the lines so they all line up with that point. Reminds me of art school and learning about vanishing points.

Dealing with Sporadics

The sporadics might be bothering you. After all, you went through all this work to create an image where scores of meteors are pointing toward the same point in space, just to have a few rogues that point wherever they want (Figure 10).

Figure 10: Sporadic meteors circled in red. Note they do not point toward Perseus. I removed them.

You have a few options:

  • If you only want a “clean” radiant, turn off the layers with the sporadics.

  • If you don’t care, leave them on.

  • Free transform and rotate/move the sporadics so they look as if they came from the radiant.

It’s your choice. But my choice is not to pretend they all were radiant meteors if they were not. I chose to turn those layers off.

Along the same lines, you may choose to move some meteors that cross over or are too near to each other. It’s your fiction … or not. I chose to rotate each layer to honor the origin of the radiant.

Mask in the Ground and Sky

Your base images (which should be the lowest layers in your Photoshop file) for the sky and ground need to be masked over the meteor stack. Here’s how I did mine:

Photoshop is getting very good at auto-detecting with the Quick Selection tool (W). I set Point Sample to a tolerance of 2, and checked Anti-Alias and Contiguous. Then I clicked and dragged on the sky/ground (both of which we crushed in Lightroom earlier to make the unwanted pixels similar, specifically to ease the masking process now).

Figure 11.

When I had the selection I wanted (Figure 11), I added a layer mask and inverted it. Voila! Sky and Ground perfection (Figure 12).

Figure 12. The Sky and Ground layers blended, minus the stacked meteors.

After all this work (and pausing to save many times!), you have a Photoshop document with lots of layers, and it might look something like this:

Figure 13. Final image. Great Sand Dunes National Park, Colorado. Nikon D750 with a Zeiss Distagon 15mm f/2.8 lens. 17 images at 22 seconds, f/2.8, ISO 6400, plus a single foreground exposure at 382 seconds, ISO 2000.

Your final steps are to:

  1. Save it once more (Command/Control-S).

  2. Flatten the layers by choosing Layer > Flatten Image from the menu.

  3. From the Menu choose File > Save As and then choose Photoshop from the Format menu to save this file as a PSD. This process should automatically save the file and return it to Lightroom. If the PSD does not appear back in Lightroom, do the following: Navigate to the Library Module. Right-click on the folder containing the meteor images, and choose Synchronize. When prompted, choose to import the new image into Lightroom.

  4. Discard the giant layered PSD/PSB when you are totally comfortable that you are done editing it. I suggest giving it at least a week. (If you have giant hard drives and don’t care about gigabytes, feel free to skip this step.)

Wrapping Up

At this point, do whatever you do to celebrate. It’s a major accomplishment—to plan, to shoot and to edit a meteor shower radiant. Good on ya.

And please—please, please, please—if you go through all of this work, share what you’ve done. We’d love to see it. Post in the comments below or on our Facebook page.

Now be sure to download the e-book, Great Balls of Fire: A Guide to Photographing Meteor Showers, which includes all three blog posts, plus a gear guide and a location guide!

Matt Hill is a partner and workshop leader with National Parks at Night. See more about his photography, art, workshops and writing at MattHillArt.com. Follow Matt on Twitter Instagram Facebook.

UPCOMING WORKSHOPS FROM NATIONAL PARKS AT NIGHT

Five Questions: Sony, Z Options, Flying Objects, Third-Party Software and More

We get a fair number of questions. We try to answer them all, and we like to share this information exchange with any night photographer interested in listening in.

This installment of our “Five Questions” series features inquiries about enhancing Sony live view, the Nikon Z6 versus the Z 7, identifying flying objects, using Nikon lenses on Canon bodies, and third-party post-processing software.

If you have any questions you would like to throw our way, please contact us anytime. Questions could be about gear, national parks or other photo locations, post-processing techniques, field etiquette, or anything else related to night photography. #SeizeTheNight!


1. Bright Monitoring for Sony Cameras

Q: In your recent blog post about the Nikon Z 6, you mentioned that Sony recently added a Bright Monitoring mode to their A7 and 6000 cameras that makes it easier to compose at night. Where do I find that? You also said it could use some improvement. Where does it fall short? – N.N.

A: It is a bit hidden in their menus, so it’s best to assign the feature to a button. To find it:

  1. Change your camera to manual focus. It won’t let you select Bright Monitoring if you are in any of the AF modes.

  2. Navigate to the Camera Settings2 tab in the menu, and look for Custom Key for stills (the icon that looks like a picture of a mountain).

  3. Assign a button to activate Bright Monitoring.

This lets the camera decrease the FPS refresh rate so that you can better see and compose in dark scenarios.

Where it falls short is here: Because you are in manual focus mode, if you zoom in on your LCD or EVF to finesse your focus, the camera automatically jumps out of Bright Monitoring and the screen goes back to normal (i.e., dark), which makes it hard to focus. So then you need to revert back to one of our “8 Ways to Focus in the Dark.”

So yeah, it has room for improvement. You can use it to compose, but not to focus. Still, it’s a very cool feature, and it could be added as a firmware upgrade by any camera manufacturer. (Hint hint.) — Gabe

2. Nikon Z 6 or Z 7 at Night?

Q: I’ve been sitting on the fence about buying a Nikon Z 6 or Z 7. Your recent article makes me want to go ahead and get one, but I’m curious how the Z 7 compares with the Z 6 at night. I currently shoot my night (and day) pics with the D850. — Deb

A: The short answer is that the Z 6 is better for night photography than the Z 7. The long answer? Here it goes:

The Z 7 has a very similar sensor to your D850, so if you like the image quality you are getting now, then the Z 7 would give you about the same results in a smaller body. And those results are amazing.

But at night things change. The issue with higher-megapixel cameras (typically over about 40 megapixels) is that it’s harder to achieve cleaner high ISOs, particularly past 6400. This is true for the Z 7, whereas the Z 6 can easily shoot 2 to 3 stops beyond that—it’s a low-light machine.

The other issue for me (and this is a literally a big one) is that the file size created by the Z 7 averages about 85 MB for an uncompressed RAW file. The Z 6 is in the 35 MB range. This gives you more detail (which is great for making very large prints), but at two costs:

  1. Stars will start to trail faster on a higher-resolution camera. So when you want to shoot star points, not only will you be losing a couple of stops in ISO due the reason I mentioned above, but you’ll also lose another half-stop in shutter speed.

  2. The bigger file size fills up memory cards and hard drives twice as fast. If you are going to do star stacking (which is something I do a lot at night), then your computer will be working twice as hard, for twice as long, while blending or stacking 60 or 100 85 MB files. For that reason, the most needed accessory to go along with higher-megapixel cameras is a new computer or hard drive for all the wonderful files they produce.

My honest suggestion to you is this: If you currently love your D850, keep it as your high detail/dynamic range daytime camera. It will also be fine under most moonlit conditions at night. But for shooting the Milky Way and moonless nights, invest in a Z 6. — Gabe

© 2019 Sue Wilson.

3. Identified Flying Objects

Q: I was out taking photos last night and I just started looking at them. I came across this grouping of three photos that have three distinct lines in the sky. The photos are consecutive (the ones before and after do not have anything). Would these lines be three jets? Just curious as to whether you have captured or seen something like this. — Sue

A: Those three lines are typically what we see from commercial airliners. There are lights on the end of the wingtips and sometimes one in the middle, so it’s most likely you are seeing a large airliner with a broad wingspan, or a large military aircraft that also has a sizable wingspan and perhaps is flying lower to the ground.

A fun side project of night photography can be identifying airborne objects in our images. See my blog post from last year, “How to Tell the Difference Between Planes, Satellites and Meteors.” — Matt

4. Nikon Lenses on Canon Cameras?

Q: In your recent blog post “The Simmer Dim: Photographing in Twilight that Lasts Till Morning,” the caption below the first picture says it was shot with a Canon 5D and a Nikkor lens. Can one really do such a thing? — Henry

Stones of Stenness, Orkney, Scotland. Canon 5D with a Nikkor 28mm f/3.5 PC lens. 30 seconds, f/8, ISO 800.

Stones of Stenness, Orkney, Scotland. Canon 5D with a Nikkor 28mm f/3.5 PC lens. 30 seconds, f/8, ISO 800.

A: There are adapters that allow you to use Nikon, Olympus, Pentax and Contax lenses on Canon DSLRs. And that’s a good thing, because I have a bag full of film-camera perspective control lenses that I use this way! I’m still using the old PC Nikon lenses, as well as a couple of Olympus Zuiko Shift PC (Perspective Control) lenses. They are great quality, and way cheaper than the modern equivalents, especially when bought used on eBay.

You can adapt all sorts of lenses to all sorts of cameras (though manual-focus Canon FD lenses cannot be adapted to other cameras because of the flange that was used to stop down the aperture). There’s a price to pay in performance, though. Using old film-camera lenses on digital cameras is 100 percent manual—no auto focus, manual aperture control, and no metadata in your software. — Lance

5. Third-Party Software for Stars and HDR

Q: There are some other programs you guys use a lot for star trails and HDR. What are they? – J.K.

A: All five of us use Lightroom and Photoshop for almost all of our star-trail images. Adobe has done a good job over the years of watching the market for third-party tools that fill a real need for photographers, and then adopting, and then improving upon, the best solutions.

That said, there are a few exceptions in our personal workflows:

  1. For creating star stacks, Lance and Gabe sometimes use StarStax, which fills the gaps in the trails created when multiple images are stacked together.

  2. Lance also likes Dr. Brown’s Stack-a-Matic, which is a Photoshop script that automates creating masks on each stacked layer.

HDR night image of Las Vegas, which Tim created in PhotoMatix.

As for HDR, most of us use Lightroom, which creates a 32-bit DNG file from your bracketed exposures, which you can then develop or tone-map as usual. The exception here is Tim, who instead often uses PhotoMatix for creating HDR images in cases where Lightroom fails with ghosting or complex blends.

Incidentally, the only three third-party solutions we really use often accomplish tasks other than what you asked about:

  1. LRTimelapse for creating time lapse videos

  2. Silver Efex Pro for black-and-white conversions

  3. Starry Landscape Stacker for making low-noise star-point images

What third-party software solutions do you all use? Let us know in the comments sections below, or on our Facebook page. — Chris

Chris Nicholson is a partner and workshop leader with National Parks at Night, and author of Photographing National Parks (Sidelight Books, 2015). Learn more about national parks as photography destinations, subscribe to Chris' free e-newsletter, and more at www.PhotographingNationalParks.com.

UPCOMING WORKSHOPS FROM NATIONAL PARKS AT NIGHT

Northern Exposure: 8 Illuminating tips for Photographing Auroras

Witnessing an aurora is one of life’s truly magical experiences. Watching the pulsating light and soaking in the surreal green glow fills you with excitement, awe and wonder. As photographers, however, we’re not content to just stand by and watch. We want to capture this spectacle, share it with others, and relive it again and again.

To help you do that even better, Lance, Gabe and I put together eight killer tips for seizing the northern (or southern!) lights.

(For a primer on this topic, read Lance Keimig’s February blog post Capturing Clouds of Light: How to Photograph the Aurora Borealis.”)

15 seconds, f/3.3, ISO 3200. Shot with Nikon D750 and 24mm lens. © Lance Keimig.

Lance Keimig

1. Aurora Exposures

The correct exposure for an aurora can vary dramatically depending on both its intensity and movement. Sometimes there may be a relatively stable band of light in the sky that grows in intensity over time. This is easy to photograph, and usually does not change the exposure from what the normal landscape exposure would be.

For a static aurora, typical exposures are equivalent to landscape exposures based on corresponding moonlight or artificial light.

If you’re lucky, the band will grow into the magical dancing lights that can become so bright as to illuminate the landscape with green. To photograph a dancing aurora, it is important to keep the shutter speed as short as possible to prevent the crazy shapes from blending into electric pea soup.

For a rapidly changing aurora, try to keep exposures in the neighborhood of about 2 to 10 seconds. I recommend setting the ISO based on the ambient landscape light—i.e., not factoring the aurora into your exposure determination. So, for new moon conditions, shoot at ISO 1600 to 6400, and for full moon conditions, shoot at 400 to 800. From there, pick a wide aperture that gives adequate depth of field for the scene, usually stopping down 1 or 1 1/2 stops from wide-open, depending on the focal length and quality of your glass. Lastly, vary the shutter speed as needed to get a balance between a decent exposure and stopping the movement of the dancing lights.

6 seconds, f/3.3, ISO 3200. Shot with Nikon D750 and 14mm lens. © Lance Keimig.

6 seconds, f/3.3, ISO 3200. Shot with Nikon D750 and 14mm lens. © Lance Keimig.

2. Finding the Aurora: What the Camera sees Versus what You See

Because human eyes lose sensitivity to color in low light, an aurora may sometimes fool you into thinking it is just a cloud. The show often begins as a faint glow in one location in the sky, and it may not be very impressive. If there is a high probability of auroras, it’s a good idea to take test images of different parts of the sky while you are waiting in case there is something that your eyes don’t pick up.

If you live in—or will be traveling to—extreme northern or southern latitudes where auroras are commonly seen, it’s a good idea to have an app like Aurora Forecast (Apple, Android) or Aurora Alerts (Apple, Android) on your phone, and set notifications for specific activity levels. Auroral strength is measured on a scale of 0 to 9 Kp. In high latitudes like Alaska or Iceland, a Kp of 4 or higher indicates a high probability of photographable auroras. In middle latitudes like New England or the Pacific Northwest, a Kp of 5 means that you just might see something on the northern horizon. In mid-latitudes, a Kp of 6 or higher makes it worthwhile to seek out the lights.

In high latitudes, auroras may appear in any part of the sky. In middle latitudes, they are generally seen only as a faint green glow on the northern horizon.

Four-frame panorama shot at 20 seconds, f/4, ISO 6400. Nikon D750 with a 24mm lens. © Lance Keimig.

Gabriel Biderman

3. Keep Clicking and Make a Time-lapse

Bring two rigs and set up one for a time-lapse. If the auroras are really active, this is a great way to show off how much they dance in the sky. Once you figure out your exposure, use an intervalometer to make sure the camera keeps firing for at least 30 minutes. The longer you let it rip, the longer the “movie” will be.

Here’s a time-lapse I did of aurora in Iceland:

4. Look for Interesting Foreground and Subjects

When chasing after an aurora, look for interesting foregrounds to play against the dancing green lights. Trees, mountains and other landscape elements are common subject matter—so look for dramatic compositions to include them.

On our last workshop in Iceland, we were fortunate enough to have the ruins of an old herring factory, old boats and other striking buildings beautifully collide with the auroras. And on our recent workshop in Olympic National Park, Matt, Chris and the participants were able to photograph an aurora alongside a massive sea stack.

10 seconds, f/2.8, ISO 6400. Nikon D750 with a 14mm lens. © Gabriel Biderman.

5. Create an Aurora Portrait

Try to capture your experience under the northern/southern lights. There is such a sense of wonder and amazement when you are experiencing an aurora, so take a portrait of yourself or your friends under the night sky! A flash can be your friend for freezing the portrait with one pop, as your shutter speeds will generally be 2 to 4 seconds.

We had an amazing time taking our Iceland participants’ portraits during a night when the auroras just wouldn’t stop! My base exposure was 4 seconds, f/2.8, ISO 6400, so we just needed 1/64 power from the flash to make the night portrait complete.

Lance under an Icelandic aurora. 4 seconds, f/2.8, ISO 6400. Nikon D750 with a 14mm lens. © Gabriel Biderman.

Tim Cooper

We should always strive to get the perfect picture in-camera, and shooting the auroral lights is no different. Composition and exposure (f-stop and shutter speed) are crucial. Severe cropping and exposure changes will damage your photo, and fixing shutter speed or depth of field is impossible after the fact.

That being said, there are several things that can be altered in post-production that have no bearing on the initial capture. In fact, some of these things you can’t even accomplish in-camera.

6. Change Your White Balance

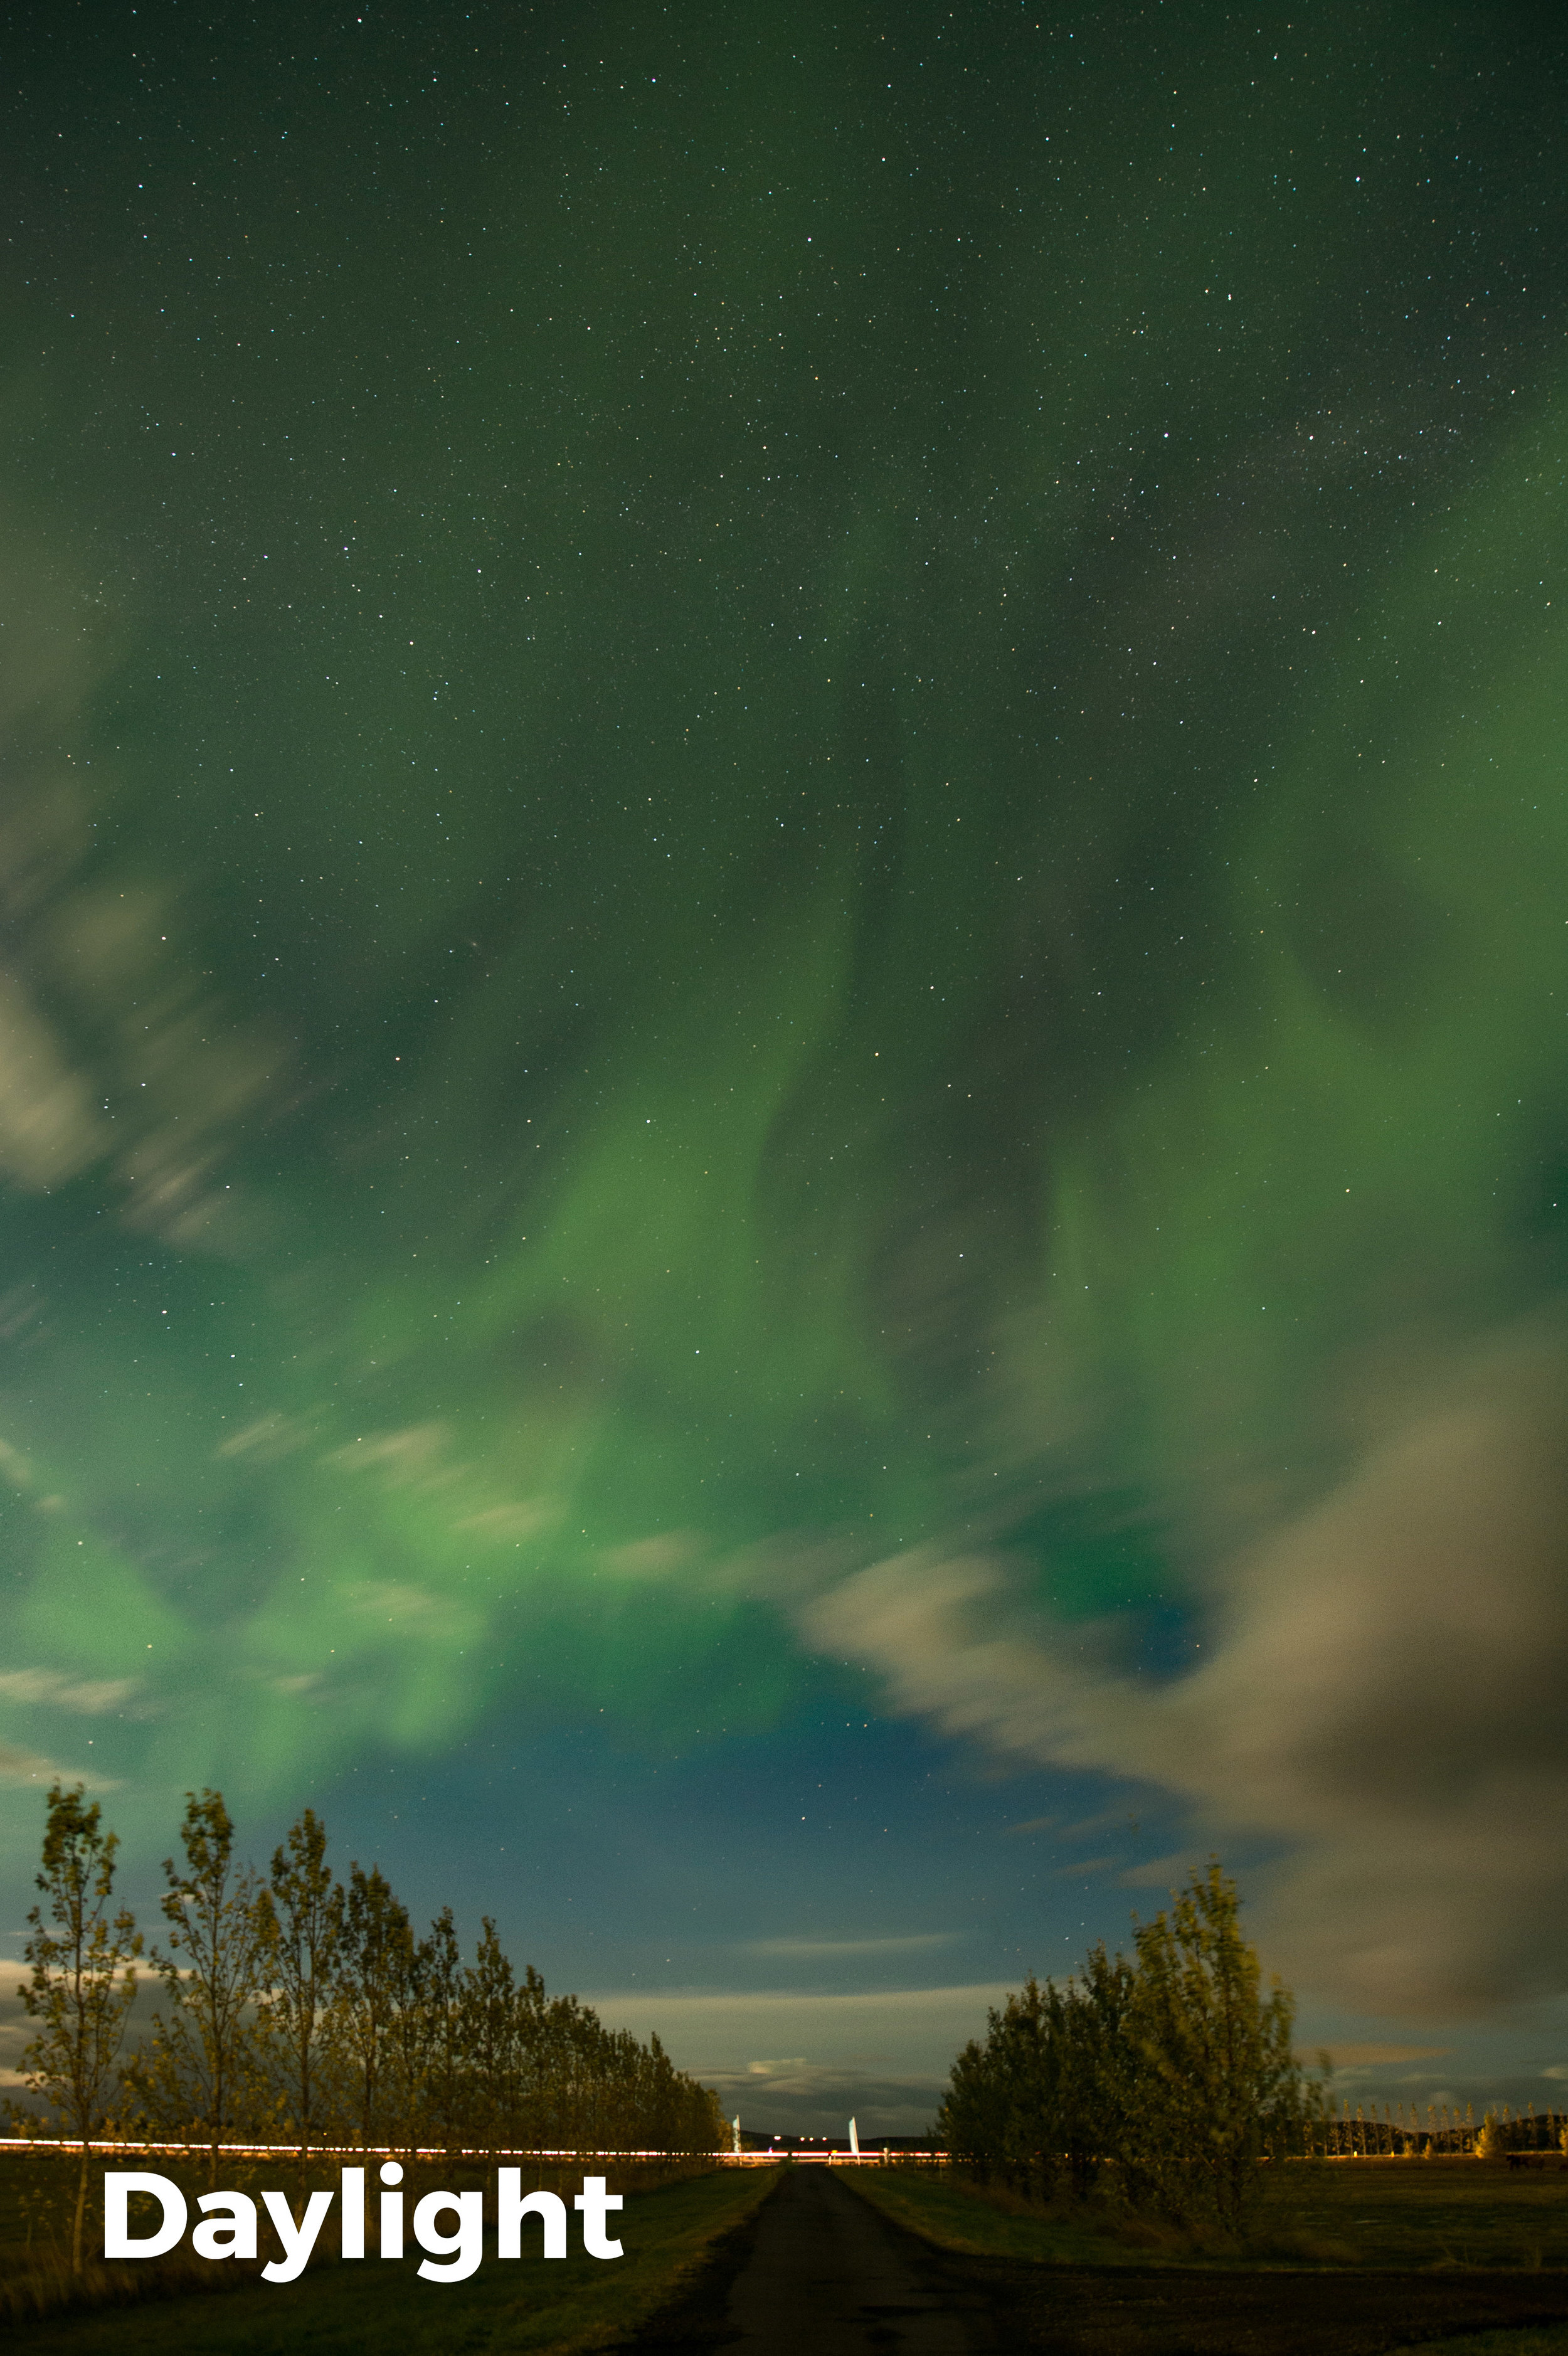
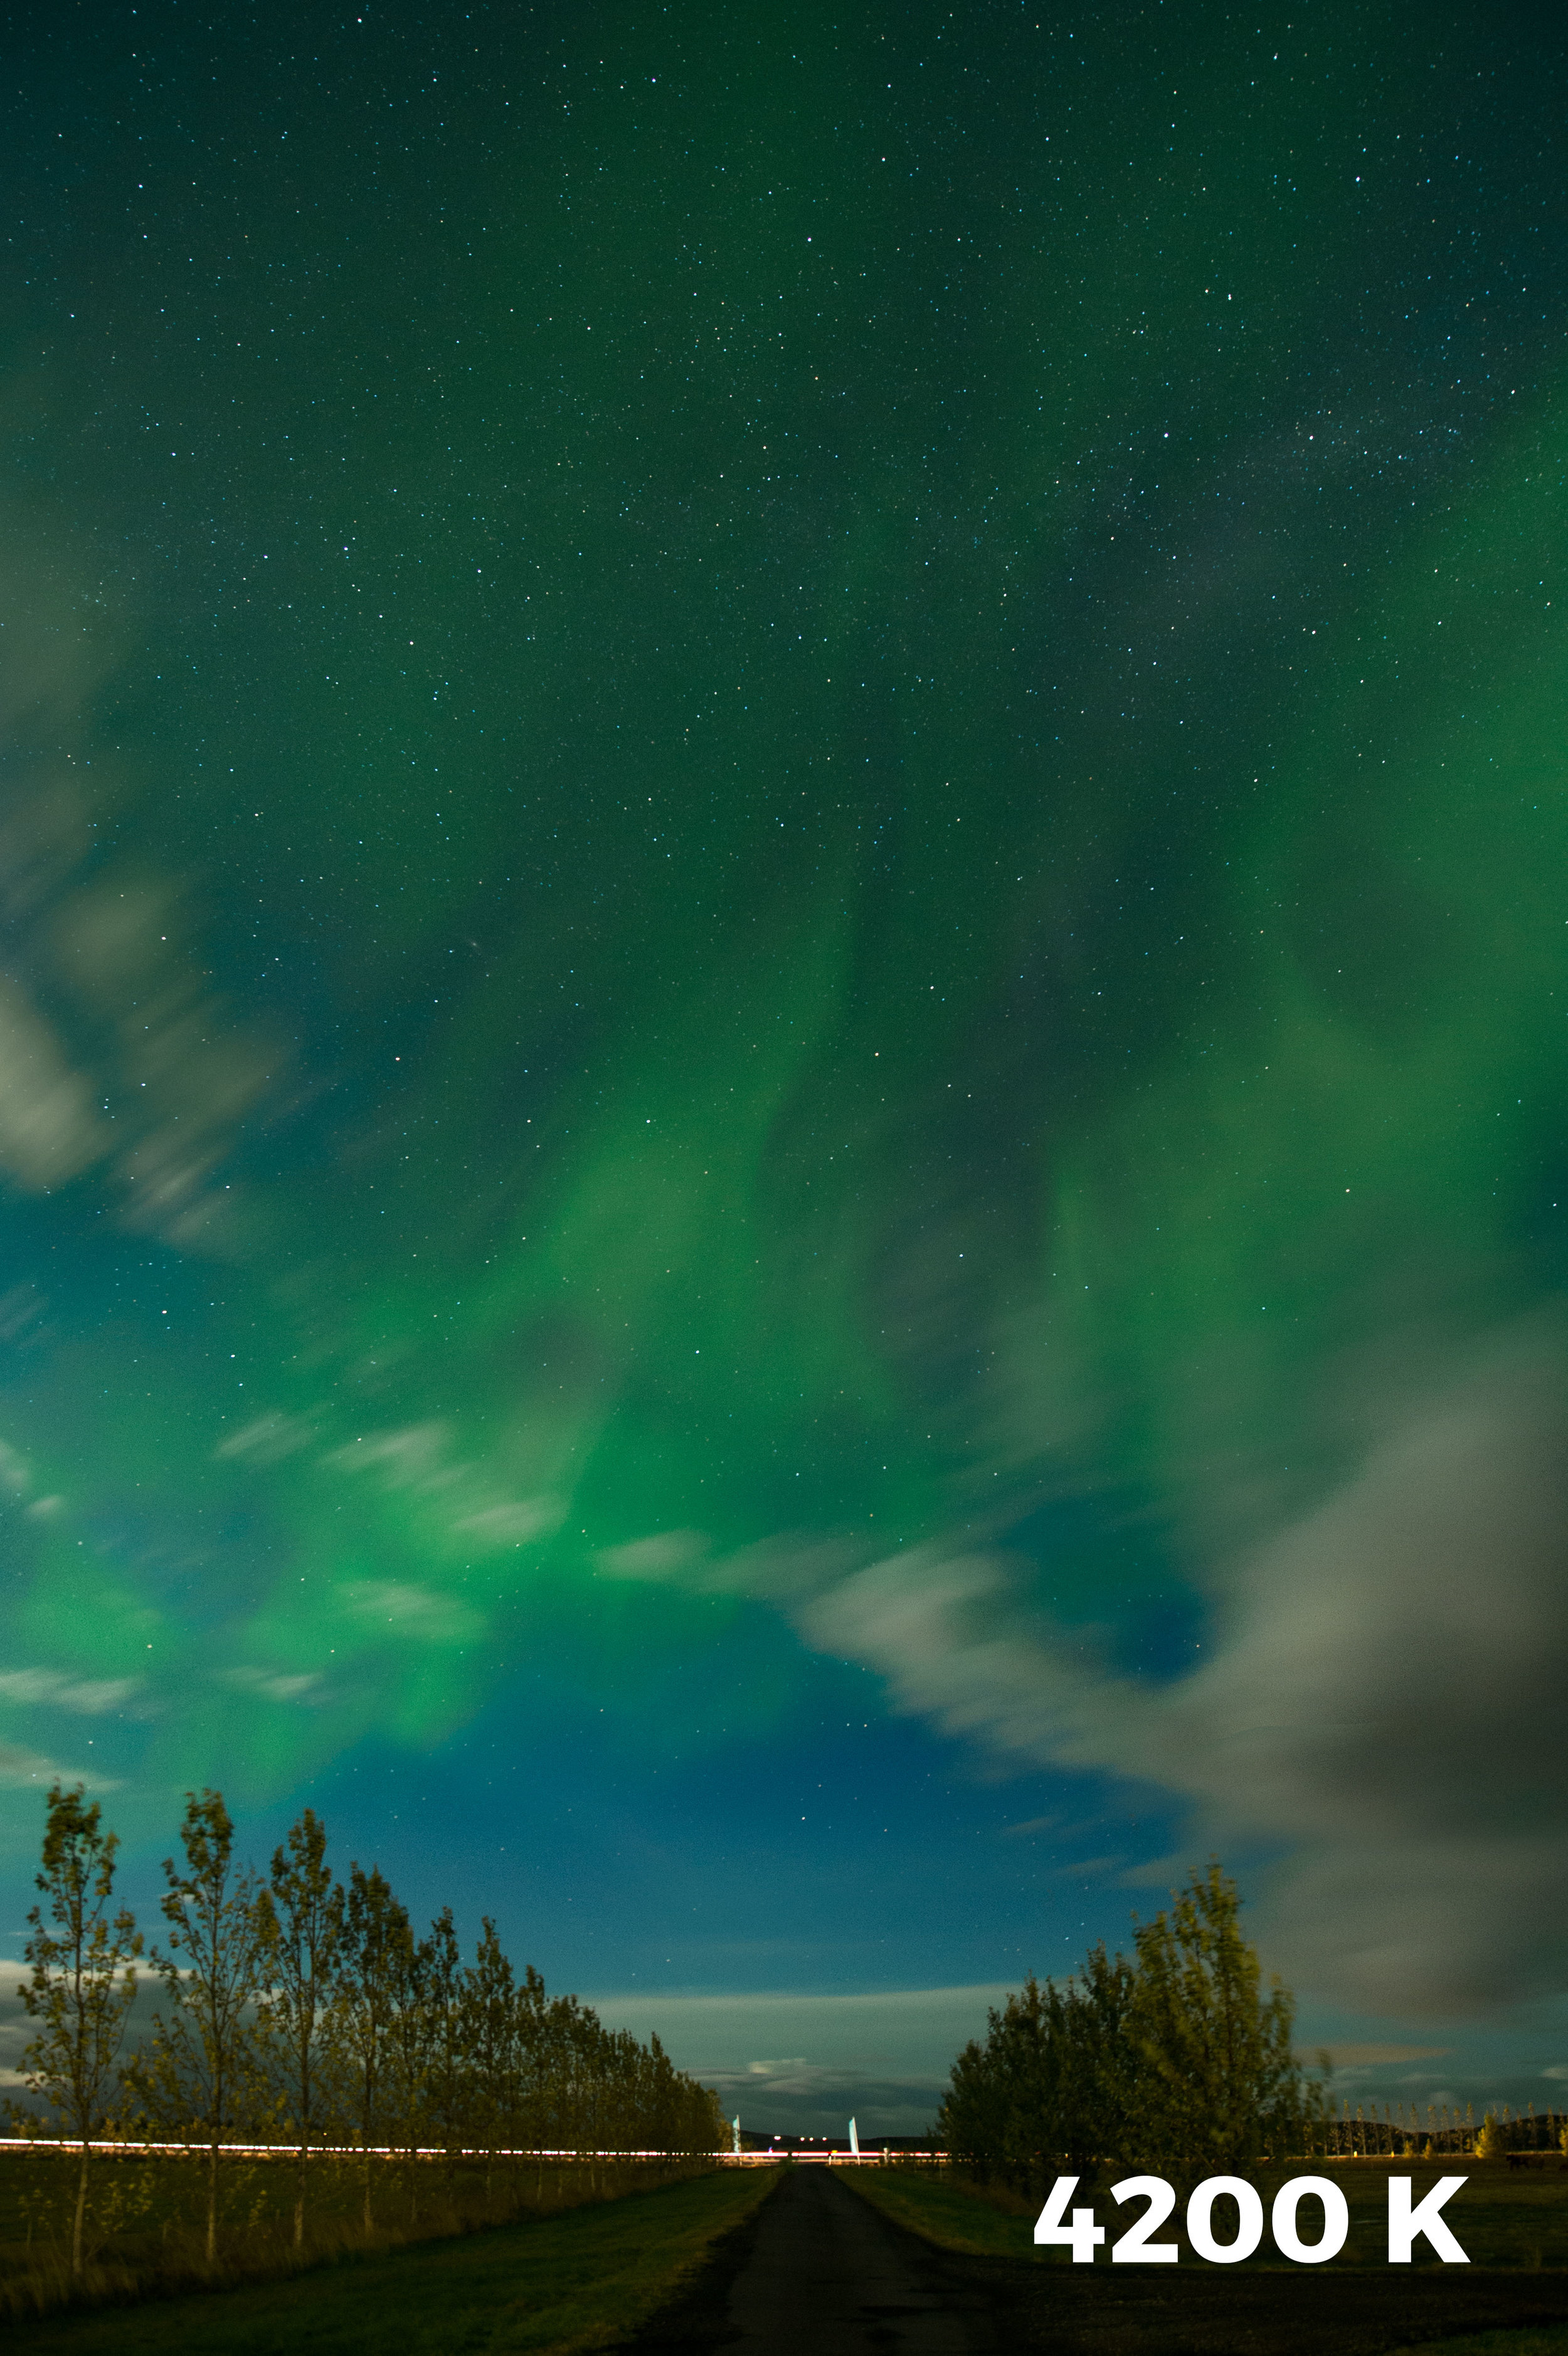
White balance can and should be set correctly for the initial capture. While it’s difficult to give an exact white balance setting for all situations, it’s safe to say that you’ll probably want to run a bit cooler than a typical Daylight (direct sun) setting. In the comparison below, the first image was made with a Daylight white balance, while the second was made at 4200 K. (Both images shot at 20 seconds, f/4, ISO 1600 with a 14mm lens.) Notice how the cooler white balance setting of 4200 K separates the color and makes the image feel more dynamic.

Experiment while out in the field to find the best look. If you find your images are too warm when back in Lightroom, slide the Temp slider toward the blue end.

7. Add Whites

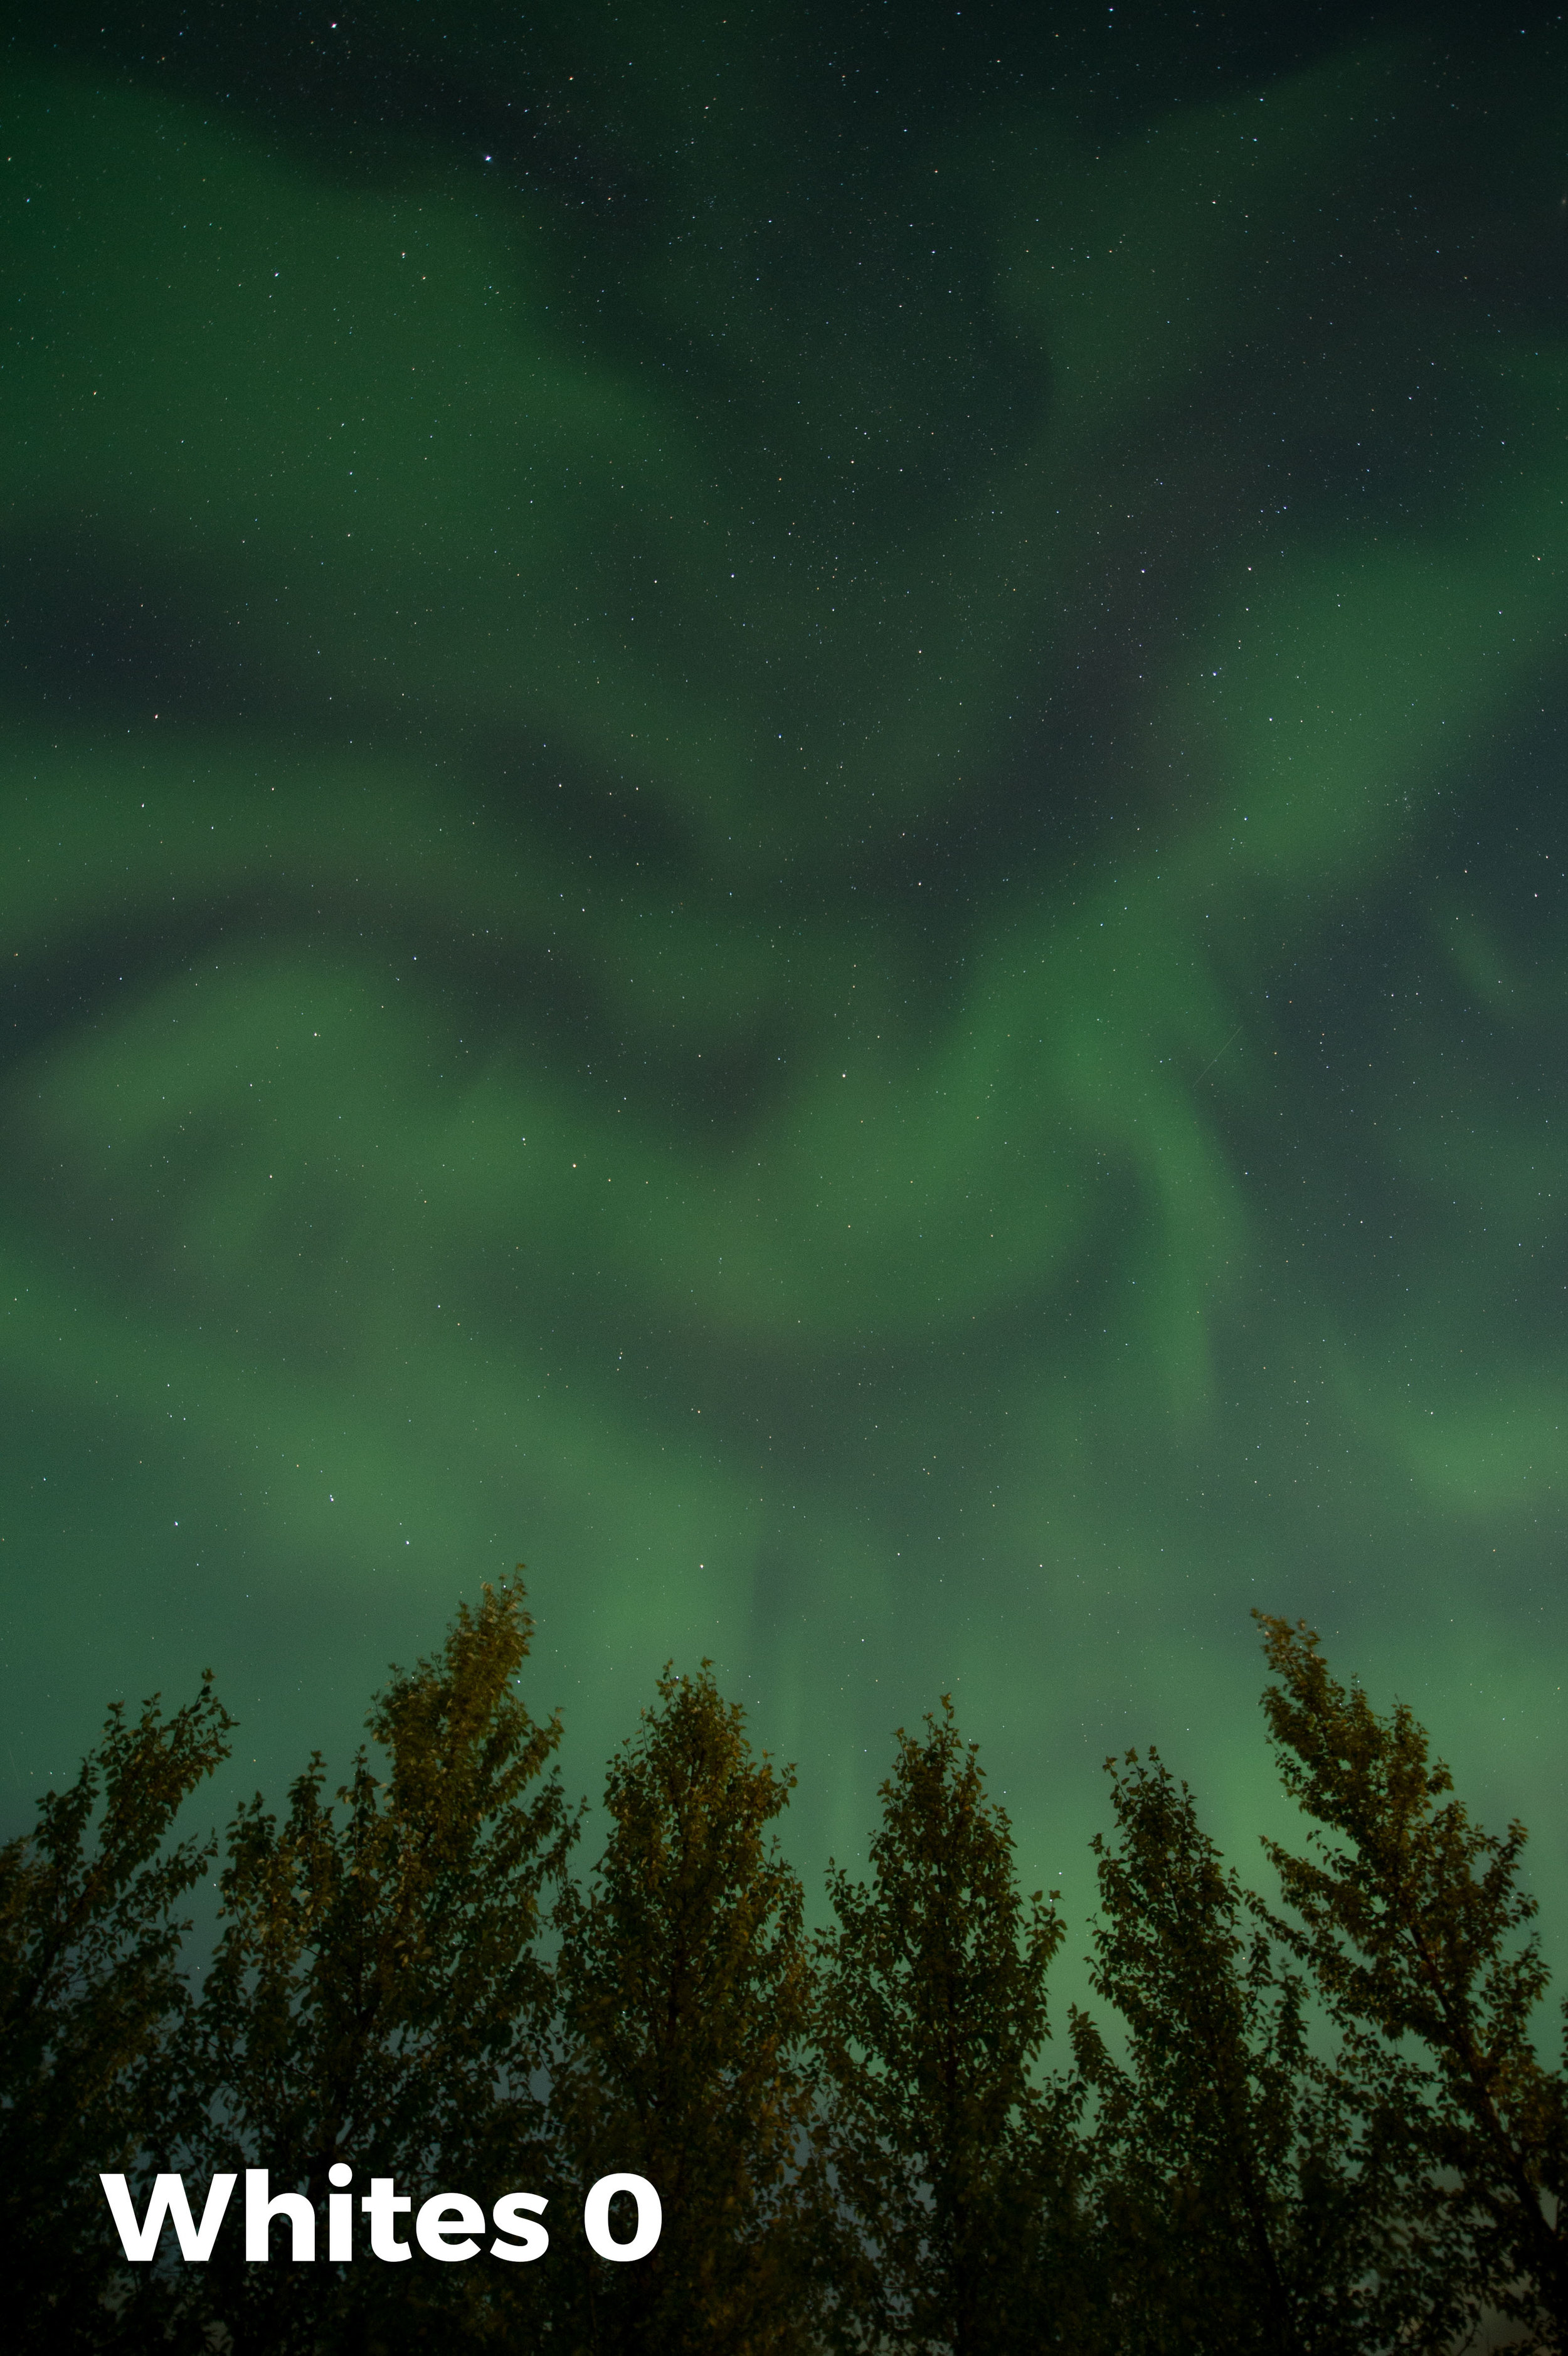
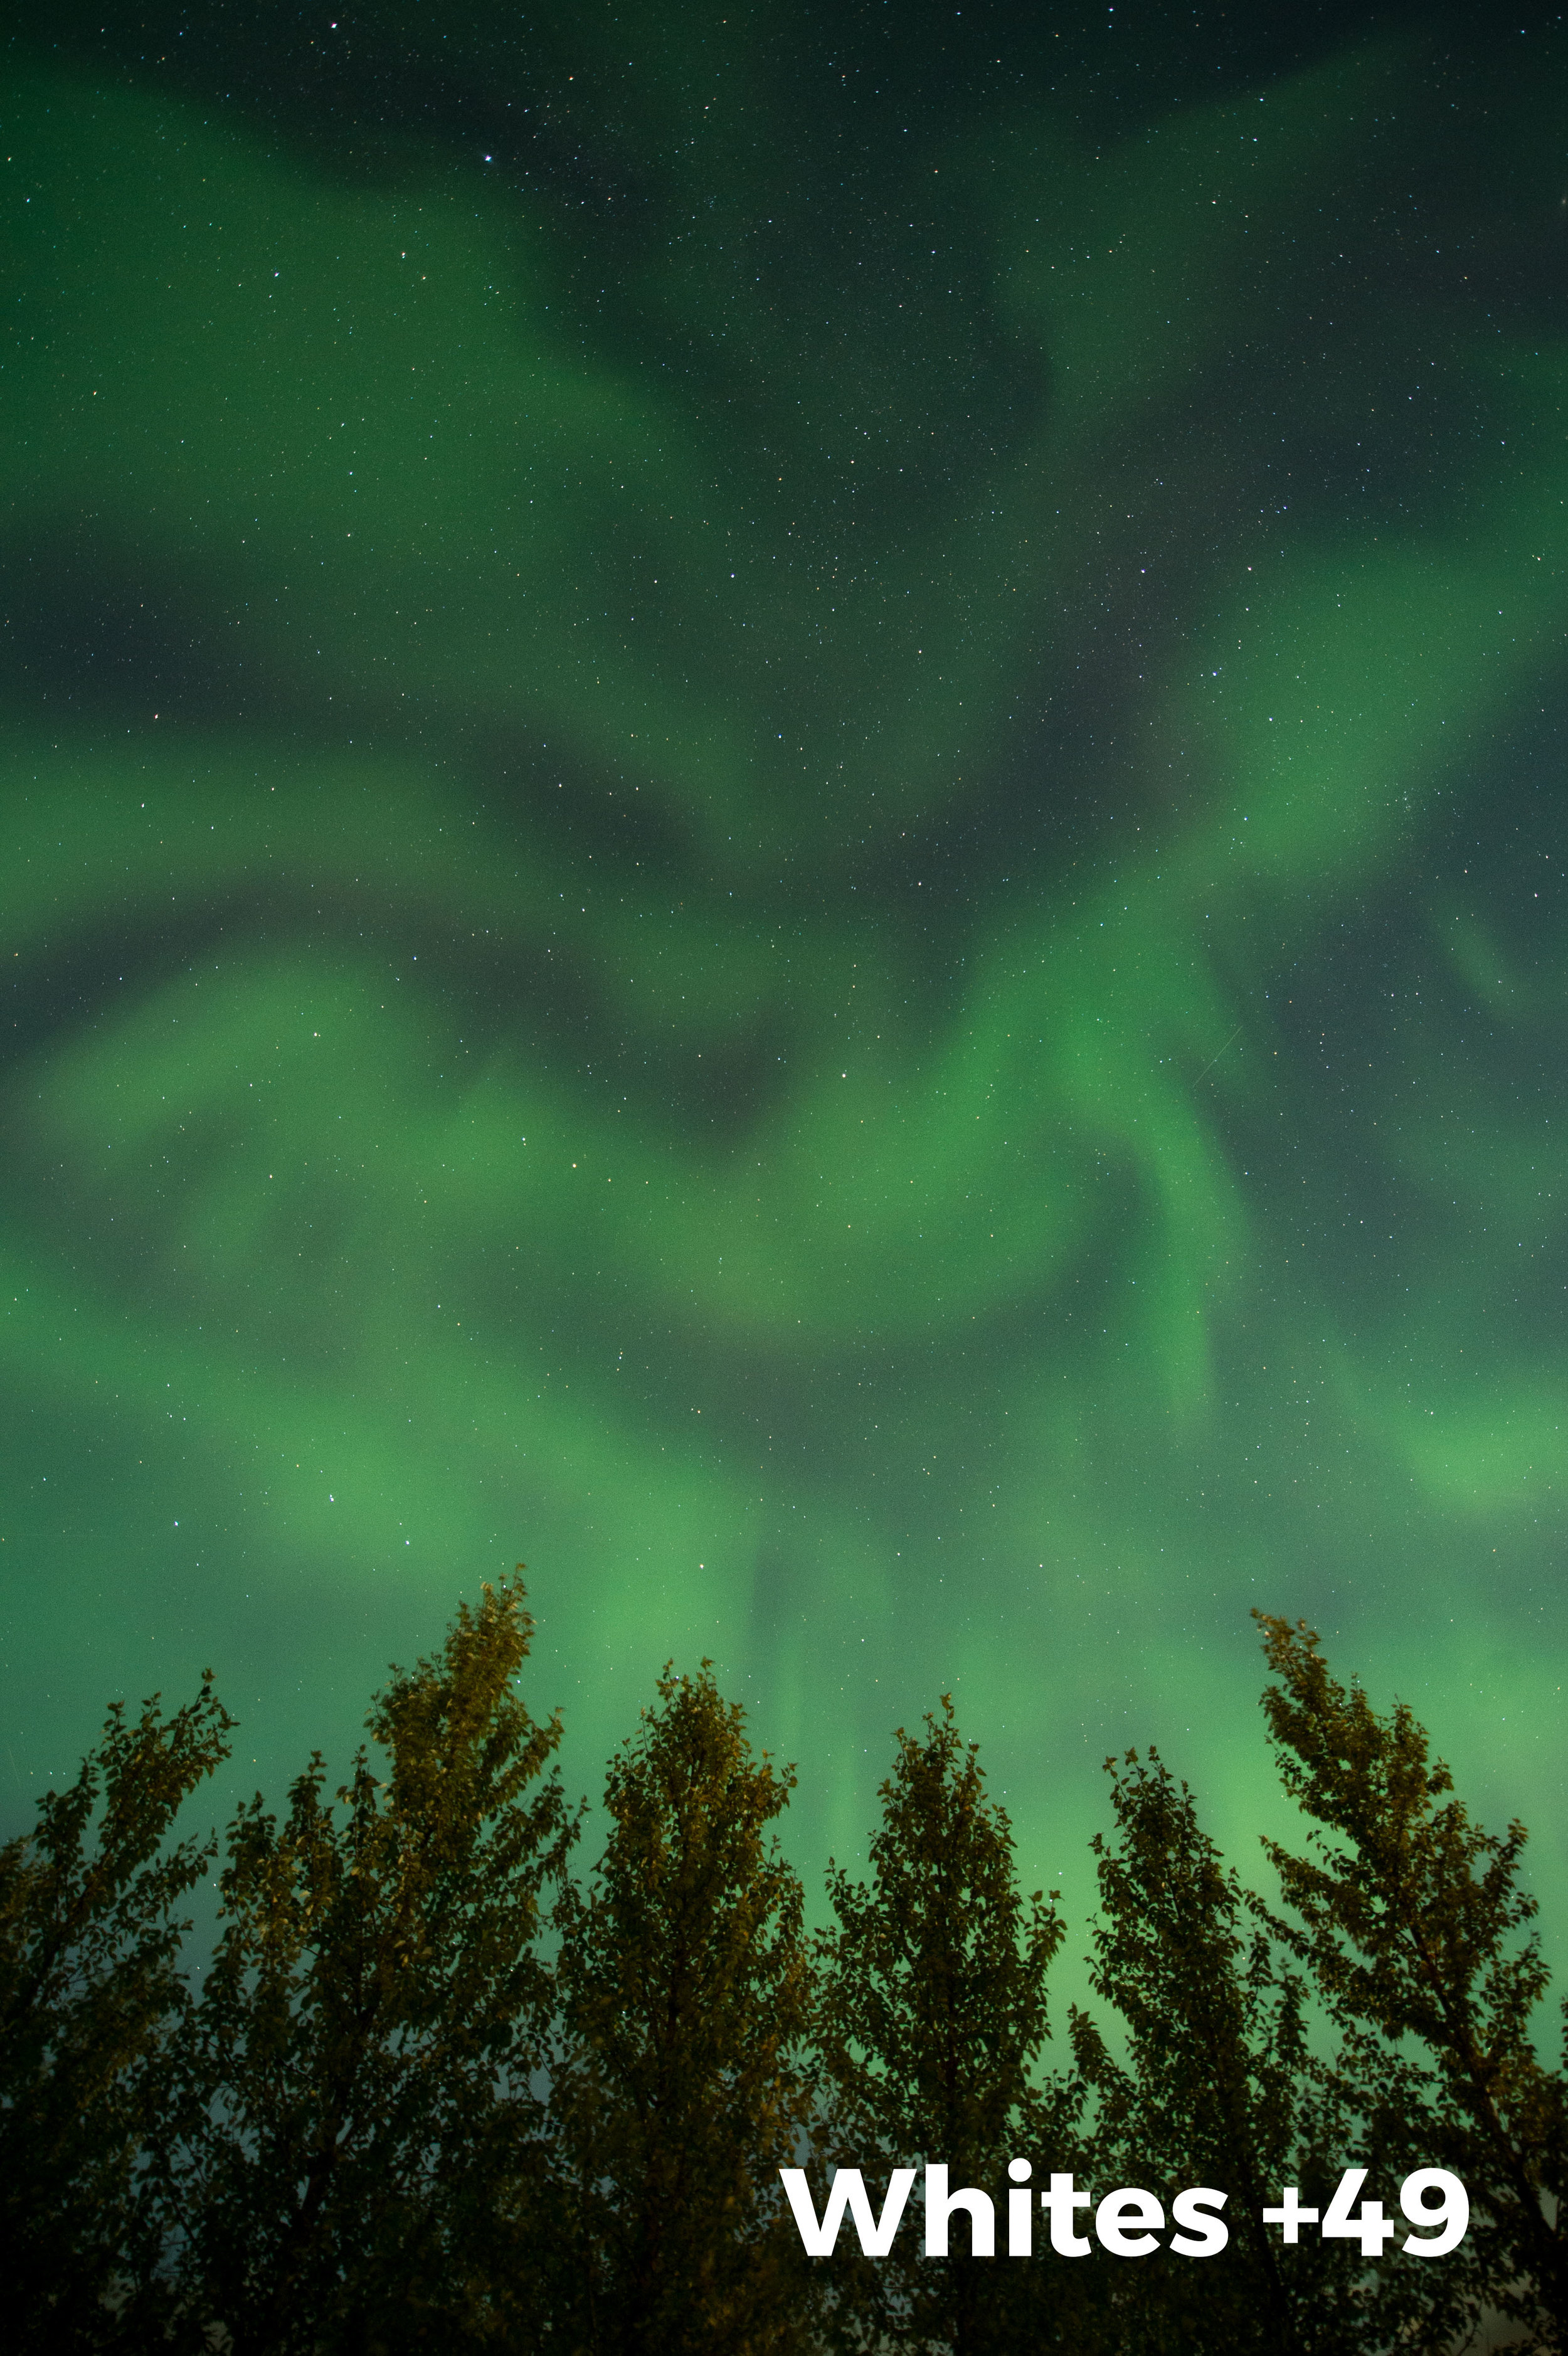
It would seem odd to address the Whites slider in Lightroom’s Basic panel while working aurora images, but it really works! This has to do with the underlying algorithm of the tool itself. Moving the slider to the right has the effect of increasing overall contrast, thereby adding more snap and pop to your images. In the comparison below, the first image (10 seconds, f/2.8, ISO 1600 with a 14mm lens) is as shot, while the second has been adjusted in Lightroom with Whites at +49, and therefore has more pop.

8. Add Dehaze

The Dehaze slider is the night photographer’s secret weapon. It increases contrast and saturation in the low-contrast portions of the image. Be careful here. This slider can be seductive. Adding too much can make your image look really fake. Start slow and add small increments at a time. Continue to compare your adjustments with the original by clicking on the before-and-after view (circled below).

We hope some of these tips will help make your aurora photographs even more stellar!

Are there any tips or techniques you’d like to share? How about some amazing aurora images? Feel free to post in the Comments section below!

Tim Cooper is a partner and workshop leader with National Parks at Night. Learn more techniques from his book The Magic of Light Painting, available from Peachpit.

UPCOMING WORKSHOPS FROM NATIONAL PARKS AT NIGHT