Night Photography Blog — National Parks at Night

star trails

Five Questions: Yes, Light Painting is Allowed in National Parks, and More

You ask questions, we give answers. (For the record, we do other things too. And we assume you do as well. But we all love night photography, so here we go.)

This installment of our “Five Questions” series features inquiries about light painting in national parks (hint: yes), focusing at night, an amazing national park in Utah, better batteries for the Luxli Viola, and the direction of star trails.

If you have any questions you would like to throw our way, please contact us anytime. Questions could be about gear, national parks or other photo locations, post-processing techniques, field etiquette, or anything else related to night photography. #SeizeTheNight!

1. Yes, Light Painting is Allowed in National Parks

A great example of low-level lighting: In Joshua Tree National Park, Arch Rock, at 30 feet high, was light-painted by just three battery-operated votive candles. Illumination barely visible to the naked eye even from close-up. Six stitched frames sh…

A great example of low-level lighting: In Joshua Tree National Park, Arch Rock, at 30 feet high, was light-painted by just three battery-operated votive candles. Illumination barely visible to the naked eye even from close-up. Six stitched frames shot with a Nikon D750 and a Tamron 15-30mm f/2.8 lens at 15mm Photo © 2017 Lance Keimig.

Q: I saw an article online that said light painting is no longer allowed in national parks. Is this true? — Pretty Much Everyone Who Has Emailed or Spoken to Us in the Last 18 Months

A: The headline of that article misled the reality of the situation. About 18 months later we still get this question, so let’s set the record straight.

First of all, it is true that a few National Park Service units have gotten hesitant about light painting. However, as far as we are aware, this has happened at only five NPS units—out of about 420. So to insinuate that night photography is being hampered at all national parks is a massive overstatement.

It should also be noted that of those five units, four (Arches National Park, Canyonlands National Park, Natural Bridges National Monument and Hovenweep National Monument) are administered by the same office, so it’s mostly just one rule that’s affecting a few places. It’s not like a bunch of parks have independently decided they don’t like night photography. In fact, we find that almost every park we visit loves the night, loves night photography, and encourages visitors to enjoy the darkness of the parkness either without or with a camera.

Those four Utah NPS units acted with exactly that feeling in mind. Michael Hill, who works in the district, and with whom we have communicated, is very clear that they felt light painting “confuses visitors” and they leave because of this confusion. We get that, and we are respectful of it.

However, that rule has been amended. As of earlier this year, those Utah parks allow Low-level Landscape Lightning (LLL), which is essentially very low levels of light that build up over the course of a long exposure.

In Lassen Volcanic National Park, Lance and I used a pair of Luxli Viola panel lights to illuminate Cinder Cone, which is approximately 1,000 feet in diameter. We were relatively far away from our giant subject with relatively dim illumination. We could barely see where the light was hitting, but over the course of a 15-second exposure at a high ISO, that little bit of light was enough to do the job. Nikon D5 and 14-24mm f/2.8 lens. 15 seconds, f/3.2, ISO 6400. Photo © 2018 Chris Nicholson.

For example, at our workshops we often employ LLL by using a Luxli Viola set to 1 percent brightness. That gentle glow is barely visible to the naked eye, but is extraordinary for cameras at high ISOs. That works out very well, and we cannot imagine that it would ruin the experience of any non-photographer who might happen to be there too. (For the record, usually no one else is there. We find it rare to encounter anyone else out at 1 a.m. other than—seldom but occasionally—other night photographers.)

In the case of the Utah parks, how low is acceptably “low-level”? Good follow-up question. When in Canyonlands last month, I asked a ranger, and he admitted the threshold is a bit subjective. He added that as long as the light isn’t disturbing wildlife or interfering with the enjoyment of other park visitors, then it’s probably OK. For commercial groups, the permit regulations stipulate that waving flashlights around is a no-no, but low-level static lighting is fine.

(Note: Since publication, this rule has since been amended again. As of 2020, no light painting—not even LLL—is permitted in the four Utah parks mentioned above. In 2021, Capitol Reef also prohibited light painting, bringing the total to six National Park Service units doing so.)

So, that’s the scoop with that set of four Utah units. The fifth unit in question is Grand Teton National Park in the beautiful state of Wyoming.

Grand Teton is an interesting case, because the park’s concern appears to really be in regard to shining artificial light on wildlife. We’re on board with whatever helps in that regard. Of course we don’t want to use flashlights for “spotting” wildlife, which in hunting is known as “jacklighting.” As people who use the parks for artistic inspiration and growth, we also have a responsibility to respect and preserve the natural environment, and that includes not disturbing the animals that call those places home.

There are many ways to photograph Grand Teton National Park in low light without light painting—such as by moonlight. Nikon D3 and 28-70mm f/2.8 lens. 1/50, f/ 4, ISO 400. Photo © 2012 Chris Nicholson.

That said, Grand Teton curbing light painting is a curious decision, as the park has a highway that runs right through it, along with plenty of private property that people drive on. Cars have headlights. There’s also an international airport that’s in park boundaries, and airplanes have lights too. The however-many cars and planes in the park each night illuminate far more than a few photographers’ flashlights do. So we’re not sure why photographers are the ones getting their lights extinguished. (We’ve heard of at least one photographer who light-painted by “accidentally” sweeping his flashlight across the scene. Perhaps that kind of behavior has something to do with photographers being mistrusted there.)

Regardless of our personal feelings about any of this, National Parks at Night always preaches respect for the land, and that means respect for the park regulations, for equal access for all visitors, and for the rights of animals not to be blinded with sun-guns.

To that end, on our workshops we are very clear that if someone from outside our group approaches with a light on or wants to walk where we are shooting, they have a right to do so. If they want to linger in the same place we’re shooting, they have a right to that too. We should all share the space, and we should all share the darkness. If what we as photographers are doing will disrupt another visitor’s enjoyment of the park, we can find another way or another moment to do it.

Let’s end with this thought: Rather than making negative assumptions and predictions based on some (very few) new obstacles at a tiny minority of parks, we instead implore our fellow night photographers to ensure this does not become an actual issue anywhere else.

How? By being responsible with our practices. That could be by employing LLL lighting techniques, or by light painting at a location only when alone or with other night photographers, or by shooting just the dark skies. Whatever works for you in the moment.

And finally, by encouraging other night photographers to do the same. — Chris

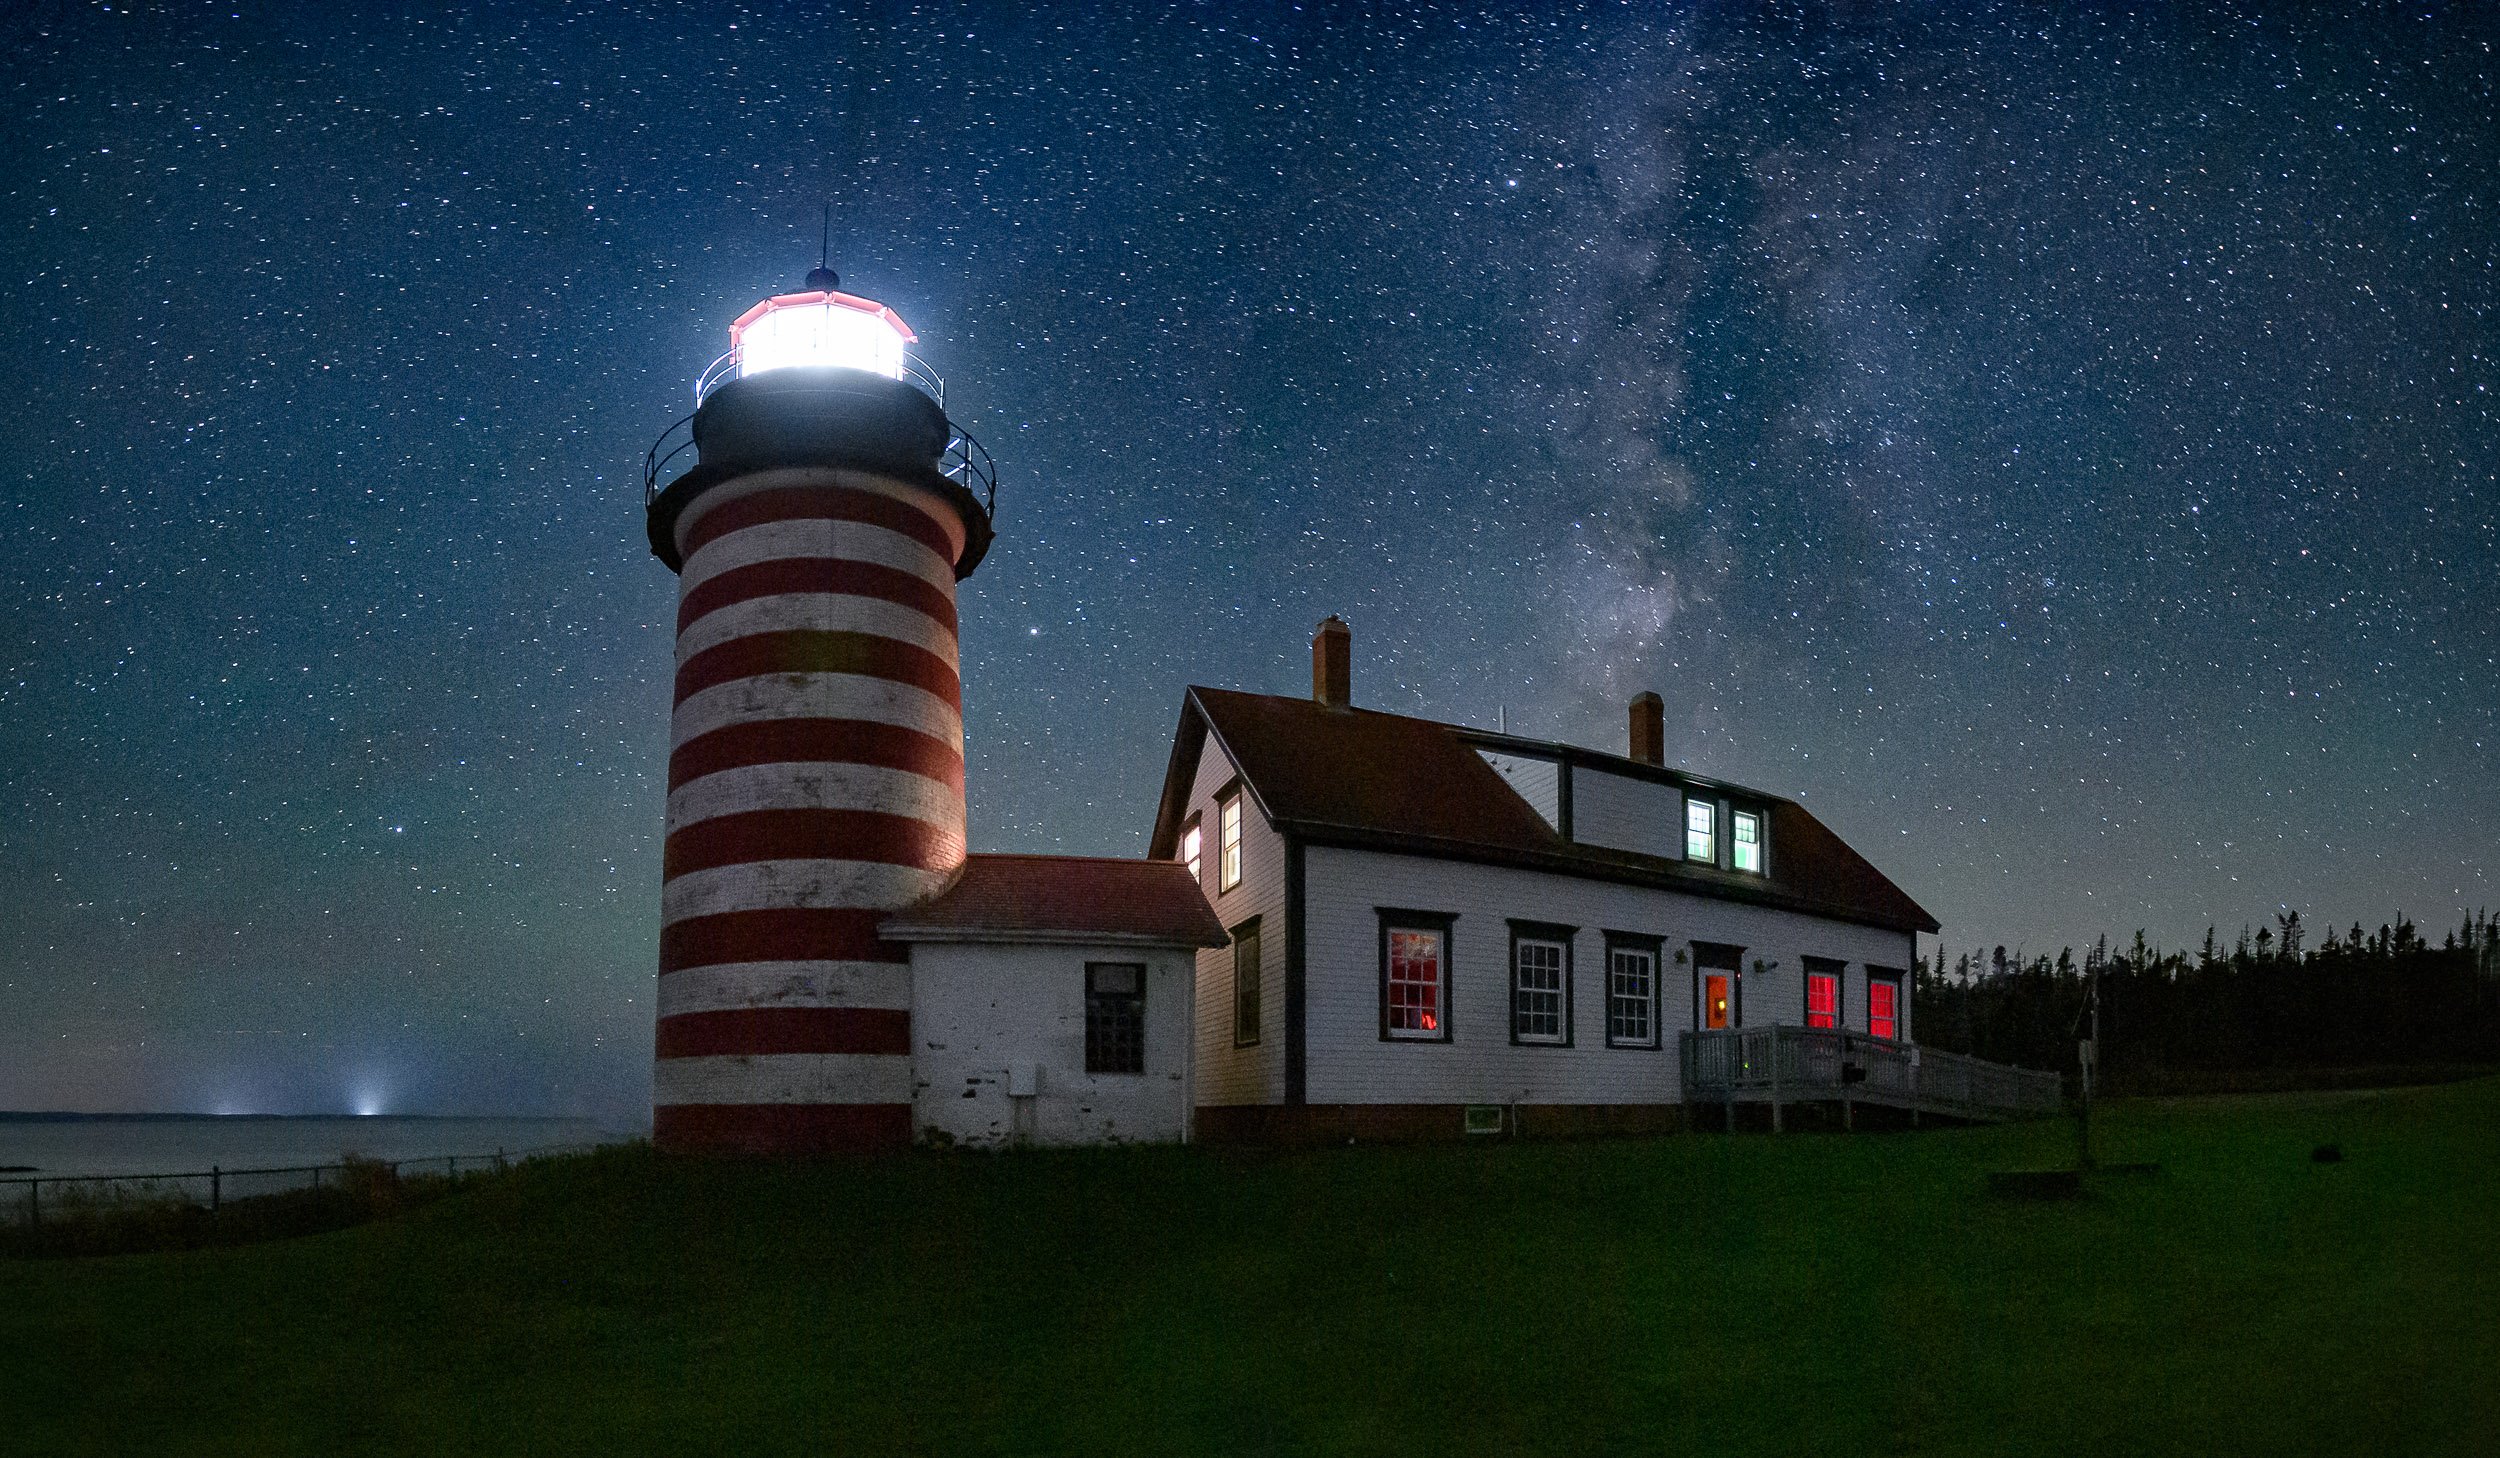
2. Focusing from Foreground to Infinity

Pemaquid Point, Maine, sharp from front to back after focusing to a hyperfocal distance of 18 feet. Nikon D750, Sigma 24mm f/4 lens. 488 seconds, f/3.5, ISO 800.

Q: On a recent night shoot at the Devils Garden in Utah, I was really disappointed in the fuzziness (not in good focus) of the rocks in the foreground of my shots. I may just have screwed up the focus on infinity, and I should have zoomed in on the first few shots to ensure clarity. Should I have focused on infinity and assured/assumed that the depth of field would maintain focus throughout the range, or should I have focused on a hyperfocal distance to ensure the full range of focus, which would have included my foreground rocks and out to infinity? — Michael D.

A: Anytime you have foreground subject matter, hyperfocal (providing it is done accurately) is the way to go. It’s a technique that is designed to maximize the available depth of field rather than focusing at infinity and sacrificing sharpness in your foreground.

To learn more about that technique, read my 2016 blog post “Use Hyperfocal Distance to Maximize Depth of Field at Night.” Then follow that up with a post that Chris wrote, “Staying Sharp: 8 Ways to Focus in the Dark.” — Lance

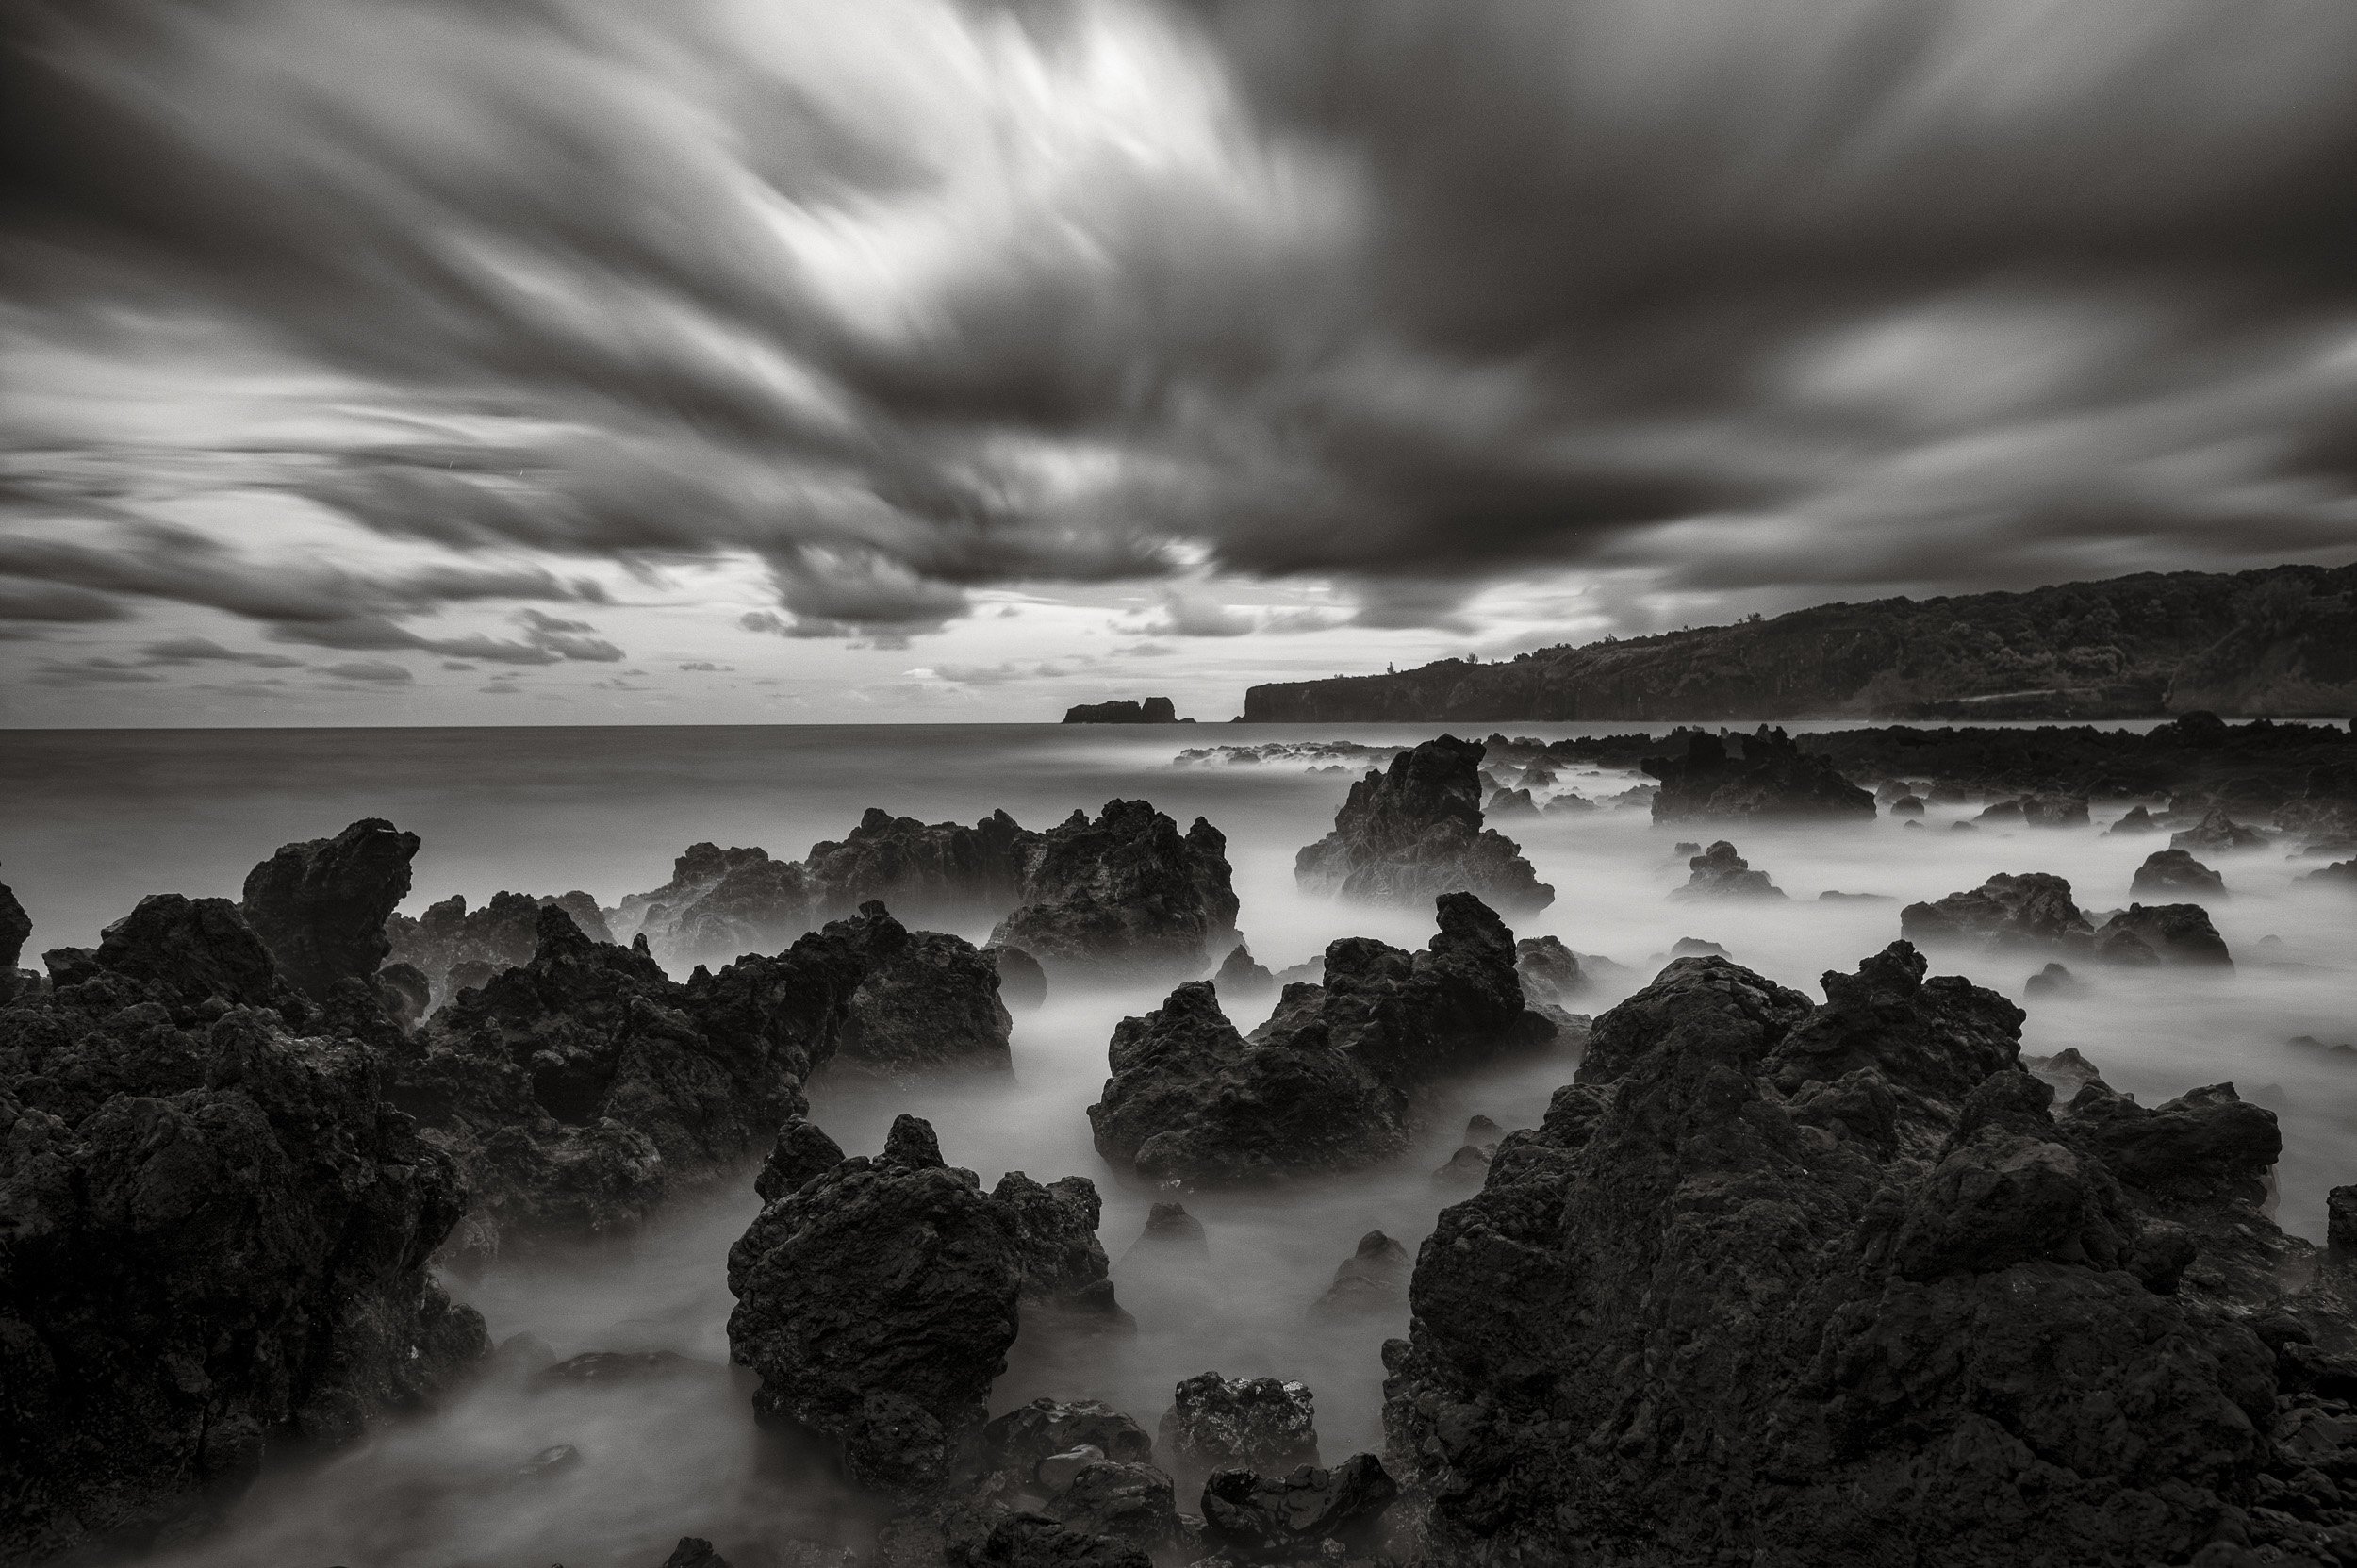
3. Capitol Reef Night Programs

The night skies of Capitol Reef National Park are worth a trip. Nikon D750, Zeiss 15mm Distagon f/2.8 lens. 154 seconds, f/4, ISO 100. Photo © 2016 Matt Hill.

Q: I would love to go to Capitol Reef National Park to see the stars. Are there any nighttime programs available? — Nancy

A: There certainly are! Capitol Reef is an awesome place to view and photograph night skies—and they know it, and they’re happy to help you enjoy what they have.

Check the Ranger Programs resource on the park website. They recommend the following special programs (check at the visitor center for schedules and meeting points):

  • guided hikes—60 to 90 minutes

  • star programs—tour the night sky in a gold-tier International Dark Sky Park

  • full moon walks

Have fun, send pictures! — Matt

4. Superpowering the Luxli Viola

Q: I was first introduced to Matt and Chris through a seminar held at B&H Photo in New York City. I proceeded to order the Luxli Viola LED light and am looking forward to working with it. I recall a reference to a better battery to use with the Viola than the one that comes with it (due to the short life of the battery), but I can’t find it in my notes. Please help me find the best battery for this kit. — Debi F.

A: First, I wouldn’t say the Viola’s battery has a short life. In fact, Chris claims to recharge his only every couple of months or so. That’s because he shoots mostly still photos, and he uses it only at night when very little power is needed to light a scene.

But if your usage drains your Viola faster than you prefer, you can get more run time by using the Watson NP-F550 replacement battery, which from my experience is very reliable.

If you want even longer run time for other applications—say, if you’re shooting video, when you’d probably leave the light on for hours at a time at full power—you can get the even larger Watson NP-F770 battery. That should about double your run time.

If you want to spend a little more, the Sony versions of the NP-F battery are supposedly the best to be found. — Matt

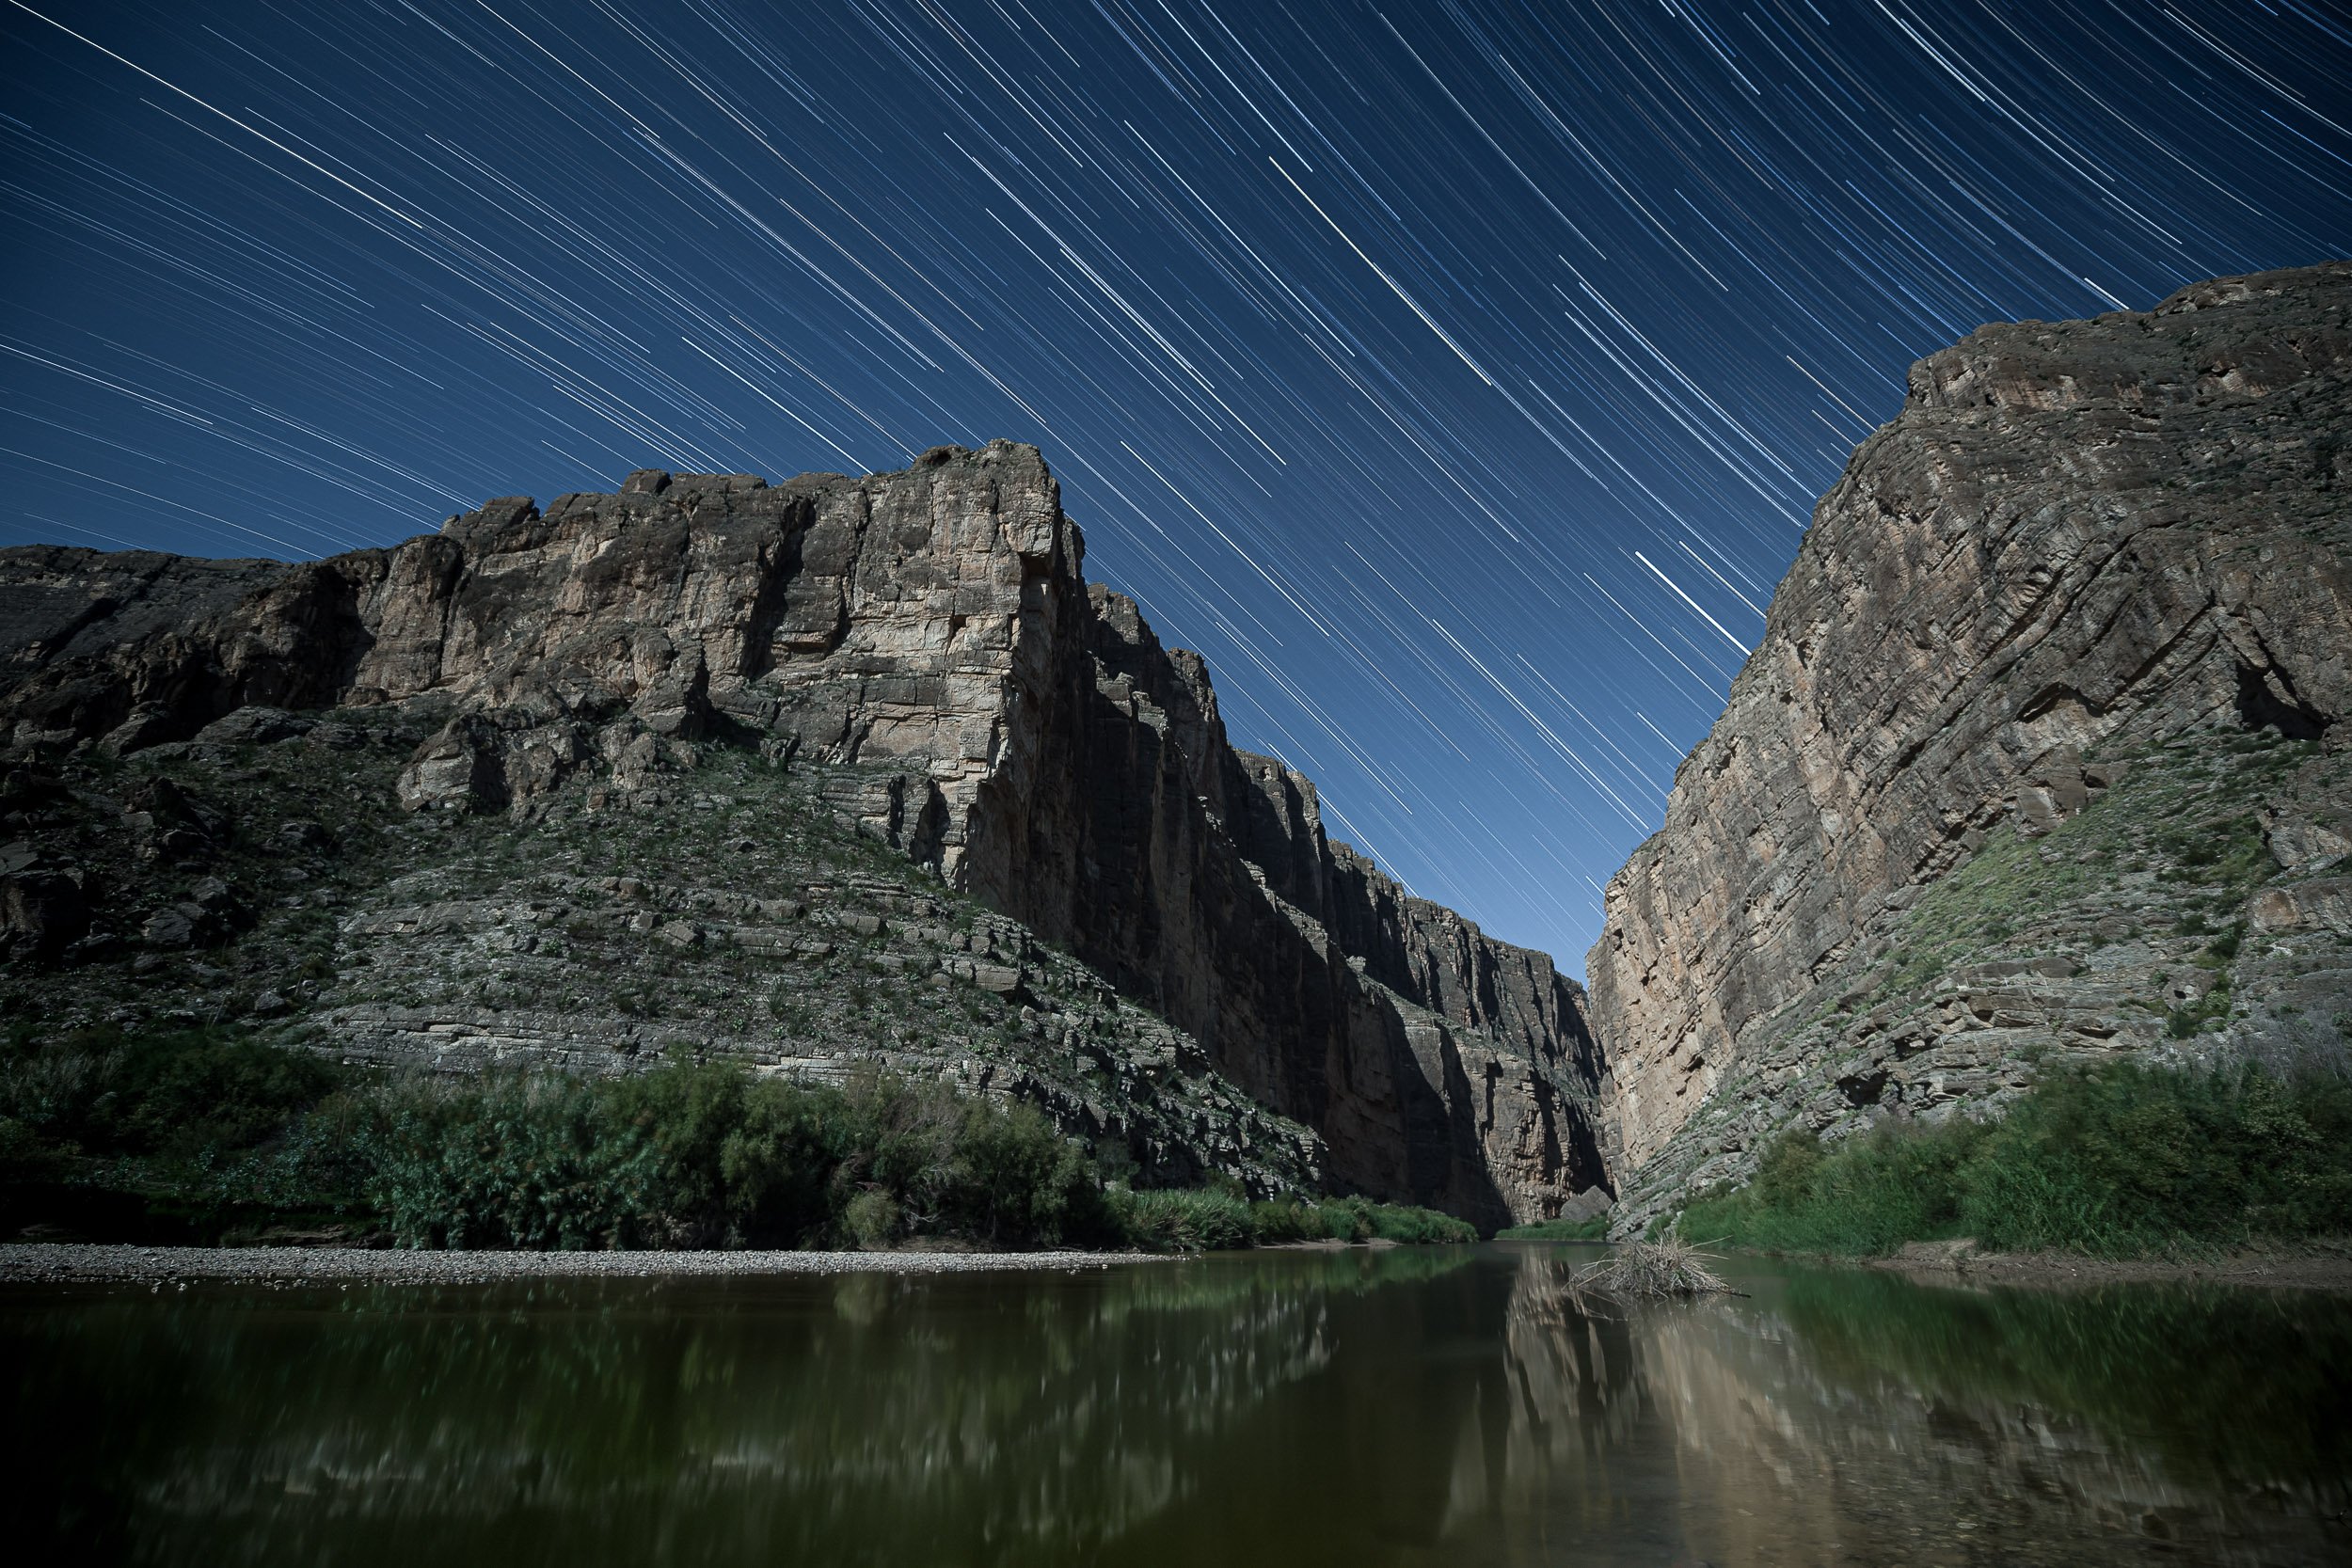
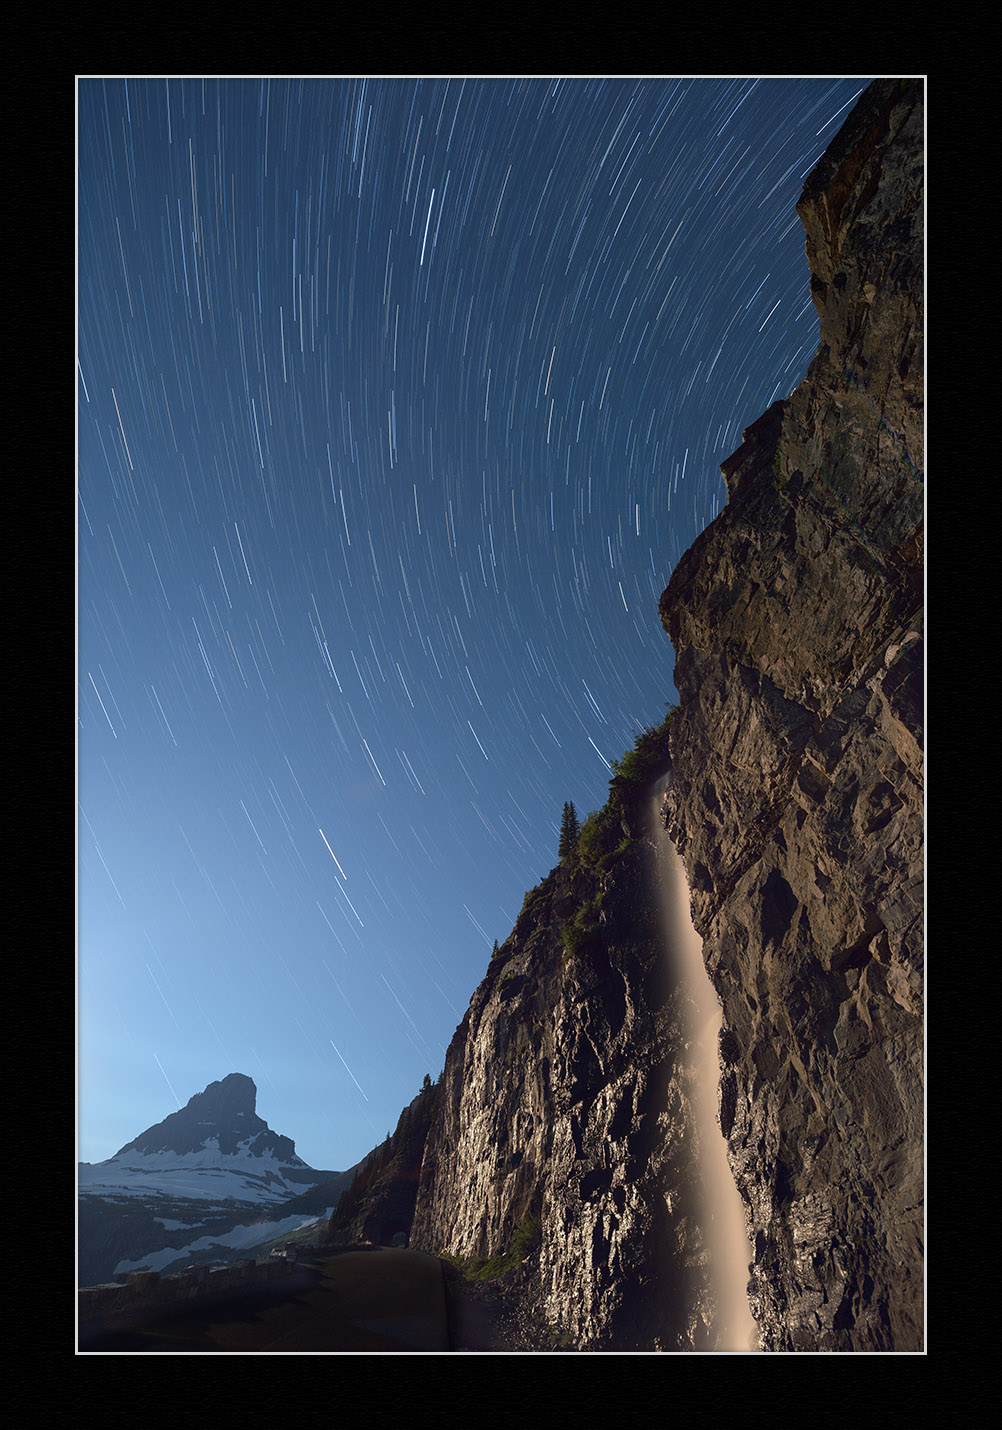
5. Stars Trailing in Different Directions

Sotheast view in Sedona, Arizona. Nikon D4s, 14-24mm f/2.8 lens. 4 minutes, f/4, ISO 200. Photo © Tim Cooper.

Q: In Tim’s recent blog post “Making the Move to Manual White Balance,” I can’t figure out how, in the last pair of photos outside Sedona, he managed to get the stars moving other than in concentric circles. Were some of them mirror-imaged to fill in areas where there was too much light, to let the stars show through? Thank you for satisfying my curiosity! — Marilyn O.

A: No mirror-imaging involved or required! Star trails move in different directions, angles and arcs depending on which direction you’re facing.

  • You get concentric rings from star trails only when you are shooting due north.  

  • When you are shooting east, they move from upper right to lower left.    

  • When you are facing west, stars move from upper left to lower right.

  • When facing due south, the stars go nearly horizontal across your frame.

For the image in question, I was facing southeast, so you are seeing the divergence of the east and south views.  If I had turned right a little bit more (south), I would have ended up with nearly all horizontal trails. If I had turned a little more to the left (east), the trails would have moved from upper right to lower left. I shot this photo with a very wide 14mm lens—so wide that I actually captured a little of both views! — Tim

Chris Nicholson is a partner and workshop leader with National Parks at Night, and author of Photographing National Parks (Sidelight Books, 2015). Learn more about national parks as photography destinations, subscribe to Chris' free e-newsletter, and more at www.PhotographingNationalParks.com.

UPCOMING WORKSHOPS FROM NATIONAL PARKS AT NIGHT

How I Got the Shot: Waterfall and Clements Mountain in Glacier National Park

“Clements Mountain, Star Trails, Waterfall.” © Tim Cooper.

Clements Mountain, Star Trails, Waterfall.” © Tim Cooper.

The Location

I am fortunate to live in Montana. It’s a beautiful state filled with wonderful people and fantastic landscapes. My “backyard” is Glacier National Park. Glacier is truly one of America’s great alpine experiences—from gorgeous glaciated peaks to alpine meadows carpeted with wildflowers to the host of wildlife visible on a near daily basis. I take every chance I can to get up to the park.

Early last summer I made this image while scouting for our upcoming National Parks at Night workshops in August and September. (While the first week of this workshop is already filled, the second week still has some spots available. Check out our workshop page for more information.)

Luck vs. Planning

When it comes to photography, I always give luck a little credit. Did the clouds cover the sky? Or did they add a nice accent? Did it rain on the night I had planned to shoot? There are so many small blessings that are easy to overlook.

Luck, however, is no substitute for planning. If you read this blog often then you have seen us discuss many times the importance of planning a night shoot. My familiarity with Glacier helped enormously with planning this shot. I already knew the location of the waterfall and exactly where I wanted the moon to be so that it would backlight the water. It was just a simple matter of using the indispensable phone app, PhotoPills, to determine when the moon would reach the necessary spot in the sky (see Figure 1).

Figure 1. The zoomed-out and zoomed-in views of the shoot location, as seen in PhotoPills’' Planner mode. The blue lines told me where the moon would be at different times of the night, which told me when to shoot for the effect I wanted.

The Exposure

I wanted to use the moon to illuminate the falls, but I also envisioned star trails rather than star points in my image. To create the effect of star trails, you have to make a very long exposure—15 minutes, 30 minutes, an hour or even longer. This makes the stars appear as if they are trailing through the sky. Another method to create these trails is to break up the exposure time into shorter chunks, and then stack the resulting set of images in post-production. This is especially helpful under bright moon situations or when you want to light paint.

Using multiple short exposures was my plan for this setup. The first step was to calculate an exposure using a high ISO test (i.e., the 6 Stop Rule). Setting my Nikon D4s to ISO 3200 and f/4, my final test shot (Figure 2) was exposed for 30 seconds.

Figure 2. Test shot at 30 seconds, f/4, ISO 3200.

The Shoot

Typically night photographers use an ISO of 6400 for test shots because, according to that 6 Stop Rule, we know that an exposure time of X seconds at ISO 6400 equals X minutes at ISO 100. This is a very handy little trick for calculating long exposures easily.

Because my successful test exposure was 30 seconds at ISO 3200, which equals 15 seconds at ISO 6400, then my long low-ISO exposure would be 15 minutes at ISO 100. Or—to shorten things up a bit—8 minutes at ISO 200. Using this exposure, I could shoot multiple frames at 8 minutes and blend them later in post using the star-stacking technique.

This evening, however, I either miscalculated or mistakenly set my camera wrong. My final exposures (Figure 3) ended up being shot at 5 minutes, f/4, ISO 100. That’s about two stops underexposed!

Figure 3.

I didn’t notice that at the time. I finished shooting and had to leave immediately, so there was no time to reshoot the frames. I was destined to have to fix it later in post.

Post-Processing

After downloading my images, the first post-processing edit was adjusting the Exposure slider to account for the underexposure out in the field. After increasing the exposure, the final set of images looked like this:

Figure 4.

The next step was to blend all the frames together to create the star trail effect. I began by selecting all of the images in Lightroom. Next, from the menu I selected Photo > Edit In > Open as Layers in Photoshop. This opens all of the images into Photoshop as layers within one file.

Once the file opened, I clicked on the top layer, held down the Shift key, then clicked on the bottom layer. This selects all of the layers in the file.

Next, in the Blending Mode drop-down list (circled in red in Figure 5), I selected Lighten (Figure 6).

Figure 5.

Figure 6.

This blending mode allows the brightest part of each layer to show through on the final image, which in this case creates the effect of the stars trailing across the sky. Figure 7 shows the result of blending the images with this technique.

Figure 7.

Did you notice the multiple car headlights that showed up after blending the layers? They were in the first, second and last photo frames (Figure 8). Because using the Lighten mode reveals the brightest parts of each layer, all the headlights showed up after blending.

Figure 8.

So, the next step was to remove the unwanted car lights. One of the benefits of stacking frames rather than taking one long exposure is that you can use layer masks to remove unwanted artifacts that show up in just a few frames rather than overwhelming an entire final photo. To do this, I clicked on the first layer that contained headlights to select it. Then at the bottom of the Layers palette I clicked on the Add a Mask icon (Figure 9).

Figure 9.

Figure 10.

Next I selected the paintbrush tool and chose black as my foreground color. Then I just painted on the mask over the area I wanted to remove. Notice in Figure 10 how I painted over the tunnel where the car headlights appeared. Also notice the corresponding black area on the white mask thumbnail, indicating the shape and location of the mask.

I followed the same steps for the other two layers with the artifact, painting out the headlights further up the road. Figure 11 shows the three masks with black painted on them covering up all of the headlights that exist on the different layers.

Figure 11.

Figure 12.

Finally, I wanted to separate the cool tones of the sky from the foreground waterfall. I clicked on the bottom layer, chose the Quick Select tool and then selected the foreground waterfall and cliff face (Figure 12).

Then I created a Color Balance layer by choosing Layer > New Adjustment Layer > Color Balance. Adding some warmth via the Red and Yellow sliders started to really separate the warm colors in the foreground from the cool colors of the background.

Figure 13 shows the final image.

Figure 13. Five stacked frames, each shot at 5 minutes, f/4, ISO 100 with a Nikon D4s and Nikkor 14-24mm f/2.8 lens zoomed out to 14mm.

While this may sound like a lot of work, after a little practice in Photoshop, you’ll find that completing these types of images takes no time at all!

Tim Cooper is a partner and workshop leader with National Parks at Night. Learn more techniques from his book The Magic of Light Painting, available from Peachpit.

UPCOMING WORKSHOPS FROM NATIONAL PARKS AT NIGHT

How I Got The Shot: Star Stacks and Sea Stacks in Olympic National Park

Sea Stack at Ruby Beach, Olympic National Park. Nikon D3s, Nikkor 17-35mm f/2.8. 120 stacked exposures shot at 20 seconds, f/2.8, ISO 1600. Light-painted with a Coast HP7R flashlight. © 2016 Chris Nicholson.

The Location

It’s hard for me to choose a “favorite” national park, because it’s like trying pick a favorite item from a buffet of candy and ice creams. But Olympic National Park would certainly be near be near the tippy-top of my list, if not the cherry at the very top.

Not only is Olympic simply beautiful, but its three distinct ecosystems—mountain, rain forest and coast—all present unique photography opportunities. You could literally be shooting an entirely different scene and genre from one hour to the next.

My favorite of those ecosystems? That’s an easier question to answer: the coast. I grew up in New England only a mile from the shore, so my affinity for the water is strong. And my favorite spot on the Olympic coast to photograph? Ruby Beach.

Ruby Beach is a stunning stretch of coastline ... flanked by high cliffs, lined with hundreds of ancient, massive driftwood logs, divided by Cedar Creek, and punctuated by picturesque sea stacks amid the crashing Pacific waves.

During my four visits and shoots at Olympic National Park, I’ve shot at Ruby Beach in three of them. When I visit the park again this September to prepare for the two workshops we’re hosting there, I’m certain to shoot at Ruby again.

Ruby Beach is a stunning stretch of coastline that is a perfect location for photographing sunsets, in sunset light, on overcast days (tide pools!) and, of course, at night. The shore is flanked by high cliffs, lined with hundreds of ancient, massive driftwood logs, divided by Cedar Creek, and punctuated by picturesque sea stacks amid the crashing Pacific waves.

(Shameless plug: I’d be happy to personally show you around Ruby Beach this September, when Matt Hill and I run our two workshops there. A couple of seats are still open for each week—September 17 to 22 and September 24 to 29—so sign up today!)

Here are a few of photos to give a sense of what Ruby Beach looks and feels like:

The Setup

On a July afternoon in 2016 I scouted Ruby Beach for a night shoot, and planned three setups for once the sky grew dark. I knew I would have a good view of the Milky Way, and intended to frame it with sea stacks in two of the setups, but also wanted to rip one long exposure to capture some southern star trails.

One thing I kept in mind while scouting is something that can be important when working around the coast: Changing tides affect the appearance of the shoreline. To get a good idea of what the water levels would look like once shooting at night, I used the Tide Graph Pro app. I looked up the tide chart for that date (see Figure 1), noticed where the water level would be during my nighttime shoot (about 9 pm. to 1 a.m.), found a corresponding tide level during daylight (about 1 p.m.), and visited at that time for scouting. This way I didn’t have to imagine what the water would look like later—I knew exactly.

Figure 1. Tide Graph Pro showed me that the tide level during my shoot would be at about 1 foot above the zero tide height. I saw that the water would be at about 1 foot also around 1 p.m., so that is when I did my daytime scouting.

Incidentally, knowing the tides is important for safety too, especially in Olympic National Park, where many headlands are impassable at high tide. You don’t want to venture around a promontory at low tide and get trapped a few hours later when the water floods your trail back.

The Gear

Ruby Beach is certainly not a long hike from the car—it’s only about a half-mile round-trip—but because I was working on a beach, I didn’t want to be burdened with a heavy bag that I’d be tempted to put down in the sand during my several planned hours out. So I left some of my gear in the car and brought along a one-camera, two-lens, one-tripod kit:

The Exposure

For the star trail photo, I chose a single sea stack about halfway between Cedar Creek and Abbey Island, and once set up I started to “work the scene”—i.e., I shot from several different angles, some without light painting, some with varying approaches to light painting, some including the Milky Way, some including reflections in the sand as the tide receded. You can see a couple of the variations in Figures 2 and 3.

Figure 2. My first composition included the reflection in the wet sand, which is how I visualized the photo during my daytime scouting, an approach I abandoned while adjusting the composition.

Figure 3. My second attempt at a composition included a little of the Milky Way to the left. I also tried scraping the wet, pebbly shore with some light painting to emphasize the texture of the wavy sand.

I ultimately chose an angle that allowed me to get a little of the Milky Way behind the sea stack. I didn’t like the position of the galactic core in the frame, but figured that as it moved over the next hour or so, it would eventually be in a spot I did like. This led me to a key decision in how I approached the exposure: I chose to create my star trails using a long series of short exposures that I would later stack in post-production.

I could have created the star trails using one very long exposure, but there are drawbacks to that approach, including a significant drain on the camera battery, along with the introduction of long-exposure noise, which would be particularly problematic in warm midsummer temperatures. So instead I opted for “star stacking.” Star stacking is a post-processing technique for creating star trails that solves many of the image-quality issues inherent in night photography. (I will likely write more about all of that in a future blog post, so please stayed tuned for a year or two.)

Star stacking involves shooting multiple frames of the scene that are later layered together in Photoshop in a way that combines the stars into the same trails they would have made in a long exposure. You can do this with shutter speeds of any length. For example, if you wanted to create one-hour star trails, you could star-stack 12 5-minute exposures, or 30 2-minute exposures, or 60 1-minutes exposures, or so on.

Star stacking is a post-processing technique for creating star trails that solves many of the image-quality issues inherent in night photography.

For this photo, I shot 120 20-second exposures, giving me the equivalent of 40 minutes of star trails. Shooting that many frames meant I’d have more work to do later in Lightroom and Photoshop, but there was a reason I chose this approach, and it goes back to the decision about the Milky Way. I wanted to be able to pick out of my sequence one frame in which I liked the position of the galactic core, and I wanted that frame to have crisp star points.

I had my lens zoomed to 19mm, and using the 400 Rule, I knew that my shutter speed could be no longer than 20 seconds before the stars would start to blur. Therefore, I set my shutter speed to 20 seconds, and calculated that I would need 120 frames to produce my 40-minute star trails.

I set my aperture to f/2.8, and I used hyperfocal distance to ensure that both the sea stack and the stars would be in focus. I set the ISO to 1600, which could normally be quite low for star points, except that the moon was close to rising—not close enough for its light to be seen by the naked eye, but close enough to brighten the sky a bit during a long exposure. Shooting at f/2.8, I would have plenty of stars to trail, so I wasn’t concerned about them being a little dim, and because I would be light painting the sea stack, I wasn’t concerned about lacking shadow detail.

The last piece of the puzzle was the light painting. The sea stack was too prominent in the frame to use as a silhouette—half the composition would have been pure black. So I wanted to light paint the rock in a way that would bring out its texture and color. I experimented with different angles and determined the best option was lighting from the right, standing as close to a 90-degree angle to the sea stack as I could without stepping into the waves. (See Figure 4.)

Figure 4. A self-portrait of me light painting the sea stack.

I also experimented with different flashlights and chose my Coast HP7R, because its wide, crisp edge-to-edge beam allowed me to evenly paint the entire sea stack from a relatively close distance without having to move the light. Figure 5 is the painting approach I settled on.

Figure 5. The final approach to the light painting, after trying several variations.

The Shoot

Once my exposure and light painting strategies were set, all I needed to do was execute the sequence. Because I was shooting 20-second exposures, I didn’t need an intervalometer, so I simplified matters by using a wired remote shutter release that I could lock (specifically, the Nikon MC-30A). The camera was set in Continuous shooting mode, so all I needed to do was push the button on the remote, set the lock, and let the camera do its thing 120 times.

During the first exposure, I did the light painting that I had already practiced. The remaining 119 frames have just a silhouetted sea stack. I went for a walk and enjoyed a quiet night on the coast under the dark skies of Olympic National Park.

Figure 6. The entire 120-frame sequence in Lightroom.

The Post-Production

The star-stack process is actually pretty simple for such a powerful technique.

After dumping the cards into Lightroom, I looked at the images and decided not to make any adjustments other than adding a standard touch of Vibrance and Clarity, and (this is important) in the Len Corrections panel I turned on Remove Chromatic Aberration and Enable Profile Corrections. I made those adjustments to one file, then selected the entire sequence and clicked the Sync button to apply those changes to all the highlighted files.

With the entire sequence still selected, I went to the menu and chose Photo – Edit In – Open as Layers in Photoshop. This maneuver created a new file by making a layer out of each of the selected frames of the sequence I had shot on the beach. (See Figure 7.) Because I initiated this process for over a gigabyte of collective data, once the computer was working I went to the kitchen and made a sandwich and a cup of coffee. My computer is no slouch, but it still needed a good 20 minutes to complete the job.

Figure 7. Each frame of the sequence was imported to Photoshop as individuals layers in one file.

The next step was to select all the layers (Figure 8), which can be done either by shift-clicking the first and last layers, or by pressing Control+Option+A (Mac) or Control+Alt+A (PC).

Figure 8. All layers selected.

Then, using the drop-down menu at the top of the Layers panel, I changed the blend mode to “Lighten.” (Figure 9.) The Lighten mode essentially looks at the layers as a pile of aligned images, searching through each of them pixel by pixel. It searches for the lightest pixel in each pixel pile, then brings that lightest pixel to the top. In the case of stars that are moving against a dark sky, that means the star point in each layer is brought forward, thus creating the trails. (Note to astronomers: Of course we know that it’s actually the Earth moving, not the stars, but it’s easier to explain this way, so please bear with me.)

Also, because I light-painted the sea stack in that one frame but left it silhouetted in the others, the sea stack is also brought forward. No masking needed—it happens automatically.

Figure 9.

That’s a sort-of technical explanation of how the Lighten mode works behind the scenes. What I see on-screen is some nifty magic of star trails appearing where before there were only star points and dark sky. (See Figure 10.) It looks pretty much the same as if I’d shot the 40-minute exposure, except it has no long exposure noise, and my camera battery didn’t have the life sucked out of it.

The Cleanup

The keen observer will note that while shooting those 120 frames, some planes flew through my composition, and they impolitely neglected to turn their lights off before doing so. Some photographers like to keep plane trails in their photos. I’m not one of those photographers. Getting rid of them is a simple matter of masking or cloning them out of the layers they appear in.

I also wasn’t crazy about the bright star trail in the upper right corner of the composition. It’s the brightest and thickest trail, and it’s right in the corner, where it draws attention far away from where I want attention drawn. So I masked it out.

One more bit of cleanup I did was in the lower right corner of the composition, where you can see a big blotch of light that was caused by a moving star being distorted in the reflections on the sand. That was relatively easy to mask out as well.

Figure 10. The artifacts from stacking that I masked out of the layers in Photoshop.

Figure 10. The artifacts from stacking that I masked out of the layers in Photoshop.

The Save

The final decision in creating a star stack is whether to save the layered PSD file. If I had shot the sequence using fewer longer exposures (for example, eight 5-minute exposures), then saving the layers file may have been feasible, and it would have come with the benefit of being able to make adjustments to the individual layers in the future. But I didn’t do that—I used 120 short exposures to create this stack, and if I saved that as a PSD—well, I wouldn’t be able to, because it would have resulted in an 8 GB file, which is too gigantic for the PSD format.

Rather, I would have had to save it as a PSB, which is Adobe’s large document format. But I still would have ended up with a giant file that I don’t want to deal with reserving space for or having to open again. So instead, I flattened the image and saved it as a 70 MB PSD, which while not as flexible for future edits, is much easier to maintain. Should I ever want to approach this image differently, I can always recreate it from the sequence files—and enjoy another sandwich and cup of coffee while doing so.

Once the star-stacked photo was saved and back in the Lightroom catalog, I made some minor adjustments to Clarity and Vibrance to optimize the look of the stars, and that was that—star trails over Ruby Beach.

Figure 11. The final image.

And what about that star-point Milky Way photo I wanted to pull out of the sequence? Well, I didn’t like the position of our galaxy in any of those 120 frames. So after I wrapped the star stack sequence, I reframed my composition and shot Figure 12 instead.

Figure 12. The Milky Way over Ruby Beach in Olympic National Park. © 2016 Chris Nicholson.

Speaking of the Milky Way, can you see it in the star trail photo (Figure 11)? It’s to the left of the sea stack, and you can discern it by the telltale cluster of denser star trails. It looks like a streaky cloud of light. That’s what our galaxy looks like in a long exposure!

Note: If you’re interested in joining NPAN instructors Chris Nicholson and Matt Hill in Olympic National Park, there are only a few spots left, so sign up today! We’re offering two weeks in this amazing national park: September 17 to 22 and September 24 to 29.

Chris Nicholson is a partner and workshop leader with National Parks at Night, and author of Photographing National Parks (Sidelight Books, 2015). Learn more about national parks as photography destinations, subscribe to Chris' free e-newsletter, and more at www.PhotographingNationalParks.com.

UPCOMING WORKSHOPS FROM NATIONAL PARKS AT NIGHT

How I Got the Shot: Walkway to the Stars at Dry Tortugas National Park

Star stack over the moat wall at Florida's Dry Tortugas National Park. © 2016 Gabriel Biderman.

The Location

Last year, an amazing time-lapse video brought awareness to one of the most remote national parks in our country, Dry Tortugas. Three days after I watched that stunning piece, I was invited to come down and create my interpretation of the largest masonry structure in the Americas, under the night skies, all while doing prep work for our workshop in Dry Tortugas this coming July.

Dry Tortugas takes some effort to get to: Go as far south as you can in the continental U.S., then turn right and go 70 miles out into the sea. The fastest boat gets you there in just over two hours. As I walked around the deck of the boat, all I could see was an endless horizon in every direction. It was like looking at an infinite blank canvas, which can be thrilling and definitely a little daunting. Eventually a small red dot on the horizon turned into a larger box, then a brick rectangle, until … it finally became Fort Jefferson looming ominous above us.

I had a good eight hours to scout the fortress, which encompasses the whole island. I was immediately drawn to the walkway, which creates a moat around most of this engineering marvel. The fort’s overall shape is hexagonal. I was paying attention to a few things as I made my way around the six-angled pathway. First, I noticed that at each turn, and at a low enough angle, the road seemed to meet the horizon.

This emphasized an infinite passage to the sky.

OK, I like that.

The next thing that came immediately to my mind: Does one of these paths point directly north? If we can blend that straight line to meet an epic circular star trail, I think we have a winner!

Lighting and Conditions

In an ideal world I would have planned this shoot around a new to half moon. It was summer and Milky Way season, plus the fort offers so many light painting opportunities. But the only time we could coordinate my visit was around a full moon, so I had to embrace the idea of lots of light. Fortunately the sky was clear except for some clouds that hovered over the far horizon.

Gear

Because I had only one night to scout, I brought a bunch of gear, including two rigs so that I could stay as productive as possible on a short summer night. The gear I used for this shoot was:

Test Shots

I always take two to 10 high ISO test shots to confirm focus, composition and exposure. Even though it was bright out with the full moon, our eyes adjust and see better than our viewfinder or LCD screen.

The first test shot (Figure 1) of 6 seconds, f/5.6, ISO 6400 was taken at a focal length of 24mm. The histogram showed that it was an average exposure with very little dark shadows and bright highlights.

Figure 1

The composition wasn’t doing it for me. My main subject was the path, and it was not being given its due with that framing. I moved the rig to the middle of the walkway and went a little wider—from 24mm to 20mm for the second shot (Figure 2).

Figure 2

Still needed some finesse. So I closed all the legs to the tripod and shot lower and wider, going from 20mm to 14mm. I was also observant of keeping the camera very level—I didn’t want to distort or have converging lines in the fort by pointing at an oblique angle. I also wanted to include lots of stars and sky. Figure 3 is one of my few shots where the horizon is practically in the middle, but the strong foreground of the path plays nicely against the open sky.

Figure 3

I was almost there. Before I commit to an hour-plus exposure, it is very important to patrol those composition borders and make sure everything is there for a reason. I felt the entry point of the walkway was a little off. I wanted it to be coming in from both of the lower corners, so that path would fill the bottom of the frame and then fade off to infinity (Figure 4).

Figure 4

Using the Six-Stop Rule, I lowered my ISO from 6400 to 100 and then added the six stops to my shutter speed—which turned 6 seconds into 6 minutes. However, the air temperature was about 75 F, too hot to rip a 6-minute exposure without inducing long-exposure noise. I felt safer using an ISO of 200 and a shutter speed of 3 minutes.

But something was nagging me: That histogram was too average.

I was about to create a dramatic 1- to 2-hour stack of exposures, and I didn’t want it to be average-looking. So I shaved about one-third of a stop off the shutter speed, and set a final exposure of 2 minutes, f/5.6, ISO 250.

I set the camera to Bulb, turned off my LENR and set my Vello Shutterboss to 2 minutes, with a 1-second interval between shots, and an infinite number of frames. I set the timer on my phone and then went to the top of the fort to continue photographing with my other rig for a couple of hours.

Putting it Together in Lightroom and Photoshop

I ended up with 60 2-minute exposures that I was going to stack to create a 2-hour star trail. The exposure was similar across the 60 images, so in Lightroom I worked on one image, making simple Lens Profile corrections and slight adjustments to the Exposure (-45), Clarity and Vibrance settings, and then synced those adjustments to the other 59 images.

Then I selected all 60 frames and went to Photo–Edit In–Open as Layers in Photoshop (Figure 5).

Figure 5

Depending on how big your file sizes are and how juiced your computer is, this can open in 1 to 2 minutes or 1 to 2 hours. (I recently stacked 600 shots and it took my poor MacBook Air close to 4 hours. Guess who is upgrading their travel computer!)

When my Dry Tortugas image opened in Photoshop, I selected all the layers and changed the blend mode to Lighten. And voila, all the stars connected to create a nice long star trail.

However, the caveat with this post-processing technique is that the Lighten blend mode also stacks any other highlights in the scene—such as, in this case, the white clouds. Photoshop blended all the clouds into one, which was a bit too much for my liking. (Figure 6).

Figure 6

I turned different layers on and off to find the clouds that I didn’t want in the scene. I unfortunately identified that the first 45 images had clouds cutting right through the middle of the star trail. My two options were to go in and touch up 45 layers, or cut them out completely and go with a shorter star trail. I choose the latter strategy, keeping the last 15 layers and settling for a 30-minute trail with fewer clouds. The remaining first layer had two small clouds that I wanted to remove, so I added a layer mask and used a black brush to paint them out (Figure 7).

Figure 7

Once I finished editing in Photoshop, I flattened the layers to keep the file size from exploding, and then did final cropping, sharpening and touch-up in Lightroom (Figure 8).

Figure 8: Here is the difference between the fully stacked image (right) and one edited down to remove the intrusive clouds.

I do love the blue and green colors in the scene, but to heighten the drama and stay true to how old this building is, I converted the photo to black and white in Silver Efex Pro 2.

Which do you prefer—the color or B&W? Feel free to add your thoughts in the comments section below.

Be one of the few people to experience Dry Tortugas and Fort Jefferson at night during our upcoming workshop in July. See our Dry Tortugas National Park page for more information.

Gabriel Biderman is a Brooklyn-based fine art and travel photographer, and author of Night Photography: From Snapshots to Great Shots (Peachpit, 2014). During the daytime hours you'll often find Gabe at one of many photo events around the world working for B&H Photo’s road marketing team. See his portfolio and workshop lineup at www.ruinism.com.

UPCOMING WORKSHOPS FROM NATIONAL PARKS AT NIGHT