Technique

Own Your Settings

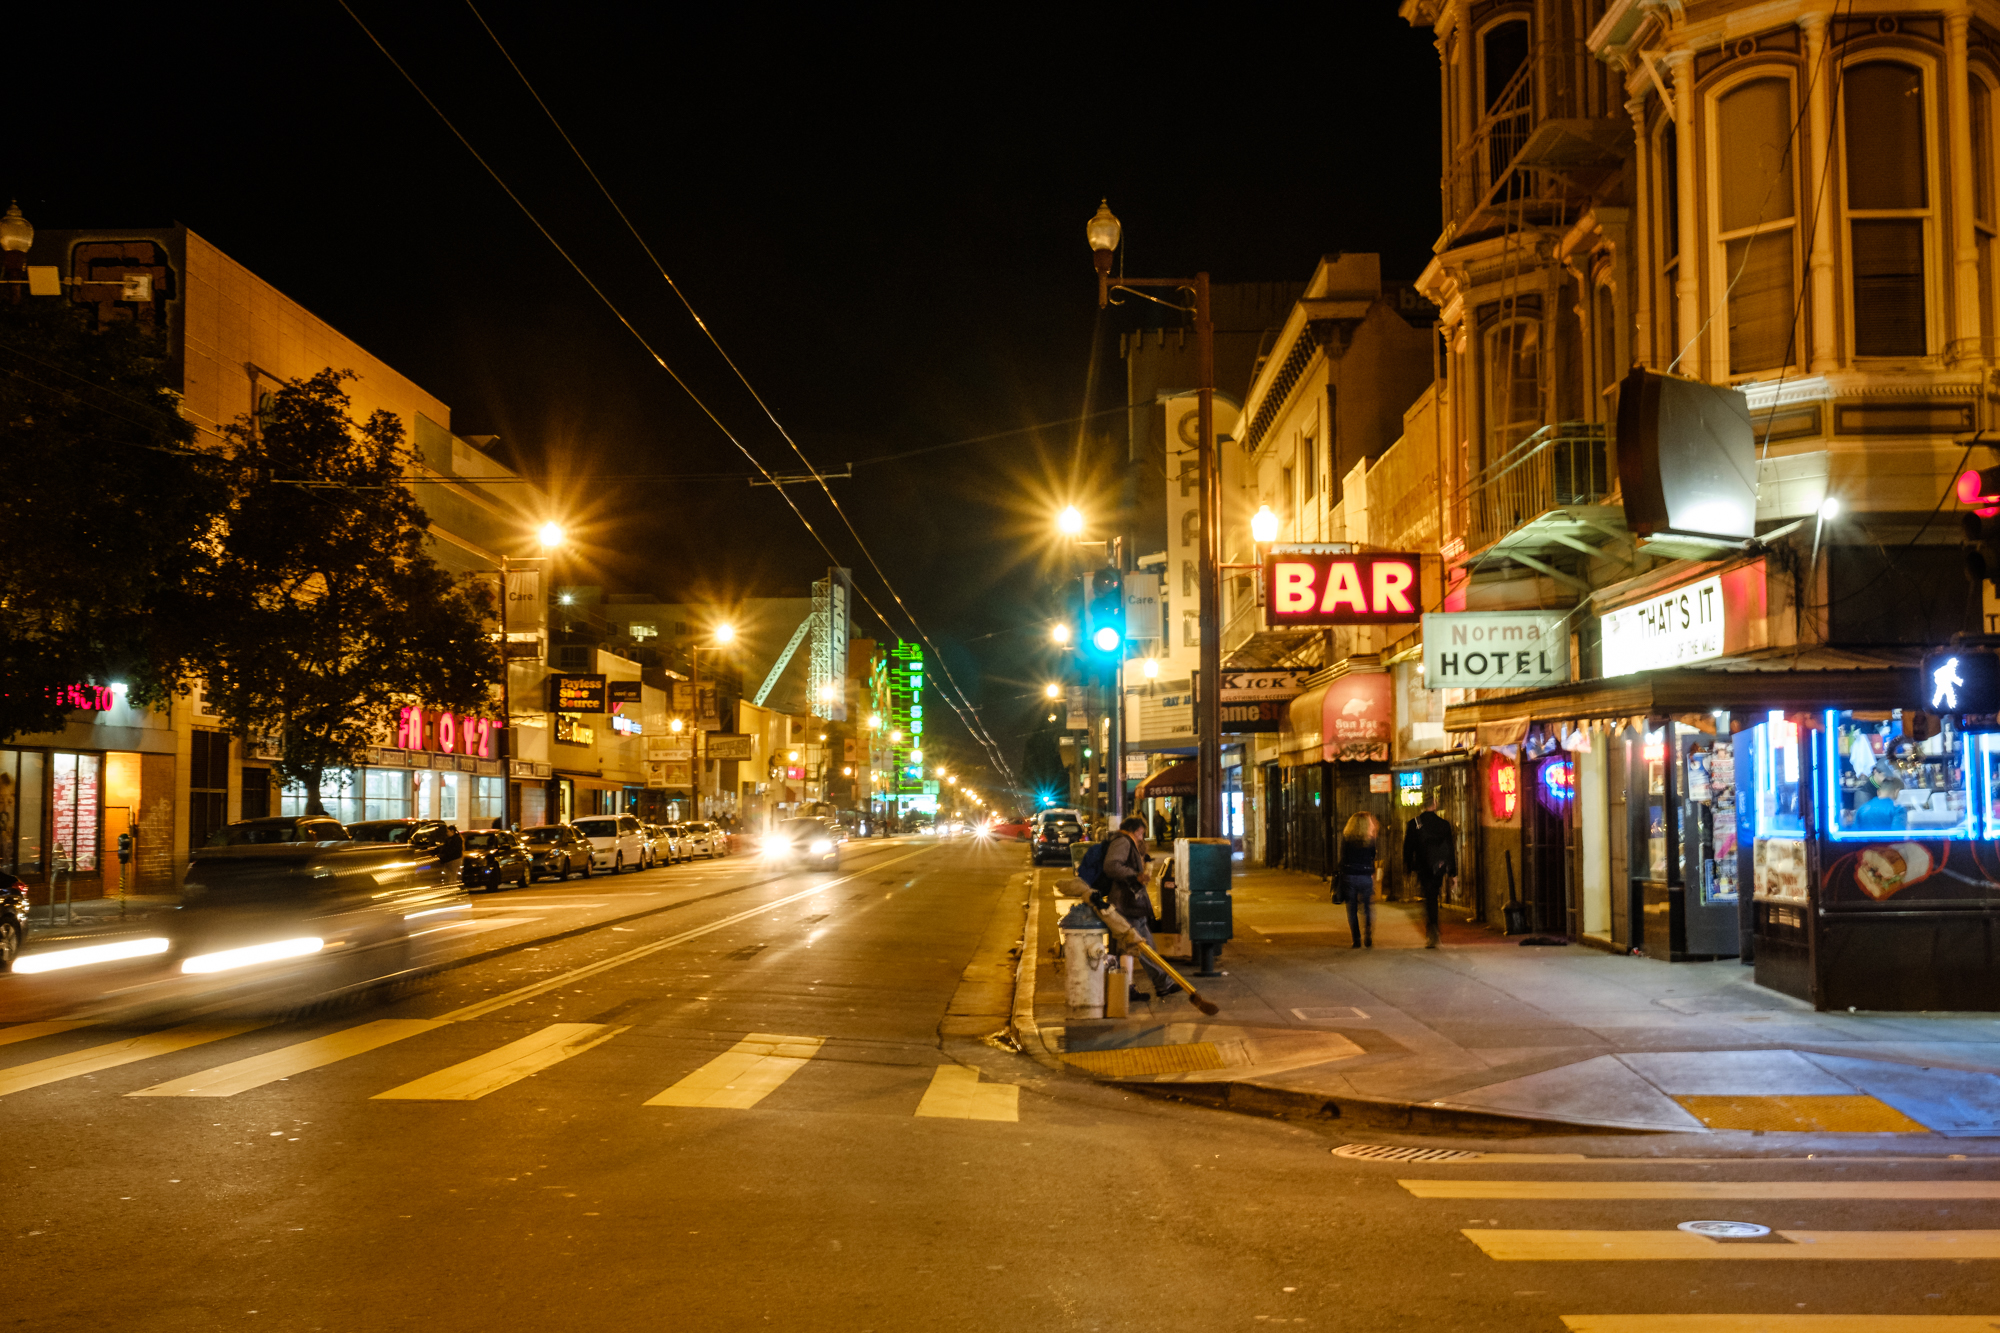
It’s not as far as it looks from here to there. Fujifilm XT-1, 7Artisans 7.5mm f/2.8 lens. 1/60, f/2.8, ISO 1000.

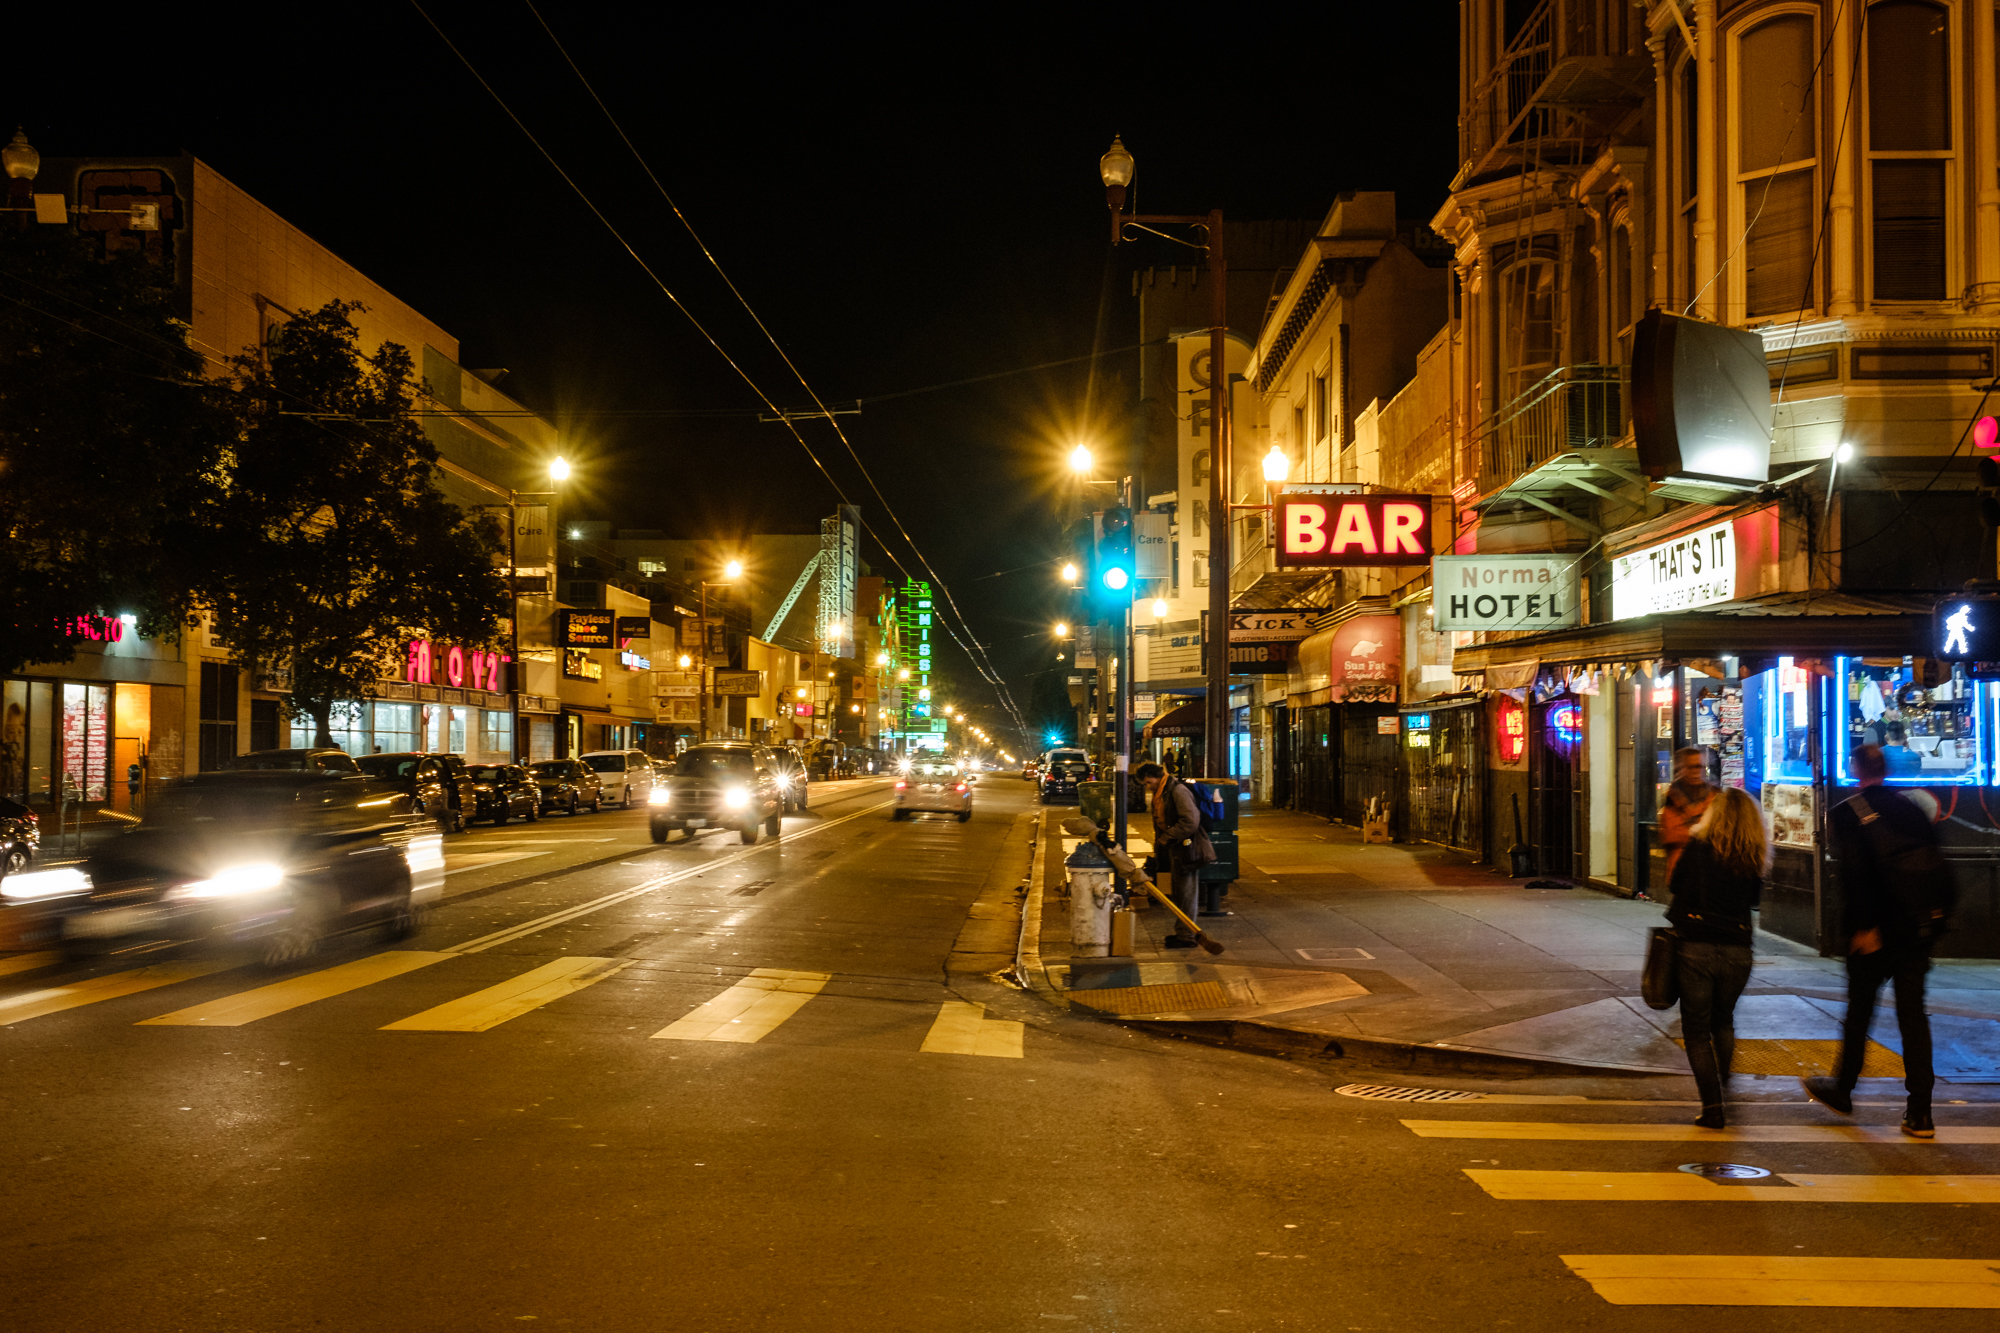
It’s not as far as it looks from here to there. Fujifilm XT-1, 7Artisans 7.5mm f/2.8 lens. 1/60, f/2.8, ISO 1000.

What follows is one of my favorite moments of our 2017 season—a moment of candor and clarity from a student during our workshops at Olympic National Park.

During the daily group image review she expressed, “I learned that I need to own my settings.”

I paused. I sensed Chris pause, too. It was a pivotal moment for her.

She further elaborated, “Too often I counted on my fellow students to aid me when choosing the right settings. And this took part of the ‘work’ out of this workshop. I’m taking it back. I will own my own settings.”

This was a poignant moment. I was awfully proud of her, and actively thanked her for sharing and committing to the idea—and for stating it in a manner so succinct that it became profound. For the remainder of the workshop, she made rapid progress and took ownership of her mistakes, and explored what she learned from each.

You can be transparent in many ways. Nikon D750 and 70-200mm f/2.8 lens. 2 seconds, f/16, ISO 100.

You can be transparent in many ways. Nikon D750 and 70-200mm f/2.8 lens. 2 seconds, f/16, ISO 100.

Moments like these are a core reason we love holding workshops. You have good chances for making extraordinary images, but the true purpose is to put in the hard work by facing your own gaps in knowledge by trying things outside your comfort zone.

Often photographers, or anyone learning challenging material in the field, look for any lead to follow. It’s natural, it’s human nature. Much can be learned by doing what the photographer next to you is doing. But it works best when it’s followed by two more steps: 1) dissecting why the borrowed knowledge works, and 2) taking off those training wheels and figuring it out yourself. Or, as this student said, by owning your settings.

I’ll take that even further. To “own your settings” I suggest you commit to:

  1. doing the math
  2. trying things that may not work
  3. asking why a photo failed and making a process to ensure you won’t make the same mistake repeatedly
  4. exploring your gear, including its strong capabilities and disadvantages
  5. developing your own system of process

Let’s break these down.

Doing the Math

We supply “cheat sheets” to workshop attendees for the 400 Rule and the high ISO test. It’s intended as a backup for when you have what I lovingly call a “brain fart.”

But knowing the math is vital. Doubling and halving the shutter speed or ISO is something that should come as easy as breathing. Well, breathing doesn’t take practice, but getting used to these numbers does. And you get used to them by shooting over and over again—you know, while working through your first 10,000 photos.

Similarly, being able to perform a high ISO test on demand will increase your enjoyment of night photography forever. Knowing you got a proper exposure frees your mind to bend on creativity.

Trying Things That May Not Work

As a rule, doesn’t this apply to shooting in darkness? LOL.

What I intend by this is truly to adopt an attitude that rewards creative risk-taking. There is no harm when making a photograph that does not work.

But what if it does work? Then you have another piece of evidence you can file away in your mental bank of “settings” for future use.

This may not have worked … but it did. Nikon D750, 15mm Zeiss Distagon f/2.8 lens. 75 seconds, f/2.8, ISO 400.

This may not have worked … but it did. Nikon D750, 15mm Zeiss Distagon f/2.8 lens. 75 seconds, f/2.8, ISO 400.

Asking Why A Photo Failed

… And Making A Process To Ensure You Won’t Make The Same Mistake Repeatedly

Great leaders often say, “I learned more from my mistakes than my successes.” There are many reasons for this. Some are emotional. Some are scientific.

My favorite quote about learning from failure comes from Seth Godin:

The rule is simple: The person who fails the most will win. If I fail more than you do, I will win. Because in order to keep failing, you’ve got to be good enough to keep playing.
So, if you fail cataclysmically and never play again, you only fail once. But if you are always there shipping, putting your work into the world, creating and starting things, you will learn endless things.
You will learn to see more accurately, you will learn the difference between a good idea and a bad idea and, most of all, you will keep producing.

Developing a habit to accelerate the study of failure includes:

  • acknowledging your mistakes via self-review
  • engaging in peer review
  • soliciting feedback from people whom you aspire to be like, or hold in high technical or creative esteem
  • putting your work out there, be it on Facebook, Instagram, your website or on gallery walls

On the technical side, if you have trouble identifying how a photo went sideways and your peers fail you for an explanation, you can always book some time with us for a remote critique.

But please fail often, and well.

Exploring Your Gear

… Including Its Strong Capabilities And Disadvantages

I know that my Nikon D750 can’t make a quality file over 60 seconds in duration when the temperature is above 90 F. When does your gear fail? Knowing is important.

I also know that I can shoot a half-hour single exposure at 45 F with no quality degradation. At the same temperature I also know that after 8 minutes I should turn on Long Exposure Noise Reduction (LENR).

Elwha Valley, Olympic National Park. Nikon D750, Zeiss Distagon 15mm Zeiss Distagon f/2.8 lens. 60 minutes, f/5.6, ISO 400, plus LENR.

Elwha Valley, Olympic National Park. Nikon D750, Zeiss Distagon 15mm Zeiss Distagon f/2.8 lens. 60 minutes, f/5.6, ISO 400, plus LENR.

How do I know these things? I scrub my Lightroom. I look at the settings. I take notes. And I keep this info in my backpack just in case I need a reference about the technical boundaries of my camera.

Another example: You may have a lens that can’t focus on stars via live view, but does OK with a strong flashlight and a subject relatively nearby.

Knowing these things helps you avoid the future frustration of committing time making exposures when your gear just can’t handle it. No one camera system can do everything right. So it’s a practice of working within the boundaries of possibility.

Developing Your Own System Of Process

What works for me may not work for you. So please don’t take any of this as dogma. A final belief you may choose to hold about owning your settings is to make a system that helps you recall the things you need to do at the right time.

I’ve recently started using the Bullet Journal to manage my priorities, ideas and commitments. I started a page in there where I have a living list of steps for night photography that I had (until recently) kept only in my head.

Zig when others zag. Nikon D750, Zeiss Distagon 15mm Zeiss Distagon f/2.8lens. 26 seconds, f/2.8, ISO 6400.

Zig when others zag. Nikon D750, Zeiss Distagon 15mm Zeiss Distagon f/2.8lens. 26 seconds, f/2.8, ISO 6400.

No matter how you choose to do it, establishing a process—instead of trusting your brain to have perfect recall—is a sound choice. Because when it’s dark, and when everything is unfamiliar, wouldn’t having your own step-by-step guide, tailored to you, help appease anxiety and help you focus on making gorgeous night photography?

It does for me.

Wrapping Up, Taking Ownership

The path to owning your settings is just that: a path, a journey. It’s not a destination reached quickly or by accident, especially in night photography. But it’s a journey worth making, because when you get there, you will have the confidence required to take responsibility for your own creative process, which includes mastering the techniques necessary to level up.

We love the “work” part of workshop. When participants choose to share images that didn’t work, expressly to learn how to avoid that mistake in the future, it helps the whole group grow.

Many thanks to our student who had the clarity to speak aloud, in front of her peers, “I will own my settings.”

And thank you, dear reader, for being part of the adventure. Now go, and seize the night, as well as your settings.

Matt Hill is a partner and workshop leader with National Parks at Night. See more about his photography, art, workshops and writing at MattHillArt.com. Follow Matt on Twitter Instagram Facebook.

UPCOMING WORKSHOPS FROM NATIONAL PARKS AT NIGHT

Northern Exposure: 8 Illuminating tips for Photographing Auroras

Witnessing an aurora is one of life’s truly magical experiences. Watching the pulsating light and soaking in the surreal green glow fills you with excitement, awe and wonder. As photographers, however, we’re not content to just stand by and watch. We want to capture this spectacle, share it with others, and relive it again and again.

To help you do that even better, Lance, Gabe and I put together eight killer tips for seizing the northern (or southern!) lights.

(For a primer on this topic, read Lance Keimig’s February blog post Capturing Clouds of Light: How to Photograph the Aurora Borealis.”)

15 seconds, f/3.3, ISO 3200. Shot with Nikon D750 and 24mm lens. © Lance Keimig.

Lance Keimig

1. Aurora Exposures

The correct exposure for an aurora can vary dramatically depending on both its intensity and movement. Sometimes there may be a relatively stable band of light in the sky that grows in intensity over time. This is easy to photograph, and usually does not change the exposure from what the normal landscape exposure would be.

For a static aurora, typical exposures are equivalent to landscape exposures based on corresponding moonlight or artificial light.

If you’re lucky, the band will grow into the magical dancing lights that can become so bright as to illuminate the landscape with green. To photograph a dancing aurora, it is important to keep the shutter speed as short as possible to prevent the crazy shapes from blending into electric pea soup.

For a rapidly changing aurora, try to keep exposures in the neighborhood of about 2 to 10 seconds. I recommend setting the ISO based on the ambient landscape light—i.e., not factoring the aurora into your exposure determination. So, for new moon conditions, shoot at ISO 1600 to 6400, and for full moon conditions, shoot at 400 to 800. From there, pick a wide aperture that gives adequate depth of field for the scene, usually stopping down 1 or 1 1/2 stops from wide-open, depending on the focal length and quality of your glass. Lastly, vary the shutter speed as needed to get a balance between a decent exposure and stopping the movement of the dancing lights.

6 seconds, f/3.3, ISO 3200. Shot with Nikon D750 and 14mm lens. © Lance Keimig.

6 seconds, f/3.3, ISO 3200. Shot with Nikon D750 and 14mm lens. © Lance Keimig.

2. Finding the Aurora: What the Camera sees Versus what You See

Because human eyes lose sensitivity to color in low light, an aurora may sometimes fool you into thinking it is just a cloud. The show often begins as a faint glow in one location in the sky, and it may not be very impressive. If there is a high probability of auroras, it’s a good idea to take test images of different parts of the sky while you are waiting in case there is something that your eyes don’t pick up.

If you live in—or will be traveling to—extreme northern or southern latitudes where auroras are commonly seen, it’s a good idea to have an app like Aurora Forecast (Apple, Android) or Aurora Alerts (Apple, Android) on your phone, and set notifications for specific activity levels. Auroral strength is measured on a scale of 0 to 9 Kp. In high latitudes like Alaska or Iceland, a Kp of 4 or higher indicates a high probability of photographable auroras. In middle latitudes like New England or the Pacific Northwest, a Kp of 5 means that you just might see something on the northern horizon. In mid-latitudes, a Kp of 6 or higher makes it worthwhile to seek out the lights.

In high latitudes, auroras may appear in any part of the sky. In middle latitudes, they are generally seen only as a faint green glow on the northern horizon.

Four-frame panorama shot at 20 seconds, f/4, ISO 6400. Nikon D750 with a 24mm lens. © Lance Keimig.

Gabriel Biderman

3. Keep Clicking and Make a Time-lapse

Bring two rigs and set up one for a time-lapse. If the auroras are really active, this is a great way to show off how much they dance in the sky. Once you figure out your exposure, use an intervalometer to make sure the camera keeps firing for at least 30 minutes. The longer you let it rip, the longer the “movie” will be.

Here’s a time-lapse I did of aurora in Iceland:

4. Look for Interesting Foreground and Subjects

When chasing after an aurora, look for interesting foregrounds to play against the dancing green lights. Trees, mountains and other landscape elements are common subject matter—so look for dramatic compositions to include them.

On our last workshop in Iceland, we were fortunate enough to have the ruins of an old herring factory, old boats and other striking buildings beautifully collide with the auroras. And on our recent workshop in Olympic National Park, Matt, Chris and the participants were able to photograph an aurora alongside a massive sea stack.

10 seconds, f/2.8, ISO 6400. Nikon D750 with a 14mm lens. © Gabriel Biderman.

5. Create an Aurora Portrait

Try to capture your experience under the northern/southern lights. There is such a sense of wonder and amazement when you are experiencing an aurora, so take a portrait of yourself or your friends under the night sky! A flash can be your friend for freezing the portrait with one pop, as your shutter speeds will generally be 2 to 4 seconds.

We had an amazing time taking our Iceland participants’ portraits during a night when the auroras just wouldn’t stop! My base exposure was 4 seconds, f/2.8, ISO 6400, so we just needed 1/64 power from the flash to make the night portrait complete.

Lance under an Icelandic aurora. 4 seconds, f/2.8, ISO 6400. Nikon D750 with a 14mm lens. © Gabriel Biderman.

Tim Cooper

We should always strive to get the perfect picture in-camera, and shooting the auroral lights is no different. Composition and exposure (f-stop and shutter speed) are crucial. Severe cropping and exposure changes will damage your photo, and fixing shutter speed or depth of field is impossible after the fact.

That being said, there are several things that can be altered in post-production that have no bearing on the initial capture. In fact, some of these things you can’t even accomplish in-camera.

6. Change Your White Balance

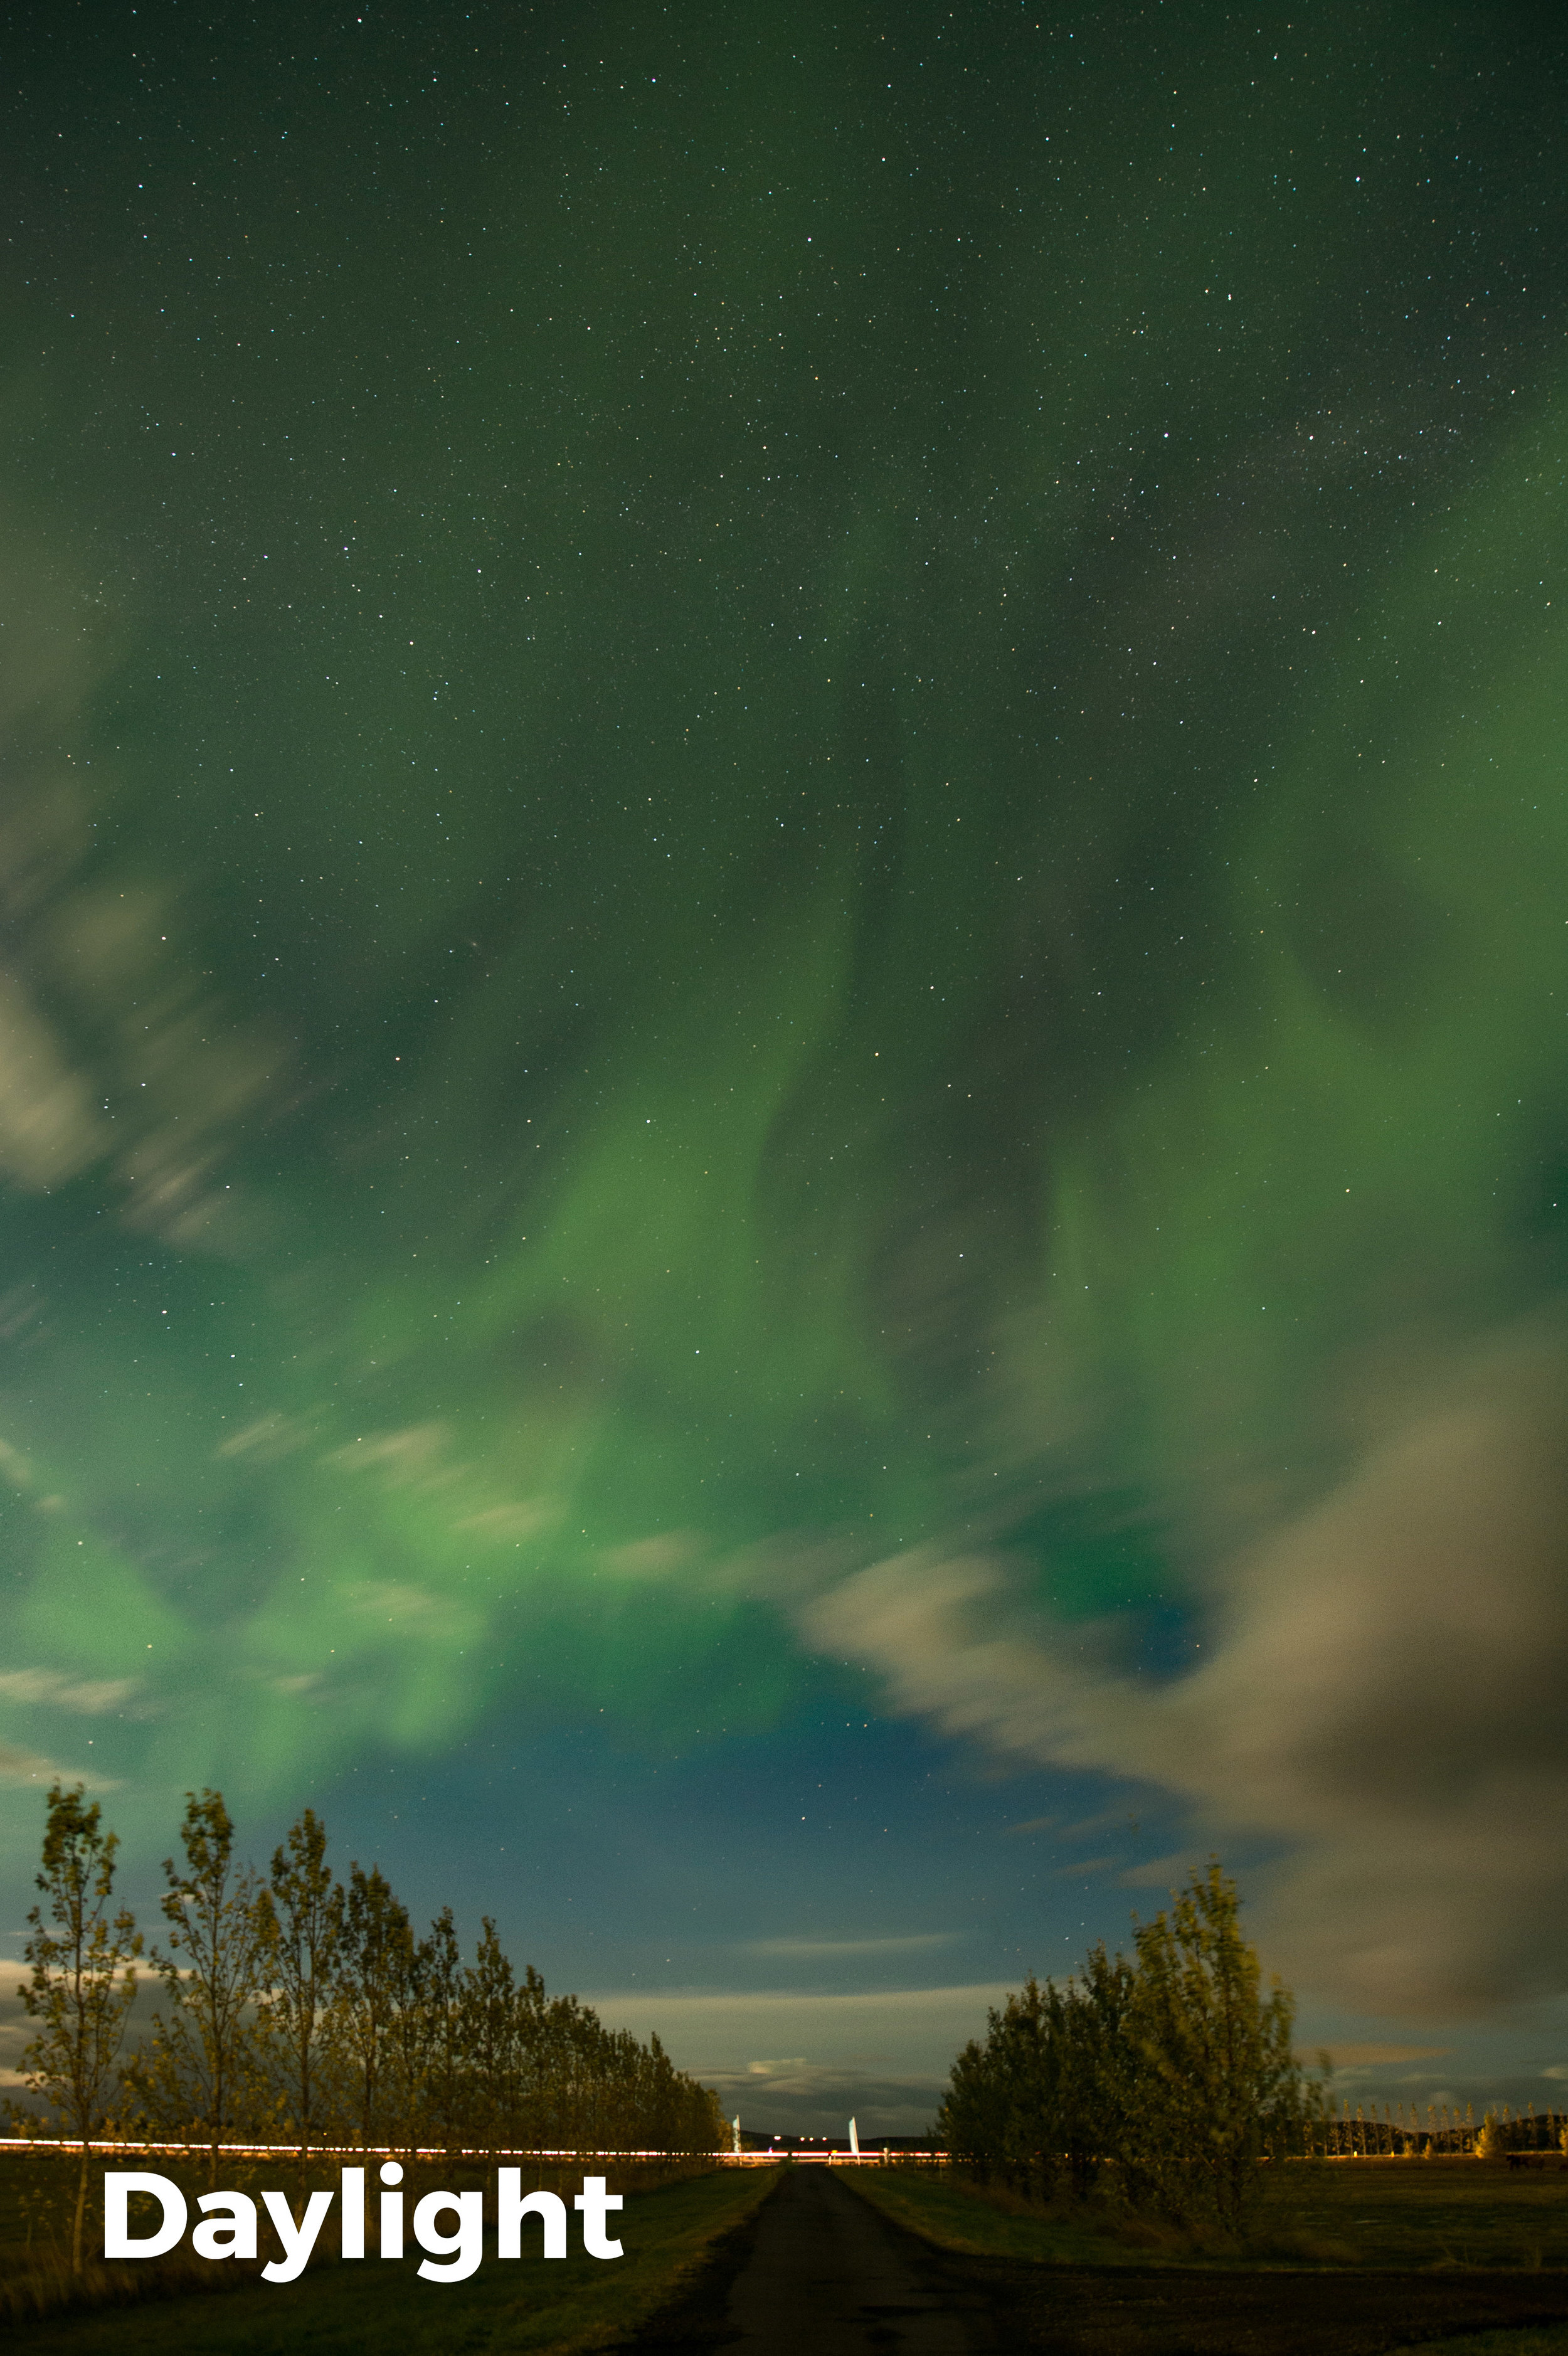
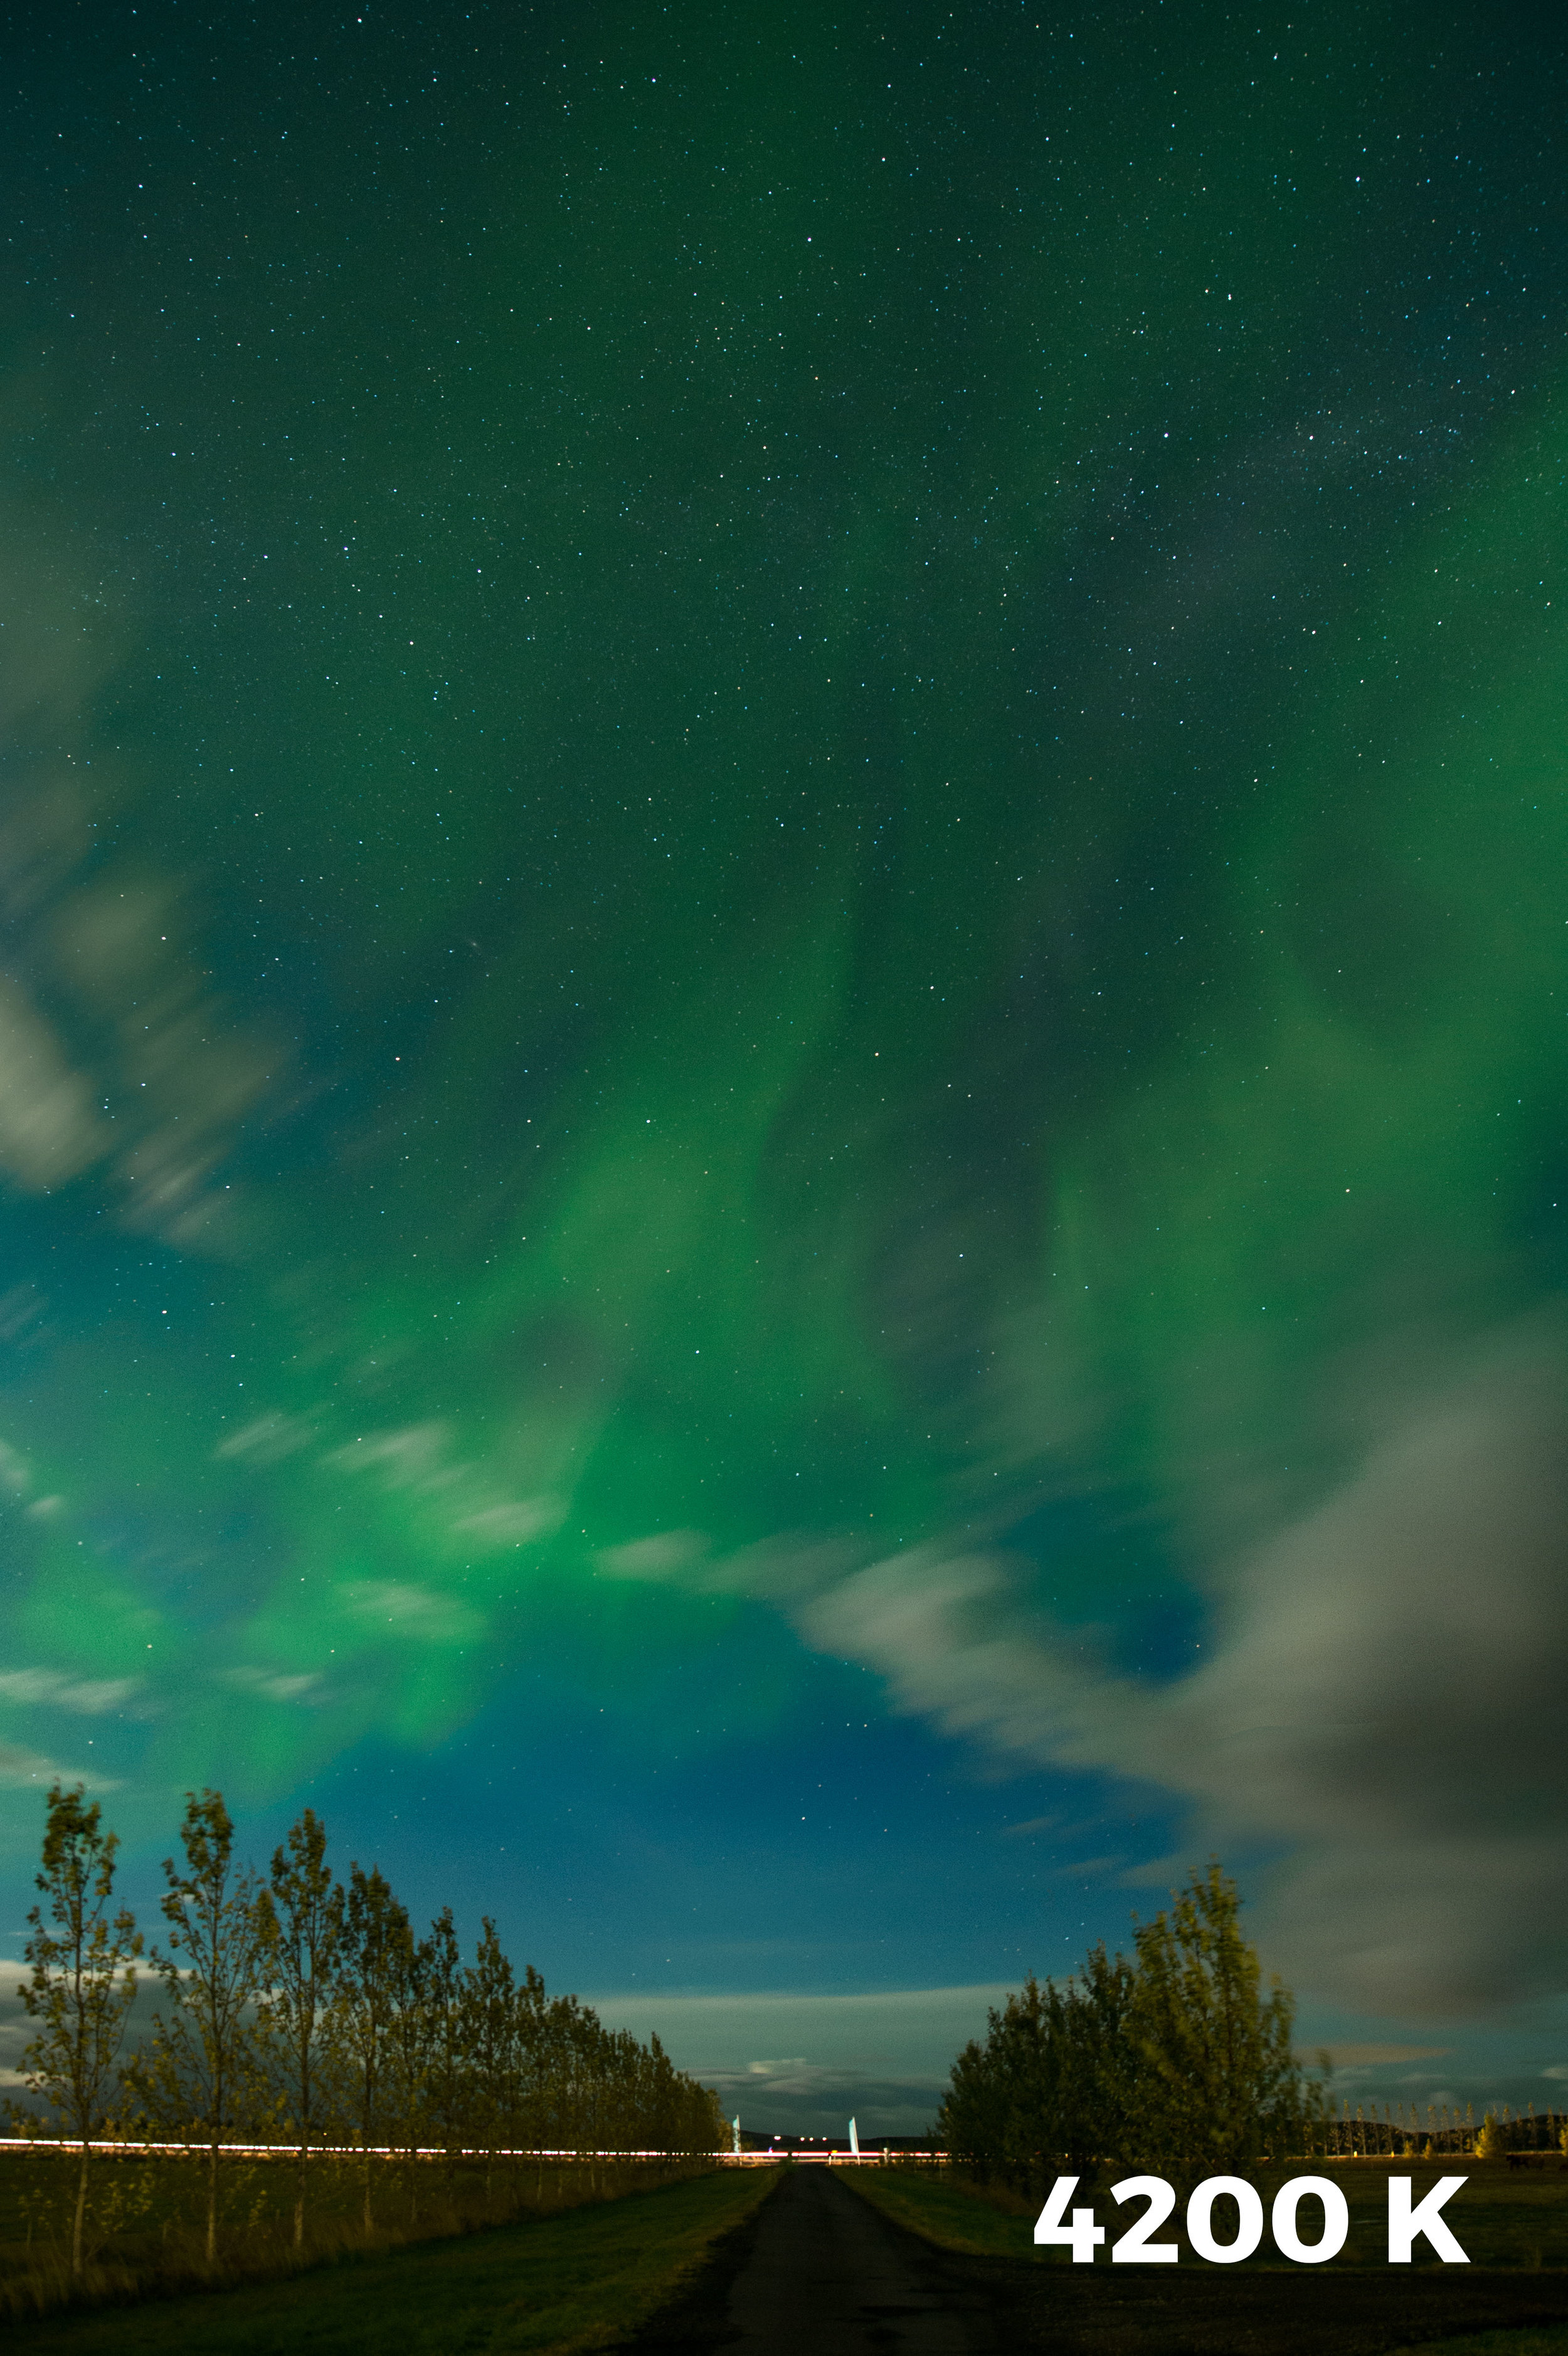
White balance can and should be set correctly for the initial capture. While it’s difficult to give an exact white balance setting for all situations, it’s safe to say that you’ll probably want to run a bit cooler than a typical Daylight (direct sun) setting. In the comparison below, the first image was made with a Daylight white balance, while the second was made at 4200 K. (Both images shot at 20 seconds, f/4, ISO 1600 with a 14mm lens.) Notice how the cooler white balance setting of 4200 K separates the color and makes the image feel more dynamic.

Experiment while out in the field to find the best look. If you find your images are too warm when back in Lightroom, slide the Temp slider toward the blue end.

7. Add Whites

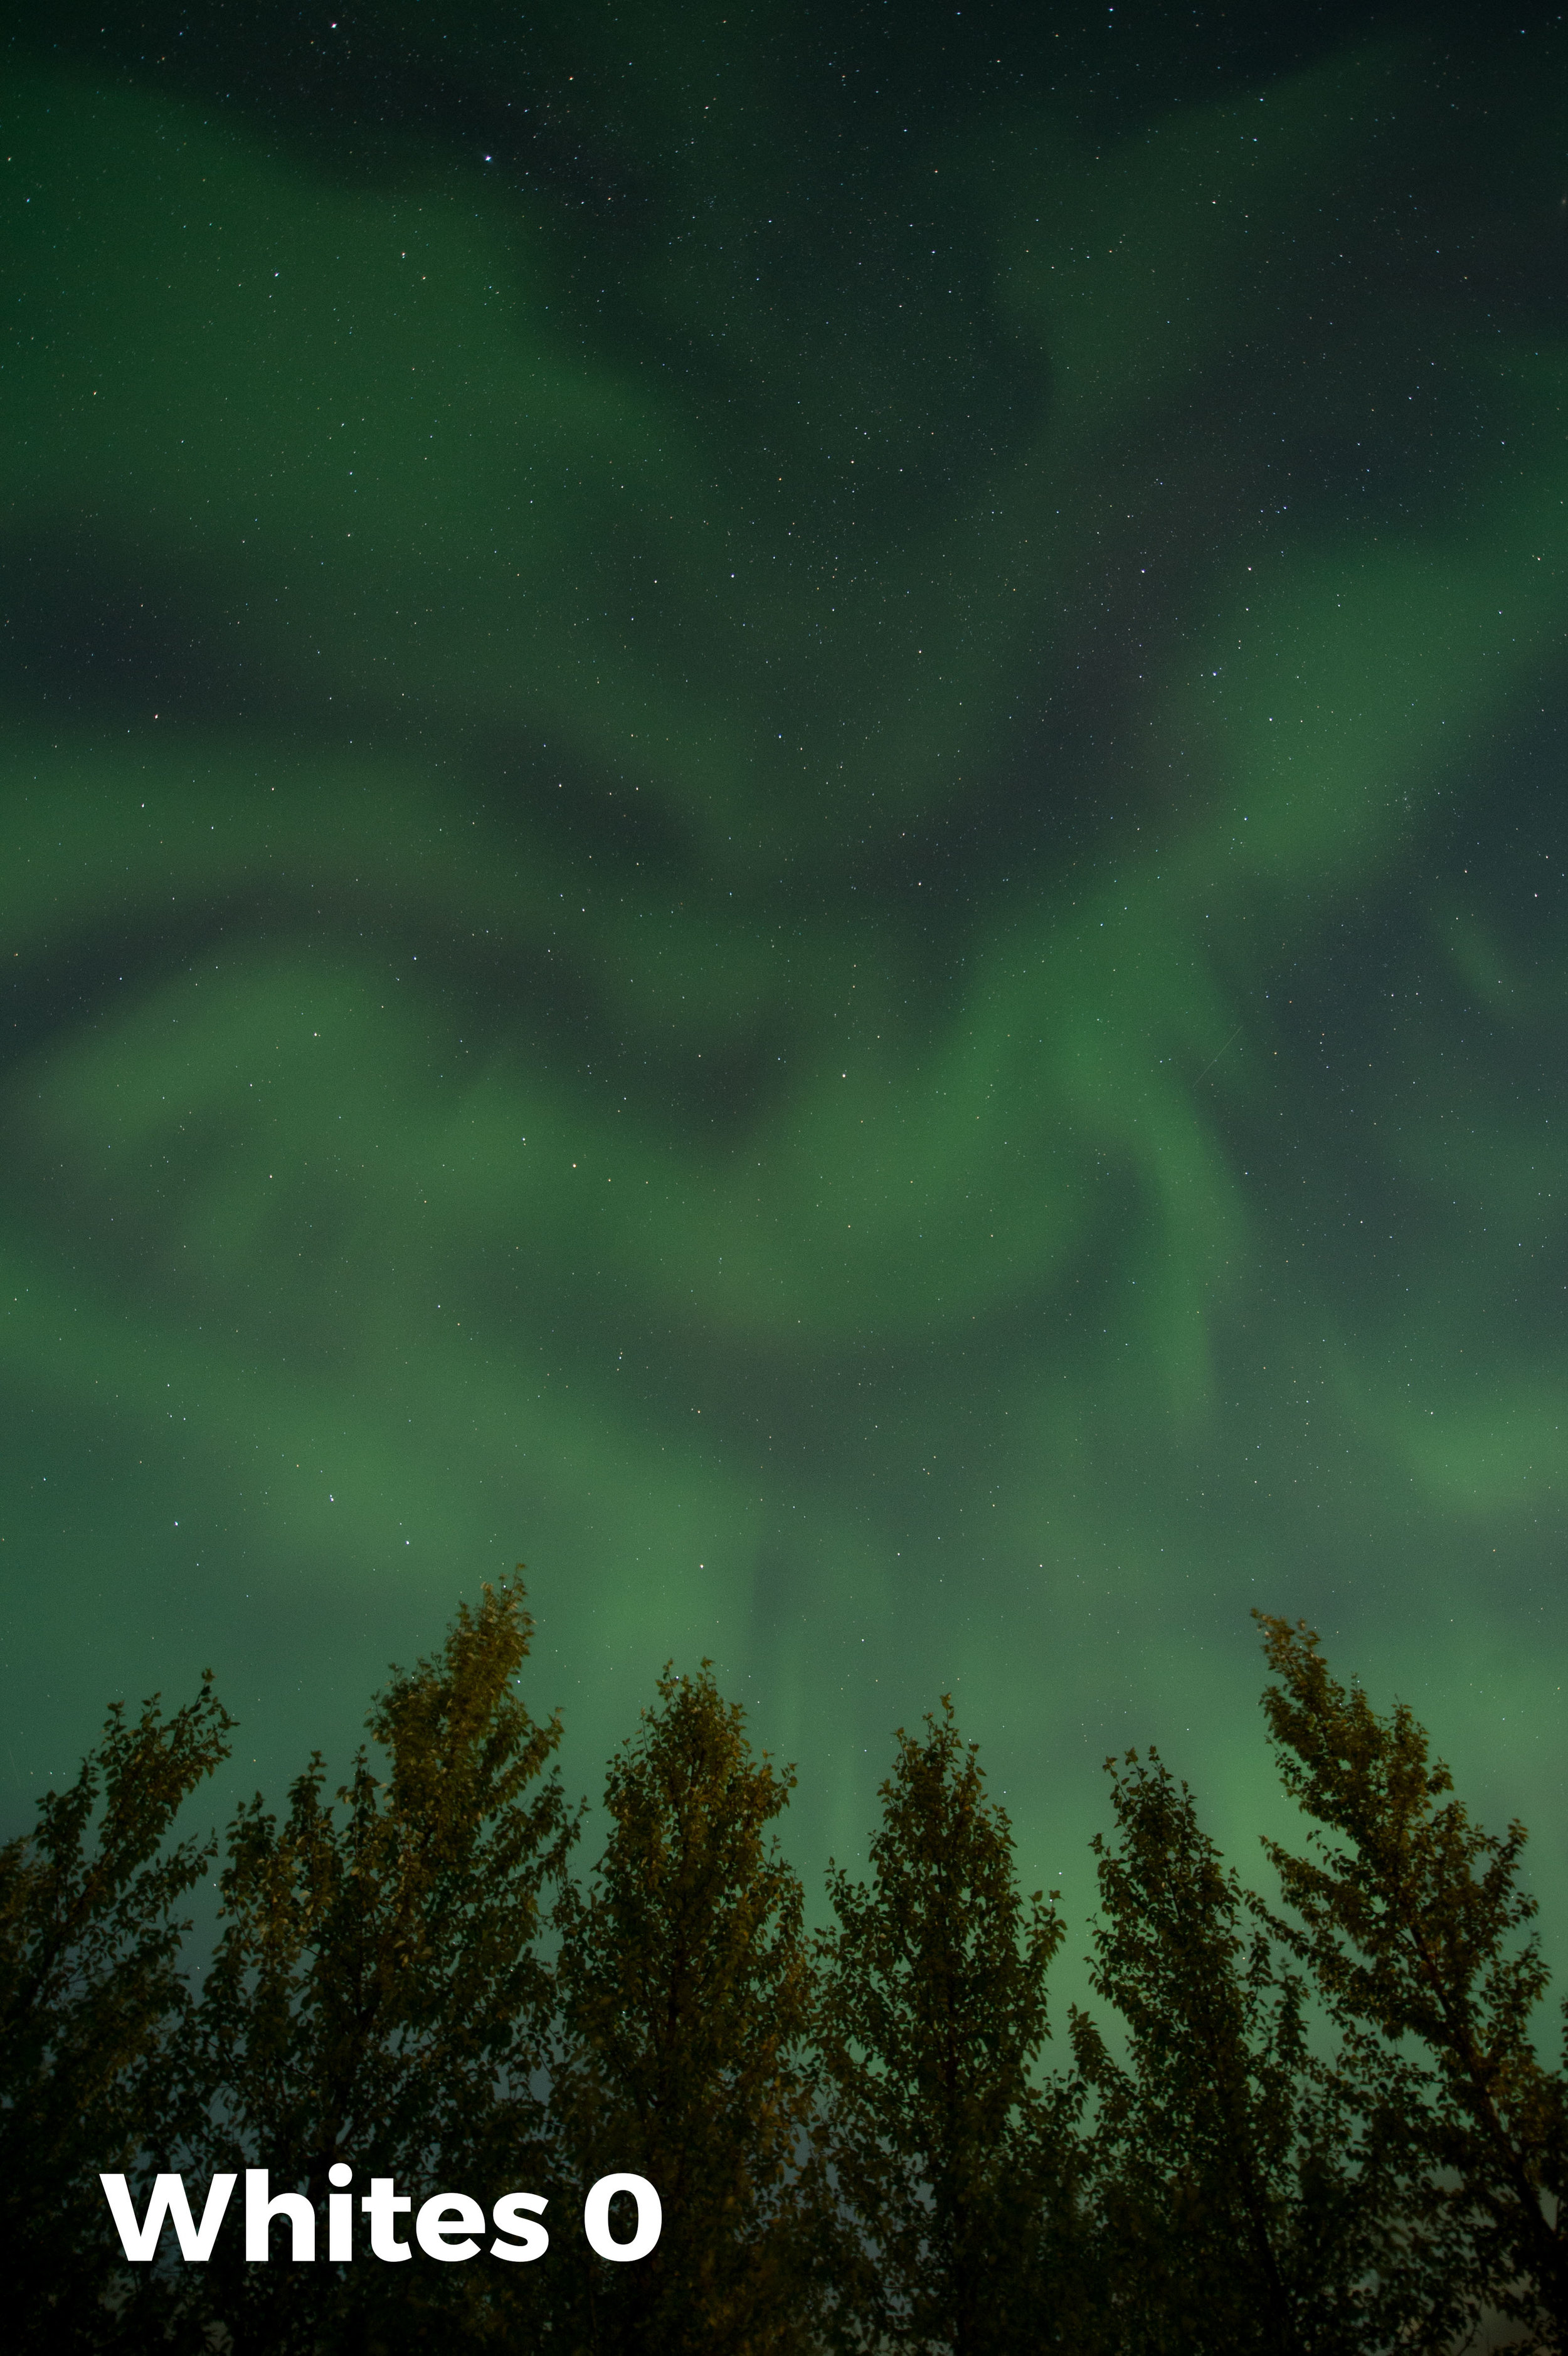
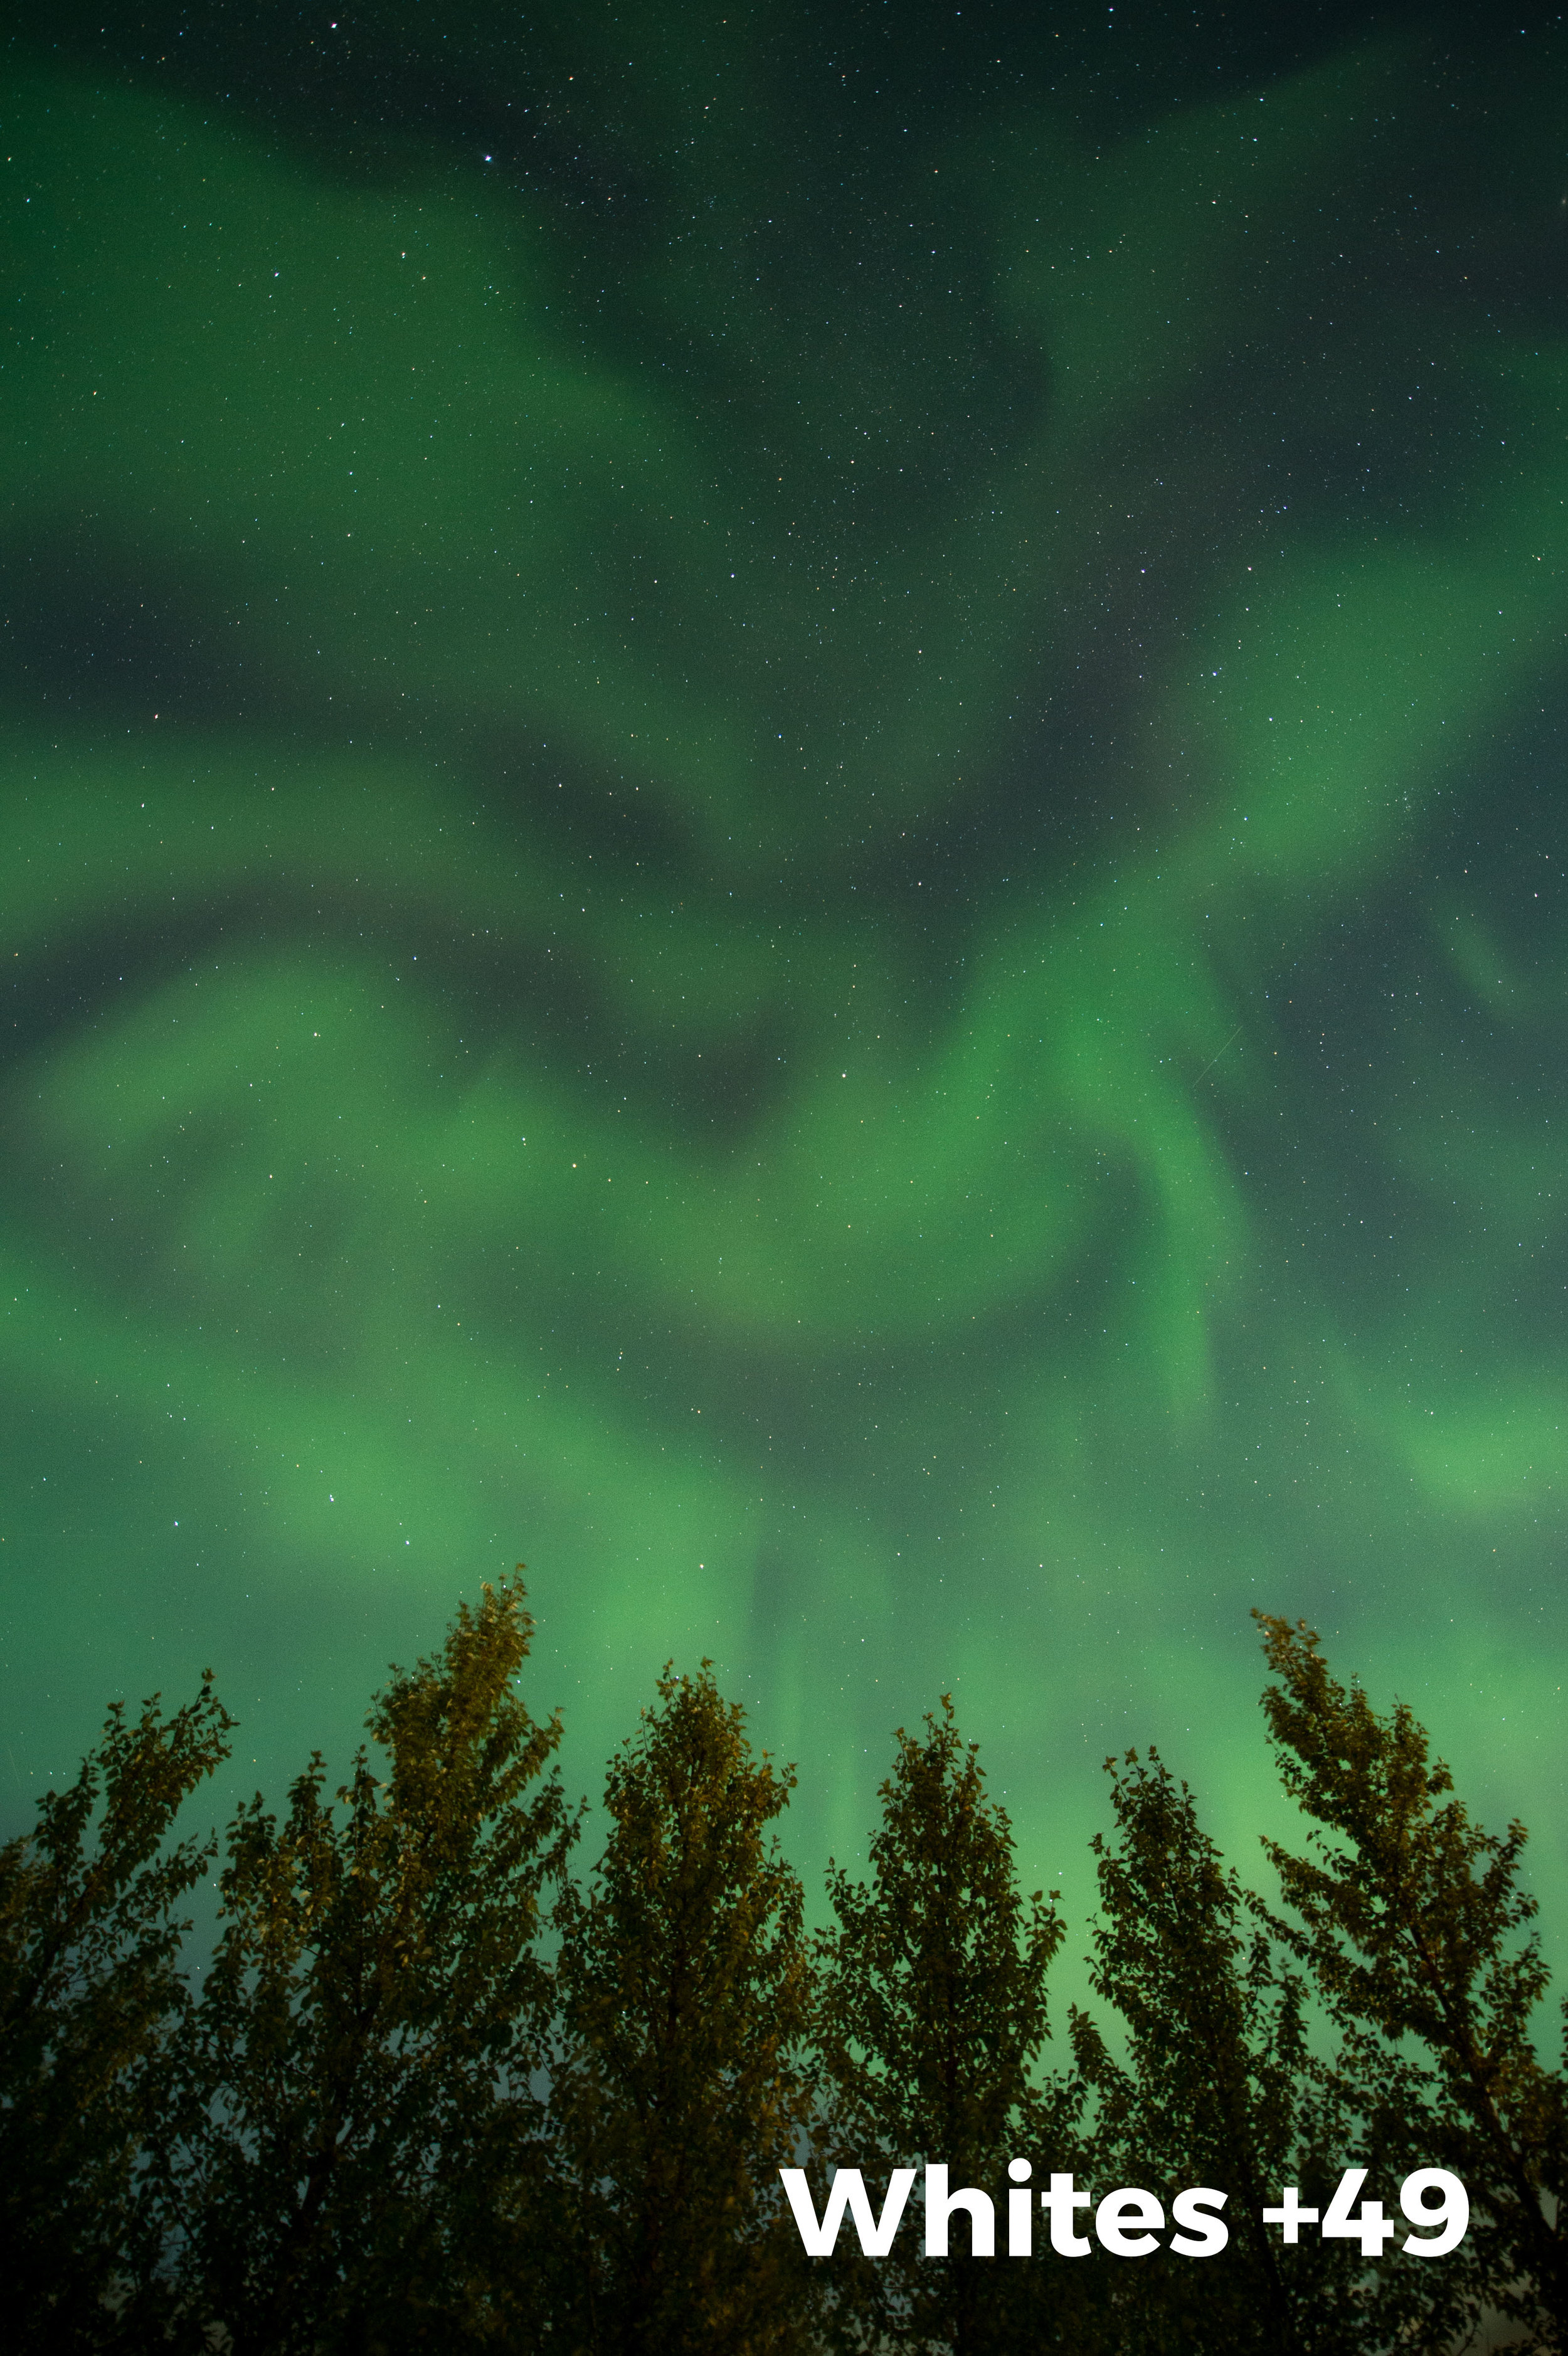
It would seem odd to address the Whites slider in Lightroom’s Basic panel while working aurora images, but it really works! This has to do with the underlying algorithm of the tool itself. Moving the slider to the right has the effect of increasing overall contrast, thereby adding more snap and pop to your images. In the comparison below, the first image (10 seconds, f/2.8, ISO 1600 with a 14mm lens) is as shot, while the second has been adjusted in Lightroom with Whites at +49, and therefore has more pop.

8. Add Dehaze

The Dehaze slider is the night photographer’s secret weapon. It increases contrast and saturation in the low-contrast portions of the image. Be careful here. This slider can be seductive. Adding too much can make your image look really fake. Start slow and add small increments at a time. Continue to compare your adjustments with the original by clicking on the before-and-after view (circled below).

We hope some of these tips will help make your aurora photographs even more stellar!

Are there any tips or techniques you’d like to share? How about some amazing aurora images? Feel free to post in the Comments section below!

Tim Cooper is a partner and workshop leader with National Parks at Night. Learn more techniques from his book The Magic of Light Painting, available from Peachpit.

UPCOMING WORKSHOPS FROM NATIONAL PARKS AT NIGHT

Casting Out Shadows: When HDR is the Right Choice for a Night Scene

The acronym HDR stands for High Dynamic Range. The term can refer to a computer program, or a photograph that has been processed by an HDR program, or the technique of taking multiple photographs with the intention of blending them together in an HDR program.

Let’s begin with the phrase “dynamic range.” Dynamic range refers to the amount of separation between the brightest and darkest parts of a scene. A scene low in dynamic range has a limited range of brightness tones (as seen below).

Example of a low dynamic range photo, from Death Valley National Park.

Example of a low dynamic range photo, from Death Valley National Park.

On the other hand, a scene such as this Moraine Lake photograph (below) contains a large range of brightness values. This huge difference between values is what makes a scene high in dynamic range. (“High contrast” is another phrase used to describe such a scene.)

Example of a high dynamic range photo., of Moraine Lake in Canada'a Banff National Park.

Example of a high dynamic range photo., of Moraine Lake in Canada'a Banff National Park.

The problem, of course, is that even the best cameras cannot capture a scene with an extreme amount of dynamic range. In the example of the Moraine Lake photo, to reveal the detail in all of the tones, I made five different exposures of the scene by using different shutter speeds (1/125, 1/60, 1/30, 1/15 and 1/8—all at f/11) and blended them together in an HDR program called PhotoMatix.

Final image created by blending five different exposures.

Final image created by blending five different exposures.

Night Applications

While HDR is a common technique in daytime photography, the definition of high contrast certainly describes many nighttime scenarios. Not all night scenes are high in contrast, though. A landscape illuminated by a full moon, for example, can be fairly low in dynamic range.

Low-contrast scene illuminated by the full moon, in Zion National Park.

Low-contrast scene illuminated by the full moon, in Zion National Park.

But any scene that contains deep shadows and very bright highlights is a candidate for the HDR process—even if it's after dark. This scenario is especially common at night when we mix deep shadows and man-made light sources, such as city lights or car trails.

High-contrast scene mixing Las Vegas city lights and deep shadows.

High-contrast scene mixing Las Vegas city lights and deep shadows.

Below is a final image I made in Las Vegas after shooting three separate exposures of 1 second, 2 seconds and 4 seconds (all at f/11) and blending them together in PhotoMatix. This process reveals details in the dark shadows while allowing the city lights to retain texture while remaining bright.

Final image after HDR treatment.

Final image after HDR treatment.

Cuyahoga Case Study

I don’t use the HDR process for every nighttime image, but when confronted with deep shadows, bright city lights or brightly lit buildings, I’ll certainly consider it. This is exactly what happened to me while scouting and shooting for our upcoming night photography adventure workshop in Cuyahoga Valley National Park. I wanted to take a picture of the rail crossing and station at Boston Mill. In order to capture detail in the "Boston Mill" sign on the depot, I had to use an exposure of 8 seconds, f/8 at ISO 100.

At Cuyahoga Valley, an exposure of 8 seconds, f/8 at ISO 100 recorded detail in the highlights.

At Cuyahoga Valley, an exposure of 8 seconds, f/8 at ISO 100 recorded detail in the highlights.

However, this exposure left the sky and foreground very dark. Therefore, it was time for HDR. I needed to create a few more exposures that were brighter so I could get some detail in the darker areas of the image. Varying only the shutter speed to alter exposures left my f-stop constant, which in turn created the same amount of depth of field in each image.

Exposures of 15 seconds at f/8, 30 seconds at f/8, and 1 minute at f/8.

After viewing the histogram of the 1-minute exposure, I decided that the shadows had received enough light, and I didn’t need to open them up any more. Later, I took all four exposures and blended them together in PhotoMatix.

HDR blend of the four exposures.

HDR blend of the four exposures.

Blending the images together kept the highlight detail of the Boston Mill sign intact while brightening up the shadow portions of the image.

At this point I had all the exposures necessary to reveal the desired detail, but I had not captured the car trails that I was hoping for. Leaving my camera in position, I waited for more traffic and made a few more exposures. To create the final image (below), I used Photoshop to add a few more exposures with car trails to the HDR blended image above.

The final image of the HDR frame (four exposures combined) layered with car-trail exposures.

The final image of the HDR frame (four exposures combined) layered with car-trail exposures.

When making images at night, we’re faced with all sorts of challenges. In the case of the Boston Mill shot, the difficulty lay in the extreme contrast between the lit sign, the dark foreground and even darker sky. By taking multiple exposures and blending them together in HDR I was able to control that high contrast.

Like with any photography discipline, a firm grasp of the basics and being familiar with your gear will carry you through many situations. Knowing a few cool techniques like HDR, however, can greatly expand the possibilities.

For more information about shooting and processing HDR images, check out Tim Cooper’s books The Realistic HDR Image and HDR Photography: From Snapshots to Great Shots. If you are interested in using Tim’s HDR program of choice, click for a 15% discount on PhotoMatix.

UPCOMING WORKSHOPS FROM NATIONAL PARKS AT NIGHT

No Legs to Stand on: How to Take Night Photos Without a Tripod

About a month ago, fellow NPAN instructor Chris Nicholson and I had the honor of teaching at the Out of New York Photography Conference. During the event we led a night walk, but when we met the students, there was a surprise for us—none of them brought tripods!

Tripods had been listed as required gear on the instructions list, but … well, I guess things happen. We could have cancelled the walk, but Chris and I chatted and decided on a different tack: Let’s teach how to overcome the challenge of shooting at night without a tripod! There are thousands of makeshift tripods on the streets of NYC—so we went out to find them.

What happened next was a magical “letting go” and a total embrace of what the night has to offer. We started by leaning our cameras against poles, buildings and even mailboxes (yes, there are a few left in NYC!). We challenged the students to place the cameras higher and lower than their normal point of view, and the sidewalks and stairs became our stabilization. We searched for movement in cars, people and water fountains, and we braced our cameras against chairs, tables and benches.

It was one of the most fun nights out that I have had in a long time. We were constantly searching for something stable, and we were smiling back to each other when—Eureka! We got it! This forced all of us way out of our normal clicking boxes, which is always an excellent place to be.

With that in mind, I wanted to share a few of the tips that helped us survive a night without tripods. As much as good support is some of the most important night-photography gear, these tips will help you in a pinch, not to mention stretch your creative capacity.

Bursting for sharpness

Burst Rate is your friend. I like it for a few different reasons—it greatly helps your “hit rate” when shooting handheld below 1/60 second (but no longer than 1/4 second). Set your camera to its fastest frame rate, hold the camera as still as possible, then fire off a bunch of frames.

Your first couple of shots will be blurry because of the shake created by triggering the shutter, as will your last few because of taking pressure off the shutter release. But if you keep your finger on the button for 10 to 15 shots—you’ll most likely get 2 or 3 in the middle that are acceptably sharp.

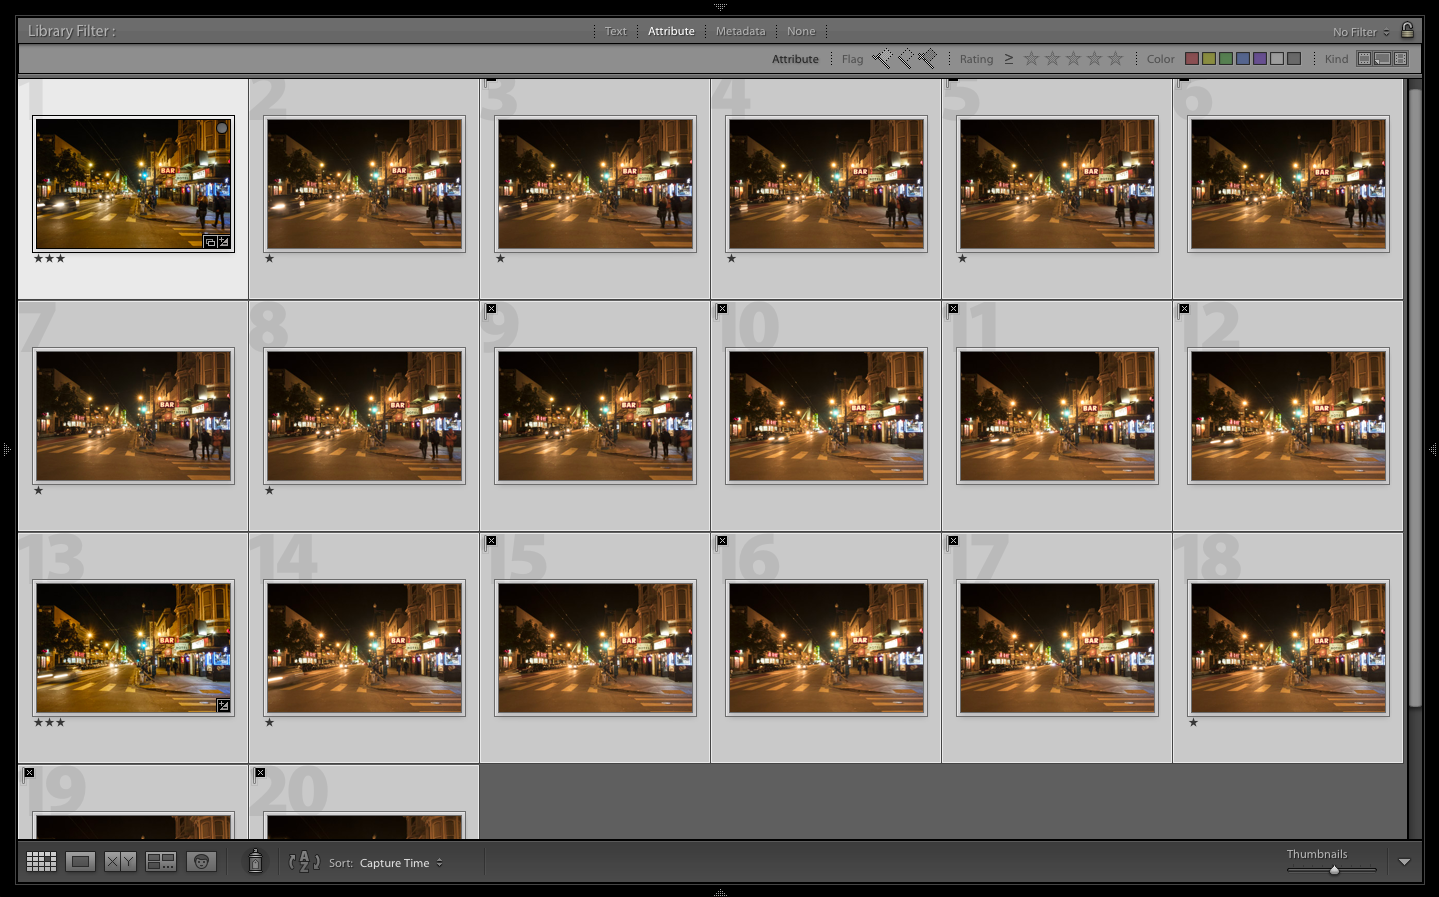
Above you can see the two bursts of approximately 10 shots I did at shutter speeds of 1/8 and then 1/4 to get more movement in the cars. The starred frames are the ones sharp enough to use and the ones flagged with an X are too blurry. (Click the “Next” arrow to see the two sharpest frames.)

To gain a little more stability, here’s a more advanced technique: If your camera has a strap, wrap the strap around your neck, and then extend your arms and the camera until the strap is taut (see below). The tautness will help you keep the camera a little more stable while shooting your burst.

And as for all those extra photos, you don’t necessarily need to delete them. It will require more editing afterward, but you could see how they look as an animated GIF. That is my second reason to shoot in burst mode—I love creating little GIFs or flip books of these moments.

Animated GIF created from a burst of photos.

Animated GIF created from a burst of photos.

Grounding for stability

Of course, everyone has their limit to how steady they can hold a camera. I can typically shoot as slow as 1/4 second, but if I need to go 1/2 second or 1 second, I’ll tuck in my arms and try to lean against a wall to create more stability. Breath in and then trigger that burst on the exhale. Your hit rate will be substantially less with these longer exposures—maybe 1 in 10 frames will be sharp enough to use.

I typically don’t advise hand-holding for exposures longer than 1 second. When opening the shutter for that long, you need find something solid to place your camera on. Be creative. In an urban environment, find stable objects like we used in NYC. In the wilderness, use the ground, a boulder, a ledge, a tree stump, a sturdy branch, etc.

Hand-held at 1/15.

Hand-held at 1/15.

If you happen to have a cable release, great—use it. But chances are, if you forgot your tripod then you probably didn’t bring your cable release! In that case, use the camera’s self-timer—generally 2 seconds is sufficient. That way any vibration caused by you pressing the shutter release will subside before the shutter opens.

Also, many modern cameras have a built-in intervalometer. This is a good solution for shooting car trails, or anything else with lots of constant motion. When using the built-in intervalometer, turn off the self-timer. Set the interval timer to fire every 2 seconds for 10 to 20 frames or more. The first shot might be blurry because of manually triggering the camera, but the subsequent ones should be sharp.

I hope these tips will help you keep on clicking for longer exposures even when you forget your tripod. We had so much fun that night that we are thinking of offering an annual no-tripod night walk—stay posted for that!

Traveling light

Lastly, one final tip. If you didn’t “forget” your tripod but rather just don’t like the idea of carrying one around, then at least consider investing in a travel or lightweight model. Even though the above tips can save your night, using the right tool for the job—a quality tripod—will guarantee you get the steadiest shot possible.

Our favorite travel tripod at NPAN is the Gitzo 2545, which weighs only 4 pounds and can hold up to 26 pounds of gear (which is well under pretty much any DSLR and lens combo). This tripod can easily fit into a messenger or tote bag and is a professional joy to always have with you. It is pricey, but that’s because it’s one of the best. Moreover, it will last you a lifetime.

If you are on a budget, check out the Manfrotto 190go! tripod (available in aluminum or carbon fiber), which you can match with the head of your choice.

Gabriel Biderman is a Brooklyn-based fine art and travel photographer, and author of Night Photography: From Snapshots to Great Shots (Peachpit, 2014). During the daytime hours you'll often find Gabe at one of many photo events around the world working for B&H Photo’s road marketing team. See his portfolio and workshop lineup at www.ruinism.com.

Upcoming workshops from National Parks at Night

Holiday Special: Tips for Getting the Most Explosive Fireworks Photos

Unless you live in the upper or lower latitudes, you can do night photography pretty much any day of the year. But opportunities for fireworks photography arise only every now and then—particularly, in the U.S., on and around Independence Day.

With that in mind, National Parks at Night wanted to offer some tips for those of you who might be heading out this weekend with cameras and tripods and perhaps some trepidation.

One thing to note: You’re in luck! This year Independence Day is falling right smack in the middle of a full moon, affording you skies as dark as local conditions allow.

Another note: Fireworks are prohibited in national parks. However, many other National Park Service units (especially national historic sites and national battlefields) hold special events over this holiday. You can photograph flag displays, battle reenactments, parades, etc. For more information about what’s going on near you or near where you’re traveling, a great resource is the National Park Service Event Calendar.

NPS Photo

NPS Photo

Perhaps the best-known of those celebrations, of course, is the fireworks display at the National Mall in Washington, D.C. The show is launched from the Reflecting Pool in front of the Lincoln Memorial. Various vantage points in the area allow you to frame the fireworks along with the U.S. Capitol, Washington Monument, Vietnam Veterans Memorial, Martin Luther King Jr. Memorial, and so on.

Also, just because you can’t see fireworks in a national park doesn’t mean you can’t see them from a national park. For example, Bar Harbor, Maine, hosts a popular show over Frenchman Bay, which can be seen from many spots in Acadia. One of the hippest viewpoints? On top of Cadillac Mountain!

Now, from the NPAN crew, a few tips for getting some explosive images, no matter where you decide to photograph them.


Lance Keimig:

I want to start this off by pointing out that fireworks as a subject has been done extensively. So do a lot of thinking and a lot of experimenting to find a new way to approach the subject. I always advise to move beyond the clichés, and with fireworks, you have your work cut out for you.

That said, I have found that the most interesting photos include the spectators, illuminated by the glow of the fireworks. Also, be judicious with long exposures—it is easy to overdo it and include too many bursts in one shot, which can be overkill.


Gabriel Biderman:

Arrive early to stake out a good vantage point. This is especially important for fireworks shows in major cities, where photographers show up early in the morning to plant their tripods in the perfect spot. It’s like being first in line to a popular concert.

Scout the location and look for landmarks, bridges or other interesting foreground elements to give the image scale and drama. Often fireworks are shot over water—include the water and get fantastic reflections.

© Gabriel Biderman

© Gabriel Biderman

You will be surrounded by people, which I do like to include in the image, but watch out and make sure they don’t bump into you and knock your tripod over. Also, use a lens shade to prevent flare from street lights.

Lastly, be aware of any downward smoke, because it can obscure fireworks or—if you are too close to the show—can just smoke you out! So strategically, try to avoid it physically and in your shots. As the show goes on, the smoke tends to linger and gather lower to ground (launch location). To compensate, I might shoot very wide and include the crowd or subject matter at the beginning of the show, but then shoot higher and tighter in the sky the more the smoke accumulates.
 

Tim Cooper:

Use a lens that will allow a composition wide enough to encompass enough of the sky to capture different bursts at different heights. Either focus it to infinity (unless you have a foreground reason not to) or, better yet, use hyperfocal distance to maximize depth of field.

Use a slow ISO (such as 100) and a medium aperture (such as f/8, or even smaller). Experiment. Set your camera to bulb and use a cable release to control the shutter.

© Tim Cooper

© Tim Cooper

When ready to shoot, open the shutter and cover your lens with a black card to keep out any extraneous light. When you hear the sound of a firework exploding, remove the card from the lens and let the fireworks fly through your frame. When the bursts subside, cover the lens again and wait for the next explosion. Repeat several times, covering your lens in between bursts, so that you can “stack” multiple patterns onto one frame.


Matt Hill:

If you want to shoot and enjoy the show, then your intervalometer is your best friend. Or maybe your wing-man. (Pick whichever analogy works better for you.)

First, test for the right exposure. You can choose a fast shutter speed to capture many frames with a few explosions in each, or you can choose a long shutter speed to capture fewer frames with more explosions in each. Then find the right aperture and ISO (using Tim's advice above), and you have your exposure. You can do this pretty quickly, within the first minute or two of the fireworks display.

© Chris Nicholson

© Chris Nicholson

Once that's done, get the intervalometer configured. Set your interval to 1 second, and the number of photos to infinite or a couple hundred. (You can do the math to figure out exactly how many frames to shoot, but why bother? Just set it to keep firing.) Finally, simply start the sequence, walk away and enjoy the show! When the fireworks are over, stop the sequence.

Voila! You've shot a whole fireworks display while sitting down and feeling like a kid.


Chris Nicholson:

If the fireworks start before the sky is dark and the sky is too light for a long exposure, it's a perfect time to get a neutral density filter out of the bag. A 3-stop filter (or even less) should do the trick. It will allow you to shoot longer, catching more bursts (and complete bursts), which is kind of key in the sparser, early moments of a pyrotechnics show.

Also, if you know the display is beginning in twilight, try to get an east-facing position, which will give you a darker-sky background than if you were facing west.

Framing can be tricky, because it's nearly impossible to precisely predict where the blasts will occur and how large they'll be. So frame loosely to get everything, then crop to taste in post-production.

© Chris Nicholson

© Chris Nicholson

Finally... please, please, please keep safety in mind. I’ve been to all sorts of fireworks shows, and one of the most impressive I’ve ever seen and photographed (a few times) was a local “passionate amateurs” display put on in a beachfront neighborhood of my old hometown. Everything is exploding right over you or the nearby water, making it at once spectacular and terrifying. In the few years I attended, I saw a few firework-human near collisions.

Should you shoot this type of event, be sure not to keep your eye stuck to your viewfinder—frame your photograph, then stick your eyes to what’s happening around you. Also, consider wearing eye and ear protection if you’re close to the launch area.
 

From All of Us:

All the best for doing some great work, and have a very Happy 4th of July!

Chris Nicholson is the author of Photographing National Parks (Sidelight Books, 2015). Learn more about national parks as photography destinations, subscribe to Chris' free e-newsletter, and more at www.PhotographingNationalParks.com.

Upcoming workshops from National Parks at Night