To 100 and Beyond: A Centuple Celebration of 8 Years of Workshops

In 2015, the five of us partners at National Parks at Night had our first meeting, and in 2016 we ran our first five workshops together: chronologically, at Acadia, Zion, Crater Lake, Arches and Death Valley national parks. Tonight, at Bannerman Island in New York, we will run our 100th workshop.

During these 8 years and 100 adventures, we have met and formed bonds with over 700 night photographers who have joined us. They are the people who have made the National Parks at Night dream possible, and our gratitude couldnโ€™t be grander.

With that feeling in our hearts, we never considered celebrating our 100th workshop without our attendees. We instead wanted to host a party to mark the milestone and invite all of our alums to attend. And thatโ€™s precisely what we did this past Thursday in New York City.

More than 60 members of the NPAN community gathered in Midtown Manhattan to share our common bonds and the friendships weโ€™ve all developed during this run. There were people who have attended many workshops together, people who havenโ€™t seen each other in a few years, people who had never met before the partyโ€”and even one person from our first workshop who we got to see for the first time since then!

We started with a soiree hosted in the studios at NYC Salt, a non-profit high school photography program for underserved youth. (Gabe has been a volunteer for them for over 10 years and the program has assisted in getting many students into college for the first time in their family. If youโ€™re not familiar with NYC Salt, definitely check out their work and their mission. Youโ€™ll be inspiredโ€”and if youโ€™re inspired enough to help them in some way, all the better!)

Our guests were greeted with some new NPAN swag: a North Face beanie and a special โ€œ100 and Beyondโ€ pin commemorating our Centuple Celebration. A few of our longtime brand partners were there as well: B&H Photo, Luxli and Benro all stopped by to share some gifts (more on that below), and Canon was on hand to make two free 18x24 prints for all the partygoers on Red River Polar Glossy Metallic paper.

Everyone mingled, enjoying conversation, along with wine, cheese and a buffet of light food graciously prepared by four of our five significant others (thank you Nancy, Angela, Katherine and Mabel!). In the corner a large-screen television displayed a looping slide show of the group photos from all of our workshops, as well as over 400 photos of attendees at the workshops.

Photo courtesy Angela Weir.

Toward the end of the party the gathering circled Gabe, who emceed some gift-giving. Many of our sponsors also wanted to thank our attendees for their support over the past 8 years. Between them, Acratech, B&H, Benro, Coast Portand, Focus on Stars, Luxli and Tether Tools sent 23 giveaways!

We topped off the afternoon by heading to the roof, where NYC portrait artist Adam Chinitz photographed the group in front of the city skyline.

Photo courtesy Adam Chinitz.

After the party we met at the delectable Pier 57 food court, where everyone broke into groups for dinner. Afterward we continued the roof theme by riding the elevator to the top of Pier 57 and stepping out to a magnificent view of the NYC skyline. We shot there for about an hour, then moved to Little Island, an artificial island park on the eastern shore of the Hudson River, where we shot some more.

Photo courtesy Katherine Moxhet.

The evening ended, and we once again exchanged farewells and until-we-meet-agains with a group of the finest folks we could imagine adventuring with.

One hundred workshops. Wow. At our first meeting in 2015, I donโ€™t think any of us five imagined that number. But here we are in 2023, now dreaming of 200.

For all of you who have shared this ride with us, we thank you. And for those of you who have not shared the ride yetโ€”welcome aboard! We are all eager to welcome you into this dynamic and engaging community, and to seize the night together, to 200 and beyond.

Chris Nicholson is a partner and director of content with National Parks at Night, and author of Photographing National Parks (Sidelight Books, 2015) and Photographing Lighthouses (Sidelight Books, 2023). Learn more about national parks as photography destinations, subscribe to Chris' free e-newsletter, and more at www.PhotographingNationalParks.com.

UPCOMING WORKSHOPS FROM NATIONAL PARKS AT NIGHT

The Night Photographer's Guide to Star Stacking (Part III)

Note: This is the third in a three-part series about creating star trails with the stacking technique. Part I covered how to shoot the raw materials. Part II demonstrated how to edit the individual frames in Lightroom and Photoshop to create the star trail stack. In Part III, below, Tim explains how to clean up artifacts that can occur when combining these images in Photoshop.


This is the third and final installation of our three-part guide to star trail stacking. We hope you have enjoyed the series so far. For those of you who didnโ€™t catch Part I and Part II, we recommend reading those blog posts before you jump in here, so that you are up to speed with the capture and initial processing steps.

This method of creating star trail images is versatile and comes with many advantages, but it can also result in artifacts that need to be corrected in order to create a polished final imageโ€”things such as plane trails and stray light, which can appear on individual frames during capture.

Star trails over Animas Forks, Colorado. Nikon Z 6II with a Nikon Z 14-24mm f/2.8 S lens at 15mm. 17 stacked frames shot at 4 minutes, f/2.8, ISO 640.

While the fact that these artifacts exist at all might make you question whether to use this technique to begin with, the opposite is true: These problems can appear in any long exposure of the night sky, and the stacking technique gives you more power to remove them in a way that doesnโ€™t harm your final image.

Indeed, that we can remove common artifacts from individual layers is a great reason to choose the technique of shooting multiple shorter exposures and stacking them together in Photoshop rather than shooting one long exposure.

In This Video

In the following video Iโ€™ll cover:

  • exporting your images from Lightroom into Photoshop

  • changing blending modes to create the initial star trail composite

  • identifying and working on individual layers

  • removing plane trails from individual layers using the Spot Healing Brush

  • the difference between layers and masks

  • creating layer masks and using the paintbrush to remove unwanted items that appear on individual frames

  • using selections to remove unwanted items that appear on individual frames

  • streamlining the editing process by grouping layers

  • using color labels to mark important layers

  • when to flatten your image and when to retain the layers

  • creating a composite layer to enable edits that canโ€™t be done to multiple layers

  • renaming your Lightroom files to reflect the fileโ€™s status

Your Turn

Have you been creating star trail images using the stacking technique? Weโ€™d love to see your photos! Share in the comments below, or on our Facebook page, or on Instagram (tag us @nationalparksatnight #nationalparksatnight #seizethenight).

Tim Cooper is a partner and workshop leader with National Parks at Night. Learn more techniques from his book The Magic of Light Painting, available from Peachpit.

UPCOMING WORKSHOPS FROM NATIONAL PARKS AT NIGHT

Out of and Into the Dark: Wrapping Up Nightscaper 2023

What happens when 200 night-minded people converge in Kanab, Utah, for the Nightscaper Photo Conference

Well, stellar things of course! And just like when we prepare for an epic night of photographing under the stars, unexpected happenings occurred that provided even more opportunities for us to โ€œseize the nightโ€ with old friends and new.

Gratitude

Before we recap the 4 days and nights of Nightscaper 2023, we want to thank the 22 speakers who provided so much inspiration and education on a variety of topics, from deep space tools and techniques to more down-to-earth topics such as planning successful night shoots, tracking and processing panos, sculpting light, saving our stars, and the business side to kickstarting your night photography career. 

Another thank you to our 20 sponsors that provided over 35 prizes and incredible hands-on opportunities to try out the latest products to help us reach for the stars:

Shawn from Canon printed attendeesโ€™ amazing night photographs.

  • Canon ImagePrograf was probably the busiest vendor, as Shawn was constantly printing free 18x24-inch prints on our new favorite paper, the Red River Polar Gloss Metallic, which made everyoneโ€™s stars really shine.

  • Peter from Shimoda showed the brand new Action X V2 bag for the first time in public, and everyone was eager to figure out which size fit their night kit the best.

  • Brenda from Calibrite offered free display calibrations.

  • Fotopro and Novoflex showcased a veritable forest of tripods for people to try.

  • Michael from Benro co-presented an engaging discussion about noise, including the influence of AI in cleaning up night images.

  • Erik from KelbyOne shared his epic rocket photography images and gave us even better insight about the best apps for predicting clear dark skies.

  • Clarence from Spencerโ€™s Camera offered a course on how to get the most from astro-modified cameras.

  • David from Action Photo Tours walked attendees through a practical approach to creating time-lapses.

  • Bay Photo Lab came up huge by creating the most unique aluminum badge for all in-person attendees, while Patrick showcased a variety of surfaces for us to print our best night photos on.

  • Our friends at B&H Photo, Max and Michael, showcased the latest night-centric gear and of course offered those amazing B&H deals.

4 Days of Conferring

The 4-day conference schedule (May 18-21) included two tracks and over 30 classes for nightscapers to choose from. Determining which class to sit in on was a challenge at times, but knowing that all the sessions were being recorded for streaming replays allowed us not to suffer too much from the fear of missing out.

Beyond the education, the common through-line during the event was community. People from all over the world converged to โ€œcollab in Kanabโ€ (thanks to Max for that turn of phrase!)โ€”whether that was in between sessions, over the many meals we shared, or during the multiple night shoots that were organized by speakers and attendees. The weather was mostly cooperative for people to meet up and photograph the many sites around Kanab and the Grand Staircase-Escalante region.

Dan Zafra teaching tracked Milky Way panoramas.

One of the highlights of opening day was when we broke the fourth wall between the speakers and audience and offered a โ€œTales of the Nightโ€ session, where in-person attendees could share an image on the big screen, then stand up and take the mic to reveal the vision behind their photo. The variety of work shown sparked conversations as we found even more common bonds with our newfound family. 

Another highlight was the Star Party we co-hosted with Amazing Earthfest and the International Dark-Sky Association (IDA) on the second night. Everyone enjoyed sharing the 10 telescopes locked in on key features in the sky, set up along a section of abandoned highway in the desert. Bettymaya Foote from IDA and Rich Csenge from Amazing Earthfest took us through twilight with demonstrations on what we can all do to limit light pollution in our hometowns and backyards. Starlink was โ€œkind enoughโ€ to schedule their latest launch of satellites during the star party, which created many oohs and ahhs.

Gazing at the stars with Nightscaper Photo Conference, Amazing Earthfest and the International Dark-Sky Association.

However, we couldnโ€™t have planned for one of the most unique night experiences ever. On the third night of the conference, the local power company scheduled a planned outage from midnight to morning so they could work on upgrades to the grid of several local counties. This included Kane County and Kanab, which most likely inconvenienced the 5,000 locals. But for the 200 Nightscapers in town, it was a golden opportunity to capture the Milky Way rising over Main Street. 

This ended up being my favorite night, as I wandered the streets safely greeting Nightscapers and seeing what they were creating under such rare conditions. It made us dream of what a true IDA dark sky city would look like.

Milky Way and Main Street, Kanab 2023. Nikon Z 6II with a Nikon Z 24-70mm f/2.8 lens. 6 seconds, f/3.2, ISO 12800.

As it turned out, the updates to the grid still needed some fixing. The next morning, after about seven slides into my talk titled โ€œInspirations Beyond the Milky Way,โ€ the power went out again. In the darkness with only a battery-powered spotlight shining on me and no images on the screen, I pivoted and told some of my own tales of the night. I tried to paint a picture of my favorite photos and adventures under the starsโ€”stories that are of course similar to what many nightscapers have experienced. In the darkness of the room, I no longer felt like we were in a conference center, and I imagined what humans have been doing for many a millennia: telling stories under the stars. I could feel energy and love from our nocturnal family.

Night photography can be a solo sport, but at Nightscaper we discovered that we were not alone in the universe. We are united by a common passion and we have so much to learn from each other. We are still very young at exploring the night, but we are going to seize each and every moment.

Speaker Jess Santos working with an attendee in a portfolio review.

โ€™Til Next Time

Whether or not you attended the Nightscaper Photo Conference, we are all connected. There is a comfort knowing we are not the only ones who have a passion for staying up to all hours of the night. We invite you to join the conversation either in the comments below or by tagging #nightscaperconference socially when you share your images and stories. 

If you are interested in watching any of the replays from Nightscaper, you can still purchase a ticket here. The replays should be ready in about a week, and theyโ€™ll be available for streaming for 1 year after the conference ended.

We are already making plans for the next Nightscaper Photo Conference family reunion. Stay tuned to this blog for more!

Gabriel Biderman is a partner and workshop leader with National Parks at Night. He is a Brooklyn-based fine art and travel photographer, and author of Night Photography: From Snapshots to Great Shots (Peachpit, 2014). During the daytime hours you'll often find Gabe at one of many photo events around the world working for B&H Photoโ€™s road marketing team. See his portfolio and workshop lineup at www.ruinism.com.

UPCOMING WORKSHOPS FROM NATIONAL PARKS AT NIGHT

Five Questions: Nikon Z 8 for Night, Perseids, Aurora Apps and More

The night photography world is full of questions, and weโ€™re happy to help with answers.

This installment of our โ€œFive Questionsโ€ series features inquiries about the new Nikon Z 8, locations to shoot the Perseids, aurora apps, filter systems and an Irix lens.

If you have any questions you would like to throw our way, please contact us anytime. Questions could be about gear, national parks and other photo locations, post-processing techniques, field etiquette, or anything else related to night photography. #SeizeTheNight!


1. The Nikon Z 8 and Night Noise

Question:

Since the Nikon Z 8 was announced this week, do you have an opinion about it with respect to night photography and noise, and how it compares to Nikonโ€™s other mirrorless cameras? Iโ€™m currently shooting with a D850, which I really like but itโ€™s getting long in tooth. In your opinion, what is the best high-res Nikon mirrorless camera for night photography at this point? โ€” Jeff

Answer:

Three of our team members shoot with the Nikon Z 6II, one with the D780 and one with the D5. Between all of us, weโ€™ve shot the Z 7 and Z 9, but none of us owns one, and none of us intends to own one. That tells you something about our preferences, but it doesnโ€™t mean those are bad cameras, even for night photography. Shooting priorities matter.

We havenโ€™t done methodical comparisons between the Z models, and the Z 8 is not yet shipping, so we have no experience with that model. But from our experience shooting Z cameras, hereโ€™s what we know:

We have found that the Z 6II has a slight edge in high ISO characteristics, with the Z 9 not that far behind. The Z 8 features the same 45.7-megapixel full-frame sensor and Expeed processor as the Z 9, so the former should perform as well as the latter does for a high-resolution camera at night. In other words, the Z 8 is kind of a mini Z 9, so weโ€™d expect the same results.

That would mean the Z 6II would still be the best option for low-light photography in terms of high ISO noise, all things being equal.

However, all things usually arenโ€™t equal. There is a lot that goes on in determining the best noise characteristics of any given camera. You could do a side-by-side test by shooting the same scene with all of same parameters, but that may not be the best test for night photography.

For example, when shooting to freeze star points, you need to use a faster shutter speed on a camera with a higher pixel count than you would on one with a smaller pixel count to achieve the same visual result. This means you need to use a faster ISO on that higher-resolution camera. Now you are no longer comparing apples to apples.

The Z 8 autofocus is sensitive down to -9.0 EV, making it the best camera autofocus for low-light photography.

There are other considerations with the higher pixel count as well. Such as:

  • Do you like to do a lot of star stacking? High-resolution files can really bog down that process due to their sheer size.

  • Do you like to make giant prints? If so, a higher-resolution camera could be a great choice.

  • Another consideration would be the better low-light focusing the Z 9 and Z 8 haveโ€”a feature called โ€œStarlight View.โ€ If you have trouble focusing at night, this capability alone may trump everything else.

  • The Z 8 simulates the Z 9 in high-speed capture, advanced auto-focusing capabilities and superhigh-resolution video. If you like to shoot sports and wildlife in addition to night photography, those robust features would be a huge asset.

In short, we have not shot with the Z 8 yet so we canโ€™t really say how it will compare with the other Z models. We do look forward to getting our hands on one and putting it through its paces, but seeing as none of us shoots with the other higher-resolution cameras, my guess is that our collective preference will remain the Z 6II. โ€” Tim

2. Perseids from the Curb

Question:

Can you recommend someplace I could go to photograph the Perseid Meteor Shower where Iโ€™d have the possibility of an outstanding foreground and dark sky for the meteors? One caveat: I have a knee issue. โ€” H.

PhotoPills confirms that Great Sand Dunes National Park could be a great Perseids option.

Answer:

It sounds like you need a good roadside location. You also definitely need someplace with a north/northeast view and no light pollution in that direction, nor a mountain range blocking the sky.

Great Sand Dunes National Park is awesome for those criteria. You can shoot roadside and have the dunes in front of the mountains with the sky above. Iโ€™d even be tempted to attempt a vertorama with a blue hour bottom and star field above.

Badlands National Park also has some spectacular pull-outs where you could do the same. The beaches of Olympic National Park fit the bill, but the ones with the best foregrounds require at least a little bit of a walk, and slippery stones may be troublesome if the tide is receding. At Crater Lake National Park, shooting from the lodge over Wizard Island could be amazing. โ€” Matt

Note: For more information about shooting meteor showers, be sure to check out our e-book Great Balls of Fire.

3. Tracking Auroras

Question:

Can you share the aurora tracking app that you use? โ€” Deborah C.

Vatnajokull National Park, Iceland. ยฉ 2023 Chris Nicholson. Nikon D5 with a Nikon 14-24mm f/2.8 lens. 4 seconds, f/4, ISO 6400.

Answer:

The answer is ... several! Iโ€™m on Android, and I use My Aurora Forecast. Lance, Tim and Matt are on iPhone, and they use Aurora Forecast (Lance, Tim), My Aurora Forecast & Alerts (Matt) and SpaceWeatherLive (Matt).

We recommend using more than one. Pooling info from different sources can give a more accurate picture of what might happen and where. Also, it can be nice to set up an automated alertโ€”sometimes we can end up shooting auroras on a night we didnโ€™t know theyโ€™d happen. โ€” Chris

4. Finding a Filter System

Question:

Iโ€™d like to get a filter system that works with my lensesโ€”primarily an 82mm and 95mm. But I also have a very concave lens (the Sigma 14-24mm f/2.8), so Iโ€™m thinking I need a 150mm system. โ€” Rachna

Answer:

Welcome to the wonderful world of filters! This is a great way to extend long exposures during the day and night.

Iโ€™m a fan of square systems, as they offer the most versatility. Going down the path you suggest, I suggest you invest in these three things:

  1. NiSi 150mm Filter Holder for Sigma 14-24mm lens

  2. the adapter rings for 105mm, 95mm and 82mm filter threads

  3. Starter Kit that includes 6-stop, 10-stop and 3-stop graduated 150mm neutral density filters

This is pricey but gets you everything you need, albeit in a big kit. (Most people who invest in 150mm filters find them cumbersome, but thatโ€™s the way it goes.)

Alternatively you can use rear ND filters for the Sigma and then use 100mm filters for your other lenses. This would be more cost-efficient, as well as a smaller footprint on your lenses and bag. The caveat is that there are no rear graduated ND filters, so scenes that would normally call for them would need to be shot with multiple exposures and blended in post.

But if you do choose to go that way and use a 100mm square filter system, the NiSi V7 Advance Kit includes pretty much everything you would need except the 95mm adapter. However, the caveat with this system is that the circular polarizer will work only with lenses 82mm or smaller.

Another thought is that most mirrorless lenses are smaller than their DSLR counterparts, and they donโ€™t have bulbous front elements. Therefore, switching to mirrorless also facilitates a more compact and cost-efficient filter system.

Finally, why do I keep recommending NiSi? There are lots of filter systems that are great. I happen to like NiSi because they are a good value. Iโ€™ve been using them for more than 5 years and couldnโ€™t be happier. โ€” Gabe

5. Eyeing the Irix 21mm

Question:

I have a Canon R6 mirrorless camera and Iโ€™m looking for a good, fast astro lens. I noticed you recommended the Irix 15mm f/2.4 lens. Is the Irix 21mm f/1.4 good for astro too? โ€” Jim

Answer:

Iโ€™ve shot with the Irix 15mm for years and am quite fond of it. You need to stop down to f/3.2 to eliminate most of the coma. I have not shot with the 21mm yet but will be receiving one soon. Based on their other f/1.4 lenses, Iโ€™d expect that youโ€™ll need to stop down to f/2.8 or thereabouts to minimize the coma.

The main thing for you and the R6 is that these lenses are DSLR-mount only. If you donโ€™t mind using the adapter, then Iโ€™m sure either would be a great lens for youโ€”the choice just depends more on your style of shooting. The 15mm focal length is quite wide, so you really need a foreground.

My first choice would be the Canon 15-35mm f/2.8, which wide open should get you coma similar to the stopped-down Irix lenses. But if that is not in your budget, Iโ€™d go with whichever of those Irix lenses fits your shooting style the best. โ€” Lance

Chris Nicholson is a partner and director of content with National Parks at Night, and author of Photographing National Parks (Sidelight Books, 2015) and Photographing Lighthouses (Sidelight Books, 2023). Learn more about national parks as photography destinations, subscribe to Chris' free e-newsletter, and more at www.PhotographingNationalParks.com.

UPCOMING WORKSHOPS FROM NATIONAL PARKS AT NIGHT

A Whole New Bag of Tricks: Check Out the Features in Adobe's Latest Update

Earlier this week Adobe released its latest updates to Lightroom and Photoshop. As happens sometimes, this particular release included some tweaks that are exciting for night photographers.

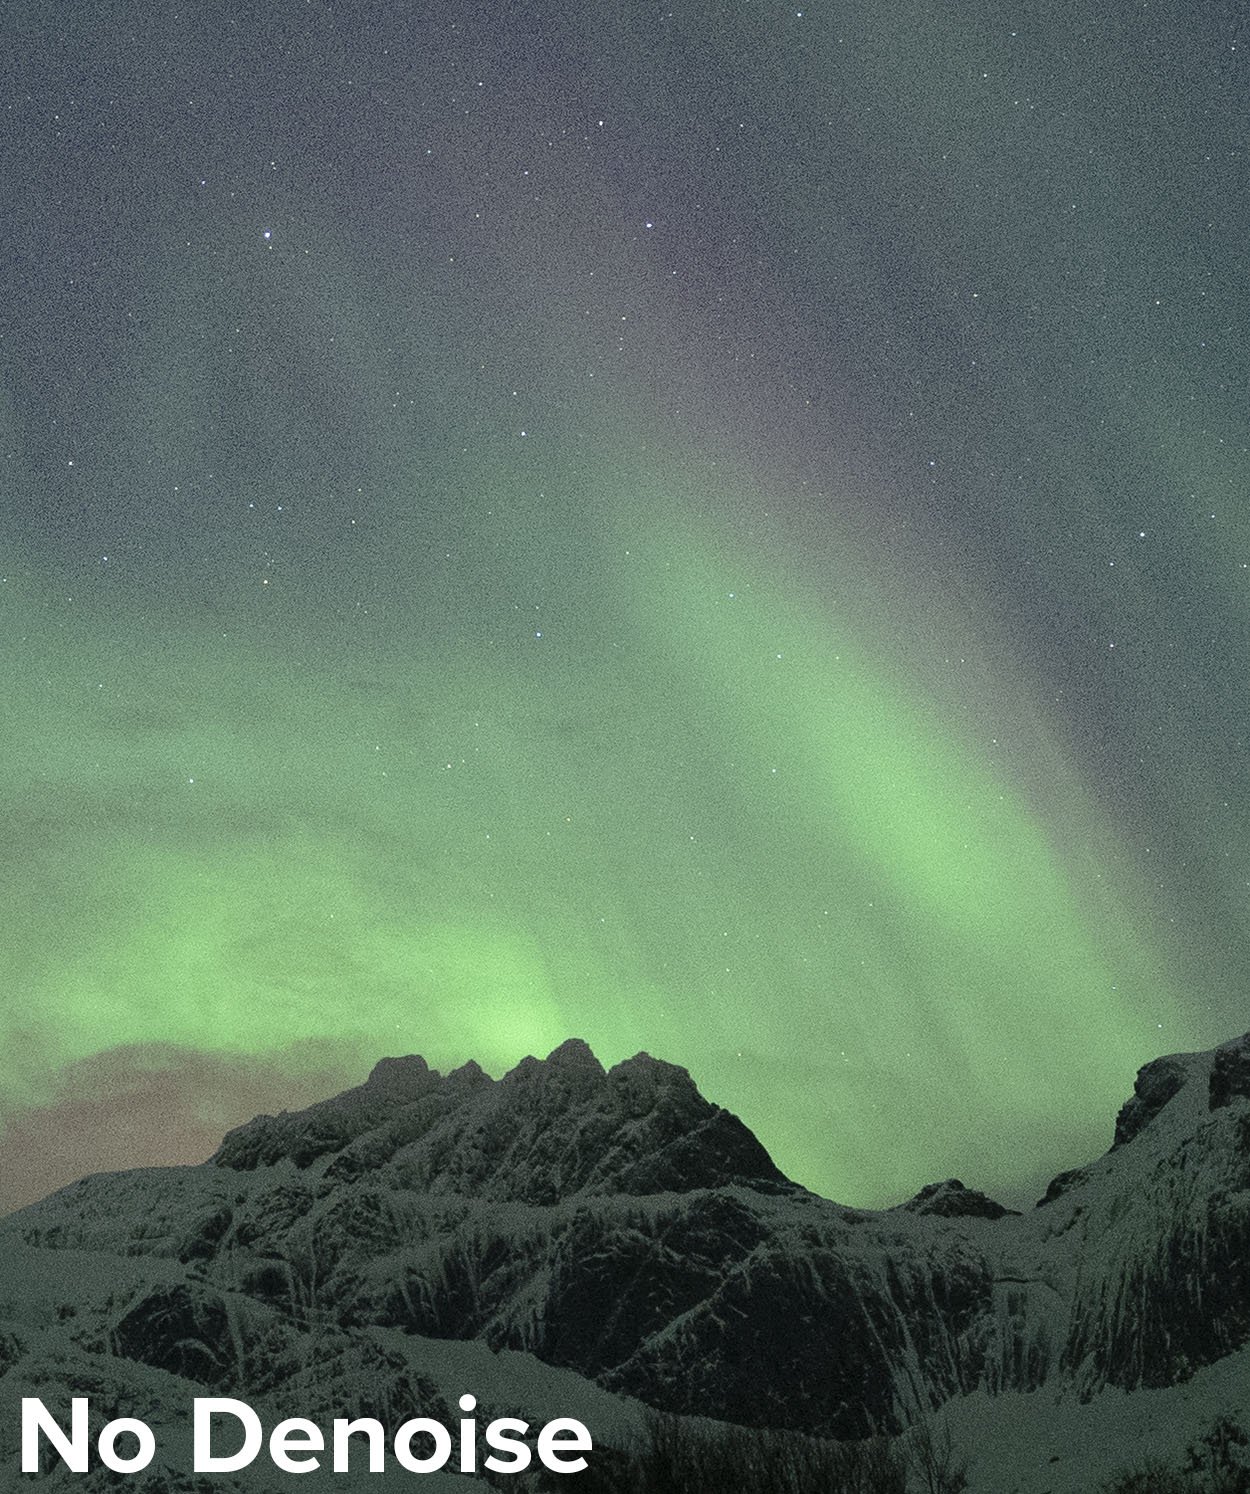
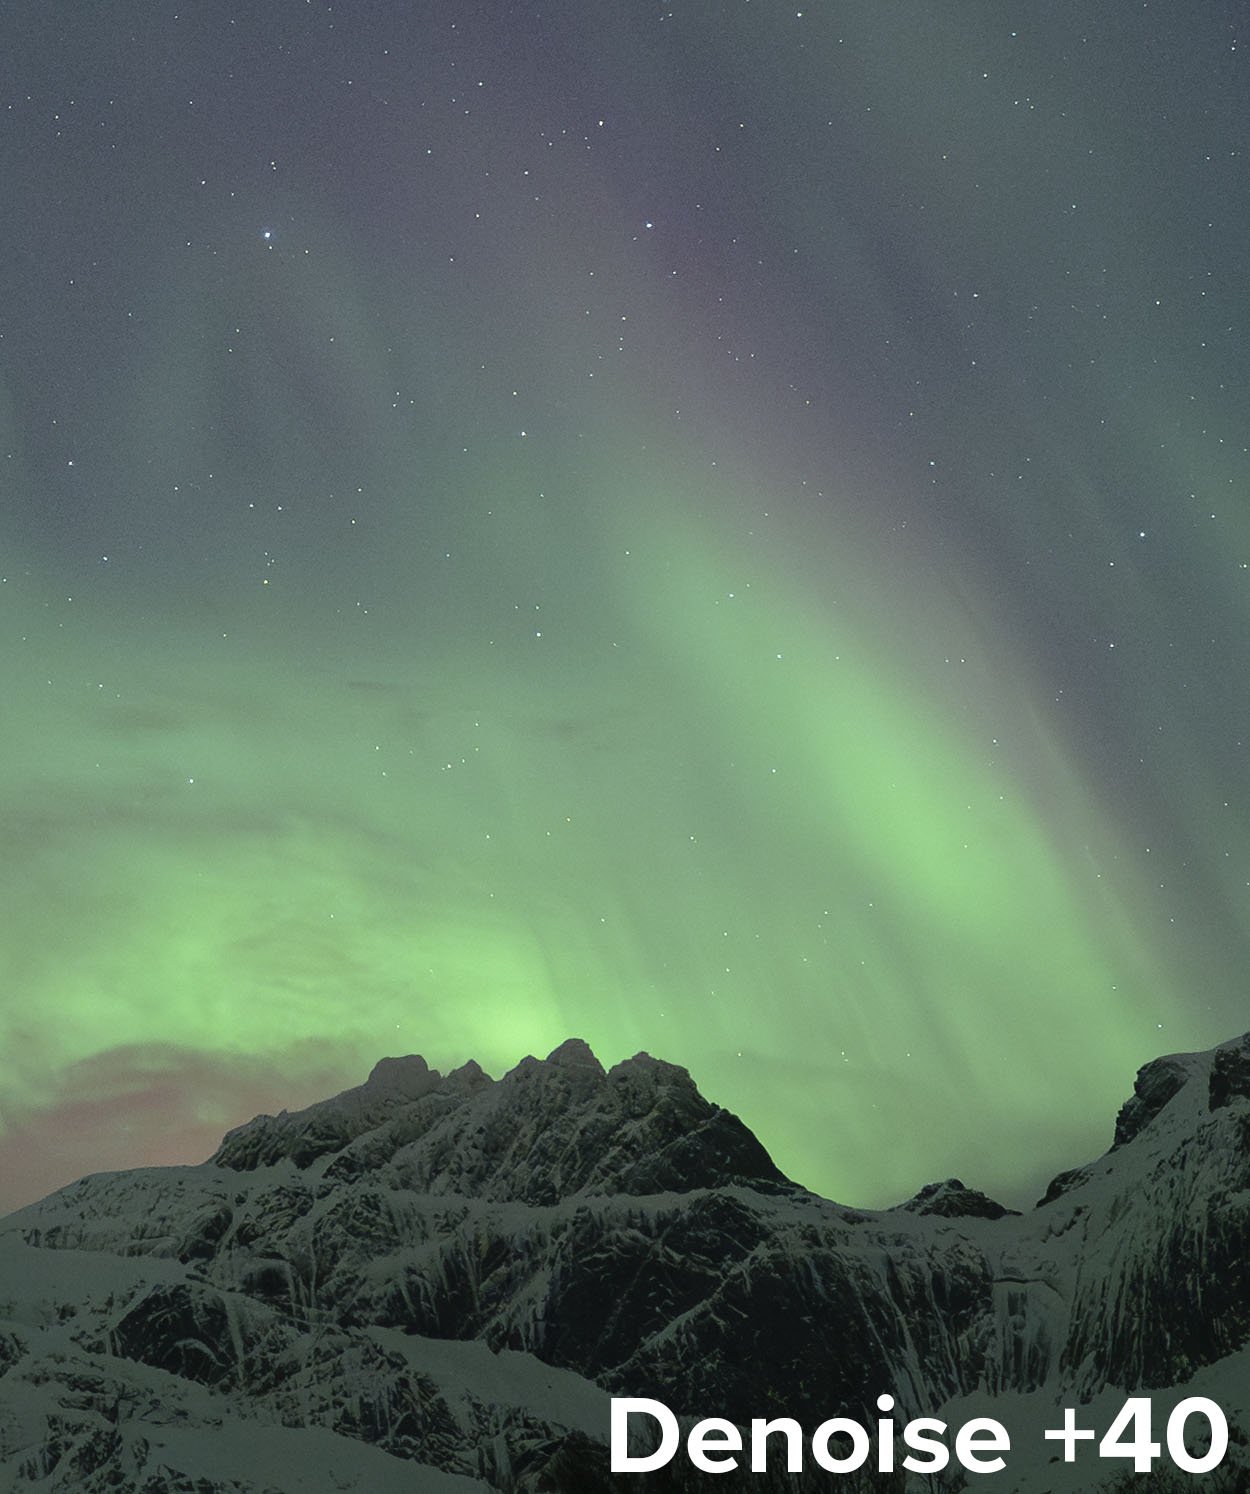
The biggest among those was the introduction of Lightroomโ€™s new AI-based Denoise feature, which is simple to use and amazingly effective. On Tuesday we published a video post that explains the new Denoise feature (see โ€œCutting Through the Noise: Lightroom Just Made Night Photography Betterโ€). You can see the power of this new tool in these before and after pictures:

But Denoise isnโ€™t the only new thing to be excited about in Lightroom and Photoshop. Several other new features in this release will prove to be a real benefit for the night photography enthusiast. In todayโ€™s blog post, Iโ€™m sharing a video to show all the new tools and tweaks that youโ€™ll want to look into, as well as some tips on how to use them, including:

  • the new ability to use Lightroom Curves adjustments on a masked selection

  • how to use the targeted adjustment tool to speed up manual changes to Curves

  • the new ability to open multiple images into the same Photoshop file as Smart Object layers (and why youโ€™d want to do that)

  • two examples of using two Smart Object layers for better control when creating a blue hour blend

Check it out below.

Wrapping Up

All in all, itโ€™s a great day to be a night photographer!

What are you most excited about in the latest Adobe updates? What photos are you making with them? Share in the comments below, or on our Facebook page, or on Instagram (tag us @nationalparksatnight #nationalparksatnight #seizethenight).

Tim Cooper is a partner and workshop leader with National Parks at Night. Learn more techniques from his book The Magic of Light Painting, available from Peachpit.

UPCOMING WORKSHOPS FROM NATIONAL PARKS AT NIGHT